The NEC V20 is an Intel 8088-compatible processor that features the same use of microcode, though with its own characteristics. This makes it important to use this same microcode if your goal is to create a cycle-accurate emulator of this processor, as [GloriousCow]’s goal is. Cue decoding the microcode ROM in a die shot of this CPU, in order to create a usable ROM image.
As with any fabricated ROM you can technically do it by hand, the ROM section in the die shot contained 29,928 bits which even at a pretty zippy pace would take up a considerable amount of time to parse. Here you can divide-and-conquer by handing parts of the ROM off to good friends, or you can use automation and some machine vision and theoretically get an answer as soon as you have finished writing and testing the tool.
Close-up of some of the microcode bits.
Although [Travis Goodspeed]’s MaskRomTool exists exactly to automate bit detection, it was found that there wasn’t enough contrast in the die shot for it to work reliably. What it did provide were the locations of the bits and from it 42×42 pixel PNG files of each bit.
Next a convolutional neural network (CNN) was trained to determine the difference between a 0 and 1 bit. This still took the manual classifying of 1,000 images, but seemed to work fairly well. Although some bits were marked as ambiguous, it was easy enough to use Mark 1 eyeballs to run a classification on these handful of images than to tweak the CNN model.
With this microcode in hand it was then possible to match it against the V20’s internal architecture to fully determine what each part does. Although not quite finished yet, there’s a GitHub repository containing the progress so far.
The V20’s microcode has been the focal point of much legal fighting back when NEC and Intel were still duking it out in how far one could make a CPU compatible with that of a competitor.
VS Code is a big deal. In Stack Overflow’s 2025 Developer Survey, a whopping 76% of respondents said they use it regularly. That towers over the 29% who report using its nearest competitor, Visual Studio.
Whether you like it or not, the use of LLMs to write code is kind of a big deal at the moment. We’ve been asking ourselves what, if anything, this means for us here at Hackaday. Should we try to figure out what percentage of a project was done by an actual human and how much was done by a machine? Does it really matter? What is our AI policy anyway?
Clearly, Hackaday is pro-human. We’re in it for the hackers as much as for the hacks. Our community is, like Soylent Green, made of people. It’s your inspirations and innovations that keep us reading and writing every day. And we produce 100% of our content the old-fashioned way, with projects selected through the taste and judgement of our writers, and their own words telling the story.
What about the hacks? We’ve seen a lot of projects recently that were coded with the help of an LLM. Does that diminish the work? In the end, what rings truest to us is what has always been Hackaday’s editorial guiding star: Is there something special in the hack that makes it worth talking about? Then we write about it. Was it written using vim or emacs? Did the author consult friends or a chatbot while working on the project? That’s not really relevant.
But in the past few years, the BS-generation machines have found our hobby, and we’re finding a lot more projects that don’t have any spark to them. We’re seeing circuits that make no sense, and claims that defy physics. Of course, we always have. The LLM-nonsense project is today’s version of the perpetual motion machines of old. Just like we never trust a hardware project that is all renders, seeing only AI-generated images is a huge red flag. It’s our job to separate out the wheat from the chaff for you all, but it’s something that you must be doing everyday as well.
We’ve seen amazing hacks over Hackaday’s 22-year history. Hackaday is older than YouTube and older than Stack Overflow. We’ve seen technology come and go. We’ve seen C-beams glitter in the dark near the Tannhäuser gate. (OK, maybe not.) And in the end, our AI policy is our same-old policy: we write up hacks that inspire us in the hope that they inspire you.
So if you’re using Claude to help you with the UI bits, or if you’re hand-writing it all in assembly, or wiring up the logic in diodes, we just want to see your cool hacks. And we hope that our collective signal will be so loud that we drown out the noise, at least in our own little corner of the hacker universe.
This article is part of the Hackaday.com newsletter, delivered every seven days for each of the last 200+ weeks. It also includes our favorite articles from the last seven days that you can see on the web version of the newsletter.
Want this type of article to hit your inbox every Friday morning? You should sign up!
The genetic code is what life everywhere uses to convert the information contained in DNA into specific protein sequences. With minor variations, the same genetic code is used by every living thing on Earth, suggesting it was already present in the last common ancestor of all of them. It's not an easy thing to change, because so many things in every cell depend on it.
Nevertheless, some preliminary steps have been taken. Researchers have managed to add some new amino acids to a bacterial cell and were able to make proteins that were one amino acid less than usual. But it's a slog; for some of this work, people have had to re-engineer every single gene in a bacterial genome.
Now, researchers have found a way to operate two separate genetic codes simultaneously, avoiding the need to do any work to compensate for altering the code that every protein in a cell relies on. They didn't test it in an actual cell, and it might cause some problems there. But it's a creative solution that should accelerate some synthetic biology work.
Link shorteners have been a staple of the online world for over two decades now, but they’ve got some issues– for one thing, it’s totally non-transparent where the link actually goes, leaving you open to all sorts of shenanigans, of which RickRolling is probably the best case. For two, your traffic is going through an external service who may have their own nefarious intent. [PortalRunner] had an idea: don’t shorten the link, but compress it.
You see, a traditional URL shortener like tinyurl just generates a random code and associates that with your original link in its database. That’s fine, but you’re relying on a third party database. The alternative is to take the URL, encode it in some way, and apply some compression algorithm to the data. If the encoding and compression are open-source– which [Portal ]’s absolutely are— then you can check yourself before following the link, and/or self-host the whole thing for piece of mind. As a bonus [Portal]’s Ha.mr– that’s pronounced Hammer– also gives you a QR code optimized for easy scanning. QR codes have a specific alphanumeric character set built in, and it isn’t the full UTF-8– if you naively use random text, you’re in byte mode, which needs a lot more QR real estate. Or inverting that, the fewer bits it has to store, the easier a qr code is to scan at the same size. The text version of the compressed links can use UTF-8– including emoticons– but they don’t have to.
The whole project has a “why isn’t everyone doing it this way” vibe about it. We’d probably want to self-host this if we were using it seriously– [Portal] put this together on a lark and makes no promises it will be online forever–but again, this is open source, so we can. [Portal] is using normal compression algorithms here, but if you really want to squeeze text, use a neural net.
Some projects seem too good to be true until you dig into it and find the secret magic that makes it all work. Take Paper Tunes by [Makestreame], a project which purports to store a song on a single sheet of paper via QR code and transmit the data over LoRA. If it was a MIDI sequence, maybe. But the promise of Paper Tunes is to take any MP3 and give it this treatment, and that just seems like an impossible level of compression at first glance.
The music is heavily compressed, make no doubt about that. There’s samples in the Instructables link above and in the video below, but it sounds far better than it has any right to. The secret is Meta’s EnCodec neural codec, which like you’d guess uses neural nets to squeeze the absolute minimum information needed to reconstruct a sample. With it [Makestreame] is able to get a 2.9 MB MP3 file down to just 21.44 kB.
Of course, that’s still not going to fit in a 3.3 kB QR code. But by simply making eight of them, [Makestreame] is able to fit the song onto the front and back of a piece of paper. Yes, each song has an “A” and a “B” side — and you thought flipping a record halfway through got old fast. Having to scan eight codes to get one song may strike some as a bit silly, but we do enjoy some silly things here.
The same EnCodec compression that gets the song so tiny as to fit in a brace of QR codes is obviously also what enables its transmission over LoRA. While it’s got far lower bandwidth than something like WiFi, 21 kB is well within its limits. It’s often said that LoRA isn’t suitable for audio, but this project is another example that one person’s “unsuitable” is another person’s “challenge accepted”.
CoolClient is a backdoor family attributed to the HoneyMyte APT group (also known as Mustang Panda) that has been used in their cyber-espionage campaigns targeting organizations across Asia and Russia. It supports such capabilities as keylogging, clipboard theft, credential harvesting, file management, system reconnaissance, and plugin-based extensions.
Since its first public disclosure by Sophos in 2022 and subsequent analysis by Trend Micro in 2023, CoolClient has continued to evolve. In 2025, we analyzed a newer variant that introduced clipboard theft and HTTP traffic interception for credential harvesting.
In late 2025 and 2026, our latest investigation reveal another major evolution. The newest CoolClient variant can deploy a signed kernel-mode driver as a Windows service and communicate with it through IOCTL requests. The driver enhances the malware’s stealth by hiding the CoolClient process, protecting related files and registry entries, and preventing them from being inspected or modified. The overall design is comparable to the kernel-mode enhancements previously observed in ToneShell, but the CoolClient driver exposes dedicated IOCTL handlers that allow the user-mode backdoor to communicate directly with the driver.
We have observed this updated CoolClient variant and its accompanying driver in intrusions across multiple countries in Asia, including Pakistan, Mongolia, and Myanmar.
Technical analysis
In the observed campaign targeting Myanmar, HoneyMyte used PlugX as the initial post-compromise implant to deploy the CoolClient components. Before deploying the malware, the actor added both a folder exclusion and a file exclusion to Microsoft Defender for the fake Windows Defender installation directory and the renamed sideloader executable (defender.exe).
The actor then created a fake Windows Defender installation directory, copied the CoolClient components into it, and renamed a legitimate Sangfor executable, usually named Sang.exe, to defender.exe to serve as the DLL sideloader.
When executed, defender.exe sideloads the malicious libngs.dll, initiating the CoolClient execution chain described in the following sections.
CoolClient components
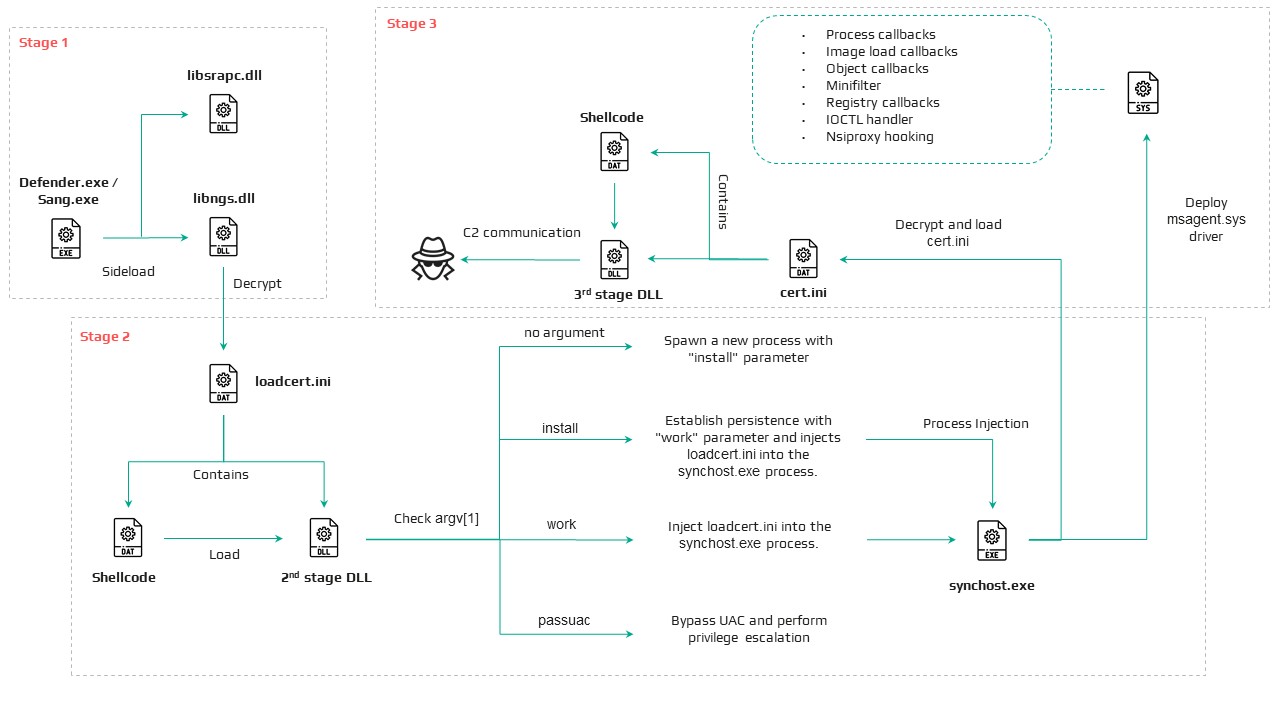
Similar to previous variants, the latest CoolClient user-mode component follows a multi-stage execution chain, with each component performing a distinct role during execution.
Component
Description
defender.exe / Sang.exe
Legitimate Sangfor application abused for DLL sideloading
libsrapc.dll
Benign dependency required for the Sangfor application to execute normally
libngs.dll
First-stage loader that decrypts and loads the next stage into memory (First stage)
loadcert.ini
Encrypted DLL implementing the core CoolClient functionality, including command handling, process injection, driver deployment, and persistence (Second stage)
cert.ini
Final-stage implant responsible for C2 communication and backdoor functionality (Final stage)
time.ini
CoolCleint configuration file
Our previous CoolClient analysis focused primarily on the final-stage implant (main.dat), including its backdoor commands and plugin framework, while the first-stage loader (libngs.dll) and second-stage component (loader.dat) received only a brief overview. In the latest variant CoolClient, loader.dat and main.dat have been renamed to loadcert.ini and cert.ini, respectively. This article revisits those earlier stages, focusing on the second-stage component and the newly introduced kernel-mode driver that extends CoolClient with rootkit capabilities.
Overview of the new variant of CoolClient
First stage: libngs.dll
Execution begins when the legitimate Sangfor application (defender.exe or Sang.exe) loads the malicious libngs.dll through DLL sideloading. As in previous CoolClient variants, the malware continues to abuse the same Sangfor application to execute its first-stage loader.
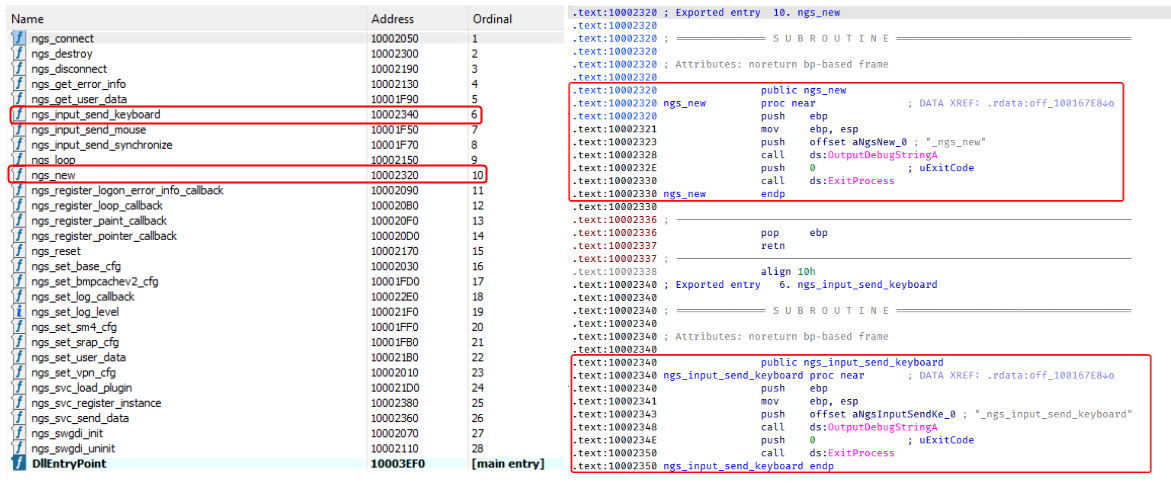
To make the DLL appear legitimate, libngs.dll exports numerous dummy functions. Each export simply calls OutputDebugStringA with its corresponding function name before immediately invoking ExitProcess, serving no functional purpose other than mimicking the expected export table of the legitimate DLL.
Dummy export functions in libngs.dll invoking OutputDebugStringA and ExitProcess
The actual malicious logic is executed from DllMain (DllEntryPoint). Although heavily obfuscated through control flow flattening and numerous unconditional jumps, the routine ultimately performs a straightforward task: loading, decrypting, and executing the encrypted second-stage DLL, loadcert.ini.
The loader resolves the required Windows APIs, reads loadcert.ini into memory, and decrypts it using a 0x32-byte repeating XOR keystream derived from a transformed seed value of 0xA4. After decryption, the DLL is loaded directly into memory, and execution is transferred to loadcert.ini.
Second stage: loadcert.ini (before synchost.exe injection)
The second-stage DLL, loadcert.ini, is responsible for preparing the execution environment before the malware transitions into its injected process. It first determines its execution context by checking whether the current module is synchost.exe.
If the DLL is running under the original sideloaded process (for example, Sang.exe), it performs the initial setup, including persistence, UAC bypass, registry modifications, and process injection.
If the DLL is already executing inside synchost.exe, it follows a different execution path that decrypts time.ini, deploys the kernel-mode driver, and loads the final-stage implant (cert.ini).
Command handler
The command handler remains largely unchanged from previous CoolClient variants, with one notable difference: the malware now injects into synchost.exe instead of write.exe.
Execution is controlled through three command-line parameters:
Parameter
Purpose
install
Performs the initial setup, including persistence, privilege checks, and preparation for the injected execution path.
work
Executes the primary second-stage functionality from the injected synchost.exe process, including driver deployment and third-stage loading.
passuac
Continues execution after privilege elevation.
If no parameter is supplied, the malware creates a new Sang.exe process with the install parameter using CreateProcessW.
Establishing AutoRun persistence
When executed with the install parameter, CoolClient creates an AutoRun entry under:
The registry value, named goopdate, launches Sang.exe (or defender.exe, depending on the deployment) with the work parameter whenever the user logs on.
Process injection into synchost.exe
Upon establishing the AutoRun registry entry, CoolClient decrypts loadcert.ini using a 0x32-byte repeating XOR keystream derived from the hardcoded base key 0x4D.
The decrypted DLL is then injected into a newly created suspended instance of synchost.exe. The malware allocates memory in the target process, writes the decrypted payload, redirects the thread context to the injected code, resumes execution, and finally terminates the original process with ExitProcess.
From this point onward, execution continues entirely within synchost.exe, where the malware proceeds with kernel-mode driver deployment before loading the final-stage implant (cert.ini).
Service installation
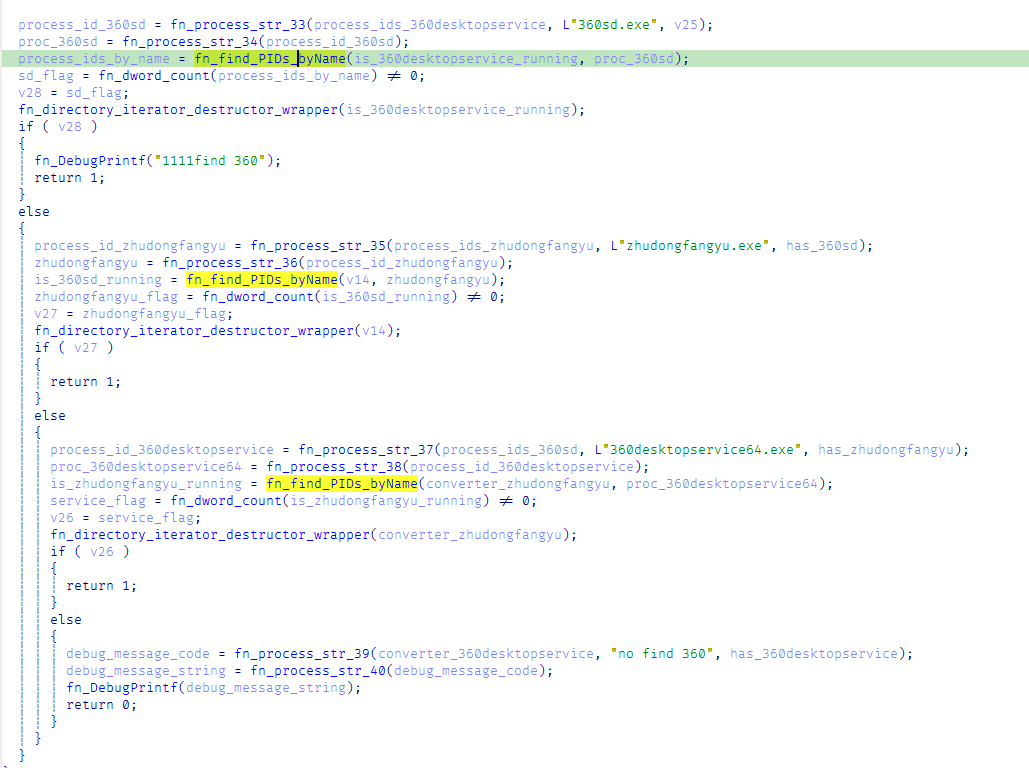
When executed with the install parameter, CoolClient establishes an additional persistence mechanism by installing itself as a Windows service. Before doing so, it verifies that it has sufficient access to the Service Control Manager and that no 360 Total Security software processes (360sd.exe, zhudongfangyu.exe, or 360desktopservice64.exe) are running.
Function to check for running 360 Total Security software processes
If both checks succeed, the malware decrypts time.ini to retrieve the service configuration, including the service name and description. It then checks whether the service media_updaten already exists. If found, the existing service is stopped and deleted before a new one is created.
The new service is configured to execute Sang.exe<.code> with the work parameter using CreateServiceA. The malware then starts the service by executing "sc start media_updaten" via WinExec.
Administrator privilege check
If the service installation path is not taken, CoolClient checks whether the current process is running with administrator privileges by verifying membership in the local Administrators group.
When administrative privileges are available, the malware relaunches itself with the passuac parameter before continuing with the remaining execution flow.
Elevated relaunch and UAC bypass
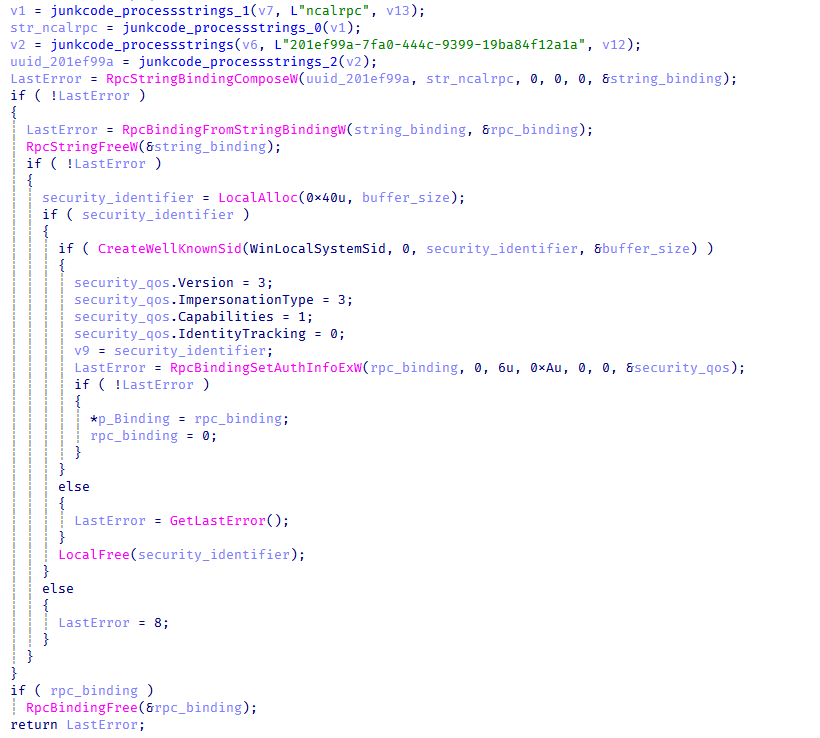
To continue execution with elevated privileges while concealing its true parent process, CoolClient implements an RPC-based process creation technique similar to the method described by Google Project Zero. The technique combines RPC process creation with parent process ID (PPID) spoofing to launch a new elevated instance of itself.
The malware first checks for the presence of escanmon.exe. If the process is running, it constructs the path to C:\Windows\System32\winver.exe and establishes a connection to the local ncalrpc endpoint (201ef99a-7fa0-444c-9399-19ba84f12a1a). It then invokes NdrAsyncClientCall to launch winver.exe through the RPC interface.
Authenticated RPC binding used during the RPC-based UAC bypass
After winver.exe is created, CoolClient retrieves its debug object using NtQueryInformationProcess, detaches the debugger through NtRemoveProcessDebug, and terminates the process. The obtained debug object is later reused during the remainder of the UAC bypass routine.
Next, the malware repeats the same RPC-based process creation technique to launch computerdefaults.exe. It associates the previously obtained debug object with the current thread using DbgUiSetThreadDebugObject, waits for the resulting process creation event through WaitForDebugEvent, and duplicates the process handle using NtDuplicateObject, obtaining a handle with full access rights.
Finally, CoolClient relaunches itself as Sang.exe passuac using CreateProcessW with an extended startup attribute list. By configuring PROC_THREAD_ATTRIBUTE_PARENT_PROCESS through UpdateProcThreadAttribute, the duplicated process handle is assigned as the parent of the new process. As a result, the new Sang.exe passuac instance executes with an elevated context while appearing to have been spawned by the trusted Windows process instead of the original CoolClient process.
Second stage: loadcert.ini (Injected Execution)
After being injected into synchost.exe, loadcert.ini follows its injected execution path, where it deploys the kernel-mode driver and launches the final-stage implant (cert.ini). If administrative privileges are unavailable, the malware skips driver deployment and proceeds directly to the third-stage injection.
Kernel-Mode driver deployment
The deployment routine begins by decrypting time.ini. CoolClient then verifies that it has sufficient privileges to install a kernel-mode driver by checking for full access to the Service Control Manager (SCM) and the presence of SeTcbPrivilege.
If both conditions are met, CoolClient extracts an embedded LZMA-compressed driver from loadcert.ini, decompresses it, and writes it to disk as msagent.sys in the same directory as cert.ini, for example:
Next, the malware checks whether a service named msagent already exists. If present, the existing service is stopped and deleted before a new driver service is created and started, loading the kernel-mode component into the operating system.
Driver initialization
After the driver is loaded, CoolClient establishes communication with it by opening the device \\.\msagent using CreateFileW. The user-mode component then initializes the driver by issuing three DeviceIoControl requests.
IOCTL
Purpose
0x222120
Registers the current CoolClient process with the driver.
0x2221E0
Sends the configured C2 IPv4 address to the driver.
0x2220F0
Registers filesystem and registry paths that should be protected or hidden.
The first request (0x222120) registers the current CoolClient process as a trusted process within the driver. The request includes the process ID, an operation code, and a flag that marks the process as trusted, allowing it to interact with protected files, registry keys, and processes.
The second request (0x2221E0) passes the configured C2 IPv4 address extracted from time.ini.
Finally, 0x2220F0 registers the CoolClient installation directory (for example, C:\Program Files\Microsoft\Windows Defender\) together with the service registry path (\Registry\Machine\SYSTEM\CurrentControlSet\Services\media_updaten). These entries allow the driver to protect the malware’s files and registry objects from inspection, modification, and deletion.
As part of the initialization, CoolClient updates the HKLM\SYSTEM\RNG\Wid_H1deF5Dirs registry value by appending its installation directory if it is not already present. This registry value is later used by the driver when applying its hiding and protection mechanisms.
The implementation of these IOCTL handlers and the corresponding driver functionality are discussed in the msagent.sys section.
Cert.ini process injection
Once the driver has been initialized, CoolClient proceeds to launch the final-stage implant (cert.ini). Before creating the target process, the malware enumerates active WinStation sessions to identify a suitable interactive user session.
After selecting a session, CoolClient duplicates its access token, updates the session identifier, and creates a new synchost.exe process using CreateProcessAsUserA. The decrypted cert.ini DLL is then injected into the suspended process using the same memory allocation, thread context modification, and ResumeThread technique described earlier.
This marks the final transition in the execution chain, where the third-stage implant takes over C2 communication and the remaining backdoor functionality.
Msagent.sys driver
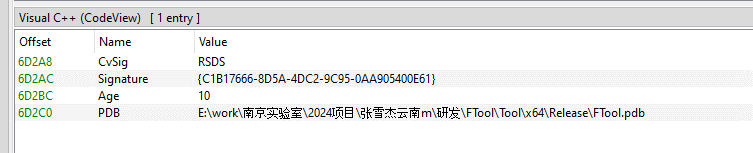
Analysis of the deployed kernel-mode driver reveals an embedded PDB path:
The path contains several notable strings, including “Nanjing Laboratory” (南京实验室) and “Zhang Xuejie Yunnan m” (张雪杰云南m), which likely refer to the driver’s development environment. However, our OSINT analysis did not identify any information linking these strings to a known organization, developer, or threat actor.
The driver is digitally signed with a certificate issued to "Nanjing Ranyi Technology Co., Ltd.", with serial number 3E 62 DC 5D 8D 61 2A 26 33 E7 6B DF D6 07 19 DD. The certificate was valid from August 2013 to September 2014.
We identified several older malicious drivers signed with the same certificate that were compiled around 2013. However, we found no evidence directly linking those samples to the CoolClient activity described in this article.
Driver configuration
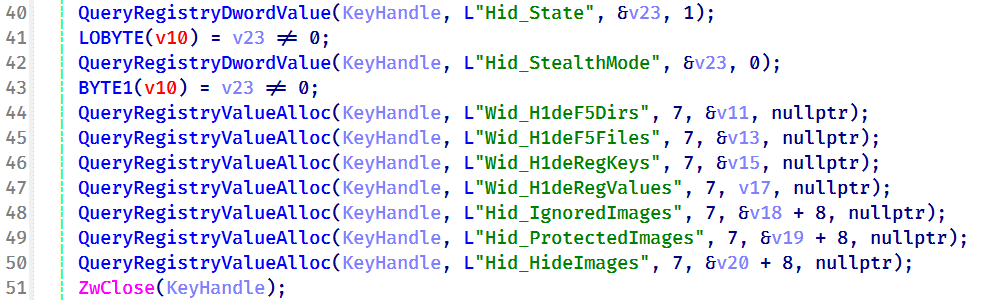
During initialization, the driver loads its stealth configuration from the registry key \REGISTRY\MACHINE\SYSTEM\RNG. The configuration defines which system objects should be hidden or protected and controls the driver’s operating mode.
Registry configuration loaded by the driver during initialization
Two REG_DWORD values control the driver’s operating mode:
Registry Value
Default
Description
Hid_State
1
Enables the driver’s rootkit functionality.
Hid_StealthMode
0
Controls additional stealth features used by selected driver routines.
In addition, the driver loads several REG_MULTI_SZ values that define the objects to be hidden or protected.
Registry Value
Purpose
Wid_H1deF5Dirs
Directories to hide
Wid_H1deF5Files
Files to hide
Wid_H1deRegKeys
Registry keys to hide
Wid_H1deRegValues
Registry values to hide
Hid_IgnoredImages
Processes to ignore
Hid_ProtectedImages
Processes to protect
Together, these registry values determine which filesystem paths, registry objects, and processes are managed by the driver’s protection mechanisms.
After loading the configuration, the driver converts the registry entries into internal lookup structures that are shared across its various protection components.
These structures are later referenced by the filesystem minifilter, registry callback, process callback, object callback, image load callback, and IOCTL handlers to determine whether a file, registry object, or process should be hidden, protected, or ignored.
Preparation for process hiding
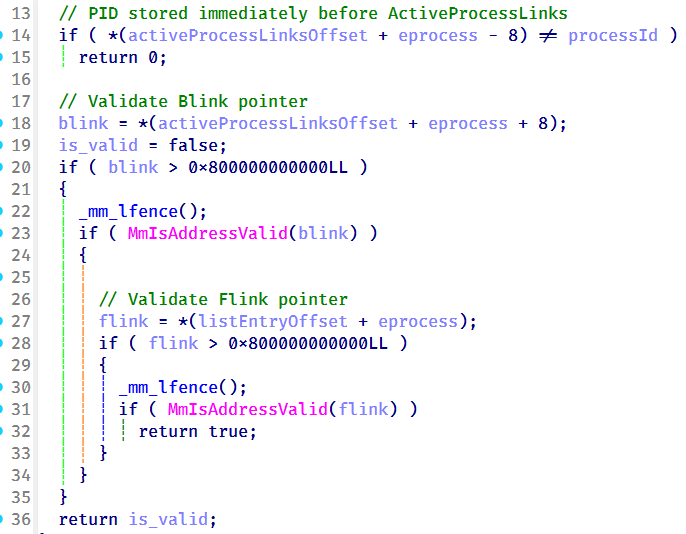
Next, the driver dynamically locates the ActiveProcessLinks (LIST_ENTRY) field within the EPROCESS structure instead of relying on hardcoded offsets. It first validates several predefined offsets and, if none match, performs a linear scan of the EPROCESS structure to identify the correct location. This approach allows the driver to remain compatible across different Windows versions, where the layout of EPROCESS may differ.
The driver validates candidate ActiveProcessLinks layouts before enabling process hiding
Once the correct offset has been identified, it is stored for later use by the process hiding routines. During process hiding and restoration, the driver uses IOCTLs 0x22219C and 0x2221A0 to unlink and relink entries in the Windows active process list, effectively hiding or restoring processes on demand.
Process, object, and image load callbacks
After preparing its process tracking structures, the driver initializes several AVL trees and populates them with configuration entries loaded from the registry, including Wid_H1deF5Dirs, Wid_H1deF5Files, Wid_H1deRegKeys, Wid_H1deRegValues, Hid_IgnoredImages, Hid_ProtectedImages, and Hid_HideImages.
These AVL trees provide efficient lookups for protected files, registry objects, and tracked processes, and are shared by the callback routines and IOCTL handlers.
The driver then registers three types of kernel callbacks that form the foundation of its protection and monitoring mechanisms:
Object callbacks using ObRegisterCallbacks
Process creation and termination callbacks using PsSetCreateProcessNotifyRoutineEx
Image load callbacks using PsSetLoadImageNotifyRoutine
Registration of object, process, and image load callbacks during driver initialization
After registration, these callbacks maintain the driver’s internal tracking structures as processes, threads, and images are created or loaded.
Object callbacks
To protect selected processes, the driver registers object callbacks for process (PsProcessType) and thread (PsThreadType) objects using ObRegisterCallbacks with an altitude of 1203. These callbacks intercept requests to open process and thread handles. If the target process is protected, the driver reduces the access rights granted to the requesting process, preventing operations such as process termination, code injection, and other forms of process manipulation. In this sample, the protected process is the injected CoolClient code running inside synchost.exe.
Process and image load callbacks
The driver registers process creation and termination callbacks using PsSetCreateProcessNotifyRoutineEx, together with an image load callback via PsSetLoadImageNotifyRoutine.
When a process is created, its image name is compared against the configuration lists Hid_IgnoredImages, Hid_ProtectedImages, and Hid_HideImages. Matching processes are added to the driver’s internal tracking structures, allowing them to be protected, hidden, or managed through subsequent IOCTL requests. When a tracked process terminates, its entry is removed from the tracking structures.
The image load callback monitors modules loaded into tracked processes and updates the driver’s internal state to support subsequent protection and hiding operations.
To ensure that processes already running before the driver is initialized are also tracked, the driver performs a one-time enumeration of all active processes after registering the callbacks and adds any matching processes to the tracking structures.
MiniFilter registration
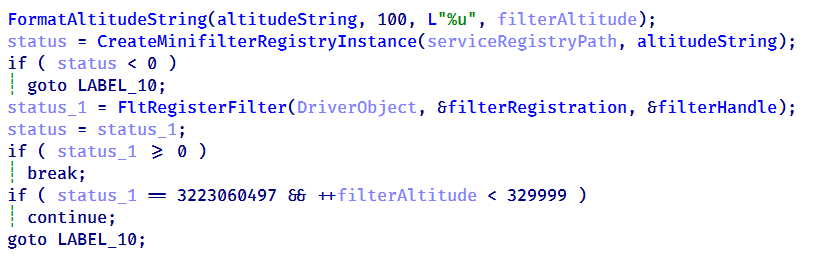
To protect files and directories, the driver registers a filesystem minifilter. During initialization, it creates internal path filter lists, loads the configured directory and file entries (Wid_H1deF5Dirs and Wid_H1deF5Files), and creates the required minifilter registry entries under HKLM\SYSTEM\CurrentControlSet\Services\msagent\Instances. To avoid altitude conflicts, the driver dynamically assigns a filter altitude and retries registration until a unique value is obtained.
Retrying minifilter registration with incrementing filter altitude values until FltRegisterFilter succeeds
The driver then activates the minifilter using FltRegisterFilter. The filter works together with the IOCTL interface, which dynamically adds, removes, or clears protected path entries (0x2220F0, 0x2220F4, and 0x2220F8). During filesystem operations, the minifilter compares accessed paths against its internal path lists and denies access to matching entries, effectively hiding protected files and directories from users and applications.
Registry callback registration
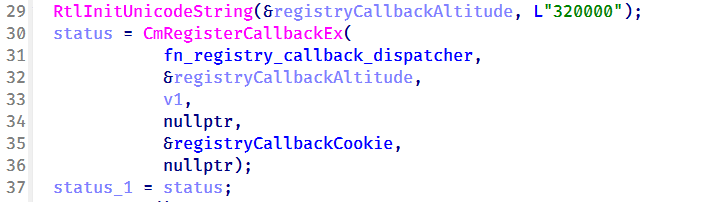
To protect registry keys and values, the driver registers a registry callback using CmRegisterCallbackEx with an altitude of 320000. During initialization, it creates separate lookup structures for protected registry keys and values, then populates them using the configured entries from Wid_H1deRegKeys and Wid_H1deRegValues.
Registration of the registry callback using CmRegisterCallbackEx with an altitude of 320000
Once registered, the callback intercepts registry operations and compares the target key or value against the protected entries. For enumeration requests, matching keys and values are removed from the results before they are returned to user mode, effectively hiding them from registry viewers. For direct access requests, such as opening, modifying, or deleting protected registry objects, the callback returns STATUS_ACCESS_DENIED, preventing the operation.
Before applying these restrictions, the driver verifies whether the requesting process is trusted. Processes registered through IOCTL 0x222120, including the CoolClient user-mode component, bypass the filtering logic and retain unrestricted access, while all other processes remain subject to the driver’s registry protection rules.
IOCTL command dispatcher
To communicate with the user-mode component, the driver creates a device object named \Device\ToolTool together with the symbolic link \DosDevices\ToolTool to allow the user-mode CoolClient component to communicate with the driver through DeviceIoControl requests.
The driver implements 33 IOCTL handlers, although the analyzed CoolClient sample uses only three during normal execution:
0x222120: registers the current CoolClient process with the driver.
0x2221E0: passes the configured C2 IPv4 address.
0x2220F0: registers filesystem and registry paths for protection.
The remaining IOCTL handlers were not invoked by the analyzed sample.
IOCTL
Handler
Functionality
0x222000
0x140001E04
Enable or disable the rootkit.
0x222004
0x1400020B0
Query the current rootkit state.
0x2220F0
0x140002320
● Register protected filesystem or registry paths
● Used by CoolClient to register its installation directory and service registry key.
0x2220F4
0x1400034DC
Remove a protected filesystem or registry path.
0x2220F8
0x140003464
Clear all protected filesystem and registry path entries.
0x222118
0x1400024B0
Register process or path protection entries.
0x22211C
0x140002A20
Query registered protection entries.
0x222120
0x140003794
Update process protection entries. Used by CoolClient to register itself as a trusted process.
0x222124
0x14000362C
Remove a protection entry.
0x222128
0x14000349C
Clear all process protection entries.
0x222130
0x14000265C
Register a protected process by PID.
0x222134
0x140010E88
Inject shellcode into a target process using NtCreateThreadEx.
0x222138
0x14000F498
Hide a kernel module by unlinking it from PsLoadedModuleList.
0x222144
0x14000270C
Delete a file.
0x222148
0x14000286C
Decrypt an embedded buffer and write it to disk.
0x22214C
0x1400027F4
Read and decrypt an encrypted file.
0x222168
0x140002780
Unmap the image section of a target process.
0x22216C
0x140013984
Terminate a process by PID.
0x222194
0x140011F50
Remove Protected Process Light (PPL) protection.
0x222198
0x140002940
Create or modify a registry value.
0x22219C
0x140010630
Hide a process by unlinking it from the active process list.
0x2221A0
0x140010670
Restore a previously hidden process.
0x2221A4
0x14000F8A0
Hide a module within a process.
0x2221A8
0x14000F954
Restore a hidden module.
0x2221AC
0x140016368
Enumerate and restore kernel notification callbacks.
0x2221B0
0x140016458
Disable or restore kernel notification callbacks.
0x2221B4
0x140012408
Manually load a secondary kernel driver.
0x2221B8
0x14001262C
Debug/test handler.
0x2221BC
0x1400165F6
Write to an arbitrary kernel address.
0x2221C0
0x14000BB00, 0x14000BB78
Enables deny-rootkit mode by registering image-load monitoring and enabling the patching logic.
0x2221C4
0x14000BB6C, 0x14000BB10
Disables deny-rootkit mode by clearing state and unregistering/removing the monitoring logic.
0x2221E0
0x1400126C0
Register a C2 IPv4 address.
0x2221E4
0x140012E50
Delete a C2 IPv4 address.
After initializing the IOCTL dispatcher, the driver releases the temporary configuration buffer that was previously loaded from \REGISTRY\MACHINE\SYSTEM\RNG.
Kernel module enumeration and hiding
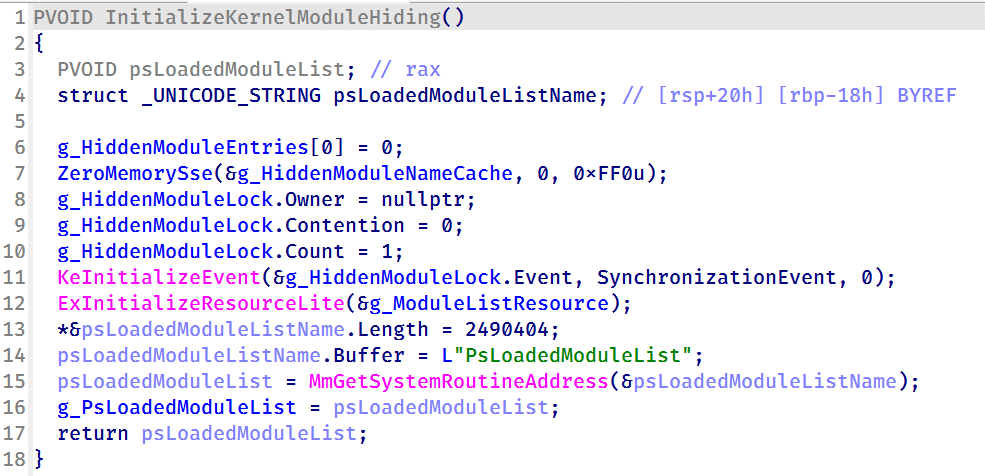
To support kernel module hiding, the driver resolves the address of the non-exported kernel variable PsLoadedModuleList at runtime using MmGetSystemRoutineAddress. This global linked list maintains information about all loaded kernel modules and drivers, allowing the rootkit to enumerate and manipulate module entries.
Driver initialization routine resolving the address of PsLoadedModuleList for subsequent kernel module hiding
This functionality is exposed through IOCTL 0x222138, which accepts a module name or path from the user-mode component. When a matching module is found, the driver locates the corresponding entry in PsLoadedModuleList and unlinks it by updating its Flink and Blink pointers. As a result, the hidden module no longer appears in standard kernel module enumeration routines.
Nsiproxy hooking and data filtering
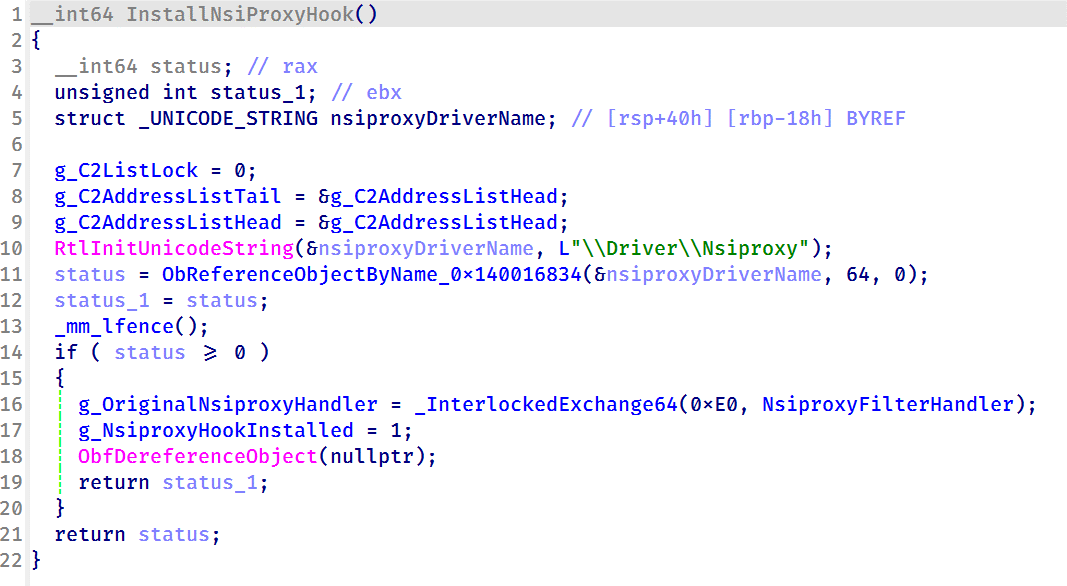
The driver also hooks the Nsiproxy driver to filter network-related data returned to user mode. This functionality is connected to IOCTL 0x2221E0, which allows the user-mode component to register C2 IPv4 addresses with the driver.
To install the hook, the driver obtains a reference to \Driver\Nsiproxy using ObReferenceObjectByName and replaces one of the Nsiproxy handler pointers with its own filtering routine. The hook preserves the original handler and forwards execution after processing the returned data.
Installing the Nsiproxy hook by resolving \Driver\Nsiproxy and replacing the original handler with the driver’s filtering routine
When the hooked routine processes network information, the driver compares the returned entries against its registered C2 address list. Matching IP addresses are removed before the data is returned to user mode, preventing applications that rely on Nsiproxy-provided network information from seeing the malware’s C2 addresses.
Finally, the driver registers a DriverUnload routine to release allocated resources when the driver is unloaded.
Victimology
The latest CoolClient variant continues to target organizations consistent with previously observed HoneyMyte activity. Based on our investigations, we identified victims in Myanmar, Mongolia, Pakistan, and Russia, including confirmed government entities.
Across the observed intrusions, CoolClient was consistently deployed as a secondary backdoor following a PlugX infection, indicating that HoneyMyte continues to use PlugX as its initial post-compromise implant before transitioning to CoolClient.
Attribution
Our analysis confirms that the investigated malware is a new CoolClient variant associated with the HoneyMyte threat group. While the overall execution flow remains consistent with previously documented CoolClient variants, this sample introduces a previously undocumented kernel-mode driver that significantly expands the malware’s stealth capabilities.
The deployment chain observed in this investigation is also consistent with previous HoneyMyte campaigns, in which PlugX serves as the initial foothold before CoolClient is deployed as a secondary backdoor, further reinforcing the attribution.
Conclusion
The latest CoolClient variant represents a significant evolution of the malware. Rather than operating solely as a user-mode backdoor with plugin support, it now deploys and communicates with a kernel-mode driver that extends its capabilities beyond earlier versions. Through this driver, CoolClient can hide and protect processes, files, and registry objects, as well as filter selected network information, making detection and analysis considerably more difficult.
HoneyMyte has previously introduced kernel-mode functionality in ToneShell. The addition of a kernel-mode driver to CoolClient suggests that the group continues to expand its use of rootkit capabilities to improve stealth, persistence, and defense evasion during post-compromise operations.
Cisco Talos found hackers using simple authorization claims to bypass AI guardrails, build DDoS attack tools, steal credentials and access live camera services.
In one of our previous articles, Aircorridor showed you how to do recon on exposed Ollama servers. There are a surprising number of them scattered across countries all over the world, and unfortunately, most of them are left completely unprotected. That means hackers can use the CPU and GPU power of those servers to run their own tools. It’s not just that they can generate answers to random questions using your exposed models. These models can also be pushed into generating malware, rewriting scripts and exploits to slip past antivirus software, and helping someone hack into other systems entirely. All of it running on your hardware, at your expense, while you have no idea it’s happening. Our goal here is to raise awareness about this problem so you understand what can happen when a model gets left exposed.
Ollama
It all starts with a simple Shodan query, and right now that query turns up 4,222 exposed hosts. That number keeps shifting as more people jump into the AI space, and most of these hosts are sitting there vulnerable to the kinds of attacks we’re about to walk through.
Following Aircorridor’s example, you can list the models running on one of these servers. As you’ll quickly notice, there’s often a long list, sometimes more than 40 models on a single host.
The ones that matter most here are the local models, not the cloud. They don’t require an API key to reach. Of course, not every listed model is actually active, so a quick curl request is usually enough to check whether one is really responding.
When a model does respond, that confirms it’s live and usable, which means it can be put to work for all sorts of purposes, good or bad. Let’s walk through a few of the ways that tend to play out.
Coding
Because these exposed models have no guardrails, they’re an attractive resource for coding tasks, including rewriting malware or generating backdoors. To pull this off, hackers often bring the model straight into VS Code using a plugin called Continue, which lets them integrate an external model directly into their coding workflow.
Once installed, they’ll edit the config file to point at the exposed server’s IP address along with the model’s name. This config can hold multiple models at once, so a hacker can switch between them right there in the chat window.
With that setup in place, the model shows up ready to work and it often has no issue generating malicious code that could cause real damage to systems out on the internet.
The same pattern shows up with exploit development and antivirus evasion, where a model can take old exploits and rewrite them so they slip past AV detection.
Hacking
Once an exploit has been generated, the next step for a hacker is putting it to use against real systems. We covered a tool called PentestCode in an earlier article, and while it normally relies on free AI models through OpenCode Zen, it can just as easily be pointed at someone else’s exposed local model instead. This is just one example among many. Plenty of other tools work the exact same way, running on borrowed compute that belongs to somebody who has no idea it’s being used.
To connect PentestCode to an exposed model, a config file gets created at ~/.config/pentestcode/pentestcode.json.
Once that’s in place, the tool automatically lists the available models. It’s worth noting that not every model supports tool use. DeepSeek R1, for example, doesn’t support it, and neither do a handful of others. So if a given exposed model doesn’t support tools, it’s simply not useful to a hacker in this particular scenario.
Chat Assistant
Finally, exposed local models can also be accessed through a full chat interface using Open WebUI, which looks a lot cleaner than working from the command line. It has the kind of layout people are used to by now, with folders, chat history, channels, and separate workspaces. It takes a bit of disk space and a little patience to install, but once it’s running, it’s a solid and polished experience.
Summary
Running Ollama is not inherently dangerous. Simply exposing a model doesn’t automatically put you at risk of a data breach or account compromise. What it does do is hand hackers free access to your CPU and GPU, letting them run their own workloads on your dime without your knowledge or consent. That alone is a real cost, even if nothing else goes wrong.
The bigger danger shows up with older, outdated Ollama instances. Older versions are more likely to carry known vulnerabilities, and there are documented CVEs out there that can lead to full API exposure. When that happens, hackers aren’t just borrowing your compute anymore. They can steal your API keys outright and use them for whatever purpose they like. Keeping Ollama updated and making sure it isn’t sitting exposed to the open internet goes a long way toward avoiding both problems entirely.
We also invite you to join our AI for Cybersecurity training, available to our Subscriber Pro members. During the training, we’ll cover practical ways to use AI in cybersecurity, show you how to install and run local models, and much more. The field is evolving rapidly, and the sooner you learn to use these tools, the greater your advantage will be.
Lately we have been covering the use of AI in cybersecurity and this space has been growing so fast that it’s hard to keep up sometimes. It’s only going to keep growing from here, so it’s smart to learn how to use it to your advantage instead of getting left behind.
Today we’re going to show you a pentest tool that works with different models. The tool comes ready to use right out of the box and you don’t have to provide your API key to get started. During our own testing, we did eventually hit a usage limit, but by that point we had already gotten a ton of work done. The limits will reset every day, sometimes you just need to wait 5-14 hours. But the daily limit should be enough for you to complete many of your tasks.
What is PentestCode
PentestCode is an autonomous agent that lives in your terminal. You point it at a target and from there it takes over. It can run tools, read the output, build a picture of the network as it decides what step makes sense next. Under the hood, it’s a hard fork of OpenCode, but stripped of all the code editing features and rebuilt from the ground up with offensive security in mind.
In our experience the tool did well in both web and network pentesting. Of course, everyone’s mileage may vary, so give it a shot yourself and see how it fits into your workflow. With that said, let’s get it set up.
Setting Up
All you need to do is unzip the release version and start it up. Before you do that though, make sure you are downloading the original project made by s0ld13rr and not some fork. There have been reports of forks being bundled with infected files, so stick to the source.
kali > wget https://github.com/s0ld13rr/pentestcode/releases/download/v0.2.5/pentestcode-linux-x64.tar.gz
kali > 7z x pentestcode-linux-x64.tar.gz
kali > 7z x pentestcode-linux-x64.tar
And that’s it, we are ready to launch.
Working with PentestCode
Once you launch the tool, the console will appear.
kali > ./pentestcode
At this point you can either leave everything at the default settings or tweak the model and the provider yourself. By default, the tool is set up with OpenCode Zen as the provider and Big Pickle as the model, though you can switch that over to DeepSeek v4 Flash.
If you want to connect to a different provider, just type /connect.
And whenever you want to swap the model, just type /models and pick from the list.
Active Directory
Let’s start by testing this against our own lab. We gave it an Active Directory account with low privileges and asked to pull some interesting information from LDAP.
It came back with domain admins, misconfigs, machine accounts and more.
At the very end of the report, it suggested the next steps based on everything it found.
Then we brought in BloodHound to see the relationships across the domain. If you have been following our earlier articles, you already know that our lowpriv account is set up as a kind of backdoor, since it holds GenericAll rights over AdminSDHolder. The tool found the backdoor and exploited it.
The agent performed a DCSync attack and pulled every user hash in the environment. Then we asked it to generate a golden ticket.
It pulled it off using the Impacket. Keep in mind, using Impacket won’t always work against a protected endpoint, so it’s important to spell out clearly how you want the pentest to be done. If you are running this against a live target, put real guardrails in place and give the tool much more detailed prompts so it does not wander somewhere it shouldn’t.
Finally, we get to the tedious part of a pentest. It’s writing up the report. You can do it in different formats using /report.
kali > sudo apt install glow
kali > glow report.md
Web Pentesting and Bug Bounty Hunting
Web pentesting is such a massive topic on its own that plenty of people end up specializing in just one or two attacks testing them across different targets. PentestCode can be used here too, once you give it a good starting point through solid reconnaissance. You can toggle between modes using Tab, switching back and forth between Recon and Pentest.
We intentionally kept our prompt vague, just to see how creative the tool would get on its own and pointed it at a website. Within 15 minutes, it mapped out every subdomain tied to that company and tested the infrastructure behind each one.
The goal was to get an RCE. We didn’t expect much to come of it, but it managed to do it.
PentestCode uploaded a webshell and used curl to do recon on the internal network from there. On top of that, it compromised both a mail account and a MySQL database. The admin panel was also exploited with a CSRF vulnerability. Pretty impressive stuff, honestly.
The tool comes in handy during post exploitation as well. In our test, it exploited a vulnerability in PostgreSQL and escalated its way up to superuser access, then went through the databases and pulled out some interesting data. You can see some of it below.
Summary
If you decide to test PentestCode yourself, make sure you steer clear of vague prompts and set clear boundaries so that it doesn’t go further than it should. Use /pause to choose a mode where it stops and waits for your approval before moving forward. We believe that it’s important to keep a human in the loop in cybersecurity work like this.
We also invite you to join our AI for Cybersecurity training. During the training, we’ll show you different ways of using AI in cybersecurity, set up local models and solve labs. The field is evolving rapidly and the sooner you learn things, the greater the advantage you’ll have. There’s no reason to resist AI. It’s a tool to master.

 Login
Login