“Could I 3D print that?” It’s a question we’ve all asked. I had the thought while listening to an LP vinyl record one night. Nearly two years later, I finally found a way to make it happen. Get your headphones ready.
When I bought my 3D printer, I didn’t have any great expectations of value for money—but it definitely feels like my Bambu Lab P2S has paid for itself. I’m not just talking about my bank account, either—there are some other pleasing upsides to 3D printer ownership.
When you’ve owned a 3D printer for a while, it’s easy to fall into the trap of thinking it’s the solution to every problem. This is especially true when it comes to storage and organization. However, as much as it may hurt to admit, there are times when it just doesn’t make sense.
There’s a new trend among some hobbyist photographers that involves 3D printing covers for digital cameras that make them resemble the analog cameras of the 35mm age.
I’m surprised it took me so long to realize that I could use my 3D printer to rectify one of my biggest problems with Nintendo’s last two generations of consoles: Joy-Con ergonomics.
If you’re interested in 3D printing, you probably recognize brands like Bambu Lab, Creality, Prusa, and Elegoo. But a decade ago, the brand on every 3D printing nerd’s lips was MakerBot.
Finding novel uses for your 3D printer is one of the best ways to burn through a few rolls of filament, so I’m always on the lookout. Though these household hacks definitely fall into the “nice to have” category, anything that makes the boring jobs easier is worth a look.
I don’t currently have any visible clocks on display in my house. I’m never without my watch or phone, and I decided that if I were to sacrifice some space for a dedicated timepiece, it would need to be something special, different, or interesting.
The great thing about 3D printers is that they can make almost anything these days. The bad thing about 3D printers is that you can make almost anything with them.
Are you putting up with pesky household problems? The ones you’ve almost forgotten about, but that make a massive difference to your quality of life when they’re finally fixed?
You can 3D print all kinds of things, from Yoda heads to little models of Pikachu. Eventually, though, most of us get to a point where we want to print something a little more interesting. The lenticular prints developed by MIT CSAIL are very much that. (h/t Core77).
The ShiftLens concept is simple enough—there’s a lens layer printed in transparent material. Beneath that, lives a patterned layer in alternating colors, corresponding with the linear lenses of the layer above. Then, there’s an actuation mechanism that can shift the lens layer relative to the pattern layer. This creates a changing color effect as the mechanism is shifted. The actuation mechanism can be a knob, switch, or roller—anything that moves the layers relative to each other. On its own, it’s a bit of a curio—but there are some fun demos. In particular, using the lenticular printing on a bottle to form an indicator for when the container is closed properly. There isn’t a publicly available design tool for these prints yet, though the team developed one for Rhino that they used internally for the project.
It’s a pretty interesting application of 3D printing, and one that we fully expect a bunch of YouTubers to replicate within the month. We’ve featured some other great print hacks lately, too, like a slicer that lets you print horizontal overhangs without support. Video after the break.
I love my Bambu Lab printers, but I got tired of the software lock-in and decided to see how well I could recreate it with community tools. I was actually able to get remote monitoring and notifications working fairly well without a ton of work, and here's how I did it.
It’s been an interesting year for 3D printers. We’ve had brand new models, updated favorites, and several companies making big strides to push the technology forward. We’ve also had some disappointments that have me feeling a little more skeptical than I was last year.
[Igor] of [My Tech Fun] set out to discover what differences, if any, can be found between parts printed in PC-ABS filament on an industrial 3D printer, and those from prosumer-grade machines and filament. His video is full of his usual attention to detail as he compares a test suite of parts printed at home in Polymaker PC-ABS with those from a Stratasys Fortus 450mc using proprietary PC-ABS filament.
PC-ABS is a filament that strives to deliver the benefits of both polycarbonate and ABS. It’s durable and has fantastic impact resistance, but it costs a bit more than either PC or ABS and requires a heated chamber.
In the end, PC-ABS from a home printer compares favorably to an industrial system, at a fraction of the price.
[Igor] has previously compared industrial ABS with comsumer ABS, but what made him curious about PC-ABS in particular was the large difference in print temperatures between Polymaker PC-ABS, and Stratasys’s own proprietary PC-ABS.
[Igor] prints Polymaker filament at 280º C in a 60-65º C chamber, whereas the Stratasys filament prints at 325º C with a chamber temperature of 95º C. That’s quite a difference. The industrial printer has over double the print time, to boot. Would test objects printed from the industrial filament, on an industrial machine, be noticeably different from those printed at home?
To find out, [Igor] orders a test suite of parts from a company with a Stratasys Fortus 450mc (who was also kind enough to take a short video of the machine in action) and prints his own on both a Prusa Core One L, and a Bambu Labs H2D. He then proceeds to compare them in a variety of ways while testing them to destruction.
What’s the bottom line? The industrial prints have better dimensional accuracy, but the home prints have the edge in appearance. When it comes to performance the differences are mostly minor, and not always in the industrial system’s favor. Broadly speaking, PC-ABS from the home workshop compares very favorably from an expensive industrial system and proprietary filament, at a fraction of the price. See it for yourself in the video, embedded just below.
In 2007, a piece of space debris punched a bullet-like hole through the radiator panel of the US space shuttle Endeavor. The shuttle program ended in 2011, but the space debris problem has only intensified as we launch more and more satellite constellations, telescopes, and spacecraft into orbit. That's why Chinese scientists have devised a new aluminum material inspired by eggshells that they believe could offer enhanced protection against debris fragments, according to a new paper published in the Journal of Applied Physics.
Eggshells have long fascinated scientists because of their mechanical properties. For instance, it's well known that cracking an egg requires applying just enough force to the center to achieve a clean break without completely shattering the shell. In 2012, MIT mechanical engineer Pedro Reis co-authored a paper demonstrating the link between an egg's ovoid geometry and its rigidity, a major factor when predicting how much force an object can endure before cracking. (As I wrote for Slate at the time, rigidity is related to, but distinct from, strength. If one eggshell has tiny cracks and the other doesn't, both shells have different strengths—the cracked one will break more easily—but the same rigidity.)
Reis started studying eggshells after participating in a popular physics demonstration: walking on cartons of eggs without breaking them. The key, he learned, was to align the eggs with their narrow tip (the most crack-resistant part) pointing up, and then carefully place one's feet to distribute one's weight over the entire surface area. This ensures that no single egg is overloaded. While it takes around 5.5 pounds of force to crack an egg, that depends on the direction in which the force is applied, as well as its distribution over the shell's surface.
PLA is the cheapest, safest, and arguably most versatile 3D printing filament, but it’s not without its drawbacks. In addition to being a poor choice for prints that live outside or need to withstand heat and direct sunlight, PLA can deform over time.
Most modern 3D printers meet or exceed the bar of satisfactory print quality, making it a relatively trivial metric for comparing models. If you’re shopping for a printer right now, you’ll want to consider some other things instead.
I’m becoming the guy who builds weird phone accessories. This time, the idea was simple: bring back the headphone jack while retaining the ability to use the phone’s charging port. That’s exactly what I did, and it all fits in a custom case.
It’s no secret that a good percentage of thefts are opportunistic in nature. Thieves target items that are easy to grab, so a good defense often boils down to making items less inviting.
Large prints have a risk of warping, by which we mean corners can lift off the print bed as the object sort of curls inward on itself. It’s not always due to poor filament quality or an unclean build plate. Sound like something you’ve dealt with? Check out this handy roundup to understand why it happens, and learn ways to prevent it.
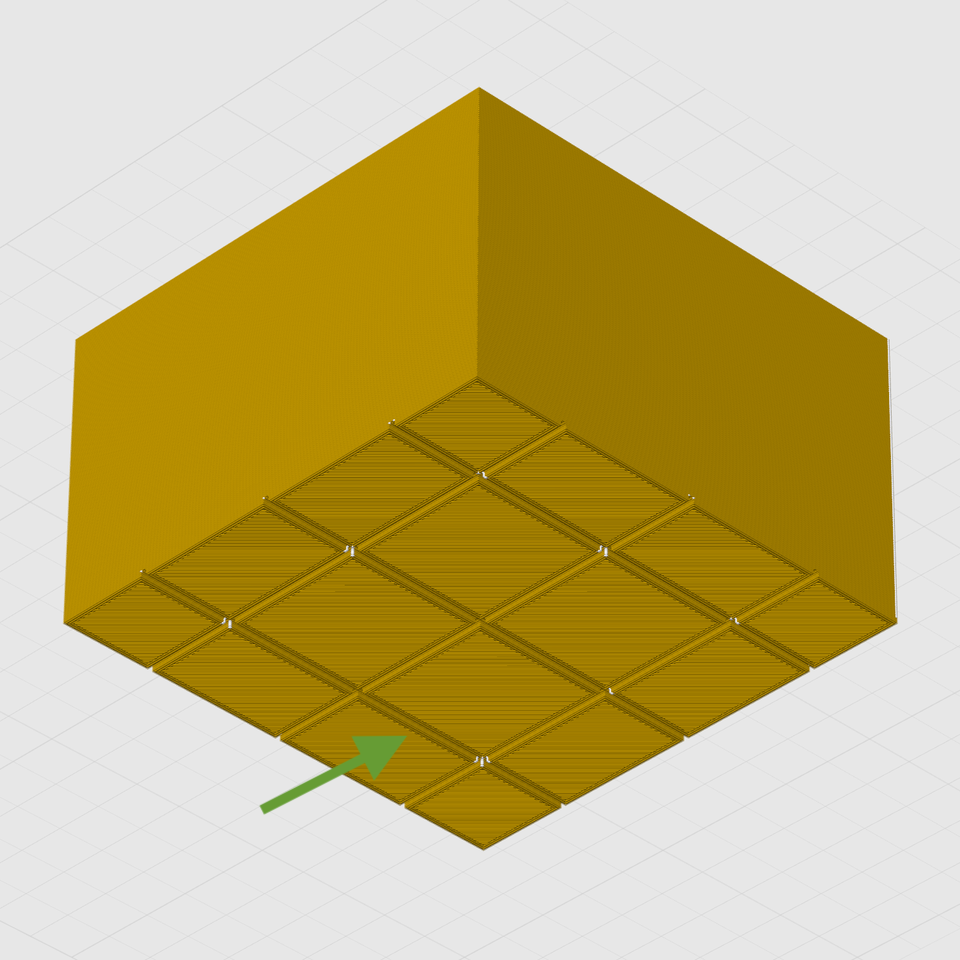
A big flat area with sharp corners is susceptible to warping. Breaking the footprint into a grid pattern helps distribute stresses instead of concentrating them at the corners.
The reason some objects have trouble while others don’t is physics. Deposited plastic shrinks ever so slightly as it cools, and some shapes — like wide, flat surfaces with sharp corners — are worse for this than others. This sort of problem is what the guide addresses with a number of techniques.
Some are simple, like turning on brims which increases an object’s footprint. This increased surface area offers more adhesion, but also increases heat transfer from the print bed into the model, slowing the cooling process. Thinner walls and an altered infill pattern is another option. Other techniques are more complex.
The most effective methods involve modifying the model itself to reduce or eliminate stress points. One such method is to break the model’s footprint into multiple zones with a shallow grid. Instead of one big flat bottom, the object has multiple smaller ones. Because big flat areas are more susceptible to warping than small ones, turning the bottom into a grid pattern helps spread those stresses out and prevent lifting.
If you design your own models, you’ll find several design tips worth keeping in mind. It’s always smart to practice good DFM (Design For Manufacturability) which means taking 3D printer strengths and weaknesses into account when designing an object. In this case, it can help prevent print failures. Good DFM can also make parts much, much stronger just by designing in the right features.

 Login
Login