If you’re interested in 3D printing, you probably recognize brands like Bambu Lab, Creality, Prusa, and Elegoo. But a decade ago, the brand on every 3D printing nerd’s lips was MakerBot.
Finding novel uses for your 3D printer is one of the best ways to burn through a few rolls of filament, so I’m always on the lookout. Though these household hacks definitely fall into the “nice to have” category, anything that makes the boring jobs easier is worth a look.
I don’t currently have any visible clocks on display in my house. I’m never without my watch or phone, and I decided that if I were to sacrifice some space for a dedicated timepiece, it would need to be something special, different, or interesting.
The great thing about 3D printers is that they can make almost anything these days. The bad thing about 3D printers is that you can make almost anything with them.
Are you putting up with pesky household problems? The ones you’ve almost forgotten about, but that make a massive difference to your quality of life when they’re finally fixed?
You can 3D print all kinds of things, from Yoda heads to little models of Pikachu. Eventually, though, most of us get to a point where we want to print something a little more interesting. The lenticular prints developed by MIT CSAIL are very much that. (h/t Core77).
The ShiftLens concept is simple enough—there’s a lens layer printed in transparent material. Beneath that, lives a patterned layer in alternating colors, corresponding with the linear lenses of the layer above. Then, there’s an actuation mechanism that can shift the lens layer relative to the pattern layer. This creates a changing color effect as the mechanism is shifted. The actuation mechanism can be a knob, switch, or roller—anything that moves the layers relative to each other. On its own, it’s a bit of a curio—but there are some fun demos. In particular, using the lenticular printing on a bottle to form an indicator for when the container is closed properly. There isn’t a publicly available design tool for these prints yet, though the team developed one for Rhino that they used internally for the project.
It’s a pretty interesting application of 3D printing, and one that we fully expect a bunch of YouTubers to replicate within the month. We’ve featured some other great print hacks lately, too, like a slicer that lets you print horizontal overhangs without support. Video after the break.
I love my Bambu Lab printers, but I got tired of the software lock-in and decided to see how well I could recreate it with community tools. I was actually able to get remote monitoring and notifications working fairly well without a ton of work, and here's how I did it.
It’s been an interesting year for 3D printers. We’ve had brand new models, updated favorites, and several companies making big strides to push the technology forward. We’ve also had some disappointments that have me feeling a little more skeptical than I was last year.
[Igor] of [My Tech Fun] set out to discover what differences, if any, can be found between parts printed in PC-ABS filament on an industrial 3D printer, and those from prosumer-grade machines and filament. His video is full of his usual attention to detail as he compares a test suite of parts printed at home in Polymaker PC-ABS with those from a Stratasys Fortus 450mc using proprietary PC-ABS filament.
PC-ABS is a filament that strives to deliver the benefits of both polycarbonate and ABS. It’s durable and has fantastic impact resistance, but it costs a bit more than either PC or ABS and requires a heated chamber.
In the end, PC-ABS from a home printer compares favorably to an industrial system, at a fraction of the price.
[Igor] has previously compared industrial ABS with comsumer ABS, but what made him curious about PC-ABS in particular was the large difference in print temperatures between Polymaker PC-ABS, and Stratasys’s own proprietary PC-ABS.
[Igor] prints Polymaker filament at 280º C in a 60-65º C chamber, whereas the Stratasys filament prints at 325º C with a chamber temperature of 95º C. That’s quite a difference. The industrial printer has over double the print time, to boot. Would test objects printed from the industrial filament, on an industrial machine, be noticeably different from those printed at home?
To find out, [Igor] orders a test suite of parts from a company with a Stratasys Fortus 450mc (who was also kind enough to take a short video of the machine in action) and prints his own on both a Prusa Core One L, and a Bambu Labs H2D. He then proceeds to compare them in a variety of ways while testing them to destruction.
What’s the bottom line? The industrial prints have better dimensional accuracy, but the home prints have the edge in appearance. When it comes to performance the differences are mostly minor, and not always in the industrial system’s favor. Broadly speaking, PC-ABS from the home workshop compares very favorably from an expensive industrial system and proprietary filament, at a fraction of the price. See it for yourself in the video, embedded just below.
In 2007, a piece of space debris punched a bullet-like hole through the radiator panel of the US space shuttle Endeavor. The shuttle program ended in 2011, but the space debris problem has only intensified as we launch more and more satellite constellations, telescopes, and spacecraft into orbit. That's why Chinese scientists have devised a new aluminum material inspired by eggshells that they believe could offer enhanced protection against debris fragments, according to a new paper published in the Journal of Applied Physics.
Eggshells have long fascinated scientists because of their mechanical properties. For instance, it's well known that cracking an egg requires applying just enough force to the center to achieve a clean break without completely shattering the shell. In 2012, MIT mechanical engineer Pedro Reis co-authored a paper demonstrating the link between an egg's ovoid geometry and its rigidity, a major factor when predicting how much force an object can endure before cracking. (As I wrote for Slate at the time, rigidity is related to, but distinct from, strength. If one eggshell has tiny cracks and the other doesn't, both shells have different strengths—the cracked one will break more easily—but the same rigidity.)
Reis started studying eggshells after participating in a popular physics demonstration: walking on cartons of eggs without breaking them. The key, he learned, was to align the eggs with their narrow tip (the most crack-resistant part) pointing up, and then carefully place one's feet to distribute one's weight over the entire surface area. This ensures that no single egg is overloaded. While it takes around 5.5 pounds of force to crack an egg, that depends on the direction in which the force is applied, as well as its distribution over the shell's surface.
PLA is the cheapest, safest, and arguably most versatile 3D printing filament, but it’s not without its drawbacks. In addition to being a poor choice for prints that live outside or need to withstand heat and direct sunlight, PLA can deform over time.
Most modern 3D printers meet or exceed the bar of satisfactory print quality, making it a relatively trivial metric for comparing models. If you’re shopping for a printer right now, you’ll want to consider some other things instead.
I’m becoming the guy who builds weird phone accessories. This time, the idea was simple: bring back the headphone jack while retaining the ability to use the phone’s charging port. That’s exactly what I did, and it all fits in a custom case.
It’s no secret that a good percentage of thefts are opportunistic in nature. Thieves target items that are easy to grab, so a good defense often boils down to making items less inviting.
Large prints have a risk of warping, by which we mean corners can lift off the print bed as the object sort of curls inward on itself. It’s not always due to poor filament quality or an unclean build plate. Sound like something you’ve dealt with? Check out this handy roundup to understand why it happens, and learn ways to prevent it.
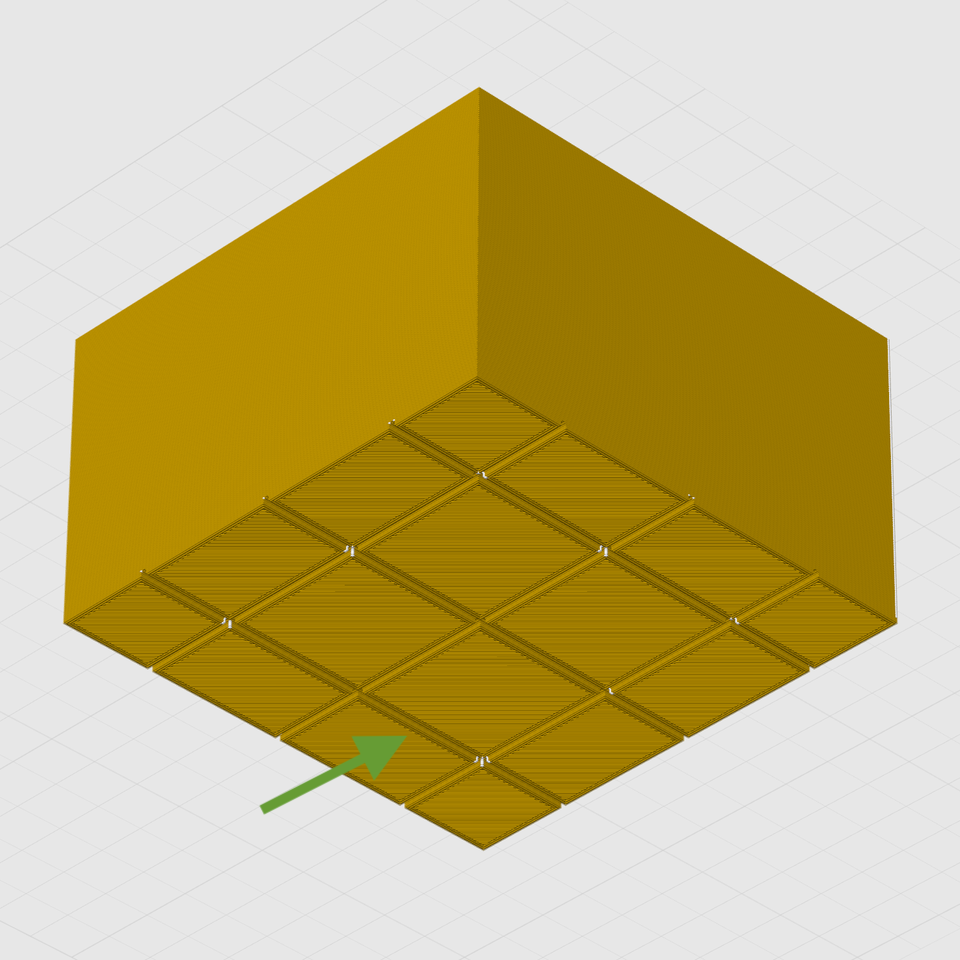
A big flat area with sharp corners is susceptible to warping. Breaking the footprint into a grid pattern helps distribute stresses instead of concentrating them at the corners.
The reason some objects have trouble while others don’t is physics. Deposited plastic shrinks ever so slightly as it cools, and some shapes — like wide, flat surfaces with sharp corners — are worse for this than others. This sort of problem is what the guide addresses with a number of techniques.
Some are simple, like turning on brims which increases an object’s footprint. This increased surface area offers more adhesion, but also increases heat transfer from the print bed into the model, slowing the cooling process. Thinner walls and an altered infill pattern is another option. Other techniques are more complex.
The most effective methods involve modifying the model itself to reduce or eliminate stress points. One such method is to break the model’s footprint into multiple zones with a shallow grid. Instead of one big flat bottom, the object has multiple smaller ones. Because big flat areas are more susceptible to warping than small ones, turning the bottom into a grid pattern helps spread those stresses out and prevent lifting.
If you design your own models, you’ll find several design tips worth keeping in mind. It’s always smart to practice good DFM (Design For Manufacturability) which means taking 3D printer strengths and weaknesses into account when designing an object. In this case, it can help prevent print failures. Good DFM can also make parts much, much stronger just by designing in the right features.
Over the time Hackaday has been in existence, the art of 3D printing has evolved from a relatively crude hit-and-miss affair to something approaching what we all imagined back then. You can’t yet walk up to a Star Trek replicator and ask for a part, but a modern state of the art consumer or prosumer grade printer will deliver consistent high-resolution parts, and in a surprisingly short time. [The Next Layer] asks whether consumer FDM printers have now reached the point at which they’re about as good as they’re going to get, and whether other technologies hold the future.
It’s a fair point to make that the resolution of a consumer FDM printer may be close to its mechanical limit. Techniques such as input shaping and the adoption of better CoreXY mechanisms mean that prints which once might have relied on SLA can be done in FDM. Healthy competition in the marketplace has delivered high quality colour printing, with tool-changing printers being no longer solely the preserve of the professional. He uses the example of a mobile phone to make the point that new machines have less of a wow factor to deliver, as increments have become less grand.
It’s a persuasive argument, and looking at the printers around us we can see it in action. The difference in ability between a 2020-ish and a 2026 FDM printer are far smaller than those between the same time periods in the last decade. Compare a MakerBot Cupcake and an Ultimaker II, or the Ultimaker and a Prusa Mini, and each is light years ahead of the last. But the best the Mini can do is surprisingly not as far behind as you’d expect to that of their latest, or of the equivalent from Bambu Labs.
Does this means that nothing new is coming in 3D printing? Of course not. UV printing is coming through and will deliver incredible results, as will SLS printing. It’s interesting he devotes little time to SLA printing, perhaps because it’s not as easy a process as FDM. He makes the point that we’ve never had it so good, as the high-end FDM features will appear in modestly priced machines, and we have those other technologies to look forward to.
It’s an interesting discussion, and you can see it below the break.
A typical response to the previous article on why PLA filament is so darn brittle. This has led some people to not use PLA filament at all, while others promote using PLA only for prototyping and throw-away parts, especially in light of PLA being compostable under the right conditions. For many mechanical parts, people turn to PETG.
Much like the PET polymer used for everything from food containers to drink bottles, PETG is durable, more resistant to degradation through mechanisms like hydrolysis and its filament form doesn’t need to be coddled like PLA does. PETG, on the other hand, tends to come from crude oil and shrugs at industrial composting conditions.
In terms of durability, degradation mechanisms and recyclability, is PETG the basic FDM filament which we should all just be using?
Polyethylene Terephthalate
PET (backbone: C10H8O4) is a polyester, just like PLA (backbone: C3H4O2). Due to how common PET is in both packaging and textile applications it’s usually just called “polyester” when used for textiles, where it is often blended with cotton and other fibers. When used in packaging PET has the sometimes rather unfortunate property of being permeable to oxygen and carbon dioxide, so that it may have to be combined with an additional oxygen-blocking layer.
This aspect of using PET for packaging is detailed for example in a 2017 review paper by Youri Michiels et al. in Applied Sciences. The main drive for using polymers like PET in packaging is due to these being more economical than traditional materials like glass and aluminium, both of which are highly impermeable to oxygen and carbon dioxide.
Consequently, a number of active and passive barriers were developed, something that is also essential in organic electronics like OLED displays when the traditional glass layers are replaced with polymers for making something like flexible displays. Active barriers can be oxygen scavengers, while passive barriers would be the application of additional materials to the basic PET film or bottle, usually in the form of a coating. This also helps to prevent the infusion of PET with colorants and aromas from food or drink, which is a common issue with recycling PET bottles.
Naturally, this can pose issues when trying to use PET materials for 3D printing, as you cannot be certain what percentage of PET waste is actually PET and what other polymers make up the remainder. This was studied by Mikołaj Garwacki et al. in a 2024 paper in Materials, with a PET-PETG blend containing PET film waste. They found it necessary to add an elastomer additive (IM) to prevent brittleness.
And this is how we get the “G” in PETG.
Triple Copolymer
Structural formula of PETG, with glycol and CHDM monomer sections. (Credit: CLauterb, Wikimedia)
The name polyethylene terephthalate (PET) already suggests that it’s more than just a polymer of purified terephthalic acid (PTA) monomers. Thus, in addition to said PTA we also see ethylene glycol (EG) monomers. This creates the basic PET copolymer as we know and love it. When we talk about PETG (polyethylene terephthalate glycol-modified), we thus do not mean the addition of glycol, but rather the replacement of said EG monomers with another monomer.
Thus PETG has a third monomer added, usually in the form of cyclohexanedimethanol (CHDM), which replaces some of the EG monomers in the resulting copolymer. In addition to PETG the ratio of CHDM monomers can create additional copolymer types:
PET -> PTA + EG.
PETG -> PTA + EG + <50% CHDM.
PCT -> PTA + CHDM.
PCTG -> PTA + EG + >50% CHDM.
Typically PETG is chosen for its high transparency and toughness properties, which is a property that’s rather useful in packaging like bottles. Although PETG FDM filament is basically PETG, something like a plastic ‘PET’ bottle can thus be PETG as well, and likely is due to the aforementioned properties.
Stability
Degradation routes of PET. (Credit: Ali Chamas et al., ACS Sustainable Chem. Eng. 2020)
One of the complaints with PLA filament is generally that it’ll become brittle no matter what, owing to the combination of increasing crystallization reducing movement within the polymer matrix, and hydrolysis shortening the polymer backbones. PETG filament has a much better reputation here, with it usually considered to be basically immune to brittleness.
The bad news here is that PETG still attracts moisture from the environment and – it being a polyester – still has a backbone that is susceptible to hydrolysis. Another common degradation mechanism is that of photo-oxidation, along with thermal degradation.
This is detailed in this 2020 review paper by Ali Chamas et al. in ACS Sustainable Chemistry & Engineering on the degradation mechanisms of various plastics within a range of environments.
As noted in the paper, hydrolytic cleavage of PET chains is very slow under neutral pH, but strongly enhanced in acidic environments. Fortunately carbonated drinks stored inside PET(G) bottles aren’t at too much of risk here, as the carbonic acid from dissolving CO2 in water is only a mild acid and thus shouldn’t hasten degradation too much.
In order for thermal degradation to occur, fairly high temperatures are required, above that for PLA, while exposure to UV light can cause photodegradation as is typically observed with many plastics. Overall long-term stability of PET polymers is not a commonly cited concern, with the cynical take of discarded PET single-use bottles potentially outliving human society being not too far from the truth.
Barring PET polymers ending up in a particularly acidic, UV-irradiated and high-temperature environment, it’s remarkably stable, even if not as much as polypropylene or polyethylene. While there are now enzymes that can dispose of PET polymers, such as PETase and MHETase, these probably are no real risk factors to your spools of PETG filament and rather just convenient ways to dispose of misprints and waste in the future.
Sample Size Of One
A pleasant sight to behold when printing with an old spool of filament.
In addition to the above theory and the perusal of the scientific literature on the topic, I figured that I would also try printing with a rather old spool of PETG filament. It dates back to the time when I was still printing on the Creality Ender 3 v2, with receipts showing a purchase date of March 2023. This spool has spent considerable time just lounging about on the FDM printer’s spool holder before being stuffed back into a sealed plastic bag and forgotten about until recently.
Digging this Reprapper-branded spool of clear PETG filament out of storage, I was momentarily dismayed at it having been stored by past me in just a resealable bag with no attempt at a vacuum, just with a probably expired baggy of forbidden silica candy tossed inside the bag. Let’s consider this a worst-case scenario.
Feeling particularly adventurous, I decided to not even dry this much-abused spool of PETG filament and just see what happens when printing on my Neptune 4 bed slinger. After some initial fiddling with loading issues I fixed this by snipping off of the dodgy tip of the filament, presumably due to its mangling by the Ender 3 v2’s extruder gear and hotend.
I still had my worries about the extruder teeth marks from the previous printer and the presence of a few bends in the filament that made me suffer PLA-related flashbacks, but after slicing up a cable chain model that I had printed many times in PLA before, the printing was very much uneventful.
As can be seen in the photo, I was greeted by a happy print result. While keeping an eye on it for the first layers I did notice a bit of oozing, but after a few minutes it normalized and the cable chain elements were printed cleanly, including the big overhangs. I was able to clip the elements together as well without any brittleness or other issues.
I probably should have turned on the auxiliary cooling fan on the Neptune 4 as PETG prefers things cool unlike PLA, but even with this YOLO printing attempt with a neglected spool of PETG I was left impressed. After my recent experiences with PLA I was bracing for at least a few hours of troubleshooting, but this was almost boring.
Vibe Check
With this printing experience and the scientific literature put side by side, I think that they concur. Despite me taking no precautions at all, even a more than three-year old neglected spool of PETG filament printed just fine. There were no signs of stringing or other issues that would prevent me from just queueing up another print. Although I’d still advocate at least for keeping PETG spools in at least a sealed bag or container, it’s not nearly as fragile as PLA.
Since my previous article on PLA’s brittleness, I have opened its still factory-sealed twin in the form of black PLA and found that although it’s not nearly as brittle as its white sibling, it too began to snap off if left at anything beyond a gentle curve. Clearly this puts a pretty big expiration data on PLA filament, but it’s still an open question whether it was just this particular batch of Sunlu PLA filament.
In light of all this, I think it is fair to say that PETG is by far the most ‘no fuss’ filament for general use, with PLA only having its theoretical composting advantage. Yet when taking into account that this is only guaranteed for pure PLA without additives, and PET-degrading enzymes exist, that theoretical advantage doesn’t seem so convincing anymore.
When I got back into SLA resin printing recently, I knew that I’d inevitably have to deal with the agony of failed prints and of course resin spills. This moment eventually came, and I felt motivated to treat mistakes as teaching moments on aspects like how to properly prepare an SLA build plate in terms of angles and supports or how to deal with failed print aftermaths.
Before moving on to the disaster, I’d like to first start with a look at the resin print of the previous article, which contained a number of fairly small parts. These I had oriented and supported almost fully using the automatic methods provided by the ChituBox slicer software, and worked about 90% as I had hoped, while leaving plenty of room for improvement as well.
Overall, preparing an SLA build plate in the slicer isn’t quite the same as for an FDM printer, mostly due to one phrase that strikes fear in the heart of anyone who has ever done resin printing: “peeling forces”.
Not Bad, Not Great
For last article’s resin print, I had to put a number of models onto the build plate in the slicer, after which I mashed ‘auto arrange’, ‘auto orient’ and then ‘auto support’ in their respective tabs. I did change the orientation of the beam so that it wasn’t pointing straight upward any more, as I wasn’t going to wait a few extra hours for it to print just for that single object.
This then got me the following overview including a veritable forest of supporting structures:
You’re going to enjoy peeling off those supports later.
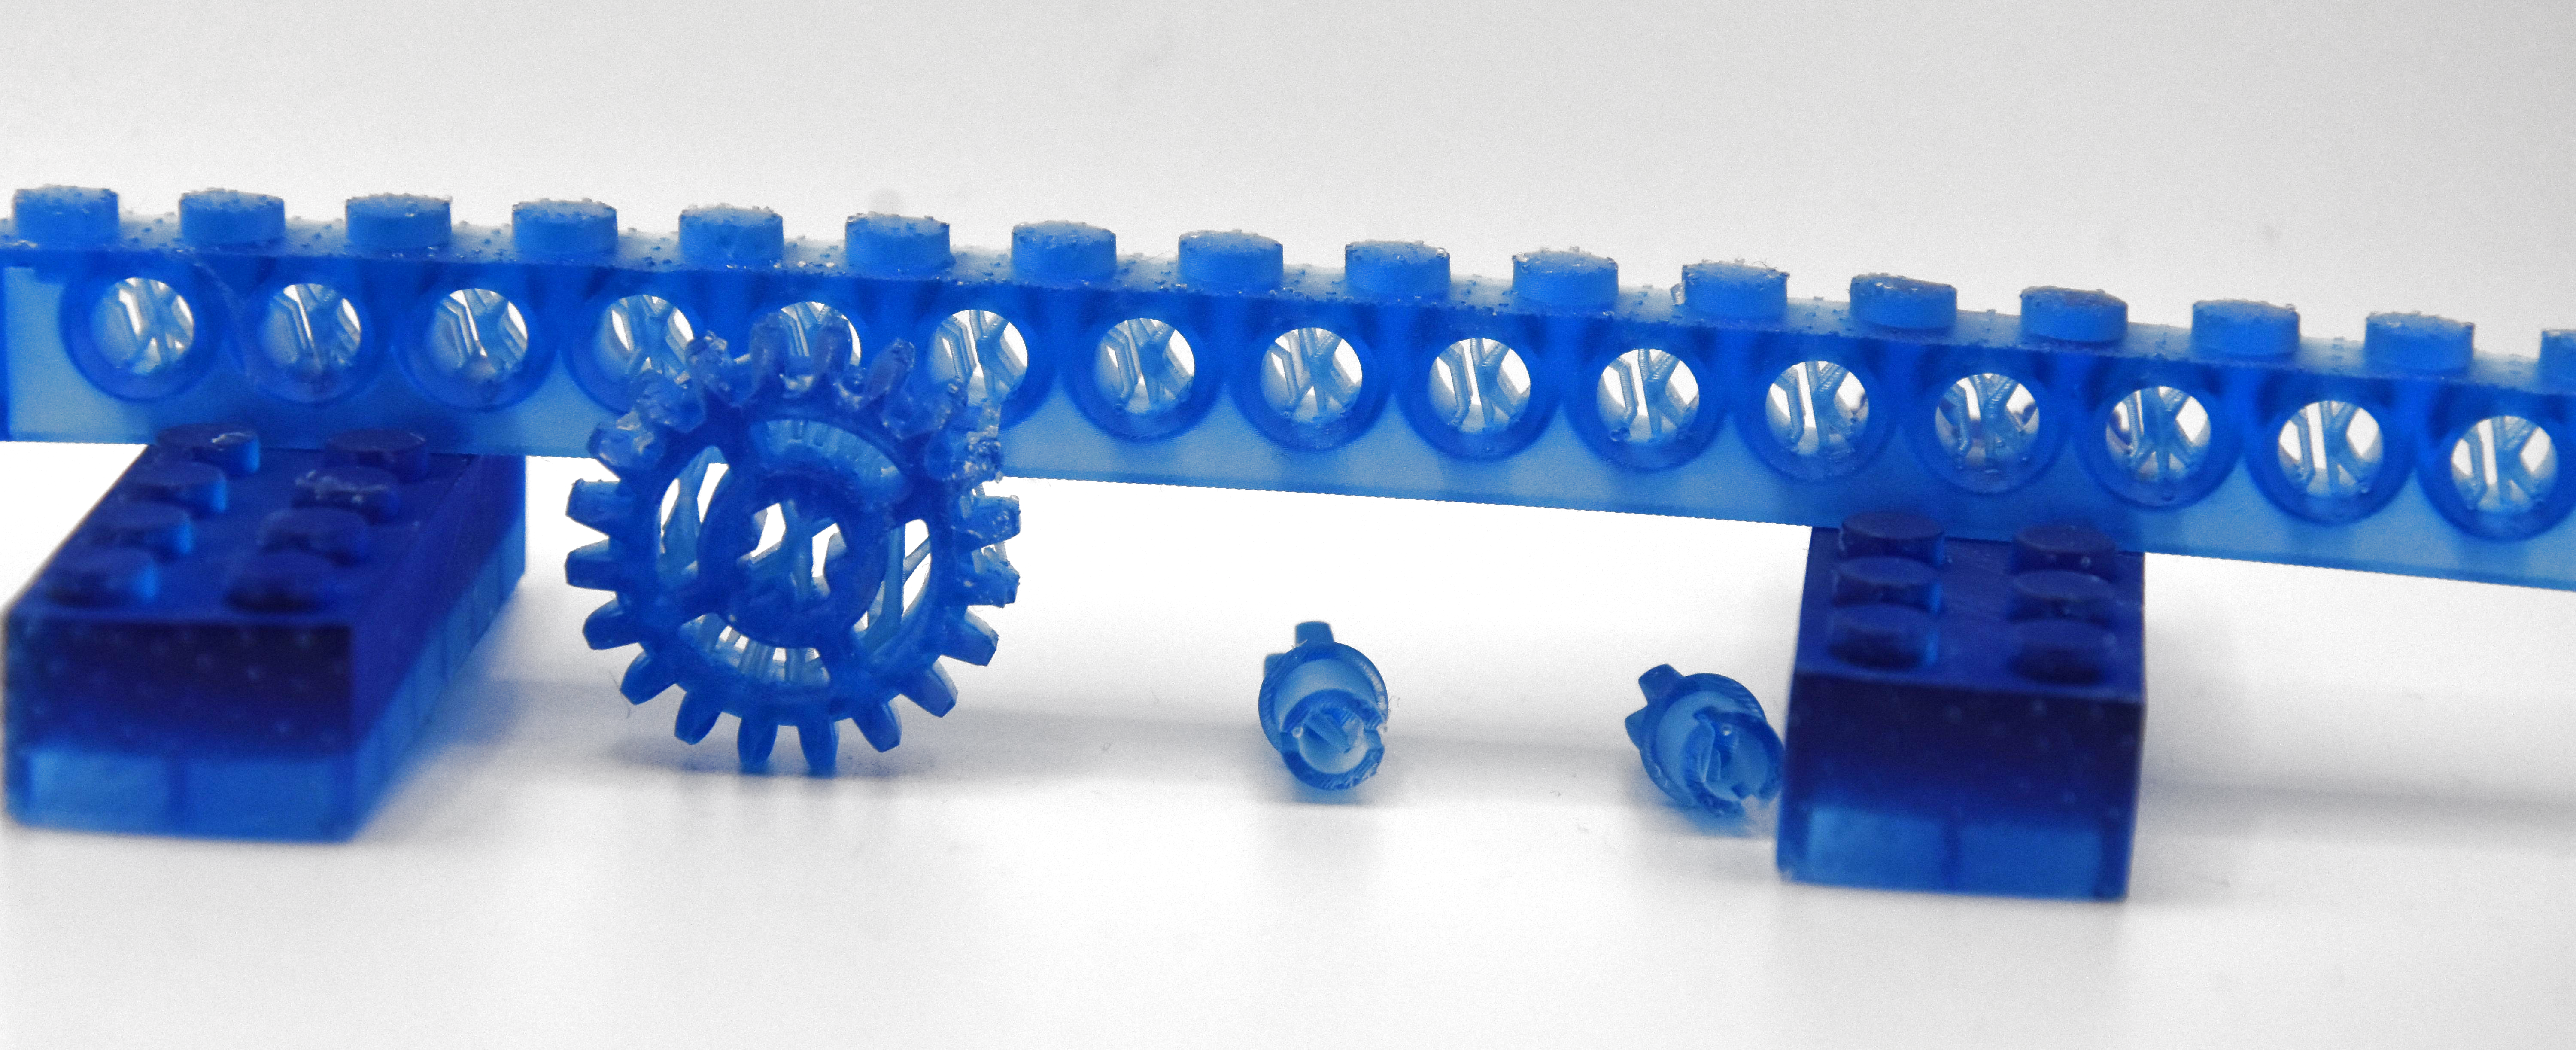
By playing it safe, I managed to get everything printed without any glitches other than my previously mentioned fight with the resin auto-feed system of the printer. Of course, by leaning heavily on defaults, I also got backstabbed by the slicer’s overzealous use of supports, especially where it was highly undesirable, such as inside parts of the LEGO Technic-compatible parts:
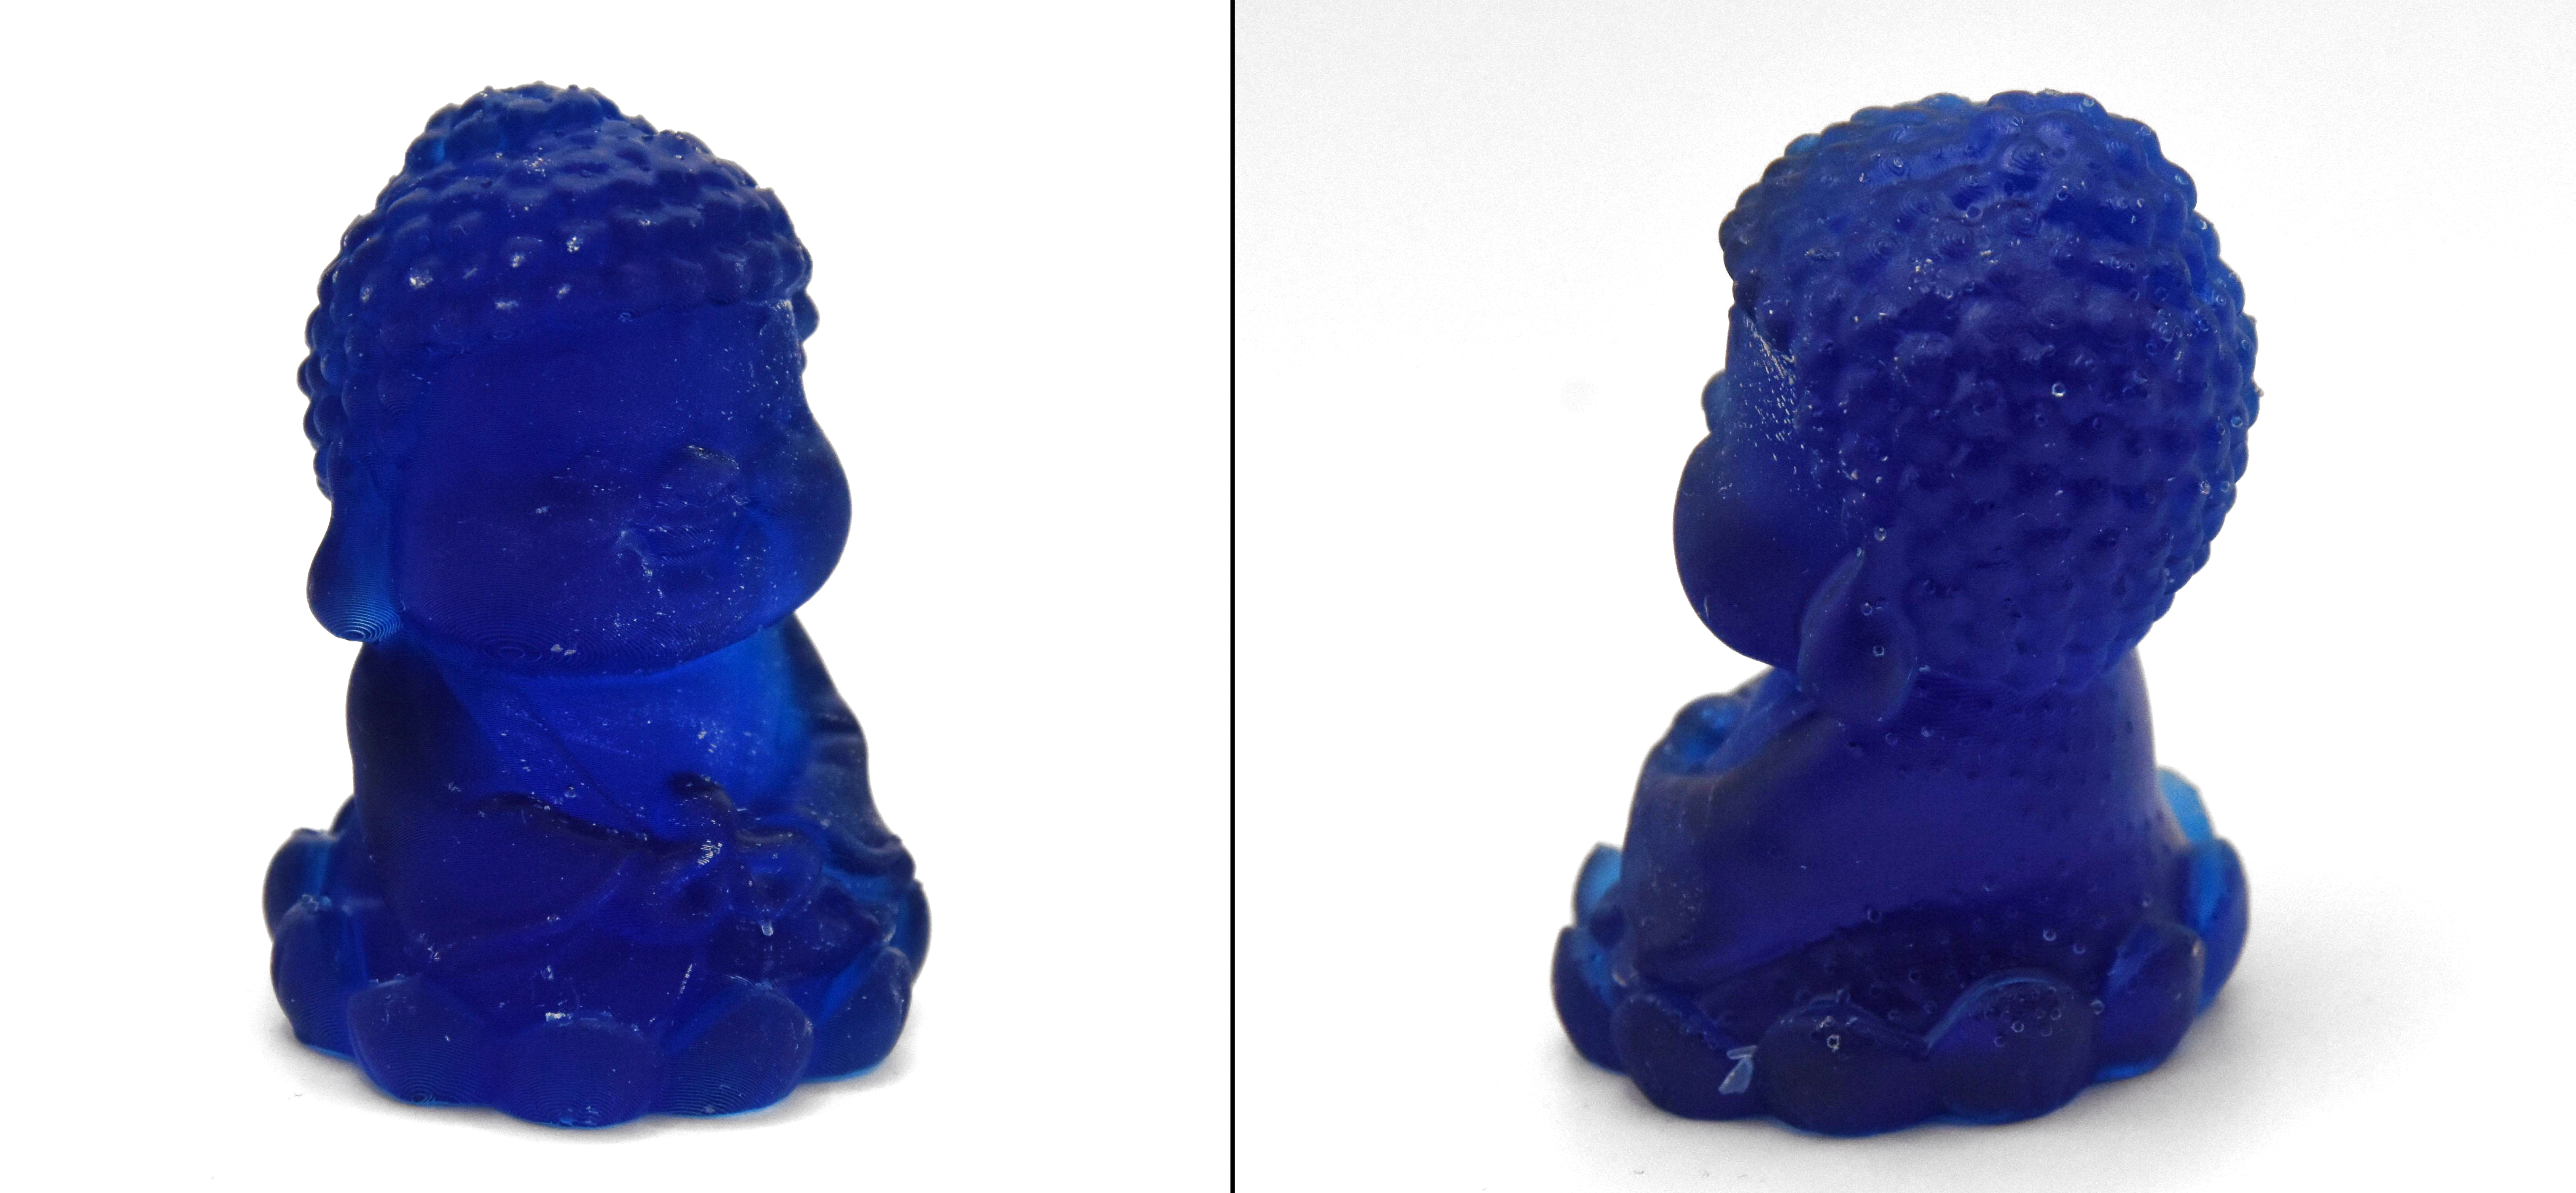
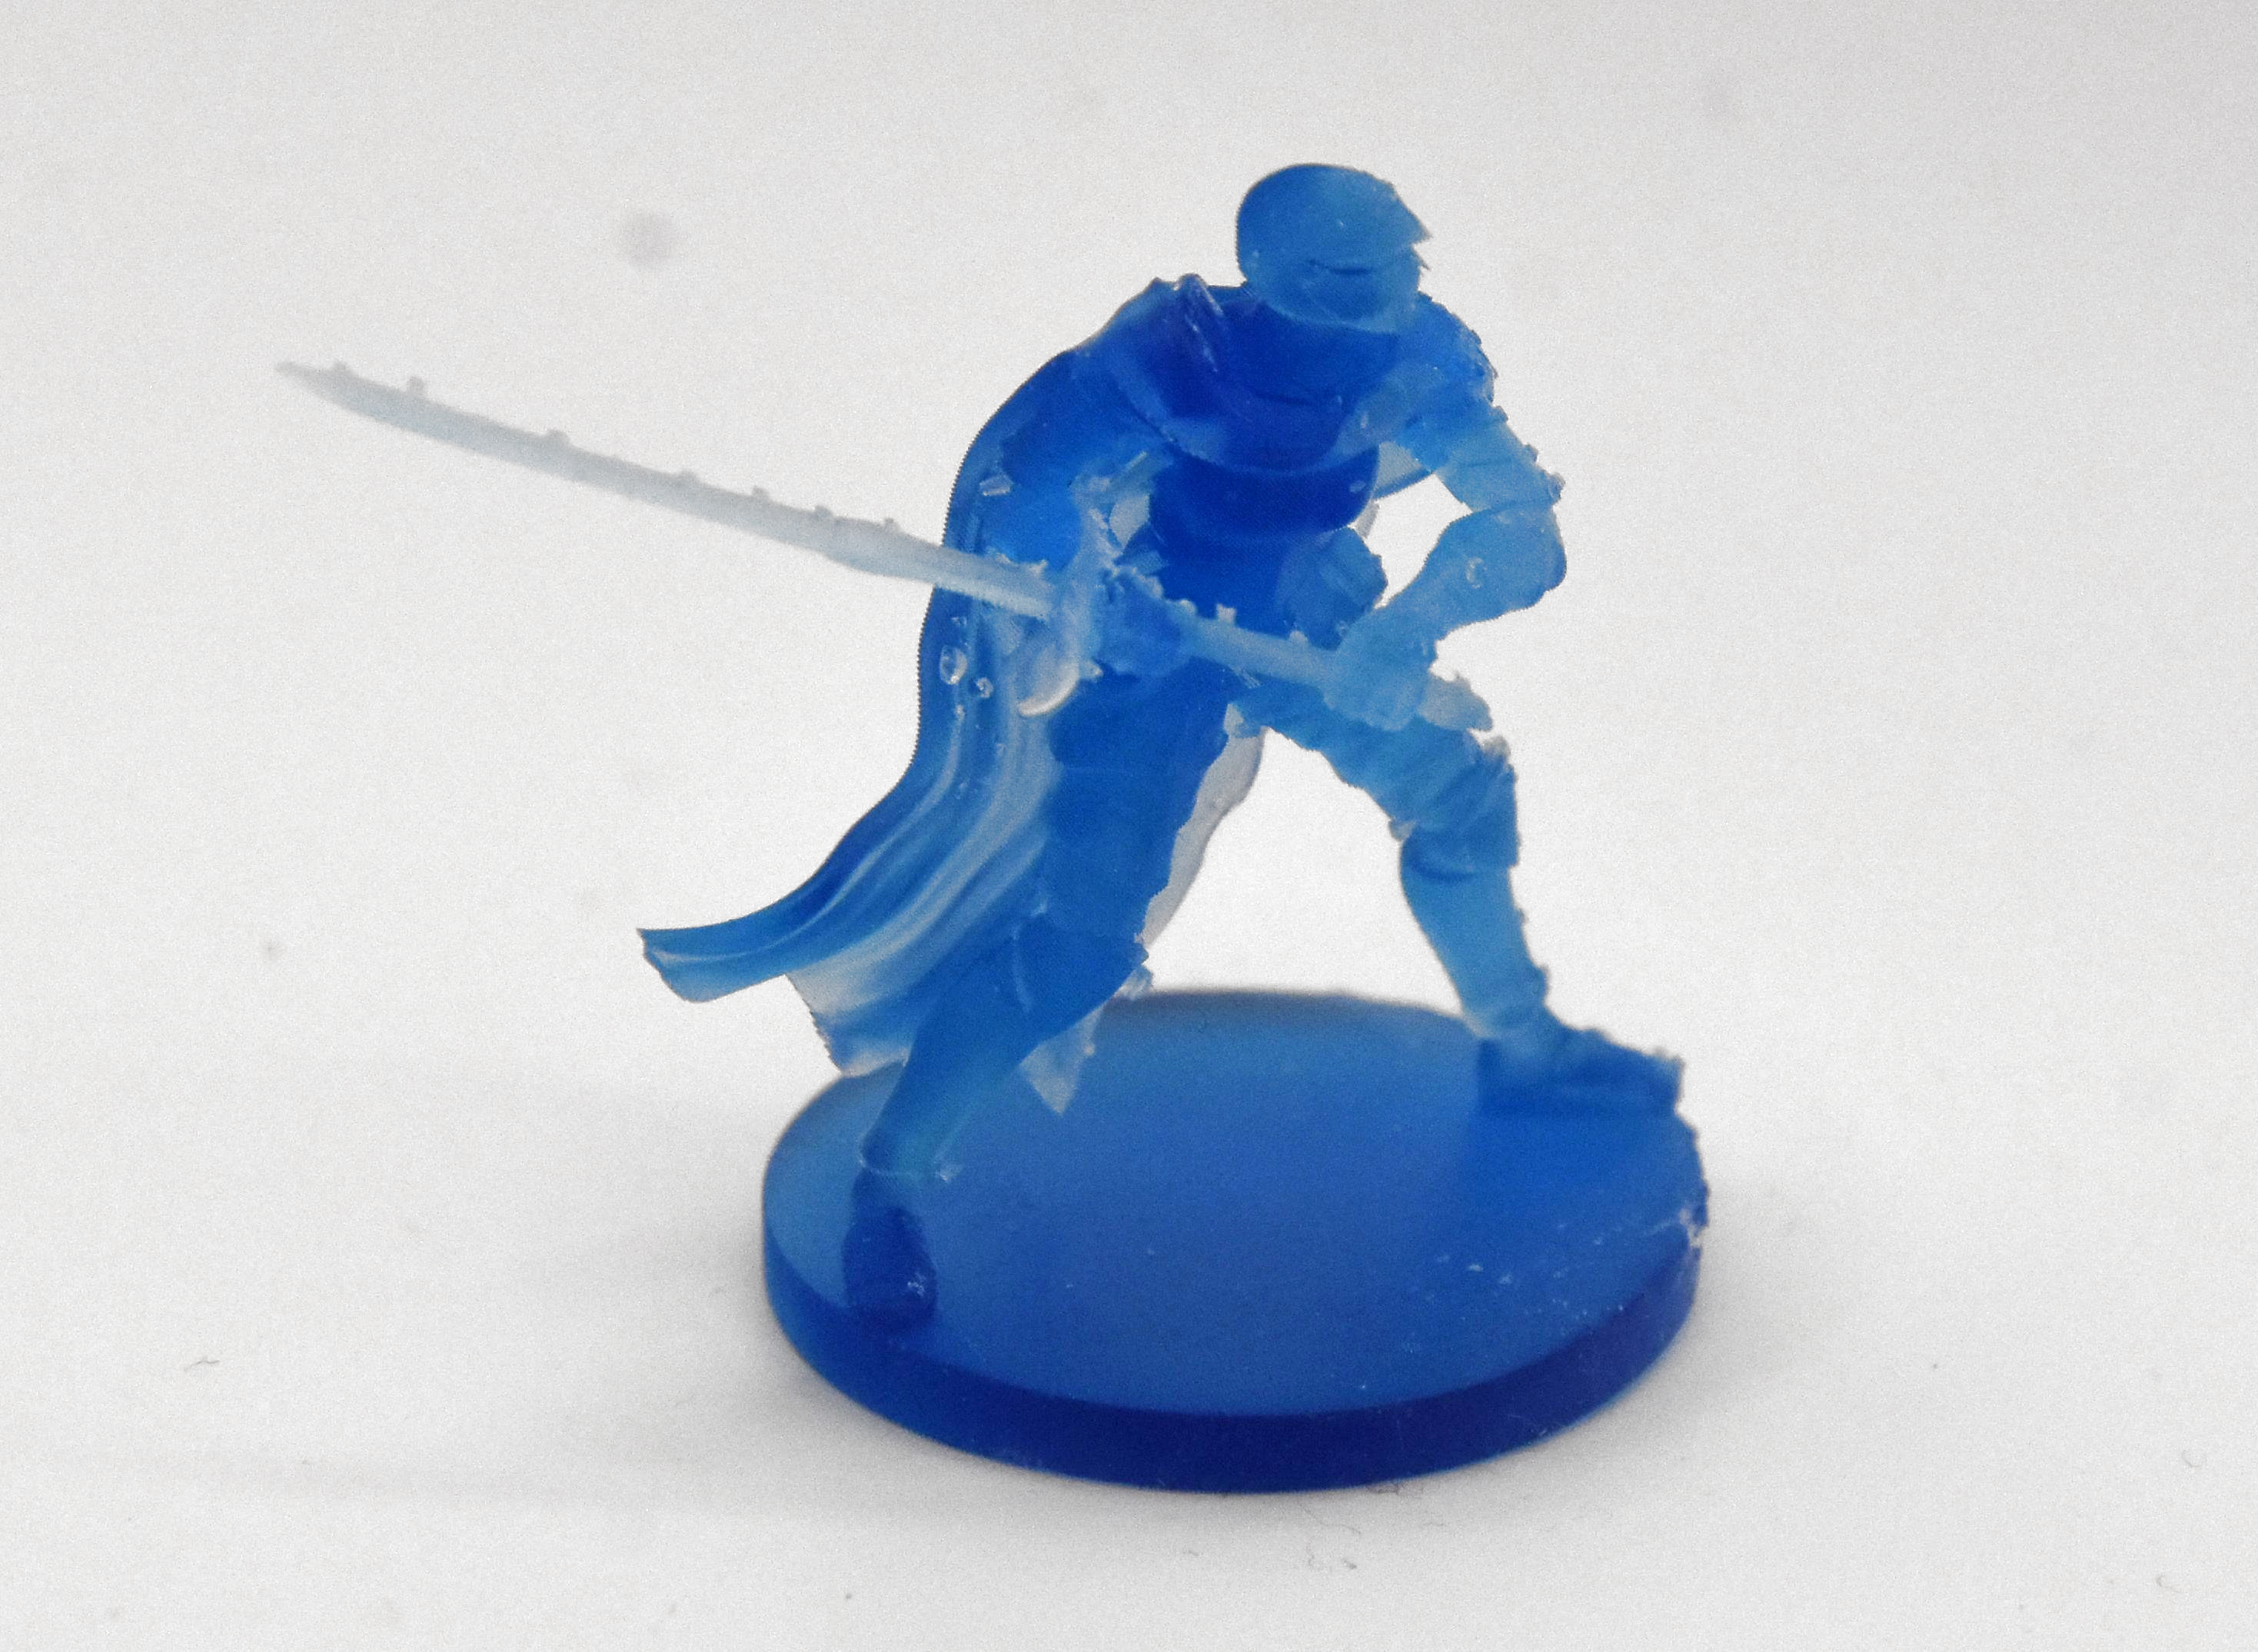
By rotating the figurines to be printed upside-down relative to the build plate this also meant having lots of ugly marks left by the supports, both on the happy buddha and the female knight figurine.
Here the fix seems rather straightforward: angle figurines so that supports contact things like the bottom of a surface where it won’t be as noticeable. Also inspect the auto-generated supports to remove any that are in naughty places and perhaps do some manual supporting if you feel particularly confident.
I did look at a few “how to do supports right” videos and written tutorials, and the general advice seems to be to simply forget about auto-generated supports.
For me an amazing aspect was that both figurines were angled upside-down by the slicer, when everyone prints them with the base towards to the build plate. Exactly how ChituBox’s algorithm here works is a complete mystery to me, but I reckon that this slightly confusing experience may have contributed to the subsequent disaster that occurred with another print.
Simply Bad
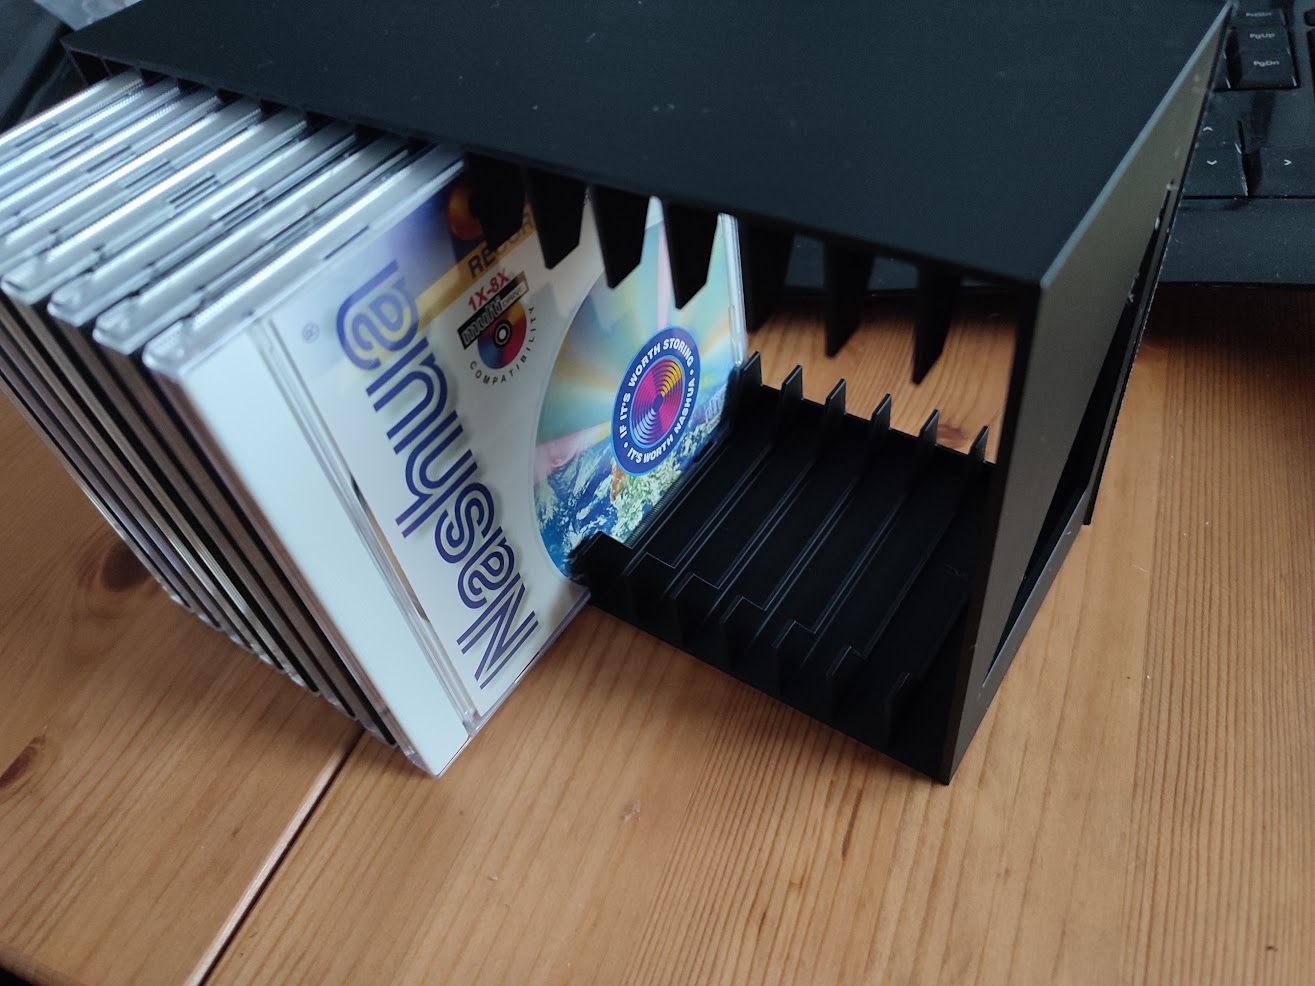
The FDM version of the CD rack in black PLA passing QA.
Where things slid sideways and wrapped themselves at high velocity around a phone pole was when trying to print a 16-slot CD rack, specifically this rather nice model by [zenitar3d] from Thingiverse. On an FDM printer this is braindead simple to print: you slap it on the build plate in the slicer, do a sanity check that it physically fits, slice it and let ‘er rip. My only issue here was that OrcaSlicer deemed it necessary to add a brim, so that took some sanding to clean up a razor sharp edge.
On the resin side of things, you enter a torment nexus: you can slap the part on the build plate, but then you risk elephant foot — a thickening at the base where exposure time is longer than for subsequent layers. Even if that’s of no concern, you still need to violently remove the part from the solid metal build plate, which is highly likely to cause damage.
If I still had the LD-002R printer with its flex plate, an aftermarket modification that I had fitted. This would be of no concern with a mere flex-and-pop, but here I’d have to violently wield a metal scraper to convince the build plate and cured layers to part ways. Clearly I need to look into flexible build plates for current SLA printers.
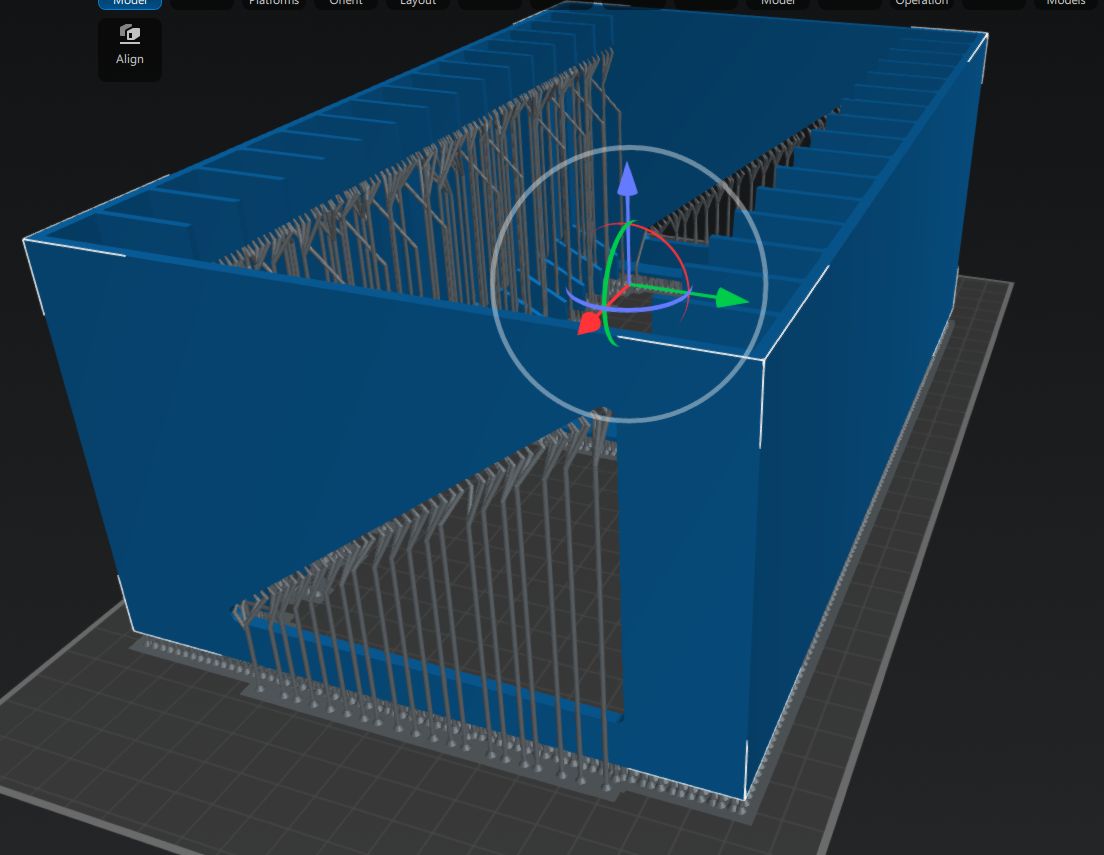
I did try to use the same auto-angle and auto-rotate approach in the slicer, but ChituBox would just always put part of the model outside of the printing area. After a while I grew tired of this and just printed it with the part slightly lifted off the build plate with medium supports like this:
Anyone who has ever done any resin printing cringes at this screenshot.
In my defense, I did this in the midst of yet another European heatwave with zero air conditioning, so maybe that had sufficiently fried my remaining brain cells. Regardless, the results were rather predictable.
Carnage
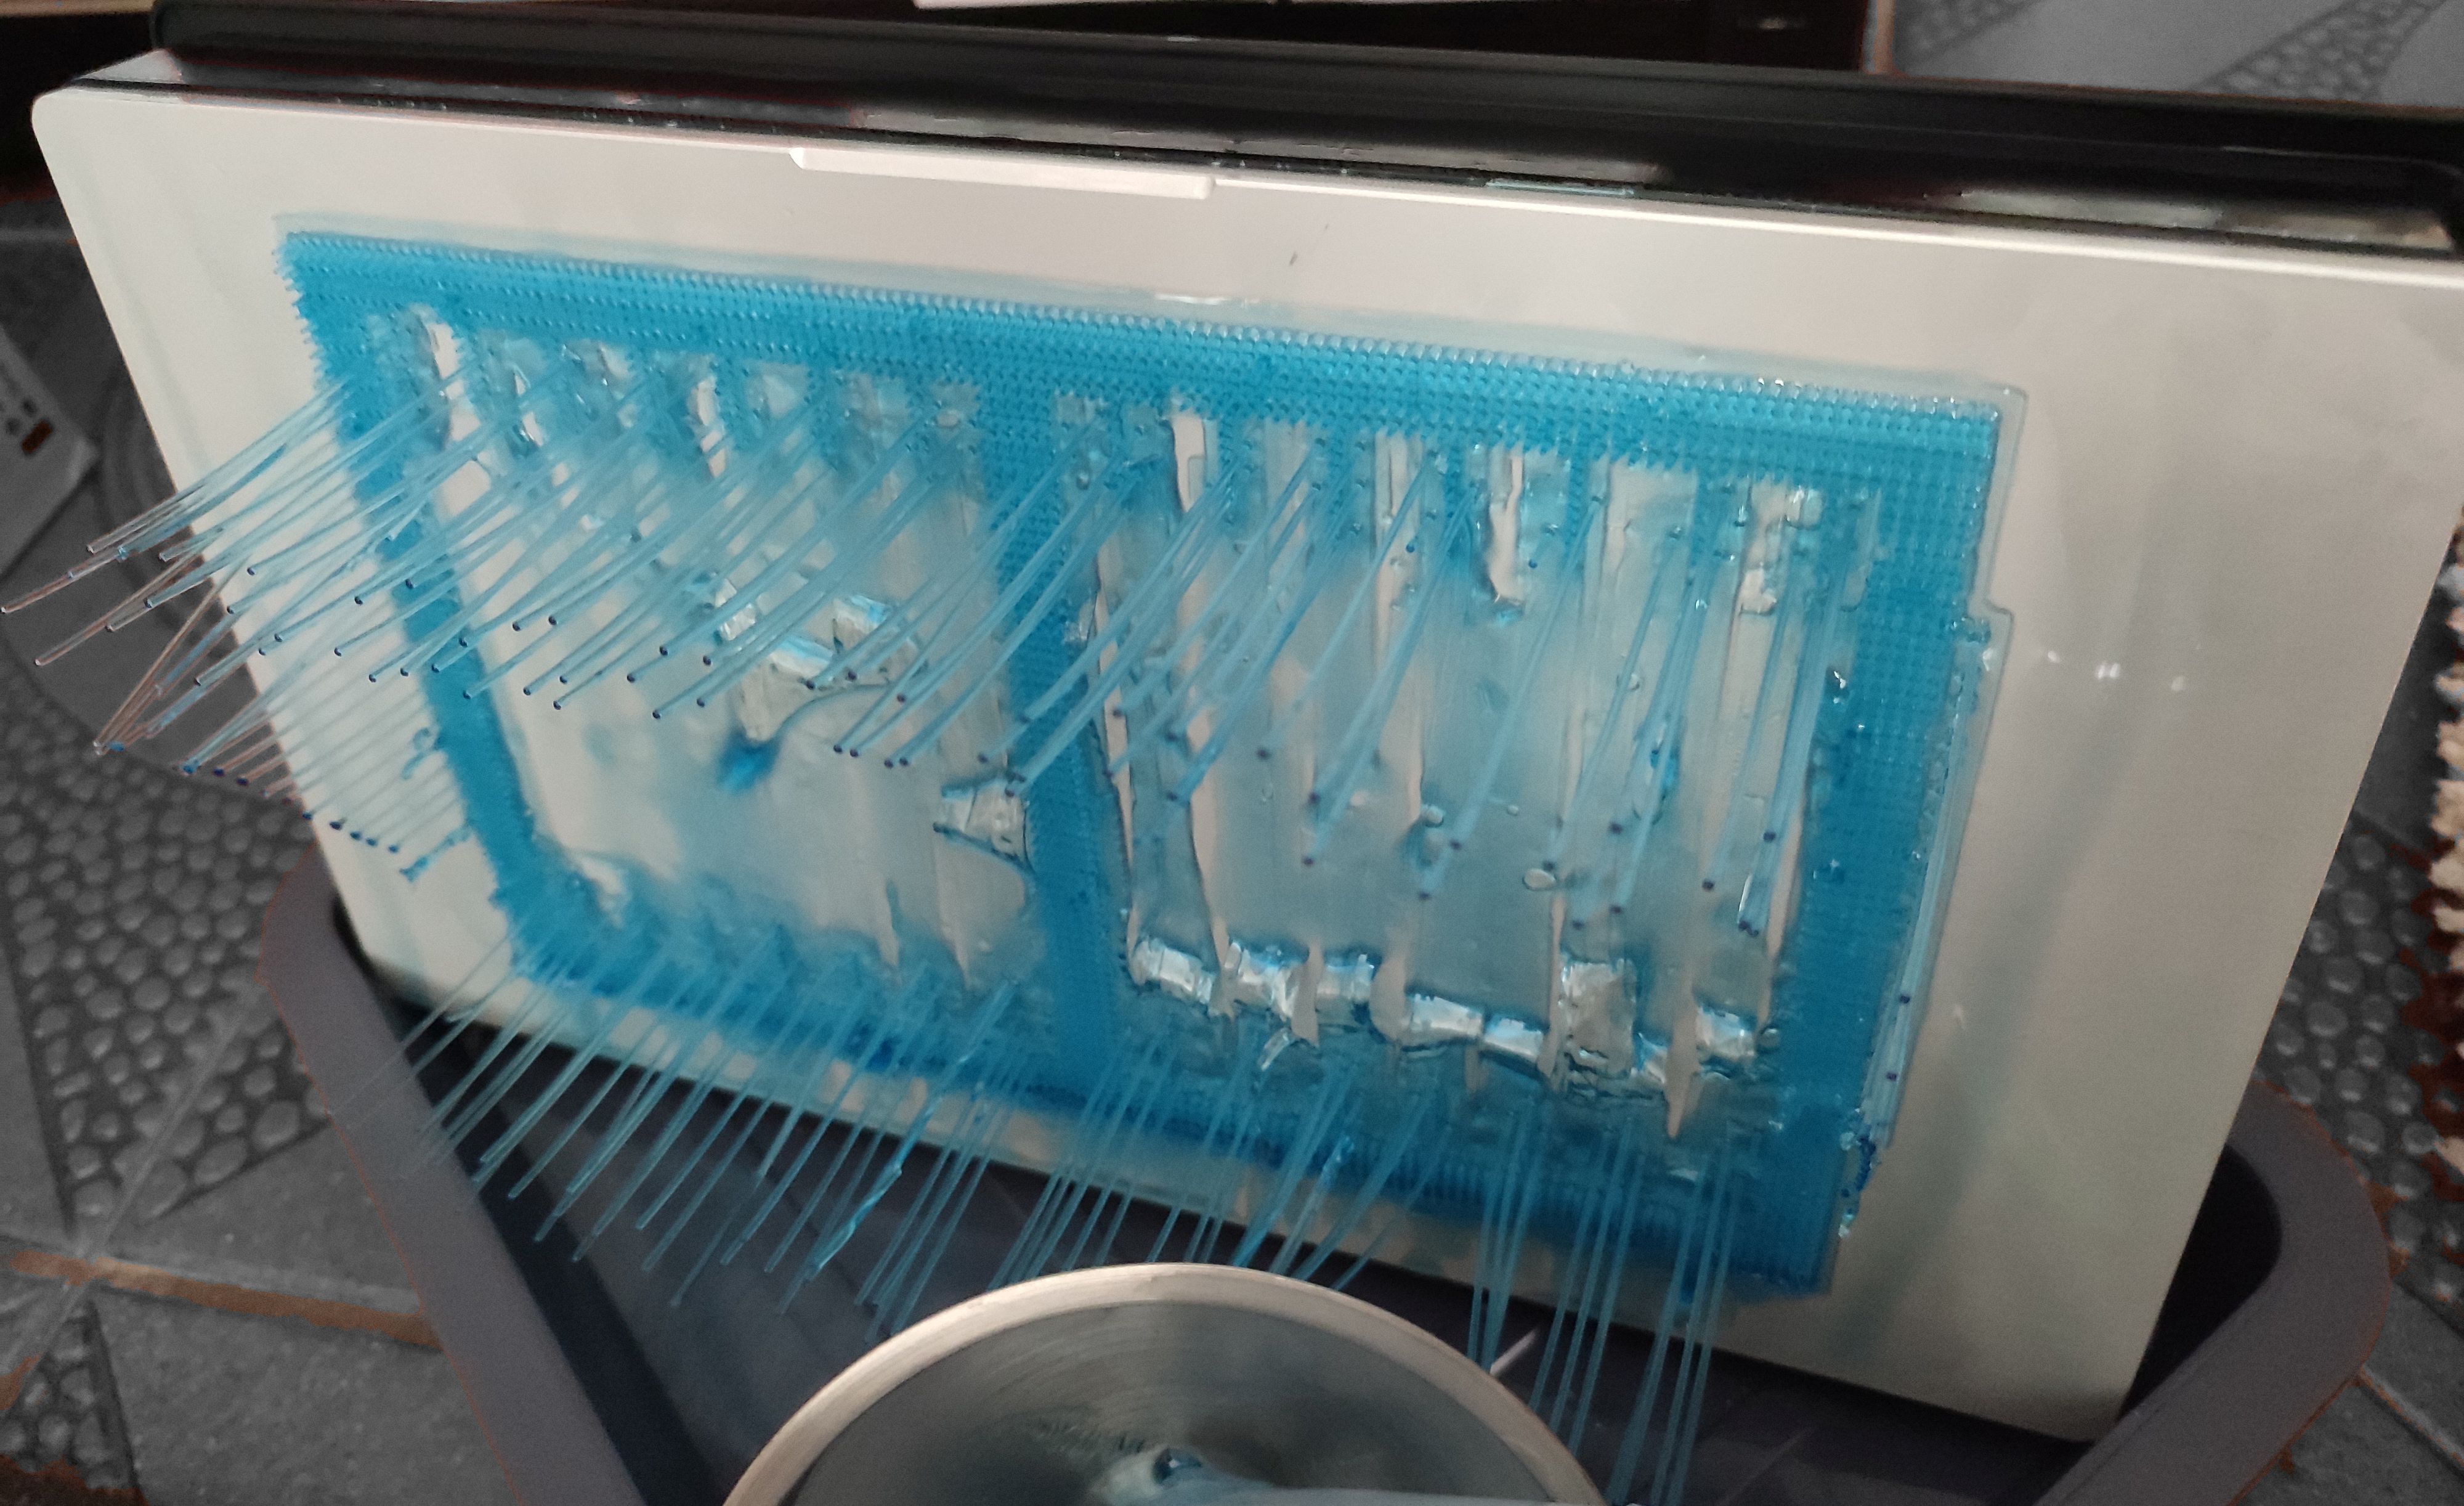
A little while later I had the good news in the sense that the supports were printing beautifully, but also bad news in that the actual model had been ripped off the supports by the aforementioned peeling forces.
Cue sad trombone SFX.
In hindsight this was obvious: the quite solid surface of the model has significantly more surface area than the area contacted by the supports. At the first attempt to peel the newly cured model layer off the nFEP (PFA) film, the tug of war resulted in the supports winning out and the print being a total failure.
You could call this the ‘FDM spaghetti’ equivalent with resin printing, where the FDM’s extruder is printing in empty air, but unlike with FDM printing the subsequent clean-up is less of a sighing, brushing away bits of thermoplastic and trying again with the glue stick, and more of a chemical hazard situation.
Dealing with an SLA resin printing failure sees you draining and filtering the resin from the vat, carefully removing any solid resin from the vat’s film and curing the failed parts so that they can be safely disposed of. All while suited up with gloves, eye protection, and at least a half-face mask with A1P2 filters that still leave you plenty of opportunity to consider whether SLA resin or IPA smells worse when the copious amounts involved of both try to overwhelm the filters.
Clean-Up Detail
All of this is perfectly fine.
Where the whole kerfuffle got even worse was when the whole auto-feeding of the resin caught up with me. After ripping the bottle out of the machine I had noticed that the GK3 Ultra had for some reason pulled a vacuum inside the bottle, which could explain some of the issues that I had experienced. This did however also mean that its internal volume had decreased due to the bottle’s deformation.
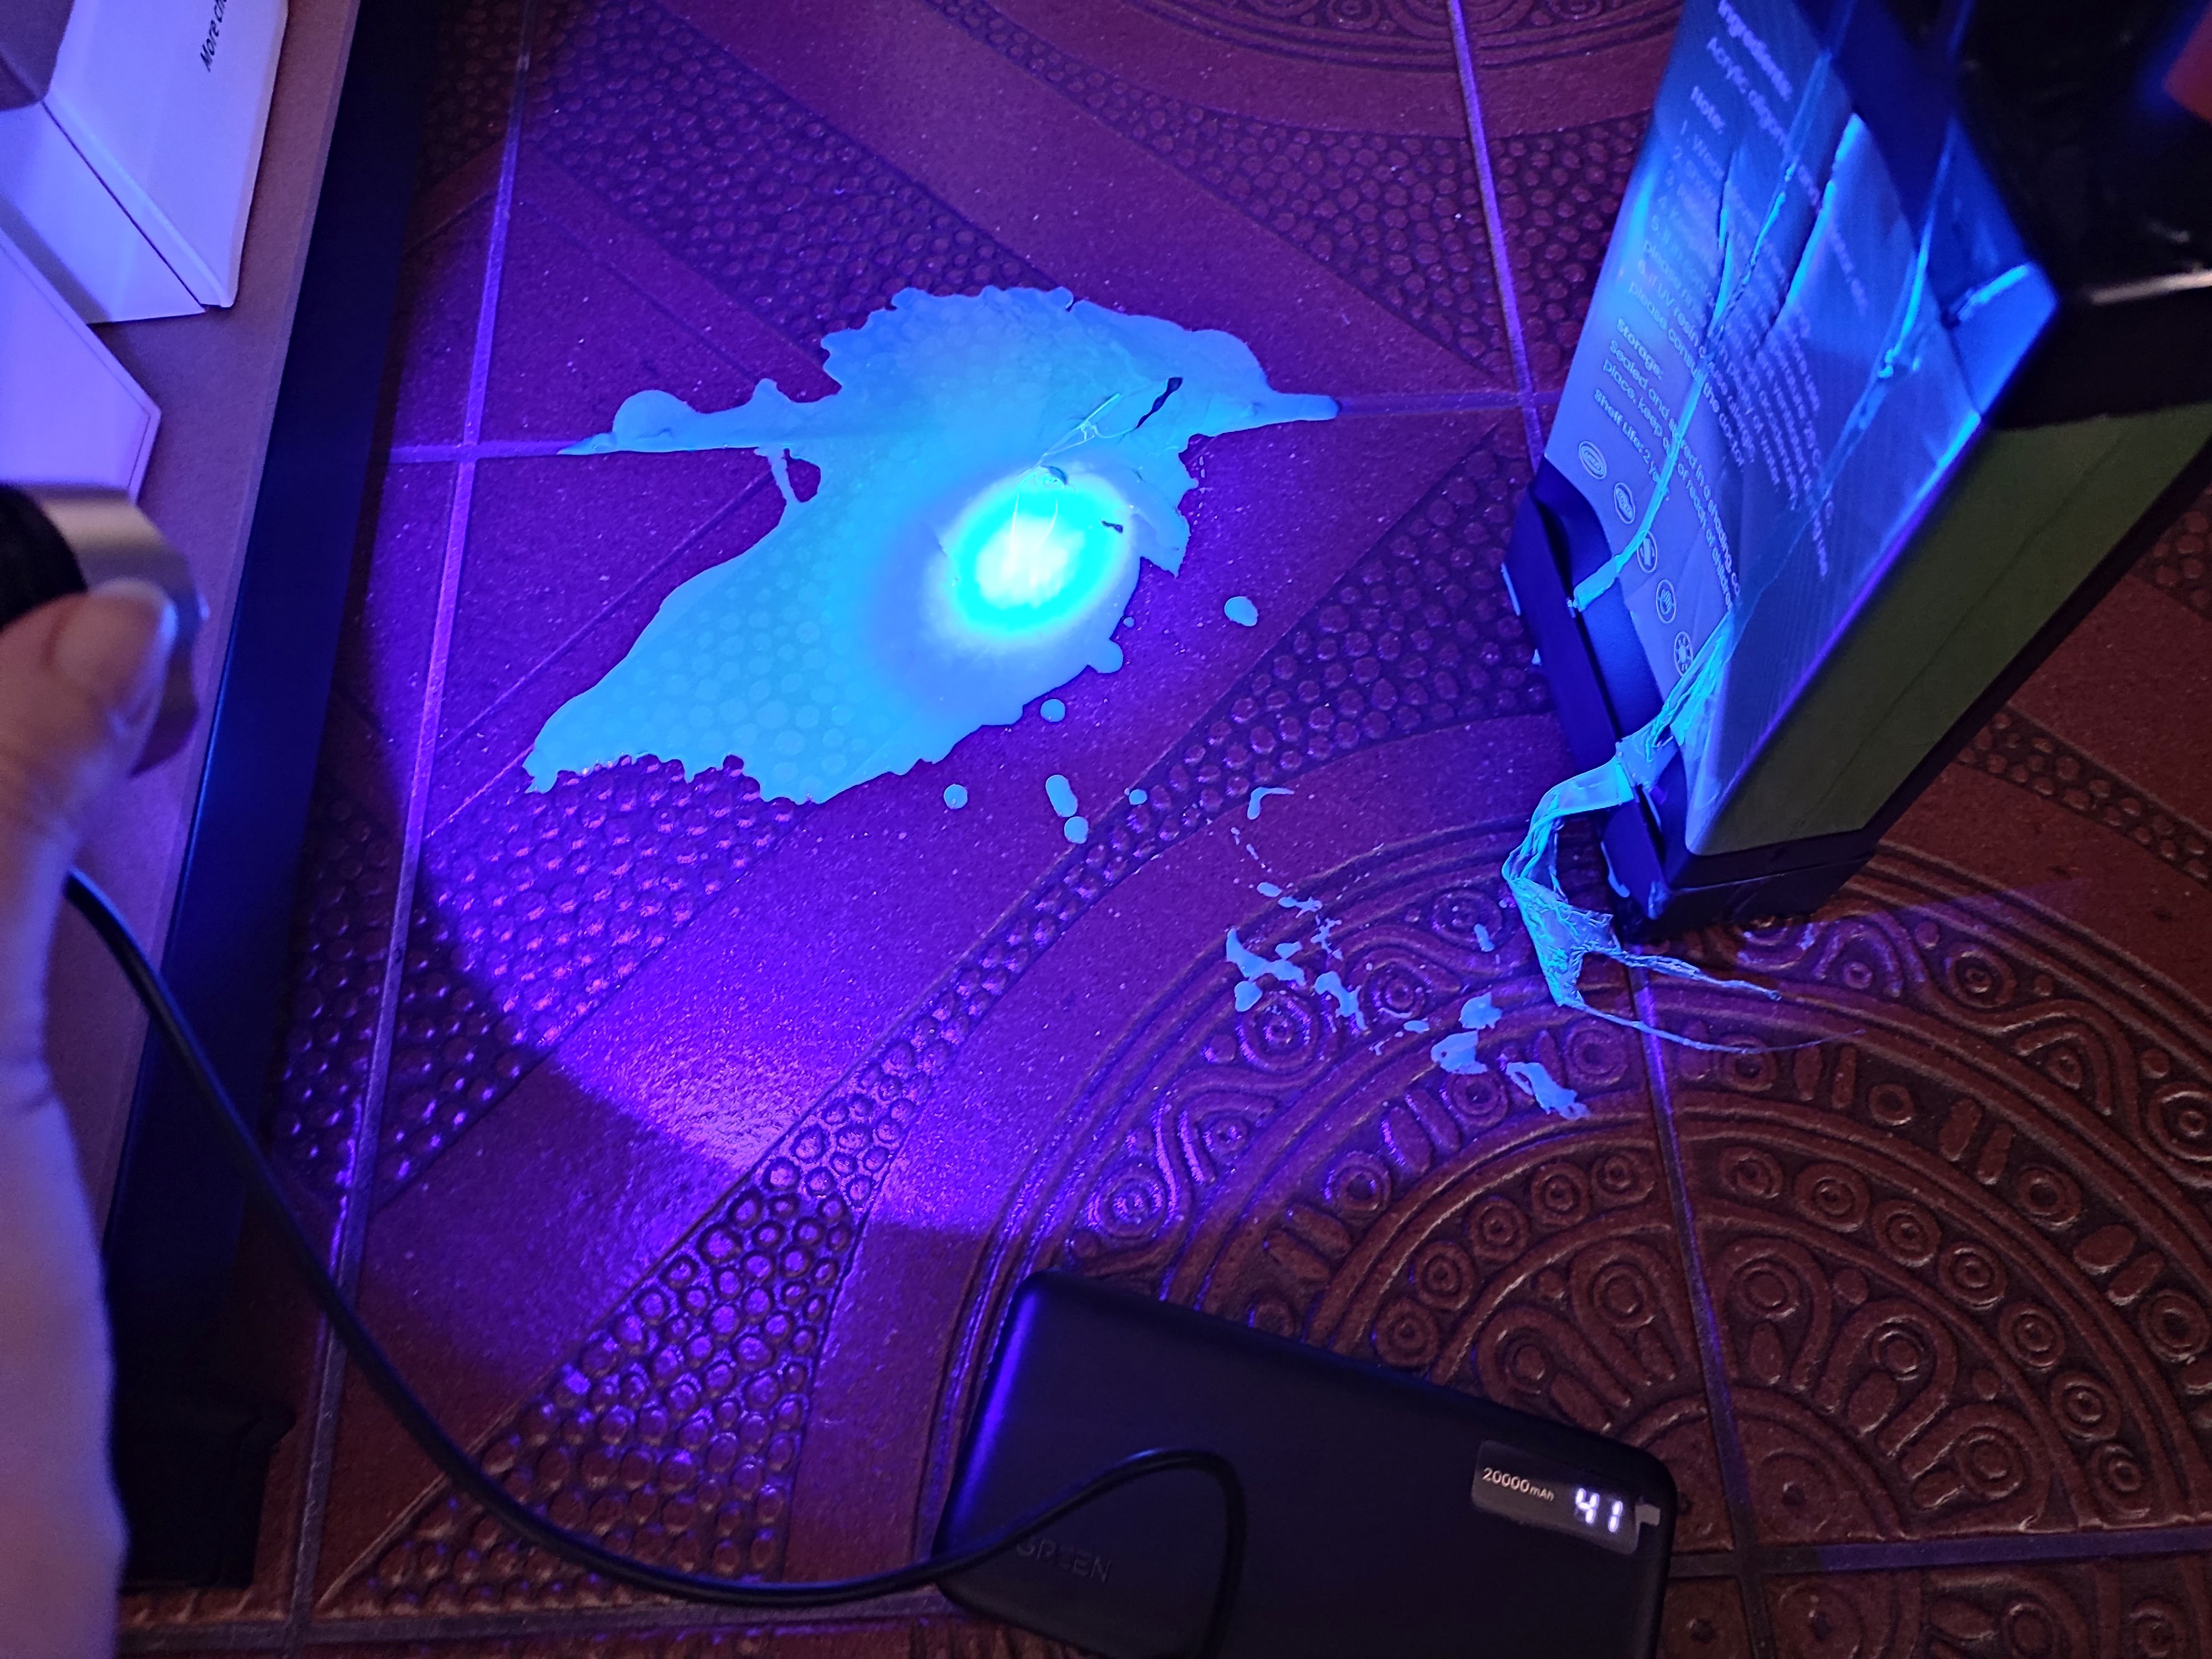
This was a detail that didn’t quite register with me until resin that I was pouring through the filter into the bottle was overflowing onto the floor. Cue copious amounts of colorful cursing and a dash for the paper kitchen towels, followed by a rather illuminating UV exposure session using a handheld UV lamp. Fortunately cured resin doesn’t bond well to tile flooring, so it can be peeled off after curing and tossed into the regular household waste. The pro-tip here is to always use silicone underneath potential resin spills. If only I had done so.
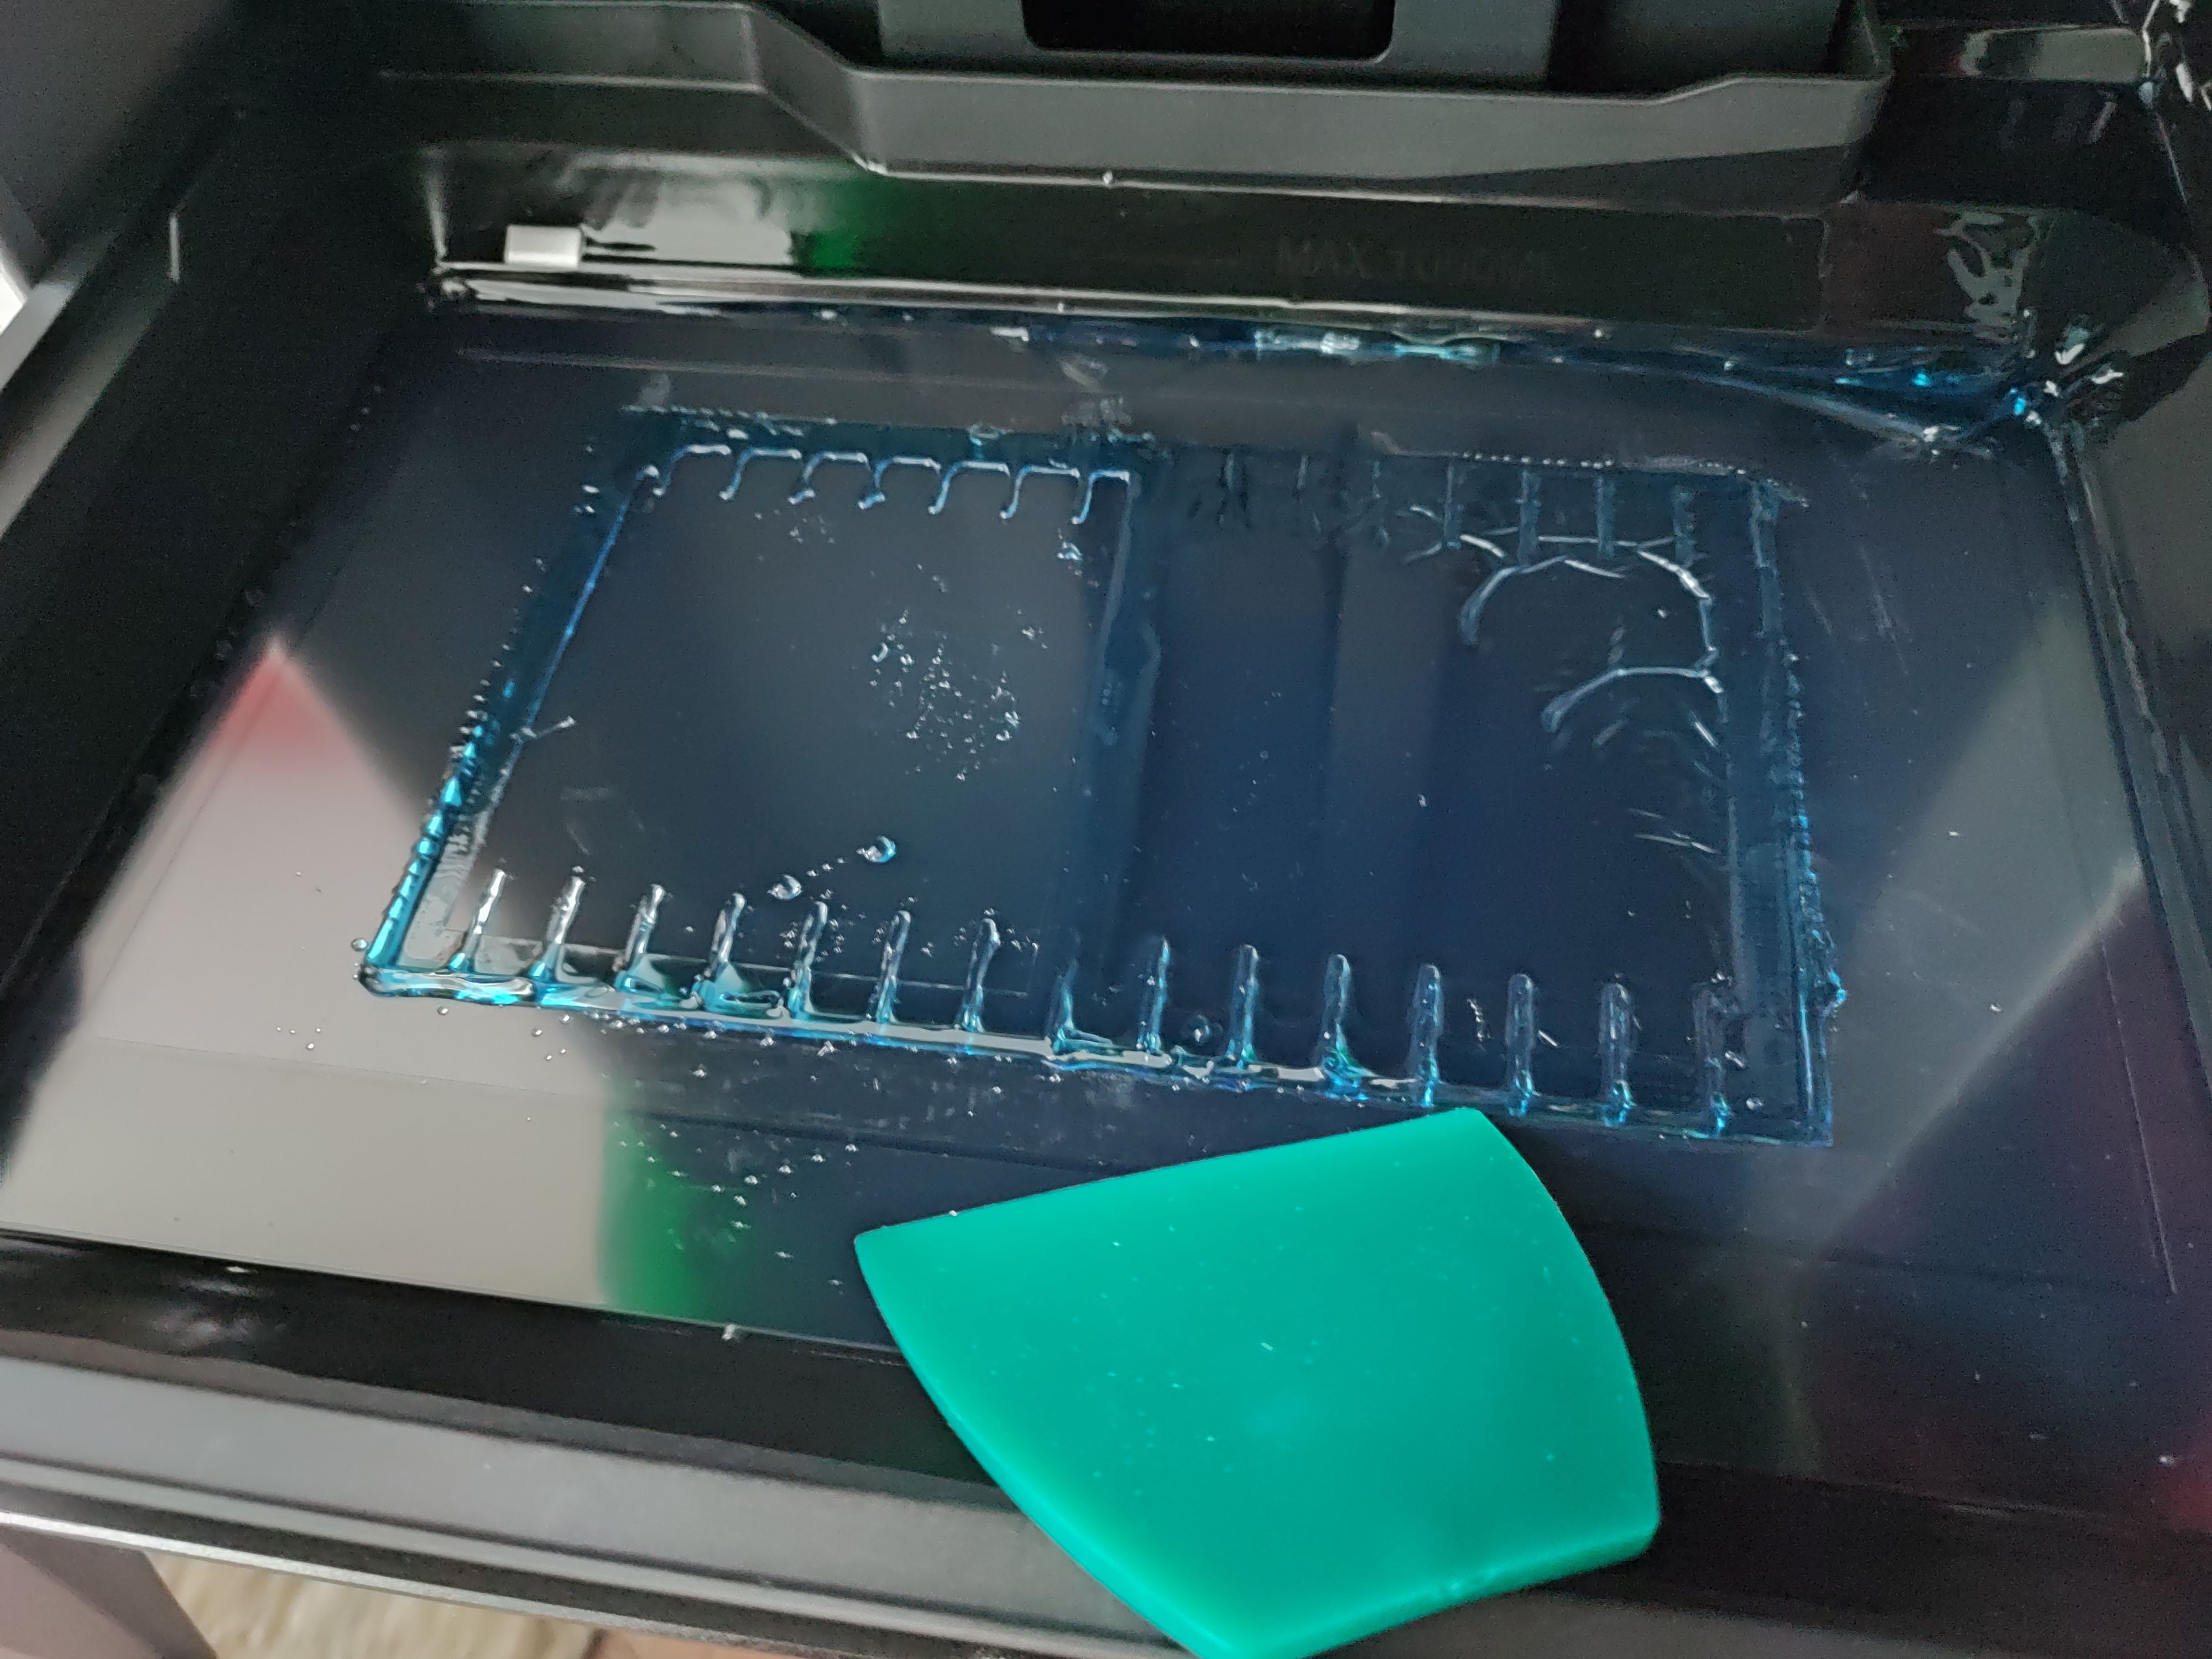
With the floor clean once more, the next challenge was to get the vat cleaned up again. The provided silicone scraper was useful here, but you absolutely need that spray bottle with IPA to soften up the connection between the PFA film and the cured resin.
This calls for IPA and elbow grease.
Using the built-in vat curing feature I could cure most of the remaining resin in the vat, but still had to use the handheld lamp to get to corners where it didn’t reach. This is the part that I’m still working on, making sure everything is clean and the PFA film undamaged before I throw myself again at another printing session.
Lessons Learned
As they say, spilled milk, or resin.
I think the primary lesson that I have learned here is that I still do not comprehend why consumer resin printers insist on having that solid lump of metal that they dare to call a ‘build plate’ — an immovable surface that you have to violently assault with a scraper after printing to make it release printed parts.
After mostly printing with the magnetically attached flex plate on the LD-002R – of course after adjusting its Z-height correspondingly – it still feels like time hasn’t moved at all here.
As a friend of mine remarked when I reported the print failure described in this article, it’s also rather astounding that there’s no simulation of peel forces in slicers to get some idea of whether your supports game is overkill or weak sauce. There are some resin printers that even try to reduce the peel forces by tilting the vat – such as the Prusa SL1S and Form 3 – and there are various ‘tricks’ to reduce the peeling forces, such as lubricating with silicone and PTFE oil, many of which I too have tried with the LD-002R with unclear results, but ultimately you just want to ‘science’ it, as the kids say.
Overall, a resin printing failure isn’t the end of the world, as long as you are mindful of a potential mismatch between the air volume in the target bottle and the resin volume in the vat you’re pouring from. Resin is only nasty until you blast it with UV, when it turns into relatively harmless plastic.
All of that said, I’m still torn on that CD rack model. Theoretically the GK3 Ultra has the build volume for it, surpassing the Neptune 4 in two directions, but it’s not easy to prepare a plate in such a way that the model isn’t ripped off its supports, is not disgraced by a massive elephant’s foot, or worst case the build plate wins and the FEP/PFA film loses the tug of war and rips.
Did I mention rips in the vat’s film? That’s another thing I experienced with the LD-002R back in the day. I was lucky that the resin spill was fairly contained, but I was puzzled for a while why the prints kept failing until I actually drained the vat.
Anyway, after all this learning, it’s time to reorganize and see what I can improve when I next hurl myself at this whole SLA resin printing topic.
When it comes to 3D printing in the FDM world, you can go a long way just relying on standard settings that ship with your 3D printer and/or slicer. If you want to push the limits, though, it pays to better understand the hardware and materials you’re working with to know what you can get away with. To that end, [Robert Samples] put together the MeltCalc database to help.
The purpose of MeltCalc is simple—it collates data on hot ends and materials regarding factors like maximum flow rate, print speeds, and heater requirements. If you’re wondering whether a given hot end can flow a given filament at a given rate, for example, this tool is a great place to start. It features 64 different hot ends and 36 polymers typically used in the 3D printing world, and can spit out maximum flow rates and print speed estimations even accounting for fancy tech like Core Heating Technology (CHT) nozzles. It’s all based on thermodynamic modelling which [Robert] put together based on his experience as a chemist who works with polymers. His aim was to provide a tool with realistic flow rates for hot ends, so that end users don’t have to just rely on often-optimistic marketing numbers.
For those eager to dive deeper into the code and modelling, the project source is available on Github. We’ve featured all kinds of other useful hacks in this space lately, too, like our recent look at how to achieve wave overhangs. If you’ve got your own nifty 3D printing tools in the works, don’t hesitate to notify the tipsline.

 Login
Login