
Normal view

There are new articles available, click to refresh the page.
Yesterday — 12 September 2026Main stream

Big Infinity Mirror Clock Invites You To Gaze Deeply

12 September 2026 at 16:00

[Andy Huot] has a fantastic-looking infinity mirror digital clock that really raises the bar. It uses high quality components, smart use of RGB LED animations, and a clever “stacked diffuser” vertical design to the 7-segment display elements that really enhances the infinity mirror effect. It needs to be seen in action, so check it out.

The end result is expressly portal-like, with the smooth animations of the LEDs really playing into the effect. The size helps, too. It’s 24 inches in diameter, giving it considerable presence.
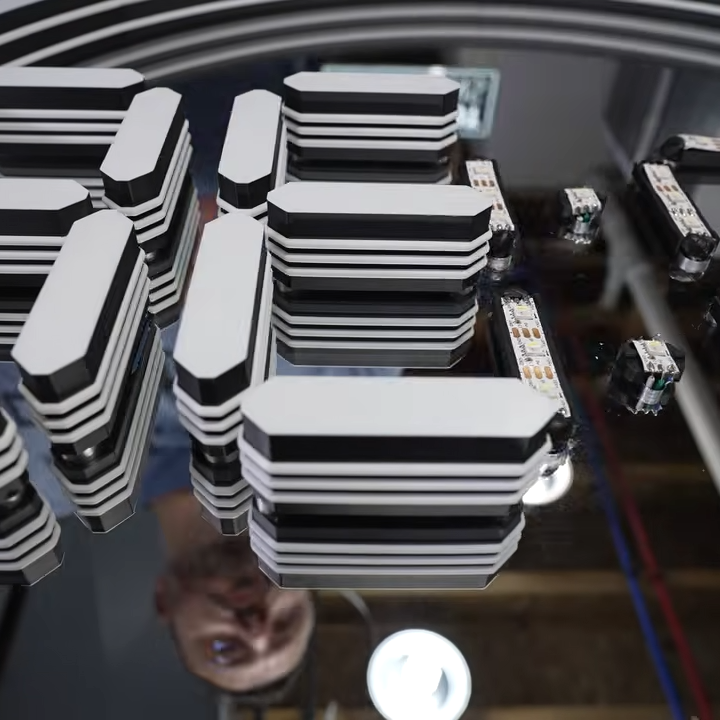
The stacked diffuser design for each display element really enhances the effect.

A basic infinity mirror design consists of lit elements sandwiched between a reflective back surface and a partially-reflective, partially-transmissive top cover. That same basic principle is used here, but with great care given to ensure nothing so much as a fingerprint spoils the illusion. For example, the top cover is a disk of acrylic with a 90% reflective film affixed to the inside surface. That’s easy enough to DIY with some car tint, but [Andy] found that for the very best results it was worth having high-quality film professionally applied.

We like the use of 3D-printed custom jigs for soldering the segments of RGB LED strips, and holding the pre-measured wires in place with some putty is a great way to keep them in place while working. In case you’re wondering, the mirrored acrylic making up the back wall has holes in it for mounting each segment’s LED strip in a holder, and running the wires to the rear.

The video (embedded below) documents every step of the assembly, and it’s a serious build. While the design files for the 3D-printed parts are not free, there’s certainly enough detail for an enterprising hacker to replicate the design in their own way.
Before yesterdayMain stream

Voicebox FX is a Blueprint for CircuitPython I2S Audio

5 September 2026 at 13:00

[Adafruit]’s Voicebox FX gadget is a fun, well-documented project that serves another useful purpose: being a fantastic reference design for audio on CircuitPython, with I2S audio components. Be sure to check it out if you have a project that involves any of that and could use a few pointers, or if you just want to jog a few ideas loose.

I2S (Inter-IC Sound) is a protocol aimed squarely at moving audio data between components as digital signals. Our own [Jenny List] can tell you everything you need to know about I2S. It’s a relatively simple interface that is not at all fussy about actually being used for audio, and that has led to it being put to some unusual uses.

The Voicebox FX uses an I2S microphone, an I2S amplifier, and an RP2350 microcontroller to record and play sound as well as offer a variety of effects controlled by physical inputs. It’s all wrapped up in a slick 3D printed case, and while it’s a fantastic reference design, it looks like a fun toy in its own right.

Parchment Paper Paired With 3D-Printed Grid Gives a Nice Glow

4 September 2026 at 22:00

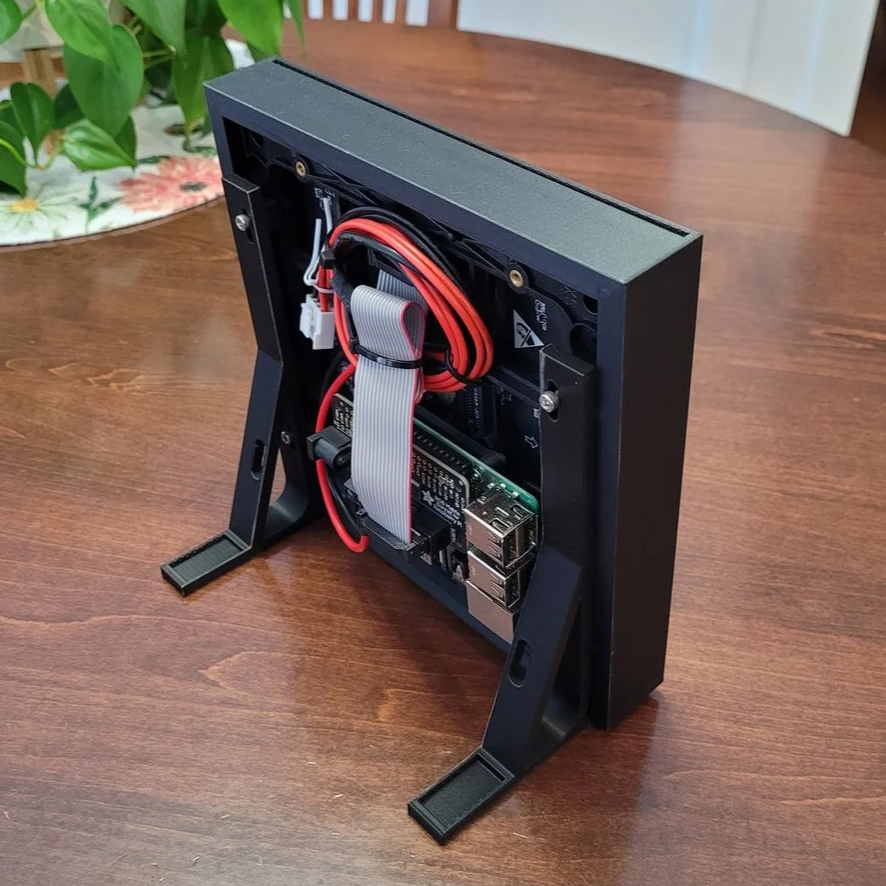
This custom enclosure for a 64×64 RGB LED matrix by [Davisan1001] not only provides a mount point for a Raspberry Pi, but presents a clean and smooth face with square pixels thanks to a 3D-printed grid, some parchment paper, and a sheet of clear plastic.

The first clever thing in this design is the way [Davisan1001] created the grid that acts as a light blocker for each LED in the matrix, preventing light from “spilling” over into its neighbors. Instead of designing the grid from scratch, the solution was just to leverage slicer settings. By printing a flat square with a grid pattern infill and zero solid top and bottom layers, the slicer creates the grid all by itself. A little trial and error was required to get the spacing just right, but it seems to have worked out fine. We’re not sure it’s better than designing a grid in CAD, but it was certainly a clever way to avoid having to do so.

[Davisan1001] also struggled to find an effective and economical solution for a diffuser. Certainly, high-quality diffuser films are available for sale, as are specialty acrylic sheets, but surely there was some household DIY option to do the trick. A sheet of plain white paper blocks too much light. Wax paper handles poorly, and off-angle viewing is poor. The sweet spot was parchment paper.

Parchment paper is commonly used in baking and is thin, easy to handle, flat and even in color, and just opaque enough to act as an effective diffuser while still transmitting enough light to not impede clarity. Cover the LED matrix with the 3D-printed grid, lay parchment paper over that, cover with a sheet of clear plastic, and the job is done.

Light diffusion can be tricky to get just right in a DIY project, and what works for one application won’t necessarily work for another. Our community had loads of suggestions on different solutions, so consider this one more idea to try the next time you have a project that calls for it.

A Split Keyboard Designed for Human Hands

3 September 2026 at 16:00

A surprising number of things we use in everyday life retain most of their design cues from their 19th century ancestors. The bicycle retains the same basic design as it had in 1890, as does the sewing machine, the toilet, the car, and of course, the keyboard and the QWERTY layout from old typewriters. But we aren’t doomed to have our technology perpetually living in the past. [Paul] wanted a keyboard designed around human hands, rather than being designed around a machine, so he built this unique split keyboard.

The design of this specific keyboard went through around 50 iterations before he was comfortable with it. Other design goals here were for it to be portable, and the split nature of this certainly makes it more compact as does the use of low-profile switches. Each finger’s column is angled and spaced based on the needs of that finger, with the ring finger keys sitting higher and the index finger columns angled inward. Each thumb has access to three keys, one of which is the spacebar and the other two layer keys, which is what enables this design to get down to only 36 total keys.

When thinking about it for any length of time, the modern keyboard’s design holdovers from the 1800s are fairly wasteful compared to this split, ergonomic version. Especially when looking at the spacebar, which ties up both thumbs and only performs a single task, there’s a lot of opportunity for modern designs to be more efficient, more portable, and easier on one’s body. Feel free to take this to the extreme and use all three dimensions, as long as you aren’t particularly concerned with portability.

Reject Fluid Simulations, Return To Rheoscopic Fluid

25 August 2026 at 19:00

Fluid simulations are one of the “killer apps” of high-performance computing, but if you can’t afford the performance, they can take a depressingly long time to run. Depending on your use case, as long as you keep the Reynold’s number in mind– or are just looking for a qualitative look at pretty flows–you might be able to get away with purely-practical simulations using rheoscopic fluid, as [Visual Thinker] demonstrates in a recent video.

The fluid, as you can guess from the name, lets you scope out rheos— that’s flow, for those of you didn’t take Greek. Making it is as simple as you could ask for: get some mica flakes, which are readily available to add ‘sparkle’ to cosmetics, and mix with water and a drop of soap. The soap isn’t always necessary, but depending on your mica it helps keep it in suspension and avoid clumping– [Visual Thinker] found it helped him a good deal. Being flat plates of reflective material, the mica flakes catch the light and sparkle beautifully– and since they align with the fluid shear, they show you exactly what’s going on in your ‘simulation’.

[Visual Thinker] isn’t starting with serious simulations; the first thing he tries is essentially a toy that lets him see fluid flow around a Benchy by sticking magnets in it and using it to move a cross-section of its hull though a thin layer of fluid sandwitched betwixt pieces of laser-cut acrylic. We don’t call it a toy to disparage it, though– we totally want one. [Visual] mentions the idea of a coffee table combining the concept with the kind of underslung mechanism we see in sand drawing tables, which sounds dangerously hypnotic. If any of you build one, please try and tear your eyes away long enough to let us know.

He has another beautiful piece that make the video worth watching: a wind-tunnel, again made of laser-cut acrylic and printed parts. With careful consideration of the scale and flow speeds, that one might actually prove useful– and even if it doesn’t, it’s pretty enough that it doesn’t really matter. Beauty has its own utility sometimes.

Most wind tunnels we see around here use actual wind, but rheoscopic fluid was invented for this sort of thing, even if it does make for pretty baubles.

❌
❌