Once upon a time, you had to carefully budget your microcontroller’s resources if you wanted to do something as simple as flash a bunch of LEDs. These days, they’re powerful enough to humiliate the game consoles of yesteryear. [alexkid77] demonstrates this well, having the ESP32-P4 run Tomb Raider.
Now, [alexkid77] hasn’t gone so far as to create a PlayStation emulator on the ESP32 or anything quite like that. Instead, this is a port—and not of the original Tomb Raider release, either. [alexkid77] started with OpenLara—the classic game running in an open-source engine. With the ESP32-P4 having two cores running at 400 MHz each, there was plenty of processing power on tap to run the engine with a software renderer at 320×240, which is hardware scaled up to 1024×600 via the Pixel Processing Accelerator (PPA) built into the chip. There’s also stereo audio with an ES8311 codec hooked up, while input is via a USB HID keyboard.
It’s funny to think that it could actually be cheaper and quicker to get Tomb Raider running on an ESP32 and a cheap LCD display versus actually going out to buy a PlayStation and an original game disc. But that’s the way the cookie crumbles in 2026. At least you don’t have to play it on an S3 Verge.
[Adafruit]’s Voicebox FX gadget is a fun, well-documented project that serves another useful purpose: being a fantastic reference design for audio on CircuitPython, with I2S audio components. Be sure to check it out if you have a project that involves any of that and could use a few pointers, or if you just want to jog a few ideas loose.
I2S (Inter-IC Sound) is a protocol aimed squarely at moving audio data between components as digital signals. Our own [Jenny List] can tell you everything you need to know about I2S. It’s a relatively simple interface that is not at all fussy about actually being used for audio, and that has led to it being put to some unusual uses.
The Voicebox FX uses an I2S microphone, an I2S amplifier, and an RP2350 microcontroller to record and play sound as well as offer a variety of effects controlled by physical inputs. It’s all wrapped up in a slick 3D printed case, and while it’s a fantastic reference design, it looks like a fun toy in its own right.
Oftentimes, when we’re using a microcontroller, we’re whipping up some very specific code focused on executing a particular task. The device is set up to execute code that does exactly what we want with minimal overhead. However, sometimes, there are scenarios where it pays to go with a somewhat heavier setup, wherein the microcontroller runs an operating system for the benefits that offers.
Federico Terraneo came to Hackaday Europe to discuss this very topic. He talks about kernel architecture, real-time operating systems, and how to best use C++ in the world of microcontrollers.
Microcontrolling
The talk begins in a helpful place. Federico starts by explaining what an operating system actually is. Basically, it’s the software that exists between the hardware and the applications that run upon it. Breaking it down into parts, an operating system typically consists of a main kernel, atop which sits things like the basic system services, libraries, and device drivers, along with utility programs necessary to maintain and work with the system. The user interface sits on top of all that, which allows the user to select and run applications and generally use the operating system to get things done.
Federico talks about the Miosix RTOS as a practical implementation of the fluid kernel architecture.
Of course, different operating systems differ in the specifics of their architectures. Monolithic kernels, such as Linux relies on, keep a split between kernelspace and userspace. This is where where the kernel has full hardware access running on the CPU in system mode, while the applications run in user mode without such direct access. Monolithic kernels typically only run on architectures with memory management units (MMU)—think full-scale computers with proper CPUs, like your laptop or desktop. Unikernel operating systems, like FreeRTOS, are a little different, where applications and the operating system are collapsed down into a single executable binary that runs with raw hardware access. There is no abstraction, no memory protection, or anything like that, which makes the architecture easier to run on typical microcontrollers. There are also microkernels, which aim to minimize the amount of code that runs in system mode, pushing things like drivers and filesystem access into userspace. This architecture still needs an MMU, and is mostly only seen in niche uses where high security and/or attention to safety is critical.
A thermal camera running on a fluid kernel system serves as a great demo application for the platform, showcasing several important features like multithreading and DMA.
When it comes to microcontrollers, unikernels are the most relevant architecture to think about. However, they have limitations–in stability, in security, in the fact that there is no run-time code loading or any way to easily partially upgrade the system. The fluid kernel, which Federico came to explain, aims to solve some of these issues. It hopes to offer a scalable operating system solution that works across the world of embedded computing, where sometimes microcontroller resources are limited and where memory management units seldom exist. It’s also intended to be compatible with standard APIs—think POSIX, C++ standard libraries, and all that. Federico calls it the “UNIX on a chip” concept.
The fluid kernel aims to exist at the intersection of the monolithic kernel and the unikernel. It allows hosting applications in kernelspace or in userspace as needed. A fluid kernel is also built to be POSIX compliant twice—with the same API whether you’re operating in kernelspace or userspace. The fluid kernel concept is designed around achieving process abstraction via the hardware Memory Protection Unit (MPU) common in modern 32-bit microcontrollers. It’s not quite an MMU, and can’t do all the same fancy virtual memory tricks, but it’s enough to provide a basic level of memory protection on a microcontroller platform. The fluid kernel can also become a unikernel if so desired as a compile-time option, which takes away process support while reducing code size significantly. It allows for unikernel devleopment that can be upgraded into a fluid kernel later by flipping the compile-time option the other way.
Federico does a great job of explaining the pros and cons of the fluid kernel architecture, and explores the security implications inherent in going this route. The Miosix RTOS is discussed as the practical implementation of this philosophy, and there’s even a helpful diversion into the efficient use of C++ on microcontrollers. If you’re getting serious about embedded development, or you just want to learn about a new architecture you might find useful one day, it’s a great talk to dive into on your next lunch break.
The Cheap Yellow Display (CYD) is a board carrying a slightly older ESP32 variant, a display with a resistive touchscreen, an SD card, and not much else. It’s often used for straightforward microcontroller applications that need a user interface, but that’s not the limit of its possibilities. [Alun Morris] has a CYD on which you can brows an entire offline Wikipedia.
The trick is to take the offline Wikipedia builds from the Kiwix project, and process them further into a custom format suited for a browser firmware on the ESP32. A modern SD card can hold so much data that a full Wikipedia is well within its abilities even with images included.
We like this idea, because it takes the knowledge away from the center of the network to its edge. We expect to see it gaining a following among enthusiasts for offline living, because all that knowledge without a network can only be useful. If you recognize [Alun]’s work, it might be because of his ESP32 web browser.
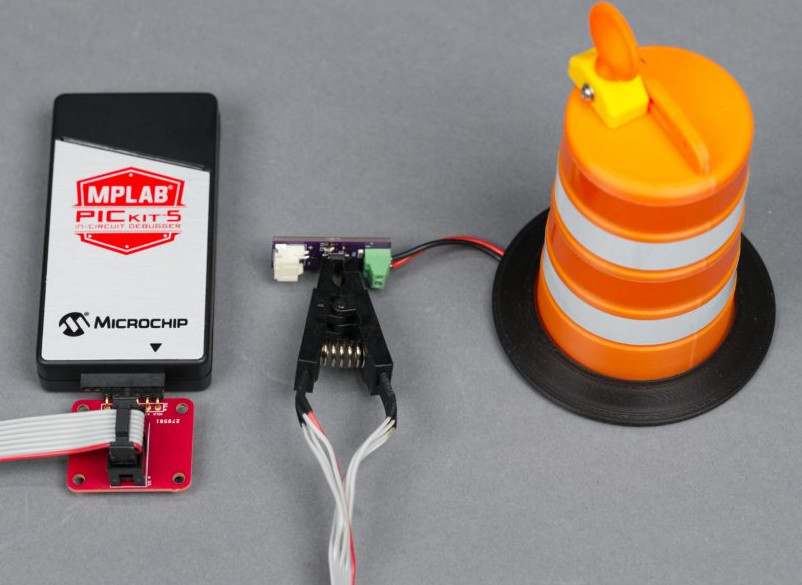
Your desk or bench is a work area, so why not make it look the part? That’s the idea behind the miniature blinking traffic barrels that [Glen Akins] recently put together. Of course, just a single blinking light doesn’t really sell the idea of a busy construction zone, so he spent a somewhat surprising amount of time and effort optimizing the design for small-scale production.
The end result is a fascinating write-up that dives into the design decisions [Glen] made. Every aspect of this project, from the overhang of the “handle” on the 3D printed barrel to the number of passive components on the PCB was carefully considered. Critics may say [Glen] put too much thought into something that didn’t need to be so complex, but projects like these are an excellent way to keep your skills sharp — there’s no such thing as practicing too much.
Starting with the design of the barrel itself, we appreciate that [Glen] kept the capabilities of his desktop 3D printer in mind. By breaking the design up into multiple pieces and avoiding overly steep angles, he produced a design that prints cleanly without the need for support material. His step-by-step documentation and screenshots also serve as a great introduction to designing parts in Fusion if that’s something you’re interested in.
From there, things switch over to the electronics. Some in the audience will bemoan that he’s using a PIC12F1612 microcontroller to blink a single LED instead of a 555, but [Glen] brought the receipts on this one. Not only does the PIC offer more flexibility in terms of getting the blinking to look the way he wants, but it requires fewer passive components on the board and is considerably more energy efficient than the iconic timer IC. Even if you ignore all the other advantages, he calculates that going with a 555 would have cut the battery life of the finished product by approximately 15%.
This is one of those projects that’s difficult to summarize in such a terse format, as every time you think the write-up must be about over it takes a new turn on you. We were mildly bemused when the second iteration of the PCB popped up, but by the time he introduced the custom programming adapter board, we knew [Glen] wasn’t messing around.
In part one of what is intended to be a series on developing an STM32-based oscilloscope, [BTTLab] demonstrates a how to use the built-in ADC of an STM32F207 MCU to develop a straightforward single-channel oscilloscope. This can be followed along both via the YouTube video and the GitHub repository for this single-channel version.
Oscilloscope front-end protections. You want this.
Of course, an MCU’s ADC generally won’t hold a candle to a dedicated ADC for oscilloscope purposes – along with the typical beefy FPGA-based processing – with even a basic Rigol DS1054Z hitting a cool 1 GSPS, but the 2 MSPS at 12-bit resolution achieved by an STM32F207 isn’t shabby either. For more basic, low-frequency circuit and protocol debugging it would already be enough.
One thing briefly touched upon in the video is the front-end. The ADC’s inputs are rated for a specific voltage range, typically 0 to 3.3 V when running the MCU off 3.3 V, so you do not want to put higher or negative voltages into said ADC input. This is where measuring something like AC becomes rather tricky and you can get some exciting releases of magic smoke.
The demonstrated single-channel oscilloscope firmware uses the ST HAL, so it might be somewhat easy to target other STM32 MCUs as well, though naturally ADC performance will differ per MCU family and sometimes sub-family, so make sure to read the datasheet and programming manual before you dive in too deep.
Although we personally have yet to see anyone brandishing an old digital point-and-shoot camera, we hear they’re back in vogue. Why, though? People are nostalgic for that image quality. While he certainly could have simply picked up a vintage model somewhere for a likely inflated price, [Arnov Sharma] decided to build his own version and call it the PolyShot.
The core of this project is the Unihiker K10 dev board, which uses an ESP32-S3, a whopping 2 megapixel camera, and a micro SD card to capture photos and display them back on the screen. The tricky part, if you can call it that, is the custom PCB. It’s a simple board with just three buttons: shutter, gallery, and next image. We do like that the position of the battery compartment creates a nice grip.
The biggest difference here is that there is a few-second delay between pressing the shutter button and actually capturing the image, which you can see in the short videos below. So if you’re trying to get a shot of a skink or something equally speedy, we wish you good luck.
In a future iteration, [Arnov] wants to address the issue of image quality, because this project ended up evolving into a more traditional digital camera. He would also improve the battery life, for which the current expectancy is around three hours on a charge. Ultimately, [Arnov] wants to ditch the Unihiker and design everything from the ground up, using an ESP32-S3 module.

 Login
Login