
 Login
Login
APT group HoneyMyte upgrades CoolClient: the backdoor gets a kernel-level Windows rootkit

Introduction
CoolClient is a backdoor family attributed to the HoneyMyte APT group (also known as Mustang Panda) that has been used in their cyber-espionage campaigns targeting organizations across Asia and Russia. It supports such capabilities as keylogging, clipboard theft, credential harvesting, file management, system reconnaissance, and plugin-based extensions.
Since its first public disclosure by Sophos in 2022 and subsequent analysis by Trend Micro in 2023, CoolClient has continued to evolve. In 2025, we analyzed a newer variant that introduced clipboard theft and HTTP traffic interception for credential harvesting.
In late 2025 and 2026, our latest investigation reveal another major evolution. The newest CoolClient variant can deploy a signed kernel-mode driver as a Windows service and communicate with it through IOCTL requests. The driver enhances the malware’s stealth by hiding the CoolClient process, protecting related files and registry entries, and preventing them from being inspected or modified. The overall design is comparable to the kernel-mode enhancements previously observed in ToneShell, but the CoolClient driver exposes dedicated IOCTL handlers that allow the user-mode backdoor to communicate directly with the driver.
We have observed this updated CoolClient variant and its accompanying driver in intrusions across multiple countries in Asia, including Pakistan, Mongolia, and Myanmar.
Technical analysis
In the observed campaign targeting Myanmar, HoneyMyte used PlugX as the initial post-compromise implant to deploy the CoolClient components. Before deploying the malware, the actor added both a folder exclusion and a file exclusion to Microsoft Defender for the fake Windows Defender installation directory and the renamed sideloader executable (defender.exe).
wmic /Node:localhost /Namespace:\\Root\Microsoft\Windows\Defender Path MSFT_MpPreference call Add ExclusionPath="$programfiles\Microsoft\Windows Defender"
wmic /Node:localhost /Namespace:\\Root\Microsoft\Windows\Defender Path MSFT_MpPreference call Add ExclusionPath="$programfiles\Microsoft\Windows Defender\defender.exe"
The actor then created a fake Windows Defender installation directory, copied the CoolClient components into it, and renamed a legitimate Sangfor executable, usually named Sang.exe, to defender.exe to serve as the DLL sideloader.
xcopy "$programfiles\Windows Defender\*" "$programfiles\Microsoft\Windows Defender" /a /s /v /e /f
Persistence was established through a scheduled task that launched defender.exe with SYSTEM privileges during system startup.
schtasks /create /sc onstart /tn "\Microsoft\Windows\Windows Defender Advanced Threat Protection Service" /tr "\"$programfiles\Microsoft\Windows Defender\defender.exe\"" /ru "system" /F
When executed, defender.exe sideloads the malicious libngs.dll, initiating the CoolClient execution chain described in the following sections.
CoolClient components
Similar to previous variants, the latest CoolClient user-mode component follows a multi-stage execution chain, with each component performing a distinct role during execution.
| Component | Description |
| defender.exe / Sang.exe | Legitimate Sangfor application abused for DLL sideloading |
| libsrapc.dll | Benign dependency required for the Sangfor application to execute normally |
| libngs.dll | First-stage loader that decrypts and loads the next stage into memory (First stage) |
| loadcert.ini | Encrypted DLL implementing the core CoolClient functionality, including command handling, process injection, driver deployment, and persistence (Second stage) |
| cert.ini | Final-stage implant responsible for C2 communication and backdoor functionality (Final stage) |
| time.ini | CoolCleint configuration file |
Our previous CoolClient analysis focused primarily on the final-stage implant (main.dat), including its backdoor commands and plugin framework, while the first-stage loader (libngs.dll) and second-stage component (loader.dat) received only a brief overview. In the latest variant CoolClient, loader.dat and main.dat have been renamed to loadcert.ini and cert.ini, respectively. This article revisits those earlier stages, focusing on the second-stage component and the newly introduced kernel-mode driver that extends CoolClient with rootkit capabilities.
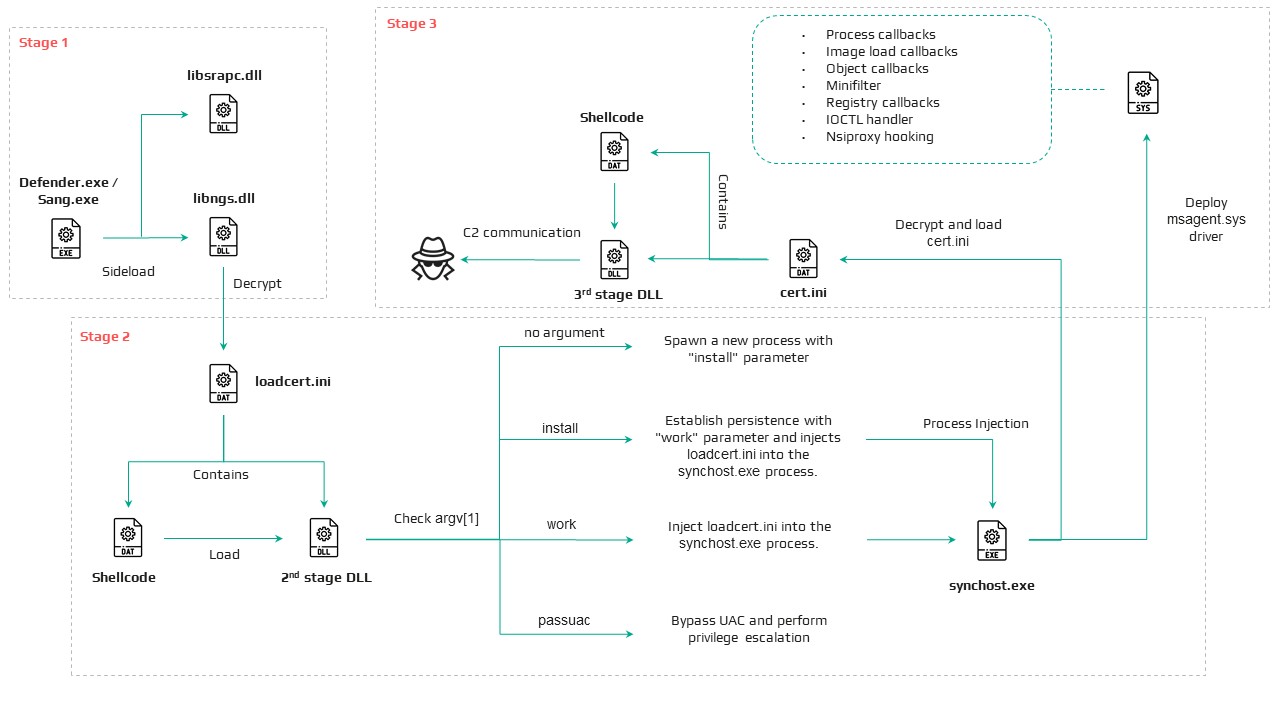
Overview of the new variant of CoolClient
First stage: libngs.dll
Execution begins when the legitimate Sangfor application (defender.exe or Sang.exe) loads the malicious libngs.dll through DLL sideloading. As in previous CoolClient variants, the malware continues to abuse the same Sangfor application to execute its first-stage loader.
To make the DLL appear legitimate, libngs.dll exports numerous dummy functions. Each export simply calls OutputDebugStringA with its corresponding function name before immediately invoking ExitProcess, serving no functional purpose other than mimicking the expected export table of the legitimate DLL.
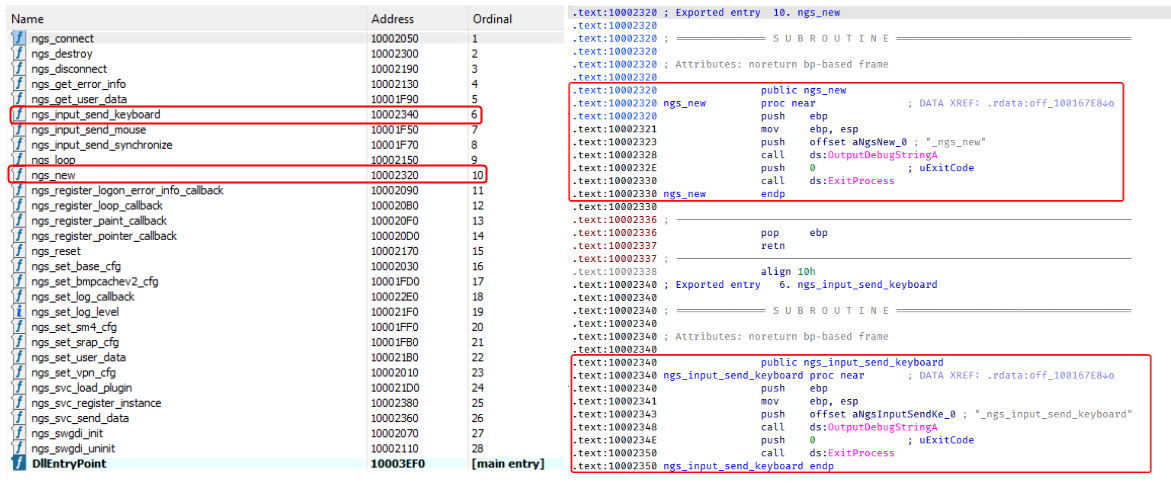
Dummy export functions in libngs.dll invoking OutputDebugStringA and ExitProcess
The actual malicious logic is executed from DllMain (DllEntryPoint). Although heavily obfuscated through control flow flattening and numerous unconditional jumps, the routine ultimately performs a straightforward task: loading, decrypting, and executing the encrypted second-stage DLL, loadcert.ini.
The loader resolves the required Windows APIs, reads loadcert.ini into memory, and decrypts it using a 0x32-byte repeating XOR keystream derived from a transformed seed value of 0xA4. After decryption, the DLL is loaded directly into memory, and execution is transferred to loadcert.ini.
Second stage: loadcert.ini (before synchost.exe injection)
The second-stage DLL, loadcert.ini, is responsible for preparing the execution environment before the malware transitions into its injected process. It first determines its execution context by checking whether the current module is synchost.exe.
If the DLL is running under the original sideloaded process (for example, Sang.exe), it performs the initial setup, including persistence, UAC bypass, registry modifications, and process injection.
If the DLL is already executing inside synchost.exe, it follows a different execution path that decrypts time.ini, deploys the kernel-mode driver, and loads the final-stage implant (cert.ini).
Command handler
The command handler remains largely unchanged from previous CoolClient variants, with one notable difference: the malware now injects into synchost.exe instead of write.exe.
Execution is controlled through three command-line parameters:
| Parameter | Purpose |
| install | Performs the initial setup, including persistence, privilege checks, and preparation for the injected execution path. |
| work | Executes the primary second-stage functionality from the injected synchost.exe process, including driver deployment and third-stage loading. |
| passuac | Continues execution after privilege elevation. |
If no parameter is supplied, the malware creates a new Sang.exe process with the install parameter using CreateProcessW.
Establishing AutoRun persistence
When executed with the install parameter, CoolClient creates an AutoRun entry under:
HKCU\Software\Microsoft\Windows\CurrentVersion\Run
The registry value, named goopdate, launches Sang.exe (or defender.exe, depending on the deployment) with the work parameter whenever the user logs on.
Process injection into synchost.exe
Upon establishing the AutoRun registry entry, CoolClient decrypts loadcert.ini using a 0x32-byte repeating XOR keystream derived from the hardcoded base key 0x4D.
The decrypted DLL is then injected into a newly created suspended instance of synchost.exe. The malware allocates memory in the target process, writes the decrypted payload, redirects the thread context to the injected code, resumes execution, and finally terminates the original process with ExitProcess.
From this point onward, execution continues entirely within synchost.exe, where the malware proceeds with kernel-mode driver deployment before loading the final-stage implant (cert.ini).
Service installation
When executed with the install parameter, CoolClient establishes an additional persistence mechanism by installing itself as a Windows service. Before doing so, it verifies that it has sufficient access to the Service Control Manager and that no 360 Total Security software processes (360sd.exe, zhudongfangyu.exe, or 360desktopservice64.exe) are running.
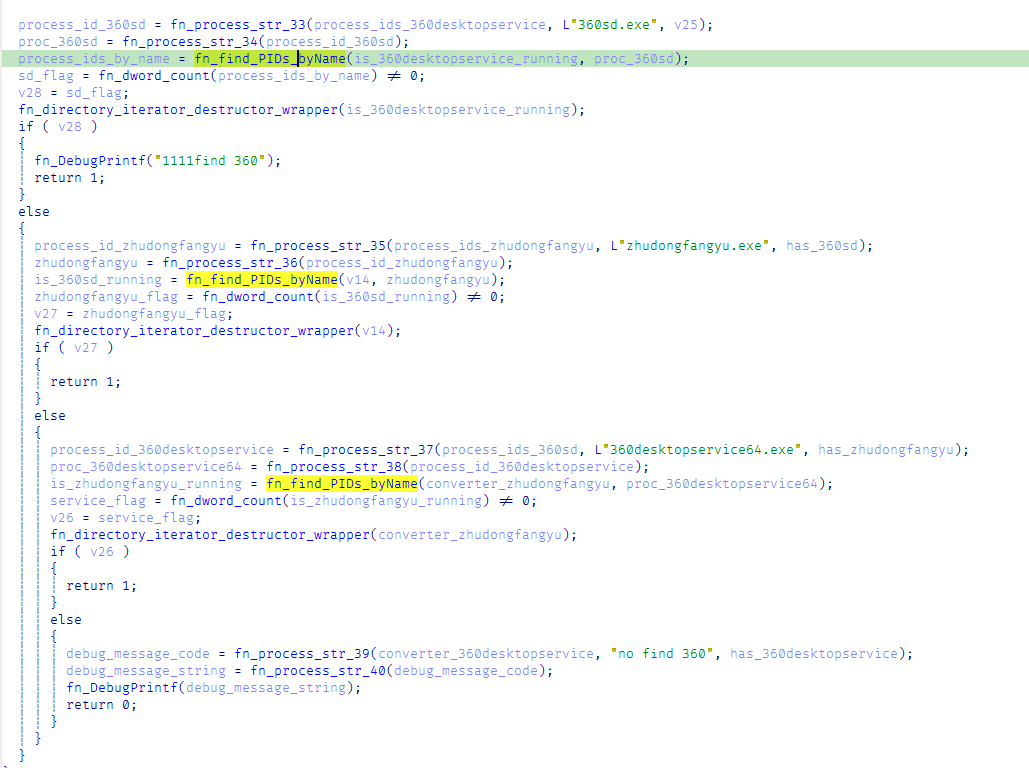
Function to check for running 360 Total Security software processes
If both checks succeed, the malware decrypts time.ini to retrieve the service configuration, including the service name and description. It then checks whether the service media_updaten already exists. If found, the existing service is stopped and deleted before a new one is created.
The new service is configured to execute Sang.exe<.code> with the work parameter using CreateServiceA. The malware then starts the service by executing "sc start media_updaten" via WinExec.
Administrator privilege check
If the service installation path is not taken, CoolClient checks whether the current process is running with administrator privileges by verifying membership in the local Administrators group.
When administrative privileges are available, the malware relaunches itself with the passuac parameter before continuing with the remaining execution flow.
Elevated relaunch and UAC bypass
To continue execution with elevated privileges while concealing its true parent process, CoolClient implements an RPC-based process creation technique similar to the method described by Google Project Zero. The technique combines RPC process creation with parent process ID (PPID) spoofing to launch a new elevated instance of itself.
The malware first checks for the presence of escanmon.exe. If the process is running, it constructs the path to C:\Windows\System32\winver.exe and establishes a connection to the local ncalrpc endpoint (201ef99a-7fa0-444c-9399-19ba84f12a1a). It then invokes NdrAsyncClientCall to launch winver.exe through the RPC interface.
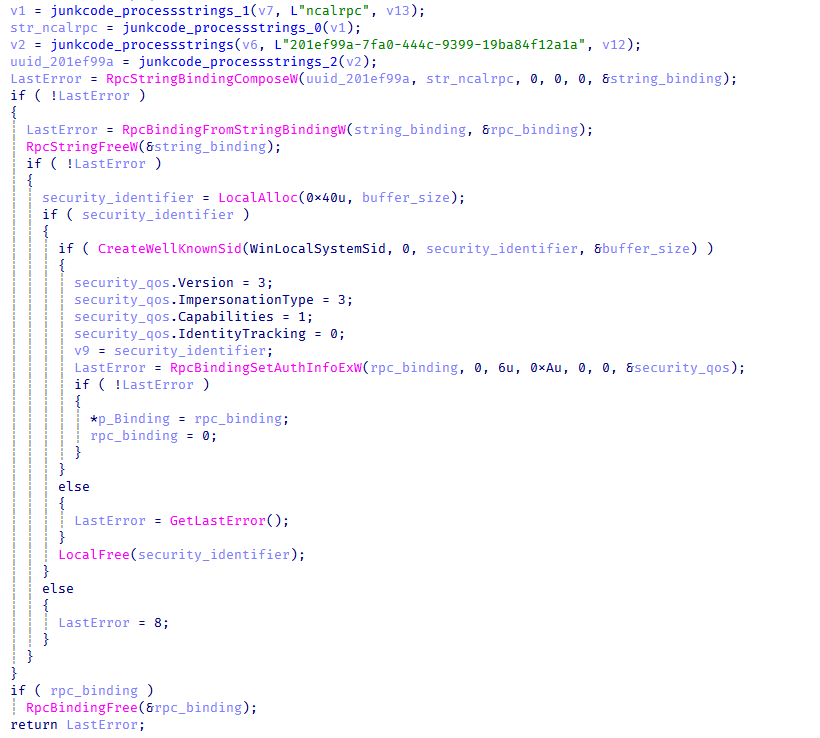
Authenticated RPC binding used during the RPC-based UAC bypass
After winver.exe is created, CoolClient retrieves its debug object using NtQueryInformationProcess, detaches the debugger through NtRemoveProcessDebug, and terminates the process. The obtained debug object is later reused during the remainder of the UAC bypass routine.
Next, the malware repeats the same RPC-based process creation technique to launch computerdefaults.exe. It associates the previously obtained debug object with the current thread using DbgUiSetThreadDebugObject, waits for the resulting process creation event through WaitForDebugEvent, and duplicates the process handle using NtDuplicateObject, obtaining a handle with full access rights.
Finally, CoolClient relaunches itself as Sang.exe passuac using CreateProcessW with an extended startup attribute list. By configuring PROC_THREAD_ATTRIBUTE_PARENT_PROCESS through UpdateProcThreadAttribute, the duplicated process handle is assigned as the parent of the new process. As a result, the new Sang.exe passuac instance executes with an elevated context while appearing to have been spawned by the trusted Windows process instead of the original CoolClient process.
Second stage: loadcert.ini (Injected Execution)
After being injected into synchost.exe, loadcert.ini follows its injected execution path, where it deploys the kernel-mode driver and launches the final-stage implant (cert.ini). If administrative privileges are unavailable, the malware skips driver deployment and proceeds directly to the third-stage injection.
Kernel-Mode driver deployment
The deployment routine begins by decrypting time.ini. CoolClient then verifies that it has sufficient privileges to install a kernel-mode driver by checking for full access to the Service Control Manager (SCM) and the presence of SeTcbPrivilege.
If both conditions are met, CoolClient extracts an embedded LZMA-compressed driver from loadcert.ini, decompresses it, and writes it to disk as msagent.sys in the same directory as cert.ini, for example:
C:\Program Files\Microsoft\Windows Defender\msagent.sys
Next, the malware checks whether a service named msagent already exists. If present, the existing service is stopped and deleted before a new driver service is created and started, loading the kernel-mode component into the operating system.
Driver initialization
After the driver is loaded, CoolClient establishes communication with it by opening the device \\.\msagent using CreateFileW. The user-mode component then initializes the driver by issuing three DeviceIoControl requests.
| IOCTL | Purpose |
| 0x222120 | Registers the current CoolClient process with the driver. |
| 0x2221E0 | Sends the configured C2 IPv4 address to the driver. |
| 0x2220F0 | Registers filesystem and registry paths that should be protected or hidden. |
The first request (0x222120) registers the current CoolClient process as a trusted process within the driver. The request includes the process ID, an operation code, and a flag that marks the process as trusted, allowing it to interact with protected files, registry keys, and processes.
The second request (0x2221E0) passes the configured C2 IPv4 address extracted from time.ini.
Finally, 0x2220F0 registers the CoolClient installation directory (for example, C:\Program Files\Microsoft\Windows Defender\) together with the service registry path (\Registry\Machine\SYSTEM\CurrentControlSet\Services\media_updaten). These entries allow the driver to protect the malware’s files and registry objects from inspection, modification, and deletion.
As part of the initialization, CoolClient updates the HKLM\SYSTEM\RNG\Wid_H1deF5Dirs registry value by appending its installation directory if it is not already present. This registry value is later used by the driver when applying its hiding and protection mechanisms.
The implementation of these IOCTL handlers and the corresponding driver functionality are discussed in the msagent.sys section.
Cert.ini process injection
Once the driver has been initialized, CoolClient proceeds to launch the final-stage implant (cert.ini). Before creating the target process, the malware enumerates active WinStation sessions to identify a suitable interactive user session.
After selecting a session, CoolClient duplicates its access token, updates the session identifier, and creates a new synchost.exe process using CreateProcessAsUserA. The decrypted cert.ini DLL is then injected into the suspended process using the same memory allocation, thread context modification, and ResumeThread technique described earlier.
This marks the final transition in the execution chain, where the third-stage implant takes over C2 communication and the remaining backdoor functionality.
Msagent.sys driver
Analysis of the deployed kernel-mode driver reveals an embedded PDB path:
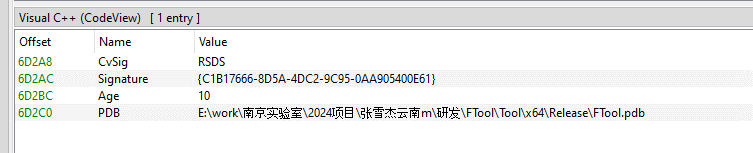
PDB Path
E:\work\南京实验室\2024项目\张雪杰云南m\研发\FTool\Tool\x64\Release\FTool.pdb
The path contains several notable strings, including “Nanjing Laboratory” (
南京实验室) and “Zhang Xuejie Yunnan m” (张雪杰云南m), which likely refer to the driver’s development environment. However, our OSINT analysis did not identify any information linking these strings to a known organization, developer, or threat actor.
The driver is digitally signed with a certificate issued to "Nanjing Ranyi Technology Co., Ltd.", with serial number 3E 62 DC 5D 8D 61 2A 26 33 E7 6B DF D6 07 19 DD. The certificate was valid from August 2013 to September 2014.
We identified several older malicious drivers signed with the same certificate that were compiled around 2013. However, we found no evidence directly linking those samples to the CoolClient activity described in this article.
Driver configuration
During initialization, the driver loads its stealth configuration from the registry key \REGISTRY\MACHINE\SYSTEM\RNG. The configuration defines which system objects should be hidden or protected and controls the driver’s operating mode.
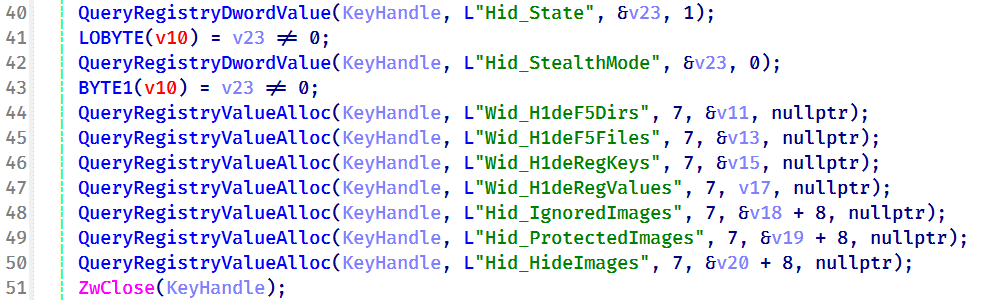
Registry configuration loaded by the driver during initialization
Two REG_DWORD values control the driver’s operating mode:
| Registry Value | Default | Description |
| Hid_State | 1 | Enables the driver’s rootkit functionality. |
| Hid_StealthMode | 0 | Controls additional stealth features used by selected driver routines. |
In addition, the driver loads several REG_MULTI_SZ values that define the objects to be hidden or protected.
| Registry Value | Purpose |
| Wid_H1deF5Dirs | Directories to hide |
| Wid_H1deF5Files | Files to hide |
| Wid_H1deRegKeys | Registry keys to hide |
| Wid_H1deRegValues | Registry values to hide |
| Hid_IgnoredImages | Processes to ignore |
| Hid_ProtectedImages | Processes to protect |
Together, these registry values determine which filesystem paths, registry objects, and processes are managed by the driver’s protection mechanisms.
After loading the configuration, the driver converts the registry entries into internal lookup structures that are shared across its various protection components.
These structures are later referenced by the filesystem minifilter, registry callback, process callback, object callback, image load callback, and IOCTL handlers to determine whether a file, registry object, or process should be hidden, protected, or ignored.
Preparation for process hiding
Next, the driver dynamically locates the ActiveProcessLinks (LIST_ENTRY) field within the EPROCESS structure instead of relying on hardcoded offsets. It first validates several predefined offsets and, if none match, performs a linear scan of the EPROCESS structure to identify the correct location. This approach allows the driver to remain compatible across different Windows versions, where the layout of EPROCESS may differ.
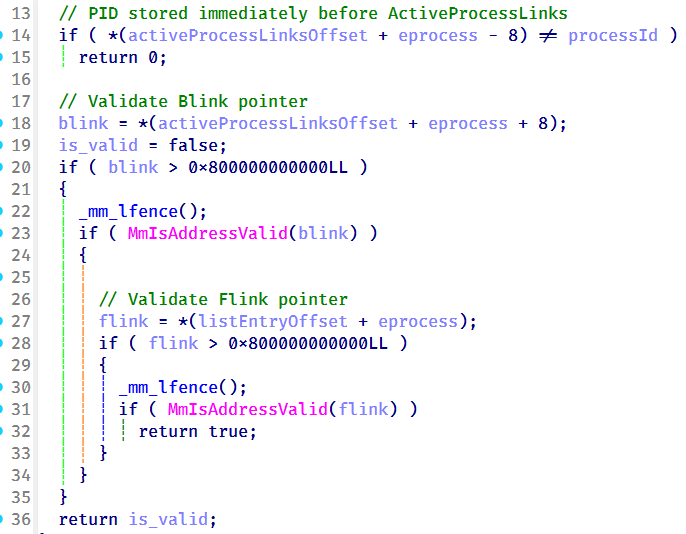
The driver validates candidate ActiveProcessLinks layouts before enabling process hiding
Once the correct offset has been identified, it is stored for later use by the process hiding routines. During process hiding and restoration, the driver uses IOCTLs 0x22219C and 0x2221A0 to unlink and relink entries in the Windows active process list, effectively hiding or restoring processes on demand.
Process, object, and image load callbacks
After preparing its process tracking structures, the driver initializes several AVL trees and populates them with configuration entries loaded from the registry, including Wid_H1deF5Dirs, Wid_H1deF5Files, Wid_H1deRegKeys, Wid_H1deRegValues, Hid_IgnoredImages, Hid_ProtectedImages, and Hid_HideImages.
These AVL trees provide efficient lookups for protected files, registry objects, and tracked processes, and are shared by the callback routines and IOCTL handlers.
The driver then registers three types of kernel callbacks that form the foundation of its protection and monitoring mechanisms:
- Object callbacks using
ObRegisterCallbacks - Process creation and termination callbacks using
PsSetCreateProcessNotifyRoutineEx - Image load callbacks using
PsSetLoadImageNotifyRoutine

Registration of object, process, and image load callbacks during driver initialization
After registration, these callbacks maintain the driver’s internal tracking structures as processes, threads, and images are created or loaded.
Object callbacks
To protect selected processes, the driver registers object callbacks for process (PsProcessType) and thread (PsThreadType) objects using ObRegisterCallbacks with an altitude of 1203. These callbacks intercept requests to open process and thread handles. If the target process is protected, the driver reduces the access rights granted to the requesting process, preventing operations such as process termination, code injection, and other forms of process manipulation. In this sample, the protected process is the injected CoolClient code running inside synchost.exe.
Process and image load callbacks
The driver registers process creation and termination callbacks using PsSetCreateProcessNotifyRoutineEx, together with an image load callback via PsSetLoadImageNotifyRoutine.
When a process is created, its image name is compared against the configuration lists Hid_IgnoredImages, Hid_ProtectedImages, and Hid_HideImages. Matching processes are added to the driver’s internal tracking structures, allowing them to be protected, hidden, or managed through subsequent IOCTL requests. When a tracked process terminates, its entry is removed from the tracking structures.
The image load callback monitors modules loaded into tracked processes and updates the driver’s internal state to support subsequent protection and hiding operations.
To ensure that processes already running before the driver is initialized are also tracked, the driver performs a one-time enumeration of all active processes after registering the callbacks and adds any matching processes to the tracking structures.
MiniFilter registration
To protect files and directories, the driver registers a filesystem minifilter. During initialization, it creates internal path filter lists, loads the configured directory and file entries (Wid_H1deF5Dirs and Wid_H1deF5Files), and creates the required minifilter registry entries under HKLM\SYSTEM\CurrentControlSet\Services\msagent\Instances. To avoid altitude conflicts, the driver dynamically assigns a filter altitude and retries registration until a unique value is obtained.
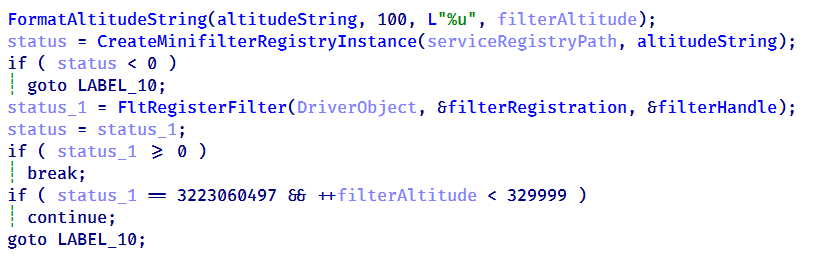
Retrying minifilter registration with incrementing filter altitude values until FltRegisterFilter succeeds
The driver then activates the minifilter using FltRegisterFilter. The filter works together with the IOCTL interface, which dynamically adds, removes, or clears protected path entries (0x2220F0, 0x2220F4, and 0x2220F8). During filesystem operations, the minifilter compares accessed paths against its internal path lists and denies access to matching entries, effectively hiding protected files and directories from users and applications.
Registry callback registration
To protect registry keys and values, the driver registers a registry callback using CmRegisterCallbackEx with an altitude of 320000. During initialization, it creates separate lookup structures for protected registry keys and values, then populates them using the configured entries from Wid_H1deRegKeys and Wid_H1deRegValues.
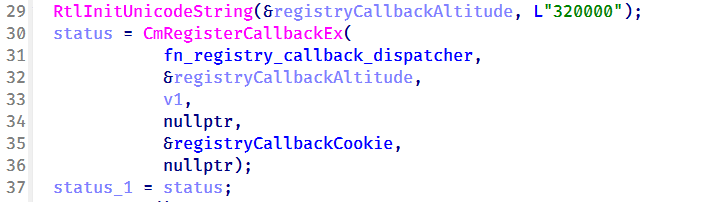
Registration of the registry callback using CmRegisterCallbackEx with an altitude of 320000
Once registered, the callback intercepts registry operations and compares the target key or value against the protected entries. For enumeration requests, matching keys and values are removed from the results before they are returned to user mode, effectively hiding them from registry viewers. For direct access requests, such as opening, modifying, or deleting protected registry objects, the callback returns STATUS_ACCESS_DENIED, preventing the operation.
Before applying these restrictions, the driver verifies whether the requesting process is trusted. Processes registered through IOCTL 0x222120, including the CoolClient user-mode component, bypass the filtering logic and retain unrestricted access, while all other processes remain subject to the driver’s registry protection rules.
IOCTL command dispatcher
To communicate with the user-mode component, the driver creates a device object named \Device\ToolTool together with the symbolic link \DosDevices\ToolTool to allow the user-mode CoolClient component to communicate with the driver through DeviceIoControl requests.
The driver implements 33 IOCTL handlers, although the analyzed CoolClient sample uses only three during normal execution:
0x222120: registers the current CoolClient process with the driver.0x2221E0: passes the configured C2 IPv4 address.0x2220F0: registers filesystem and registry paths for protection.
The remaining IOCTL handlers were not invoked by the analyzed sample.
| IOCTL | Handler | Functionality |
| 0x222000 | 0x140001E04 | Enable or disable the rootkit. |
| 0x222004 | 0x1400020B0 | Query the current rootkit state. |
| 0x2220F0 | 0x140002320 | ● Register protected filesystem or registry paths ● Used by CoolClient to register its installation directory and service registry key. |
| 0x2220F4 | 0x1400034DC | Remove a protected filesystem or registry path. |
| 0x2220F8 | 0x140003464 | Clear all protected filesystem and registry path entries. |
| 0x222118 | 0x1400024B0 | Register process or path protection entries. |
| 0x22211C | 0x140002A20 | Query registered protection entries. |
| 0x222120 | 0x140003794 | Update process protection entries. Used by CoolClient to register itself as a trusted process. |
| 0x222124 | 0x14000362C | Remove a protection entry. |
| 0x222128 | 0x14000349C | Clear all process protection entries. |
| 0x222130 | 0x14000265C | Register a protected process by PID. |
| 0x222134 | 0x140010E88 | Inject shellcode into a target process using NtCreateThreadEx. |
| 0x222138 | 0x14000F498 | Hide a kernel module by unlinking it from PsLoadedModuleList. |
| 0x222144 | 0x14000270C | Delete a file. |
| 0x222148 | 0x14000286C | Decrypt an embedded buffer and write it to disk. |
| 0x22214C | 0x1400027F4 | Read and decrypt an encrypted file. |
| 0x222168 | 0x140002780 | Unmap the image section of a target process. |
| 0x22216C | 0x140013984 | Terminate a process by PID. |
| 0x222194 | 0x140011F50 | Remove Protected Process Light (PPL) protection. |
| 0x222198 | 0x140002940 | Create or modify a registry value. |
| 0x22219C | 0x140010630 | Hide a process by unlinking it from the active process list. |
| 0x2221A0 | 0x140010670 | Restore a previously hidden process. |
| 0x2221A4 | 0x14000F8A0 | Hide a module within a process. |
| 0x2221A8 | 0x14000F954 | Restore a hidden module. |
| 0x2221AC | 0x140016368 | Enumerate and restore kernel notification callbacks. |
| 0x2221B0 | 0x140016458 | Disable or restore kernel notification callbacks. |
| 0x2221B4 | 0x140012408 | Manually load a secondary kernel driver. |
| 0x2221B8 | 0x14001262C | Debug/test handler. |
| 0x2221BC | 0x1400165F6 | Write to an arbitrary kernel address. |
| 0x2221C0 | 0x14000BB00, 0x14000BB78 | Enables deny-rootkit mode by registering image-load monitoring and enabling the patching logic. |
| 0x2221C4 | 0x14000BB6C, 0x14000BB10 | Disables deny-rootkit mode by clearing state and unregistering/removing the monitoring logic. |
| 0x2221E0 | 0x1400126C0 | Register a C2 IPv4 address. |
| 0x2221E4 | 0x140012E50 | Delete a C2 IPv4 address. |
After initializing the IOCTL dispatcher, the driver releases the temporary configuration buffer that was previously loaded from \REGISTRY\MACHINE\SYSTEM\RNG.
Kernel module enumeration and hiding
To support kernel module hiding, the driver resolves the address of the non-exported kernel variable PsLoadedModuleList at runtime using MmGetSystemRoutineAddress. This global linked list maintains information about all loaded kernel modules and drivers, allowing the rootkit to enumerate and manipulate module entries.
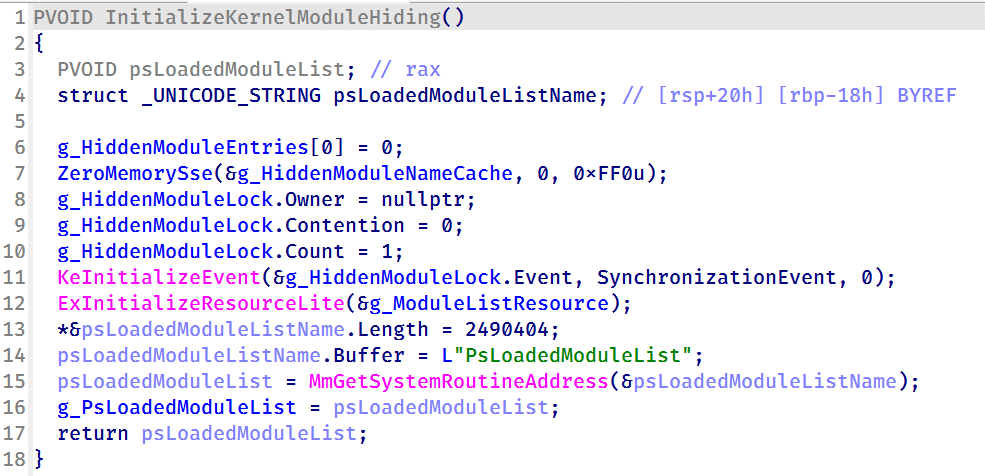
Driver initialization routine resolving the address of PsLoadedModuleList for subsequent kernel module hiding
This functionality is exposed through IOCTL 0x222138, which accepts a module name or path from the user-mode component. When a matching module is found, the driver locates the corresponding entry in PsLoadedModuleList and unlinks it by updating its Flink and Blink pointers. As a result, the hidden module no longer appears in standard kernel module enumeration routines.
Nsiproxy hooking and data filtering
The driver also hooks the Nsiproxy driver to filter network-related data returned to user mode. This functionality is connected to IOCTL 0x2221E0, which allows the user-mode component to register C2 IPv4 addresses with the driver.
To install the hook, the driver obtains a reference to \Driver\Nsiproxy using ObReferenceObjectByName and replaces one of the Nsiproxy handler pointers with its own filtering routine. The hook preserves the original handler and forwards execution after processing the returned data.
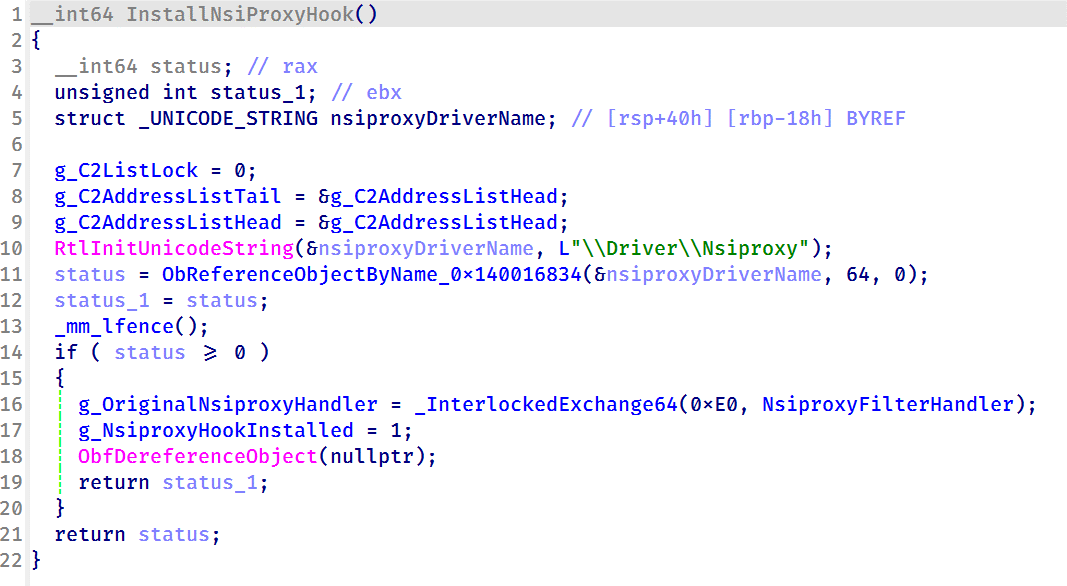
Installing the Nsiproxy hook by resolving \Driver\Nsiproxy and replacing the original handler with the driver’s filtering routine
When the hooked routine processes network information, the driver compares the returned entries against its registered C2 address list. Matching IP addresses are removed before the data is returned to user mode, preventing applications that rely on Nsiproxy-provided network information from seeing the malware’s C2 addresses.
Finally, the driver registers a DriverUnload routine to release allocated resources when the driver is unloaded.
Victimology
The latest CoolClient variant continues to target organizations consistent with previously observed HoneyMyte activity. Based on our investigations, we identified victims in Myanmar, Mongolia, Pakistan, and Russia, including confirmed government entities.
Across the observed intrusions, CoolClient was consistently deployed as a secondary backdoor following a PlugX infection, indicating that HoneyMyte continues to use PlugX as its initial post-compromise implant before transitioning to CoolClient.
Attribution
Our analysis confirms that the investigated malware is a new CoolClient variant associated with the HoneyMyte threat group. While the overall execution flow remains consistent with previously documented CoolClient variants, this sample introduces a previously undocumented kernel-mode driver that significantly expands the malware’s stealth capabilities.
The deployment chain observed in this investigation is also consistent with previous HoneyMyte campaigns, in which PlugX serves as the initial foothold before CoolClient is deployed as a secondary backdoor, further reinforcing the attribution.
Conclusion
The latest CoolClient variant represents a significant evolution of the malware. Rather than operating solely as a user-mode backdoor with plugin support, it now deploys and communicates with a kernel-mode driver that extends its capabilities beyond earlier versions. Through this driver, CoolClient can hide and protect processes, files, and registry objects, as well as filter selected network information, making detection and analysis considerably more difficult.
HoneyMyte has previously introduced kernel-mode functionality in ToneShell. The addition of a kernel-mode driver to CoolClient suggests that the group continues to expand its use of rootkit capabilities to improve stealth, persistence, and defense evasion during post-compromise operations.
IOCs
2d7c8780e97409770a9d4f31c66c9d63 msagent.sys
9460E150E1981D5C165043520C5C12FE msagent.sys
9717F005C5FB98E08D2AD983D88F94EE libngs.dll
F518D8E5FE70D9090F6280C68A95998F libngs.dll
EB79558B037669792652A816E2C669DE ctxmui.dll
C:\Program Files\microsoft\windows defender\
C:\Program Files\windows media player\mediares\
C:\ProgramData\symantecdir\
C:\ProgramData\virtualstore\
C:\Windows\identitycrl\production\
C:\Windows\serviceprofiles\networkservice\
C:\Users\<user>\AppData\Local\viber24.8\
C:\Users\<user>\AppData\Roaming\dsassistant\
C:\Program Files\common files\microsoft shared\office14\
C:\programdata\msdn\
cloudtroe.giize[.]com
employers.theworkpc[.]com
freeread.casacam[.]net
us.lenovoappstore[.]com
sundanish.freeddns[.]org
torinarlabs.webredirect[.]org
news.dursamjbataar[.]org
video.dursamjbataar[.]org
black-popular[.]com
whatismybestthing[.]com
