
❌

Normal view

There are new articles available, click to refresh the page.
Before yesterdayMain stream

Trying to Fix a Suspiciously Cheap Enterprise-Grade Network Switch

11 September 2026 at 19:00

When you see a listing for an Ethernet switch whose specification list is in effect β€˜yes’, with a four-digit price tag when new, and with the seller asking for less than 10% of said $3,000 asking price in an β€˜untested’ condition, the only rational thing to do is of course to mash that β€˜buy’ button. This is what [This Does Not Compute] did, and created a video about to show what a great investment decision this was.

Naturally this Juniper EX4100-F-12P switch came without power supply brick for its 48VDC input. Figuring out its pin-out and probing said input showed that the voltage rails had been shorted, giving a first clue as to why this switch had been on sale for so very cheap. Bravely hoping that it would be a straightforward fix, the unit was disassembled.

With a 280 Watt power brick, it’s little wonder that the top of the unit is a one massive aluminium heatsink, including a large heatpipe. Also visible on the lid near the power input was a very-bad-news black skid mark.

From that first discovery the news just got worse and worse, with clear signs of water ingression, rust and corrosion, along with the aftermath of a powered circuit meeting such bad corrosion. After some clean-up it’s clear that some components had violently exploded, ripping apart layers of the PCB and likely parts of traces in those inner sections too.

With no schematics available and no other good repair options via Juniper or anywhere else, it seems that unfortunately this gamble turned out to be merely a pile of e-waste and a few bucks worth of scrap metal. Caveat emptor, once more.
Disassembling a Mini Air Blower to Make RC Airplanes

8 September 2026 at 11:30

As a certified RC airplane fan, the [RCMakerLab] on YouTube found themselves looking at one of those nifty mini air blowers that provide an alternative to a compressor and canned air for dusting and other high-volume, high-pressure air-related tasks.

Inside these quite affordable units is a ducted fan (EDF) that can produce fairly high levels of airflow to get to every last dust bunny hiding on a PCB or inside a keyboard, raising the question of whether you could use these to fly a model airplane with.

As can be seen in the torn down unit, there isn’t a lot to these air blowers, with the ESC bolted onto the EDF and only the speed regulator and on/off switch being external controls. This would make it very easy to integrate into an airplane, but leaves the question of whether it can generate enough thrust to make it worth the effort.

Using a custom rig, it was shown to generate up to 110 grams of thrust with a current of 16.5 A, which would at least go a long way to carrying its own battery pack. In order to create an airplane with it, probably two of these motors are needed. There’s also the potential of reducing weight by changing the ESC and such, making reusing these little EDFs from any discarded or broken mini air blowers at least worth a shot.

At the very least, it seems like it has a better shot of working than a plane powered by an electric leaf blower.

Pixel Watch 5 Demonstrates Good Repairability

5 September 2026 at 16:00

Although we often find ourselves drowning in a seemingly unending sea of portable devices that are effectively e-waste once an internal component gives out, it’s good to remind ourselves that there are a few examples out there by large brands that manage to tick all the fancy feature boxes, while still being very much repairable. Case in point the Pixel Watch 5, a smart watch which much like its predecessor gets a 9/10 on [iFixit]’s repairability score.

No heat gun required, just undo the latch on the side of the watch. (Credit: iFixit, YouTube)
No heat gun required, just undo the latch on the side of the watch.

Despite featuring anΒ IP68 rating, opening it is as easy as taking out a few screws to release its latch. This allows the back to swing open, with not a drop of glue in sight, just an O-ring gasket that keeps moisture out and can be reused many times. Digging into the guts, there are color-coded screws that guide one’s hand as the very modular design is taken apart in a matter of minutes.

Being able to simply unlatch the back, and also easily obtain spare parts are two aspects that are a very welcome sight indeed. Although it’s much easier to just glue everything together, something like this latch-and-gasket approach is something that we hope that more manufacturers will copy for these small devices.

It’s potentially also an idea for one’s next DIY smart watch project, as tempting as reaching for that tube of glue may seem.

Doubling Thermal Printer Resolution by Wiggling

2 September 2026 at 19:00
Insides of the Sears 12 calculator. (Credit: Danalog, YouTube)

Thermal printers are still extremely common today, using small heating elements in combination with temperature-sensitive paper to create a dot matrix-like effect without messing with ink ribbons and complex mechanisms. Of course, even with just a line of elements you still needed one of these per pixel, which at least in the 1970s when the Sears 12 calculator was released added significantly to the cost. The solution here was to wiggle the elements, doubling the resolution of the print head, as detailed in this video by [Danalog].

Using a contemporary Texas Instruments TI-5015 calculator as comparison with its non-wiggling print head, it’s easy to see the advantages here. In an era where electronic calculators didn’t have displays but a thermal printer, this print quality was the selling point, yet adding more thermal elements added to the price tag of the final device and more complexity to the design in terms of driving circuitry.

In this regard adding a way to make the print head move side-to-side at a set rate and tying this fact into the printing would save about half of that circuitry. Inside the Sears 12 is a fairly standard Mitsubishi M58671 calculator IC, but also the whole printer mechanism. When operating, as demonstrated in the video with the cover removed, you can see the whole print head moving rapidly.

With this mechanism this much cheaper Sears 12 definitely gives the TI-5015 a run for its money, even if as noted by [Danalog] the timing would go off a bit after a longer session, resulting slightly wavy printing. Presumably with the massive cost savings of buying a Sears calculator over a TI one, this was deemed an acceptable trade-off.

Dissecting a Lethal Universal Travel Adapter

30 August 2026 at 16:00

The world’s refusal to standardize on a single type of mains power outlet has led to a vibrant market of so-called travel adapters, all of which try to outdo each other in convenience and universality. This comes at the cost of complexity, something which ultimately reflects in the price. The cheapo $9.26 universal travel adapter that [Brainiac 75] got off an online retailer’s site is thereby a good example of how safety suffers if the overarching goal is to β€˜make it cheap’.

The first exciting discovery is that when you plug any of its three sets of connectors into an outlet, the others become live at the same voltage. This would suggest that they’re just wired together, a fact soon confirmed with a quick resistance check between the respective prongs. Though to the adapter’s credit, the prongs are not live when fully retracted into the enclosure. Yet as demonstrated in the video, the retracting of prongs is not enforced, so mistakes here are possible.

The adapter also has two USB ports that claim to provide 5 V at 2.1 A, with as it turns out no hard cut-off. This is probably the best part of the adapter despite not featuring any advanced charging features. After opening the adapter, you can see that the sliding mains prongs connect to a central bus bar when either unfolded or extended, which is definitely straightforward, but doesn’t enforce that only one type of prongs can be used at any given time.

To make it safer, [Brainiac75] removed the less useful US and UK plugs, taping over the empty holes. It’s now just a USB charger with a universal mains port to plug random non-EU plugs into, which is probably relatively safe and a better idea than really using it as a travel adapter.

Foldable OLED Displays and the Bane of Dust

20 August 2026 at 14:30

Much like Apple’s once vaunted super-slim butterfly keyboard, today’s range of portable devices featuring flexible OLED displays – which can fold said display into a much smaller form factor – are a marvel of engineering.

The foldable phone after a dusty encounter. (Credit: iFixit, YouTube)

Unfortunately engineering can only do so much against fundamental flaws. In the case of both these flexible OLEDs and butterfly keyboards the main issue is that of dust intrusion, with a recent teardown by [iFixit] going over the reasons for this.

As test subject we got a Galaxy Z Fold 8, as an example of a modern-day foldable smartphone-tablet hybrid. This phone has an IP48 rating, meaning that it’s water-resistant, but not dust-resistant for particles smaller than 1 mm. To test this, [iFixit] used UV-reactive dust particles, making sure that they got literally everywhere inside the phone’s hinge mechanism.

After this treatment, trying to fold the phone caused the hinge mechanism to make absolutely horrific crunching noises, confirming that it’s reached dust-under-butterfly-keycap levels of unusable. During the subsequent teardown a quick pass with the UV lamp showed that not much of the dust had penetrated into the two halves of the device at least, but the hinge mechanism wasn’t as lucky.

Getting to the hinge is sadly rather destructive, as it involves removing the flexible OLED. Once the hinge was exposed and subjected to UV light the spectacle was something to marvel at, as can be seen in the above screenshot. With the dust caking literally every part of the mechanism, it was little wonder that the hinge had ceased to work.

Although this was obviously an extreme case of dust exposure, and the average flexible OLED screen’s hinge won’t see nearly as much dust, one can’t help but feel slightly disconcerted at that crunching noise, knowing that it’s just one big dust exposure away.

Teardown Shows Low-Fi Microphone is Surprisingly Sophisticated

20 August 2026 at 07:00

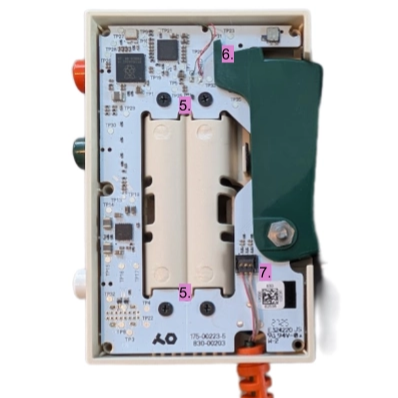
The Ting FX EP-2350 by Teenage Engineering is a standalone microphone with a few extras, including samples and built-in effect presets that can be modified by the user. It also has a distinctive design, and [Sam Holland] does an in-depth teardown that offers some insights that are worth keeping in one’s back pocket. The large, side-mounted lever in particular is an interesting bit, but more about that in a moment.

Inside the device is a single PCB, which has a cutout in the middle for a pair of AAA cells. A Raspberry Pi 2350 drives the device’s functions, supported by various components which [Sam] identifies, although he mostly looks at everything from the perspective of a mechanical engineer as he critiques the design. It’s a clean-looking, intentionally low-fi design thatΒ belies how complex the device really is.

The multi-function, chunky, spring-loaded side lever is of particular interest. It has three sensors: two switches and a potentiometer. One switch detects when the lever is at rest, or depressed by any amount at all. The potentiometer mates with the pivot point of the lever, allowing the device to directly sense how far the lever is pushed. The last switch triggers when the lever is pushed all the way in. Together, it forms an intuitive input that combines powering on (the device wakes up from sleep mode as soon as the lever is pressed) with the ability to adjust effects in proportion with how far the lever is pressed, while also bottoming out with a distinct clickΒ that itself acts as an input signal.

One other interesting bit is the light pipes that carry light from multiple indicator LEDs to the outside of the device. A textured surface acts as a diffuser and helps the lit surface look smooth, while a coating of silver paint prevents light bleed and (probably) maximizes light transmission through the plastic. Hot glue makes a pretty good light pipe material but if DIY light pipes end up in your next project, sanding the exit surface and giving the rest a coating of silver paint just might be worth a shot.

❌
❌