Normal view

There are new articles available, click to refresh the page.
Before yesterdaySweet Spicy Tasty

Vegan Mango Shake

 Mango season is almost coming to a close as Neelam variety of Mango has now landed in the markets . It is said that when the Neelam variety Mango shows up,it means the Mango season is almost over .

Summer is the time to rejoice delicious and juicy mangoes and jackfruit along with the other seasonal summer fruits.  

Mango is a fruit loved by one and all and there will hardly be any haters for Mango.  In the recent years , I am seeing a surge in restaurants hosting a Mango Meal special with a wide menu of 18 to 20 items made from ripe mango as well as raw mangoes .

Vegan Mango shake was on my mind ever since I made the Mango coconut Barfi in the microwave, and it became a super hit with my friends and family .

This year, I was determined to make and blog this vegan Mango shake before the season  ends . As always, I have used the Aaapus variety but Badami or Imampasand variety also give a nice taste. 

Store bought coconut milk can be used or home pressed fresh coconut milk. You can add sugar based on the sweetness from the mango . Most of the times,  sugar isn't needed as the Alphonso or Badami mangoes are very sweet. 

Adding a pinch of cardamom powder and saffron strands is my personal liking as it gives a nice refreshing taste to the mango shake .

Mango Specials from my blog

Mango Barfi

Mango mastani

Mango Lassi 

Aam Ras 


Preparation Time - 5 mins
Cooking Time - Nil
Complexity - easy 

Ingredients 

2 ripe Alphonso mangoes /any sweet mango
1 cup coconut milk
Soaked almonds deskinned
Few strands saffron
Pinch of cardamom powder 
Sugar optional 

Method 

  • Peel the skin from the mangoes
  • Slice the mangoes into small cubes.
  • Add the mango slices to a blender along with almonds,cardamom, saffron and coconut milk. Add some sugar if you find the shake bland.
  • Blend until smooth . 
  • Serve chilled 


Pidikarunai Masiyal | பிடிகருணை‌ மசியல் (small elephant foot yam)

 Pidikarunai Kizhangu belongs to the Yam/Jimmikand family and is native to southern India especially Tamil Nadu . 

Also known as Pidi Karanai or karunai kizhangu it is often mistaken with arbi /taro root ,but both are entirely different . 

 Elephant foot yam is known as Senai kizhangu or simply Senai /Chenai.

Pidi karunai is used in a variety of recipes like masiyal (gravy type) , stir fry , sambar, kootu etc

Pidi karunai is small in size as compared to the regular yam /suran that is commonly used. 

Kai Pidi in Tamil is a measure to denote "a fistful" and as this vegetable fits within the size of one's fist it is called as Pidi karunai .

The flesh inside is starchy, and has a slightly slimy texture when cooked. It has a mild earthy flavor . Pidi Karunai has a tendency to cause mild itchiness to some, hence we always need to cook it in tamarind water to reduce the itchy property .

Health benefits of Pidi karunai

  • Rich in dietary fibre 
  • Low glycemic index.
  • Rich in potassium ,Vit B and C 

Pidikaranai masiyal is a very traditional Tambrahm recipe ,so obviously it is devoid onions, garlic and other strong spices .

Every home will have their own slight variations in preparing this masiyal .Some use tamarind pulp to cook the masiyal while some recipes just use a dash of lime juice while serving. 

I was introduced to Pidikarunai masiyal only after my marriage and that was when I first saw this vegetable.  In Bangalore, this vegetable is still a rarity but with the growing Quick commerce and Dark storage concept, we do get to relish Pidi karunai 3 to 4 times a year .

If you are in Tamil Nadu or happen to visit, you can definitely buy these from the local vegetable vendors .In Mumbai , Matunga market stores this vegetable around Sankrant for a few weeks .


Preparation Time - 30 mins
Cooking Time - 45 mins
Complexity - medium
Serves - 3 to 4

Ingredients 

500gm pidikarunai 
2 green chillies 
Finely chopped ginger 
1/2 cup tamarind extract 
1/2 tsp sambar powder
1 tsp oil 
1/2 tsp mustard seeds 
1 tsp udad dhall
2 dry red  chillies 
Few curry leaves
Pinch of asafoetida 

Method


  • Soak the pidikarunai in water for 10-15 mins and scrub it clean to clear the mud off it .
  • Add the cleaned Pidikarunai in a pressure cooker with sufficient water ,turmeric and a small piece of tamarind. 
  • Pressure cook for 3 whistles and open it after the pressure releases .
  • You may immerse the pressure cooked pidikarunai in a bowl of water .This step makes the peeling of pidikarunai easy.
  • Peel the skin of the pidikarunai and mash it well with a masher or using back of a ladle .
  • To the mashed pidikarunai, add salt, sambar powder , turmeric and the tamarind extract. Mix it well and keep aside .
  • In a kadai,add oil and once heated,temper it with mustard ,udad dhall,curry leaves, ginger,green chillies and red chillies.  
  • Add the pidikarunai mixture to the tempering, 1/2 cup of water and cook until the raw flavor of tamarind is lost.
  • You can adjust the consistency by adding water if you feel it is too thick.  Also,adjust the spice and salt level based on your liking .
  • Delicious pidikarunai masiyal is ready to be served .
  • You can mix it with rice and hot ghee and eat it with some roasted papads and curry.


Avarakkai Kootu | Broad beans lentil curry

 Avarakkai kootu is a popular side dish from the Tambrahm cuisine made from just moong dhall (yellow split gram) , fresh coconut paste and a Sizzling tempering of mustard seeds ,curry leaves in coconut oil.

Avarakkai(tamil),Avrekkai(Kannada), chikkidkaay (Telugu) is a native Indian vegetable and used extensively across cuisines in India . In the Maharashtra and Gujarat it is called as Vaal papdi or papdi and Sem in Hindi .

Avrakkai is a diabetic friendly vegetable and also rich in protein, dietary fibre,vitamin A ,potassium and folates. Consuming avarekkai is a good source of plant protein and apt for vegetarians to meet their dietary requirements of protein intake. The fibre present in the Indian flat broad beans helps to manage cholesterol in the body.

Since, Avarekkai is a native vegetable, it is used during the Mahalaya Paksha , Amavasya cooking and also for cooking during Shraadh or Devasam. During Shraadh , Amavasai or Mahalaya paksha avrekkai is mostly used in the form of kootu but some families also make a simple stir fry known as Thenga pota curry . 

I shall share the recipe of the simple yet flavorful curry very soon. You may refer to Mildly Indian Seema's Kothavarangai Poriyal and in the same way you can make avarekkai poriyal .

Amavasya Lunch Menu

Avrekkai kootu can be mixed with rice or can also be served as an accompaniment to sambar ,vethakuzhambu, milagu kuzhambu along with some toasted papads and a simple paruppu Thogayal or pudina Thogayal. 

If making kootu to mix with rice, make it a little runny else we can have a thicker consistency. 

Avrakkai kootu is purely Saatvik and Vegan making it No Onion No garlic and Jain friendly .


You may also want to try some lip smacking healthy and delicious kootu recipes from my blog

Chou chou (Chayote) kadalai paruppu Kootu 

Cabbage Kootu 

Thiruvadhirai Kootu 

Poosanikkai (Ashgourd) Pulippu Kootu 

Vellarikaai(Cucumber) Kootu 

Keerai (Spinach) Kootu


Pin it up

https://pin.it/627Wo5jJs


Preparation Time - 10 mins
Cooking Time - 25mins 
Complexity - Simple
Serves - 2 to 3

Ingredients 

150 gms Indian broad beans /avarekkai 
1 cup moong dhall
1/2 cup fresh grated coconut 
1 tsp jeera/cumin
8 to 10 pepper corns
2 dried red chillies 
Few curry leaves 
Pinch of turmeric 
Salt as needed 
1 tsp coconut oil
1/2 tsp mustard seeds 
Pinch of asafoetida 

Method 

  • Wash the broad beans and trim the head and tail. Bundle them up and chop into medium cuts.
  • Wash the moong dhall under running water 3 to 4 times.
  • Add the washed moong dhall,chopped avrakkai ,turmeric , 2 cups water and pressure cook for 3 whistles. Let the pressure release naturally. 
  • Grind the coconut, cumin,red chillies ,pepper with water to a fine paste .
  • Once ,the pressure cools down,lightly mash and mix the lentil and add the ground coconut paste to this along with required amount of salt. 
  • If too thick,add 1/4 cup water and bring it to a quick boil with occasional stirring. Coconut paste has a tendency to stick to the bottom and the kootu will get burnt. 
  • Turn off the stove when the kootu thickens and the raw flavor from the coconut paste is gone.
  • Prepare a tempering of mustard seeds,fresh curry leaves,asafoetida in hot coconut oil and pour it over the delicious kootu.
  • Averakkai kootu is now ready to be served.


Aloo Matar (आलू मटर) | Potato Peas curry - Winter Special

18 December 2024 at 12:04

 Come winter, the market is flooded with fresh vegetables which are very tempting. Most of the times,I will hoard my fridge with the fresh produce and then struggle to consume it before the freshness withers away .

Winters at home means fresh green peas ,carrots,cauliflower and radish in abundance.  Of course the evergreen , doodhi aka lauki makes it presence in the menu atleast once a week . 

Aloo matar , alu mattar ,alu matar ,how to make aloo matar at home,urulai pattani masala ,urlai pattani masaal, alu matar gravy , restaurant style aloo matar

Aloo mutter is easy and simple to make,but packed with a riot of flavors. You can make with fresh peas or the frozen ones .Try and avoid the dried peas which needs to be soaked overnight . The dried peas don't blend well in to the curry is my opinion. 

In winters, I make this curry with fresh peas and during off season ,the frozen peas comes handy . We can easily make this Aloo Matar gravy for year end parties , get togethers and office pot luck.  

Aloo matar , alu mattar ,alu matar ,how to make aloo matar at home,urulai pattani masala ,urlai pattani masaal, alu matar gravy , restaurant style aloo matar

I learnt this recipe from my amma and she used just simple basic spices to make this curry and it would be served with piping hot fulkas just off the pan . I enjoy it with some thick yogurt or cucumber raita while hubby loves it with onion raita. 

Kulchas and Naan are a best combination too and if serving with rice, simple steamed basmati rice, jeera rice ,peas pulav or vegetable pulao are just the perfect pairing. 

I use the pressure cooker to make and it gets done quickly . Pressure cooker or instapot option is the best choice, if we want to make a large quantity of Aloo Matar.  

Donot forget to use lots and lots of fresh corriander as garnish.  It enhances the flavor of the gravy. Serve with some chopped onions and a wedge of lime.

Aloo matar , alu mattar ,alu matar ,how to make aloo matar at home,urulai pattani masala ,urlai pattani masaal, alu matar gravy , restaurant style aloo matar

Preparation Time - 10 mins
Cooking Time - 30 mins
Complexity- easy
Serves - 2 to 3 

Ingredients
3 to 4 medium sized potatoes  peeled & cut into big cubes 
1 medium onion chopped roughly 
2 tomatoes roughly chopped 
1 cup green peas
2 green chillies finely chopped 
Lots of fresh corriander
1 tsp ginger garlic paste
1 tsp Kashmiri chilli powder
1/2 tsp turmeric/haldi
1/2 tsp kasuri methi /dehydrated fenugreek leaves
3 tsp oil
Salt as needed 
Whole spices
 1tsp jeera /cumin
small piece  cinnamon /dalchini 
3 cloves /lavang
 2 cardamom / elaichi


Method

  • Heat oil in a pressure cooker .
  • Crackle the cumin seeds ,followed by the whole spices until you get a nice aroma of fried spices .Take care to roast over low flame,that is the key to bring out the essence from the whole spices. 
  • Add in the onions and green chillies ,saute till the onions turn pinkish .
  • Add in the tomatoes , turmeric powder, chilli powder, salt and cook until the tomatoes turn mushy and soft. 
  • Once,the tomatoes become soft, add the ginger garlic paste and cook till the raw flavor is lost.
  • Slowly ,add in the potato cubes ,green peas and mix it well.Adjust salt if needed and pour 3/4 cup water. 
  • Pressure cook on medium flame for 4 whistles .
  • Let the pressure release naturally.  Open the lid and gently mix the gravy while you roughly mash a few potatoes here and there.
  • Mashing of potatoes will give a nice volume to the gravy.If you find the gravy thick,you can add some hot water and adjust the consistency.
  • Lastly add the kasuri methi and fresh corriander.  Serve hot with rotis ,naan, steamed rice etc.

Some winter special recipes which you must try

Aloo Gobhi 

Lauki Channa Dal (video)

Palak Paneer 

Sabz Hariyali (video)

Gajar Halwa

Doodhi Halwa 

Gajar Mooli sabji 

Corn peas pulao 


Pin me up 

https://pin.it/36dUF7yJa


Foxtail Millet Dal Khichdi | Kangni Khichdi | कंगनी खिचड़ी

11 December 2024 at 04:46

 Millet Dal Khichdi is a healthy one pot meal made from foxtail millet and a combination of various pulses . Khichdi is a very healthy Indian meal similar to a porridge or a gruel and is a staple meal for patients recovering from illness especially fever and stomach related issues.

Foxtail millet also known as Thinai (Tamil) ,  Kangni (Hindi) is low in glycemic index and rich in fibre and beta carotene.Consuming foxtail millets helps in keeping the sugar spikes under control and the presence of beta carotene makes it good for the eyes too. Beta carotene is what is found in carrots too .

Unlike,rice dal khichdi the quantity of millets used is less because it gives a good yield on cooking.  It is preferred to soak the millets for min of 6 to 8 hrs before cooking because that helps in maximum absorption of the nutrients. 

So,if you plan on making dal khichdi for dinner ,then soak the foxtail millet during your lunch time ,so by the time you make dinner around 7pm the millets have soaked sufficiently giving you the best benefits. 

Before cooking the millets, discard the water in which they were soaked and cook it using fresh water . 

To make dal khichdi, I use a combination of thoor dal (pigeon peas) , moong dhall(yellow split peas) , handful of whole moong (green beans) and black udad dhall (unhusked black lentil) along with mild whole spices. I make khichdi as a one pot meal ,where I cook the millets and pulses in the pressure cooker and temper mustard seeds,  curry leaves in ghee and pour it over the khichdi before serving .

Khichdi is very mildly spiced and it pairs well with Kadhi or raita . A side of pickle and some ghee on top is how the khichdi is generally served. In my home, we relish it with khatta meetha Gujarati Kadhi and some roasted papads . At times I also make some potato curry,to be served if I make dal khichdi for lunch . I like my khichdi to be gooey and  slightly runny ,but if you like your khichdi to be thick ,then adjust water accordingly. 


Soaking Time - 8 hrs
Preparation Time - 20mins
Cooking Time - 30 to 40 mins
Serves - 2 to 3 

Skip the ghee if you are following vegan diet. 

Ingredients 

3/4 cup foxtail Millet (soaked)
1/4 cup thoor dhall (pigeon peas)
1/4 cup moong dhall (split yellow peas)
2 tbsp split black udad dhall
2 tbsp whole green moong dhall (green gram)
2 medium tomatoes chopped 
2 to 3 green chillies chopped
2 to 3 cloves 
1 inch cinnamon
Finely chopped ginger
Freshly chopped coriander 
Handful of curry leaves 
2 tbsp ghee / cooking oil 
1 tsp mustard/raai 
1tsp cumin /jeera
2 to 3 dry red chillies 
Pinch of asafoetida
Salt as needed
Pinch of turmeric

Method

  • Drain the water from soaked millet and wash the lentils multiple times .
  • In a deep bottom pressure cooker,add the millet,lentils ,chopped tomatoes, green chillies,  ginger,turmeric, salt with 4 cups of water .
  • Pressure cook for 5 to 6 whistles and let pressure release naturally. 
  • Open the lid and using a ladle mash the cooked khichdi nicely till it turns mushy. Add a cup of hot water if you feel it is too dry and thick .Adjust salt if needed.
  • Prepare a tempering of mustard ,cumin,dry red chillies,asafoetida and curry leaves in ghee and pour it over the khichdi .
  • Garnish with a lot of fresh coriander and serve hot .

 📍 Pin me up 


Carrot Radish Stir fry | Mullangi Carrot Poriyal | गाजर मूली सब्जी

18 November 2024 at 01:41

 Carrots and radish ,both are delicious and healthy vegetables .I am a huge fan of both these and can have it all round the year without a fuss .

To be honest,combination of radish and carrots is a very new thing for me.  I use carrots in combination with many other veggies for making poriyal ,but never attempted to use with radish as I always felt that the smell and taste of radish will be over powering in the poriyal.

Carrot Mullangi curry , carrot radish poriyal,  radish poriyal , mullangi carrot curry , mulangi poriyal , mulangi carrot curry , gajar mooli sabji , mooli gajar , radish carrots stir fry

Radish always gets made into sambar ,popularly called as mullangi sambar or as mooli paratha . As I write this post ,I realized I haven't blogged Mullangi Sambar and am setting reminder to myself, that I must blog it very soon. 

Well,now coming back to Carrot Radish curry,this was purely dear hubby's idea and as always I wasn't very convinced but he assured me that it will taste yummy . As I wasn't very comfortable with the combo,I told him to make this poriyal and that I would only taste it when it is done.  As opposed to the usual diced chopping ,hubby grated the carrots and radish for making this delightful stir fry.

Carrot Mullangi curry , carrot radish poriyal,  radish poriyal , mullangi carrot curry , mulangi poriyal , mulangi carrot curry , gajar mooli sabji , mooli gajar , radish carrots stir fry

So ,this poriyal is made by him and photography is by me . The recipe that I am penning below is just as he told me what he did . When I was asked to taste after he prepared the curry, I was totally floored . It was a riot of flavor explosion. Subtle sweetness from the carrots and mild pungent flavor from the radish was a perfect match with the occasional crunch from the green peas . The garnish from fresh corriander is an added flavor booster . Do not compromise on the use of freshly chopped coriander ,it adds up to the taste to the Nth level. Pair it with any sambar or Vethakolambu or even have it as a plain salad.

Winter is slowly setting in and now is the best time to enjoy fresh and tender carrots, radish, cauliflower , fresh green peas .

Piping hot Gajar halwa, Aloo Gobhi sabji and fulkas will be an absolute treat to the taste buds on a chill winter night. Do check out all those recipes on my blog. 


Check out the Winter Special Veg Hariyali video on my You tube channel .


Pinterest Link

https://pin.it/3AME6ZKyY


Preparation Time- 15 mins
Cooking Time - 20 mins
Complexity - simple 
Serves  - 3 to 4

Ingredients 
2 medium sized radish grated
2 medium sized carrots grated 
Handful of green peas 
1 medium onion chopped
2 to 3 green chillies chopped
2 tsp oil 
Mustard seeds + curry leaves 
Pinch of asafoetida 
Salt as needed 
Fresh corriander 

Method 

  • Squeeze out the water from the grated radish . After grating the carrots and radish don't let the vegetables sit for a long time,else they will become soggy. 
  • In a thick bottomed kadai,heat oil and crackle the mustard seeds, curry leaves, green chillies .
  • Saute the onions until transparent .
  • Stir in the carrots, radish and green peas and season with salt.  
  • Mix well and cook covered for 4 to 5 mins until the radish and carrots are well cooked .
  • Garnish with fresh corriander and serve hot.

Pin me up


Rajma Sundal - Navaratri Special

 Those of you who follow my blog posts regularly, by know very well know what is Sundal and how much me and my family love eating sundals with our meals .

Also,with Navratri going on ,this time I made sundal using rajma which definitely was my first attempt as rajma usually takes the form of Rajma Masala or Rajma Pulao in my house .

Rajma sundal , sundal , Navaratri prasad with rajma , chitra rajma, jammu rajma, rajma chundal , rajama sundal , navaratri sundal , can we make rajma sundal,how to make rajma sundal, sweet spicy tasty rajma sundal

I was skeptical about how South Indian flavors would blend with rajma in the form of sundal, but I was totally wrong. It was just my mindset and pre conceived notion ,I must say .The fresh coconut,  tempering of fresh green chili and ginger along with the delicious Sundal Podi (special spice mix)  went so well that we all enjoyed eating this delicious rajma sundal .

I have used the Chitra variety of rajma ,but you can use any variety of rajma which you use regularly.  Make sure the rajma is soaked well for minimum of 10 hrs so that it gets cooked well .Rajma sundal certainly needs a good amount of pre preparation time,so ensure that you give it the required soaking time to get best results .

Rajma sundal , sundal , Navaratri prasad with rajma , chitra rajma, jammu rajma, rajma chundal , rajama sundal , navaratri sundal , can we make rajma sundal,how to make rajma sundal, sweet spicy tasty rajma sundal

Difference between Chitra Rajma and Jammu Rajma (red /laal rajma) 

Chitra rajma is slightly bigger in size than laal rajma and also light pinkish in color . This variety of rajma is softer and has a slightly sweetish taste . One biggest advantage of using Chitra rajma is that they get cooked faster and minimum of 8hrs soaking time is enough.  Apart from this ,there is no much difference and we can use both these variety of rajma interchangeably in our recipes.  

For variety of other sundals and Navaratri celebrations,click here.  


Rajma sundal , sundal , Navaratri prasad with rajma , chitra rajma, jammu rajma, rajma chundal , rajama sundal , navaratri sundal , can we make rajma sundal,how to make rajma sundal, sweet spicy tasty rajma sundal


Soaking Time - 8 to 10 hrs
Cooking Time - 30 mins
Complexity- easy

Ingredients 
200 gms rajma/kidney beans
1/4 cup fresh grated coconut 
2 tbsp sundal powder 
2 green chillies finely chopped 
1tsp finely chopped ginger
2 tsp oil 
1 tsp mustard seeds
Salt as needed 
Asafoetida as needed 
Few fresh curry leaves 
Finely chopped fresh corriander 

Method 

Rajma sundal , sundal , Navaratri prasad with rajma , chitra rajma, jammu rajma, rajma chundal , rajama sundal , navaratri sundal , can we make rajma sundal,how to make rajma sundal, sweet spicy tasty rajma sundal

  • Wash and soak the rajma in fresh water for minimum 8hrs
  • In the morning, drain the soaked water and pressure cook with little salt for 4 to 5 whistles .Let the pressure release naturally, open carefully and press one rajma bean between your fingers . If you are able to easily press it ,then the rajma is cooked well,incase you feel it is hard, pressure cook for another 2 whistles extra .
  • Drain the rajma in a strainer/colander and let it rest for a few minutes. 
  • Meanwhile,  heat the oil in a thick bottomed pan and crackle the mustard seeds followed  by green chillies, curry leaves and ginger . Add asafoetida in low flame to avoid burning. 
  • Add the cooked rajma and mix well,adjust salt if needed .
  • Tip in the sundal podi,fresh coconut, corriander and give a quick stir .Turn off the stove .Don't cook too much after adding sundal podi as there is a chance of it getting burnt .
  • Delicious rajma sundal is ready.

Pin it up 


Rajma sundal , sundal , Navaratri prasad with rajma , chitra rajma, jammu rajma, rajma chundal , rajama sundal , navaratri sundal , can we make rajma sundal,how to make rajma sundal


Payathangaai Poriyal / Karamani Thoran / Longyard beans stir fry (Vegan & Saatvik)

27 September 2024 at 09:39

 Payathangaai , karamani , chowli or Long beans is a nutrient rich and powerhouse of natural fibre coupled with antioxidants and immune boosting properties. 

A green vegetable widely used in India in various forms makes it the most sought after vegetable . As the beans reach almost 2 to 3 feet in length they are known as long yard beans . These belong to the cow pea family popularly known as lobia ,chowli or karamani . 

The beans are thin ,long ,slender and very tender . They look very appealing to the eye when we see it and are stocked up as bundles since they are long .  Very easy to cook and it can blend in very easily with all sorts of seasonings and flavorings . Normally prepared as stir fries,  steamed and used in salads or mild vegetable stews .

Payathangaai Poriyal / Karamani Thoran / Longyard beans stir fry (Vegan & Saatvik), karamani curry , chowli bhaaji , chawli sabji , chawli , payathangai thoran , sadhya special thoran , vegan thoran , mahalaya paksham special

It is good to incorporate the payathangaai in your day to day meals as it is rich in fibre and also potassium, magnesium, vitamins C and A .

A vegetable which is heart friendly due to potassium content and gut friendly due to fibre content.  The fibre content prevents constipation and the potassium present in the chowli helps to maintain the BP and in turn helps and protects the heart.

The magnesium, zinc ,vitamins C and A help in maintaining the over all cell growth in the body and helps in having a good metabolism due to the antioxidants present . 

Payathangaai Poriyal / Karamani Thoran / Longyard beans stir fry (Vegan & Saatvik), karamani curry , chowli bhaaji , chawli sabji , chawli , payathangai thoran , sadhya special thoran , vegan thoran , mahalaya paksham special

The recipe that I am sharing today is a very simple yet flavorful curry/stir fry made using karamani and very popular in Tamil Nadu and Kerala.  This version is a no Onion No Garlic recipe but you may use finely chopped shallots for added flavor.  

In Kerala,  Onam Sadhya has payathangai thoran as one of the menu items and in Tamil homes ,this is made as a part of regular meals . Since it is a native bean like cluster beans and flat beans , karamani is widely used during Pithru Paksham (mahalaya Paksham) where we tend to consume only native vegetables. 

The recipe uses very little oil and just 2 tbsp of fresh coconut for seasoning, making it a very healthy and diet friendly preparation. 

Payathangaai Poriyal / Karamani Thoran / Longyard beans stir fry (Vegan & Saatvik), karamani curry , chowli bhaaji , chawli sabji , chawli , payathangai thoran , sadhya special thoran , vegan thoran , mahalaya paksham special

Preparation Time  - 10 mins
Cooking Time - 10 mins
Complexity- easy 
Serves - 2 to 3 

Ingredients 

250 gms karamani/chowli/ long yard beans
2 tsp oil (coconut oil or any non flavored oil) 
1 tsp mustard seeds
1 tsp udad dhall
Few curry leaves 
Pinch of asafoetida
Salt to taste 
To grind 
2 tbsp fresh coconut 
2 green chillies 
1/2 tsp jeera /cumin

Method

Payathangaai Poriyal / Karamani Thoran / Longyard beans stir fry (Vegan & Saatvik), karamani curry , chowli bhaaji , chawli sabji , chawli , payathangai thoran , sadhya special thoran , vegan thoran , mahalaya paksham special


  • Trim the top and end of the long beans and chop them finely.  Wash well and keep aside .
  • Coarsely grind the coconut, green chillies and jeera in a blender . We will use this for flavoring the poriyal/thoran.
  • In a thick bottomed pan,heat oil and splutter the mustard seeds, udad dhall until golden brown followed by curry leaves and asafoetida.  
  • Add the chopped karamani, give a quick stir . Add the required amount of salt and add 1/4 cup water and cook covered for 7 to 8 min until the beans are cooked well and tender .There should be no water left in the pan .
  • If at all you see some water is left,  cook uncovered for a few more minutes until the water evaporates .
  • Now add the coconut mixture,  give a quick stir, cover the poriyal and turn off the stove.  Let the stir fry rest for a few minutes until all the flavors are absorbed well into the beans .
  • Transfer to a serving bowl and serve it with a choice of sambar rice,  rasam rice etc . 

Some more healthy and tasty stir fries /poriyal that you may like 


Aloo Gobhi Sabji / Potato Cauliflower gravy - No onion No garlic sabzi

 Aloo Gobhi is a classic winter delicacy . Piping hot phulkas/ rotis and a bowl of delicious Aloo Gobhi curry is an absolute bliss on a chill winter night . 

Very simple to make with just basic spices ,Alu Gobhi sabji can be prepared in less than 15mins. I saute the basic spices with tomato ,potato and cauliflower and cook it in a pressure cooker for 1 whistle.  This way it gets done quickly and perfectly . 

The final garnish with fresh corriander is the icing on the cake,the smell of fine chopped kothmir when mixed with the curry kindles the appetite instantly.  Those of who you like a little extra zing, you may squeeze some lime juice over the gravy.

Aloo Gobhi is a very popular side dish ordered in most restaurants and dhabas for all those who love typical North Indian flavors. We can make a dry curry like a stir fry using Aloo and Gobhi or even as a semi liquid gravy . 

We love the gravy type curry at home ,so I prefer to make this for my family . A perfect choice for Vegans as well as those who don't prefer to include Onions and Garlic in their meal .

I chose this recipe for our ongoing No Garlic No  Onion recipes theme in Shhh cooking secretly  group. Theme  suggested by Priya Iyer ,a versatile blogger .I was partnered with Sujata Ji for this theme who has dished out a creamy and delectable Paneer Malai Curry.


Preparation Time - 15 mins
Cooking Time - 20 mins
Complexity - simple
Serves - 2 to 3

Ingredients 

1 medium sized Cauliflower 
2 medium Potatoes 
3 medium Tomatoes
2 Green chillies finely chopped
1/2 inch Ginger finely chopped
1/2 tsp Red chilli powder
1tsp Dhaniya jeera powder 
1/4 tsp Haldi/turmeric 
1 tsp garam masala
1/2 tsp jeera
1/4 tsp saunf
Salt as required 
Corriander leaves finely chopped
2tsp Oil
Pinch of sugar

Method 


  • Cut out the florets from the main flower and soak it in salt and turmeric water.  This enables to clean up some hidden worms which are usually hidden inside the cauliflower.  Discard the water after rinsing the florets well .
  • Cut the potatoes into small cubes and tomatoes into medium Chunks.
  • Heat the oil in the pressure cooker and splutter the jeera and saunf . Once it crackles, fry the chopped ginger and chillies .
  • Add the spices (turmeric, chilli powder, dhaniya jeera powder  and garam masala) and fry it on low flame without burning the masalas.
  • Add the tomatoes and cook it well until it turns mushy.
  • Add the potatoes, cauliflower mix it well .Adjust salt ,sugar, 1/2 cup water and pressure cook for 1 whistle on medium flame.
  • Release the pressure naturally,  give it a nice stir . Take 1 tbsp of the curry in a bowl and lightly mash it. Add it back to the gravy and give a quick boil for 1 or 2 mins. This mashed portion gives the gravy some thickness and volume to the curry.
  • Garnish with fresh corriander and squeeze some lime just before serving and serve hot .

Pin it up


Keerai (greens) Kootu - vegan south Indian accompaniment

6 September 2023 at 22:57

 Keerai is the Tamil name for Green Leafy vegetables in general . Spinach is known as palak keerai , fenugreek is known as Vendhiya Keerai , Amaranthus is known as Arai Keerai , Dill Leaves is known as Soi Keerai ,Drumstick leaves as Murunga keerai so on and so forth.

We all know how healthy and beneficial is the inclusion of greens in our daily diet . So pls do make it a point to include greens as a part of diet atleast once or twice a week  . Of course please exercise caution and consult your Doctor if greens need to be  avoided due to underlying medical conditions.

Keerai kootu , spinach kootu , how to make palak kootu, keerai molagootal, south indian style dal palak, how to make kootu with keerai

I am very fond of keerai sambar, keerai masiyal and keerai kootu in south indian cuisine whereas in North Indian cuisine my favorites are Dal Palak,Palak Paneer , Methi theplas, Palak Paratha which feature frequently on our meals regularly. 

Keerai kootu has been my childhood favorite and I would eat this almost everyday as a little girl . The mild sweetness from the cooked moong dal blends well with the coconut jeera paste and cooked palak and the final tempering of mustard in coconut oil simply elevates the flavor profile of the kootu.  You can pair it with some delicious sambar rice or mix this kootu with some steamed rice and ghee and enjoy as is.   You can use any variety of keerai for this kootu,but I personally love palak.  I don't like Methi in kootu as it imparts a slightly bitter taste to the kootu which puts me off.

Keerai kootu , spinach kootu , how to make palak kootu, keerai molagootal, south indian style dal palak, how to make kootu with keerai

The green Leafy vegetables need to be cleaned very well before using.  There may be a chance of lot of weeds or some rotten leaves hidden in the bunch . I am sharing a detailed video on how to clean the green Leafy vegetables at ease.  If the stems are tender,I chop them finely and use it too while making the kootu.

If you are a lover of exotic greens, then Baby Bokchoy and Shitaake stir fry by Preethi will be the best choice.  I was paired with Preethi for August's Theme of Leafy Greens theme suggested by Seema of Mildly Indian.

A simple lunch platter of keerai kootu, jeera pepper rasam and beetroot curry with fried papads. (Pic updated on Nov 5th 2024)

Keerai kootu , spinach kootu , how to make palak kootu, keerai molagootal, south indian style dal palak, how to make kootu with keerai


Preparation Time - 15 mins
Cooking Time - 20 mins
Serves - 2 to 3 
Complexity - easy

Ingredients 

2 small bunch spinach/palak 
1.5 cup cooked moong dhall
1/4 cup grated coconut 
1tsp jeera
1/2 tsp pepper
2 to 3 dry red chillies / 1 tsp red chilli powder 
2 tsp coconut oil
1 tsp mustard seeds 
1/2 tsp udad dhall
Pinch of asafoetida
Salt as needed 

Method 

  • Clean and wash the spinach  bunch well . Finely chop the palak and cook it well . No need to pressure cook .you can cook it in regular open pot until the raw flavor is lost. Use a heavy bottomed pan always.
  • Grind the coconut, jeera ,pepper, red chillies to a fine paste with sufficient water.
  • Once the palak is cooked, add this coconut paste,bring it to a rolling boil and then add the cooked moong dhall .
  • Ensure the cooking is on medium flame and you are stirring constantly to avoid burning . Moong dhall and coconut paste will stick to the pan very quickly.
  • Once the kootu reaches a rolling boil,turn off and prepare a tempering of mustard, udad dhall and asafoetida in coconut oil and pour it over the kootu . Relish the kootu with rice and papads. 

Maangai Sambar | Raw Mango Vegetable Sambar

 Raw mangoes mark the beginning of summer and the pickling season.  Apart from making pickles ,raw mangoes can be used in a variety of recipes in our day to day cooking.

The  sourness, tartness and a mild hint of sweetness adds up a lot of flavor profile to the recipe.  Earlier we had to wait for summer to get good Raw mangoes, but now with so much improvement in cold storage facilities, we do get good Raw mangoes all through the year .

The current situation in Indian markets,is the cost of tomatoes which are sky high and we have to use them sparingly . In these times,Raw mango sambar has come to my rescue. Raw mangoes are a perfect work around for tomatoes. 

Depending on the tartness/sourness in the raw mango we can adjust the usage of tamarind pulp.  Most of the times we don't need to use tamarind as the sourness from the mango balances the flavors well . 

I use some vegetables like pumpkin and capsicums in my sambar recipe because we like to have lots of veggies in the sambar . You can also use carrots ,drumsticks ,Brinjals as well in this same recipe.

Piping hot sambar mixed in rice with a dollop of ghee is just out of the world . Pair this sambar with a coconut based vegetable stir fry and serve along with some papads to enjoy a wonderful lunch experience. 

In our Facebook gourmet food group Shh Cooking Secretly!!! , we are sharing Mango based recipes for the month of June .

Anu Kollon who hosted the theme, suggested we use mango in any form, either raw or ripe in our recipe.   I have used raw mango as the star ingredient while my partner Narmadha has made Mango Popsicles using ripe mango . 

If you are looking to exploring some lipsmacking recipes using raw mango ,you must definitely check out my list below .

Maanga Pachidi (Mango relish)

Maanga Thokku ( spicy mango relish) 

Maavinkaai Chitranna ( Mango Rice)

Maanga  Thogayal (Chutney)

Maangai Pisaral (Instant mango pickle)

Aam Panna (refreshing Summer drink)


Preparation Time - 15 mins
Cooking Time - 20 to 25 mins
Complexity - Simple
Serves - 3 to 4

Ingredients 

100 gms pumpkin 
1 medium sized capsicum/green bell pepper 
1 medium sized raw mango 
3 tbsp sambar powder 
3/4 cup thoor dall /pigeon peas
Pinch of turmeric 
Salt as needed 
2 tsp oil
1/2 tsp mustard seeds 
Fresh curry leaves 
1/2 tsp jaggery powder 
Fresh corriander chopped
Pinch of asafoetida 

Method 


  • Chop the capsicum,pumpkin and mango into medium sized cubes .
  • Add 3/4 cup water ,Pinch of salt and cook the vegetables until they are well cooked. The vegetables must be firm ,yet well cooked . Donot keep stirring with the ladle,they will become mushy.
  • Meanwhile ,wash the thoor dhall well and pressure cook it with turmeric for 4 to 5 whistles with sufficient water. Release the pressure naturally and mash it well using a whisk or hand blender . The dhall must be soft and mushy. 
  • Once the vegetables are well cooked, add the sambar powder ,jaggery ,some more salt and bring it to a rolling boil. 
  • Slowly add in the cooked thoor dhall, adjust the consistency of sambar by adding some water if needed and let it come to a boil . You can add some sambar powder if you feel the spice is less. 
  • Prepare a tempering of mustard seeds,asafoetida and curry leaves in hot oil and pour it over the sambar .
  • Garnish with fresh corriander and turn off the stove.

Pin me up


Tomato Rice | Thakaali Saadham - Quick one pot vegan recipe

 Thakali Saadham / Tomato Rice is a simple and delicious recipe from South India . It makes for a Quick fix lunch or dinner option and also apt to pack for lunch boxes . 

It is not a traditional recipe, hence each household may have different recipes to dish out this yummy Thakali saadham .

The main ingredient for this recipe are juicy and slightly tangy tomatoes for the extra punch. I use just basic spices and not much whole masalas/ garam masala . I like the rice to soak in the taste and flavor of tomatoes and chillies . 

If you like you may add some fried cashews or boiled peas while preparing the tomato rice . I add them depending on my family's request . 

My hubby loves to have his tomato rice with either Pattani (Peas) Masala or Potato Curry and some chilled raita/pachadi . Papads or fryums are an excellent addition as well . 

If packing for lunch , make sure you cool the rice completely and then pack it . If you pack it very hot ,there is a chance the rice may go bad especially in summer.  

I often make thakali saadham for dinner as it is a quick fix and I wont see fussy faces at home . As always, I realised that this delicious tomato rice wasn't on my blog and as a matter of coincidence our gourmet food group theme for this month was "cook what you like " .. Viola !! I got an opportunity to publish this recipe.  My partner Rafeeda has dished out a baked Pasta recipe and if you are a pasta lover, you must try it for sure .

Preparation Time- 10 mins
Cooking Time - 20 mins
Complexity - simple
Serves  - 2 to 3

Ingredients 

2 cups rice (Basmati / Sona Masuri / any short grained rice ) 
3 to 4 medium sized tomatoes 
1 onion chopped (optional) [skip for jain and no onions no garlic recipe ] 
3 green chillies slit 
Few curry leaves 
Fresh corriander 
1 tsp mustard seeds 
1 tsp channa dal 
1 tsp udad dhal 
2 tsp corriander powder 
1/2 tsp jeera powder 
1/2 tsp chilli powder 
Pinch of turmeric powder 
Salt as  needed
2 tbsp cooking oil 
Pinch of sugar 

Method 

  • Wash the rice well and soak it for 10mins and then drain the water through a colander. 
  • Chop the tomatoes into medium sized chunks and finely chop the green chillies .
  • Heat the oil in a pressure cooker or pressure pan and crackle the mustard seeds followed by channa dal and udad dal until they turn crisp and golden brown . Saute onions if using until pick and translucent. 
  • Fry the green chillies,  curry leaves . Keep the flame on low and add the chopped tomatoes and  spice powders (haldi, red chilli powder, jeera powder and corriander powder ).
  • Saute the tomatoes well and sprinkle some water ..cook covered until the tomatoes turn mushy and soft . Continue cooking until the oil begins to separate.Add salt at this  stage along with some chopped corriander. 
  • Add water and bring to a boil . If using basmati rice use 1.5 cups water for 1 cup rice and if using sona masuri rice use 2 cups water for 1 cup rice.
  • Once the water begins to boil,add the drained rice,  Pinch of sugar and adjust salt if needed .
  • Close the pressure cooker and cook on medium flame for 2 whistles.  Let the pressure release naturally. 
  • Fluff it with a fork and add some ghee if not vegan and serve hot with raita ,papads and some gravy or curry . 


Matar Poha | Peas Poha - Vegan breakfast

 Poha (Flattened rice) is a versatile ingredient used for breakfast or a quick evening snack all over India. 

During winters fresh green peas are available in plenty and I use them in my cooking a lot.

Peas Poha is one such favorite breakfast at home where lot of fresh tender peas are used as a part of the recipe. Poha is seasoned and tempered with simple Indian spices that makes it very tasty and flavorful .


Choora Matar or Chooda Matar is a variant of Peas Poha that is very popular in Northern India especially UP and Bihar and is a purely No Onion No Garlic snack .

Matar Poha can be made with or without onions depending on your taste . If using onions, saute them after you splutter the mustard seeds and curry leaves until the onions turn soft and then add in the poha .

Some delicious Poha variants which can be easily prepared for breakfast / lunch boxes and also as Prasadam .


Puli Aval /Gojju Avalakki (Karnataka Special)
Gopalkaala / Dahi Poha (Janmashtami Special)


Preparation Time - 10mins
Cooking Time - 8 to 10mins
Complexity - Simple 
Serves  - 2 to 3

Ingredients 
2 cups medium thick Poha/Flattened rice 
2 to 3 green chillies 
1/2 cup boiled peas 
Small piece ginger finely chopped 
1 tsp mustard seeds
Pinch of asafoetida
Pinch of turmeric 
2 tsp lemon juice
Salt as needed 
Pinch of sugar
2 tbsp oil
Few curry leaves 

Method 

  • First and foremost ,sieve the poha and get rid of small dust and other unwanted particles.
  • Wash the Poha under running water in a colander and let it sit for 5 to 6 mins . This step is very important.  If there is too much water in the poha ,it will become a mushy mass and we don't want that .
  • Meanwhile, heat the oil in a thick kadai /wok.
  • Splutter the mustard seeds ,followed by curry leaves, ginger ,turmeric powder and asafoetida. 
  • Mix in the washed poha ,sprinkle salt and mix it well .
  • Add in the boiled peas, sprinkle some water and cook covered for 3 to 4 mins till the poha becomes soft and well cooked. 
  • Turn off ,open the lid, add sugar ,lemon juice and give it a quick mix ,serve hot with a garnish of freshly chopped corriander. 
  • You can sprinkle some namkeen farsan/crispies for an added crunch .

Pin me up 


Month of January we are going "Vegan" in our food bloggers' group Shhh Secretly Cooking Challenge . A wonderful theme suggested by Radha as January is also celebrated as a Vegan Month in some parts of the world .  My partner for this month is Preethi of Preethi's cuisine. Preethi gave me lemon juice and ginger as secret ingredients which was used in this flavorful aromatic Matar Poha while Preethi made a yummy  and healthy Tofu Bean Stir fry with sesame oil and rice flour being the secret ingredients I suggested to her. 
Radha has prepared a lipsmacking Jackfruit Kofta Curry which is a classic innovative recipe and that too purely plant based ..


Set Dosa | Set Dose (variation 2)

 Set dosa is one of the most loved breakfast in Karnataka.  Though the basic ingredients remain the same,there are some mild variations used by various restaurants that make them a speciality .

My mom had learnt a recipe from one restaurant cook and I have been following that primarily all these years to make Set Dosas at home . To check out my Mom's variant click here

Recently, my cousin Kalyani who blogs at Sizzling Tastebuds posted a Millet Set Dosa which prompted me to look up her recipe of The Regular Set Dosa and I found that it was slightly different from my recipe and  I went ahead and made Set Dosas with her proportion and needless to say everyone at home liked it. They were just spongy and so soft that it was a melt in mouth experience. I have followed her recipe to the 'T' and no changes at all . 

I served these cotton soft set dosas with Aloo Sagoo and Coconut Chutney the way it is served in most restaurants here in Bangalore . Chutney Pudi is of course our family favorite and we cannot imagine having our Dosas without Molagapudi.  Click on the recipe names above for detailed method of preparation. 

Ingredients 

2 cups idli rice 
1 cup whole udad dhall (udad dal gota)
1/4 cup beaten rice /Poha 
1/4 sabudana /jawwarsi 
 2 tsp channa dal
1 tsp methi seeds 
salt to taste 

Method 

  • Wash the idli rice and udad dal 3 or 4 times until the water is clear .
  • Sift the beaten rice once and wash it thoroughly under the colander .
  • Soak the idli rice , udad dhall, beaten rice, Sabudana ,methi seeds in sufficient water for 3 to 4 hours .
  • After the soaking Time,  grind the ingredients in a wet grinder or blender until you get a smooth batter . Batter must have the consistency of Dosa batter, neither too thick nor too runny . I prefer the wet grinder as the yield is more compared to  the blender method .
  • Add salt, beat it well once with your hands . The warmth from our hands induces good aeration and helps the batter to ferment well.
  • Allow the batter to ferment in a warm place for 8 to 10 hrs .

  • To prepare the dosas ,heat the tawa , drop a ladle of the batter and donot spread too much. The set  Dosa has to be slightly thick .
  • The moment you pour the batter on the hot tawa ,you can see lot of pores /holes developing on it.This means your batter is perfect. Just drizzle a few drops of oil and cook covered for 1min.
  • Slowly flip over and cook on the other side for just 10 sec . 
  • If the batter is well fermented, then absolutely no oil is required to cook the dosa.
  • Serve hot with accompaniment of your choice.

Pin me up


Zucchini Paratha

 Winter is in the air ; the chill and pleasant weather calls for  nice soul satisfying hot meals from the pan to the plate . We at home,prefer piping hot parathas or rotis for dinner .

Parathas are filling and healthy as you can include almost as many veggies you wish either by kneading it along with the dough or even by stuffing it into the rolled bread .

Doodhi Parathas are a family favorite during winter, so this time when I had some fresh Zucchini in my fridge I thought of making some delicious parathas with them. I have used green zuchini ,but you can also use the yellow zuchini which are widely available in the market .

Zucchinis belong to the squash family and are used in a variety of recipes across cuisines . Unlike cucumber ,zucchini needs to be cooked before eating.  Zucchini may either be shredded, grated , sliced or even used as cubes depending on the recipe that it is being used in .

For the paratha,I have peeled the zucchini and then grated it finely and kneaded along with the wheat flour with various spices and flavorings. 

If you want to try some healthy,delicious and tasty parathas, please click on the recipe links below 


Preparation Time - 20 mins
Cooking Time - 2 mins per Paratha 
Complexity - medium 
Makes 10 to 12 parathas
 

Ingredients 

1.5 cups whole wheat flour 
2 cups grated zucchini
1 tsp red chilli  powder 
1/2 tsp haldi powder 
1 tsp jeera powder 
2 tbsp finely chopped corriander
Salt as needed
Oil to roast the paratha 

Method 


  • Squeeze out the excess water from grated zucchini and add it a mixing bowl along with the spices (red chilli powder , haldi powder , jeera powder and salt) . Mix it well with your fingers .
  • Add the wheat flour and the corriander and knead into a smooth and firm dough without cracks .Apply some oil over the dough and keep covered for 10 mins. 
  • Pinch out big lemon sized balls from the dough and roll them into a medium thick roti .
  • Heat a tawa or griddle and place the rolled out paratha on the tawa .
  • Flip it over when you see small bubbles and brown spots on the under side .
  • Apply some oil around the paratha and roast it until its well done.
  • Take it off the tawa and serve hot with some chilled curd or raita of your choice. 

Pin it up


Parangikkai Vathakuzhambu - Tambrahm Special (Vegan)

Pumpkin is a versatile vegetable and is widely used in the Indian cuisine .Various names of pumpkin in different languages, Parangikkai /Thadiyangai (Tamil) , Mathan (Malayalam) , Kaddhu (Hindi) , Laal Bhopla (Marathi) , Sihi Kumbalkkai (kannada) ,Kumdo /Kumro (Bengali) and so on.

In India, pumpkins are available through the year unlike the western world wherein it is a Fall produce and available only during Autumn .

Having said that, in India we use pumpkin a lot across the length and breadth of various cuisines from Kashmir to Kanyakumari and Gujarat to Assam . 

Parangikkai Vethakuzhambu is a classic recipe from Tambrahm kitchen and makes for a yummy main course . Vathakuzhambu is a tamarind based gravy without the lentils and is paired with rice and a simple vegetable stir fry or keerai  masiyal.

"Vathakuzhambum Sutta appalam um" is an eternal favorite combination in most households and our home is not an exception either .Certain terminologies lose the charm when translated, but for the ease of my readers let me translate it .. the term means Vathakuzhambu and roasted papad is the best combination when  served hot .

Vethakuzhambu has a good shelf life and can stay well upto 4 or 5 days when refrigerated provided your family doesn't polish off this yumm gravy.  Vathakuzhambu certainly tickles and rejuvenates our taste buds and appetite especially after heavy festive indulgence or even post traveling. 

I have quite a few variants of Vethakuzhambu and tamarind based gravy which I am linking below for your easy reference 

Appalam Vethakuzhambu 

Kondakadalai (chick peas) Vethakuzhambu 

Karvepillai (curry leaves) kuzhambu 

Milagu (pepper) Kuzhambu 

Vendhiya (fenugreek) kuzhambu 

Verkadalai (peanuts) Vethakuzhambu 


Preparation Time 10 mins
Cooking Time - 30 mins
Complexity- simple
Serves - 2 to 3

Ingredients 

1.5 cups chopped pumpkin 
Small lemon sized tamarind soaked in hot water 
1.5 tbsp sambar powder 
1tsp thoor dhall
1/2 tsp mustard 
1 tbsp oil
1 tsp sesame oil /til oil
Salt as needed 
Few curry leaves 
Chopped corriander 
Pinch of asafoetida 

Method 


  • Extract the puree from the soaked tamarind, strain it.Add 1 cup water to it and set aside.
  • Heat oil in a thick bottomed kadai and splutter the mustard seeds followed by curry leaves, corriander, thoor dhall and asafoetida. 
  • Saute the chopped pumpkin cubes with sambar powder and add 1/2 cup water .let the pumpkin cook well .It should be well cooked, but firm at the same time 
  • Add the tamarind extract, required salt and let it boil well and the raw flavor of tamarind is lost .Continue to simmer the vathakuzhambu until it reduces and becomes slightly thick in consistency like tomato puree. The kuzhambu shouldn't be very runny. 
  • Turn off the stove and drizzle the sesame oil all over and a delicious Vethakuzhambu is ready to be enjoyed .

Pin it up for future 


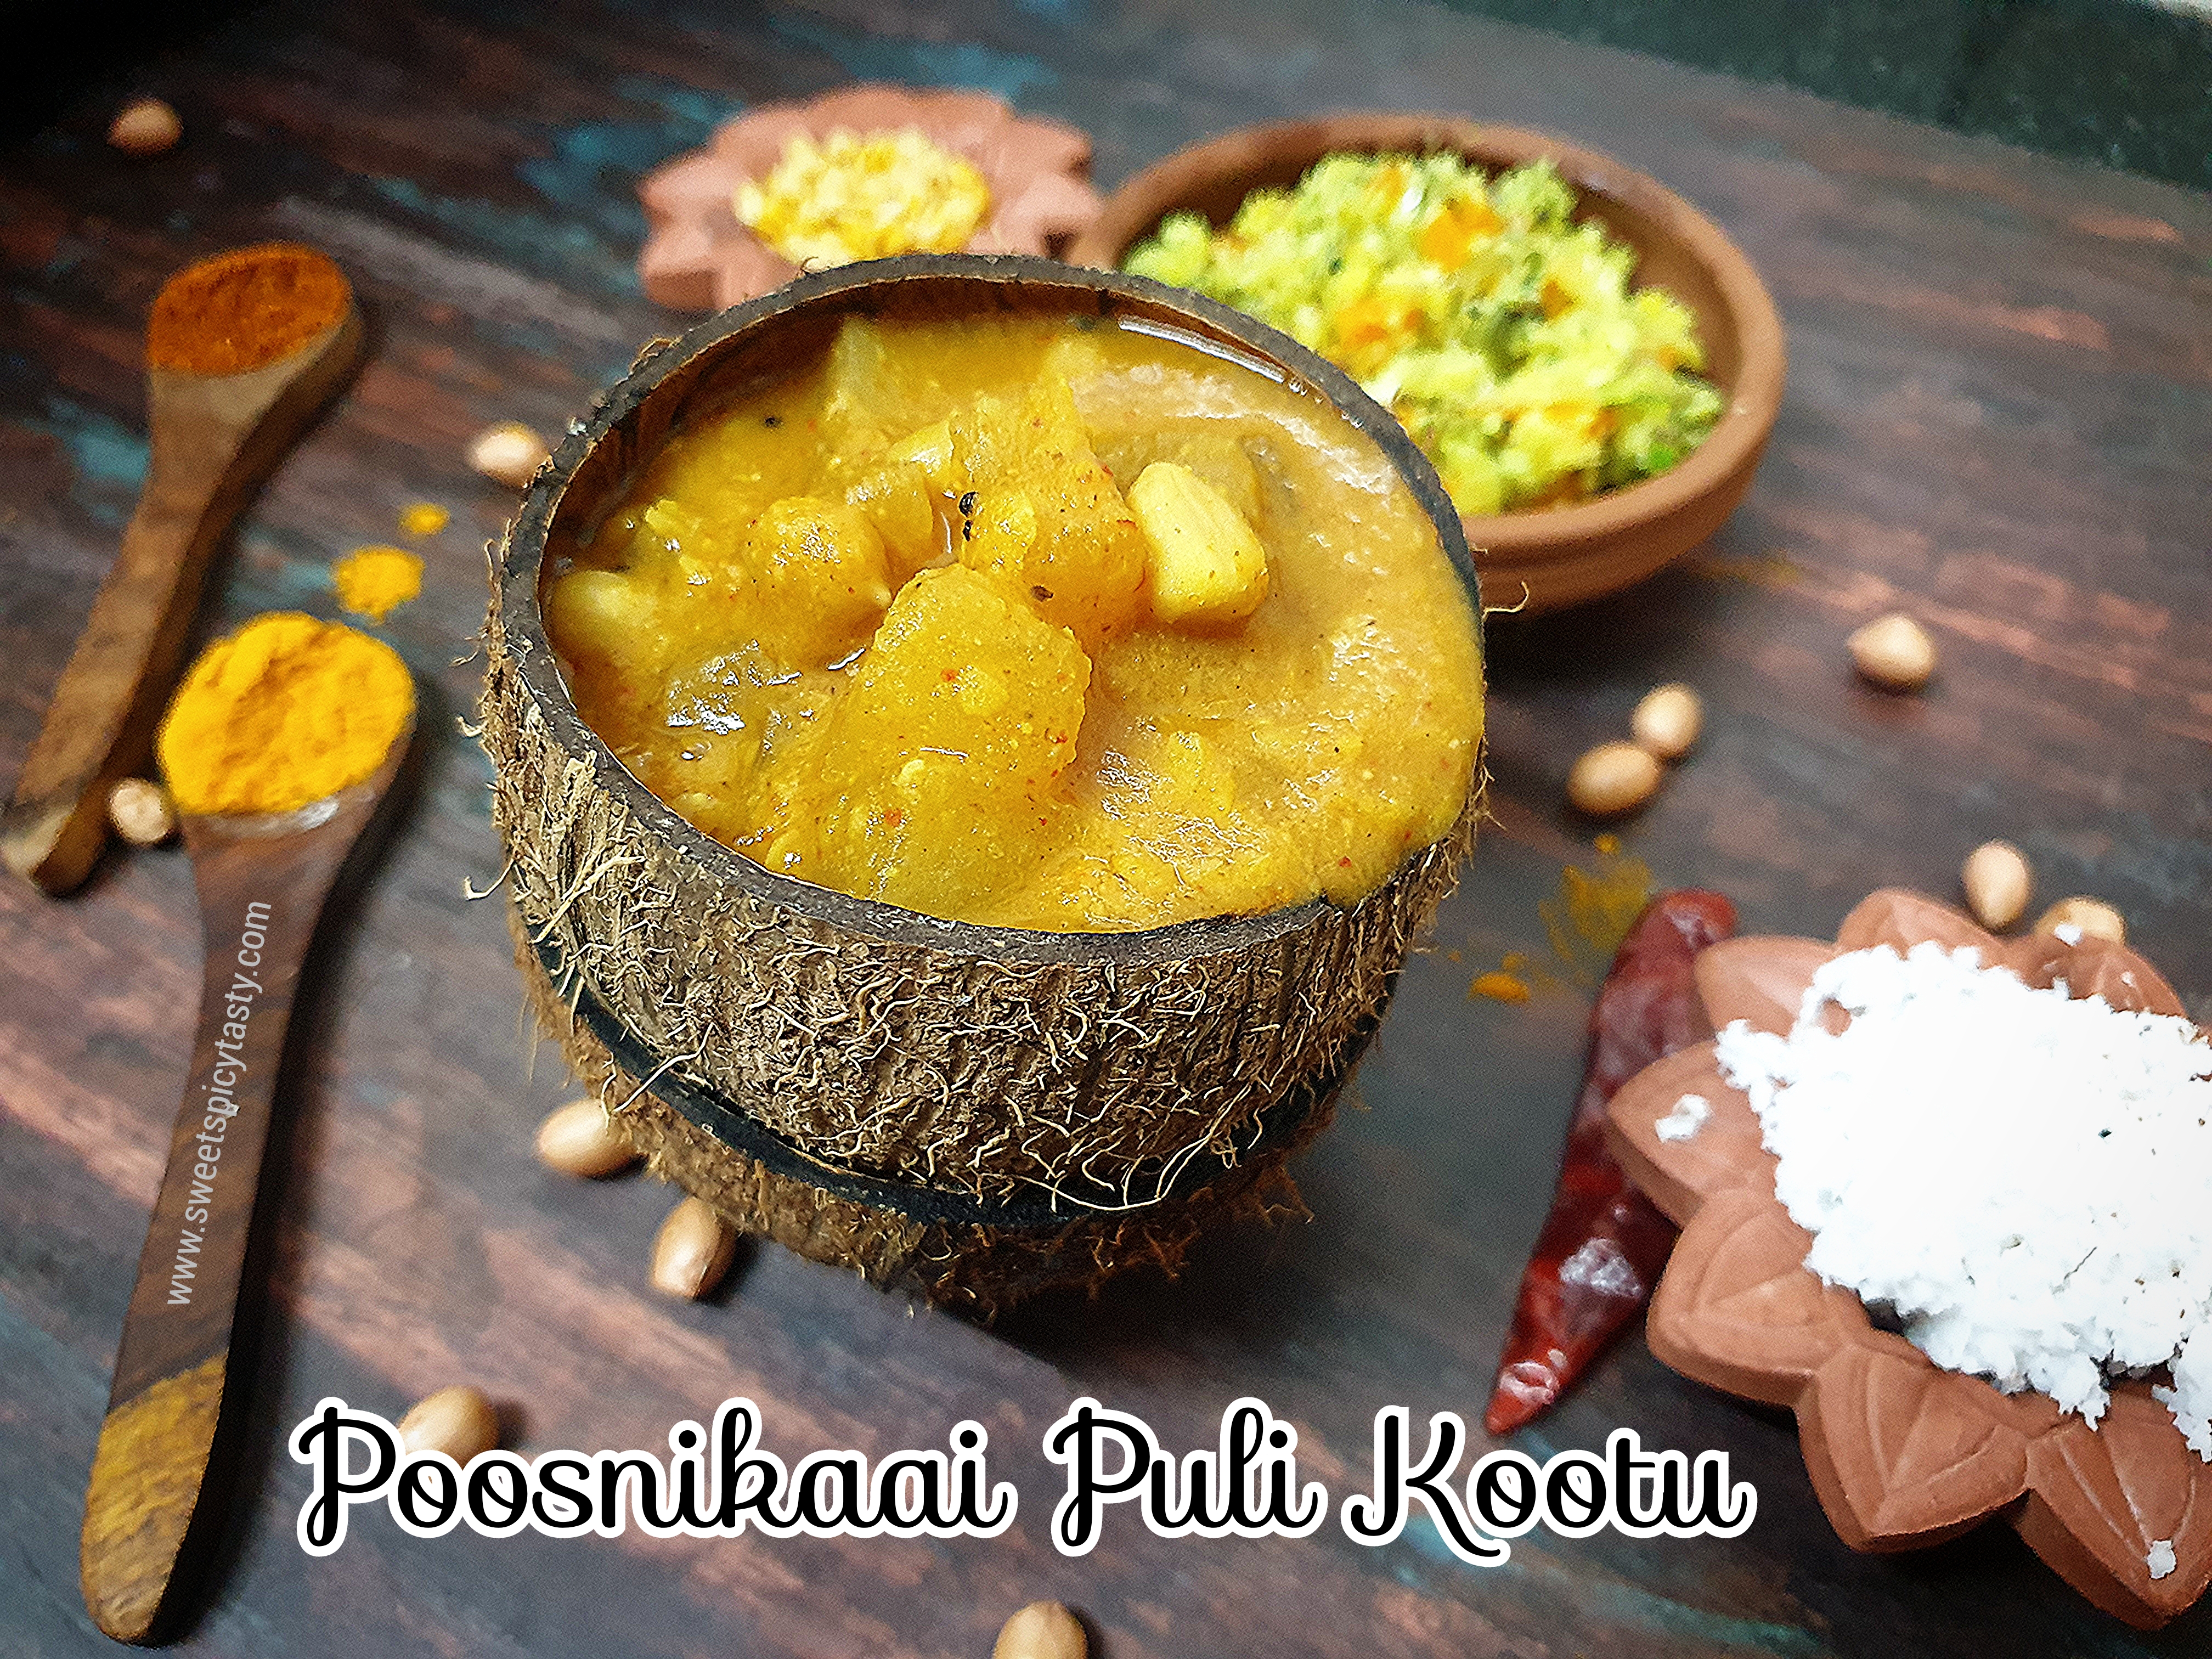
Poosanikaai Puli Kootu - Kalyana Kootu

27 September 2022 at 10:20

 Puli Kootu or Pulippu Kootu is an authentic Tamil brahmin recipe and is made quite frequently in most homes .It is a must have on the wedding feast menu and hence also known as Kalyana Kootu . 

Puli kootu is very tasty as it has a balance of all flavors and the tanginess from the tamarind extract gives it an altogether different flavor profile.

Pulippu kootu fits perfectly for those following a Vegan Diet and also being a No onion No garlic recipe  it is Saatvik and Jain Friendly as well.

Pulippu kootu can be made with brinjals,  ash gourd /white pumpkin or chayote/chou chou . In traditional tambrahm weddings puli kootu is made from ash gourd/poosanikaai and has either boiled chick peas or groundnuts added to the kootu .

In my recipe today ,I am going to use boiled peanuts but I also make it using boiled chickpeas many a times and both of them taste really delicious. 

Puli kootu with hot rice and some coconut based vegetable stir fry is an amazing combination for lunch.  In my home most often the left over puli kootu is paired with chapati for night and it pairs well .


Preparation Time - 15 mins
Cooking Time - 30 mins
Complexity- simple 
Serves - 2 to 3

Ingredients 

2 cups chopped ash gourd /poosanikaai 
1/4 cup thoor dal /pigeon peas/thuvaram paruppu
1/4 cup peanuts 
Small lemon sized tamarind ball
Few curry leaves 
Pinch of turmeric
Salt as needed 
2 tsp oil 
1/2 tsp mustard seeds
Pinch of asafoetida 

To roast and grind
1 tbsp channa dal 
1 tbsp dhaniya/corriander seeds
2 tbsp coconut grated 
3 to 4 dry red chillies 

Method


  • In a pan heat 1/4 tsp oil and roast the channa dhall until crisp and golden brown followed by the dhaniya and red chillies.Allow it to cool and the  grind into a fine paste with coconut and set aside. 
  • Soak the tamarind in hot water for 10  mins and then extract the pulp . Strain the impurities and keep ready .
  • Boil the chopped ash gourd in sufficient water until it is cooked well..it has to be firm but well cooked .
  • Pressure cook the thoor dhall and peanuts in 2 separate containers in the same cooker .Mash the thoor dhall well and set aside.  This saves a lot of time and effort as well.
  • In a thick bottomed vessel,add the boiled ashgoured ,peanuts and the tamarind extract with 1/4 cup water and boil it until the raw smell of the tamarind is lost. 
  • Next add the coconut paste , cooked thoor dhall and another 1/2 cup water and bring to a rolling boil.Adjust salt at this stage . Donot boil too much as the dhall will begin to start sticking to the bottom of the pan and it may get burnt..we don't want a burnt kootu .
  • Prepare a tempering of mustard seeds, curry leaves and asafoetida and pour it on the pulippu kootu.

Pin it up for future 


Little Millet Poha - Samai Poha (Vegan breakfast)

24 September 2022 at 14:33

 Millets are a very good alternative to rice due to their low glycemic index (GI) value which helps in control of insulin and absorption of carbohydrates into the blood stream making it ideal for people with Diabetes.  

Millets also help in weight loss as they are rich in proteins and fibre.

There are lot of millets available like Jowar, Bajra, Ragi ,Little millet, Kodo millet , Barnyard Millet etc . You can very conveniently replace the usage of rice with millet and work towards a healthy lifestyle. 

I am slowly trying to transition into using millets in my daily diet and I am certainly seeing a lot of difference.  Sudden hunger pangs,  mid morning cravings have reduced a lot and millets keep me full for a long time. 

Little Millet is known as Samo Chawal/Kutki  (Hindi), Samai Arisi (Tamil),  Saame (Kannada) , Samaalu (Telugu) .

Little millet is very rich in Magnesium,  Vit B components and also in phosphorous and zinc which help in building energy in the body. 

Making little millet poha is very easy, almost same as making the Poha using Flattened rice.  You can flavor and season it with the spices of your choice.  

Little millet flakes are available in most leading super markets and shops .Also there are many exclusive outlets selling millet based products from where we can procure them easily . 


Preparation Time - 10 mins
Cooking Time - 10 mins
Complexity - easy
Serves - 2 to 3

Ingredients 

1.5 cups little millet poha /flakes 
2 tbsp oil
Handful of peanuts 
Handful of frozen peas (thawed )
1tsp cumin /jeera
2 green chillies chopped 
Few curry leaves 
Salt as needed 
2 tsp lemon  juice
Pinch of turmeric 

Method 


  • Wash the little millet flakes under running water and let it rest in a colander for 10 15 mins . The millet flakes absorb the water and turn soft. 
  • Heat the oil in a kadai, fry the peanuts followed by cumin ,green chillies, curry leaves.
  • Throw in some salt and turmeric followed by the soaked little millet flakes and also the green peas .
  • Toss it well ,cover and cook for 3 to 4 mins . Lastly mix the lemon juice and garnish with fresh corriander and serve hot.

Pin it up


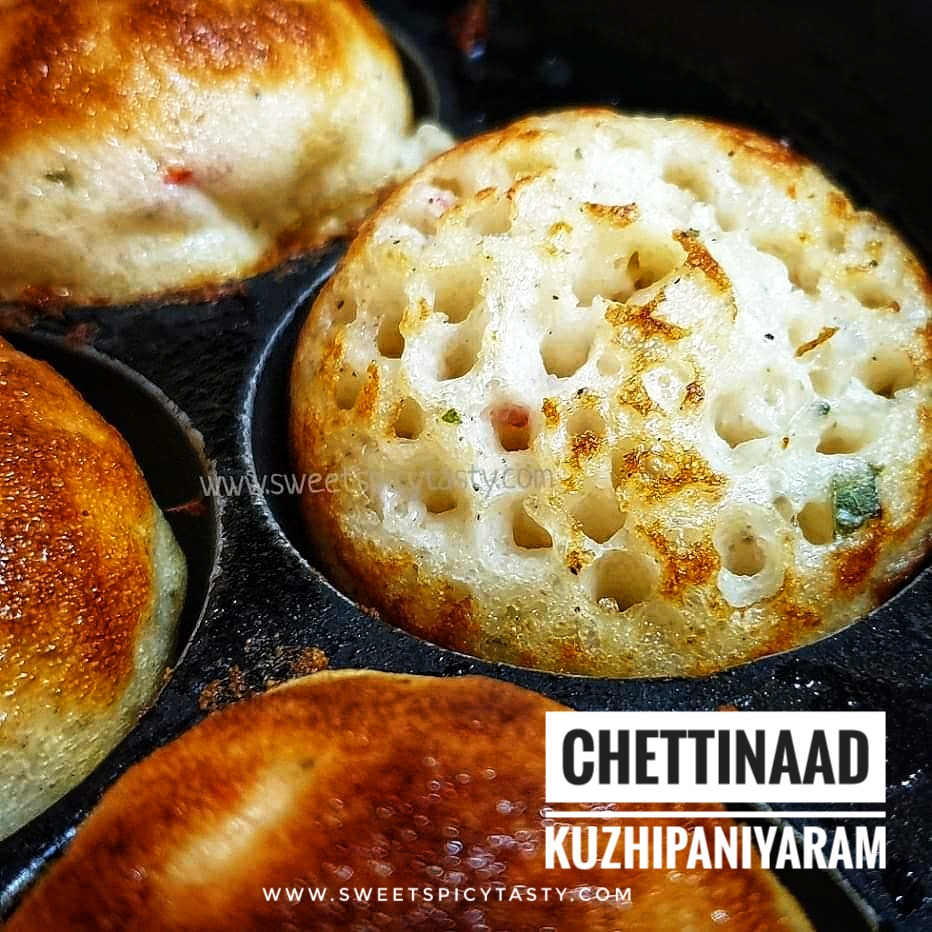
Chettinaad Kuzhipaniyaram - savory snack

 Kuzhipaniyaram is a very tasty and delightful savory snack which takes a very important place either for breakfast or evening snacks  in Tamil Nadu.

Kuzhi in Tamil means cavity/depression and paniyaram means snack in general . So Kuzhi paniyaram means a snack with a depression..sounds funny right ? Basically kuzhi refers to the cavity in the mould of the pan which is used to prepare this snack. 

Kuzhipaniyaram is made in a special vessel called as paniyarakal . It is the same pan which is used to make Sweet Appams ,paddu or gunthaponganalu .

I have already shared the other variant of Paniyaram made from regular Idli batter ,but this chettinaad Kuzhipaniyaram is a special recipe where the batter is ground solely for the purpose of making paniyarams.

Some classic recipes using the Paniyaram Kal / Aebelskeiwer Pan 

Jackfruit Nei Appam

Watermelon Nei Appam

Paddu/Gunthaponganalu

Kunukku Paniyaram

Chettinaad is a region in the Sivagangai district in Tamil Nadu (Southern India) . Chettinaad is known for amazing cotton sarees,Athangudi tiles and lipsmacking food with bold flavor profile especially non veg .

Chettinaad cuisine is known for its pungent and spicy flavor and variety of food ranging from main course , snacks to sweets and savories . As much as they are famous for non veg ,there are a lot of vegetarian options as well .

 Kuzhi paniyaram is served with coconut chutney and /or thakali(Tomato) chutney and some piping hot filter coffee. 

Kuzhipaniyaram also known as uppu appam should not be confused with the other chettinaad special known as Vellayappam .

Vellayappam is a totally different recipe and it has been very well explained by my co blogger Radha on her blog who is my partner this month for the Shh secretly cooking challenge ..we are celebrating Chettinaad cuisine suggested by Kalyani of Sizzling Tastebuds. Kalyani has shared a classic recipe Kaigari Mandi which is very delicious and a perfect accompaniment for main course or idli/dosas .


Soaking Time - 6 to 7 hrs
Fermentation Time - 8 hrs
Preparation Time - 30 mins
Cooking Time - 20 mins
Serves - 5 to 6

Ingredients 

1 cup raw rice (strictly no basmati rice)
1 cup idli rice 
1/4 cup whole udad dal (udad gota)
1 tsp fenugreek seeds 
Salt as needed 

For tempering 
1 tsp mustard seeds
2 to 3 green chillies finely  chopped 
Handful of curry leaves
2 tbsp grated coconut
1/4 cup oil
Fresh chopped corriander 
1/2 onion finely chopped (optional - I haven't used )

Method

  • Wash multiple times until the water is clear. Soak the rice and lentils with fenugreek in water for 5 to 6 hrs.
  • Grind the soaked rice and lentils in a blender or grinder to a fine smooth paste .Batter should be of idli batter consistency not a very runny batter . Let the batter ferment overnight or for 8 hrs . 
  • Before making the kuzhi paniyarams , we need to prepare a tempering that will be added to the batter. 
  • To prepare the tempering, heat about 2 tbsp oil in a pan and splutter the mustard seeds, followed by the green chillies,  curry leaves and fry the onions if using until they turn pink and soft . Lastly add in the coconut and give a quick stir .Add this tempering along with finely chopped corriander to the batter and mix well . 
  • Heat the paniyaram pan and add a few drops of oil in each cavity . 


  • Once the pan is well heated ,add the batter to each cavity and remember to fill only 3/4th of the cavity . The batter on cooking will raise and it needs space to swell . So if you fill it to the brim,the batter will overflow making it a mess .
  • The paniyarams will develop lot of pores as they are cooking, these pores are perfect indicator of a well fermented batter . Once the batter appears cooked on top ,carefully flip it over and cook the underside until it turns brown and crisp .Cooking has to be on medium flame throughout. 
  • Remove the appams /paniyarams from the pan and serve hot with chutney of your choice. 

Pin me up


Brussel Sprouts Spinach Cheela (Vegan Breakfast)

 Cheela or Besan ka cheela is a popular brekfast  in North India made from gramflour known as Besan . There are many variants in making cheela ,can be plain with just basic spices used for flavoring or we can add in some finely chopped veggies and make it a healthier version .

Cheela makes for a very filling breakfast and also a perfect lunch box option.  Gramflour is certainly a magic ingredient which makes the recipe absolutely delicious and tasty . This morning it was raining and chilly making us want to indulge in something that would pep us up for the day and we dint want to have anything deep fried ,so that's how this healthy breakfast was made .


I generally make Tomato Omlettes which are a very popular Street food in Bombay, today this cheela was kind off fusion recipe where I used finely chopped Brussel Sprouts and spinach in the recipe. I used my mini  uttapam pan to make bite sized cheelas just for fun and fancy sake but you can always use the regular dosa pan to make them . If you don't have Brussel sprouts you can also used finely chopped cabbage mixed to the batter.

Brussel sprouts belong to the cabbage family and very popular in western countries.  Brussel sprouts are a good source of vit C and vit K . Exercise medical caution if you are on any kind of medication or blood thinners before using Brussel sprouts . Also,they have a slightly strong odor and turn rubbery when over cooked ,hence donot overcook and keep and eye while cooking 


Preparation Time - 15 mins
Cooking Time - 20 mins
Complexity - simple
Serves - 3 to 4

Ingredients 
2 cups gramflour/besan
2.5 cups water 
2 tsp red chilli powder 
1 tsp crushed ajwain /carom seeds
1 finely chopped green chilli 
1/2 cup Brussel sprouts finely chopped 
1/4 cup spinach finely chopped 
Handful of corriander and mint finely chopped 
Salt as needed
Finely grated ginger 
Pinch of asafoetida 
Oil to roast the cheelas

Method


  • In a wide mixing bowl prepare a lump free batter using the gramflour. 
  • Add the red chilli powder, salt, asafoetida,ginger, crushed carom seeds, chopped Brussel Sprouts, spinach and the mint + corriander and mix well.
  • Adjust salt and spices if needed and let the batter rest for 15 mins . The batter should be of pouring consistency like that of dosa batter. 
  • Heat the pan and pour the batter from center and slightly spread it outside.  Keep it slightly thick and don't spread it too thin. 
  • Drizzle oil around the cheela and let it cook on medium flame . Gramflour takes a while to cook,so don't rush into flipping it over .
  • Once the top side appears dry,carefully flip it over and cook the underside .
  • Take it off the pan and serve it with tomato ketchup or green chutney.  You can also grate some cheese or slather some butter when serving it to kids.  

Pin me 


❌
❌