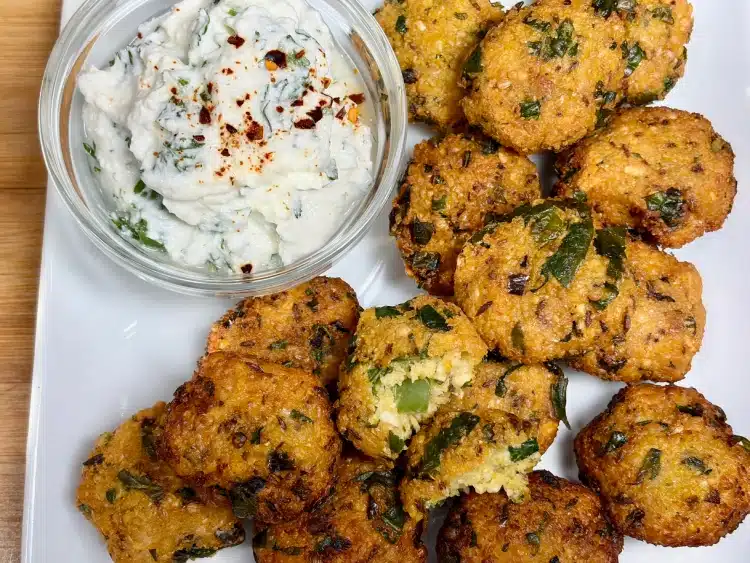
Dal Crispy Vada, Dal Pakora, Tasty Appetizer, Easy Indian Snack Recipe
Mix Dal Crispy Vada, also known as dal pakoras, are one of those comforting snacks that bringback memories of warm kitchens and happy gatherings. Crispy on the outside and soft, tenderinside, each bite is full of rich, delicious flavor.What makes these pakoras so special is the combination of different lentils (dals). Each dal addsits own texture and taste, making every bite unique and satisfying. They are also naturallyprotein-packed, which makes them not just tasty but nourishing as well.I enjoy making them in small, bite-sized portions, they fry up beautifully crisp and are perfect forsharing. Serve them fresh and hot with your favorite chutney or simply enjoy them with a hotcup of tea. That’s my favorite way, especially on a cozy afternoon.Whether you’re serving them as a tea-time snack, a party appetizer, or even adding them tochaat, these crispy dal vadas always disappear quickly!Do try them and share your experience.
Servings 4
Ingredients
½cupwashed pink lentilsmasoor dal
¼cupwashed urad dal
¼cupwashed moong dal
1teaspooncumin seeds
¼teaspoonasafetidahing
1tablespoonwhole coriander
1teaspoonblack pepper
1green chili
1-inchpiece of ginger
½cupfinely chopped spinach
1teaspoonsalt
Instructions
Method
Soak all the dals together for at least 3 hours. After soaking, drain the water well.
Grind the dals along with cumin seeds, whole coriander, black pepper, green chili, and ginger to a coarse paste without adding any water.
Transfer the mixture to a bowl. Just before frying, add salt and chopped spinach, as both release water. Mix everything well.
Shape the batter into small patties.
Heat oil in a frying pan over medium heat. To check if the oil is ready, drop a small amount of batter into the oil, it should come up slowly.
Gently drop the patties into the oil without overlapping. Fry until they turn golden brown and crispy on all sides.
Remove and place on a paper towel to absorb excess oil.
Serve hot with chutney or enjoy with a cup of tea.
I also like to serve them with a spicy yogurt cilantro dip. For the dip, use thick yogurt and add chopped cilantro. Prepare a quick seasoning with cumin seeds, asafetida, crushed dry red chilies, and curry leaves, then mix it into the yogurt for an extra burst of flavor.
Do try them and share how you like to enjoy your pakoras
Tag words I am using on YouTube
Mix Dal Vada, Dal Pakora Recipe, Crispy Dal Pakora, Mix Dal Pakora Recipe, Indian Snack Recipe, Easy Pakora Recipe, Crispy Vada Recipe, Tea Time Snacks Indian, Healthy Indian Snacks, Protein Rich Snacks, Spinach Pakora Recipe, Homemade Pakora, Indian Street Food, Chaat Recipes, Gluten Free Snacks, Vegan Indian Snacks, How to Make Pakoras, Lentil Fritters Recipe, Quick Snack Recipes,
1. Can I use only one type of dal instead of mixing?
Yes, you can use a single dal like moong or masoor, but the mix of dals gives the vadas a better texture and richer flavor.
2. Why should I not add water while grinding the dal?
Avoid adding water to keep the batter thick. A thick, coarse batter helps make the vadas crispy and prevents them from absorbing too much oil.
3. How do I make sure the pakoras turn crispy?
Fry them on medium heat and avoid overcrowding the pan. Also, make sure the batter is not too wet—this helps achieve a crisp texture.
4. Can I bake or air-fry these instead of deep frying?
Yes, you can air-fry or bake them for a healthier version, but the texture will be slightly different and less crispy compared to deep frying.
5. How long can I store the batter or leftover vadas?
The batter is best used fresh, but you can refrigerate it for up to 1 day. Cooked vadas can be stored in the fridge for 1–2 days and reheated in an oven or air fryer to regain crispiness.
Royal Khoya Pistachio Treat, Easy Five Minutes Recipe, Tasty Dessert, Home Made
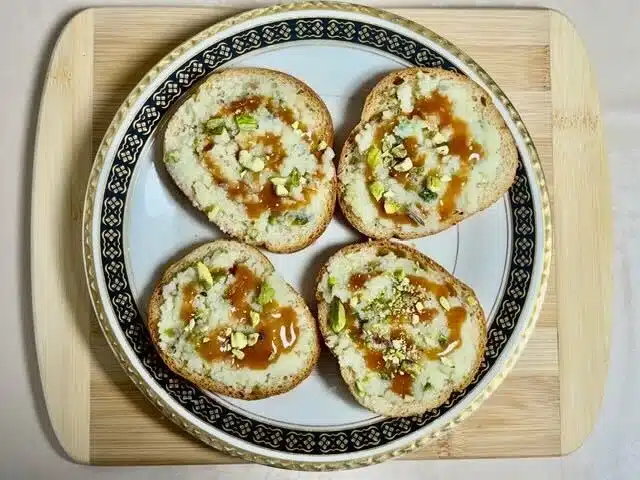
Khoya Pistachio Treat is quick and delicious dessert, you can make in just five minutes usingsimple ingredients already in your kitchen. These sweets are rich, creamy, and full of wonderful pistachio flavor. The soft texture and nuttytaste make them perfect when you want something sweet without spending a lot of time cooking. I love recipes like this because they are easy, satisfying, and feel a little special. Whether youmake them for a quick dessert, to share with family, or to serve guests, they always turn out delightful. Try this wonderful quick dessert and enjoy every bite!This recipe will make 6 pieces.I am using French Baguette; right now, I will just make 4 pieces, I have 4 slices ofbread, lightly butter them and toast them.
Servings 6
Ingredients
For Khyoa Topping
1/3cupheavy cream
1/2cupmilk powder
2tbspof cup coconut powder
2tablespoonscrushed pistachios
1/8teaspooncardamom powder
1/4cupof sugar
For the Caramel Sauce
1/2cupof sugar
1/4cupof cream
Garnishing
2tablespoonssliced pistachios
Other
Bread slices4–6 slices
Instructions
Prepare the toast
I am using French Baguette; 4 pieces lightly butter them and toast them.
Preparing the Khyoa Topping
While bread is toasting make this filling
In a microwave-safe bowl, combine the heavy cream, milk powder, coconut powder,crushed pistachios, cardamom powder, and sugar. Mix everything well.
Microwave the mixture for 40 seconds. Remove the bowl from the microwave and mix itagain thoroughly. The mixture should have a very soft dough-like texture. As it cools, itwill become slightly drier. If it is too soft microwave again for 10 seconds more seconds.
Make sure the mixture does not become too dry, it should remain soft and moist, so it iseasy to spread over toast. If it is needed add little heavy cream.
Making Caramel Sauce
In a small pan add the sugar and cook on medium-low heat until it melts and turns light golden.
Carefully add the cream and stir continuously. The mixture will bubble at first but will quickly become smooth. Cook for about 30–40 seconds until the caramel sauce becomes silky.
Assemble the Toast
Spread a generous layer of creamy nut mixture over the toasted bread.
Drizzle the warm caramel sauce on top and finish by sprinkling chopped pistachios.
Notes
Toast the bread until light golden and crisp, not too dark. This gives the perfect crunch with the soft nut mixture.The nut mixture should be soft and creamy, so it spread easily but does not run off the toast.When making caramel, cook the sugar on low heat and stir gently. Overcooking can make the caramel bitter.If the caramel becomes too thick, add a small spoon of warm cream or milk and stir to loosen it.Perfect for tea-time treats with family and friends.They are also nice for festive occasions or small gatherings, because they look rich and special but take only a few minutes to prepare.You can even serve them as a sweet snack for guests, since they are quick to assemble and always feel a little royal and indulgent.
Frequently Asked Questions (FAQs)
1. Can I use regular bread instead of French baguette?
Yes, you can use any bread like white, whole wheat, or brioche. Just toast it until lightly crisp.
2. What can I use instead of pistachios?
You can substitute with almonds, cashews, or a mix of dry fruits for a different flavor.
3. Can I make the khoya mixture without a microwave?
Yes, you can cook it in a pan on low heat, stirring continuously until it becomes soft and dough-like.
4. How do I store leftovers?
Store the topping and caramel separately in the refrigerator for up to 2 days. Assemble fresh before serving.
5. Is it necessary to make caramel sauce?
No, it’s optional. You can skip it or replace it with honey, condensed milk, or chocolate syrup for a different taste.
Moong Dal Salad with Home Made Dressing, Healthy, Fresh, & Delicious!
This Moong Dal Salad is a healthy and wholesome choice, perfect for lunch. It is made withprotein-rich moong dal and fresh vegetables that add vibrant color and a crunchy bite. Toppedwith cheese and seeds, it is delicious, fresh, slightly tangy, and wonderfully satisfying. It’srefreshing and full of flavor!This is my favorite dressing, and all my friends love it. It’s my go-to dressing. Fresh ginger juicebrings a completely different dimension to it. It adds a gentle spice and freshness that transformsa basic dressing into something much more flavorful and complex.Ginger juice is very easy to make. Simply grate the ginger using a fine shredder and squeeze itwith your fingers to extract the juice.Fresh, colorful, and full of flavor, this Moong Dal Salad makes a perfect light meal. I hopeyou enjoy it as much as we do.
Servings 4
Ingredients
The ingredients are just a guideline and can be adjusted to your taste.
½cupsplit yellow moong dal
6spinach leaves
1/2cupcucumbercut into bite sizes
1/2 cuptomatocut into bite sizes
¼cupred bell peppercut into bite size pieces
2tbspgrated carrots
1sliced radish in round
¼ cupfeta cheese
1tbsptablespoon pumpkin seeds
1tbspsunflower seeds
For Dressing
3tablespoonsof olive oil
2teaspoonsof ginger juice
¼teaspoonblack pepper
1tablespoonlemon juice
½teaspoonyellow mustard seeds powder
2teaspoonsof sugar
Instructions
Method
Wash the moong dal thoroughly and soak for about 30–40 minutes.
Drain the water well. Cook dal in one cup of water, after dal comes to boil lower the heat to low medium for about 6-8 minutes. Dal should be soft and tender but not mushy.
Notes
Serving
Serve the salad fresh for the best taste. The crisp vegetables and tender moong dal make every bite refreshing and satisfying. In a salad bowl, arrange the colorful vegetables around the moong dal. Sprinkle feta cheese on top and finish with a generous drizzle of the dressing. Toss lightly just before serving and enjoy this fresh, vibrant salad. This Moong Dal Salad is simple, healthy, and full of fresh flavors. It’s a great way to enjoy a protein-rich dish that feels light yet satisfying.
Frequently Asked Questions (FAQs)
1. Can I make this Moong Dal Salad ahead of time?
Yes, you can prepare the moong dal and chop the vegetables a few hours in advance. Store them separately in the refrigerator and add the dressing just before serving to keep the vegetables fresh and crunchy.
2. Can I use sprouted moong instead of cooked moong dal?
Yes, sprouted moong works very well in this salad. It adds extra nutrition and a slightly crunchy texture. You can use it raw or lightly steamed if you prefer a softer bite.
3. What can I substitute for feta cheese?
If you don’t have feta cheese, you can use paneer, goat cheese, or even skip the cheese for a lighter version. The salad will still taste fresh and delicious.
4. How long can the dressing be stored?
The dressing can be stored in an airtight container in the refrigerator for up to 3–4 days. Shake or stir well before using.
5. Is this salad suitable for a vegan diet?
Yes, this salad can easily be made vegan by omitting the feta cheese or replacing it with a plant-based cheese alternative. The rest of the ingredients are naturally vegan.
Crispy Vegetable Patties, Nutritious Burger with Moong Dal,Delicious
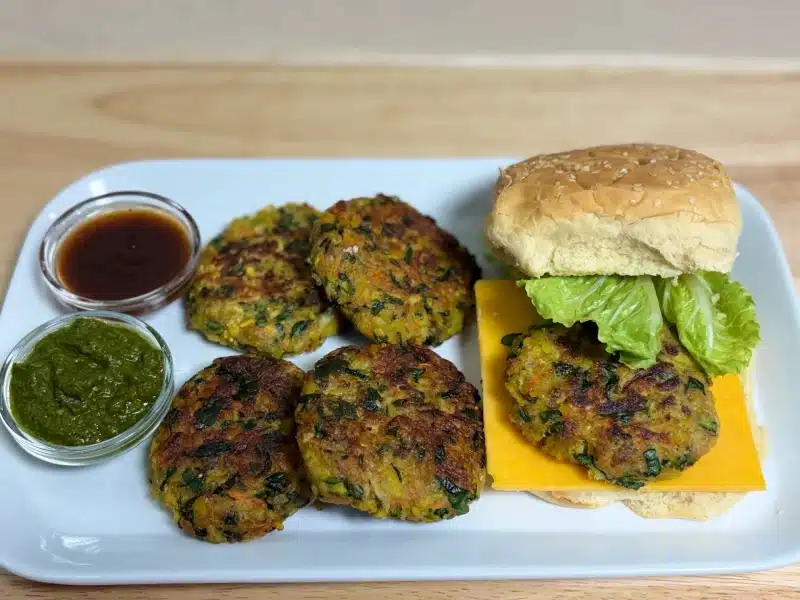
I decided to make these vegetable patties because my grandson keeps requesting them again andagain and how can a Dadi ever say no? The moment he walks in, the first question is always,“Dadi, are you making those patties today?” And just like that, I’m shredding the vegetables.These patties are made with simple, wholesome ingredients, shredded potatoes, carrots, zucchini,and protein-rich moong dal, lightly spiced and mixed with lots of love. Crispy on the outside,soft on the inside, and packed with vegetables, they disappear as soon as they hit the plate.Sometimes he enjoys them as a snack, and sometimes he adds a slice of cheese and turns theminto his favorite sandwich. Watching him enjoy homemade food so happily reminds me that thesimplest recipes create the sweetest memories.
Servings 6
Ingredients
1cupshredded potatoesI am using Yukon potatoes
½cupshredded carrots
1cupshredded zucchini
1cupchopped spinach
½cupwashed yellow moong dal
1tspshredded ginger
1tbspfinely chopped green chilioptional
3tbspcorn starch
¼cupbreadcrumbsas needed
½tspsaltor to taste
¼tspblack pepper
½tspcumin powder
1/8tspasafetida
2tbspoil or cooking
Instructions
Wash the moong dal. In a saucepan, add the dal with 3 cups of water and bring it to aboil. Once it starts boiling, lower the heat and cook for about 15 minutes, until the dal issoft but not mushy. Drain the water and set aside.
Squeeze out the excess water from the shredded zucchini and potatoes. This step is veryimportant to keep the patties firm and crispy.
Method
In a large mixing bowl, add shredded potatoes, carrots, zucchini, chopped spinach, and moong dal.
Add ginger, green chili (if using), salt, black pepper, cumin powder, and asafetida.
Sprinkle in the corn starch and add breadcrumbs as needed.
Mix everything well until it comes together into a soft but firm mixture. If the mixture feels too wet, add a little more breadcrumb.
Divide the mixture into 6 equal portions and shape them into round patties.
Heat a pan on medium heat and add oil.
Place the patties on the pan and cook until golden and crisp on one side. Flip gently and cook until evenly browned.
Remove from the pan and let them rest for a minute before serving.
Notes
I like to grill these Vegetable Patties on the stovetop. It’s quick, makes them extra crispy, and doesn’t require any additional oil.Serving Suggestions
Serve hot with green chutney, ketchup, or yogurt dip
Use them to make a healthy sandwich using cheese.
Perfect for lunchboxes or evening snacks
Tips & Variations
Add finely chopped bell peppers or corn for extra texture
Skip green chili for a kid-friendly version
These patties can be shaped smaller to make vegetable bites
Frequently Asked Questions (FAQs)
1. Can I make vegetable patties without moong dal?
Yes, you can skip moong dal and add mashed potatoes, cooked lentils, or chickpeas instead. However, moong dal adds protein and helps give the patties a better texture.
2. How do I keep vegetable patties from falling apart?
Make sure to squeeze out excess moisture from the zucchini and potatoes. Adding cornstarch and breadcrumbs also helps bind the mixture and keep the patties firm.
3. Can I bake or air fry these vegetable patties instead of pan-frying?
Yes. You can bake them at 375°F (190°C) for 20–25 minutes, flipping halfway. In an air fryer, cook at 375°F for about 12–15 minutes until crispy.
4. Can I make these patties ahead of time?
Yes, you can shape the patties and store them in the refrigerator for up to 24 hours before cooking. They can also be frozen for longer storage.
5. What can I serve with vegetable patties?
These patties taste great with green chutney, ketchup, yogurt dip, or inside a burger or sandwich with cheese and fresh vegetables.
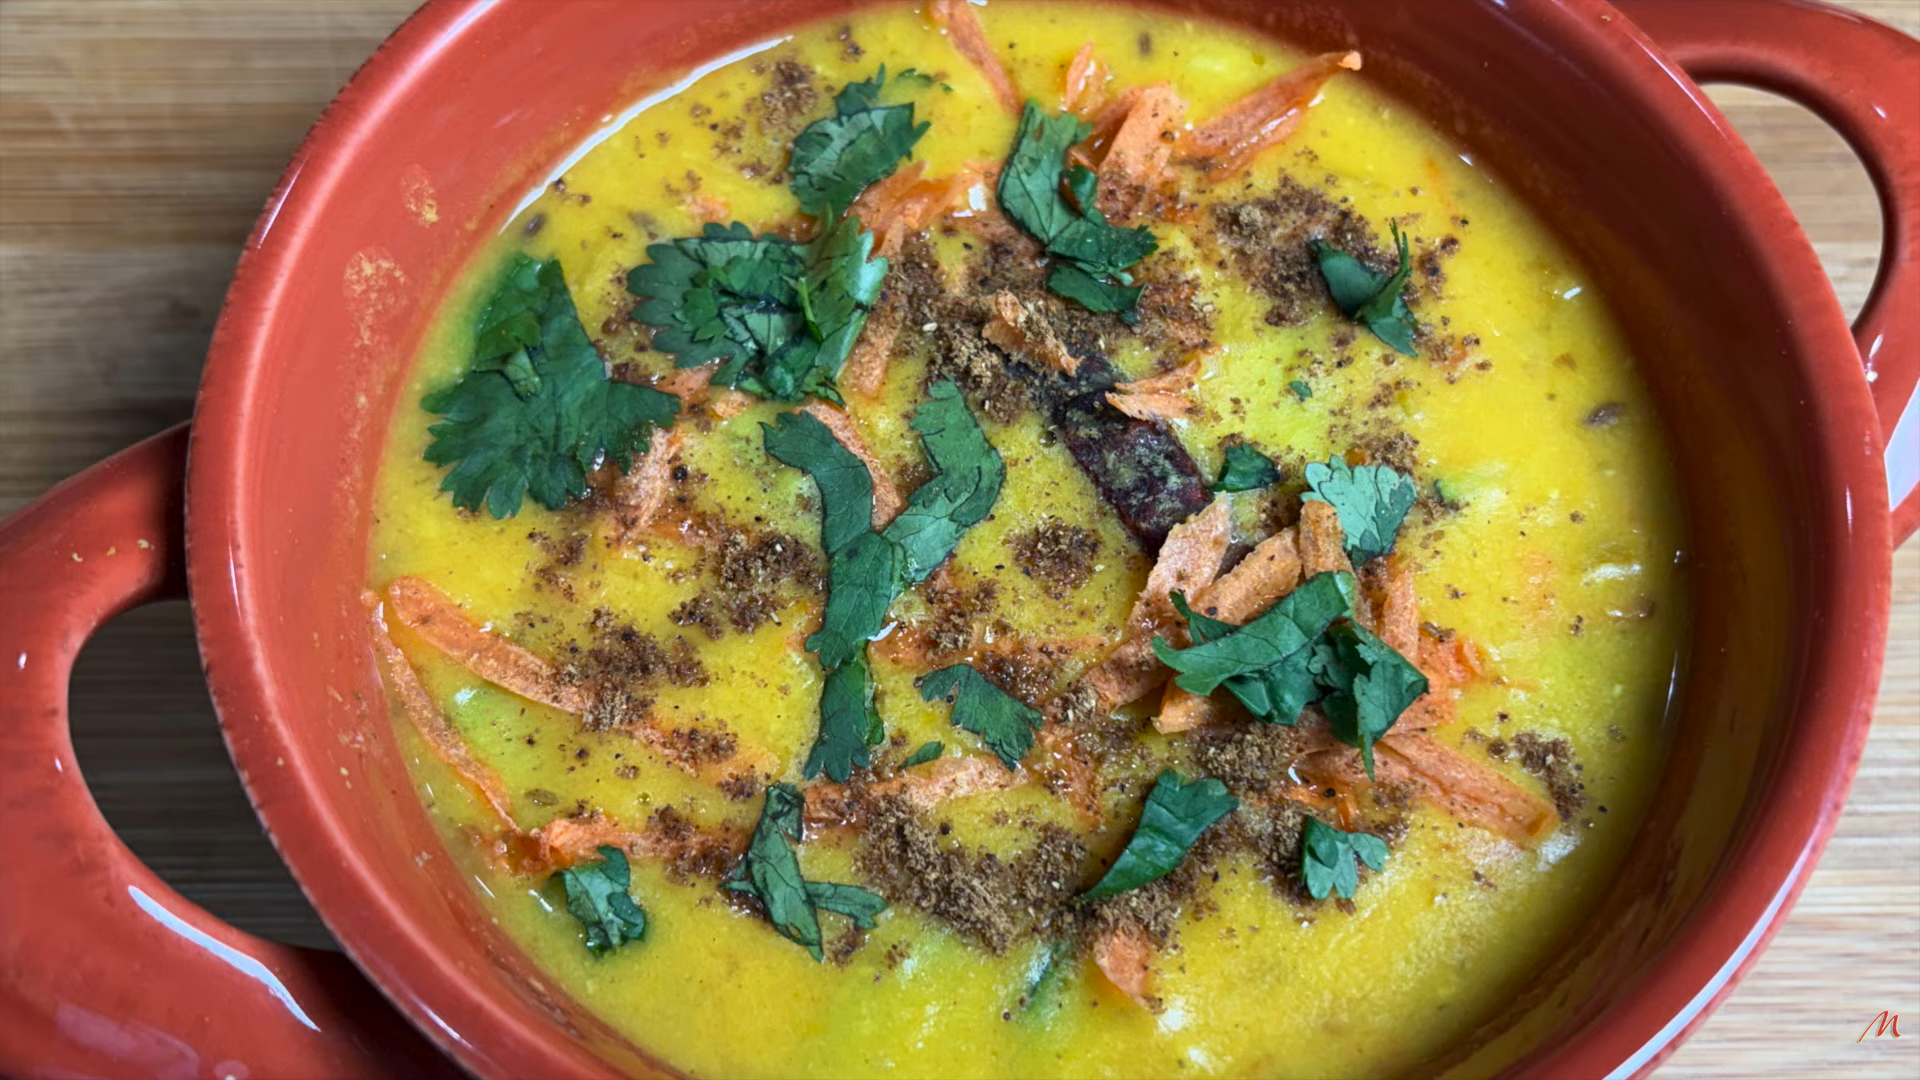
Some days call for food that is simple, nourishing, and comforting. This Ultimate Wholesome Dal Soup with Veggie Crunch is one of those recipes. Made with a blend of moong and masoor dal, it’s light yet satisfying, gently spiced, and easy to put together. What makes it special is the final touch, a quick stir-fry of colorful vegetables added at the end, bringing a little crunch and freshness to every spoonful. It reminds you how comforting homemade food can be. Serve warm and enjoy this ultimate wholesome dal soup, where soft lentils meet a fresh, veggie crunch—simple, nourishing, and deeply comforting.
Prep Time 10 minutesminutes
Cook Time 25 minutesminutes
Soaking Time 30 minutesminutes
Servings 2
Ingredients
For the Dal
½cupred dalmasoor dal
½cupmoong dalwashed
2tbspoil
½tspcumin seeds
1cupchopped tomatoes
¼tspturmeric
⅛tspasafetidahing
¼tspblack pepper
1tspsaltor to taste
3cupsof water
1cupof additional waterfor adjusting consistency
For the Stir-Fried Vegetable Topping
1tbspoil
½tspcumin seeds
¼cupzucchinifinely chopped
¼cupyellow or red bell pepperfinely chopped
¼cupof shredded carrots
1tbspgingerthinly sliced
2dried red chilies
For Garnishing
2tsplemon juice
½tspgaram masala
2tbspfinely chopped cilantro
Instructions
Wash the moong dal and red dal until the water runs clear. Soak for 30 minutes. Drain and wash again.
Heat oil in a pot. Add cumin seeds and let them sizzle.
Add chopped tomatoes and cook until soft and mushy.
Stir in turmeric, asafetida, black pepper, and salt.
Add the soaked dals and 3 cups of water. Cover and cook on low to medium heat for 15 to 20 minutes, until the dal is soft and mushy.
Blend the dal using a hand blender until smooth and soup-like in consistency.
Add 1 cup of water to adjust the consistency and bring it to a gentle boil.
In a separate pan, heat 2 tablespoons oil. Add cumin seeds.
Add ginger and dried red chilies. Sauté until fragrant.
Add zucchini and bell peppers. Stir-fry briefly until just tender, keeping a slight crunch.
Pour the stir-fried vegetables over the dal soup. Add lemon juice, garnish with cilantro, and sprinkle garam masala.
Serve warm.
Notes
Serve this dal soup as a light lunch with toasted bread, or plain rice.
This soup also works well as a make-ahead dish—reheat gently and add the veggie
topping fresh before serving.
Frequently Asked Questions (FAQs)
1. Can I use only one type of dal instead of both moong and masoor?
Yes, you can use either moong dal or masoor dal alone. However, using both gives a better texture and balanced flavor.
2. Do I have to soak the dal?
Soaking helps the dal cook faster and become softer. If you’re short on time, you can skip soaking, but increase the cooking time slightly.
3. Can I make this in a pressure cooker or Instant Pot?
Yes. Cook the soaked dals with water and spices for:
Pressure cooker: 2–3 whistles
Instant Pot: 6–8 minutes on high pressure Let the pressure release naturally before blending.
4. Can I skip blending the dal?
Yes. Blending gives it a smooth soup-like texture. If you prefer a more rustic texture, you can lightly mash it instead.
5. Can I add other vegetables to the topping?
Absolutely. You can add beans, corn, spinach, peas, or mushrooms. Just make sure not to overcook them so they keep their crunch.
What is Agar Agar: Agar agar is a natural setting agent made from seaweed. It works like gelatin, but it’s completely plant based. When you boil it in water and then let it cool, it helps desserts like pudding or jelly set beautifully.”
Strawberry Almond Pudding, Delicious and Elegant Dessert, Easy to make, Home Style
This strawberry almond pudding is creamy and smooth, light and refreshing. It comes togetherquickly using simple ingredients. A beautiful dessert that looks elegant and tastes delicious,perfect for entertaining or for a simple treat at home.
Servings 4
Ingredients
2cupsof chopped strawberriesshould be very chilled
1 cup heavy creamchilled
For a dairy-free optionuse 1 cup of coconut milk
¼ cup almond powder
1 tsp of agar powder
½ cup water
4 tbsp sugaradjust to taste
1 few strawberries to garnish
Instructions
In a saucepan, add ½ cup water and 1 teaspoon agar agar.Add 4 tablespoons sugar, mix well, and bring it to a gentle simmer.Keep stirring continuously—this is important to ensure the mixture is smooth and lump-free.Once the agar agar is fully dissolved, turn off the heat. The syrup is ready.
In a blender, add 2 cups strawberries, cut into a few pieces.The strawberries should be chilled before using—place them in the freezer for about 30minutes.Add ¼ cup almond powder, 1 cup chilled heavy cream, and the prepared sugar–agarsyrup.Blend on high speed until smooth and creamy
Add a few fresh strawberries, sliced into small pieces, to the serving bowls.Pour the strawberry–almond mixture over them.
Refrigerate for about 1 hour before serving.
Finish by adding a few more strawberry pieces on top.
For a final touch, garnish with a couple of fresh mint leaves.
Notes
A lovely dessert for get-togethers or simply treating yourself.
You may use frozen strawberries, there is no need to thaw, just blend directly.
Adjust sugar based on the sweetness of the strawberries.
Agar sets quickly, so work efficiently once it’s boiled.
What is Agar Agar:Agar agar is a natural setting agent made from seaweed. It works like gelatin, but it’s completely plant based. When you boil it in water and then let it cool, it helps desserts like pudding or jelly set beautifully.”
1. What is Strawberry Almond Pudding?
Strawberry Almond Pudding is a creamy, smooth dessert made with fresh strawberries, almond powder, cream, and agar agar. It’s light, refreshing, and naturally elegant in taste and appearance.
2. Is this pudding easy to make?
Yes, it’s very easy to prepare. The recipe uses simple ingredients and comes together quickly with minimal cooking and blending.
3. Can I make this pudding dairy-free?
Absolutely. You can replace the heavy cream with coconut milk to make a dairy-free version without affecting the texture too much.
4. What is agar agar, and why is it used?
Agar agar is a natural, plant-based setting agent made from seaweed. It works like gelatin and helps the pudding set firmly once chilled, making it suitable for vegetarian and vegan diets.
5. Can I use frozen strawberries instead of fresh ones?
Yes. Frozen strawberries work well for this recipe. There’s no need to thaw them—just blend them directly.
6. How long does the pudding need to set?
The pudding needs about 1 hour in the refrigerator to set properly. Agar agar sets faster than gelatin.
This is a very simple, yet flavorful potato dish made with just a few ingredients, lots of freshcilantro, ginger, and a little spice. It’s one of those everyday recipes I make often in my kitchen.You can enjoy it as a side dish, have it as a snack, or even roll it up in a roti for a quick andsatisfying meal. Easy home cooking doesn’t have to be complicated, just fresh ingredients andcomforting flavors. Simple ingredients, easy cooking, and so much flavor.Perfect for everyday meals!
Simple and flavorful spicy potato recipe made with fresh cilantro, ginger, and mild spices. Perfect as a side dish, snack, or rolled in a roti for easy everyday meals.
Quick & Easy Creamy Ricotta Pie (Indian Mithai Style)
Sometimes you want to make a dessert that feels special but doesn’t take hours in the kitchen. This creamy ricotta pie is one of those recipes. I am making this pie with a store-bought pie crust and simple ingredients; it has a soft, lightly grainy texture that reminds me of Indian mithai. My granddaughter says it reminds me of Kulfi. The gentle flavor of cardamom and the crunch of nuts on top make it both comforting and festive at the same time. Best of all, it’s a no-fuss recipe—mix, fill, bake, and chill.I am using Store bought pie crest use shallow pie crest not deep crest.
Prep Time 10 minutesminutes
Total Time 45 minutesminutes
Ingredients
1Store-bought pie crust
16 oz2 cupswhole milk ricotta
1/2cupsugar (adjust to taste)
1/4tspcardamom powder
1tbspcornstarch (important for setting)
2tspchopped pistachios and almonds
Instructions
Mix ricotta, sugar, cardamom, and cornstarch
Fill the pie crust evenly
Bake at 350°F (190°C) for 30–35 minutes
Cool completely before slicing
After baking for 20 minutes sprinkle the nuts and bake again.
Pie should have a light brown color on the top
Slice the pie after it is chill Served chillTexture: soft, lightly grainy, like kalakand Indian mithaiThis creamy ricotta pie looks amazingly delicious, and my kitchen is filled with the sweet aroma of cardamom. I hope you enjoy making it as much as I did. Stay healthy and stay safe.
Notes
Use a shallow store-bought pie crust, not a deep-dish crust, for best results.
Cornstarch is essential—it helps the pie set properly while keeping the texture soft and creamy.
Sprinkle chopped nuts after 20 minutes of baking to prevent them from burning.
Best served chilled for a rich, dessert-like experience
Cook at 320–330°F (160–165°C) for 15–20 minutes, checking halfway through. The pie should be set but still slightly wobbly in the center.
If the top starts browning too quickly, loosely cover it with foil.
Frequently Asked Questions (FAQs)
1. Can I use low-fat ricotta instead of whole milk ricotta?
Whole milk ricotta is recommended for a creamy, rich texture. Low-fat ricotta can make the pie drier and less smooth.
2. Can I reduce the sugar?
Yes, you can adjust the sugar to your taste. If you prefer a mildly sweet dessert, start with 1/3 cup and increase if needed.
3. Why is my pie still slightly wobbly in the center?
This is completely normal. The pie continues to set as it cools and will firm up fully after chilling in the refrigerator.
4. Can I make this pie ahead of time?
Yes. This pie actually tastes better the next day. You can make it in advance and store it covered in the refrigerator for up to 3 days.
5. Can I skip the nuts on top?
Yes, the nuts are optional and mainly add texture. You can replace them with raisins or skip the topping altogether.
6. How do I air-fry the pie safely?
Place the pie in the air fryer basket and cook at 320–330°F (160–165°C) for 15–20 minutes, checking halfway through. If the top browns too quickly, loosely cover it with foil.
Stuffed Parathas Made Easy Aloo Potato Gobhi Cauliflower
I am truly excited! Stuffed parathas sound difficult to make and time consuming andhonestly, they are. They’re one of the most loved Indian breads, but making the doughand rolling the parathas is the part that creates the most work, the most mess, and themost cleanup.That’s why I’ve been experimenting with easier ways to make them while keeping thetaste true to the original. You can even call it semi-homemade because I’m using store-bought uncooked rotis. I was so happy and surprised when I came up with this quick,simple method. In the end, your own finishing touch makes all the difference!Today, I am sharing recipes for two different parathas:Aloo (Potato) Paratha — my favorite classicGobhi (Cauliflower) Paratha — my husband’s favoriteThis recipe will make 2 parathas — one of each.
Prep Time 15 minutesminutes
Cook Time 15 minutesminutes
Servings 2parathas
Ingredients
Aloo Paratha
Ingredients
2 Uncooked Rotis (available at Indian stores)
For filling
½cupboiled and mashed potatoes
¼teaspooncumin seeds
1/2teaspooncoriander powder
¼teaspoondry mango powder
A pinch of asafetida
¼teaspoonsalt
¼teaspoonfinely grated ginger
½teaspoonfinely chopped green chili (adjust to taste),or ¼ teaspoon red chili powder
1tablespoonfinely chopped cilantro
2teaspoonsoil to cook the paratha
Gobhi (cauliflower) Paratha
Ingredients
2UncookedRotis (available at Indian stores)
½cupgrated cauliflower (Gobhi)
2tablespoonsof boiled mashed potatoes (to help hold the filling)
½teaspooncumin seeds
1teaspooncoriander powder
¼teaspoondry mango powder
A pinch of asafetida
¼teaspoonsalt
¼teaspoonfinely chopped ginger
½teaspoonfinely chopped green chili (adjust to taste),or ¼ teaspoon red chili powder
1tablespoonfinely chopped cilantro
2teaspoonsoil
Instructions
Prepare the filling:
Mix all the ingredients together. Taste and adjust the salt. If filling seems too dry add 1spoon of water.
Lightly cook the rotis:
Heat a flat skillet over medium heat. Cook each roti on one side only for about 30 seconds.Place them on a plate.
Assemble the paratha:
On one roti (cooked side up), spread the potato filling evenly. The filling should not be too thick. Place the second roti on top with the cooked side facing down.
Cook the paratha:
Heat the skillet to medium-high. Transfer the prepared paratha to the skillet. Cook on both sides using about 1 teaspoon oil per side.Press gently with a spatula and cook until golden brown and crispy. These come out looking just like traditional aloo parathas — crispy, hot, and delicious.They taste best when served hot!
Gobhi (cauliflower) Paratha
Prepare the filling:
Grate the cauliflower finely. Add the mashed potatoes and mix well, this helps bind the loose cauliflower.
Mix in all remaining ingredients. Taste and adjust the salt.
If filling seems too dry add 1 spoon of water
Lightly cook the rotis:
Heat a flat skillet over medium heat. Cook each roti on one side only for about 30 seconds.Remove and set aside.
Assemble the paratha:
Place one roti on a plate with the cooked side facing up.Spread the cauliflower-potato filling evenly in a thin layer.Place the second roti on top with the cooked side facing down.
Cook the paratha:
Heat the skillet on medium high. Gently place the stuffed paratha on the skillet.
Cook both sides using about 1 teaspoon oil per side.
Press lightly with a spatula and cook until both sides are golden brown and crisp.
These semi-homemade Gobhi Parathas turn out wonderfully — flavorful, easy to handle, and so much simpler to prepare than the traditional method. Serve hot for the best taste!
Notes
Keep the filling layer thin to prevent tearing.
Prick the paratha lightly while cooking to avoid puffing and separation.
Always cook on medium to medium-high heat for even browning.
These parathas stay crisp and reheat well on a skillet.
I like to serve paratha spiced yogurt or pickle or just enjoy, with hot cup of tea. Thank you! Enjoy!
Frequently Asked Questions (FAQs)
1. Can I use frozen rotis?
Yes. Thaw them completely before cooking to ensure even heating and proper texture.
2. Why add potatoes to gobhi filling?
Cauliflower releases moisture while cooking. Adding potatoes helps bind the filling and prevents the paratha from separating.
3. Can I make these ahead of time?
Yes. Cook them slightly less if you plan to reheat later on a skillet.
4. Can I make them oil-free?
A small amount of oil helps create a crisp texture, but you can reduce the quantity if needed.
5. What can I serve with parathas?
Parathas pair well with spiced yogurt, pickle, butter, or simply enjoy them with a hot cup of tea.
Apple pie is such a treat! It’s impossible to stop eating, especially when it’s made just right and served hot with vanilla ice cream. When I first came to the USA in January, it was very cold. As a vegetarian, we didn’t have too many options at that time, but we were treated to our first dessert: hot apple pie topped with vanilla ice cream. What a treat it was! I fell in love with it instantly.Over time, I learned to make apple pie and made it many times, but it has been a while since then. Recently, I decided to give it an Indian twist. I wanted to make it easy to prepare, so I decided to make it in paratha style, filled with sweet and sour apples. For flavoring, I used traditional spices like cinnamon, nutmeg, and cloves. You may try other fruits of your choice, such as pears and peaches—these are two I have tried. But I must admit, for me, nothing beats the sweet and sour apple flavor paired with the aroma of cinnamon.
Prep Time 15 minutesminutes
Cook Time 20 minutesminutes
Servings 4Apple Pie Parathas
Ingredients
For the Dough:
1cupall-purpose flour
¼cupwhole wheat flour
3tbspsoft butter
1pinchsalt
½ cupchilled water
For the Filling:
1½ cupsgrated appleGranny Smith apples or 1 large apple
¼tspcinnamon powder
1pinchnutmeg powder
1pinchclove powder
¾cupsugar
Instructions
For the Dough:
In a bowl, mix all-purpose flour, whole wheat flour, and salt. Then, add the butter ensuring it’s soft but not melted and use your fingers to combine the mixture until it becomes crumbly.
Slowly add water, just enough to bring the flour together, but do not knead the dough. It’s important to ensure that the paratha remains flaky. Let the dough sit for about 10 minutes.
For the Filling:
Peel and grate the apple; the grated apple should yield about 1½ cups. I like to use Granny Smith apples because they are firm and tart, but you can use other varieties, ensuring you add lemon juice to provide tartness.
Over low-medium heat, combine all the filling ingredients—apple, sugar, cinnamon, clove, and nutmeg in a pan.
Cook until the mixture becomes a soft, sticky dough, which should take about 7 minutes. Be sure to stir the filling continuously.
The filling should be at room temperature before making the paratha.
Making the Paratha:
Lightly knead the dough and divide it into four equal parts, rolling each into a ball between your palms.
Roll each dough ball into a 3-inch circle. Place about 2 tablespoons of filling in the center of the rolled dough.
Pull the edges of the dough to wrap it around the filling. Repeat to make all four filled balls. Let the filled balls rest for three to four minutes.
Meanwhile, heat a heavy flat pan over medium-high heat until moderately hot. To test, sprinkle water on the skillet—if the water sizzles right away, the skillet is ready.
Lightly press each filled ball in dry whole wheat flour on both sides. Using a rolling pin, gently roll the balls into five-inch circles, keeping the sealed side of the ball on top. If the dough sticks to the rolling pin or surface, lightly dust the parathas with dry flour.
Place the paratha on the skillet. When it starts to change color and puff up, flip it over. You will notice some golden-brown spots. After a few seconds, drizzle one teaspoon of oil over the paratha.
Flip it again and lightly presses the puffed areas with a spatula. Flip once more and press with the spatula, ensuring the paratha is golden-brown on both sides. Repeat for the remaining parathas.
These apple parathas taste like you’re having apple pie. You can make these apple pie parathas in advance; they stay good for 3-4 days at room temperature, and you can refrigerate them for 3-4 weeks.
When serving, reheat them over a skillet, in an air fryer, or the oven. Serve them with ice cream; I enjoy hot paratha with vanilla ice cream, while my husband prefers to melt cheese over his.
Notes
Tips: After stuffing the parathas, let the stuffed dough balls rest for 3 to 4 minutes. This helps the dough settle, making it easier to roll the parathas without the stuffing coming out from the sides.Roll paratha evenly without putting too much pressure. For a vegan option: I used butter to make the dough because it adds flakiness and crispness to the parathas. If you’re vegan, you can substitute butter with oil.Filling: The apple filling should have a soft, slightly sticky texture. If the filling will become little dry after cooling. This will make it easier to roll the parathas and ensure the filling spreads evenly.
Introduction to Apple Pie Paratha
Apple Pie Paratha is a creative fusion dish that combines the comforting flavors of the classic American apple pie with the traditional Indian paratha. This innovative recipe is perfect for dessert lovers who enjoy experimenting with global cuisines. Sweet and sour grated apples are flavored with aromatic spices like cinnamon, nutmeg, and cloves, creating a filling that tastes like a warm apple pie. Wrapped in a flaky paratha dough and cooked to golden perfection, this dish is an indulgent treat that pairs beautifully with vanilla ice cream or even a savory topping like melted cheese.
Cultural and Culinary Fusion
The idea of fusing apple pie flavors into a paratha showcases the versatility of Indian flatbreads. Parathas, traditionally made savory with fillings like potatoes or paneer, lend themselves wonderfully to sweet adaptations. This Apple Pie Paratha recipe celebrates both Indian and Western culinary traditions, making it an exciting choice for festive occasions, family meals, or even a quick tea-time treat. The warm spices used in the filling are reminiscent of traditional Indian desserts, while the apples and their tart-sweet flavor pay homage to the beloved American apple pie.
Recipe Variations from Manjula’s Kitchen
If you love Apple Pie Paratha, you may also enjoy exploring other innovative and traditional paratha recipes from Manjula’s Kitchen:
Aloo Paratha: A savory paratha stuffed with spiced mashed potatoes, perfect for breakfast or lunch.
Sweet Coconut Paratha: A unique dessert paratha with a filling of sweetened coconut and cardamom.
Paneer Paratha: A savory flatbread filled with spiced paneer, offering a protein-rich option.
Gobi Paratha: A classic paratha stuffed with grated cauliflower, flavored with Indian spices.
Each of these recipes showcases the versatility of parathas, whether savory or sweet, and their ability to incorporate diverse flavors.
Health Benefits and Dietary Considerations
Apple Pie Paratha combines the natural goodness of apples with the comforting texture of parathas. Apples are rich in fiber, vitamin C, and antioxidants, making them a healthy addition to any meal. The aromatic spices used in the filling, like cinnamon and nutmeg, are known for their anti-inflammatory and digestive properties.
For those following a vegan diet, this recipe can be easily adapted by replacing butter with oil in the dough preparation. The paratha dough itself is made with a mix of all-purpose and whole wheat flour, offering a balance of flavor and texture. While this is an indulgent dessert, the option to use natural sweeteners or reduce the sugar content can make it a lighter treat.
Serving Suggestions
Apple Pie Paratha is a versatile dessert that can be enjoyed in various ways:
Classic Pairing: Serve the paratha warm with a scoop of vanilla ice cream for a classic apple pie-inspired experience.
Savory Twist: Melt a slice of cheese over the hot paratha for a sweet-savory flavor profile.
Festive Plating: Drizzle some caramel or chocolate sauce over the paratha for an extra indulgent touch during special occasions.
Quick Snack: Enjoy the paratha on its own with a hot cup of chai or coffee for a cozy snack.
These parathas can be made in advance and reheated, making them a convenient option for entertaining guests or meal prepping.
ConclusionApple Pie Paratha is a delightful fusion dish that transforms a classic dessert into a flaky, flavorful Indian flatbread. Its sweet apple filling, spiced with cinnamon and nutmeg, offers a warm and comforting flavor, perfect for any season. Whether you’re looking for an innovative dessert, a festive treat, or simply something new to try, this Apple Pie Paratha recipe is sure to impress. Try it today and enjoy a unique blend of Indian and Western culinary traditions.
Frequently Asked Questions (FAQs)
What type of apples work best for Apple Pie Paratha?
Granny Smith apples are ideal for their firm texture and tart flavor. If using sweeter apples, add a splash of lemon juice to balance the taste.
Can I make Apple Pie Paratha vegan?
Yes, replace the butter in the dough with oil to make a vegan version of this recipe.
How can I store Apple Pie Paratha?
You can store these parathas at room temperature for 3-4 days or refrigerate them for up to 3-4 weeks. Reheat them in a skillet, in an air fryer, or in the oven before serving.
What are some similar recipes I can try?
Explore Sweet Coconut Paratha, Paneer Paratha, or Gobi Paratha for more delicious paratha variations.
What makes Apple Pie Paratha special?
The fusion of warm apple pie flavors with the flaky, golden-brown texture of Indian paratha makes it a unique and versatile dessert that’s easy to prepare and enjoyable for all.
Summer is here, and it's getting warm—just the right time to try making different summer drinks. The Pineapple Cucumber Cooler is a delicious and refreshing treat. I like to add a hint of lemon, ginger, and mint to most of my fruit drinks, which gives them a nice kick. It's perfect for quenching your thirst on hot summer days.For this drink, you can use fresh pineapple, but I used canned pineapple to make it easier. Most of the time, I have the ingredients on hand, and there’s not much prep work. I love how easy it is to combine everything in the blender.I definitely plan on making this refreshing Pineapple Cucumber Cooler throughout the rest of the summer.
Course Beverages
Cuisine Indian
Keyword Cucumber
Prep Time 5 minutesminutes
Servings 4people
Ingredients
1 20 oz cancrush pineapple
1largecucumber peeled and chopped
2tbsplemon juice
1tspfresh ginger, peeled and chopped
Ahandful fresh mint leaves
1tbspsugar
pinch of salt
Instructions
Add the pineapple, cucumber, lemon juice, ginger, mint leaves, salt and sugar to a blender.
Pour in 1 cup of cold water. Blend until smooth.
Strain the mixture through a fine mesh sieve.
Serve over ice and garnish with additional mint leaves.
Enjoy your refreshing drink all summer long!
Notes
Tips:Instead of water, use coconut water or sparkling water for a different twist.These drinks are easy to prepare, and you can use whatever fruits you have available or your favorite fruits.Blend the mixture without adding water and freeze it in ice cube trays for a refreshing twist.
Beat the Heat with Pineapple Cucumber Cooler
Summer is here, and with the rising temperatures, there’s nothing better than a cool and refreshing drink to quench your thirst. The Pineapple Cucumber Cooler is a perfect summer recipes, combining the sweetness of pineapple with the refreshing taste of cucumber. The addition of lemon, ginger, and mint gives it an extra zing that will leave you feeling revitalized.
This drink is incredibly easy recipe to make and requires minimal prep time. Whether you’re hosting a summer party or just relaxing at home, this cooler is sure to be a hit.
Why You’ll Love This Pineapple Cucumber Cooler
Refreshing and Hydrating: The combination of pineapple and cucumber makes this drink incredibly hydrating, perfect for hot summer days.
Quick and Easy: With just a few ingredients and a blender, you can whip up this cooler in minutes.
Healthy and Natural: Made with fresh ingredients and minimal sugar, it’s a healthier alternative to sugary sodas and store-bought drinks.
Versatile: You can easily customize the recipe with different fruits or by using coconut water or sparkling water for a twist.
How to Make Pineapple Cucumber Cooler
This Pineapple Cucumber Cooler recipe is simple and quick to prepare. Here’s how you can make it:
Ingredients:
1 20 oz can crushed pineapple
1 large cucumber, peeled and chopped
2 tablespoons lemon juice
1 teaspoon fresh ginger, peeled and chopped
A handful of fresh mint leaves
1 tablespoon sugar (adjust to taste)
Pinch of salt
1 cup cold water
Instructions:
Blend the Ingredients: In a blender, combine the crushed pineapple, chopped cucumber, lemon juice, ginger, mint leaves, sugar, and salt. Add 1 cup of cold water.
Strain the Mixture: Blend the mixture until smooth, then strain it through a fine mesh sieve to remove any pulp.
Serve and Garnish: Pour the cooler over ice and garnish with additional mint leaves for an extra touch of freshness.
Enjoy: Sip and enjoy your refreshing drink all summer long!
Tips for the Perfect Cooler
Switch Up the Base: For a different twist, try using coconut water or sparkling water instead of regular water. This adds a new layer of flavor and hydration.
Make It Ahead: Blend the mixture without adding water and freeze it in ice cube trays. When you’re ready for a drink, just blend the cubes with some water for an instant cooler.
Customize with Fruits: Feel free to experiment with other fruits you have on hand. Watermelon, berries, or even mango can be great additions.
Other Variants of Summer Beverages:
Exploring Manjula’s Kitchen reveals a treasure trove of other delicious recipes that you might enjoy.
Fruit Smoothie: This Fruit smoothie is a delicious and healthy drink, and also quick and easy to make. This great smoothie consists of cantaloupes, strawberries, and yogurt with a touch of ginger giving a nice and tangy taste.
Badam Milk: Almond saffron milk is a festive drink; this can be served hot or cold. Milk with a blend of nuts and flavored with saffron to give a beautiful orange-yellow color and distinctive flavor and aroma.
Cold Coffee: To help beat the heat on a hot summer day, there’s nothing like a tall glass of cold coffee.
Mango Lassi: Mango Lassi is a soothing cold drink for hot summer days or to brighten up any meal. This pale drink is a blend of mango and yogurt.
FAQs
How to Make Pineapple Cucumber Cooler?
To make Pineapple Cucumber Cooler, blend together pineapple, cucumber, lemon juice, ginger, mint leaves, sugar, and salt with cold water. Strain the mixture and serve over ice.
Can I Use Fresh Pineapple Instead of Canned?
Yes, you can use fresh pineapple if you prefer. Just make sure to peel and core it before blending.
Is Pineapple Cucumber Cooler Healthy?
Yes, this cooler is a healthy and refreshing drink made with natural ingredients. It’s hydrating, low in sugar, and full of vitamins and antioxidants from the pineapple, cucumber, and mint.
Can I Make This Cooler Ahead of Time?
You can prepare the cooler ahead of time and store it in the refrigerator for up to 24 hours. Just give it a good stir before serving.
What Other Ingredients Can I Add to This Cooler?
Feel free to customize your cooler with other fruits like watermelon, berries, or mango. You can also add a splash of coconut water or sparkling water for extra flavor.

 Login
Login