
❌

Normal view

There are new articles available, click to refresh the page.
Before yesterdayTech

Duplicating Parts Using Silicone Molds

26 July 2026 at 07:00

[Do As I Do] had a simple task to complete. A couple of small parts needed to be duplicated in some quantity, with good dimensional accuracy and surface finish. There are a number of ways you might go about this, particularly if you have the original tooling or a machine shop on hand. In this case, however, the plan was to duplicate the parts with silicone molds.

The first step, naturally, was to produce the silicone molds. Doing this involved some craft supplies, with glossy paper and hot glue used to create a vessel for casting silicone around the original parts. The silicone itself was mixed carefully and poured into the vessels, and soon enough [Do As I Do] had a pair of negative molds that could be used to produce duplicates of the original. The original parts were removed, and the silicone molds were filled with resin over and over again to make as many duplicates as were needed.

This was a simple enough project with straightforward geometry that suited the process. More challenging parts would require more care in mold prep and more advanced techniques. Depending on material choice for the duplicate parts and other factors like intended final application, extra steps like degassing may be necessary, too. Still, for a quick guide on duplicating a simple plastic part, it’s hard to beat.

We’ve featured other silicone mold jobs before, like these impressive recreated tail light lenses. Video after the break.
3D Printed Go Kart Designed to Fit in a Suitcase

25 July 2026 at 01:00

[Ivan Miranda] is famous for his large-scale 3D printed vehicles. They’re pretty fun, but they’re also pretty big and heavyβ€”which can make transporting them around rather impractical. Hence, when he had reason to travel with a 3D printed go kart, he went back to the drawing board to create something light enough to pack in regular plane luggage.

The build started with some major compromises compared to [Ivan]’s previous go kart build. Notably, there are only three wheels instead of four, and a simplified control layout that eschews a regular steering wheel. These decisions were made to save weight and allow the design to be more compact. The kart uses a set of handles either side of the rider to handle steering. Drive is via a brushless motor, with power supplied from a series of 18 V drill batteries. Parts were produced on [Ivan]’s massive printer which comes in handy on large-scale projects like these.

All in all, the final build weighed around 20 kg. That’s light enough to be broken down across checked luggage and carry-on for a typical flight. We’d consider the project a success on that basis, even if quite a bit of assembly was required upon arriving at the destination. [Ivan]’s other builds in this realm are pretty fun too, from the printed scooter to the ride-on tank.

20 FPS on E-Paper Display Without Help

21 July 2026 at 04:00

If electronic paper displays have one downside, it’s generally refresh rate. Earlier versions of the tech might only have been able to do single-digit frames per second, while modern, mid-range devices can sometimes manage 10-20 FPS β€” and that’s not including the frames needed to blank the display. Getting up past that double-digit barrier typically requires higher-end displays, more powerful processors or FPGAs, and more money. On the other hand, [Tony] was recently able to get 20 FPS out of an ESP32-based device without using any extra processing power.

The key to improving e-paper performance is understanding how the display actually works. The β€œink” consists of microscopic charged pigment particles that physically move in response to electric fields, making the display much slower than LCD or OLED panels. Rather than fully erasing and redrawing every frame, the software takes advantage of the particles’ existing state by generating optimized driving waveforms that only move the particles needed to produce the next image. On the software side, an MPEG-like encoding is used so only changes between frames are transmitted and converted into these waveforms, reducing unnecessary data transfers and allowing much higher frame rates.

Tony’s method is able to drive 960Γ—540 panels, like those found in the Lilygo or M5PaperS3, to 20 FPS, and these platforms are based on nothing more than the capable but limited ESP32 chip. It’s an impressive push, and worth checking out the video in the linked project page. We assume you’d need a little more to drive something like the massive e-paper display found in this home automation setup, though.

The Seemingly Impossible Oscillator

14 July 2026 at 04:00

Back in the days when an integrated circuit meant a simple but expensive device such as a 741 or a 555, most electronics enthusiasts made do with discrete transistor circuits. The common emitter amplifier and its variants are the most familiar, but the humble 3-legged device can do so much more. A particularly obtuse circuit is the subject of examination by [lcamtuf], the reverse avalanche oscillator. A 2N2222, a capacitor, an LED, and a resistor, the transistor is the wrong way round, and there’s nothing on its base. Yet the LED flashes, what on earth is up!

The answer lies in avalanche breakdown, the behavior of a reverse biased diode junction as the voltage across it increases. Eventually the electric field reaches the point at which an avalanche of electrons crosses the depletion layer, and the junction conducts. When connected across an RC circuit, the voltage in the capacitor slowly rises to the point at which avalanche breakdown occurs, and the capacitor abruptly discharges. As the voltage falls the avalanche conduction stops, and the cycle repeats itself. It’s a relaxation oscillator.

We’re treated to an explanation of why a transistor behaves this way and why a simple diode doesn’t, due to a β€œhump” in its I/V curve, and why the emitter-base junction has a lower breakdown voltage than the collector-base. It’s one of those circuits which looks as though it shouldn’t work, but never fails to oscillate.

Want to know more about transistors? Do we have the series for you!

Three Different Digital Counters To Remind Us How Good We Have It

10 July 2026 at 01:00

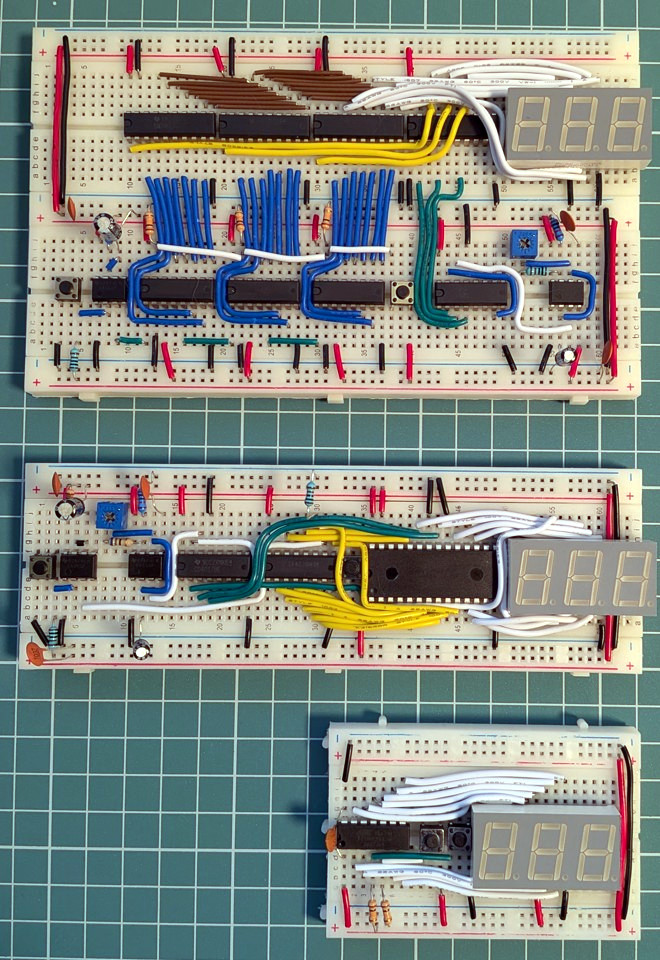
Integrated electronic modules like counters and displays are convenient and space-saving, which may also make them easy to take for granted. [Nagy KrisztiΓ‘n] demonstrates this by making three very different digital counter designs, each breadboarded with a 7-segment LED display. Push a button, and the displayed number increments by one for each press. It was a personal project that ended up educational in more ways than one.

The progressively-integrated designs shrink in part count and board space, but the complexity doesn’t disappear. It just moves into software.

The first version uses discrete components only, and even though it handles the counting with CD4026B decade counter ICs instead of building counters from scratch with NAND gates, it’s still by far the largest of the three. The second version simplifies driving the display with an AT28C64B EEPROM acting as a sort of hardware lookup table translating binary counts into 7-segment digit display patterns. The third uses an ATtiny24A microcontroller, and unsurprisingly has the smallest footprint.

All of this highlights two things. One is that implementing even a simple counter and 7-segment LED readout is a nontrivial affair when one gets right down to it, even when taking advantage of purpose-built ICs. The second is that the complexity that is on full display in the first version doesn’t simply disappear as the footprint and component count goes down. Rather, it moves into software and other infrastructure, like the need for compilers and chip programmers.

The whole thing is both educational and a reminder of how good the average hardware hacker has it today. There are so many effective electronic assemblies, available to just about anyone at low cost, that it can be very easy to take it all for granted and forget just how much breadboard space and wires were needed for even simple-seeming things.

[Nagy] is certainly no stranger to dealing with a lot of wires, as we’ve seen when he fooled a 286 processor into thinking it was plugged into a functioning vintage motherboard.

❌
❌