❌

Reading view

There are new articles available, click to refresh the page.

Easy Paneer Bhurji Gravy

Paneer Bhurji Gravy is a quick and easy side dish made using crumbled paneer, onion, tomato, spices and herbs. This is a flavorful side dish perfect to pair up with roti, nan, chapati or with rice dishes like pulao, jeera rice etc. Learn to make Paneer Bhurji Gravy with the help of step by step pictures and video.

paneer bhurji gravy served with roti, rice

Paneer Bhurji Gravy comes together in just 20 minutes yes it is so easy and quick to make. This can be made for breakfast, lunch or even dinner to pair up with any flatbread of your choice. Do try this easy gravy and enjoy!

[feast_advanced_jump_to]

About Paneer Bhurji Gravy

'Paneer' is Indian cottage cheese and 'Bhurji' means scrambled so this dish is basically paneer scrambled and cooked along with onion, tomato, ginger garlic paste and spices in gravy consistency. This is a perfect side dish for chapati, roti, pulao, jeera rice etc.

I love both the gravy and dry version of paneer bhurji. Paneer Bhurji Gravy is a tasty and zesty gravy made by crumbling paneer and cooking it with onion, tomato, herbs and spices. Paneer Bhurji Gravy is a side dish for roti, naan and rice meal too. Paneer Bhurji Gravy making is simple and could be made in minutes.

Paneer Bhurji Gravy isΒ an easy and quick side dish to make. It is one of the quickest side dish you can make in a jiffy. I tried this after getting the recipe from my cousin sister and I was like how did I miss to make this often as it gets done in few minutes when you have paneer in hand. So after that this has become a staple side dish.

paneer bhurji gravy served

Paneer Bhurji Gravy Video

Paneer Bhurji Gravy Ingredients

  • Paneer -Β Paneer is the star ingredient for this recipe. So use fresh soft paneer either homemade or store bought. That is the key to get moist juicy tasty paneer bhurji.
  • Spices -Β Indian spice powders like turmeric, red chili powder and garam masala powder. Mostly I use homemade spice powders to get fresh flavors.
  • Ginger garlic paste -Β I used homemade ginger garlic paste. If you do not have, crush ginger and garlic roughly using mortar and pestle and add it.
  • Onion, tomato -Β Freshly chopped onion and tomatoes are sauteed until mushy and used.
  • Garnish -Β Add coriander leaves and kasoori methi as garnish which enhances the flavor a lot.
  • Cumin seeds -Β Cumin seeds is used for tempering.
  • Gram flour - Gram flour is used as a thickening agent here. It makes the gravy thick and creamy.
  • Butter, Oil -Β Both butter and oil is used for tempering. Butter adds flavor and richness to the gravy.

Similar Recipes

How to make Paneer Bhurji Gravy Step by Step

1.Take 200 grams paneer, if store bought rinse it well and set aside. If using frozen thaw and use it. If refrigerated, keep it outside for a while then use it.

add crumbled paneer

2.Heat 1 and Β½ tablespoon butter, 1 teaspoon oil. Add 1 teaspoon gram flour.

add butter, oil, gram flour

3.Cook for a minute until color slightly changes.

cook for a minute

4.Add 1 teaspoon ginger garlic paste, 1 green chili finely chopped.

add ginger garlic paste, green chili

5.Add 2 medium sized onion, 2 medium sized tomatoes - finely chopped.

add onion, tomato

6.SautΓ© until tomatoes turn mushy and raw smell leaves - it takes at least 7-10 minutes. Add salt to taste, Β½ teaspoon turmeric powder, 1 teaspoon red chili powder and 1 teaspoon garam masala powder.

add spice powders

7.Give a quick sautΓ©. Add around Β½ cup water.

add water

8.Give a quick mix. Boil for few minutes until slightly thick.

boil for few mins

9.Add crumbled paneer.

add crumbled paneer

10.Give a quick mix. Boil for 2 minutes. Then add 2 tablespoon fresh cream, 1 teaspoon crushed kasoori methi and 1 tablespoon coriander leaves.

add fresh cream, crushed kasoori methi

11.Mix it well. Switch off.

paneer bhurji gravy is ready

Delicious paneer bhurji gravy ready!

Expert Tips

  • For best results use fresh paneer. You can use homemade or store bought too.
  • You can replace butter with ghee too.
  • For vegan option replace paneer with tofu.
  • You can add Β½ teaspoon coriander powder if you like.
  • If you don't have fresh cream add milk instead.

Serving and Storage

Paneer Bhurji Gravy can be enjoyed with bread or pav bun. It goes well with roti and rice too. Keeps well in fridge for 2 days.

paneer bhurji gravy served with roti, rice

If you have any more questions about this Paneer Bhurji Gravy Recipe do mail me at sharmispassions@gmail.com. In addition, follow me on Instagram, Facebook,Β  Pinterest, Youtube andΒ TwitterΒ .

Tried this Paneer Bhurji Gravy Recipe? Do let me know how you liked it. Also tag us on Instagram @sharmispassions and hash tag it on #sharmispassions.

πŸ“– Recipe Card

Print

Easy Paneer Bhurji Gravy Recipe

Paneer Bhurji Gravy is a quick and easy side dish made using crumbled paneer, onion, tomato, spices and herbs. This is a flavorful side dish perfect to pair up with roti, nan, chapati or with rice dishes like pulao, jeera rice etc. Learn to make Paneer Bhurji gravy with the help of step by step pictures and video.
Course dinner, Lunch, Side Dish
Cuisine Indian, Indo Chinese
Keyword 30 mins recipes, butter recipes, capsicum recipes, curry, curry recipes, easy paneer recipes, Gravy, gravy recipes, indian paneer recipes, lunch box recipes, lunch recipes, lunchbox recipes, masala recipes, paneer dishes, paneer recipes, veg recipes, vegetable
Prep Time 10 minutes
Cook Time 20 minutes
Total Time 30 minutes
Servings 2 people
Calories 444kcal
Author Sharmilee J

Ingredients

Instructions

  • Take 200 grams paneer, if store bought rinse it well and set aside. If using frozen thaw and use it. If refrigerated, keep it outside for a while then use it.
  • Heat 1 and Β½ tablespoon butter, 1 teaspoon oil. Add 1 teaspoon gram flour.
  • Cook for a minute until color slightly changes.
  • Add 1 teaspoon ginger garlic paste, 1 green chili finely chopped.
  • Add 2 medium sized onion, 2 medium sized tomatoes - finely chopped.
  • SautΓ© until tomatoes turn mushy and raw smell leaves - it takes at least 7-10 minutes. Add salt to taste, Β½ teaspoon turmeric powder, 1 teaspoon red chili powder and 1 teaspoon garam masala powder.
  • Give a quick sautΓ©. Add around Β½ cup water.
  • Give a quick mix. Boil for few minutes until slightly thick.
  • Add crumbled paneer.
  • Give a quick mix. Boil for 2 minutes. Then add 2 tablespoon fresh cream, 1 teaspoon crushed kasoori methi and 1 tablespoon coriander leaves.
  • Mix it well. Switch off.
  • Delicious paneer bhurji gravy ready!

Video

Notes

  • For best results use fresh paneer. You can use homemade or store bought too.
  • You can replace butter with ghee too.
  • For vegan option replace paneer with tofu.
  • You can add Β½ teaspoon coriander powder if you like.
  • If you don't have fresh cream add milk instead.

Nutrition

Serving: 100g | Calories: 444kcal | Carbohydrates: 16g | Protein: 18g | Fat: 35g | Saturated Fat: 21g | Polyunsaturated Fat: 1g | Monounsaturated Fat: 2g | Trans Fat: 0.2g | Cholesterol: 89mg | Sodium: 106mg | Potassium: 469mg | Fiber: 4g | Sugar: 6g | Vitamin A: 1578IU | Vitamin C: 22mg | Calcium: 612mg | Iron: 3mg

The post Easy Paneer Bhurji Gravy appeared first on Sharmis Passions.

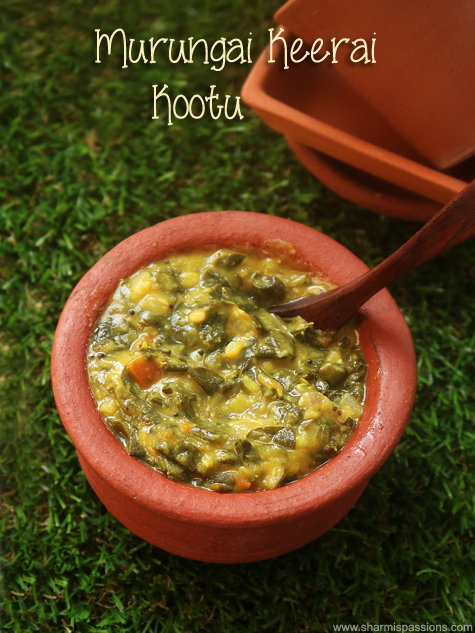
Murungai Keerai Kootu Recipe

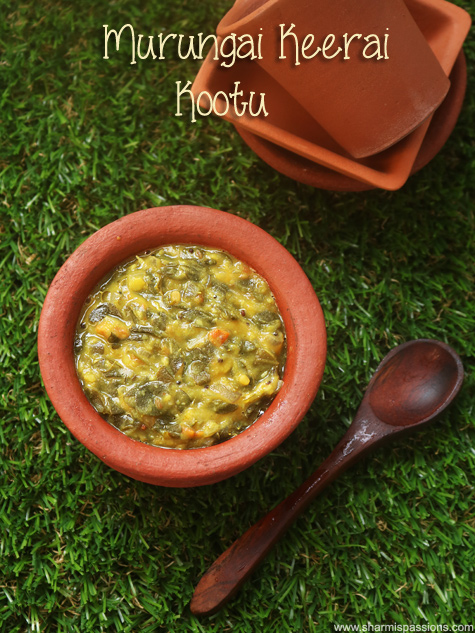
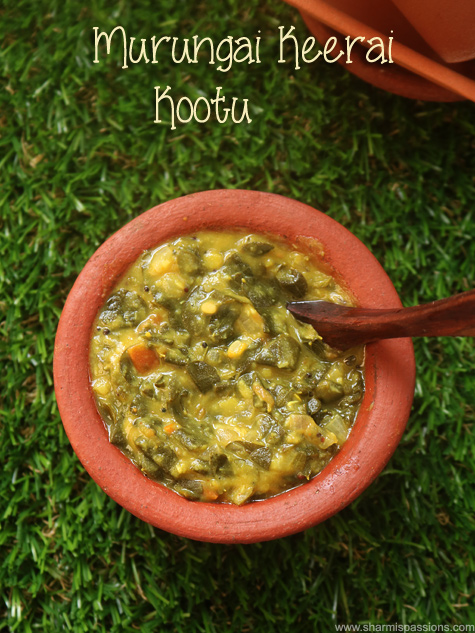
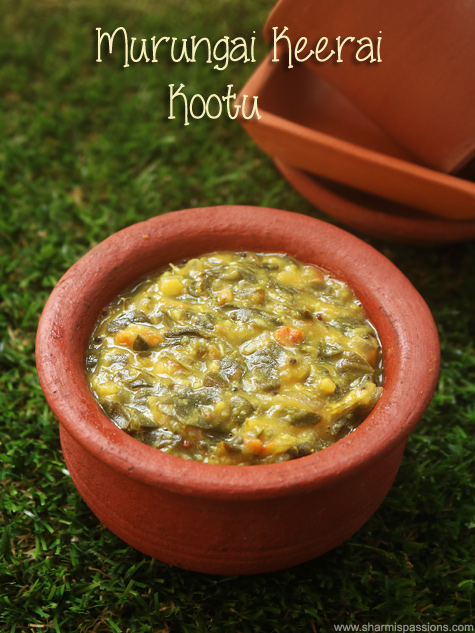
Murungai Keerai Kootu is a simple South Indian side dish made with drumstick leaves, dal, and fresh coconut paste, has mild flavour with soft, creamy texture. This is one of the easy side dish recipes to make, feels filling and is made with simple ingredients.

murungakeerai kootu served

This recipe is served with hot rice, and also it goes well with sambar and rasam rice. This feels like a comforting meal. It is just also a good way to include healthy greens in our daily lives. It feels very light to eat and keeps you fuller for a longer time.

[feast_advanced_jump_to]

About Murungai Keerai Kootu

Murungai Keerai Kootu is made often in homes as side dish for lunch. Most people like drumstick leaves, it is also easily available. These have a distinct taste and flavour. It is a simple dish without too many spices and can be made under few minutes.

You can also add an amount of sambar powder to bring everything together without taking away the taste of the greens, but its optional. Also the coconut in this recipe gives the kootu a creamy texture and the tomato adds a mild tang.

You can just add garlic to this kootu. This recipe can be adjusted to your taste preference, you can adjust spicesness to your taste. Also add in more coconut or reduce for mild flavour and it's also a healthier option for all ages. This is a staple dish in Indian homes.

I make this for lunch as it does not take much time once the leaves are cleaned. It is simple but always feels satisfying.

Since my childhood I have a aversion eating greens and amma used to try all possible ways to sneak in this veggie sometimes I even swallow it like tablet put the greens n drink water and now when I see mittu doing the same.

The only time I ate greens without much fuss was during my both pregnancies. Even now I m not fond of greens but love some varieties and this drumstick leaves is one of them but gugu loves greens definitely not my gene. As we don't get this greens variety in shops often whenever I see this never miss to cook and eat.

murungakeerai kootu served

Murungai Keerai Kootu Ingredients

  • Drumstick Leaves -Β  I make this with tender drumstick leaves as they cook faster.Β 
  • Dals - I used toor dal and moong dal for this recipe. The toor dal gives body while the moong dal makes the kootu soft and creamy.Β 
  • Tomato - I have added a ripe tomato for a light tang. It balances the earthy taste of the greens nicely without making the kootu sour.
  • Spice powders - Turmeric powder gives colour and sambar powder adds a gentle spice. I keep both on the lighter side so the greens still stands out.
  • Coconut paste - I have ground fresh coconut with cumin into a smooth paste. It makes the kootu creamy and also gives a lovely flavour.
  • Tempering - I have used oil, mustard seeds, urad dal, small onions and green chilli for the tempering. The onions become lightly golden and gives so much flavour to the kootu. I never skip this part.
  • Salt and water - Both are added as needed. I sometimes add little hot water at the end if the kootu becomes thick after resting.

Similar Recipes

How to make Murungakeerai Kootu Step by Step

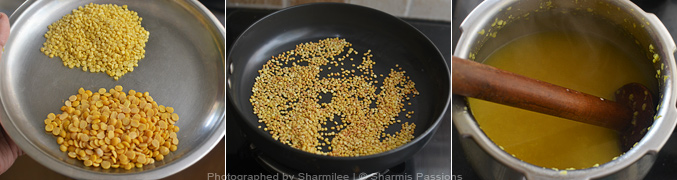
1.Dry roast moong dal till golden brown. Pressure cook both the dals with ΒΎ cup of water, salt and turmeric powder, Cook until mushy and soft. Mash it well with a ladle and set aside.

how to make murungakeerai kootu step1

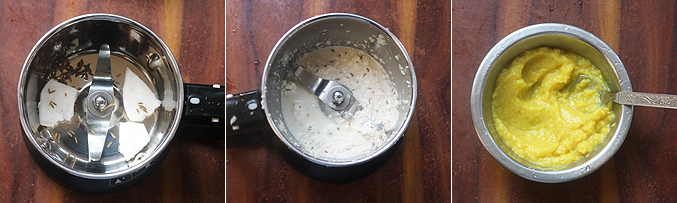
2.To a mixer jar : add coconut, jeera and little water grind it to semi fine paste. Set aside. Cooked dal is ready.

how to make murungakeerai kootu step2

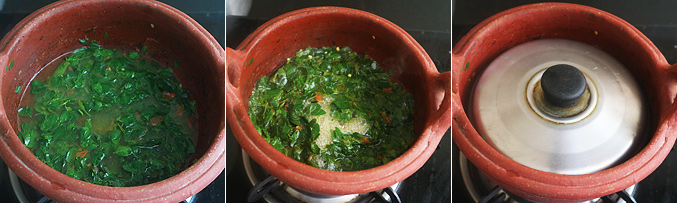
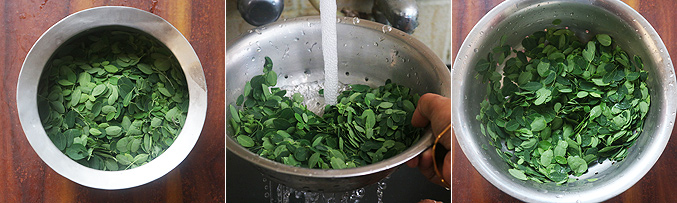
3.Clean the greens. Pluck the drumstick leaves from stem, rinse it well drain water and keep aside.

how to make murungakeerai kootu step3

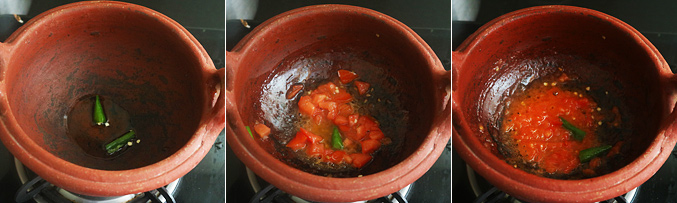
4.In a kadai heat oil - add green chillies, then tomato saute till it turns mushy.

how to make murungakeerai kootu step4

5.Add turmeric powder and sambar powder. Saute and cook for a minute. Then add water.

how to make murungakeerai kootu step5

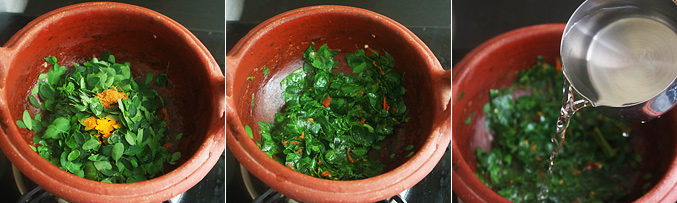
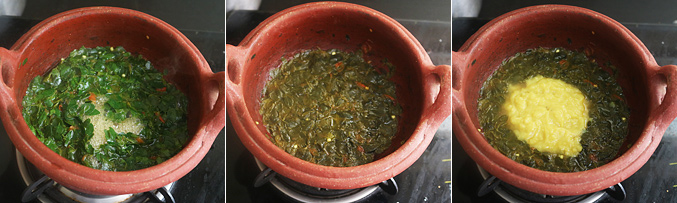
6.Add required salt. Cook covered till the greens is cooked and turns soft.

how to make murungakeerai kootu step6

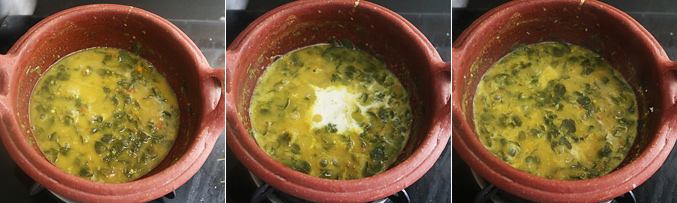
7.Now the colour is changed and there is no water too, add cooked dal.

how to make murungakeerai kootu step7

8.Mix well. Add coconut paste and cook for few minutes in low flame.

how to make murungakeerai kootu step8

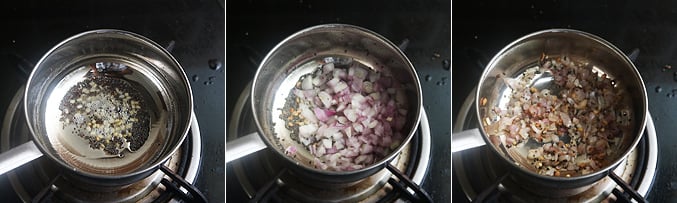
9.Meanwhile you can do the tempering. Heat oil in a tadka pan - add mustard seeds and urad dal let it splutter. Add chopped onion saute till golden.

how to make murungakeerai kootu step9

Add the tempering and mix well. Switch off

murungakeerai kootu served

Expert Tips

  • Cleaning - I always clean the drumstick leaves first before starting the recipe.Β 
  • Dal - I cook the dals until it is soft enough to mash well or else the kootu will not have that smooth texture.
  • Coconut - I prefer not to add too much water while grinding the coconut.Β 
  • Tempering - I always make the tempering at the end. Pouring it over the hot kootu gives a much nicer flavour and aroma.
  • Consistency - We like this kootu little thick for rice. If it becomes too thick later, I simply mix in little hot water while reheating.
  • Ghee - I always add a spoon of ghee while serving. It lifts the flavour so much even though it is only a small addition.

Serving and Storage

Serve it hot with rice and appalam for a simple meal. This goes well with sambar rice, rasam rice also. I don't recommend keeping this in the fridge. Consume it on the same day.Β 

FAQS

1. Can I use only toor dal?

Yes you can, sometimes make it that way and it still tastes good.

2. Can I skip the coconut?

You can, but I feel the coconut gives the kootu a much better taste.

3. Why is my kootu slightly bitter?

Tender drumstick leaves usually tastes milder, so I always use them if I can.

4. Can I add garlic?

Yes, many people do and it gives a different flavour.

5. What can I serve with this?

Β We mostly have it with hot rice, ghee and appalam.

murungakeerai kootu served

If you have any more questions about this Murungai Keerai Kootu Recipe do mail me at sharmispassions@gmail.com. In addition, follow me on Instagram,Β Facebook,Β PinterestΒ ,YoutubeΒ andΒ TwitterΒ .

Tried this Murungai Keerai Kootu Recipe? Do let me know how you liked it. Also tag us on Instagram @sharmispassions and hash tag it on #sharmispassions.

πŸ“– Recipe Card

MurungaiKeeraiKootu2
Print

Murungai Keerai Kootu Recipe

Murungai Keerai Kootu is a simple South Indian side dish made with drumstick leaves, dal, and fresh coconut paste, has mild flavour with soft, creamy texture. This is one of the easy side dish recipes to make, feels filling and is made with simple ingredients.
Course Lunch, Side Dish
Cuisine Indian
Keyword 30 mins recipes, curry, curry recipes, healthy recipes, Kerala Meal Sidedish, lunch recipes, Side Dish, spinach recipes, veg recipes, vegetable
Prep Time 15 minutes
Cook Time 25 minutes
Total Time 35 minutes
Servings 2
Calories 409kcal
Author Sharmilee J

Ingredients

  • 2 cups drumstick leaves
  • 1 small tomato chopped roughly
  • Β½ teaspoon turmeric powder
  • Β½ teaspoon sambar powder
  • ΒΌ cup toor dal
  • β…› cup moong dal
  • water as needed

To temper:

  • 1 teaspoon mustard seeds
  • Β½ teaspoon urad dal
  • 10 nos small onion
  • 2 teaspoon oil
  • 1 no green chilli slitted

To grind:

  • 2 and Β½ tablespoon coconut
  • Β½ teaspoon jeera
  • water as needed

Instructions

  • Dry roast moong dal till golden brown.
  • Pressure cook both the dals with 1 cup of water, salt and turmeric powder, Cook until mushy and soft.
  • Mash it well with a ladle and set aside.
  • To a mixer jar : add coconut, jeera and little water grind it to semi fine paste. Set aside. Cooked dal is ready.
  • Clean the greens. Pluck the drumstick leaves from stem, rinse it well drain water and keep aside.
  • In a kadai heat oil - add green chillies, then tomato saute till it turns mushy.
  • Add turmeric powder and sambar powder. Saute and cook for a minute. Then add water.
  • Add required salt. Cook covered till the greens is cooked and turns soft.
  • Now the color is changed and there is no water too, add cooked dal.
  • Mix well. Add coconut paste and cook for few mins in low flame.
  • Meanwhile you can do the tempering. Heat oil in a tadka pan - add mustard seeds and urad dal let it splutter. Add chopped onion saute till golden.
  • Add the tempering and mix well. Switch off.
  • Serve Murungai Keerai Kootu hot with a drizzle of ghee with rice, heaven!

Notes

  • Cleaning - I always clean the drumstick leaves first before starting the recipe.Β 
  • Dal - I cook the dals until it is soft enough to mash well or else the kootu will not have that smooth texture.
  • Coconut - I prefer not to add too much water while grinding the coconut.Β 
  • Tempering - I always make the tempering at the end. Pouring it over the hot kootu gives a much nicer flavour and aroma.
  • Consistency - We like this kootu little thick for rice. If it becomes too thick later, I simply mix in little hot water while reheating.
  • Ghee - I always add a spoon of ghee while serving. It lifts the flavour so much even though it is only a small addition.

Nutrition

Serving: 125g | Calories: 409kcal | Carbohydrates: 53g | Protein: 25g | Fat: 11g | Saturated Fat: 2g | Polyunsaturated Fat: 1g | Monounsaturated Fat: 3g | Trans Fat: 0.01g | Sodium: 25mg | Potassium: 783mg | Fiber: 6g | Sugar: 3g | Vitamin A: 411IU | Vitamin C: 528mg | Calcium: 1073mg | Iron: 4mg

The post Murungai Keerai Kootu Recipe appeared first on Sharmis Passions.
Honey Cornbread

This honey butter cornbread has been a regular on our table for years. It’s sweet without tipping into dessert territory, soft in the middle, and gets a proper crisp edge from baking it in a cast iron skillet. All it takes is a handful of pantry staples and about half an hour, so it’s an […]
The post Honey Cornbread appeared first on Simply Meat Smoking.

❌