❌

Reading view

There are new articles available, click to refresh the page.

Easy Congee Recipe with Leftover Rice

This easy congee recipe turns yesterday’s leftover rice into a warm, silky bowl of chicken and mushroom porridge in about 20 minutes. If you’ve ever had congee at a Chinese restaurant and wished you could make it at home, this is the recipe you need! 
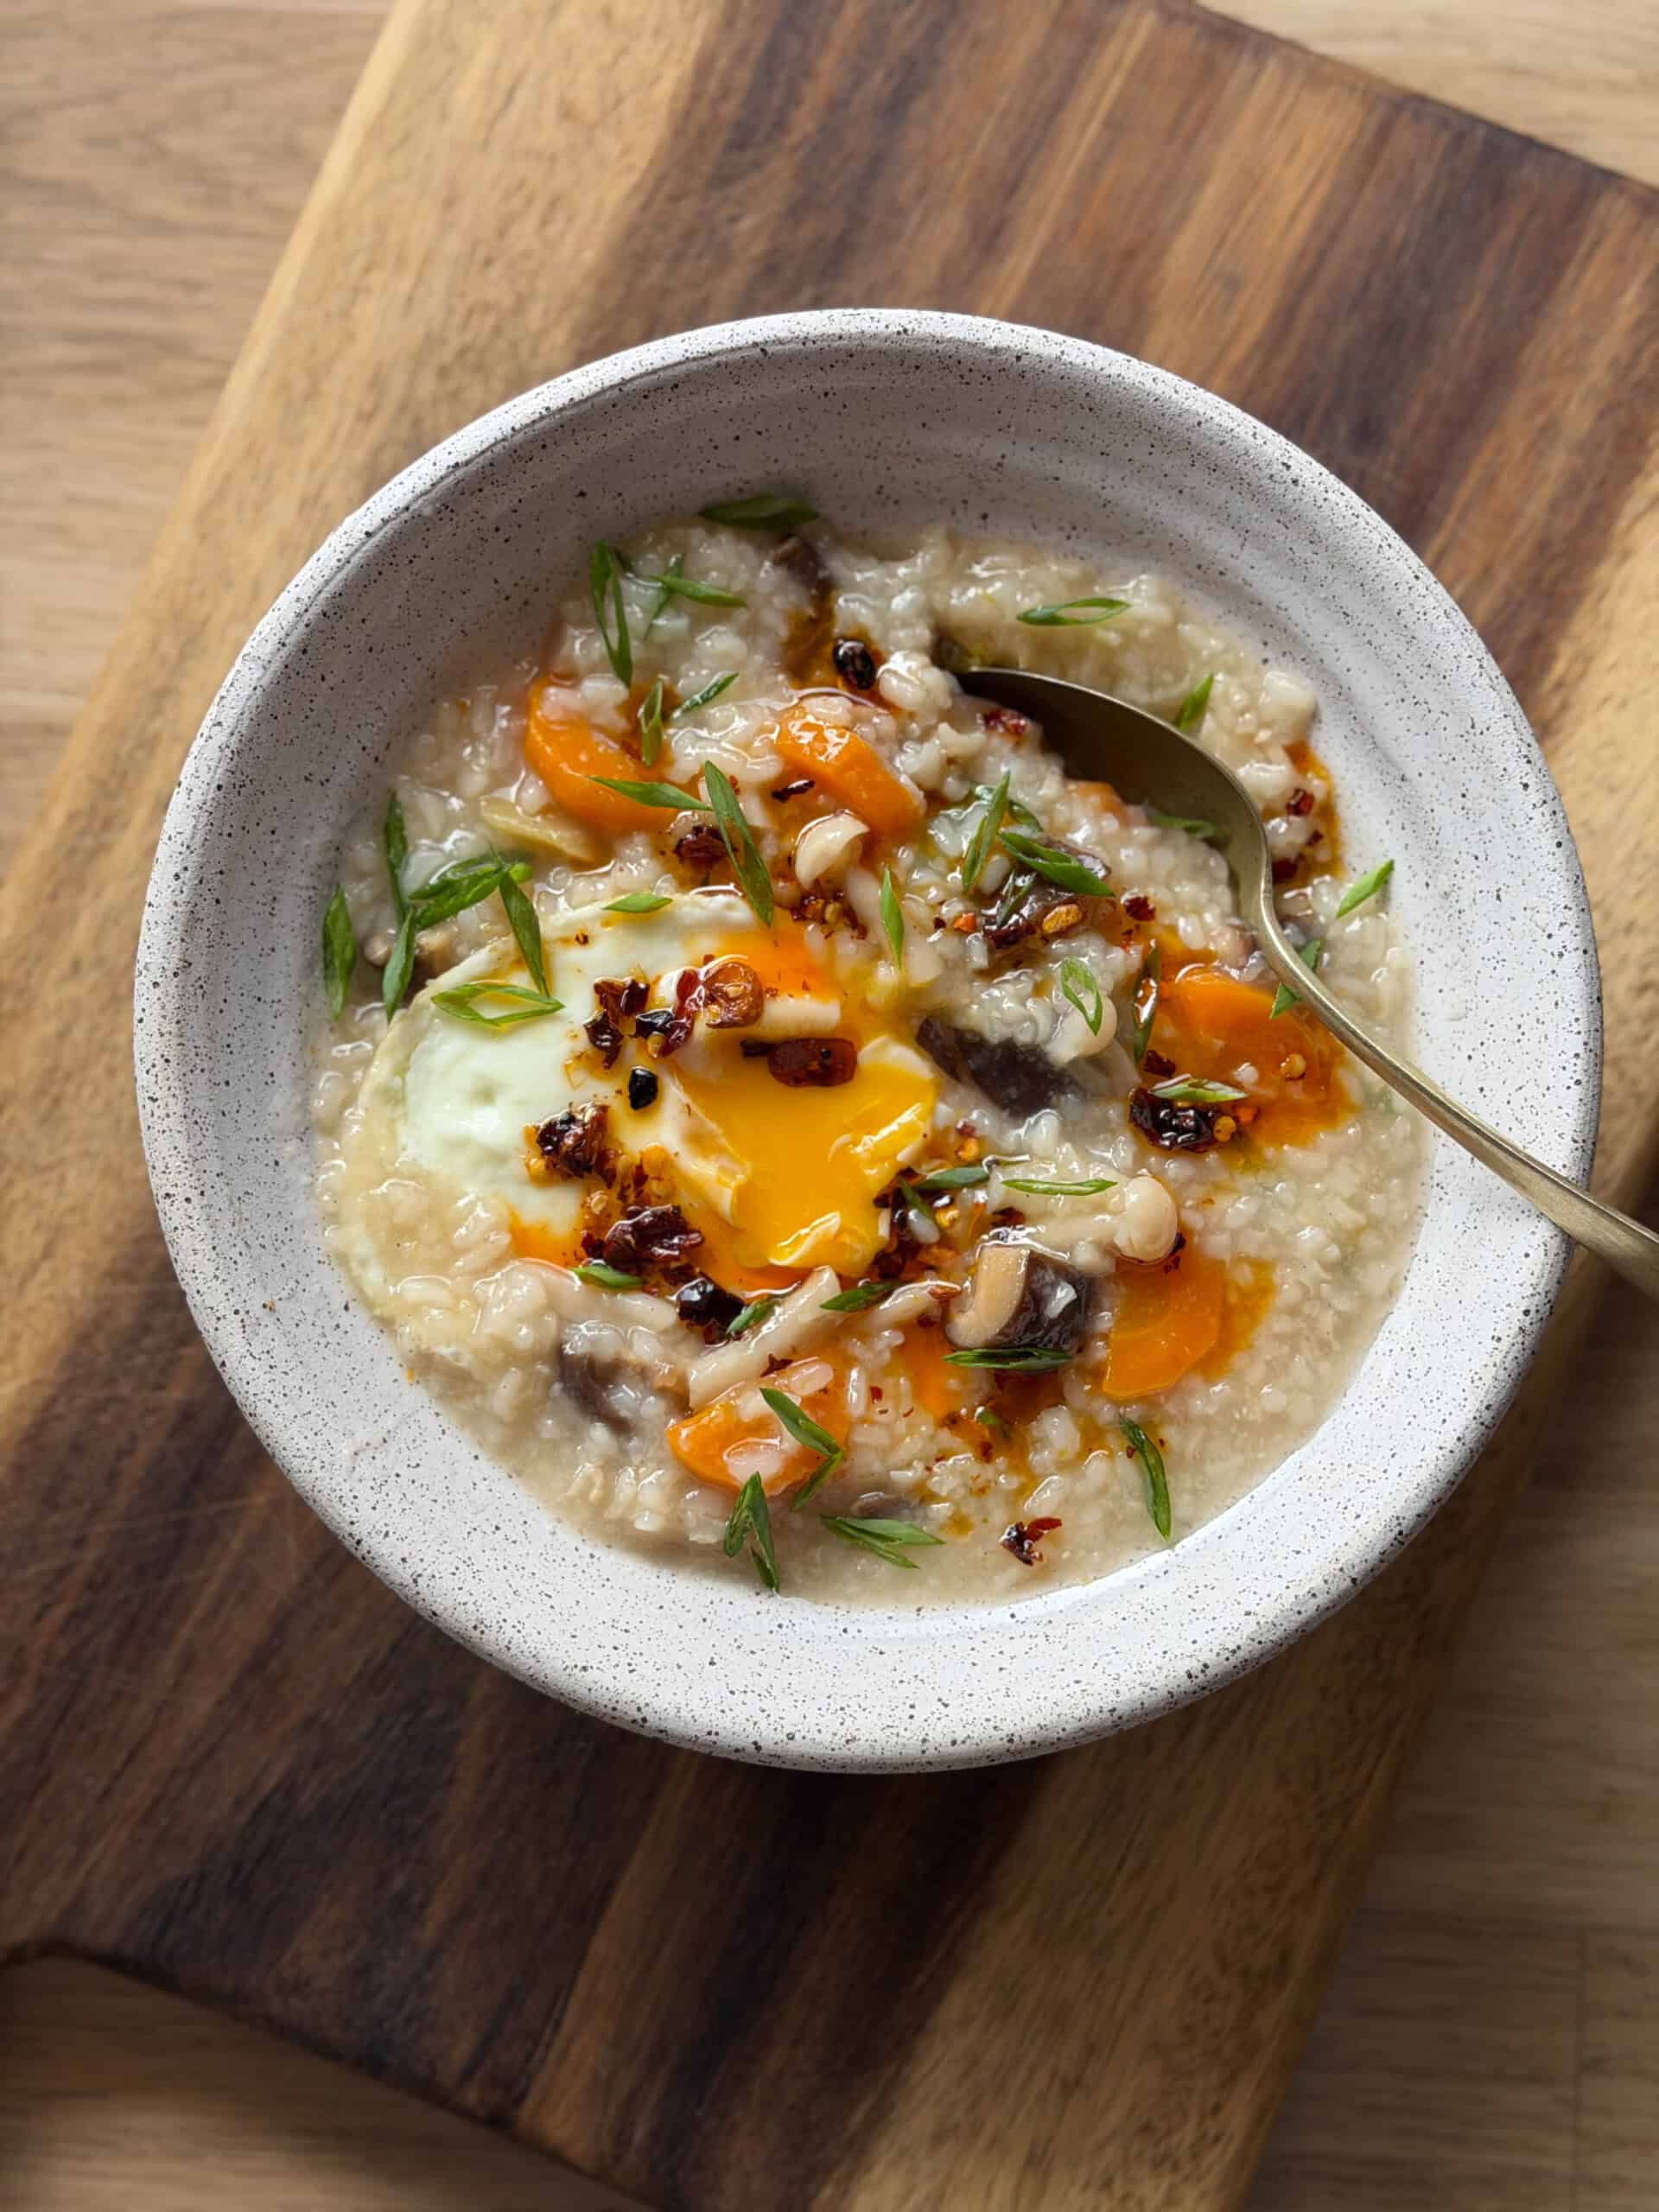
rice congee served in a bowl with toppings

This easy congee recipe is something I wish more Indian kitchens knew about. We have khichdi for when we’re feeling low or under the weather, and congee is the Chinese equivalent for that same home-like comfort. It’s warm, gentle on your stomach, and makes you feel taken care of. The chicken and mushrooms add enough flavour and substance that it works as a full meal, not just something you eat when you’re sick.

The whole dish is cooked fully in a pressure cooker and gets ready in about two whistles, which is roughly the same time as making khichdi. If you’ve been enjoying our wonton soup or claypot mushroom rice, this congee has that same cosy, Asian comfort food quality. And if you’ve got leftover rice sitting in the fridge with no plan, this is a really good reason to use it up.

Ingredients for Congee

Leftover Rice: Day-old or cold rice works perfectly here. The pressure cooker breaks it down into that silky, porridge-like consistency that congee is known for.

Chicken Breast: Boneless, thigh or breast pieces cut into small cubes. Washed with milk before cooking to remove any raw odour, which is a common technique in Chinese cooking.

Mushrooms: Dried shiitake for deep umami and shimeji for a lighter, nuttier flavour. 

Carrot: Cut into semi-roundels for some sweetness and colour.

Ginger: Slice it instead of grating to infuse flavour gently. 

Chicken Broth Powder: Adds a savoury base to the congee. If you don’t have it, a stock cube dissolved in water works too.

Seasoning: Salt and white pepper. 

Toasted Sesame Oil: Drizzled on top right before serving for a nutty fragrance. 

Frequently Asked Questions

Can I make this rice congee without a pressure cooker?

Yes. If you’re not making congee in a pressure cooker, then use a regular pot on the stove at low heat for about 40-45 minutes, stirring occasionally. The pot method takes longer because the rice needs more time to break down without the pressure, but the result is the same silky, porridge-like congee. You may need to add an extra cup of water since more evaporates without a sealed lid. You can even make this rice congee in an instant pot.

Can I use uncooked rice instead of leftover rice?

You can, but you’ll need to adjust the water quantity and cooking time. Use about ½ cup of raw rice with 4-5 cups of water, and pressure cook for 3-4 whistles instead of 2. Leftover rice is recommended because it breaks down faster and gives you that smooth consistency with less cooking time.

Can I make this vegetarian?

Skip the chicken and chicken broth powder. Use vegetable stock or a vegetable bouillon cube instead. Double up on the mushrooms and add some tofu cubes for protein. The shiitake mushrooms bring enough umami on their own to keep the congee flavourful without any meat.

Can I add other toppings?

Absolutely. Congee is very customisable. A soft boiled egg, fried garlic chips, sliced spring onions, crispy shallots, or a drizzle of homemade chilli oil all work really well on top.

My congee is too thick. What do I do?

Just stir in some hot water until you reach the consistency you like. Rice congee thickens as it sits and cools, so it’s completely normal to adjust with water before serving or when reheating.

Richa’s Top Tips

  • Wash the chicken with milk before cooking. This removes the raw odour that chicken sometimes has, especially when it’s going into a delicate, lightly seasoned dish like congee. Just rub the milk on, discard it, rinse with water, and the chicken will taste much cleaner.
  • Hydrate the shiitake mushrooms properly. Soak them in hot water for at least 15-20 minutes until they’re soft and pliable. Under-soaked shiitake will be tough and chewy in the finished congee.
  • Let the pressure cooker de-pressurise on its own. Don’t force open the lid. The natural release allows the rice to continue breaking down and the flavours to meld together. Forcing it open means a thinner, less developed congee.
  • Use sliced ginger, not grated. Sliced ginger infuses the congee gently as it cooks and can be easily removed or eaten around. Grated ginger would dissolve completely and make the congee too sharp and gingery.
  • Add the sesame oil right before serving, never during cooking. Toasted sesame oil loses its fragrance when heated for too long. A drizzle at the very end keeps that nutty aroma fresh and vibrant in every spoonful.

Storage Tips

  • In the fridge: Store in an airtight container for up to 2 days. Congee thickens a lot as it cools, which is completely normal. When reheating, add hot water or stock and stir until it loosens back up.
  • Freezing: Congee freezes surprisingly well for up to two weeks. Freeze in individual portions so you can thaw only what you need. Thaw overnight in the fridge and reheat on the stove with some water.
  • Reheating tip: Always reheat on the stove, not the microwave. Stir frequently, and add water or stock gradually until you reach your preferred consistency. Finish with a fresh drizzle of sesame oil before serving.

Serving Ideas

Congee is traditionally eaten on its own, but here are a few ways to make it more of a meal:

  • With Chilli Oil Fried Eggs: A crispy, spicy fried egg on top of warm congee adds texture and heat that makes the bowl feel really complete.
  • With Homemade Chilli Oil: A generous drizzle of chilli oil on top along with the sesame oil takes the congee from gentle to exciting in one spoonful.
  • With Vegetarian Gyoza Potstickers: Crispy dumplings on the side with a warm bowl of congee is a classic Asian comfort meal.
  • With crispy fried garlic and spring onions: Fry some sliced garlic until golden, scatter it over the congee with spring onion greens, and the crunch against the silky porridge is lovely.

Customisation Ideas

  • Try it with prawns: Swap the chicken for prawns and add them in the last 5 minutes of cooking so they don’t overcook. They cook quickly in the hot congee and stay tender.
  • Add a soft boiled egg: Halve a jammy soft boiled egg and place it on top of the congee just before serving. The runny yolk melts into the hot porridge and makes it even richer.
  • Try different mushrooms: Enoki, king oyster, or even regular button mushrooms all work well in congee. Each one brings a slightly different texture, so use whatever you can find.

Did You Know?

Almost every Asian country has its own version of rice porridge, and none of them taste the same. In Japan, it’s called okayu and is typically very plain with just rice, salt, and an umeboshi plum on top. Thailand has jok and is loaded with ginger, garlic, and pork meatballs. Arroz Caldo from the Philippines uses turmeric and fish sauce. In Korea it’s called juk and comes in dozens of varieties including pumpkin, abalone, and black sesame. India has its own version too, kanji, which is fermented rice porridge eaten across Kerala and parts of South India. The concept is the same everywhere: rice cooked slowly in liquid until it breaks down into something soft, warm, and nourishing. This recipe draws from the Chinese tradition, where congee is typically savoury and loaded with toppings. 
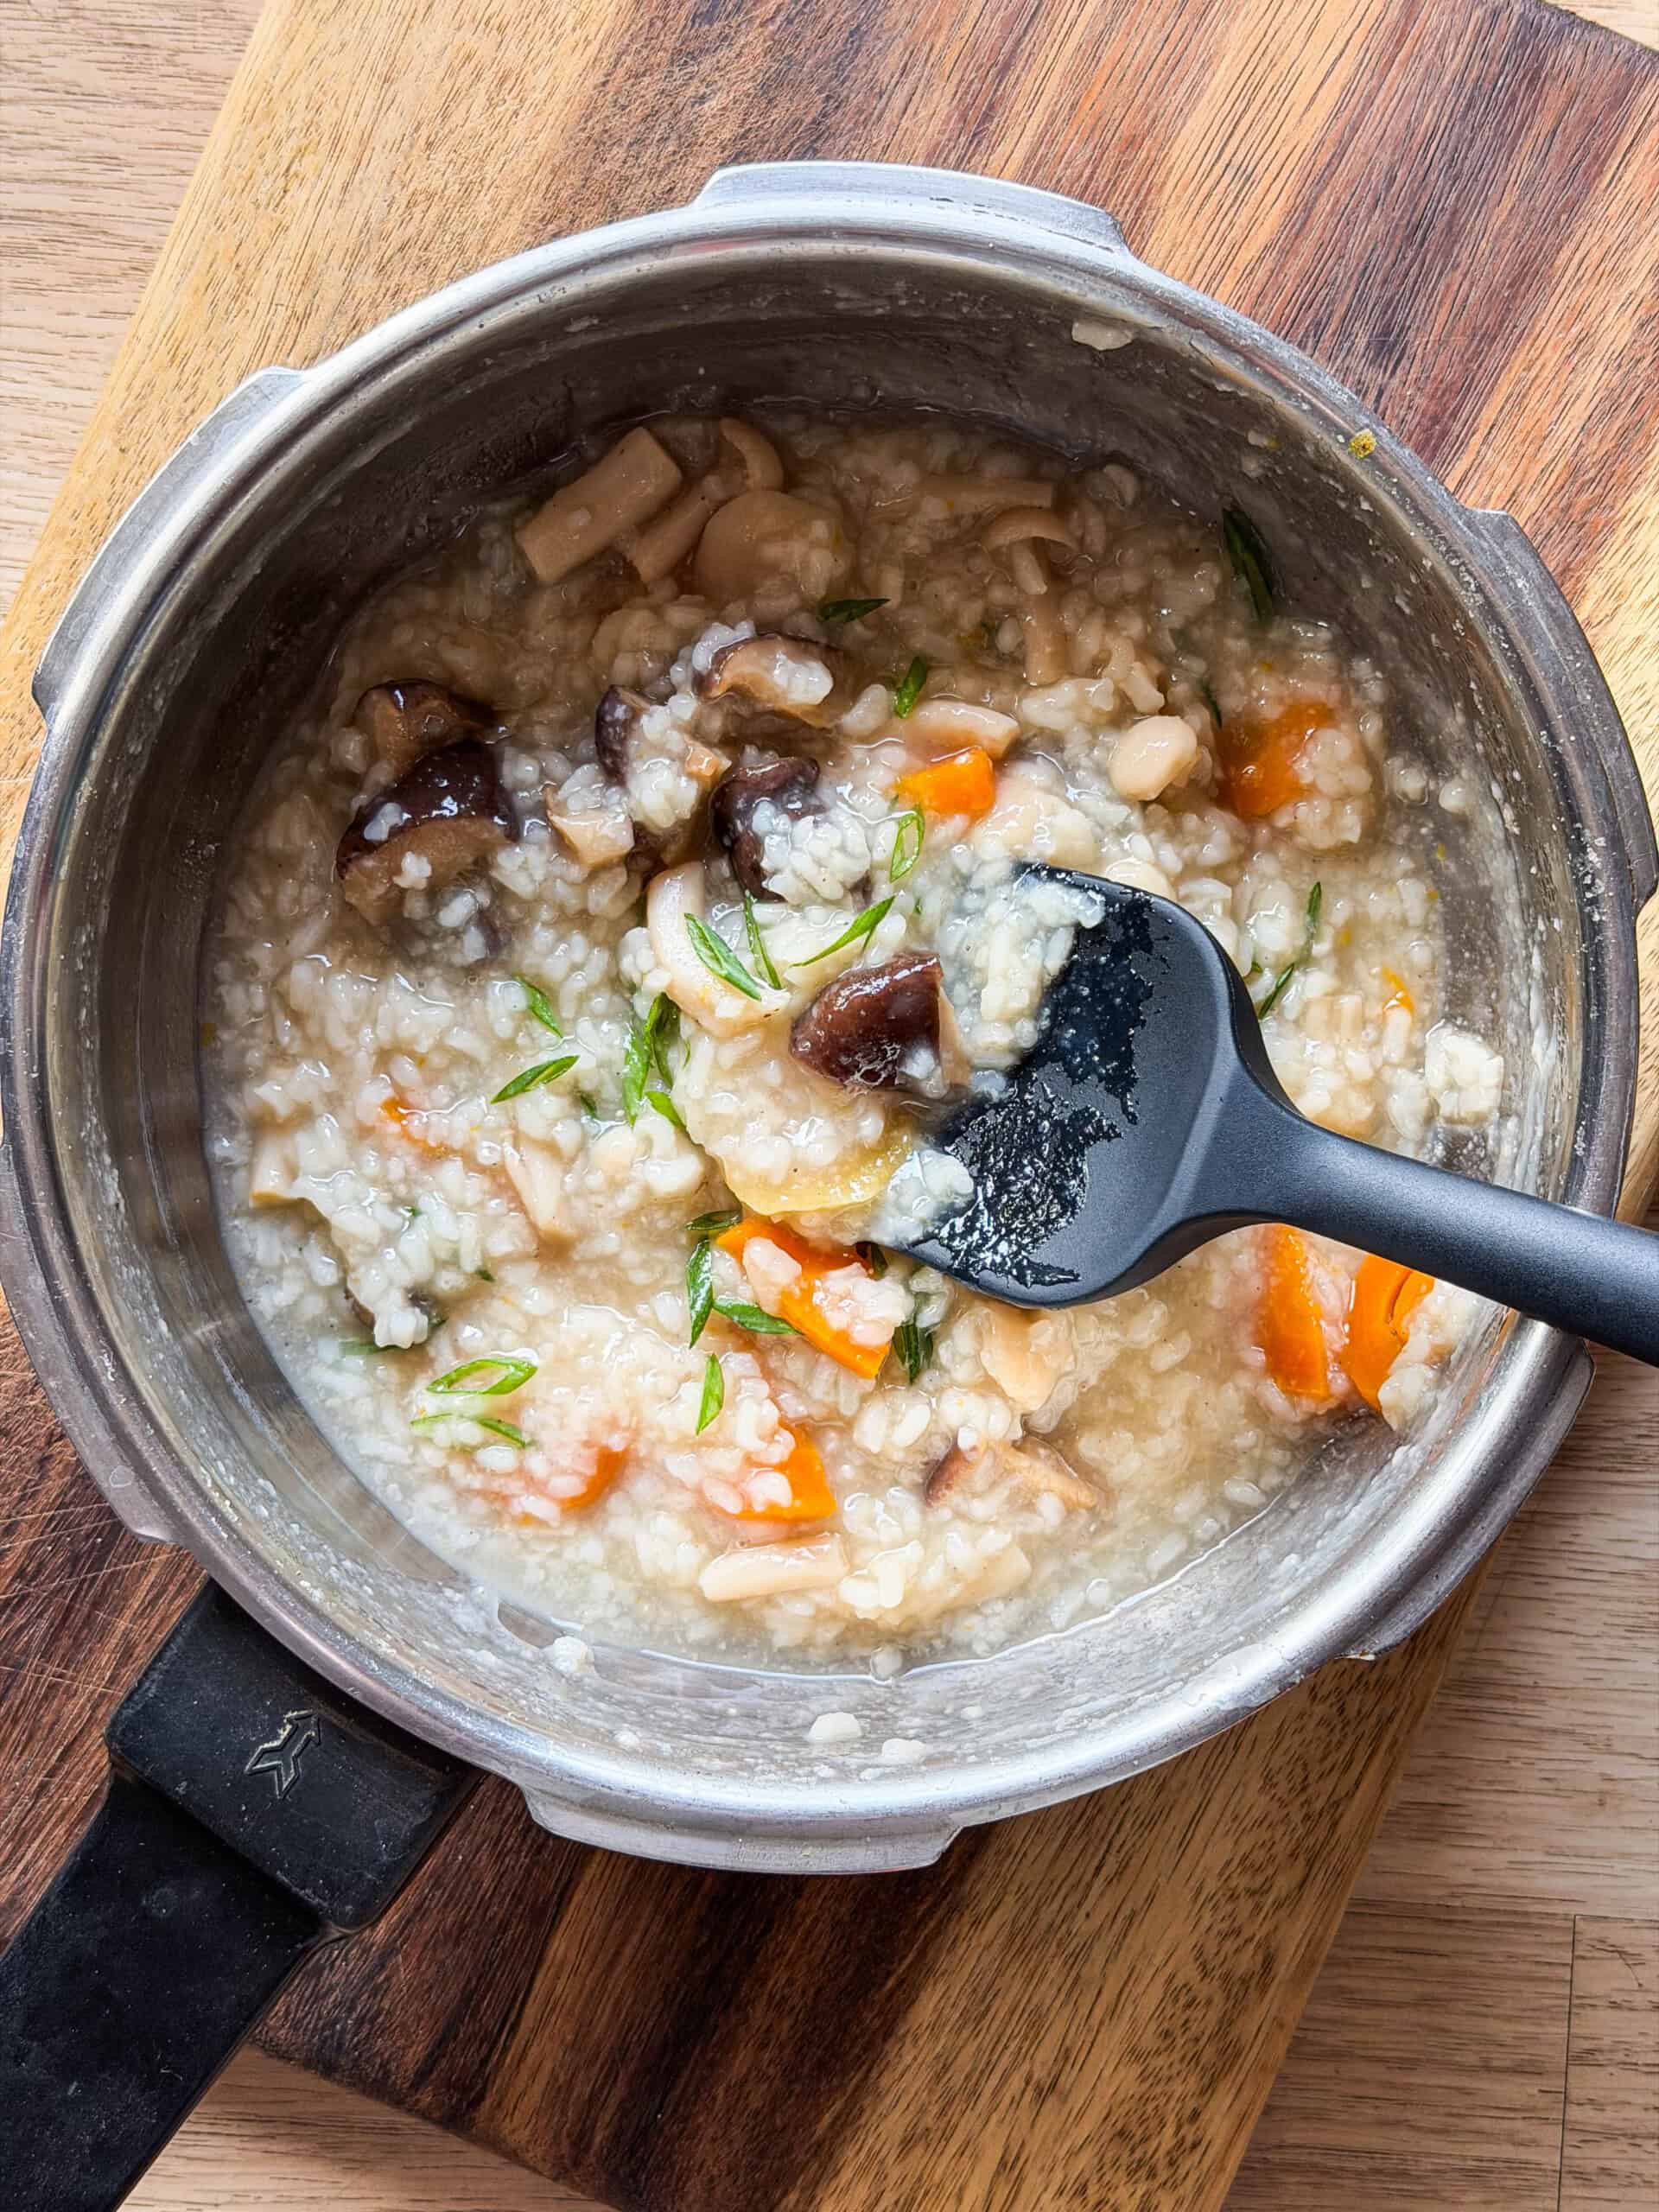
freshly made rice congee still in the pressure cooker it was cooked in

If you’ve never made this Chinese rice porridge at home before, let this be the recipe that introduces you to it. It’s warm, it’s simple, and I promise it’ll make you feel good from the inside. When you try it, come tell me about it on Instagram @my_foodstory.

Watch Easy Rice Congee Recipe Video
rice congee served in a bowl with toppings
Print

Rice Congee with Leftover Rice

This easy congee recipe turns yesterday’s leftover rice into a warm, silky bowl of chicken and mushroom porridge in about 20 minutes. It's comfort food at it's best!
Course Main Course
Cuisine Chinese
Diet Halal
Prep Time 10 minutes
Cook Time 20 minutes
Total Time 30 minutes
Servings 4 servings
Calories 158kcal
Author Richa

Equipment

Ingredients

  • 75 gms boneless chicken breast cut into ½ inch cubes
  • ¼ cup milk
  • 3 dry shiitake mushrooms hydrated
  • ½ cup shimeji mushrooms
  • 1 carrot cut into semi-roundels
  • 3 slices of ginger
  • 1 teaspoon chicken broth powder
  • ½ teaspoon salt
  • ⅛ teaspoon white pepper powder
  • 2 ½ cups water
  • 2 cups cooked rice
  • ½ teaspoon cornflour mixed in 2 tablespoons water
  • 1 teaspoon toasted sesame oil

Instructions

  • Add chicken cubes to a bowl, add milk and rub the chicken gently with milk to remove the odor. Discard the milk, rinse with water, drain the water and set aside the chicken cubes.
  • Slice the shiitake mushrooms into thin slices.
  • Heat a pressure cooker, add chicken, shiitake & shimeji mushrooms, carrots, ginger, broth powder, salt, pepper, water, rice, mix well, close the lid and pressure cook until 2 whistles, approx. 7 minutes.
  • Let the cooker de-pressurise by itself, open the lid and set the cooker to heat on medium. Add cornflour slurry, mix continuously till it boils and cook for 2-3 minutes.
  • Top with toasted sesame oil and serve hot.

Video

Nutrition

Calories: 158kcal | Carbohydrates: 26g | Protein: 7g | Fat: 2g | Saturated Fat: 1g | Polyunsaturated Fat: 1g | Monounsaturated Fat: 1g | Trans Fat: 0.003g | Cholesterol: 14mg | Sodium: 458mg | Potassium: 229mg | Fiber: 1g | Sugar: 2g | Vitamin A: 2578IU | Vitamin C: 1mg | Calcium: 40mg | Iron: 0.4mg

The post Easy Congee Recipe with Leftover Rice appeared first on My Food Story.
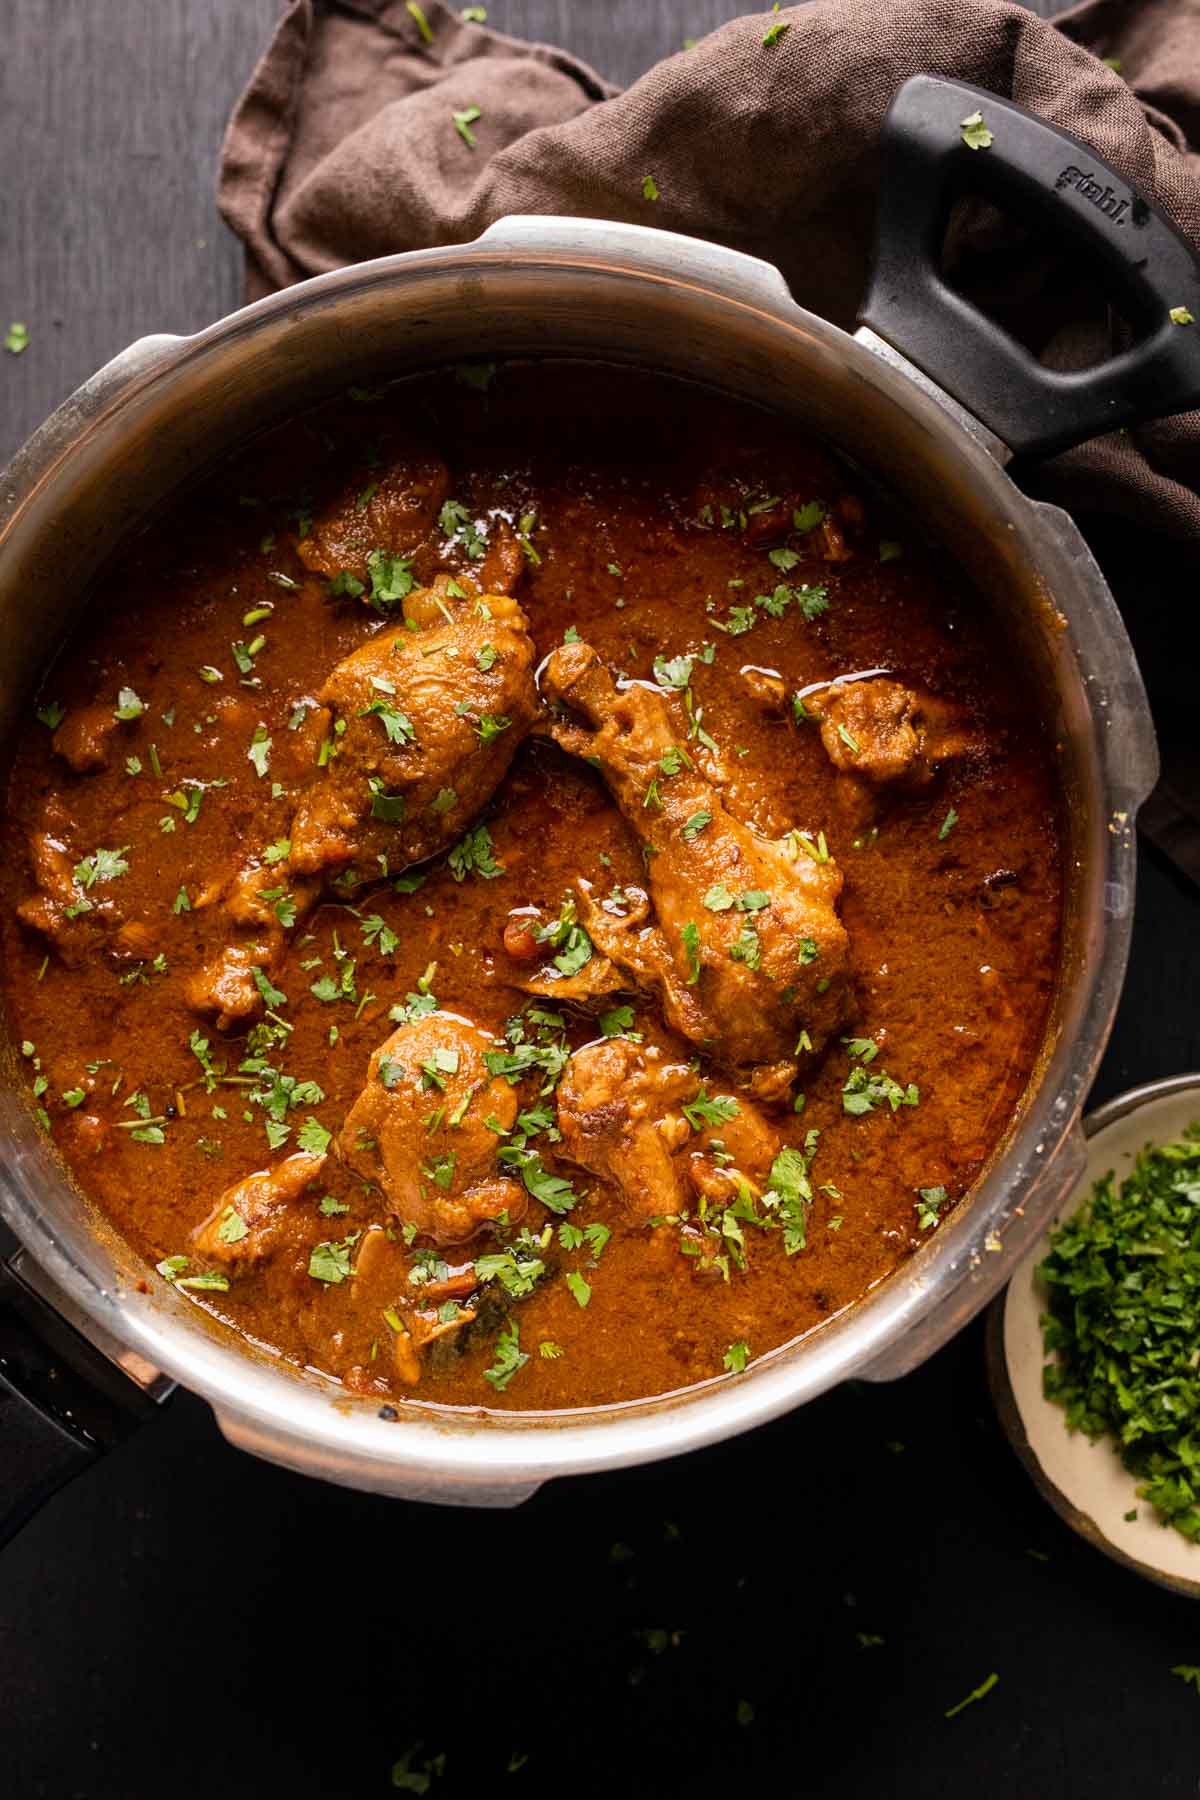
Dhaba Style Chicken Curry

This Dhaba Style Chicken Curry stands for every road trip we’ve had with our families. Same bold flavours, hot, fragrant, and ready in under 45 minutes. Learn how to make it in a traditional pressure cooker, instant pot, and on the stovetop.

Dhaba style chicken curry served in the pressure cooker it was made in

I think I’ve finally nailed it. This Dhaba Style Chicken Curry is SO good. Its legit, as close as it gets to eating it in a dhaba. Spicy, fragrant with spices, big, bold flavours and really juicy pieces of chicken.

Dhabas, for the uninitiated, are roadside restaurants that you’ll find along the highway. They’re road trip essentials and are scattered all over the country and really well-known for their bold, rustic flavors and ambience. Growing up, the highlight of any road trip was a stopover at a dhaba for steaming hot, spicy dhaba style chicken curry, dal fry or dal makhani and tandoori rotis fresh from the oven to mop it all up. These soul satisfying meals will always be etched on to my heart!

Unlike my other recipes, this one’s slightly time consuming because masala is ground and cooked till it’s color changes. This is characteristic of most Indian curries, and the slow cooking process or bhuno is what lends dishes a unique flavor.

Dhaba Chicken Curry Ingredients

Here are the main ingredients you’ll need for this recipe:

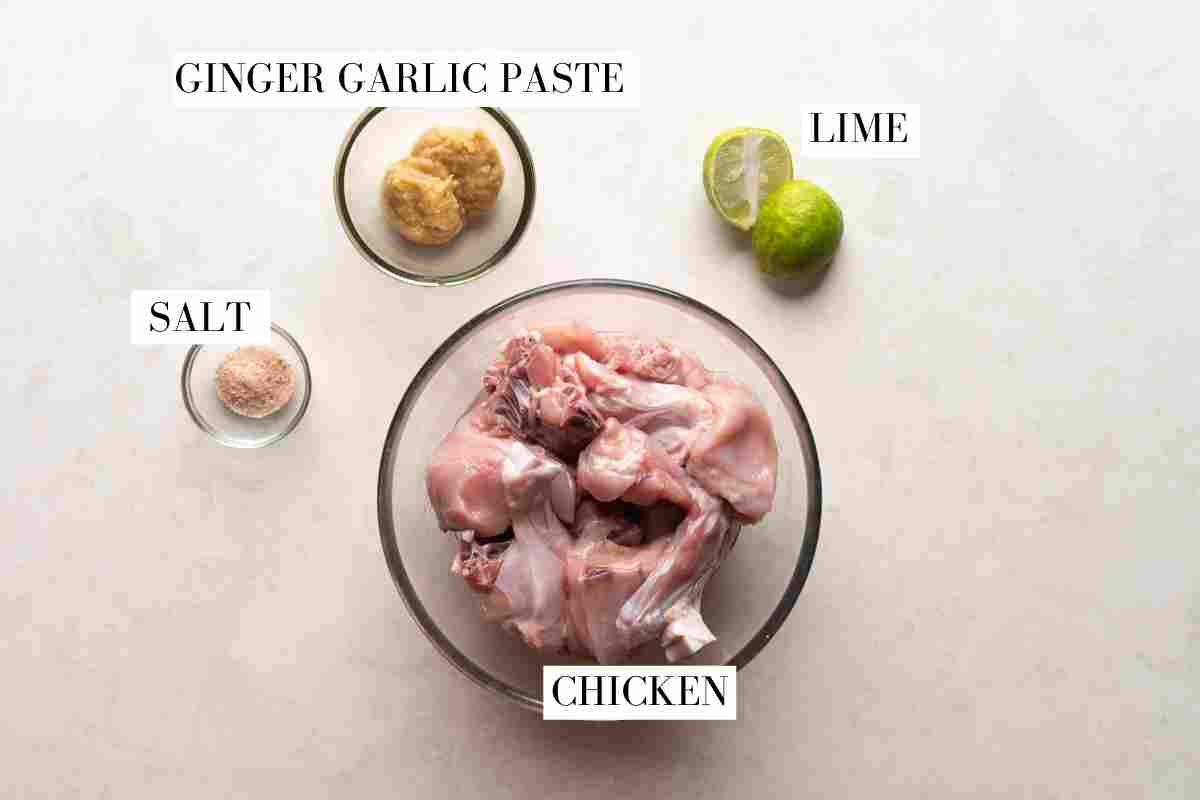
Ingredients for the marinade pictured on white marble with text to identify them
  • Chicken: Bone in chicken cut into 2 inch pieces. Most Indian curries use the entire bird (thighs, breast, drumsticks)
  • Ginger Garlic Paste: Fresh ginger and garlic in equal parts ground to a paste with a little water. Use store bought in a pinch but fresh adds more flavour
  • Lime Juice: Acid helps tenderise the meat
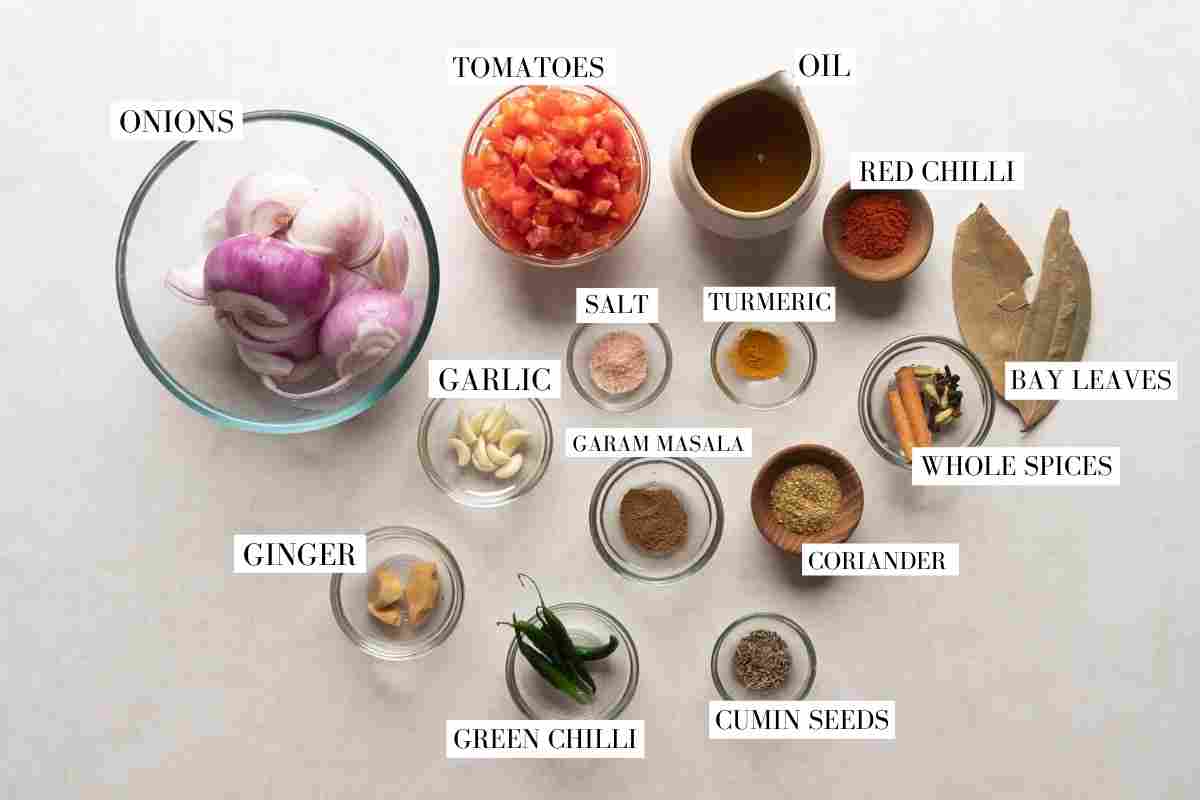
Ingredients for chicken curry pictures on a marble with text to identify them
  • Mustard Oil: Key to getting that unique dhaba flavour. It’s more pungent and adds a smokiness
  • Whole Spices: Cumin, cloves, cardamom, cinnamon and bayleaf. Skip if you don’t have but I recommend using them for that burst of flavour
  • Ginger & Garlic: Ground with onions. You can substitute it with 1.5 tbsp store bought or homemade ginger garlic paste
  • Onions: Form the main base of the gravy and add flavour, density and thickness
  • Green Chillies: Add heat and flavour. Use serrano peppers if you don’t have Indian green chillies available
  • Ground Spices: Red Chilli Powder, Turmeric Powder, Coriander Powder and Garam Masala. I highly recommend using homemade garam masala. Add it towards the middle or end of the cooking process to retain its aroma and flavour
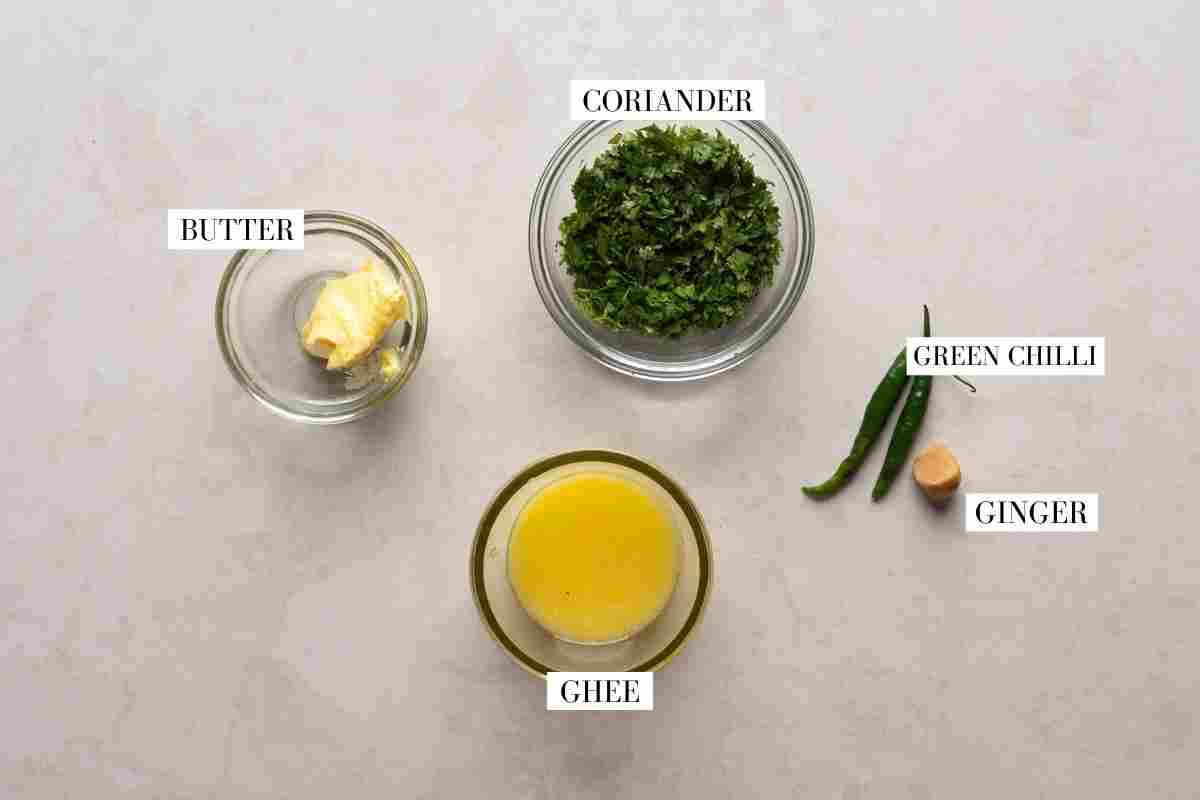
Ingredients for the tempering or tadka laid out on a marble with text to identify them
  • Tempering: We use ghee, ginger, and green chillies to add an additional layer of flavor to finish off the curry. Don’t skip this step!

Why is this Chicken Curry recipe so unique

We were asking this question ourselves while trying to replicate that dhaba like flavour – How is it that common dishes taste extra unique when they come from a dhaba?

Here’s what we found: Dhabas use more oil, ghee and butter to add richness and to cook the food faster, there’s a natural smoky flavour because all the cooking is done on a really high flame or using firewood. They liberally use freshly ground spices wherever possible and finally, they end the dish with a sizzling tadka/tempering!

We’ve taken all this information and compiled it into one beautiful chicken curry.

How to make Chicken Curry

Check out the simple steps that go into making this beautiful curry

Marinate

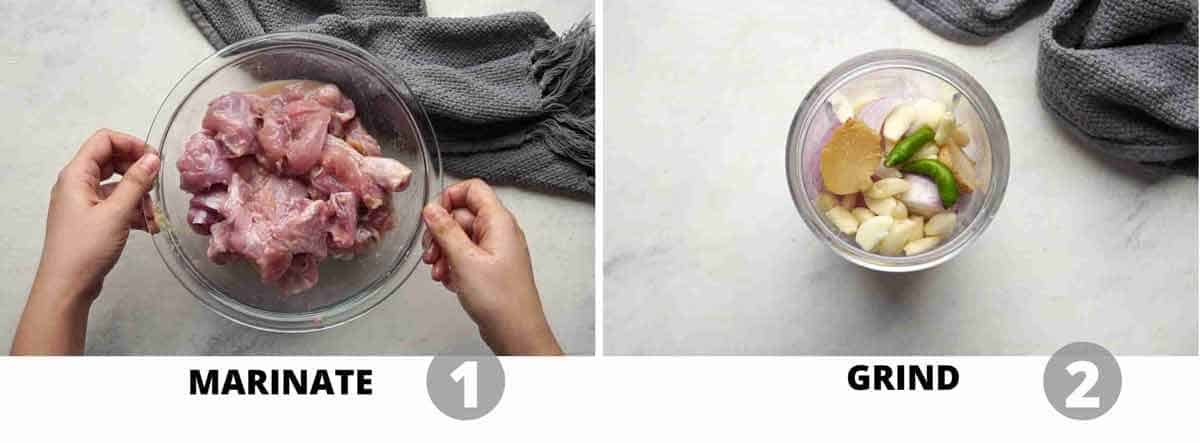
Step by step collage showing how to marinade chicken and grind onion paste for the gravy

1. Marinate the chicken in ginger garlic paste, lime juice and salt. This adds flavour from within and the acid helps tenderise the meat

2. Add onions, ginger, garlic and green chillies to a chopper and pulse to get a coarse mix. 

Curry

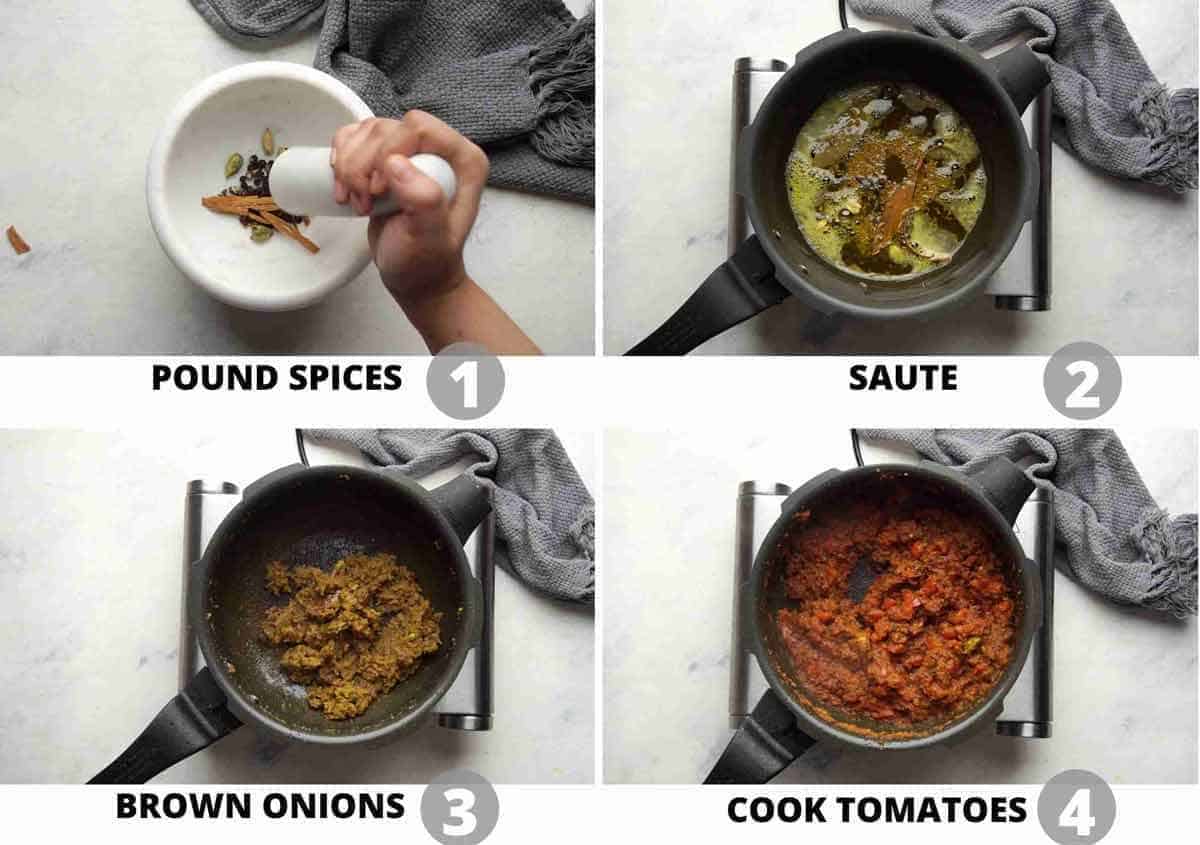
Step by step collage showing how to prepare the curry

1. Pound spices roughly with a mortar pestle to break them down and release their flavour

2. Saute them in hot oil to temper them

3. Brown the onion paste in oil that’s tempered with whole spices. This is a slow cooking process where the onion paste is sauteed on a low flame till it changes colour and becomes a deep golden brown. You’ll see a thin layer of oil floating on the top and the sides – thats when you know its cooked through and isn’t raw anymore

4. Cook tomatoes and spices for a few minutes till the tomatoes become pulpy soft

Step by step picture collage showing how to make dhaba chicken curry

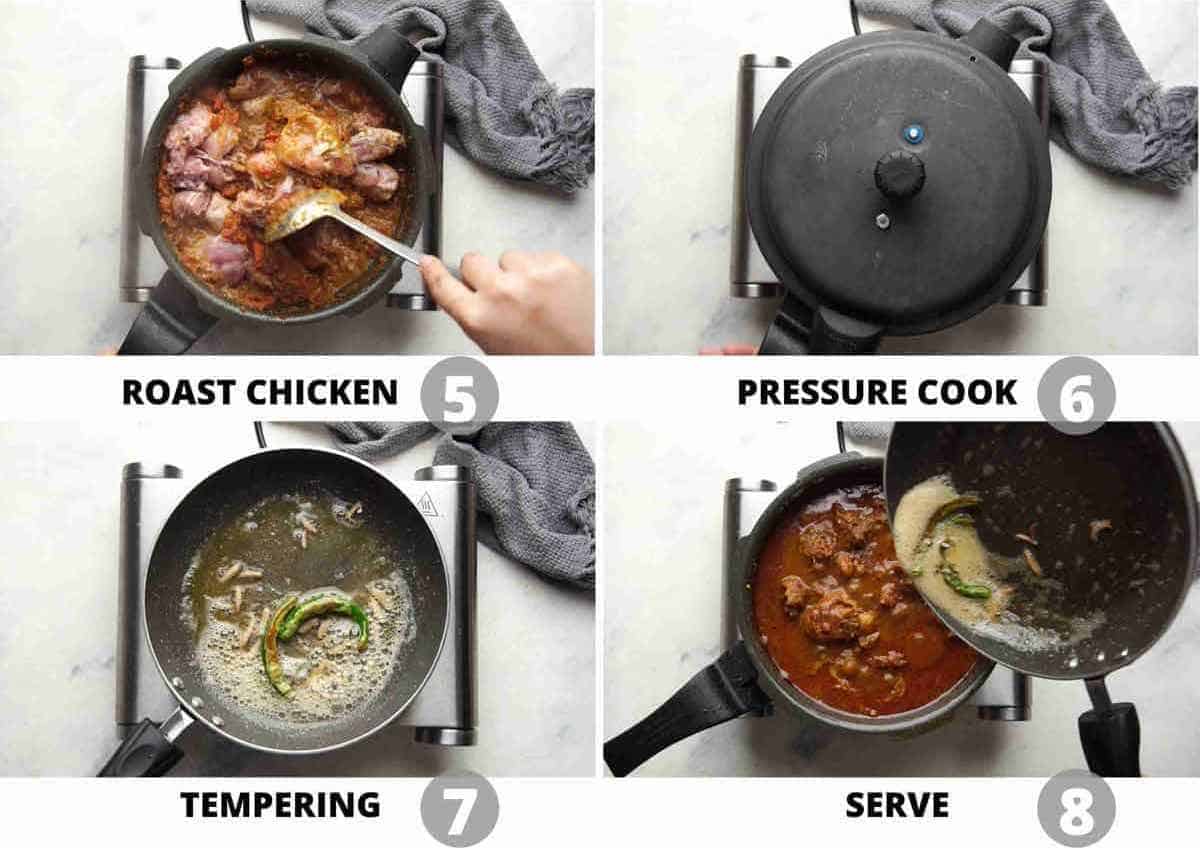
5. Roast the chicken along with garam masala in the onion tomato mixture, tossing it for a minute or two till the gravy coats all the pieces

6. Pressure Cook for 15 minutes. If using a traditional pressure cooker, start on high heat and after the first whistle, reduce the heat to low. Wait till you hear two more whistles and then turn off the flame. Let the pressure release naturally. To make instant pot chicken curry, pressure cook on high for 8 minutes

7. Temper julienned ginger and slit green chillies in butter and ghee.This adds an extra layer of flavour and gives it a nice hint of ginger

8. Serve chicken curry with tempering poured on top. Sprinkle some chopped coriander for freshness and flavour

Richa’s Top Tips

  • Always marinate the chicken. The longer the better. This literally changes the game by adding flavour, seasoning, and tenderising.
  • Brown the onion paste. Don’t rush this process. Browning onions slowly gets rid of any raw smell and flavour. You’ll know its done when you see a little oil separating on the sides and the colour changes to a deep golden. This, in addition with the herbs, spices and tomatoes create the perfect balance. 
  • Don’t skimp on oil. There is a fair amount of fat in this recipe in the form of oil, butter and ghee. I would not recommend skimping on oil as it will compromise the flavor.
  • Always use quality garam masala. I always recommend homemade garam masala. But even if using store bought, make sure its not more than a year old. Add it just before cooking the chicken so that it retains its freshness and aroma
  • Do not forget the tempering. It gives it that extra kick along with the richness from the ghee. 

Storage Tips

  • If you have leftovers, let the chicken curry cool completely before transferring it to an airtight container. It will keep well in the refrigerator for 3–4 days.
  • If you’d like to store it for longer, you can freeze Dhaba Chicken Curry for up to 2–3 months. For convenience, portion it into freezer-safe containers so you can thaw only as much as you need.
  • When you’re ready to reheat, thaw the frozen curry in the refrigerator overnight and then warm it gently on the stovetop. The gravy tends to thicken as it sits, so add a splash of water while reheating if needed. Make sure the chicken is heated through before serving.
  • And the best part? The flavours have more time to come together as the curry sits, so leftovers can taste even better the next day. This also makes it a great make-ahead chicken curry for busy weeknights.

Serving Ideas

Wondering what to serve with Dhaba Chicken Curry? You really can’t go wrong with something that helps soak up all that delicious, spicy gravy!

  • For an easy weeknight meal, serve this Indian chicken curry with jeera rice, steamed basmati rice or soft rotis.
  • If you’re craving a proper dhaba-style spread, go for tandoori roti or naan with a bowl of cool raita, sliced onions and lemon wedges on the side.
  • For a bigger Indian meal, add dal fry or dal makhani and a simple vegetable sabzi. And don’t forget extra rotis or rice because you’ll want every last bit of that gravy!
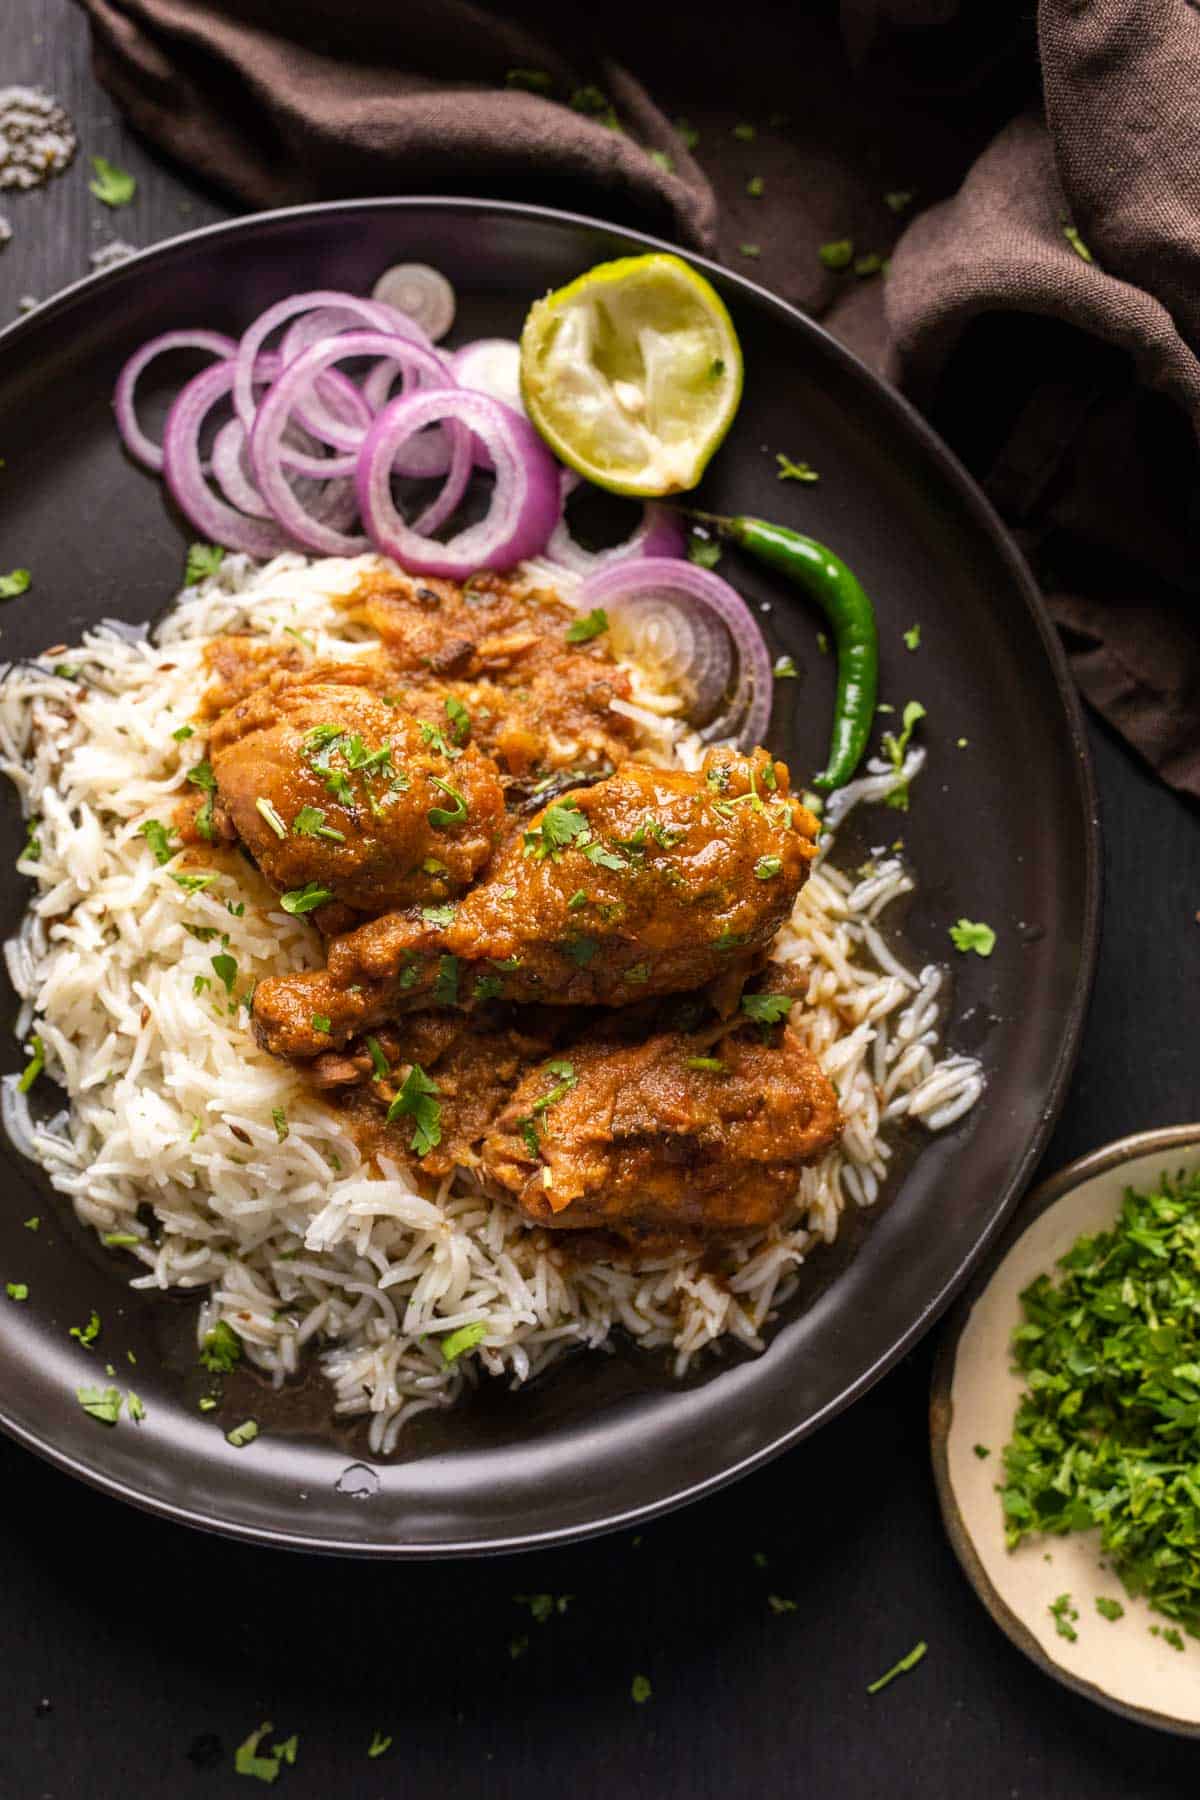
Chicken curry served on a black plate with rice, onions, lime juice and green chillies on the side

I hope you guys enjoy this recipe as much as I do, it’s truly one of my favorites! And like all curries, this tastes even better the next day, so no need to worry about leftovers! If you love dhaba style food, check out my other favourite like Dhaba Dal Fry, Dhaba Dal Tadka, Matar Paneer, Karahi Chicken, Dal Makhani.

When you make this recipe, don’t forget to send me pictures over on my IG @my_foodstory. I love seeing your recreations!

Watch Dhaba Chicken Curry Recipe Video

Dhaba style chicken curry served in the pressure cooker it was made in
Print

Dhaba Style Chicken Curry

The best dhaba style chicken curry recipe! Spicy, hot, fragrant curry made with ground spices, onions and tomatoes, and perfect for a family lunch or dinner.
Course Main Course
Cuisine Indian
Diet Gluten Free, Halal
Prep Time 10 minutes
Cook Time 35 minutes
Total Time 45 minutes
Servings 8 Portions
Calories 283kcal
Author Richa

Ingredients

  • 1 kg Chicken skinless, bone-in whole chicken cut into medium sized pieces (referred to as curry cut in India)

For the marinade:

  • 2 tablespoons Ginger Garlic Paste
  • 1 Juice of lime
  • 1 tablespoon Salt

For the curry:

  • 1/4 cup Mustard Oil see note 2
  • 4 medium Red Onions
  • 10 cloves Garlic
  • 1½ inches Ginger
  • 3 – 4 Green Chilies use Serrano Peppers as replacement, adjust the spice as required
  • 1 tablespoon Cumin Seeds
  • 2 Bay leaves
  • ½ Cinnamon stick Stick
  • 4 – 5 Cardamoms
  • 8 – 10 Peppercorns
  • 4 – 5 Cloves
  • 4 medium Tomatoes finely chopped
  • ½ teaspoon Turmeric Powder
  • 1 teaspoon Red Chili Powder optional; adjust the spice as required
  • 2 tablespoons Coriander Powder
  • 1 teaspoon garam masala Powder
  • 1 teaspoon meat masala
  • 1 teaspoon Salt
  • 1 1/4 cups water

For tempering:

  • 1 tablespoon Ghee or Oil
  • 1 tablespoon Butter
  • 2 Green Chilies slit lengthwise
  • ½ inch Ginger julienned
  • 2 tablespoon Coriander for garnishing

Instructions

  • Marinate the chicken pieces with ginger garlic paste, lime juice and salt. Cover and set aside while you prep everything else
  • Add onions, ginger, garlic and green chillies to a chopper and pulse to get a coarse mix.
  • Heat oil in a pressure cooker or a large heavy bottom pan. Add cumin seeds. Roughly pound all the whole spices (bay leaves, cinnamon, cardamom, peppercorns and cloves) and add to the oil.
  • once they start to splutter, add the onion mix. Cook the onion mix on a low flame, stirring occasionally till it is reduced to a golden brown mix and you see a thin layer of oil along the sides
  • Add tomatoes, salt, turmeric powder, red chili powder (if using) and coriander powder. Cook till the tomatoes start melting, and almost form a paste.
  • Add chicken and garam masala powder and roast for a minute or two till the chicken pieces turn pink and get coated with the masala. Add meat masala powder, 1 ¼ cups of water, mix well.

Pressure Cooker:

  • At this stage, if you are using a pressure cooker, place the lid and pressure cook on high till the first whistle goes off. Then reduce the flame to low and pressure cook for two more whistles and turn off the flame. If using a different kind of pressure cooker (without a whistle system), pressure cook on high for 15 minutes. Let the pressure release naturally.
  • Simmer for 5-10 mins on high flame, if required, to thicken the curry (chicken leaves a lot of water). I didn't need to do this.

Stovetop Method:

  • If you are using a heavy bottomed pan, bring the curry to a boil, reduce the heat, cover with a lid and let it cook on medium heat for 20-25 minutes. Uncover the pan, and cook for another 10-15 minutes till the curry starts to thicken. Once the curry is ready, switch off the flame.
  • Instant Pot Method:
  • If using an instant pot, place the lid and change the vent to sealing. Pressure cook on high for 8 minutes. Release pressure manually. Simmer the curry for a few minutes to achieve the desired thickness if there is too much water.
  • Tempering:
  • In another small pan, heat ghee and butter and add green chilies and ginger. Once they start to splutter, switch off the flame and mix the tadka (or tempering) into the curry. Top with coriander.
  • Let the curry sit for 10-15 minutes before serving. Tastes best with rotis or rice.

Video

Nutrition

Calories: 283kcal | Carbohydrates: 14g | Protein: 13g | Fat: 20g | Saturated Fat: 6g | Polyunsaturated Fat: 4g | Monounsaturated Fat: 9g | Trans Fat: 0.1g | Cholesterol: 54mg | Sodium: 1330mg | Potassium: 425mg | Fiber: 4g | Sugar: 5g | Vitamin A: 811IU | Vitamin C: 20mg | Calcium: 63mg | Iron: 2mg

This article was researched and written by Urvi Dalal.

The post Dhaba Style Chicken Curry appeared first on My Food Story.

Mexican Oatmeal Bowl | Savory Oatmeal Recipe

This Mexican oatmeal bowl recipe is savoury, spiced, and loaded with toppings that make it feel more like a taco bowl than a bowl of oats. 

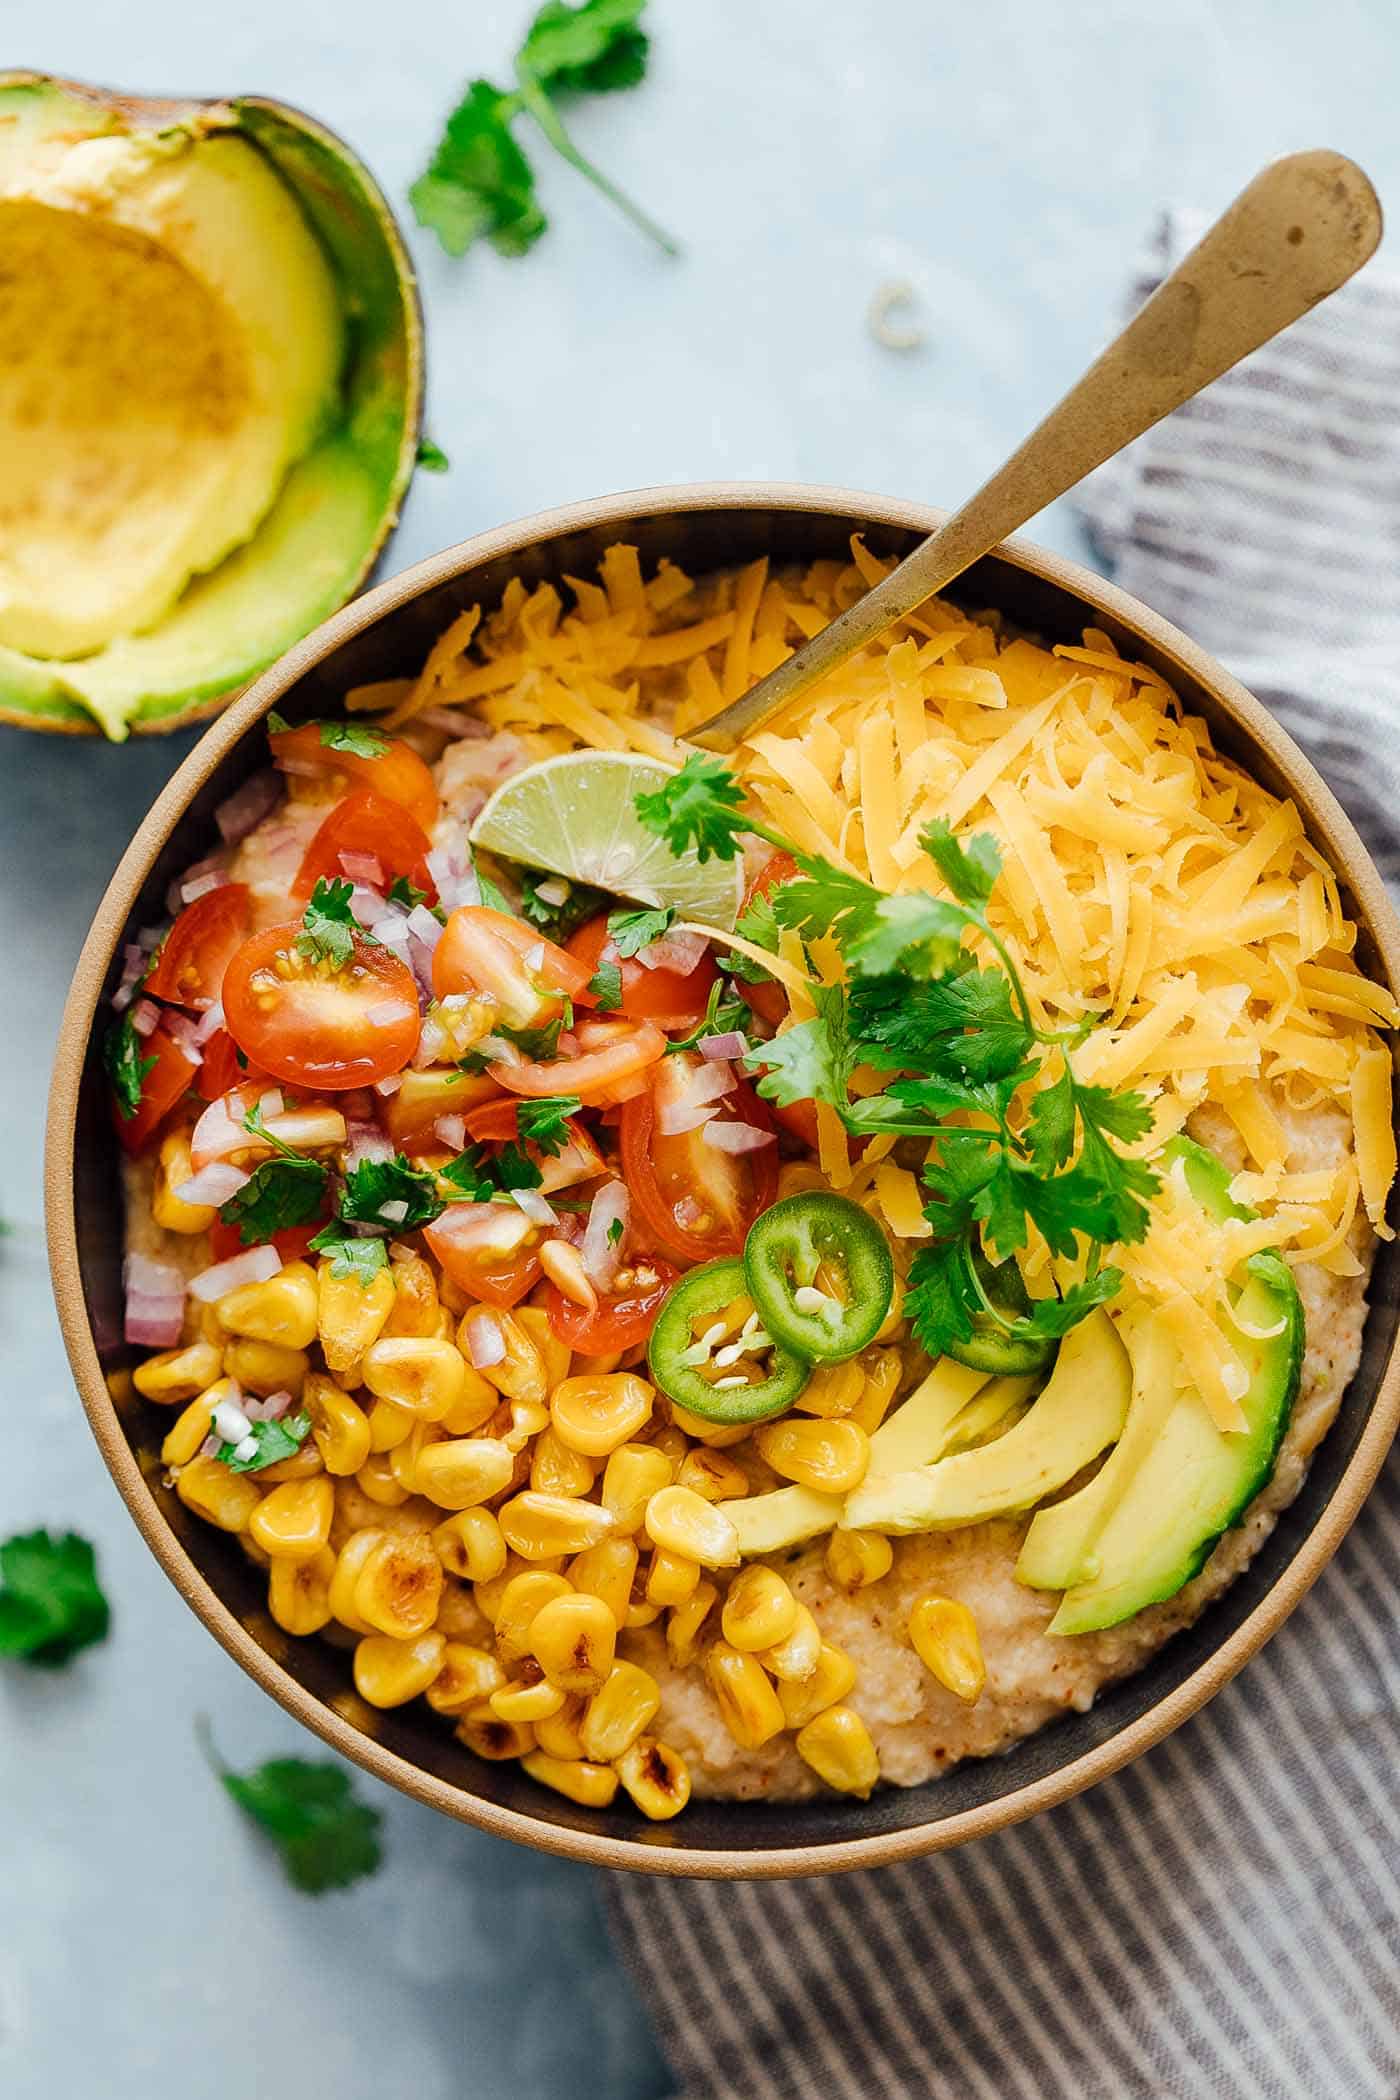
a bowl of mexican oats ready to be served

Oats for breakfast don’t have to mean the same old sweet porridge every morning. This Mexican oatmeal bowl is a really fun way to eat oats if you’ve never tried them savoury before. The oats in the recipe are cooked with garlic, taco seasoning, paprika, and a squeeze of lime, and then topped with things like corn salsa, avocado, cheddar, and jalapenos. It takes about 15 minutes and feels a lot more like brunch than a regular bowl of porridge.

The recipe is completely customisable, so you can top it with whatever you enjoy. If your family already loves our high protein dosa or moong dal chilla for breakfast, this oatmeal bowl makes a really nice change on mornings when you want something quick and different.

Ingredients for Mexican Oatmeal Bowl

Oats: I have used rolled oats which I have pressure cooked to help them cook fast and come to the perfect consistency.

Garlic: Minced and sautéed before the oats go in. 

Seasoning: Taco seasoning, paprika powder, lime juice, and salt. These give the oats their Mexican flavour.

Toppings: Corn salsa, grated cheddar, avocado, and jalapenos. 

Oil: For sautéing the garlic.

Richa’s Top Tips

  • Don’t overcook the oats. They only need 3-4 minutes of simmering after the water comes to a boil. Any longer and they turn gluggy and lose their texture. You want them cooked but still with a little body to them.
  • Adjust the water to get the consistency you like. Some people prefer their oats thick and porridge-like, others like them a little looser. Start with the 2 cups and add more if needed.
  • Make this fresh and eat it immediately. Oatmeal dries out and turns stodgy really fast once it cools. This isn’t a recipe you want to make ahead or save for later. It’s best eaten straight from the pot.
  • Go heavy on the toppings. The toppings are what make this bowl exciting. Don’t hold back on the salsa, avocado, and cheddar. They add freshness, creaminess, and flavour that the oats need.

Frequently Asked Questions

Is this recipe spicy?

It has a mild warmth from the taco seasoning and paprika, but nothing overpowering. If you want more heat, add extra jalapenos on top or a dash of hot sauce. If you’re making this for kids or someone who doesn’t like spice, reduce the taco seasoning slightly and skip the jalapenos.

Do I need to soak my oats before making this recipe?

No. Quick cooking oats don’t need soaking. They cook in just 3-4 minutes once the water comes to a boil. That’s what makes this recipe so quick.

Can I use instant oats or steel cut oats instead?

Steel cut oats need significantly more time and water, so the recipe would need to be adjusted quite a bit. You can use instant oats for the recipe though.

Can I make this vegan?

Yes. Just skip the cheddar or use a plant-based cheese, and make sure your taco seasoning doesn’t contain any dairy. Everything else in the recipe is already vegan.

Storage Tips

  • Best eaten fresh. This is one of those recipes that doesn’t store well. Oatmeal dries out and becomes thick and gluggy as it cools, so make only as much as you plan to eat right away.
  • Freezing: Not recommended for the same reason. The texture won’t come back after freezing and thawing.
  • Prep ahead tip: If you want to speed up your mornings, you can pre-mix the dry seasoning (taco seasoning, paprika, salt) and keep it in a small jar. When you’re ready, just sauté the garlic, add oats, water, the seasoning mix, and you’ll have breakfast ready even faster.

Serving Ideas

These Mexican oats are a complete breakfast on their own, but here are a few ways to make the morning even better:

  • With a Watermelon Lime Smoothie: A cold, refreshing smoothie alongside a warm, savory oatmeal bowl is a really good morning combination.
  • With a cup of Masala Chai: If you want to keep it simple, a hot chai alongside this bowl is all you need.
  • With Air Fryer Poached Eggs on top: A poached egg with a runny yolk over the savoury oats adds protein and makes the bowl even more filling.

Customisation Ideas

  • Add protein: A fried egg, grilled chicken strips, sautéed prawns, or even some black beans on top turn this from a light breakfast into a really filling meal.
  • Swap the toppings: Guacamole instead of plain avocado, pico de gallo instead of corn salsa, or sour cream and pickled onions for a completely different flavour profile. Use whatever you enjoy on your tacos.
  • Make it Indian style: Skip the taco seasoning and add cumin powder, turmeric, and a pinch of chaat masala instead. Top with chopped onions, tomatoes, green chutney, and sev for a desi savoury oats bowl.

Did You Know?

Oats are one of the few grains that actually lower cholesterol. They contain a soluble fibre called beta-glucan that forms a gel-like substance in your gut, which binds to cholesterol and prevents it from being absorbed into the bloodstream. Studies have shown that eating just 3 grams of beta-glucan a day, roughly one bowl of oats, can reduce LDL cholesterol by 5-10%. 

a bowl of mexican oats ready to be served

If you’ve been eating oats the same sweet way every morning, give this savoury breakfast oatmeal bowl a try and see how you feel about savoury oats. I think one bowl is all it’ll take to convert you. Share your bowls with me on Instagram @my_foodstory when you make it.

Watch Mexican Oatmeal Bowl Recipe Video

This Mexican oatmeal bowl is the healthier version of a Mexican breakfast bowl. The oatmeal is seasoned with all the spices that go into your favorite taco, and then topped with salsa, corn, avocado, jalapenos and cheddar. Super simple to make but you’ll feel like a king when you dig into this!
Print

Mexican Oatmeal Bowl

A power packed healthy oatmeal bowl upgraded with Mexican flavours. Added flavours from garlic, lemon and paprika make this meal truly scrumptious.
Course Breakfast
Cuisine Mexican
Prep Time 5 minutes
Cook Time 10 minutes
Total Time 15 minutes
Servings 1 portions
Calories 263kcal
Author Richa

Equipment

Ingredients

  • 1 teaspoon Oil
  • 2 Garlic Cloves minced
  • ¾ cup Quick cooking Oats
  • ½ teaspoon Taco Seasoning refer to Notes
  • ¼ teaspoon Paprika Powder
  • ½ teaspoon Lime Juice
  • 2 cups Water
  • Salt to taste
  • Corn Salsa for topping
  • grated Cheddar for topping
  • Avocado for topping
  • Jalapeno for topping

Instructions

  • Pressure cook oats along with garlic, salt, and water for about 2 whistles on high heat. Turn off the flame allow the pressure to release naturally.
  • Transfer to a bowl and taco seasoning, paprika powder, and lime juice.
  • Top with corn, salsa, grated cheddar, avocado and jalapeno. Serve hot.

Video

Notes

  1. You can substitute Taco seasoning with any Mexican flavoured seasoning readily available at supermarkets.
  2. I have topped my meal with my favourites like corn salsa and avocado. You can top it with any condiments like salsa verde, proteins like – grilled chicken or prawns, chipotle dressing, guacamole etc.,
  3. This is a very quick recipe. Do not prepare it and store it for later as oatmeal can very easily become dry and gluggy. 

Nutrition

Calories: 263kcal | Carbohydrates: 42g | Protein: 8g | Fat: 8g | Saturated Fat: 1g | Sodium: 30mg | Potassium: 215mg | Fiber: 6g | Sugar: 1g | Vitamin A: 246IU | Calcium: 42mg | Iron: 3mg

This article was researched and written by Harita Odedra.

The post Mexican Oatmeal Bowl | Savory Oatmeal Recipe appeared first on My Food Story.
❌