❌

Reading view

There are new articles available, click to refresh the page.

Sesame Chikki Recipe (Til Chikki Recipe)

Sesame chikki, also known as Ellu mittai or Til chikki, is a traditional Indian sweet made with sesame seeds and jaggery. It is a crunchy sweet to try during festivals like Diwali, Makar Sankranti and Lohri. Learn how to make this chikki at home with step-by-step pictures.  Sesame Chikki Recipe I have been waiting to...

Read More

The post Sesame Chikki Recipe (Til Chikki Recipe) appeared first on Yummy Tummy.

Sandesh Recipe | Bengali Sondesh Recipe

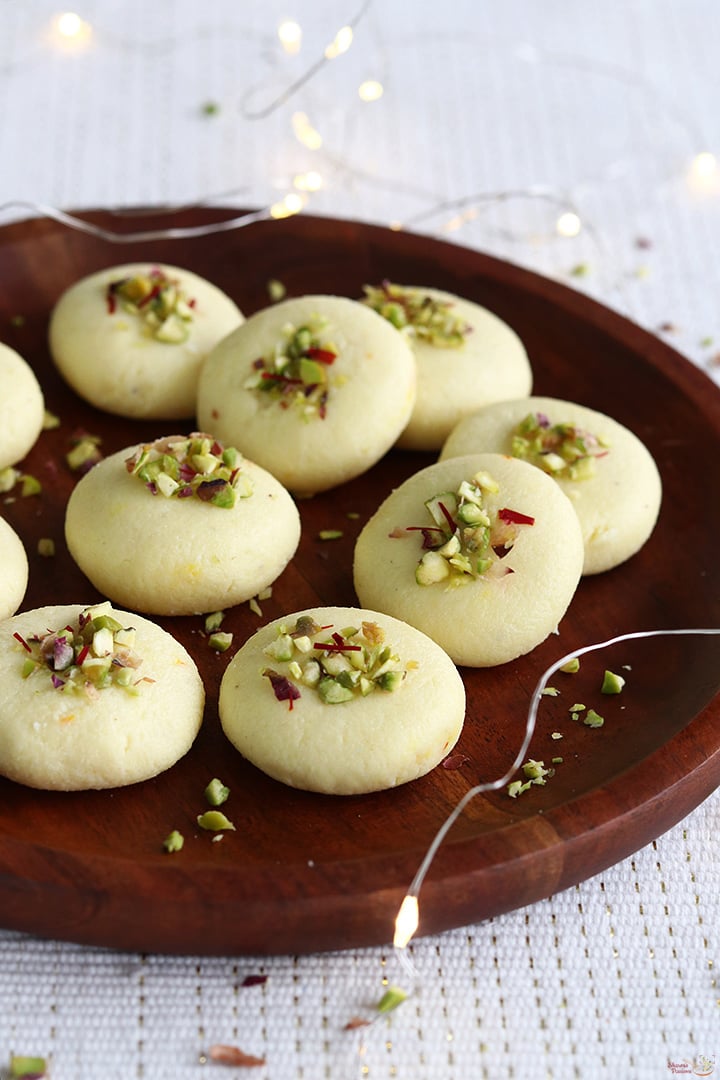
Sandesh is a delicious Bengali milk sweet popular all over India. Sandesh also known as Bengali Sondesh is milk cheese based rich sweet made using milk, sugar, nuts, cardamom powder and saffron. Sandesh is most commonly made for festivals and special occasions.

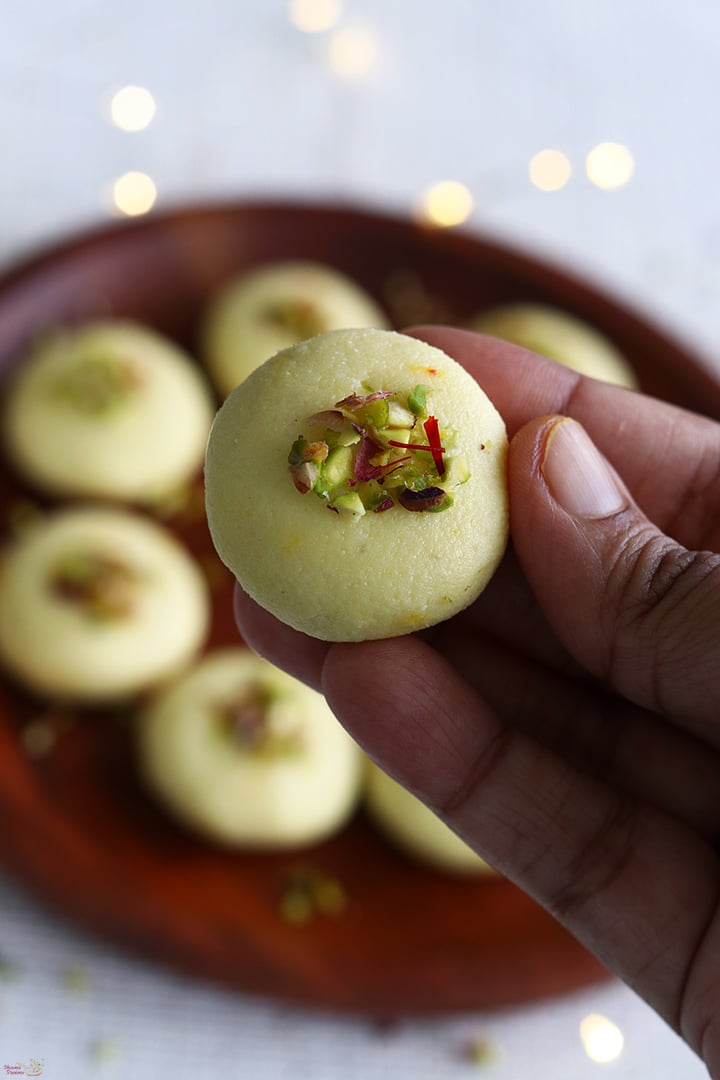
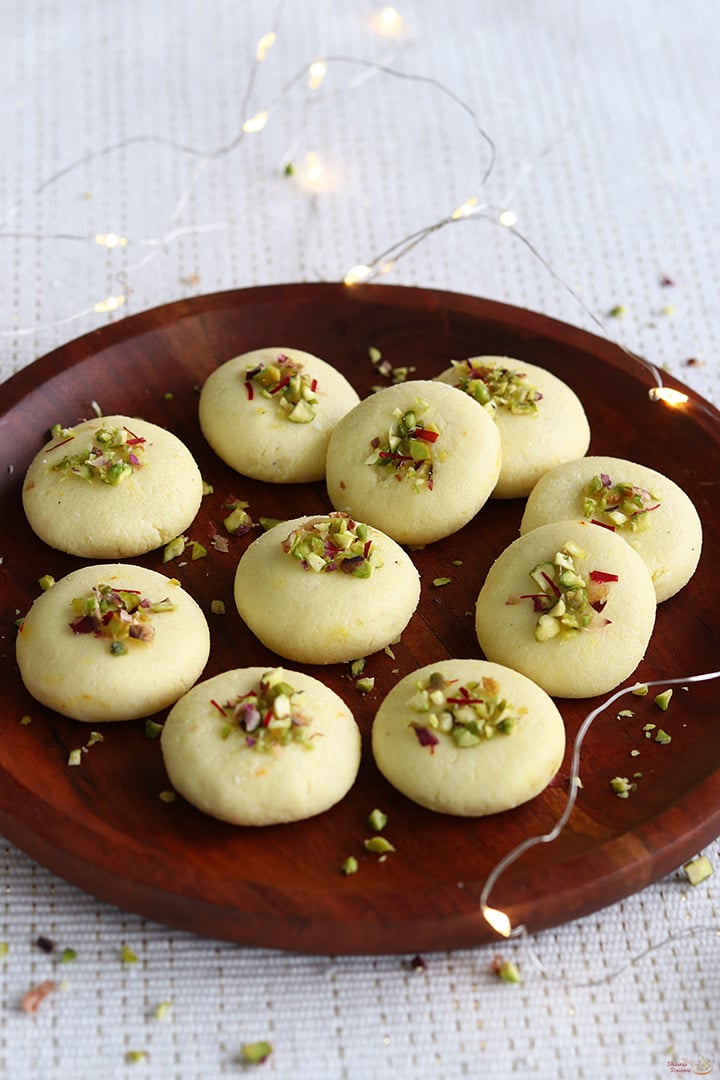
sandesh served in a wooden plate

Sandesh sweet can be made for special occasions, festivals like Navratri, Diwali and Durga Pooja. It is made with just simple ingredients from your kitchen and can be made easily within just few minutes of time. Even beginners can try this simple, quick and easy sweet.

[feast_advanced_jump_to]

About Sandesh

Sandesh is a popular Bengali sweet made by first curdling milk to form chenna then mixing it with sugar and cooking until soft, non sticky, then shaping into small discs and garnishing with nuts.

There are many variations to sandesh including many flavours but the one I have shared here is the traditional one. The colour and taste of sandesh veries depending on the flavours we add.

This is the easiest sweet I have made, just few minutes and you are done with this yummy milk sweet. To make the best tasting sandesh, chenna should be prepared fresh and using store bought paneer may change the taste of sandesh.

The garnishings are end less you can add chocolte chips or nuts or dry fruits of your choice. Sandesh tastes incredibly delicious making it one of the popular sweets in Bengal.

Similar Recipes

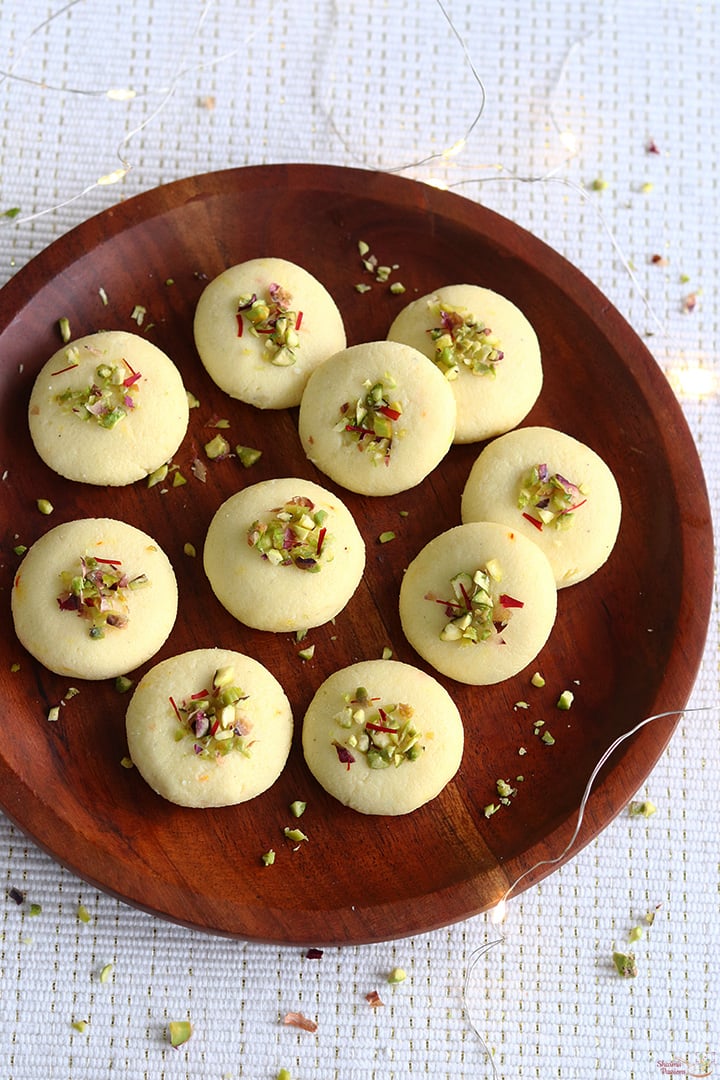
sandesh sweet served in a wooden plate

Sandesh Video

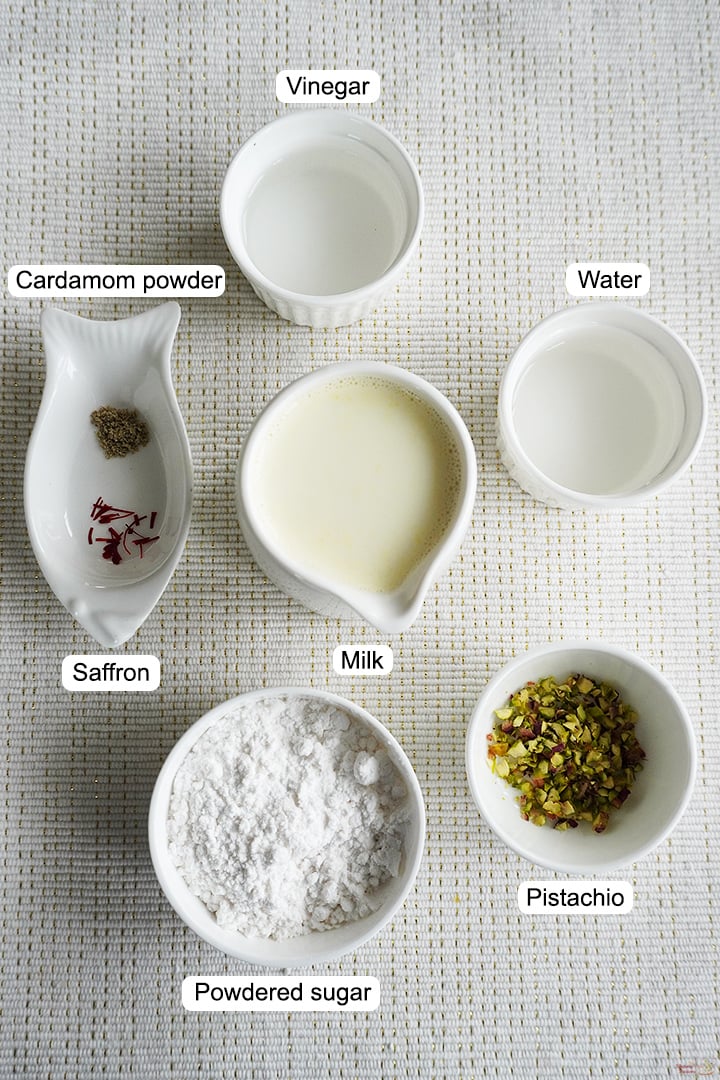
Sandesh Ingredients

  • Milk - Use full cream milk either farm fresh or packed milk.
  • Vinegar - You can use vinegar or lemon juice to curdle milk.
  • Sugar - Grind sugar to a fine powder then use it.
  • Nuts - I have used chopped pistachios for garnish. You can even use almonds, cashews etc.
  • Saffron - Saffron adds a rich flavour and mild colour to this sweet.
  • Cardamom powder - This is one of the main flavourings for sandesh.
ingredients needed to make sandesh

How to make Sandesh Step by Step

1.To a sauce pan add 1 liter milk. Stir and boil for a minute. Switch off and let it rest for 2-3 minutes.

boil milk

2.To a small bowl add 2 tablespoon vinegar, 2 tablespoon water, mix it well and set aside.

mix vinegar with water

3.Now add vinegar water solution little by little and stir gently. Now the flame is off, this helps to slowly curdle milk and the resulting chenna is so soft.

add it to milk

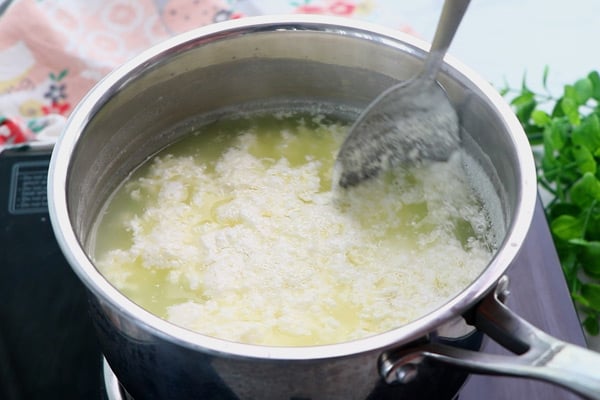
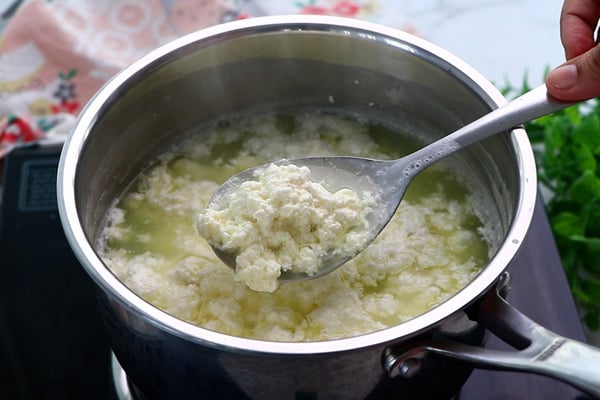
4.Now whey water(green liquid) and chenna(white solid) separates.

milk is curdled

5.Now it is curdled completely. Switch off.

chenna in a ladle

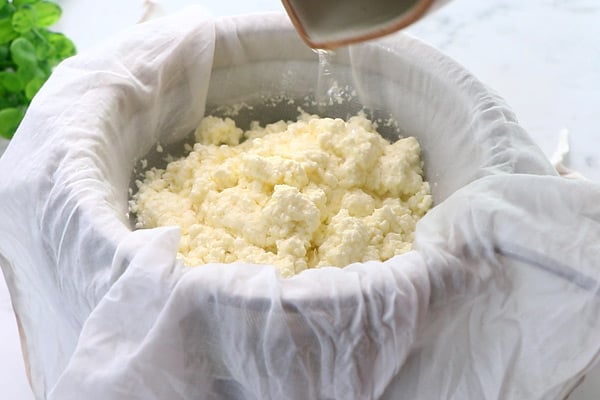
6.Transfer this to a cloth placed on a strainer. Keep a bowl underneath to collect the whey water. You can use this whey water for kneading chapathi dough or for curdling milk again.

add to a strainer

7.Rinse it with water well.

rinse well with water

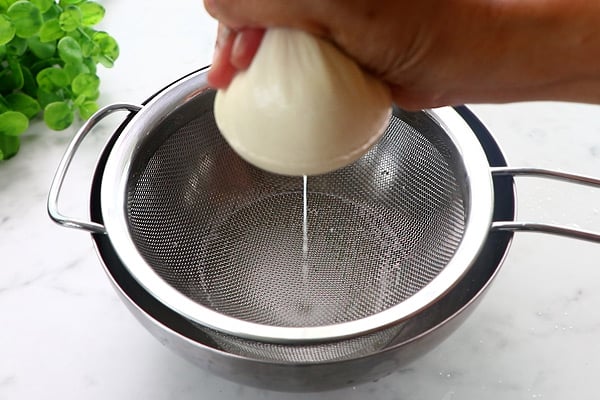
8.Squeeze excess water.

squeeze water

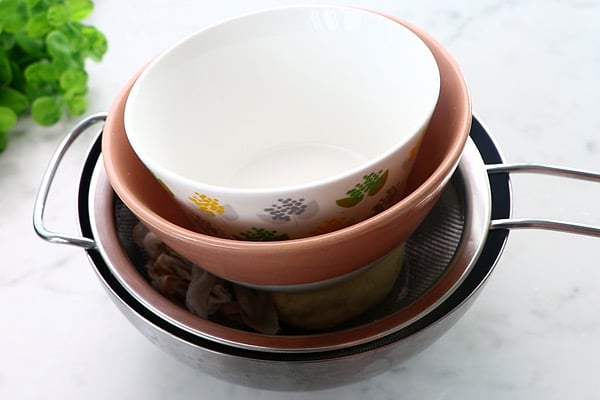
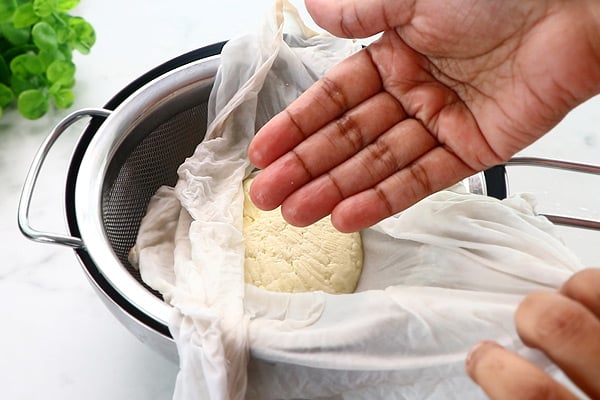
9.Roll and place it on the strainer. Keep 2 bowls on it. Do not keep heavy weight. Set aside for 30 minutes.

set aside for 10 mins

10.Now open, moisture should be still there slightly, it should not be dry.

moisture is still there

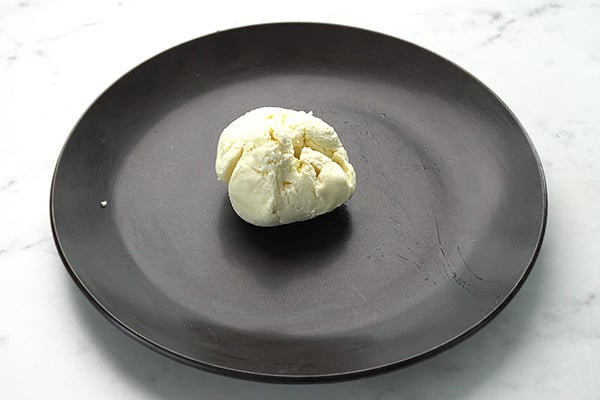
11.Transfer it to a plate.

transfer to a plate

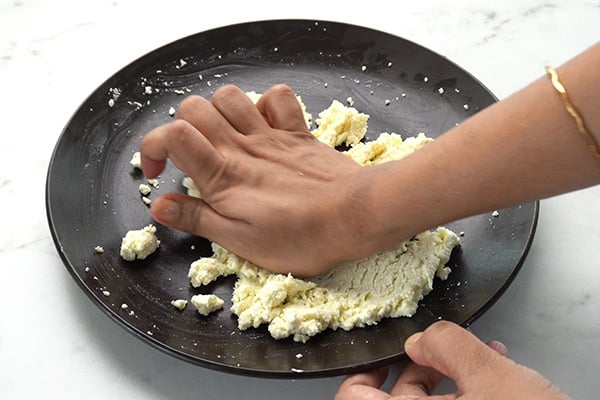
12.Knead it well using your palm like shown. Knead until the texture changes smooth and soft.

knead well

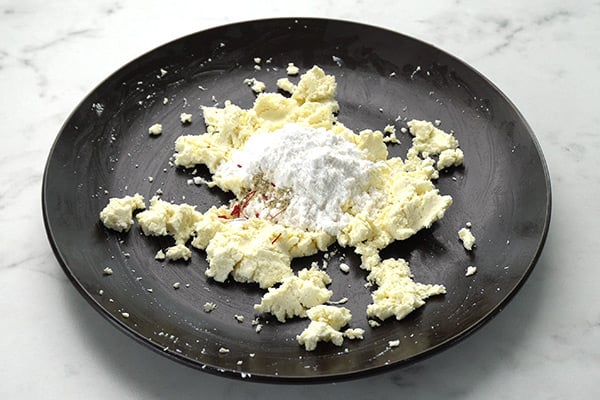
13.Add ⅓ cup powdered sugar, ¼ teaspoon cardamom powder and 5 strands saffron.

add sugar, cardamom powder and saffron

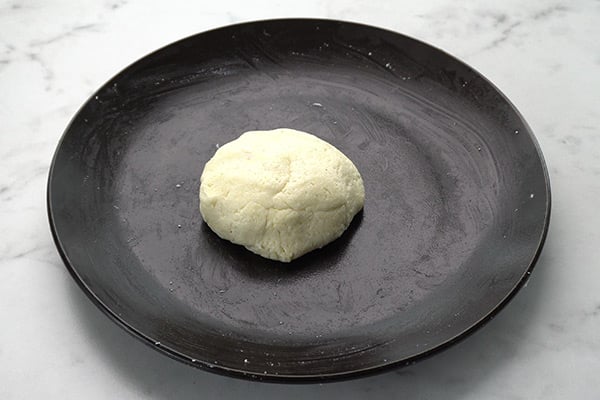
14.Mix well and gather to form a dough like this.

mix it well

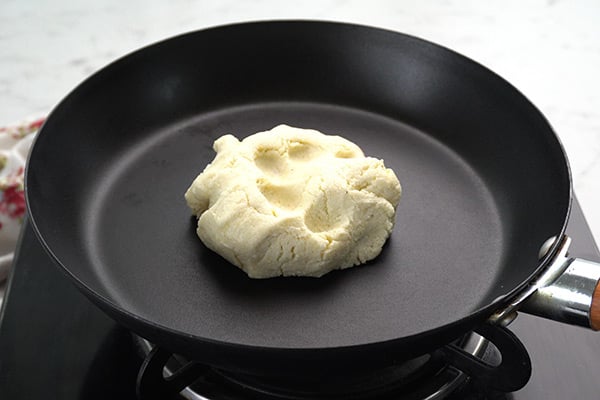
14.Keep a pan in low flame and add it to the pan.

add to pan

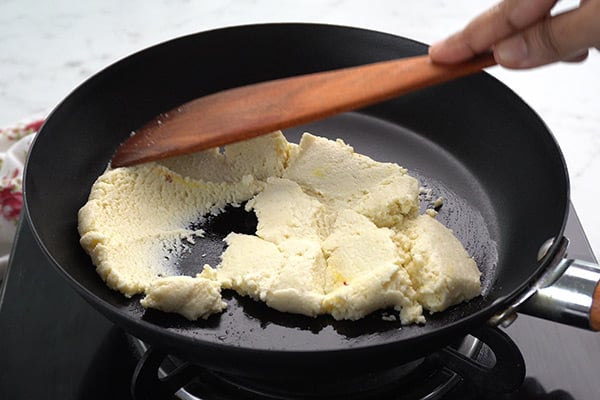
15.Keep cooking in low flame.

cook the mixture

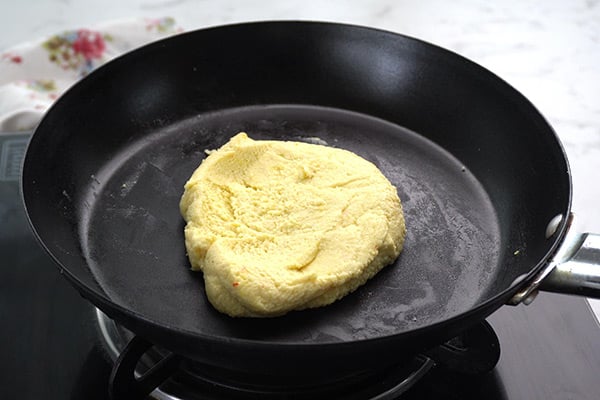
16.Cook for 3-5 minutes not more than that. If you cook longer it may become hard and will crumble. Switch off and remove from flame.

cooked

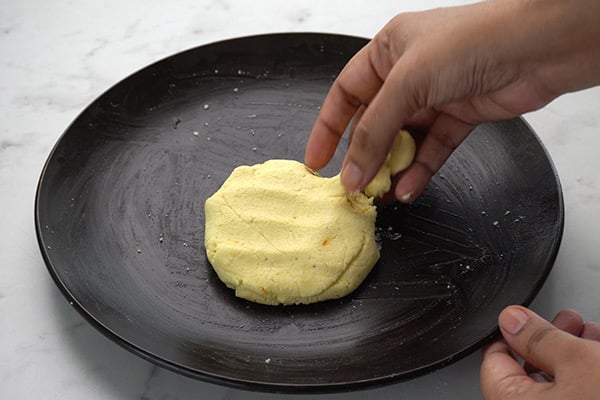
17.Transfer to a plate. Pinch a small portion.

pinch a small portion

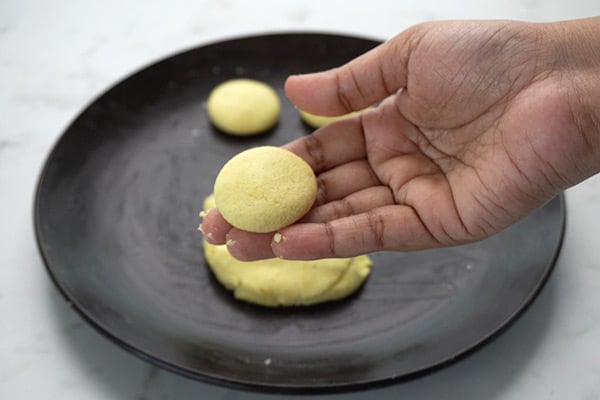
18. Make small balls, flatten it slightly.

shape into discs

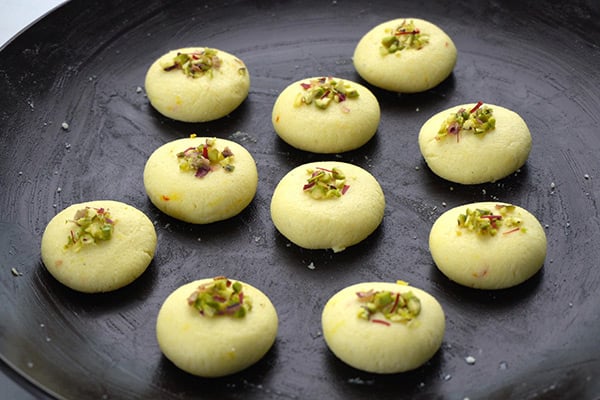
19.Garnish with chopped pistachio and saffron strands.

garnish with nuts

Sandesh is ready!

sandesh sweet served in a wooden plate

Expert Tips

  • Vinegar solution - Vinegar when mixed with water is more concentrated and makes chenna soft.
  • Preparing chenna - Boil milk give a quick stir and switch off, let it rest for few minutes before adding vinegar solution. Add vinegar, water mixture little by little and stir gently.
  • Kneading - I usually knead for at least 7-10 minutes till it becomes smooth and soft. Make sure you do not over knead then fat will get released.
  • Cooking - Cook the mixture in lowest flame and cook not more than 5 minutes.
  • Flavours - You can add cocoa powder to make chocolate sandesh, rose essence to make rose sandesh. Like wise you can make so many variations like orange sandesh, pista sandesh etc.

Serving and Storage

Sandesh is served as a sweet snack with other sweet varieties we make foe the festival. It can be stored in fridge for 3-5 days.

FAQS

1.What type of milk should I use?

Use full cream milk for best taste and volume. Avoid low fat or toned or skimmed milk.

2.While cooking it became crumbly, how to fix it?

Do no worry if happens when you over cook the mixture. Cool down the mixture then add to mixer and blend until smooth. Now transfer to a plate and shape it, sandesh is ready.

3.Can I add brown sugar or jaggery?

Yes you can use brown sugar or jaggery but make sure it is in powdered form and is free from impurities.

sandesh sweet served in a wooden plate

If you have any more questions about this Sandesh Recipe do mail me at sharmispassions@gmail.com. In addition, follow me on Instagram, Facebook, Pinterest ,Youtube and Twitter .

Tried this Sandesh Recipe? Do let me know how you liked it. Also tag us on Instagram @sharmispassions and hash tag it on #sharmispassions.

📖 Recipe Card

Print

Sandesh Recipe | Bengali Sondesh Recipe

Sandesh is a delicious Bengali milk sweet popular all over India. Sandesh also known as Bengali Sondesh is milk cheese based rich sweet made using milk, sugar, nuts, cardamom powder and saffron. Sandesh is most commonly made for festivals and special occasions.
Course sweets
Cuisine Indian
Keyword dessert recipes, diwali dishes, diwali food, diwali mithai, diwali recipes, diwali sweets, diwali sweets recipes, easy diwali recipes, easy paneer recipes, indian paneer recipes, milk recipes, paneer dishes, paneer recipes, sweet recipes
Prep Time 20 minutes
Cook Time 10 minutes
Total Time 30 minutes
Servings 6 pieces
Calories 129kcal
Author Sharmilee J

Ingredients

To curdle milk

  • 1 litre milk
  • 2 tablespoon vinegar
  • 2 tablespoon water

To make sandesh

Instructions

  • To a sauce pan add 1 liter milk. Stir and boil for a minute. Switch off and let it rest for 2-3 minutes.
  • To a small bowl add 2 tablespoon vinegar, 2 tablespoon water, mix it well and set aside.
  • Now add vinegar water solution little by little and stir gently. Now the flame is off, this helps to slowly curdle milk and the chenna is so soft.
  • Now whey water(green liquid) and chenna(white solid) separates.
  • Now it is curdled completely. Switch off.
  • Transfer this to a cloth placed on a strainer. Keep a bowl underneath to collect the whey water. You can use this for kneading chapathi dough or for curdling milk again.
  • Rinse it with water well.
  • Squeeze excess water.
  • Roll and place it on the strainer. Keep 2 bowls on it. Do not keep heavy weight. Set aside for 10 minutes.
  • Now open, moisture should be there, it should not be dry.
  • Transfer the prepared chenna to a wide plate.
  • Knead it well using your palm like shown. Knead until the texture changes smooth and soft.
  • Add ⅓ cup powdered sugar, ¼ teaspoon cardamom powder and 5 strands saffron.
  • Mix well and gather to form a dough like this.
  • Keep a pan in low flame and add it to the pan.
  • Keep cooking in low flame.
  • Cook for 3-5 minutes not more than that. If you cook longer it may become hard and will crumble. Switch off and remove from flame.
  • Transfer to a plate. Pinch a small portion.
  • Make small balls, flatten it slightly.
  • Garnish with chopped pistachio and saffron strands.
  • Sandesh is ready!

Video

Notes

  • Vinegar solution - Vinegar when mixed with water is more concentrated and makes chenna soft.
  • Preparing chenna - Boil milk give a quick stir and switch off, let it rest for few minutes before adding vinegar solution. Add vinegar, water mixture little by little and stir gently.
  • Kneading - I usually knead for at least 7-10 minutes till it becomes smooth and soft. Make sure you do not over knead then fat will get released.
  • Cooking - Cook the mixture in lowest flame and cook not more than 5 minutes.
  • Flavours - You can add cocoa powder to make chocolate sandesh, rose essence to make rose sandesh. Like wise you can make so many variations like orange sandesh, pista sandesh etc.

Nutrition

Serving: 40g | Calories: 129kcal | Carbohydrates: 13g | Protein: 6g | Fat: 6g | Saturated Fat: 3g | Polyunsaturated Fat: 0.4g | Monounsaturated Fat: 1g | Cholesterol: 21mg | Sodium: 66mg | Potassium: 283mg | Fiber: 0.2g | Sugar: 13g | Vitamin A: 287IU | Vitamin C: 2mg | Calcium: 214mg | Iron: 0.1mg

The post Sandesh Recipe | Bengali Sondesh Recipe appeared first on Sharmis Passions.

Carrot Sabzi Recipe

Carrot besan sabzi also known as carrot sabzi is a simple and tasty stir fry made with fresh carrots, besan flour and a few basic spices. It comes together quickly in no time which makes it an easy side dish for lunch or dinner.  Carrot Sabzi Recipe I always like finding easy ways to add...

Read More

The post Carrot Sabzi Recipe appeared first on Yummy Tummy.

Popcorn Paneer Recipe

Paneer popcorn also known as popcorn paneer is a simple snack recipe. The paneer is cut into small pieces, seasoned with a few basic spices, coated and fried until golden. The crunchy fried paneer will be a favorite snack with kids. Popcorn paneer This is my lil one's favourite snack. It is a paneer popcorn...

Read More

The post Popcorn Paneer Recipe appeared first on Yummy Tummy.

Dahi Bhalla Recipe

Dahi Bhalla is a soft, creamy, and flavor-packed North Indian snack. It's made by soaking deep-fried urad dal vadas in curd and topping them with chutneys, spices, and sev. This dish is perfect for summer as its cooling and light. You don't need fancy ingredients or long hours in the kitchen to make it.

dahi bhalla served with chutneys, sev

The best part is how the curd soaks into the vadas and makes them soft and juicy. The sweet chutney and spicy green chutney balance each other really well. It's also a very colorful dish - white curd, green chutney, brown tamarind chutney, yellow sev - it's a treat to the eyes and taste buds.

[feast_advanced_jump_to]

About Dahi Bhalla

Dahi Bhalla is also called Dahi Vada in some regions. It is made by frying soft urad dal batter into round balls and soaking them in water to make them softer. Then, they are topped with thick curd, chutneys, spice powders, and crispy sev. Curd is one of the main ingredient so make sure it is fresh and not sour.

It's a popular dish during festivals like Holi and Diwali. In many homes, it is served as part of a festive meal or even during get-togethers and parties. It also makes a great option for iftar or as a starter during special lunches. Most of the items used are basic and easily available in your kitchen. Once you try it, you'll want to make it often.

The toppings can be adjusted to suit your taste. If you like it sweet, add more tamarind chutney. If you prefer spicy, increase the green chutney and red chili powder. You can even sprinkle a bit of roasted cumin powder. It is a lovely choice for festivals, parties, or as a simple weekend evening snack at home.

I enjoy making Dahi Bhalla when I want something light yet satisfying. It's one of those dishes that brings a sense of celebration even on an ordinary day. The aroma of the chutneys and the look of the finished plate always brings back happy memories.

dahi bhalla served with chutneys, sev

Dahi Bhalla Ingredients

  • Whole urad dal - It is used to make the base vadas. When soaked and grind, it turns soft and fluffy. You can also use split urad dal if whole is not available but it gives less volume when compared to whole urad dal.
  • Thick curd (yogurt) - Fresh thick curd is preferred which makes the vadas creamy and juicy. Don't use sour curd.
  • Green chili - Added while grinding to give a mild spice. You can skip or reduce based on your preference.
  • Ginger - It helps with digestion. You can use a small piece of fresh ginger chopped.
  • Water - Used for grinding the dal. Add a little at a time to get a thick and fluffy batter.
  • Oil - Used to deep fry the vadas. Choose a flavor less oil for best taste.
  • Sugar - A little sugar is added to the curd to balance flavours. You can adjust it or skip it based on your preference.
  • Sweet chutney - Adds a mild sweetness and tanginess. Made with tamarind and jaggery. You can use homemade or store-bought.
  • Green chutney - Gives a fresh and spicy touch. Usually made with mint, coriander, green chili, and lemon juice.
  • Red chilli powder - A light sprinkle adds color and a bit of heat.
  • Chaat masala - Adds a tangy kick and brings a street-style flavour to the dish.
  • Sev - Adds a crunchy topping. Use thin sev or nylon sev for best texture.
  • Cashews, Raisins - Adds crunch, sweetness and rich taste to the vadas.
  • Coriander leaves - Used for garnish. Adds freshness and a nice pop of green.
ingredients needed to make dahi bhalla

Why This Recipe Works

  • It uses simple kitchen staple ingredients.
  • Uses ingredients that are easily available.
  • Refreshing, colorful and delicious chat.
  • The chutneys add layers of flavour - sweet, spicy, and tangy.
  • You can prepare it partly ahead and assemble just before serving.

Similar Recipes

How to make Dahi Bhalla Step by Step

1.Rinse whole urad dal well. Soak urad dal for 3-4 hours. Drain water and keep aside (I usually drain the water completely and then sprinkle little by little while grinding, doing so you can be sure of the quantity of water).Now grind it to a fluffy texture along with ginger and green chilies in a grinder sprinkling water now and then. Don't add much water as the batter will become runny. The batter should be thick and fluffy as shown, add required salt and mix well. Now add raisins and chopped cashews to the batter.

how to make dahi bhalla step1

2.Mix well and Set aside. Meanwhile add sugar to curd and beat it well. Add little water to make it little runny so that its pourable.

how to make dahi bhalla step2

3.Heat oil - Wet your hands and take lemon sized balls and drop it carefully into oil. You can fry up to 3-4 balls at a time depends on the size of your kadai. Flip around and deep fry till golden brown. Drain in tissue paper.

how to make dahi bhalla step3

4.Then add the vadas to hot water, remove it immediately - this is to make the vadas soft and make it absorb curd well, also it helps in removing extra oil. Now squeeze using 2 ladles to remove extra water.

how to make dahi bhalla step4

5.Arrange the vadas in a plate may be 4-5 vadas. Then pour curd over it. Add green chutney and sweet chutney. Then sprinkle sev, red chili powder and chat masala and garnish with coriander leaves.

how to make dahi bhalla step5

Serve at room temperature or chilled.

dahi bhalla served with chutneys, sev

Expert Tips

  • Use fresh curd - Sour curd can ruin the taste. Add a little sugar and beat it well before using.
  • Soak dal properly - Soak for at least 3-4 hours to get soft and fluffy vadas that absorb less oil.
  • Grind thick batter - Use little water while grinding. The batter should be thick and smooth.
  • Soften vadas - Dunk the vadas in hot water. which helps to remove extra oil and makes the vadas absorb curd better.
  • Add toppings just before serving - Add toppings, chutneys, sev at the time of serving to keep it stay fresh, crisp and not soggy.

Serving and Storage

Serve Dahi Bhalla chilled or at room temperature. Pour curd over the vadas, then add chutneys, sprinkle spices, and top with sev and coriander leaves.

You can make the vadas and chutneys ahead of time. Store vadas in the fridge, soak before use. Store leftover curd vadas in a closed container and consume within a day. Add fresh toppings when serving again.

FAQS

1.Can I make vadas ahead of time?

Yes, fry and store them in the fridge. Soak in hot water before using.

2.What if I don't have green & sweet chutney?

You can skip it, but it adds a lovely sweetness that balances the dish. You get readymade chutneys in supermarkets, you can use them too.

3.Why are my vadas hard?

The batter might not have been fluffy or you may have added too much water while grinding which will make vadas hard.

4.Can I shallow fry the vadas?

It's best to deep fry for the right texture, but you can try shallow frying or using appe pan.

5.Is this a dessert or snack?

It's a savory snack actually chat in specific, but because of the sweet chutney and curd, it tastes mildly sweet too.

dahi bhalla served with chutneys, sev

If you have any more questions about this Dahi Bhalla Recipe do mail me at sharmispassions@gmail.com. In addition, follow me on Instagram, Facebook,  Pinterest, Youtube and Twitter .

Tried this Dahi Bhalla Recipe ? Do let me know how you liked it. Also tag us on Instagram @sharmispassions and hash tag it on #sharmispassions.

📖 Recipe Card

16050291948 858902871f o
Print

Dahi Bhalla Recipe

Dahi Bhalla is a soft, creamy, and flavor-packed North Indian snack. It's made by soaking deep-fried urad dal vadas in curd and topping them with chutneys, spices, and sev. This dish is perfect for summer as its cooling and light. You don't need fancy ingredients or long hours in the kitchen to make it.
Course Snack
Cuisine Indian
Keyword chaat, chaat recipes, curd recipes, North Indian, snack recipes, Vada
Prep Time 4 hours
Cook Time 20 minutes
Total Time 4 hours 20 minutes
Servings 2 people
Calories 396kcal
Author Sharmilee J

Ingredients

  • 1 cup thick curd / yogurt
  • ¼ cup sweet chutney
  • ¼ cup green chutney
  • red chilli powder just for sprinkling
  • chat masala powder just for sprinkling
  • ¼ cup sev
  • ½ tablespoon cashews
  • ½ tablespoon raisins
  • 1 tablespoon sugar
  • 1 tablespoon coriander leaves chopped
  • salt to taste

For the Vada

  • ½ cup whole urad dal deskinned
  • 1 green chilli
  • ¼ inch piece ginger
  • salt to taste
  • water as required
  • oil to deep fry

Instructions

  • Rinse whole urad dal well. Soak urad dal for 3-4 hours.
  • Drain water and keep aside (I usually drain the water completely and then sprinkle little by little while grinding, doing so you can be sure of the quantity of water).
  • Now grind it to a fluffy texture along with ginger and green chillies in a grinder sprinkling water now and then. Dont add much water as the batter will become runny. The batter should be thick and fluffy, add required salt and mix well.
  • Now add raisins and chopped cashews to the batter. Mix well and set aside.
  • Meanwhile add sugar to curd and beat it well. Add little water to make it little runny so that its pourable.
  • Heat oil….Wet your hands and take lemon sized balls and drop it carefully into oil.
  • You can fry up to 3-4 balls at a time depends on the size of your kadai.
  • Flip around and deep fry till golden brown. Drain in tissue paper.
  • Then add the vadas to hot water, remove it immediately - this is to make the vadas soft and make it absorb curd well, also it helps in removing extra oil. Now squeeze using 2 ladles to remove extra water.
  • Arrange the vadas in a plate may be 4-5 vadas. Then pour curd over it.
  • Add green chutney and sweet chutney.
  • Then sprinkle sev, red chilli powder and chat masala and garnish with coriander leaves.
  • Serve Dahi Bhalla at room temperature or chilled.

Notes

  • Use fresh curd - Sour curd can ruin the taste. Add a little sugar and beat it well before using.
  • Soak dal properly - Soak for at least 3-4 hours to get soft and fluffy vadas that absorb less oil.
  • Grind thick batter - Use little water while grinding. The batter should be thick and smooth.
  • Soften vadas - Dunk the vadas in hot water. which helps to remove extra oil and makes the vadas absorb curd better.
  • Add toppings just before serving - Add toppings, chutneys, sev at the time of serving to keep it stay fresh, crisp and not soggy.

Nutrition

Serving: 200g | Calories: 396kcal | Carbohydrates: 60g | Protein: 22g | Fat: 11g | Saturated Fat: 5g | Polyunsaturated Fat: 3g | Monounsaturated Fat: 3g | Cholesterol: 22mg | Sodium: 882mg | Potassium: 828mg | Fiber: 22g | Sugar: 17g | Vitamin A: 9157IU | Vitamin C: 7mg | Calcium: 286mg | Iron: 9mg


The post Dahi Bhalla Recipe appeared first on Sharmis Passions.

Prawn Curry Recipe (without Coconut)

Spicy and tasty prawn curry is made with prawns, onions, tomatoes and simple spices and it doesn't use coconut like other South Indian prawn curry. The onion tomato masala is spicy, slightly tangy and packed with flavours. It is a delicious homestyle curry that can be enjoyed with hot steamed rice, idli, dosa, idiyappam, roti...

Read More

The post Prawn Curry Recipe (without Coconut) appeared first on Yummy Tummy.

Salted Chaas Recipe

Salted chaas is a simple and refreshing Indian drink made with curd, water, black salt, spices and fresh coriander. I grew up having curd with almost every lunch and during hot summer days, we would often turn it into a chilled glass of chaas. Chaas Recipe This is one of those easy everyday drinks that...

Read More

The post Salted Chaas Recipe appeared first on Yummy Tummy.

Aloo Gobi Matar Recipe

Aloo Gobi Matar Sabzi is an all-time favorite vegetarian side dish made with three pantry staples: potatoes (aloo), cauliflower (Gobi), and green peas (matar). These veggies are slowly cooked until tender along with spices. This dry sabzi shows up very often in Indian households, holding a special place. This sabzi is perfect for outdoor picnics, lunch boxes, and a lazy dinner.

aloo gobi matar served in a white bowl

The beauty of this lies in its simplicity as there is no complicated recipe or fancy masala involved. Every ingredient has its job to do. The king ingredient, potato soaks up the flavors while the Gobi stays firm, giving its addition to the recipe, and balancing the texture. Whereas the matar pops its sweetness. This recipe works best with chapatis, parathas, or even a quick roti wrap, flooding you with flavor bombs.

[feast_advanced_jump_to]

About Aloo Gobi Matar Sabzi

Aloo Gobi Matar Sabzi is one of those dishes that never goes out of style. Evergreen as ever, made with staple vegetables like potatoes, cauliflower, and green peas, it's simple, tasty, and very comforting. If you are craving something homely, simple, and delicious, this is the go-to recipe, giving you comfort in every bite.

This dish is made with simple, everyday ingredients, thus, very comforting. If you are a beginner or a pro, Aloo Gobi Matar makes its place on the weekly menu. It is a traditional dish that has been passed down through generations, effortlessly adapting over time. It quietly reminds us that life's best flavors often come from the simplest ingredients.

Growing up, this sabzi was a regular dish cooked in my house. I remember sitting beside my mother, helping her break the cauliflower into small florets while sneaking a few raw peas straight into my mouth. Now, when I cook it, the aroma takes me right back to those early mornings. Hence, this recipe is beginner-friendly and specially curated for anyone who is away from home but still wants to enjoy a home-cooked meal.

aloo gobi matar served in a white bowl

Aloo Gobi Matar Ingredients

  • Potato - the base of the dish, making it wholesome.
  • Cauliflower (small florets) - crisp and tender, balancing the flavours.
  • Green peas - Small with stuffed with sweetness.
  • Garlic - Adding that extra zing.
  • Onion - the perfect base and balance for every sabzi.
  • Red chilli powder - adds spice and vibrant color.
  • Coriander powder - warm, aromatic, and flavor bomb, bringing everything together.
  • Turmeric powder - Adding color and flavor to the sabzi.
  • Garam masala powder - Packed with tang, adding its own richness to the dish.
  • Coriander leaves - Completing the dish with its aroma and adds freshness.
  • Kasoori methi - Essential for that last essence, acts as an aromatic garnish.
  • Oil - the base for a perfect tempering, adding its richness.
  • Jeera (cumin seeds) - crackling in the oil, leaving its earthy aroma in the dish.

Why this recipe works

  • Simple ingredients yet so flavorful
  • No-fuss one-pot cooking
  • Perfectly balanced spices
  • Versatile pairing of the ingredients
  • Perfect lunch box recipe

Similar Recipes

How to make Aloo Gobi Matar Step by Step

1.Wash potatoes, peel off the skin of potatoes, chop them into bite sized cubes and set aside. Clean cauliflower, cut them into small florets and set aside. Peel the skin and collect the peas in bowl and set aside. Heat oil in a pan - add jeera and let it splutter. Then add garlic sauté till slightly browned, then add onion and sauté for a minute.

how to make aloo gobi matar sabzi step1

2.Then add potato along with turmeric powder and required salt. Sprinkle little water and cook covered with a lid containing water. When the water reduces, add more water and stir the veggie occasionally to avoid burning at the bottom.

how to make aloo gobi matar sabzi step2

3.When potato is half cooked add cauliflower and peas. Then again cook covered as mentioned in step 2. Then add red chili powder, coriander powder and garam masala powder, give a quick toss.

how to make aloo gobi matar sabzi step3

4.Sprinkle little water and cook covered for 2 minutes. Mix well till the masala coats well with the veggies. Saute for 2-3 minutes. Adjust salt and spice level at this stage. Finally garnish with chopped coriander leaves and kasoori methi.

how to make aloo gobi matar sabzi step4

Serve hot with roti / rice or any pulao of your choice.

aloo gobi matar sabzi just prepared

Expert Tips

  • Slow cooking - Potatoes are the key ingredient, and slow cooking brings out their real flavors.
  • Cut Them Right - Keep all the vegetables uniform in size so that they cook evenly.
  • Keep it fresh - Using fresh peas adds charm and sweetness to the sabzi. You can use frozen works as a handy substitute.
  • Stirring - Gently stir the sabzi after adding the peas. Peas tend to get squished up and lose its shape so stir gently.
  • Use Hot Water - Use hot water if your veggies need more time to cook. Hot water will enhance the flavours. Don't add too much water, or else the sabzi will turn mushy.
  • Masala - Use freshly ground masala for a deeper, richer flavor in your sabzi.

Serving & Storage

Serve this sabzi hot with roti, paratha, or steamed rice for the most comforting and homely meal. You can serve with a dollop of fresh yogurt, sliced onions and wedge of lemon as side condiments.

Store the leftovers in an airtight container. The dish can stay fresh for up to 3 days. While reheating, stay gentle with the veggies. This is a perfect dish for lunch box recipes.

FAQS

1. Can I use frozen vegetables instead of fresh?

Totally! Frozen peas and cauliflower work fine. Remember to adjust the cooking time so they stay crisp.

2. How spicy is this dish?

Mild to medium. You can adjust the spice level as required.

3. Can I make this sabzi without garlic or onion?

Yes, you can! You can add asafoetida (hing) for a savoury touch.

4. What can I serve this sabzi with?

Classic butter roti, paratha, steamed rice. You can also make quick wraps with the sabzi.

5. How long can I store leftovers?

Store in the fridge airtight for up to 3 days. Reheat gently ensuring the veggies stay crisp.

aloo gobi matar sabzi served in a white bowl

If you have any more questions about this Aloo Gobi Matar do mail me at sharmispassions@gmail.com. In addition, follow me on Instagram, Facebook, Pinterest ,Youtube and Twitter .

Tried this Aloo Gobi Matar? Do let me know how you liked it. Also tag us on Instagram @sharmispassions and hash tag it on #sharmispassions.

📖 Recipe Card

16001677721 66cbd10154 o
Print

Aloo Gobi Matar Recipe

Aloo Gobi Matar is an all-time favorite vegetarian side dish made with three pantry staples: potatoes (aloo), cauliflower (Gobi), and green peas (matar). These veggies are slowly cooked until tender along with spices. This dry sabzi shows up very often in Indian households, holding a special place. This sabzi is perfect for outdoor picnics, lunch boxes, and a lazy dinner.
Course dinner, Lunch, Side Dish
Cuisine Indian
Keyword 30 mins recipes, Aloo Recipes, Potato, Potato Recipes, roti sidedish, Side Dish
Prep Time 15 minutes
Cook Time 20 minutes
Total Time 35 minutes
Servings 2 people
Calories 188kcal
Author Sharmilee J

Ingredients

  • 1 potato medium sized
  • ½ cup cauliflower small florets
  • ½ cup green peas
  • 1 teaspoon garlic finely chopped
  • 1 big onion small sized finely chopped
  • ½ teaspoon red chilli powder
  • 1 teaspoon coriander powder
  • 1 pinch turmeric powder
  • ½ teaspoon garam masala powder
  • 2 teaspoon coriander leaves finely chopped
  • ¼ teaspoon kasoori methi crushed
  • salt to taste

To Temper:

  • 2 teaspoon oil
  • ¾ teaspoon cumin seeds

Instructions

  • Wash potatoes, peel off the skin of potatoes, chop them into bite sized cubes and set aside.
  • Clean cauliflower, cut them into small florets and set aside. Peel the skin and collect the peas in bowl and set aside.
  • Heat oil in a pan - add jeera and let it splutter.
  • Then add garlic saute till slightly browned, then add onion and saute for a minute.
  • Then add potato along with turmeric powder and required salt.
  • Sprinkle little water and cook covered with a lid containing water.
  • When the water reduces, add more water and stir the veggie occasionally to avoid burning at the bottom.
  • When potato is half cooked add cauliflower and peas.
  • Then again cook covered as mentioned in step 6 & 7.
  • Then add red chilli powder,coriander powder and garam masala powder, give a quick toss.
  • Sprinkle little water and cook covered for 2 minutes.
  • Mix well till the masala coats well with the veggies.
  • Saute for 2-3 minutes. Adjust salt and spice level at this stage.
  • Finally garnish with chopped coriander leaves and kasoori methi.
  • Serve hot with roti / rice or any pulao of your choice.

Notes

  • Slow cooking - Potatoes are the key ingredient, and slow cooking brings out their real flavors.
  • Cut Them Right - Keep all the vegetables uniform in size so that they cook evenly.
  • Keep it fresh - Using fresh peas adds charm and sweetness to the sabzi. You can use frozen works as a handy substitute.
  • Stirring - Gently stir the sabzi after adding the peas. Peas tend to get squished up and lose its shape so stir gently.
  • Use Hot Water - Use hot water if your veggies need more time to cook. Hot water will enhance the flavours. Don't add too much water, or else the sabzi will turn mushy.
  • Masala - Use freshly ground masala for a deeper, richer flavor in your sabzi.

Nutrition

Serving: 100g | Calories: 188kcal | Carbohydrates: 32g | Protein: 6g | Fat: 5g | Saturated Fat: 1g | Polyunsaturated Fat: 1g | Monounsaturated Fat: 3g | Trans Fat: 0.01g | Sodium: 28mg | Potassium: 735mg | Fiber: 7g | Sugar: 6g | Vitamin A: 450IU | Vitamin C: 52mg | Calcium: 61mg | Iron: 3mg

The post Aloo Gobi Matar Recipe appeared first on Sharmis Passions.

Baingan Bharta Recipe

Baingan Bharta is a tasty and comforting North Indian side dish. The eggplant is roasted on the stove until soft, smoky then mashed and cooked with onions, tomatoes, and a few spices. It goes really well with roti, chapati, or even plain rice. Simple food, but full of flavor. Learn to make perfect Baingan Bharta with step by step images and instructions.

baingan bharta served in a white bowl

What's nice is how easy it is to change the recipe to your liking. You can add more spice if you like it hot, or keep it mild for kids. A little extra garlic or some chopped coriander also makes it taste great. You don't need anything fancy - just everyday ingredients. Do try and enjoy with rice or roti.

[feast_advanced_jump_to]

About Baingan Bharta

Baingan Bharta Recipe is a north Indian style curry made by roasting eggplant or aubergine on direct flame. It is a simple but exotic curry with the distinct smoky flavor. Traditionally baingan bharta is made by roasting eggplant in a charcoal based tandoor but at home we can use this simple method of roasting it directly on stovetop. This is Punjabi cuisine and is a very famous side dish for rotis.

You can adjust the spice level to your liking, keep it mild or make it fiery with green chilies. You can also add more garlic, a pinch of garam masala, or even some chopped coriander for extra flavor. A squeeze of lemon juice at the end adds a nice touch.

You can serve Baingan Bharta with roti, phulka, chapati, or even plain rice. If you like, add a spoon of ghee or a bit of curd on the side for that homely feel. The soft texture and smoky taste make it really comforting. This recipe is naturally vegan and gluten-free, so it fits many diets. A humble dish that's always satisfying.

I still remember the smell of eggplant roasting in the kitchen. It was a sign that something yummy was cooking in the kitchen. Even now, making it brings back happy memories of simple family dinners.

baingan bharta served in a white bowl

Baingan Bharta Ingredients

  • Aubergine (eggplant) - Roast it directly on flame until the skin is charred and the inside turns soft and smoky.
  • Oil - Used to grease the eggplant before roasting, and also for sautéing the spices and veggies later.
  • Cumin seeds - Used for tempering. It adds a warm, earthy aroma.
  • Garlic - Use finely chopped and sautéed in oil. It gives a nice depth and aroma to the dish.
  • Green chilies - It's optional, but if used, they adds more heat. It's sautéed along with garlic to enhance their flavor.
  • Onion - Use finely chopped and cook it until turns soft and golden. Adds sweetness and body to the bharta.
  • Tomato - Chopped and added after onions. It brings a gentle tanginess that balances the smoky aubergine.
  • Red chilli powder & Garam masala powder - Red chilli powder adds mild heat and a bright colour, while garam masala gives a warm, spiced flavor.
  • Coriander leaves - Freshly chopped and added at the end as garnish. It adds freshness and a bit of color to finish the dish.

Why This Recipe Works

  • This is a quick and easy to make recipe with minimal ingredients.
  • This recipe is made simple pantry ingredients.
  • This recipe has authentic smoky and  deeper flavors.
  • It has a creamy, luscious texture.
  • It is a versatile dish that pairs well with bread, Roti or rice.

Similar Recipes

How to make Baingan Bharta Step by Step

1.Wash the aubergine and remove the stalk part of aubergine. Grease the outer skin with oil and roast it directly on stove top. I used a metal skewer to hold it. Turn over and cook on all sides evenly. Make sure you cook in low medium flame so that it gets cooked inside also. It took me just 5-8 minutes to roast completely.

how to make baingan bharta step1

2.When its cooked fully the inside, it will turn mushy and you can feel it easily. Now switch off and cool down. Remove the outer skin carefully, you can just peel it of easily. Now mash it well with a fork until nicely mashed up. Set aside.

how to make baingan bharta step2

3.Heat oil in a pan - add jeera and let it crackle. Add garlic and green chilies sauté for a minute then add onions and sauté till slightly golden then add tomato.

how to make baingan bharta step3

4.Add red chili powder, garam masala powder and required salt. Saute till tomatoes turn mushy and raw smell leaves.

how to make baingan bharta step4

5.Add mashed eggplant or aubergine. Mix well and cook for 3-5 minutes in low medium flame. Garnish with coriander leaves.

how to make baingan bharta step5

Serve hot with roti / rice or any pulao of your choice.

baingan bharta served with roti

Expert Tips

  • Roasting -Roast aubergine evenly on all sides using low-medium flame to ensure it cooks through without burning outside.
  • Cooling - Let the aubergine cool fully before peeling the skin to avoid burns and ensure easy removal.
  • Mashing - Mash the roasted aubergine well with a fork to get a smooth texture.
  • Tip - Add aubergine to the cooked tomato-onion masala only after the raw tomato smell has completely vanished.
  • Cooking - Cook the final curry on low flame for 5-7 minutes so the flavors meld well.
  • Optional - Add a pinch of coriander powder for extra earthiness.

Serving and Storage

Serve Baingan Bharta hot, garnished with fresh coriander leaves. It's delicious with roti, chapatti, paratha, or plain steamed rice. It also pairs well with pulao or biryani as a side.

Store leftovers in an airtight container in the refrigerator for up to 2 days. Reheat gently on the stove before serving.

FAQS

1.Can I roast aubergine in the oven instead?

Yes, you can roast it at high temperature till the skin chars, but direct flame roasting gives the best smoky flavor.

2.Why does my aubergine turn hard after roasting?

Make sure to roast evenly on low-medium flame and cook long enough till soft inside.

3.Can I add other spices?

Yes, cumin powder or coriander powder can be added as per your taste.

4.Is this dish vegan?

Absolutely, No dairy or animal products are used in this recipe.

5.Can I make it less spicy?

Reduce the red chili powder or skip green chilies if you want a milder version.

baingan bharta served in a white bowl

If you have any more questions about this Baingan Bharta Recipe do mail me at sharmispassions@gmail.com. In addition, follow me on Instagram, Facebook,  Pinterest, Youtube and Twitter .

Tried this Baingan Bharta Recipe? Do let me know how you liked it. Also tag us on Instagram @sharmispassions and hash tag it on #sharmispassions.

📖 Recipe Card

16049090765 43e6dd00e2 o
Print

Baingan Bharta Recipe

Baingan Bharta is a tasty and comforting North Indian side dish. The eggplant is roasted on the stove until soft, smoky then mashed and cooked with onions, tomatoes, and a few spices. It goes really well with roti, chapati, or even plain rice. Simple food, but full of flavor. Learn to make perfect Baingan Bharta with step by step images and instructions.
Course Lunch, Side Dish
Cuisine Indian
Keyword 30 mins recipes, curry, curry recipes, roti sidedish, Side Dish, veg recipes, vegetable
Prep Time 15 minutes
Cook Time 20 minutes
Total Time 35 minutes
Servings 2
Calories 131kcal
Author Sharmilee J

Ingredients

  • 1 aubergine / eggplant
  • 1 onion finely chopped
  • 2 tomato finely chopped
  • 1 teaspoon garlic finely chopped
  • 1.5 teaspoon red chilli powder
  • 1 teaspoon garam masala powder
  • 2 teaspoon coriander leaves finely chopped
  • salt to taste

To temper

  • 2 teaspoon oil
  • 1 teaspoon jeera

Instructions

  • Wash the aubergine and remove the stalk part of aubergine.
  • Grease the outer skin with oil and roast it directly on stove top. I used a metal skewer to hold it.
  • Turn over and cook on all sides evenly. Make sure you cook in low medium flame so that it gets cooked inside also.
  • It took me just 5-8 minutes to roast completely.
  • When its cooked fully the inside, it will turn mushy and you can feel it easily.
  • Now switch off and cool down.
  • Remove the outer skin carefully, you can just peel it of easily.
  • Now mash it well with a fork until nicely mashed up. Set aside.
  • Heat oil in a pan - add jeera and let it crackle.
  • Add garlic and green chilies sauté for a minute then add onions and sauté till slightly golden then add tomato.
  • Add red chilli powder, garam masala powder and required salt.
  • Saute till tomatoes turn mushy and raw smell leaves.
  • Add mashed aubergine.
  • Mix well and cook for 3-5 minutes in low medium flame.
  • Garnish with coriander leaves.
  • Serve Baingan Bharta hot with roti / rice or any pulao of your choice.

Notes

  • Aubergine (eggplant) - Roast it directly on flame until the skin is charred and the inside turns soft and smoky.
  • Oil - Used to grease the eggplant before roasting, and also for sautéing the spices and veggies later.
  • Cumin seeds - Used for tempering. It adds a warm, earthy aroma.
  • Garlic - Use finely chopped and sautéed in oil. It gives a nice depth and aroma to the dish.
  • Green chilies - It's optional, but if used, they adds more heat. It's sautéed along with garlic to enhance their flavor.
  • Onion - Use finely chopped and cook it until turns soft and golden. Adds sweetness and body to the bharta.
  • Tomato - Chopped and added after onions. It brings a gentle tanginess that balances the smoky aubergine.
  • Red chilli powder & Garam masala powder - Red chilli powder adds mild heat and a bright colour, while garam masala gives a warm, spiced flavor.
  • Coriander leaves - Freshly chopped and added at the end as garnish. It adds freshness and a bit of color to finish the dish.

Nutrition

Serving: 75g | Calories: 131kcal | Carbohydrates: 21g | Protein: 4g | Fat: 5g | Saturated Fat: 1g | Polyunsaturated Fat: 1g | Monounsaturated Fat: 3g | Trans Fat: 0.01g | Sodium: 33mg | Potassium: 661mg | Fiber: 9g | Sugar: 11g | Vitamin A: 526IU | Vitamin C: 10mg | Calcium: 50mg | Iron: 2mg

The post Baingan Bharta Recipe appeared first on Sharmis Passions.

Keema Paratha Recipe

Chicken keema paratha, also known as chicken stuffed paratha, is a delicious and filling paratha made with whole wheat flour and a spicy chicken filling. Minced chicken is cooked with onions, green chillies and spices until juicy and flavourful. The chicken filling is then stuffed inside the dough, rolled and cooked on a hot tawa...

Read More

The post Keema Paratha Recipe appeared first on Yummy Tummy.

Doodh Poha Recipe (Milk Poha)

Milk Poha also known as Doodh poha, Paal aval is a popular flattened rice preparation made in Gujarati household. It is made by a combination of flattened rice simmered in sweetened milk and garnished with nuts and dried fruits. This healthy dish is considered as an Indian cereal in many places. Doodh Poha Recipe (Milk...

Read More

The post Doodh Poha Recipe (Milk Poha) appeared first on Yummy Tummy.

Aloo Matar Recipe | Aloo Mutter Recipe

Aloo Matar is a North Indian flavorful dish made with potatoes and green peas in a spiced onion tomato gravy. This recipe is versatile and can be paired with roti, rice, or pulao. The potatoes and peas are cooked in a rich, aromatic sauce, making it a favorite for families. This curry is a comforting dish to enjoy.

14779841778 9a63c0380a o

This recipe is made with simple ingredients. The creamy texture of the base and warm spices create a soulful dish. It's both satisfying and full of flavor, making it the perfect choice for a home-cooked meal any day of the week. This dish brings the comfort of restaurant-style Aloo Matar.

[feast_advanced_jump_to]

About Aloo Matar

Aloo Matar is a classic comforting dish. The soft potatoes and tender green peas soak up all the flavors of the spices, making each bite delicious and wholesome. This recipe uses minimal ingredients but tastes delicious. The spices along with aloo, matar blend gently into the onion tomato base, and gives the curry a homely feel.

You can enjoy this dish anytime, whether it's a quick weekday lunch or a peaceful weekend dinner. The subtle sweetness from peas and the creamy bite of potatoes make it a great combo that never fails. You can make it anyway either thick or slightly runny, depending on what you're serving it with. 

The potatoes and peas perfectly complement the warm, aromatic spices, creating a balanced and flavorful dish. It's also perfect for lunch boxes and stays tasty even after a few hours. This recipe uses basic vegetables, is budget-friendly, and is a reliable dish.
You will love this for sure.

14779772830 585ebbe08c o

Aloo Matar Ingredients

  • Oil, cumin seeds - Added for tempering and aroma.
  • Ginger garlic paste - Adds depth and flavor to the curry base.
  • Onion, tomatoes - These are ground into a paste to create the flavorful base.
  • Red chili powder, turmeric powder, garam masala powder - Adds heat, earthy flavor, and a rich, aromatic spice blend to the curry.
  • Tomato sauce - Adds tanginess and deepens the curry's flavor.
  • Potatoes, green peas - These are the key ingredients that absorb the curry flavors.
  • Fresh cream - Makes the curry creamy and smooth, adds richness to the dish.
  • Coriander leaves - Adds freshness to the dish and as a garnish.

Similar Recipes

Why This Recipe Works

  • This recipe is quick and easy to make with minimal ingredients.
  • The dish is full of flavors, filling and satisfying.
  • Can be made with simple pantry ingredients.
  • Easily Customizable - you can adjust the spice levels accordingly.
  • Best side dish for ghee rice, roti, or phulka.
  • Great for lunch or dinner. Ideal for any day.

How to make Aloo Matar Step by Step

1.Wash potatoes, peel off the skin of potatoes and chop them into bite sized cubes, Set aside. Grind the ingredients listed under 'to grind' to a fine paste, Set aside.

14955658042 ec59a3e468 b

2.In a pan heat oil - add the items listed under 'to temper' allow it to crackle, then add ginger garlic paste give a quick sauté. Then add tomato puree and sauté for few mins till raw smell leaves. Add required salt.

14955658262 7b3cae81cf b

3.Then add turmeric powder, garam masala powder and red chili powders, give a quick mix, let it cook for 2-3 minutes until it becomes thick. Then add potato and peas.

14769449267 e0beeb17b0 b

4.Mix well till the masala coats well with the veggies. Sauté for 2-3 minutes. Then add 1 cup of water and pressure cook for 2-3 whistles in low flame. Once pressure releases open and let it boil. Adjust salt and spice level at this stage.

14932997836 01ce24feab b

5.Then add tomato sauce, fresh cream and bring to a boil. Once it reaches gravy consistency and oil separates switch off and garnish with coriander leaves and sprinkle a pinch of garam masala powder.

14956003785 bff5af5d81 b

Serve hot with roti / rice or any pulao of your choice.

14779772830 585ebbe08c o

Expert Tips

  • Spice level - You can adjust the amount of red chili powder and garam masala to reduce spice.
  • Consistency - For thicker gravy, you can let it simmer for longer time after pressure cooking.
  • Tomato sauce - This adds tanginess to the dish, but you can skip it if you prefer a traditional curry.
  • Cream - Use fresh cream to make the curry rich and creamy.
  • Potatoes - Cut the potatoes into bite-sized cubes so they cook quickly and absorb the flavors fully.
  • Onion paste - Blend the onions and tomatoes finely for a smooth gravy.
  • Garnish - Garnish it with fresh coriander leaves and a sprinkle of garam masala for extra flavor and aroma.

Serving and Storage

Serve Aloo Matar hot with roti, rice, or pulao. It's perfect as a side dish for any Indian meal. 

You can store it in an airtight container in the refrigerator for up to 2 to 3 days. The curry may thicken after refrigeration, so add a splash of water to adjust the consistency while reheating.

FAQS

1.Can I skip the cream?

Yes, you can skip it for a lighter version of the dish. Add ¼ cup boiled milk for a creamy texture.

2.Can I make this recipe without a pressure cooker?

Yes, you can cook it in a pan. But it will take a bit longer to cook the vegetables.

3.Can I add other vegetables?

Yes, you can add vegetables like carrots, beans, or cauliflower for a different flavor and taste. But make sure to cook the vegetables accordingly.

4.Can I use tomato puree instead of fresh tomatoes?

Yes, you can use homemade tomato puree or store bought puree but the taste slightly varies.

5.Can I make Aloo Matar without onions?

While onions add depth to the flavor, you can skip them if needed.

6.What can I serve with Aloo Matar?

You can pair it with roti, nan, plain basmati rice, or pulao. 

14966110732 5caf8af462 o

If you have any more questions about this Aloo Matar Recipe do mail me at sharmispassions@gmail.com. In addition, follow me on Instagram, Facebook, Pinterest ,Youtube and Twitter .

Tried this Aloo Matar Recipe? Do let me know how you liked it. Also tag us on Instagram @sharmispassions and hash tag it on #sharmispassions.

📖 Recipe Card

14779772830 585ebbe08c o
Print

Aloo Matar Recipe | Aloo Mutter Recipe

Aloo Matar is a North Indian flavorful dish made with potatoes and green peas in a spiced onion tomato gravy. This recipe is versatile and can be paired with roti, rice, or pulao. The potatoes and peas are cooked in a rich, aromatic sauce, making it a favorite for families. This curry is a comforting dish to enjoy.
Course dinner, Lunch, Side Dish
Cuisine Indian
Keyword 30 mins recipes, Aloo Recipes, Gravy, Potato, Potato Recipes, roti sidedish, Side Dish
Prep Time 15 minutes
Cook Time 25 minutes
Total Time 40 minutes
Servings 2 people
Calories 312kcal
Author Sharmilee J

Ingredients

To temper:

  • 2 teaspoon oil
  • ¾ teaspoon jeera

To grind:

  • 1 big onion roughly chopped
  • 2 tomatoes roughly chopped

Instructions

  • Wash potatoes, peel off the skin of potatoes and chop them into bite sized cubes, Set aside.
  • Grind the ingredients listed under 'to grind' to a fine paste, Set aside.
  • In a pan heat oil - add the items listed under 'to temper' allow it to crackle, then add ginger garlic paste give a quick sauté.
  • Then add tomato puree and sauté for few minutes till raw smell leaves.
  • Add required salt.
  • Then add turmeric powder, garam masala powder and red chili powders, give a quick mix, let it cook for 2-3 minutes until it becomes thick.
  • Then add potato and peas.
  • Mix well till the masala coats well with the veggies.
  • Sauté for 2-3 minutes.
  • Then add 1 cup of water and pressure cook for 2-3 whistles in low flame.
  • Once pressure releases open and let it boil.
  • Adjust salt and spice level at this stage.
  • Then add tomato sauce, fresh cream and bring to a boil.
  • Once it reaches gravy consistency and oil separates switch off and garnish with coriander leaves and sprinkle a pinch of garam masala powder.
  • Serve hot with roti / rice or any pulao of your choice.

Notes

  • Spice level - You can adjust the amount of red chili powder and garam masala to reduce spice.
  • Consistency - For thicker gravy, you can let it simmer for longer time after pressure cooking.
  • Tomato sauce - This adds tanginess to the dish, but you can skip it if you prefer a traditional curry.
  • Cream - Use fresh cream to make the curry rich and creamy.
  • Potatoes - Cut the potatoes into bite-sized cubes so they cook quickly and absorb the flavors fully.
  • Onion paste - Blend the onions and tomatoes finely for a smooth gravy.
  • Garnish - Garnish it with fresh coriander leaves and a sprinkle of garam masala for extra flavor and aroma.

Nutrition

Serving: 100g | Calories: 312kcal | Carbohydrates: 54g | Protein: 8g | Fat: 8g | Saturated Fat: 2g | Polyunsaturated Fat: 2g | Monounsaturated Fat: 3g | Trans Fat: 0.01g | Cholesterol: 8mg | Sodium: 57mg | Potassium: 1422mg | Fiber: 10g | Sugar: 10g | Vitamin A: 1642IU | Vitamin C: 74mg | Calcium: 77mg | Iron: 4mg


The post Aloo Matar Recipe | Aloo Mutter Recipe appeared first on Sharmis Passions.

Pineapple Chaat Recipe

Pineapple Chaat Recipe also known as pineapple salad is a refreshing salad made with ripe pineapples, spice powders and fresh herbs. Enjoy this salad as it is on a summer afternoon or as a side with grilled meat or chicken. Pineapple Chaat Did you know pineapple is one of my favourite fruit. Every time we...

Read More

The post Pineapple Chaat Recipe appeared first on Yummy Tummy.

Black Tea Recipe

Making a cup of black tea is not rocket science, but I am sharing few of my tips and tricks to make the perfect cup of black tea so it is not bitter. Enjoy this hot cup of tea with black tea with biscuits or cookies. Black Tea Recipe Making black tea is not rocket...

Read More

The post Black Tea Recipe appeared first on Yummy Tummy.

❌