❌

Reading view

There are new articles available, click to refresh the page.

Big Beef Flavor, Little Buns: Smoked Chuck Roast Sliders

By Daniel Hale

Tailgating calls for food that’s easy to serve, easy to eat, and substantial enough to satisfy hungry sports fans. Here at BarbecueBible.com, we believe you can do better than the usual burgers and hotdogs. BBQ beef sliders check all three boxes, especially when the beef has been smoked low and slow over smoldering hardwood. Just one catch: You’ll want to smoke the beef the day before the game. Which, come to think of it, isn’t a catch at all, because by doing most of the prep ahead of time, you get to enjoy the game.

For this recipe, I went with chuck roast instead of brisket. It’s a smaller, more manageable cut of beef with plenty of marbling and rich flavor. It’s a lot more affordable (and these days, who isn’t worried about the grocery bill.). And when smoked properly, it makes a spectacular filling for BBQ sandwiches.

I used the Monument Denali 605Pro gas grill and Monument smoker box to smoke the chuck roast low and slow, developing a flavorful, smoky bark before chopping the beef for our sliders.

And yes, you can smoke beef on a gas grill. You just need the right setup, some wood chips, and patience.

Why Chuck Roast Works for BBQ Sliders

Chuck roast comes from the shoulder of the steer, an area that gets plenty of exercise. The meat contains loads of connective tissue and intramuscular fat, which make it particularly well-suited to low-and-slow smoking.

As the roast heats, the connective tissue gradually breaks down, helping transform a tough cut of beef into meat tender enough to cut with the side of a fork.

Chuck also has a practical advantage over brisket. You can purchase a roast weighing three to five pounds rather than committing to a 12 pound packer. For this smoke, I started with a boneless chuck roast weighing a little over 4 1/2 pounds.

If you have the time and patience, you can smoke a chuck roast until it’s tender enough to pull or shred with forks. I had neither, so I chopped the smoked chuck with a cleaver instead. It makes an excellent sandwich filling, especially when mixed with barbecue sauce.

How to Set Up the Monument Denali 605Pro for Smoking

A gas grill might not be the first thing that comes to mind when you think about smoking beef, but with indirect heat and a smoker box, it’s entirely possible.

I used the Monument Denali 605 gas grill, setting it up for indirect grilling with a target temperature of approximately 250°F.

The Monument smoker box holds wood chips, allowing them to smolder over an active burner and produce smoke inside the grill. The chuck roast sits away from the direct heat, where it can smoke slowly without scorching.
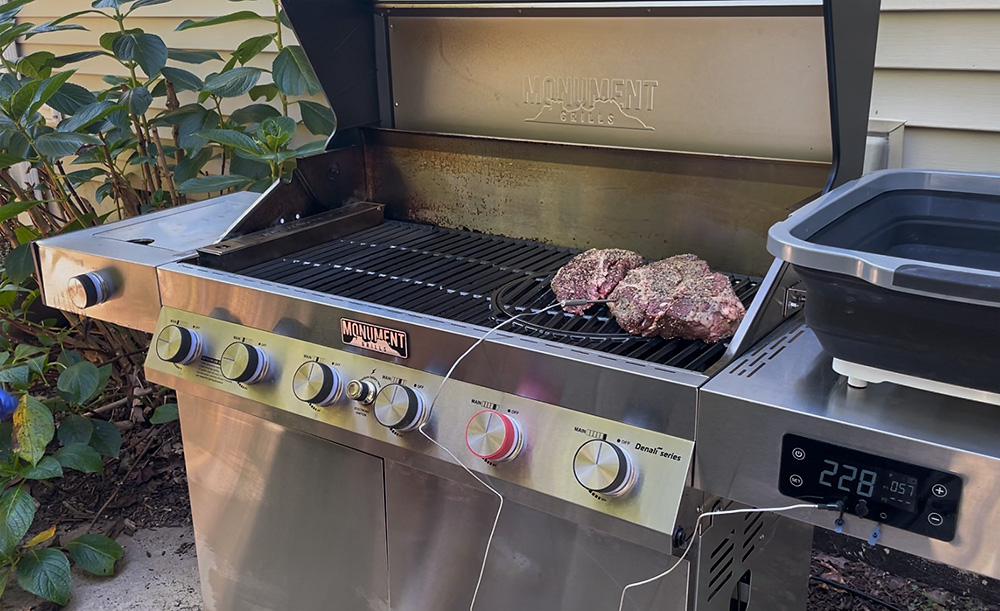
Chuck Roast on the Monument Denali 605

My target was 250°F, although the grill temperature fluctuated between approximately 230°F and 280°F throughout the smoke. Maintaining a steady low temperature can be tricky on a gas grill, even with the burners turned down.

Steven shared a little hack for managing the heat: Prop the grill lid open slightly with a small metal rod to allow some heat to escape. (I wish I’d known that one before I started!)

I added wood chips twice during the initial smoking stage. The goal was to develop a noticeable smoke flavor and a dark exterior bark, not to produce heavy smoke for the entire grilling session.

A few tips for smoking on a gas grill:

  • Use indirect heat so the roast isn’t sitting directly over an active burner.
  • Monitor the grill temperature and adjust the burners as necessary.
  • Replenish wood chips when needed, especially during the early stages of smoking.
  • Use a meat thermometer to follow the roast’s progress.

Smoking the Chuck Roast

I started by seasoning the chuck roast generously with Steven’s Texas Brisket Rub, covering all sides of the meat.

Once the Denali 605Pro was preheated and the smoker box was producing smoke, I placed the roast over indirect heat and closed the lid.
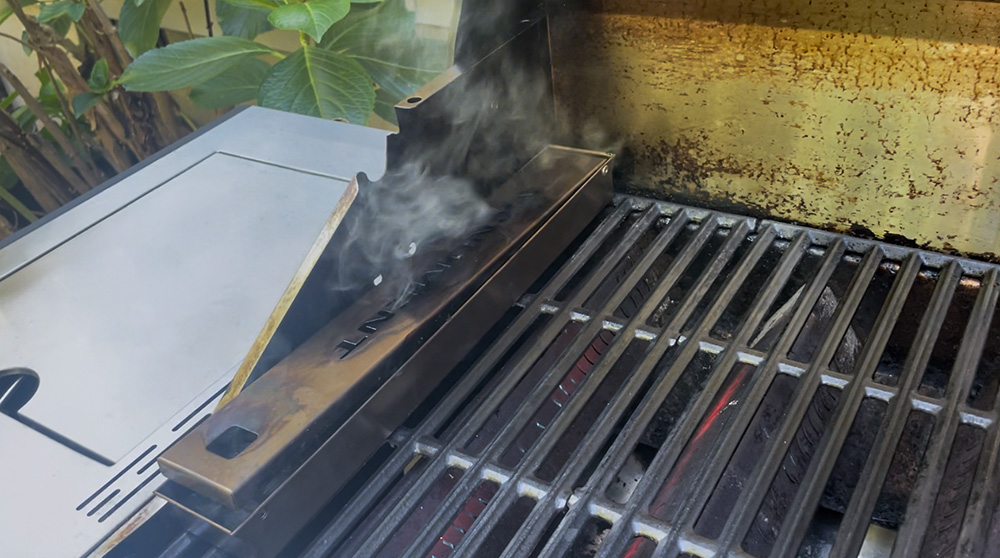
Monument Grills Smoker Box

After four hours, the internal temperature was approximately 142°F. An hour later, it had only climbed to 147°F.

That slow progression isn’t unusual with a large piece of beef. Evaporative cooling can slow the rise in internal temperature, a phenomenon barbecue enthusiasts know as the stall. And personally, it drove me crazy.

By this point, the chuck roast had spent around five hours in the smoke, developing its bark and smoke flavor.

Rather than continuing to smoke the beef uncovered, I moved to the next stage: a covered finish to help tenderize the meat.
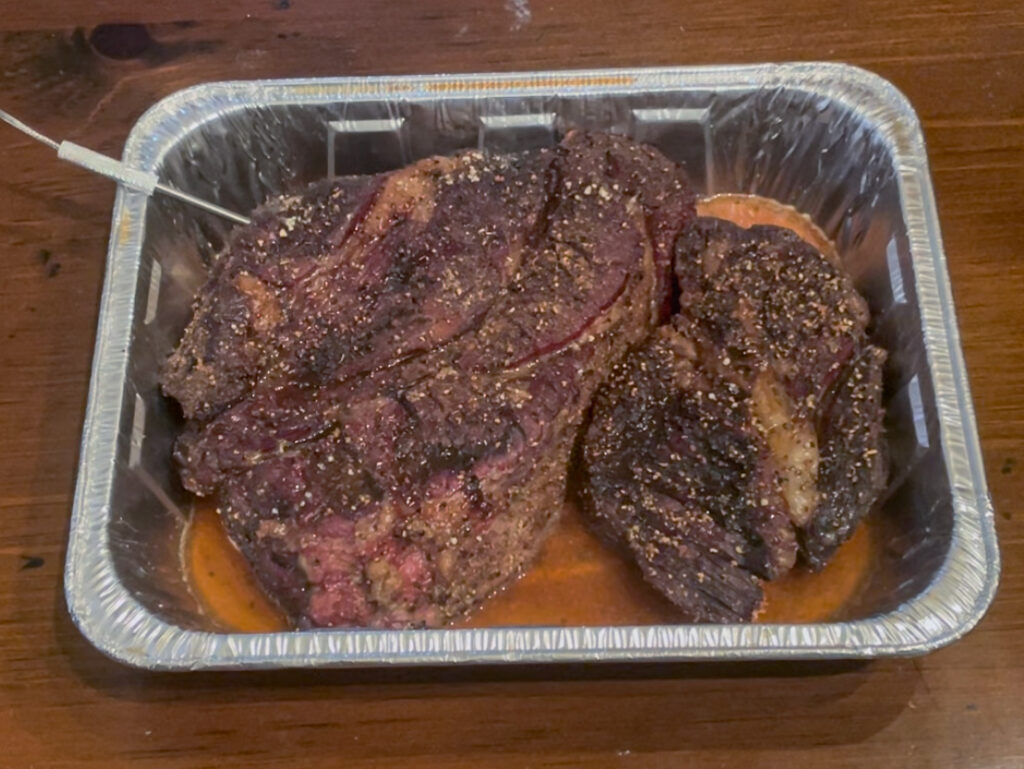
Chuck Roast in Pan

Finishing the Chuck Roast

Once the smoking stage was complete, I transferred the roast to a foil pan with beef broth, Worcestershire sauce, minced garlic, and onion powder.

I covered the pan tightly to retain moisture and moved it to the oven to finish. That’s a little tip I picked up from barbecuebible.com editor Nancy Loseke: Once the grill has done its job developing the smoke flavor and bark, there’s no need to keep burning propane—unless you want to. Your oven can take it from there.

The purpose of this stage is to help break down the connective tissue while keeping the meat moist. The liquid also collects beef juices that can be used later when preparing the sliders.

After more than eight hours of total grilling and finishing time, the chuck roast reached approximately 205°F internally.

Here’s something worth emphasizing: Internal temperature alone doesn’t guarantee tender beef.

Although the roast had reached the temperature normally associated with shreddable chuck, it wasn’t quite as tender as I had hoped. One section pulled apart relatively easily, while the larger portion still offered a little resistance.
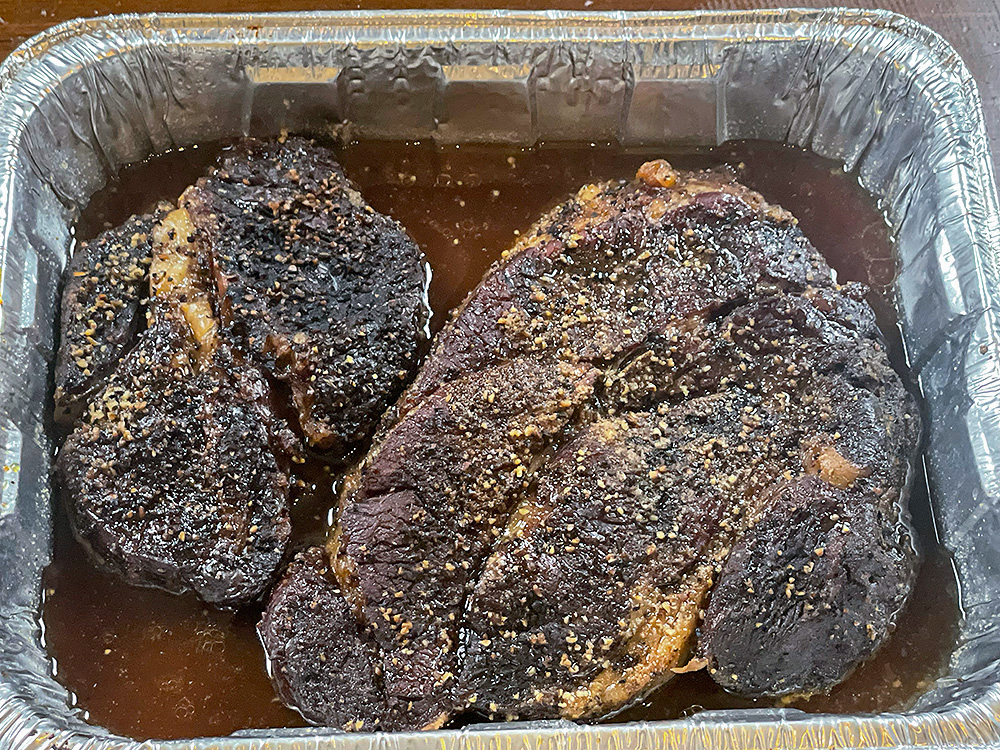
Chuck Roast

Since it was getting late, it was time for Plan B. I decided to chop the meat instead.

And that proved excellent for sliders.

If you’re aiming for fully shredded beef, you have to keep cooking until a temperature probe or skewer slides into the thickest part with very little resistance. That final tenderness test is more important than reaching a particular temperature on the thermometer.

Building the Smoked Chuck Roast BBQ Sliders

With the beef rested and chopped, it was time to assemble the sliders.

I mixed some of the chopped smoked chuck roast with barbecue sauce, using just enough to coat the beef without overpowering the smoke flavor. You can use any barbecue sauce you like, including Steven’s Chipotle Molasses Barbecue Sauce. Personally, I prefer a sauce with less sugar for health reasons. I’m partial to Stubb’s Simply Sweet Reduced Sugar BBQ Sauce.
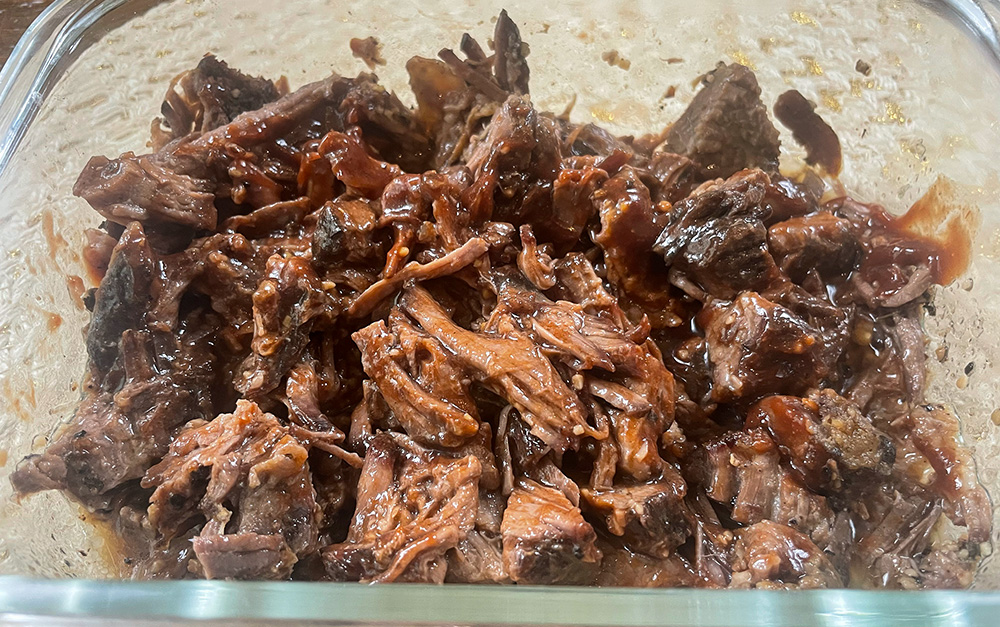
Chuck Roast Chopped with Barbecue Sauce

For the sandwiches, I kept it simple: Hawaiian slider rolls, smoked BBQ beef, and provolone cheese. The sweetness of the rolls worked nicely with the smoky beef and barbecue sauce.

These sliders are ideal for tailgating because you can prepare the beef the day before the game. Save some of the juices from the covered finishing stage to keep the meat moist when reheating.

On game day, simply reheat the beef until hot, toast the slider rolls, add the provolone, and assemble the sandwiches.

Smoked Chuck Roast BBQ Sliders for Game Day

The finished sliders were fantastic. The smoky beef, barbecue sauce, melted provolone, and sweetness of the Hawaiian rolls made a spectacular sandwich!

The Monument Denali 605Pro did a great job smoking the chuck roast. Paired with the Monument smoker box, it gave the beef plenty of smoke flavor and developed a nice bark, all on a gas grill.

Not bad for a tailgate sandwich!
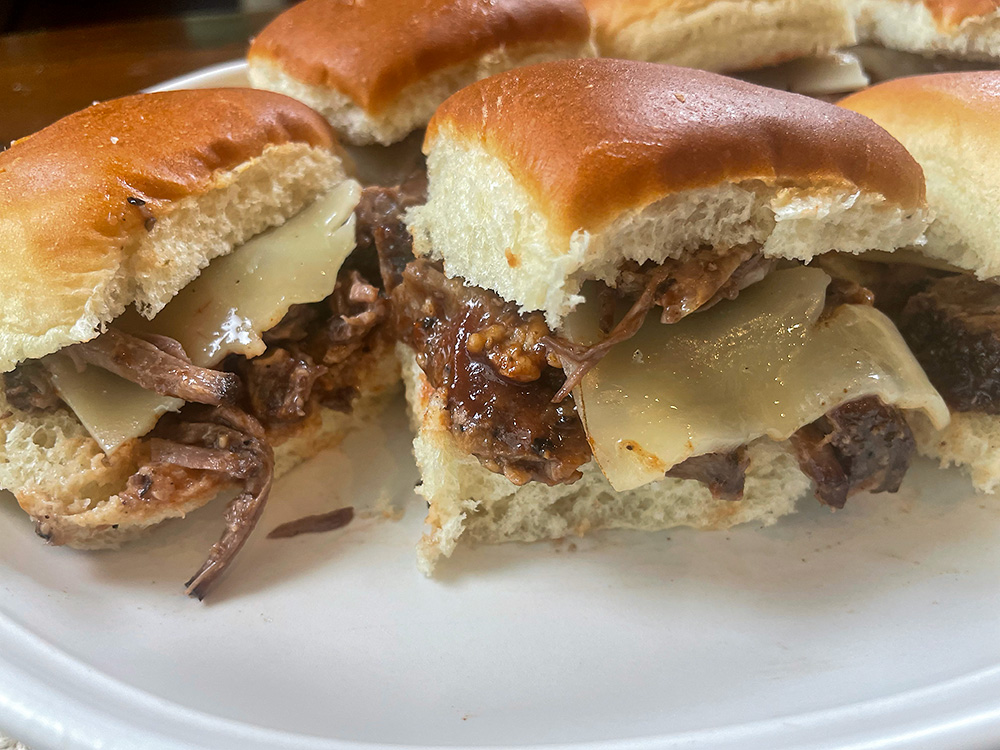
Chuck Roast Sliders

Recipe

Smoked Chuck Roast BBQ Sliders

Smoked chuck roast, chopped or shredded and tossed with barbecue sauce, served on Hawaiian slider rolls with melted provolone cheese.

Yield: Approximately 16–20 sliders (estimated)

Method: Indirect smoking

Equipment: Gas grill, smoker box, meat thermometer, disposable foil pan, aluminum foil

Ingredients

For the smoked chuck roast:

  • 1 boneless beef chuck roast (approximately 4 1/2 pounds)
  • Steven Raichlen’s Texas Brisket Rub (or your favorite barbecue rub), enough to generously season the roast
  • Wood chips, for smoking
  • 1 cup beef broth
  • 2 tablespoons Worcestershire sauce
  • 1 tablespoon jarred minced garlic
  • 1 teaspoon onion powder

For the sliders:

  • 16–20 Hawaiian slider rolls
  • Your favorite barbecue sauce, to taste
  • Sliced provolone cheese, enough for each slider

Instructions

  1. Season the beef: Generously season the chuck roast on all sides with Steven Raichlen’s Texas Brisket Rub.
  2. Set up the grill: Prepare the gas grill for indirect smoking at approximately 250°F. Fill the smoker box with wood chips and position it over an active burner according to the manufacturer’s instructions.
  3. Smoke the chuck roast: Place the roast over indirect heat and close the lid. Maintain a grill temperature near 250°F, replenishing the wood chips as needed. Smoke until the roast develops a dark bark and reaches an internal temperature of approximately 165°F.
  4. Cover the roast: Transfer the chuck roast to a disposable foil pan. Add the beef broth, Worcestershire sauce, minced garlic, and onion powder. Cover the pan tightly with aluminum foil.
  5. Finish the roast: Return the covered pan to the grill over indirect heat. Continue smoking at approximately 250°F. When the internal temperature reaches 205°F, begin checking for tenderness. The beef is ready when a temperature probe or skewer slides into the thickest part with very little resistance.
  6. Rest and chop: Remove the roast from the grill and let it rest for 20–30 minutes. Chop or shred the beef, reserving some of the pan juices.
  7. Add the barbecue sauce: Toss the beef with enough barbecue sauce to coat it. Add a little reserved pan liquid if needed to keep the meat moist.
  8. Prepare the slider rolls: Split the Hawaiian slider rolls and lightly toast them on the grill. Place a portion of BBQ beef on each bottom bun and top with provolone cheese. Warm briefly until the cheese melts.
  9. Assemble and serve: Replace the top buns and serve warm.

Make-Ahead Tailgating Tip

Prepare the smoked chuck roast the day before the game. Refrigerate the chopped or shredded beef with some of the reserved pan juices in a covered container. On game day, reheat the beef thoroughly to 165°F, adding reserved liquid as needed to keep it moist. Toss with barbecue sauce and assemble the sliders shortly before serving.

A big thank you to Monument Grills for sponsoring this post.

Plan your next cook with our full recipe collection—weeknight grills, weekend projects, and special-occasion feasts.

Get Steven’s weekly grilling tips, seasonal recipes, and live-fire ideas in your inbox. Join our Up in Smoke newsletter. Sign up and get a FREE PDF of Steven Raichlen's Best Ribs Recipes Ebook.

Preorder Man On Fire — A Steven Raichlen Memoir. And get some really cool rewards!

Looking to upgrade your tailgating setup? Check out our Tailgating Essentials.

The post Big Beef Flavor, Little Buns: <br />Smoked Chuck Roast Sliders appeared first on Barbecuebible.com.
Kick Off Tailgating Season with Rotisserie Tri-Tip

Photo Credit: Daniel Hale


By Daniel Hale

With football season fast approaching, it’s time to make my first tailgating meal. Being from California, I have to go with tri-tip!

A few years ago, I wrote about my first real attempt at grilling tri-tip. I cooked it indirectly on my Weber kettle, then finished it over direct heat for that amazing sear.

This time I wanted to take the same cut in a different direction. I decided to put a Santa Maria-style tri-tip on the rotisserie.

And what better grill to use than the Monument Eminence 605? This is a big grill. This isn’t something I’m throwing in the back of the car and hauling to a stadium parking lot. This was game-day cooking at home.

Rotisserie Tri-Tip on the Eminence 605

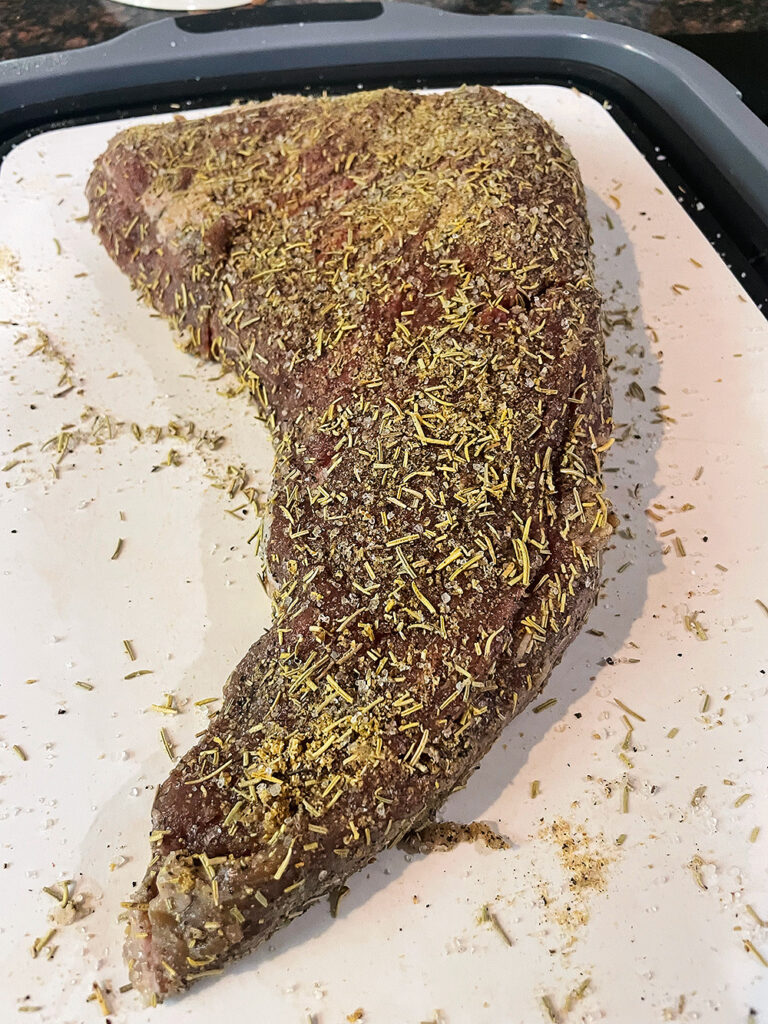
I started with Steven’s Santa Maria Tri-Tip recipe, seasoning the meat with coarse salt, black pepper, garlic powder, and dried rosemary. The tri-tip started at about 3 1/2 pounds before I trimmed a fair amount of exterior fat.

Tri-Tip with Santa Maria Rub

Photo Credit: Daniel Hale


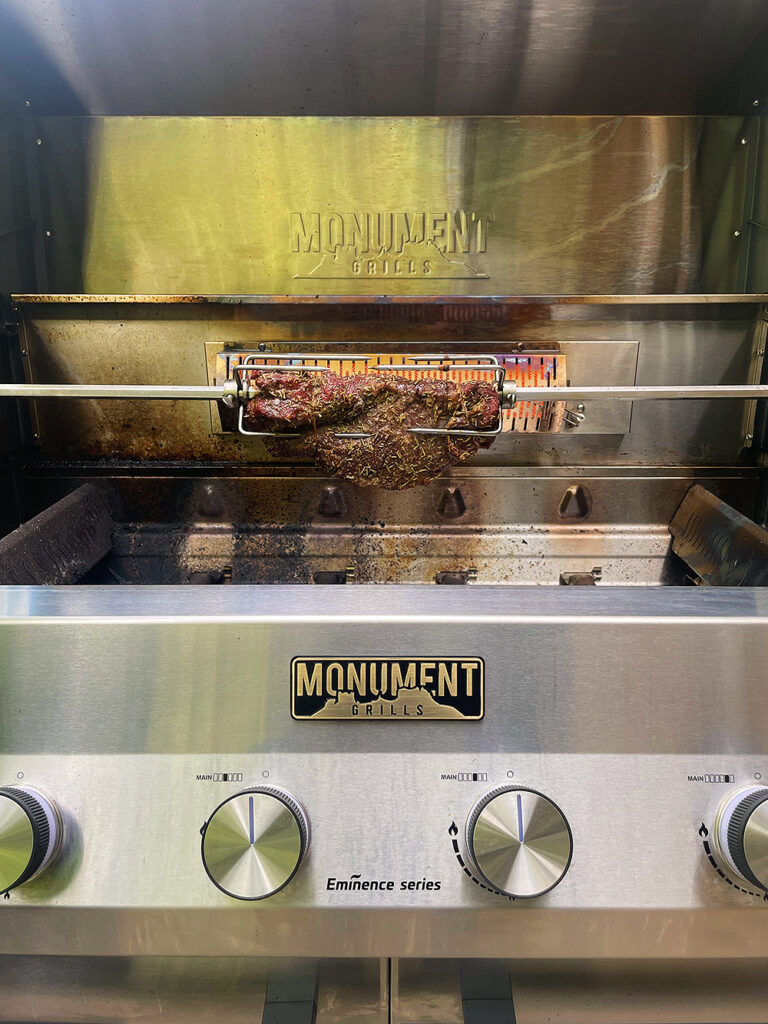
Once the meat was secured on the rotisserie spit, I set up the Eminence 605 for indirect cooking. I lit the burners on either side of the meat and left the burners directly below the tri-tip off. The grill settled in around 285 to 290°F.

The rotisserie kept the tri-tip turning steadily without any flipping or repositioning. After about 45 minutes, the deepest part of the roast had reached 117°F.

Finishing with the Infrared Rear Burner

The Monument Eminence 605 includes a rear infrared burner designed to work with the rotisserie. The rear burner is either on or off rather than adjustable like the main burners.

Rotisserie Tri-Tip on the Eminence 605

Photo Credit: Daniel Hale


I turned on the infrared rear burner and kept the rotisserie running. The added radiant heat browned the outside while I watched the internal temperature closely.

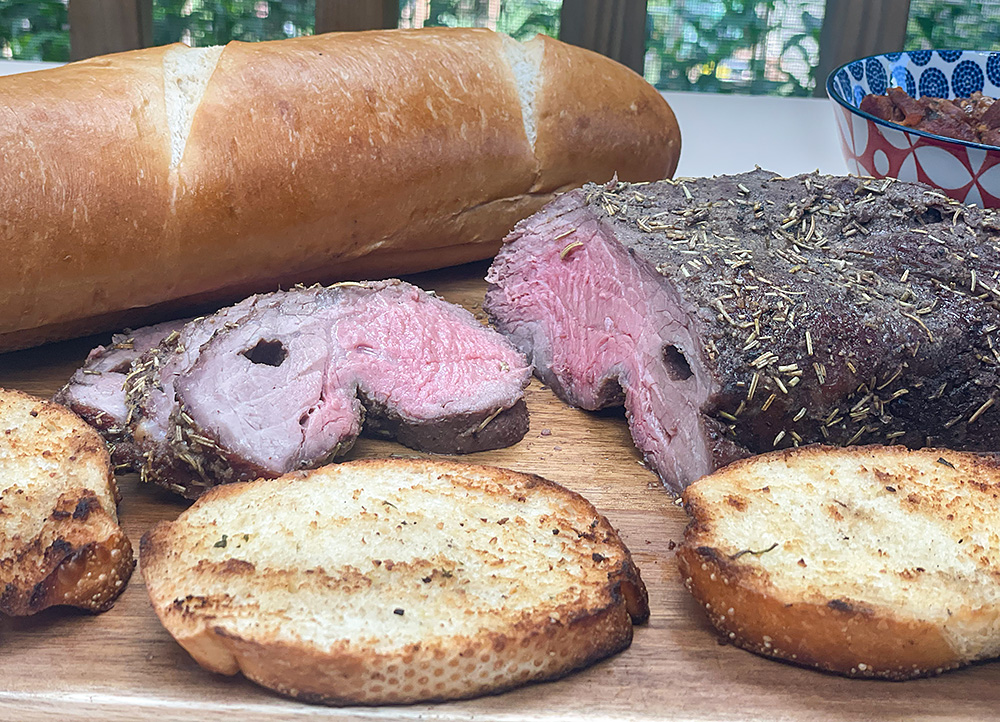
I wanted medium-rare, so I pulled the tri-tip when the deepest part reached 130°F and let it rest before slicing. The finished meat had a pink center and a browned, rosemary-flecked exterior.

Tri-tip has grain that changes direction, so I separated the roast as needed and sliced each section across the grain. The method was different from my previous tri-tip cook, but the temperature strategy was familiar: cook it gently first, then use higher heat to finish the exterior.

Santa Maria-Style Sides on the Grill

A Santa Maria-style tri-tip called for the traditional supporting cast, so I also made Steven’s Santa Maria Garlic Bread and Santa Maria Pinquito Beans.

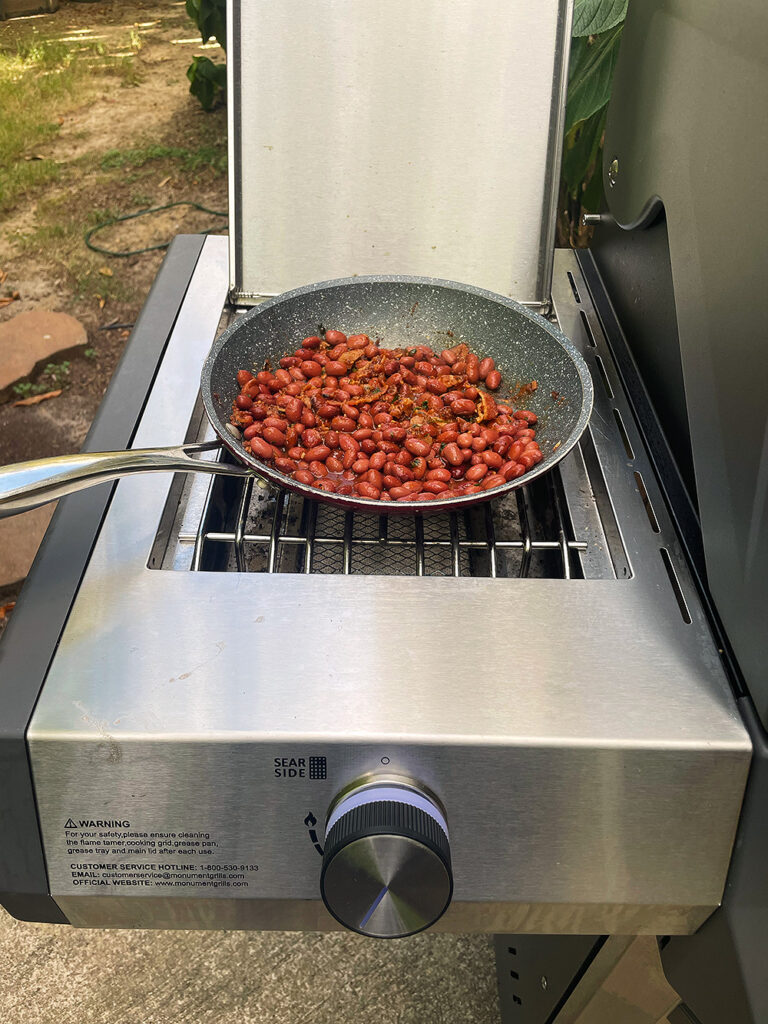
I made a couple of changes to the beans. Instead of pinquito beans, I used Frijoles Colorados Cortos (small red beans). I also substituted chipotle sauce for the red chile sauce. Other than that, I followed the recipe.

Santa Maria Style Beans on the Monument Eminence 605

Photo Credit: Daniel Hale


I cooked the beans in a saucepan on the Eminence 605’s side burner while the tri-tip was on the rotisserie. Bacon, ham, onion, garlic, tomato purée, chipotle sauce, and the seasonings all went into the pot with the beans.

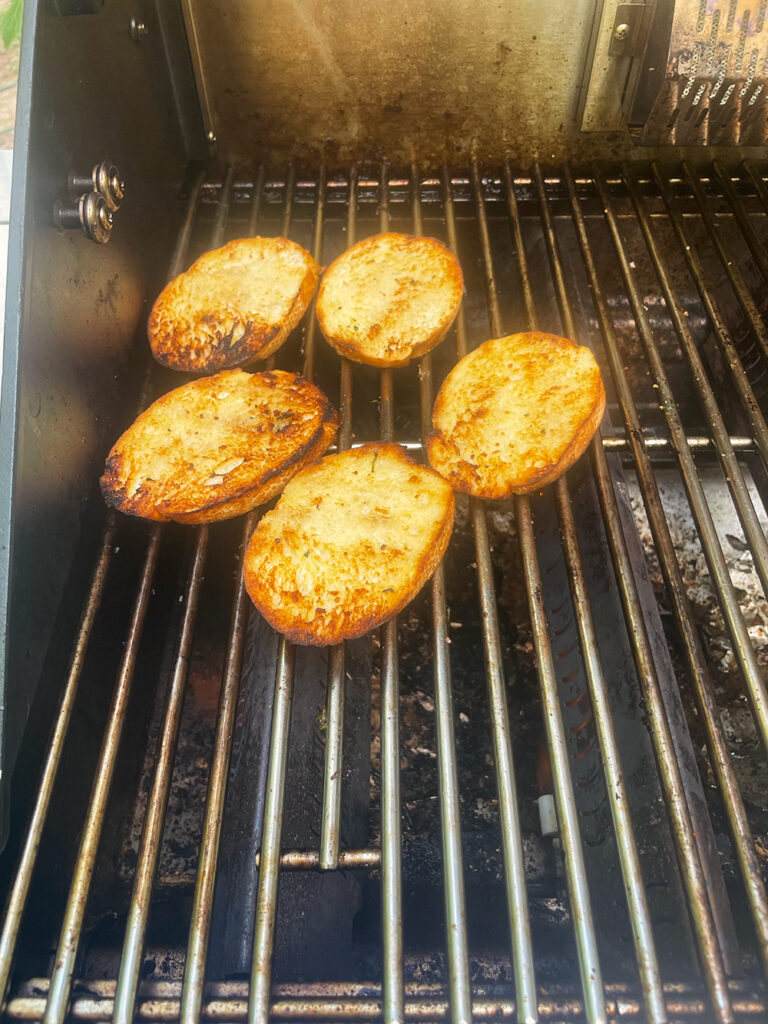
For the garlic bread, I followed the Santa Maria Garlic Bread recipe. I grilled the bread at the end of the cook while the rest of the meal was coming together.

Santa Maria Garlic Bread

Photo Credit: Daniel Hale


That gave me the full game-day menu: rotisserie tri-tip, Santa Maria-ish beans, and Santa Maria grilled garlic bread.

The Results

The tri-tip came out beautifully, with a pink center and a browned exterior from the infrared finish. The rosemary really came through in the Santa Maria seasoning and gave the beef a distinct herbal note without covering up the flavor of the meat. I especially liked what the chipotle sauce did for the beans, adding a deeper smoky flavor and a little heat. And the garlic bread may have been the surprise of the meal. Grilled until crisp around the edges and loaded with garlic butter, it was excellent alongside the tri-tip and beans.

Game Day at Home

I’ve now cooked tri-tip a few different ways, and the rotisserie gave me another one worth keeping. The Eminence 605 handled the slow roast, the infrared rear burner handled the finish, and the side burner gave me a place to cook the beans at the same time.

Rotisserie Tri-Tip

Photo Credit: Daniel Hale


For a tailgating-season meal at home, it made good use of the grill without turning dinner into a juggling act.

A big thank you to Monument Grills for sponsoring this cook.

Build your live-fire skills with our Back-to-Basics library—setups, temps, tools, and pro moves that make a difference.

Get Steven’s weekly grilling tips, seasonal recipes, and live-fire ideas in your inbox. Join our Up in Smoke newsletter. Sign up and get a FREE PDF of Steven Raichlen's Best Ribs Recipes Ebook.

Preorder Man On Fire — A Steven Raichlen Memoir. And get some really cool rewards!

Looking to upgrade your tailgating setup? Check out our Tailgating Essentials.

The post Kick Off Tailgating Season with Rotisserie Tri-Tip appeared first on Barbecuebible.com.
Fire-Roasted Hatch Chile Burgers: A Taste of New Mexico

Photo Credit: Daniel Hale


By Daniel Hale

There are burgers, and then there are burgers that make you rethink what a burger should be.

I came across these New Mexican Green Chile Burgers while paging through Steven Raichlen’s Raichlen’s Burgers.

This is the kind of burger I had never really considered. Sure, I’ve had plenty of chili cheeseburgers. But a green chile burger? That was something new for me.

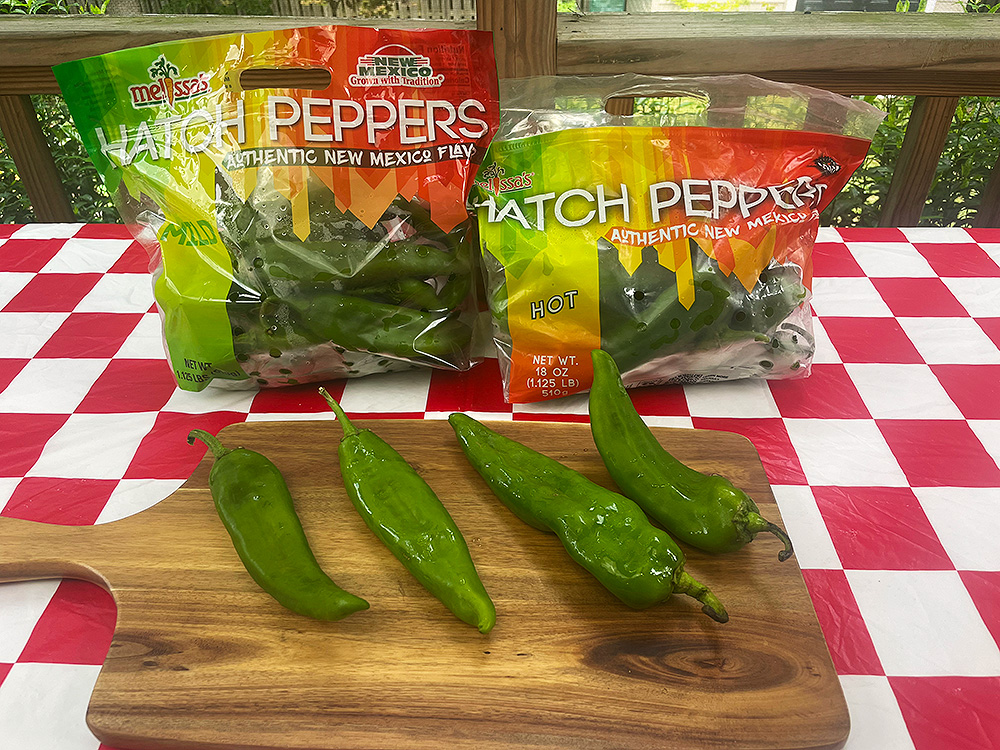
So when Melissa’s Produce sent me a box of fresh mild Hatch chiles in the middle of Hatch season, I knew exactly what I wanted to make.

I fired up the Monument Grills Eminence 605 and put Steven’s New Mexican burger to the test.

What Makes a Hatch Chile Different?

Hatch isn’t a particular variety of pepper. The name refers to chiles grown in and around New Mexico’s Hatch Valley.

They can range from mild to seriously hot, but what makes them special is their distinctive flavor—especially once they meet fire. Roasting softens the flesh, concentrates the flavor, and adds a smoky edge that makes green chile a natural partner for grilled beef.

Hatch Peppers

Photo Credit: Daniel Hale


Once roasted, the chiles are covered briefly to steam, then peeled, seeded, and cut into strips. Some go into the cheddar topping for the burgers, while the rest can be used to make Steven’s New Mexican Salsa Verde.

Making the Green Chile Burgers on the Monument Eminence 605

The first job for the Monument Grills Eminence 605 was roasting the Hatch chiles.

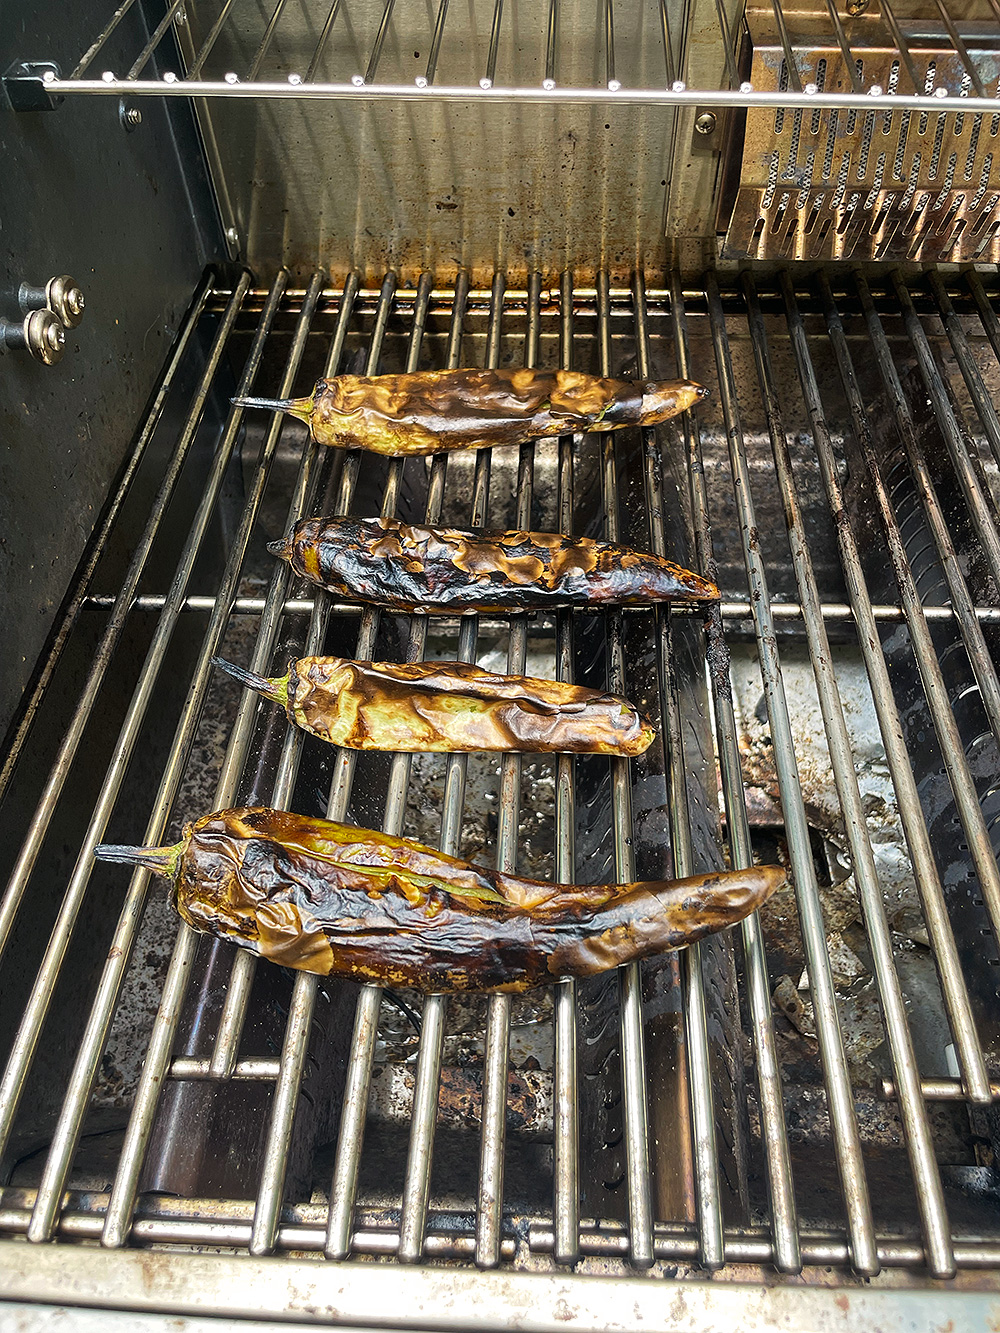
I fired up the grill and brought the temperature to around 550° to 600°F. That intense heat quickly blistered and blackened the skins while softening the flesh underneath.

Fire-roasted green chiles blistered on the grill

Photo Credit: Daniel Hale


The Eminence 605’s six main burners made it easy to generate the high heat I was looking for. I placed the chiles directly over the heat and turned them until the skins were blistered on all sides.

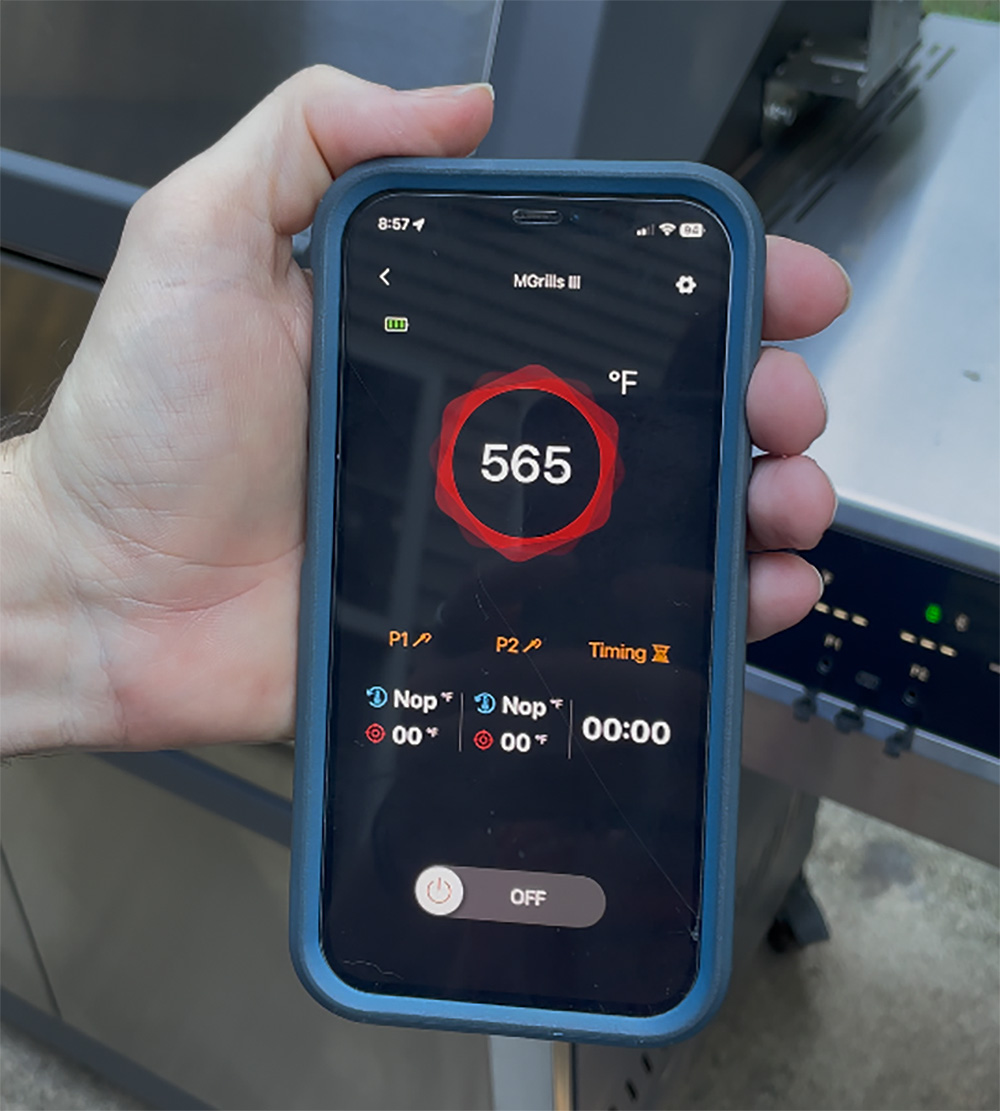
While they cooked, I kept an eye on the grill through the Monument Grills app. The Eminence 605 connects to the app via Bluetooth, allowing me to monitor the grill temperature from my phone without constantly lifting the lid.

Monument Grills App

Photo Credit: Daniel Hale


Once the chiles were roasted, peeled, and seeded, they became the ingredient that really sets Steven’s New Mexican Green Chile Burger apart.

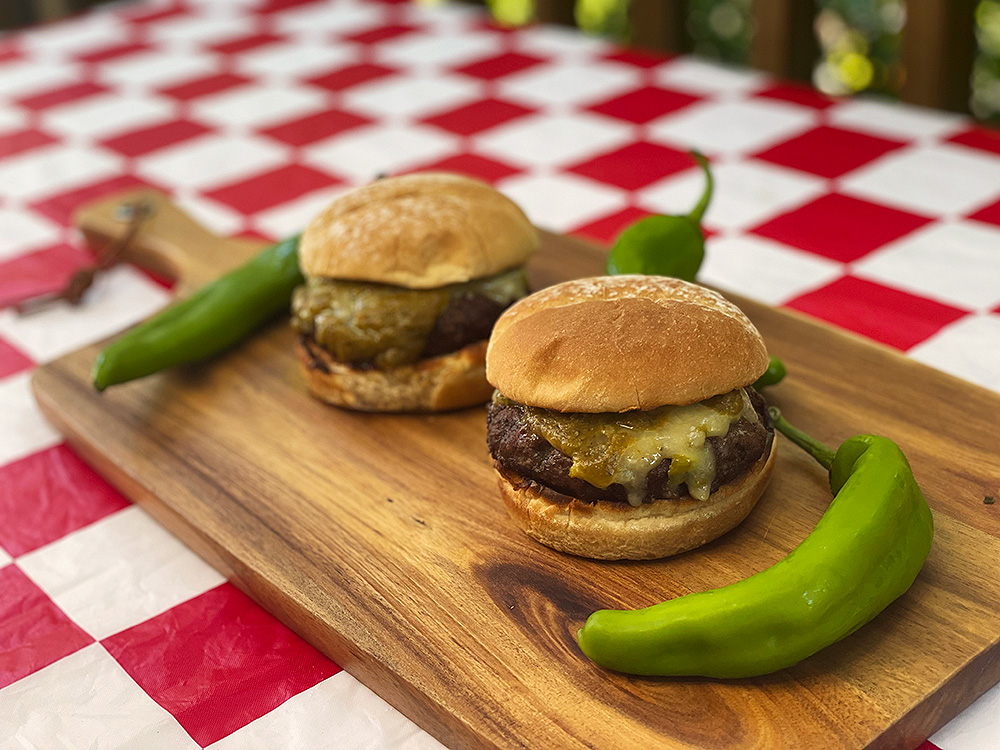
The chile shows up twice. First, strips of fire-roasted Hatch chile are combined with grated white cheddar and piled onto the hot burger, where the cheese melts around the peppers.

Then comes the salsa verde. Made with roasted green chiles, garlic, cilantro, lime juice, cumin, and oregano, it adds another layer of chile flavor along with acidity and freshness.

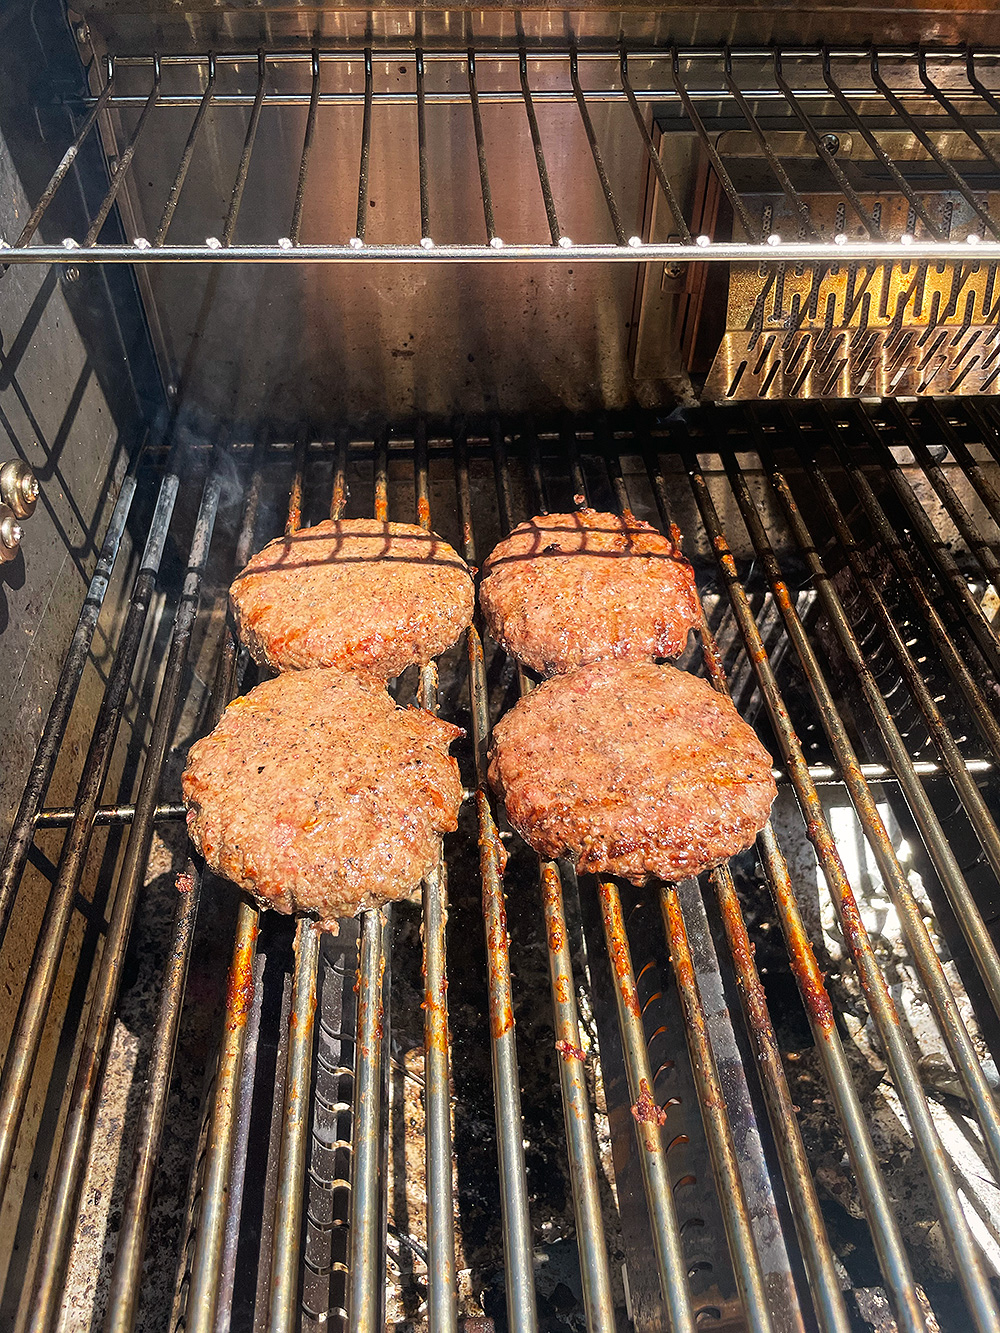
The burgers themselves are intentionally simple: ground chuck or sirloin seasoned generously with salt and pepper. After roasting the chiles, I used the Eminence 605 to grill the beef patties and toast the hamburger buns.

Burgers on the Monument Eminence 605 Grill

Photo Credit: Daniel Hale


Steven’s original recipe calls for New Mexican green chiles, Anaheim chiles, or poblanos. If you can get fresh Hatch chiles while they’re in season, use them.

Recipe

New Mexican Green Chile Burgers with Salsa Verde

Recipe by Steven Raichlen

These New Mexican green chile burgers get a double dose of chile flavor from fire-roasted peppers mixed with white cheddar and a fresh New Mexican salsa verde.

Method
Direct grilling
Serves
4

Ingredients

Instructions

  1. Place the chile strips in a serving bowl and stir in the Cheddar. Cover and refrigerate until ready to use.
  2. Wet your hands with cold water and divide the ground beef into 4 equal portions. Working quickly and with a light touch, pat each portion into a thick patty. Place the patties on a plate lined with plastic wrap and refrigerate, covered, until ready to grill.
  3. Generously, and I mean generously, season each patty on both sides with salt and black pepper. Grill the burgers until they are cooked through. Remove the burgers and cover to keep warm. Leave the grill on.
  4. Brush the cut sides of the hamburger buns with the olive oil. Place the buns on the hot grill, cut side down, and, lowering the temperature if necessary, grill until toasted, 1 to 2 minutes. You may need to work in batches.
  5. Place each of the burgers on the bottom half of a bun and top each with a quarter of the chile and cheese mixture. Spoon some salsa verde over each, top with the other half of the bun, and serve at once.

Fire Up a Different Kind of Burger

I have to say, this burger was fantastic.

You get great beefy flavor up front, followed by the roasted chile and just enough Hatch chile heat at the finish. The salsa verde adds brightness without overpowering the burger.

A great burger doesn’t always need bacon, a dozen toppings, or some complicated secret sauce. Sometimes all it takes is good beef, a hot grill, melted cheese, and one ingredient that changes the whole personality of the burger.

In New Mexico, that ingredient is green chile.

After trying one topped with fire-roasted Hatch chiles, the standard lettuce-and-tomato cheeseburger suddenly has some serious competition.

Fire-Roasted Hatch Chile Burgers

Photo Credit: Daniel Hale


A huge thanks to Monument Grills for sponsoring this post.

The post Fire-Roasted Hatch Chile Burgers:<br /> A Taste of New Mexico appeared first on Barbecuebible.com.
Grilling Across America: 6 Regional Hot Dogs I Love

Photo Credit: Daniel Hale


By Daniel Hale

All hail the hotdog! For some people, it’s an affordable staple. For others, it’s a rite of summer—along with baseball and backyard barbecues. For yet others, it’s the barbecue equivalent of a blank canvas—awaiting embellishments ranging from green pickle relish and chopped onions (Chicago) to beef chili (Detroit) to bacon and pinto beans (the Sonoran hotdog from Arizona).

Few foods are as regional as the humble hot dog. Nearly every part of the country has its version, and everyone has a favorite they’ll insist is the best.

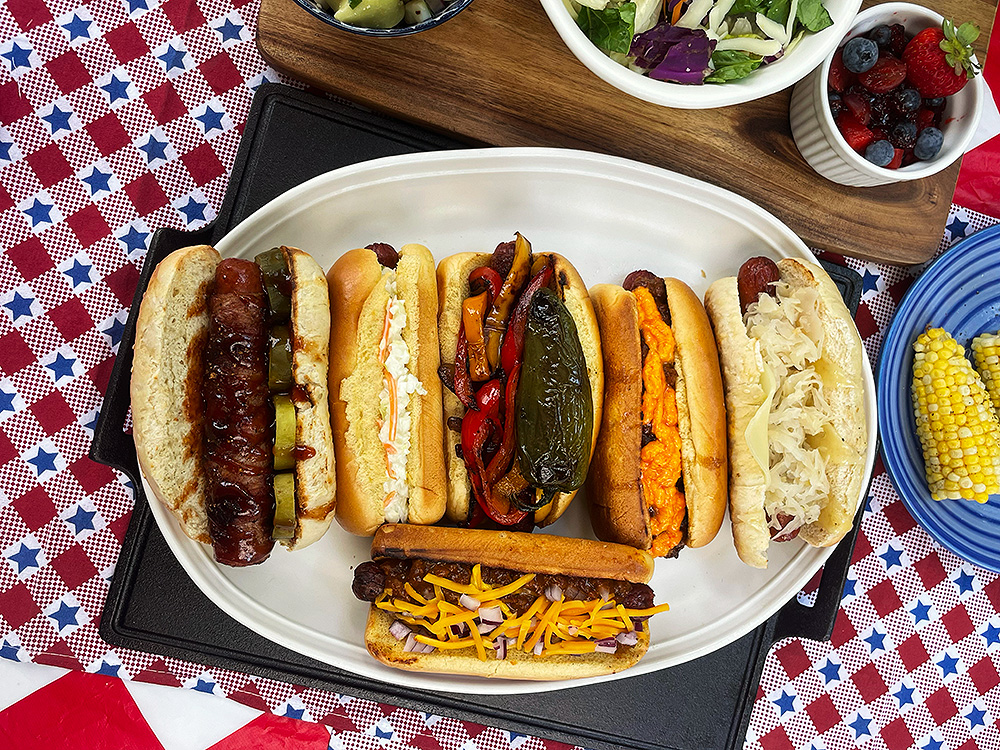
Since July is National Hot Dog Month, I decided to make six different American hotdogs. Some are classics, some are personal favorites, and all of them prove there’s more than one way to build a great dog.

Setting Up the Grill

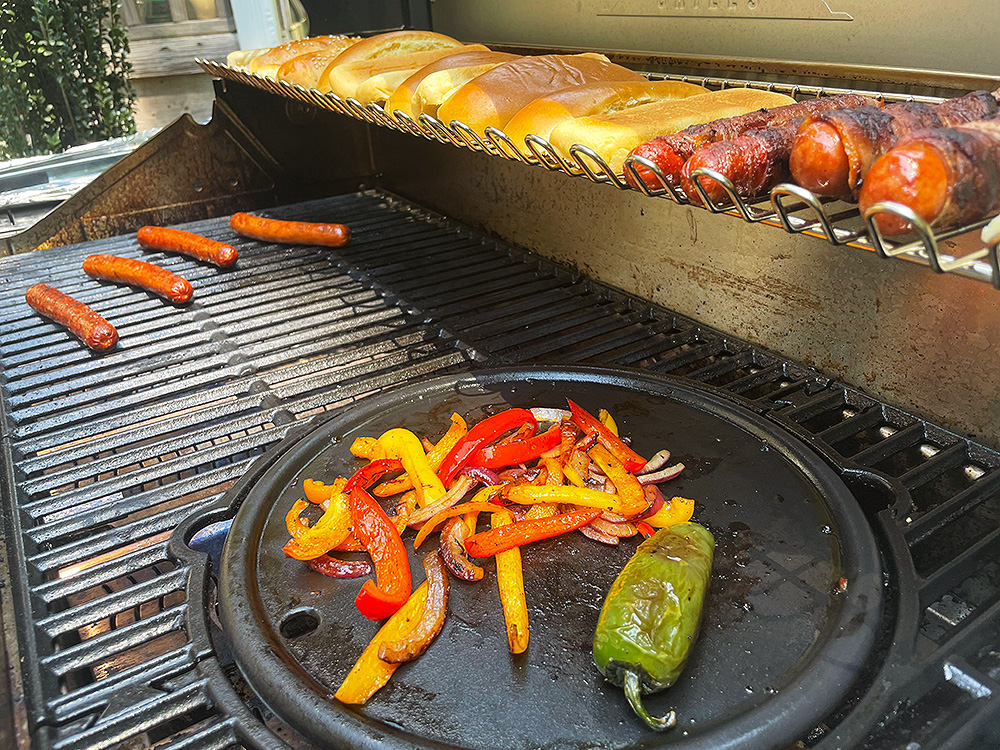
One of the things I wanted to take advantage of for this cook was the versatility of the Denali 605 Pro from Monument Grills. Besides its spacious cooking surface, the grill features a removable center cooking grate that can be swapped out for accessories. For this cook, I replaced it with Monument’s Round Cast Iron Cooking Plate.

Monument Grill Cast Iron Plate

Photo Credit: Daniel Hale


That gave me the best of both worlds. The hot dogs cooked over the main grill grates while the cast iron plate handled everything else. Onions and peppers caramelized, and the plancha was perfect for cooking the bacon-wrapped hot dogs without worrying about flare-ups. Having both cooking surfaces going at the same time made preparing six different hot dogs much easier than trying to juggle multiple pans indoors.

6 Regional American Hot Dogs

Frankie Frankk’s “Lou Dog”

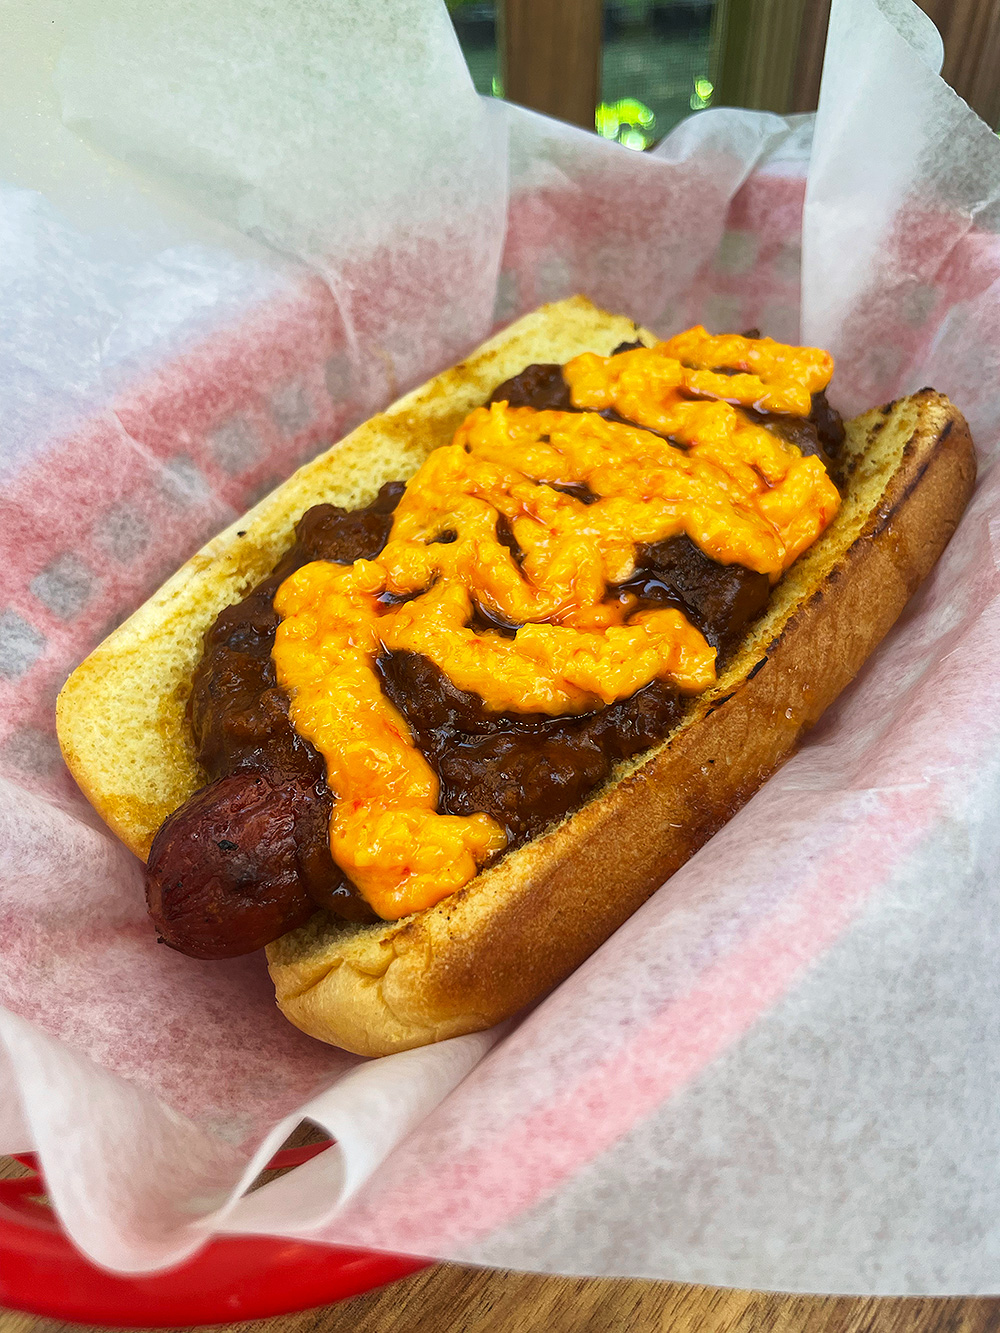
This one is special for me because it’s local. If you live in the Raleigh area, there’s a good chance you’ve heard of Frankie Frankk’s, a popular hot dog cart that’s developed a loyal following over the years. One of their signature creations is the Lou Dog, and while this isn’t an exact copy, it’s definitely inspired by it.

Frankie Frankk's Lou Dog

Photo Credit: Daniel Hale


Chili, pimento cheese, and a drizzle of hot honey works surprisingly well. The rich chili and creamy pimento cheese create a classic Southern flavor, while the hot honey adds just enough sweetness and heat.

The Barbecue Dog

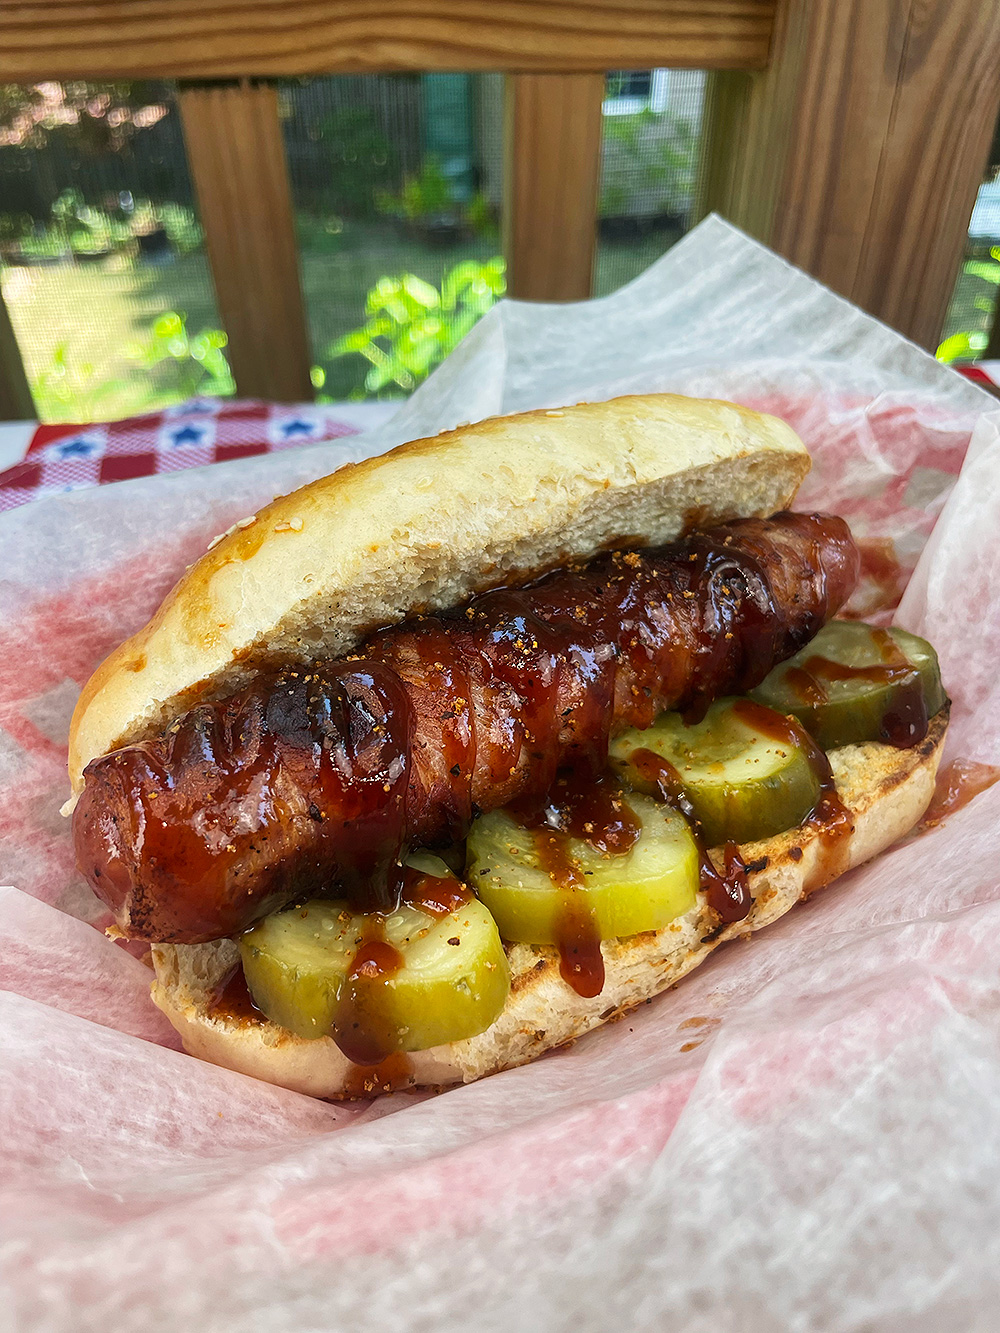
This one may not belong to any particular city, but it absolutely belongs on this list. I wrapped the hot dog in bacon, seasoned it with barbecue rub, and cooked it on the cast iron cooking plate until the bacon was crisp. After that came a brush of barbecue sauce and a handful of pickle chips.

The Barbecue Dog

Photo Credit: Daniel Hale


Smoky bacon, sweet and tangy barbecue sauce, a little extra seasoning, and crunchy pickles turn an ordinary hot dog into something that eats more like barbecue.

Kansas City Dog

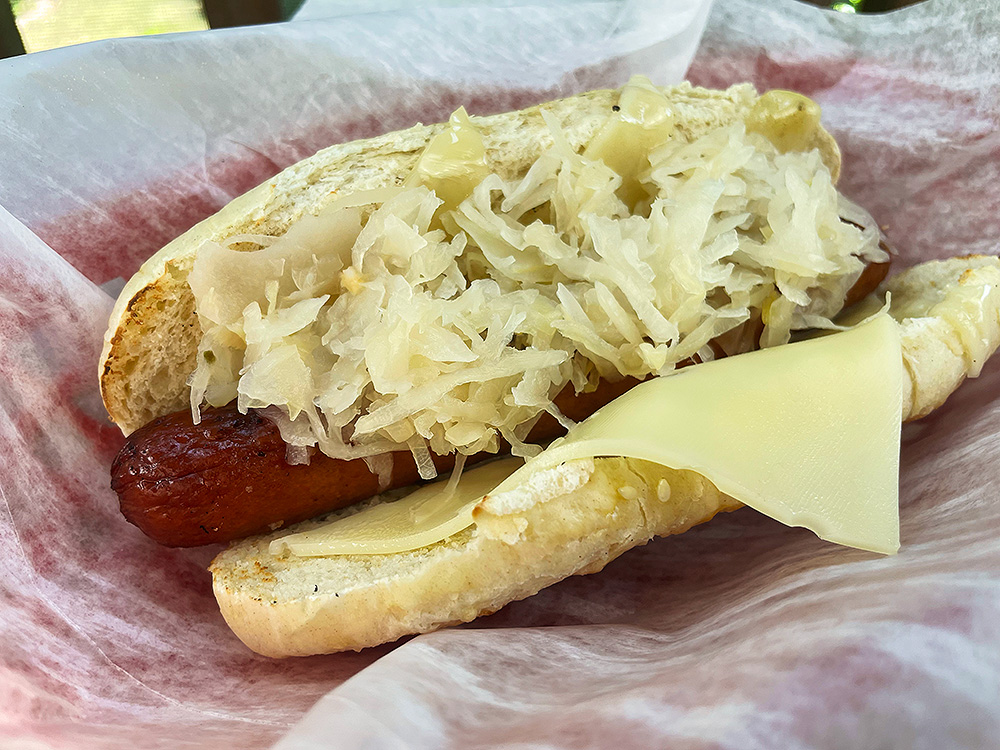
The Kansas City Dog keeps things relatively simple, but sometimes simple is exactly what works. Melted Swiss cheese and tangy sauerkraut are served on a sesame seed bun, creating a balanced combination.

The Kansas City Dog

Photo Credit: Daniel Hale


The sauerkraut cuts through the richness of the hot dog while the Swiss adds a mild, nutty flavor. It’s one of those combinations you probably wouldn’t think to make, but after one bite you’ll understand why it’s become a regional favorite.

Coney Dog

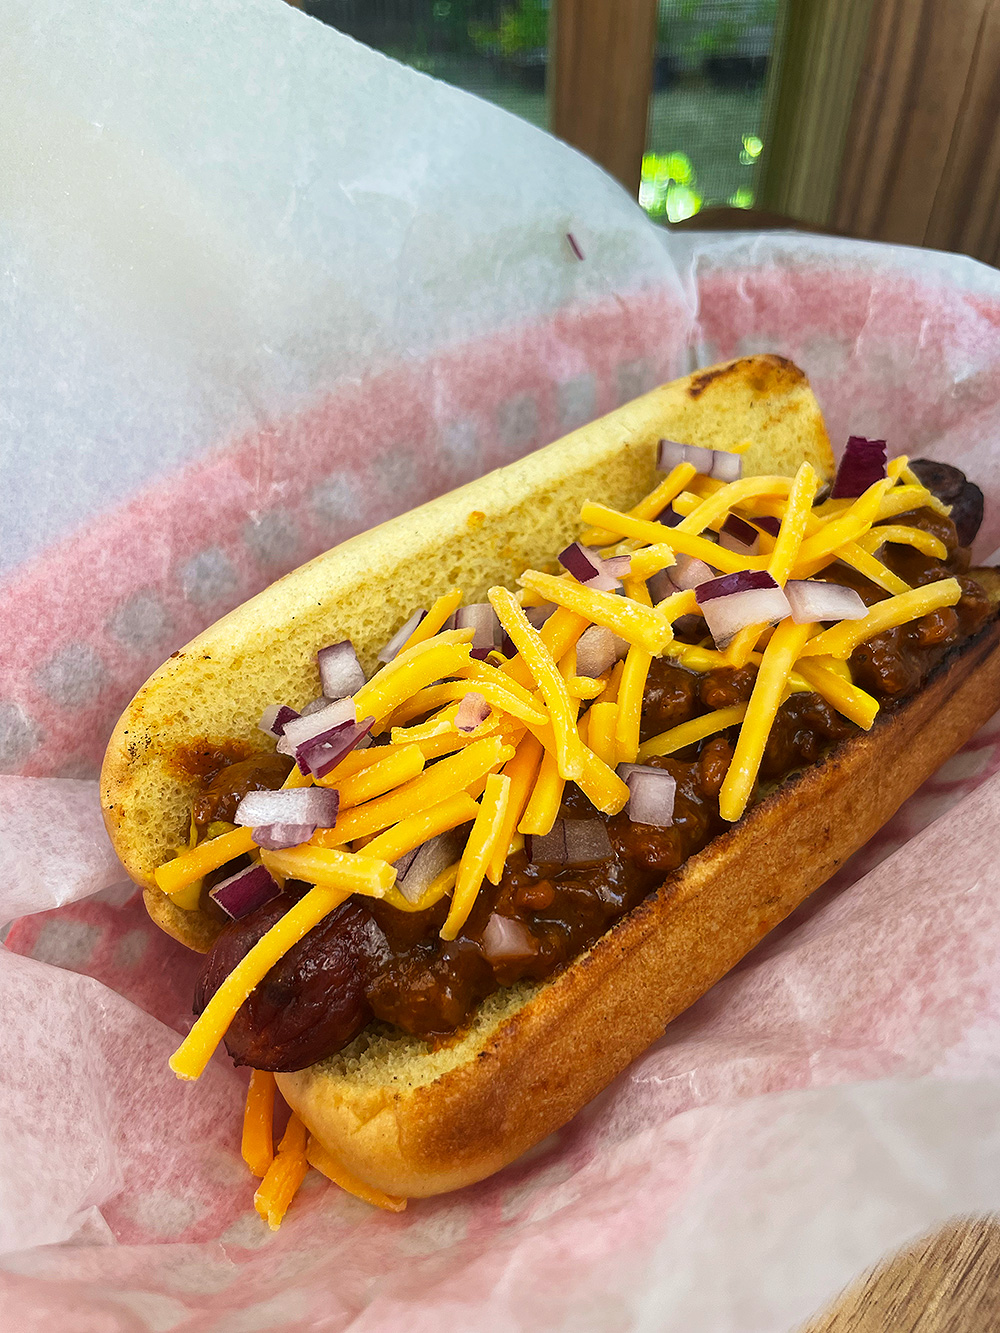
No list of iconic American hot dogs would feel complete without a Coney Dog. Not to be confused with Coney Island in Brooklyn, the Coney Dog is most closely associated with Detroit. Piled high with chili, chopped raw onions, yellow mustard, and shredded cheddar cheese, it’s messy, hearty, and worth every napkin you’ll need afterward.

The Coney Dog

Photo Credit: Daniel Hale


LA Street Dog

Speaking of messy, this one might be my favorite simply because of the memories it brings back. I grew up in Los Angeles, and bacon-wrapped street dogs were everywhere after concerts, sporting events, and nights out. You could smell them cooking from half a block away.

The LA Street Dog

Photo Credit: Daniel Hale


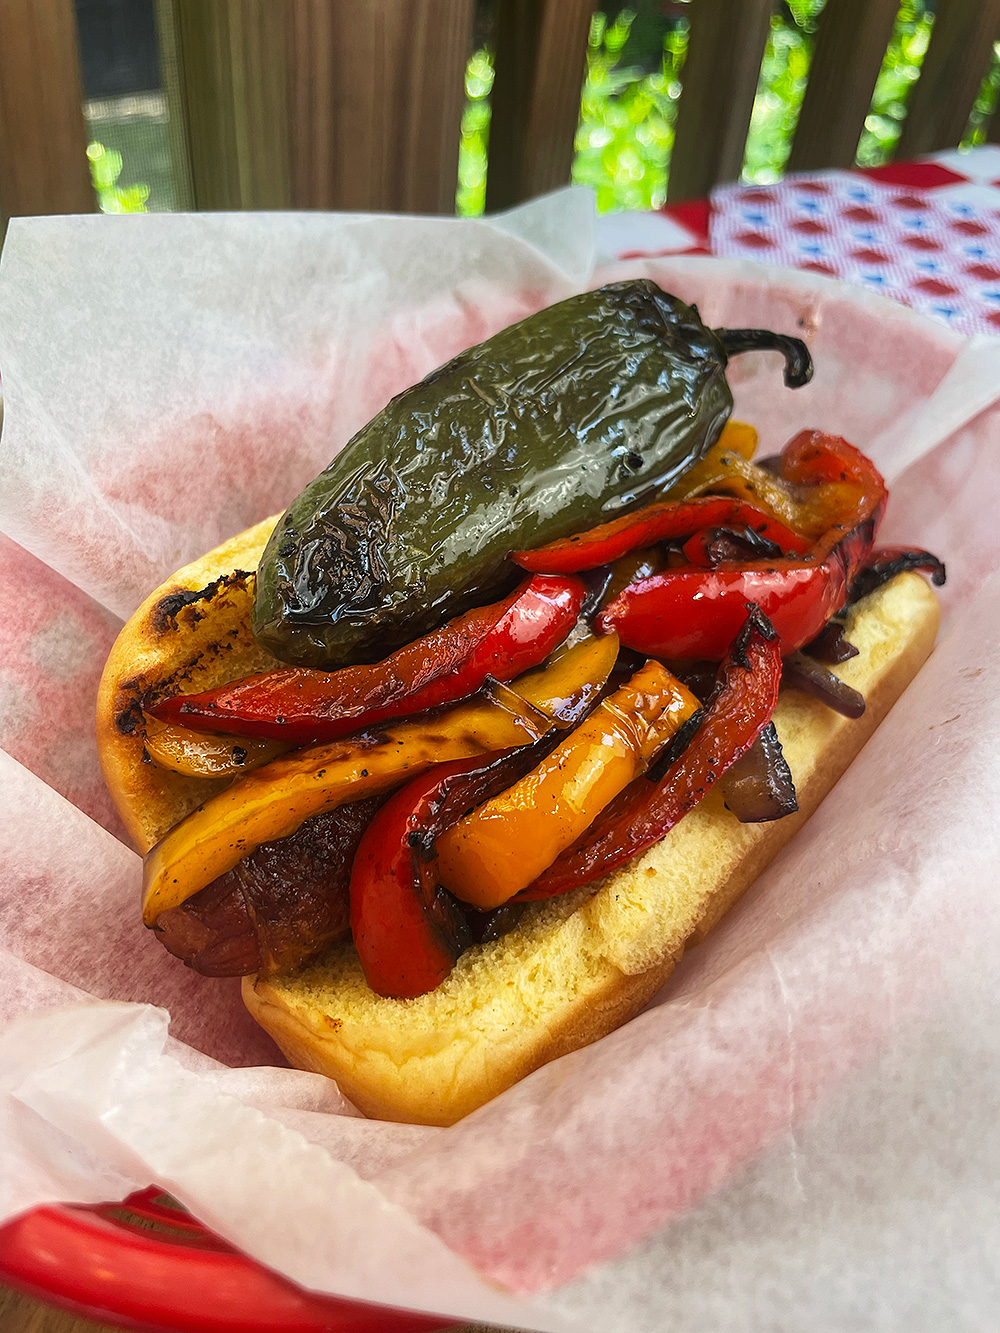
Wrapped in bacon and topped with grilled onions, peppers, mayonnaise, ketchup, mustard, and a whole jalapeño, this is definitely the biggest hot dog of the bunch. Cooking it on the cast iron plate made it easy to crisp the bacon while caramelizing the vegetables right beside it. One bite immediately transported me back to SoCal.

Southern Slaw Dog

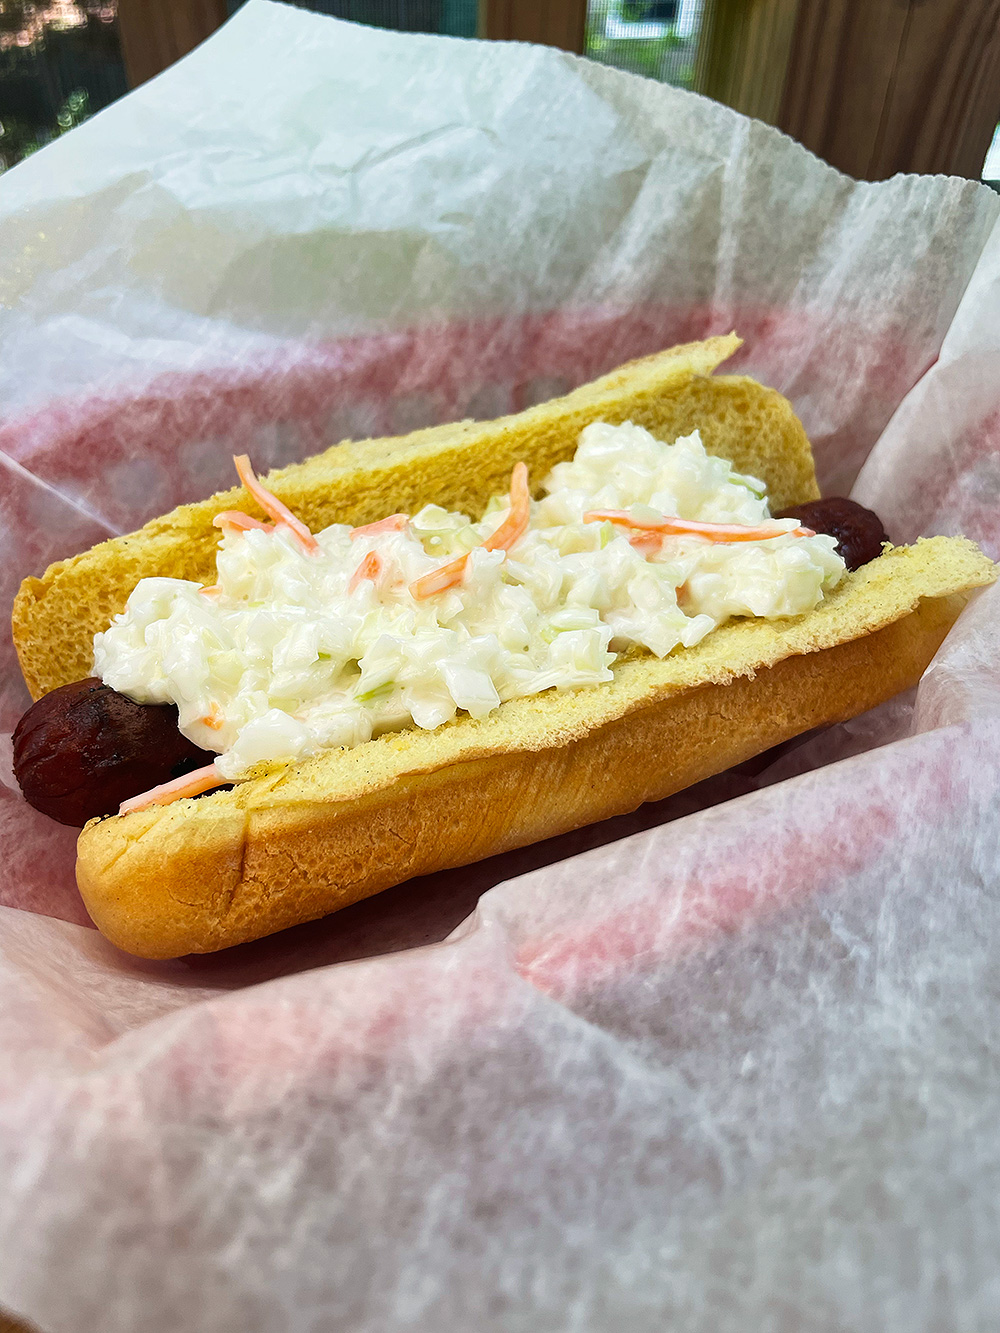
Sometimes less really is more. The Southern Slaw Dog skips all the extra toppings and lets creamy coleslaw do the work.

The Southern Slaw Dog

Photo Credit: Daniel Hale


Cool, crunchy slaw adds freshness and texture while complementing the smoky flavor of the grilled hot dog. Around the Carolinas, this combination has been a favorite for decades, and after one bite it’s easy to understand why.

Which One Will You Try First?

One of the best things about hot dogs is how personal they are. Every region has its own version, and every griller eventually finds a favorite combination. That’s what made this cook so much fun. It was simple, messy, and a good reminder that sometimes the best grilling ideas start with something as familiar as a hot dog.

Monument Grills - Hot Dogs

Photo Credit: Daniel Hale


The Denali 605 Pro made this cook especially enjoyable. I was able to grill the hot dogs on the main grates while cooking the vegetables and bacon-wrapped dogs on the Round Cast Iron Cooking Plate. It kept everything moving and made it easy to build six different hot dogs without juggling pans indoors. Thanks to Monument Grills for sponsoring this post.

Want to go deeper on the craft? Explore our grilling techniques and how-to guides for ribs, steak, chicken, seafood, and more.

Get Steven’s weekly grilling tips, seasonal recipes, and live-fire ideas in your inbox. Join our Up in Smoke newsletter. Sign up and get a FREE PDF of Steven Raichlen's Best Ribs Recipes Ebook.

Preorder Man On Fire — A Steven Raichlen Memoir. And get some really cool rewards!

Looking for more summer grilling inspiration? Check out our Summer Grilling Guide.

The post Grilling Across America: <br />6 Regional Hot Dogs I Love appeared first on Barbecuebible.com.
Honey-Glazed Hong Kong Wings on the Grill

Photo Credit: Daniel Hale


By Daniel Hale

International Chicken Wing Day is tomorrow. (Yes, that’s a thing.) And honestly, I don’t need much of an excuse to fire up the grill for chicken wings. This time, I went with Steven Raichlen’s Honey-Glazed Hong Kong Wings from The Barbecue Bible. Not even an out-of-nowhere rainstorm was going to stop me.

Why These Wings Work

I like these wings because they are simple. You get a lot of flavor from just garlic, salt, pepper, and honey—ingredients you probably already have on hand.

The prep is simple, too. You cut a few slashes into the meaty part of each wing so the seasoning can get in deeper, then season the wings and let them chill for a couple of hours. After some time in the fridge, I threaded them onto metal skewers, which made them much easier to flip and move around on the grill.

Setting Up the Grill

For this cook, I set up the Monument Eminence 605 for direct grilling over medium-high heat. Since the wings were skewered whole, they took up more room than separated flats and drumettes, so the wide cooking surface was a big help.

Honey-Glazed Hong Kong Wings On The Monument Grill

Photo Credit: Daniel Hale


I also liked having plenty of heat control. With honey-glazed wings, you want enough heat to crisp the skin, but not so much that the honey burns the second it hits the grill. The Eminence 605 gave me the room and control I needed to keep the wings moving and finish them with that sweet glaze at the end.

Cooking the Wings

Once the grill was hot, I arranged the skewered wings on the grill grates over direct heat. The skewers helped hold the wings in the extended position and made them easier to flip, which came in handy.

Of course, right when I started flipping the wings, an out-of-nowhere rainstorm rolled in. Perfect timing, right? But the Eminence held up well, and I was able to keep turning the wings and managing the heat without too many issues.

Monument Grills in the Rain

Photo Credit: Daniel Hale


The wings cooked for about 12 to 16 minutes total. I kept an eye on the thicker sections (165°F internal temperature) and moved the wings as needed so the skin could crisp without burning.

Glazing the Wings

Fortunately, the rain died down during the last few minutes of grilling. I then started brushing the wings with warm honey. This is where you need to pay attention. Honey can burn quickly over direct heat, so I waited until the wings were almost done before adding the glaze.

Adding the Honey Glaze to Chicken Wings.

Photo Credit: Daniel Hale


I kept turning the wings and brushing lightly until they had a nice color without letting the glaze get too dark.

The Results

These wings came off the grill with exactly what I was hoping for: crisp skin, a sweet honey glaze, and plenty of garlic and black pepper underneath. They are not heavy or saucy; they are simple grilled wings with a lot of flavor.

Honey-Glazed Hong Kong Wings

Photo Credit: Daniel Hale


A big thank-you to Monument Grills for sponsoring this cook. The Eminence 605 gave me the space and control I needed for skewered wings over direct heat—and it held up well when that surprise rainstorm rolled in.

Frequently Asked Questions

How long does it take to grill whole chicken wings?

Whole chicken wings usually take about 12 to 16 minutes over direct medium-high heat. The exact time depends on your grill, the size of the wings, and how often you turn them.

What temperature should grilled chicken wings reach?

Chicken wings should reach an internal temperature of at least 165°F in the thickest part of the meat. With wings, I like to make sure the thicker sections near the bone are fully cooked and the skin has had enough time to crisp.

Why do you brush the honey on at the end?

Honey can burn quickly over direct heat, so it should go on during the last few minutes of grilling. That gives the wings a glossy, lightly sweet glaze without letting the honey scorch.

Do I have to skewer the wings?

The skewers help hold whole wings open on the grill and make them easier to flip. Bamboo skewers work, but I used metal skewers, which made turning the wings simple and gave me more control over the cook.

Can I make this recipe with flats and drumettes instead of whole wings?

Yes, you can use separated flats and drumettes, but they may cook a little faster than whole wings. Keep an eye on them, turn them often, and brush with honey only near the end.

Plan your next cook with our full recipe collection—weeknight grills, weekend projects, and special-occasion feasts.

Get Steven’s weekly grilling tips, seasonal recipes, and live-fire ideas in your inbox. Join our Up in Smoke newsletter. Sign up and get a FREE PDF of Steven Raichlen's Best Ribs Recipes Ebook.

Preorder Man On Fire — A Steven Raichlen Memoir. And get some really cool rewards!

Looking for more summer grilling inspiration? Check out our Summer Grilling Guide.

The post Honey-Glazed Hong Kong Wings on the Grill appeared first on Barbecuebible.com.
❌