❌

Reading view

There are new articles available, click to refresh the page.

Sesame Chikki Recipe (Til Chikki Recipe)

Sesame chikki, also known as Ellu mittai or Til chikki, is a traditional Indian sweet made with sesame seeds and jaggery. It is a crunchy sweet to try during festivals like Diwali, Makar Sankranti and Lohri. Learn how to make this chikki at home with step-by-step pictures.Β  Sesame Chikki Recipe I have been waiting to...

Read More

The post Sesame Chikki Recipe (Til Chikki Recipe) appeared first on Yummy Tummy.

No Bake Chocolate Coconut Bars Recipe

If you're looking for a quick sweet treat without using the oven, these no-bake chocolate coconut bars are a great choice. They are made with just 5 ingredients oreo biscuits, chocolate, butter, condensed milk and coconut. Chocolate Coconut Bar I had a packet of multi coloured dried coconut on my pantry shelf for a while....

Read More

The post No Bake Chocolate Coconut Bars Recipe appeared first on Yummy Tummy.

Vendakkai Sambar | Ladies Finger Sambar

Vendakkai Sambar is one of those timeless South Indian dishes that makes its appearance almost every day, with a different vegetable. It is the simplest, comforting and flavor some side dish. If you are running late to office or your alarm missed waking you up, this vendakkai sambar is a perfect lunch dish when served with steamed rice and crispy potato fry.

vendakkai sambar served with potato fry

This evergreen dish is a wholesome pot consisting the richness of lentils, goodness of vegetables and the tanginess of imli (tamarind). This vendakkai sambar is generously served with ghee, papads or fryums and poriyal. This sambar pairs well with tiffin items like idli, dosa, pongal etc.

[feast_advanced_jump_to]

About Vendakkai Sambar

Vendakkai Sambar is a typical South Indian dish that is made with dal, spices and vendakkai (okra) and finished with tempering. Toor dal is one of the finest dal that is used to make sambar and the combination of okra with the sambar makes it a delectable dish.

While making this sambar, ensure the okra are slightly sautΓ©ed before adding to the sambar. This step brings down the stickiness while they are tender and soft. Simmer the sambar in low flame so that the ingredients blend together, releasing aroma.

Every sambar is layered with different flavor infusions which comes from the vegetable used. Tempering is one of the most important layer for making delicious sambar. You can add mustard seeds, asafetida, dried red chillies to hot oil for them to release their aroma and magic essence.

Every South Indian house have their own version of sambar. Some add a pinch of jaggery or fresh coconut to enhance the overall flavor of the sambar. The taste might change a little but vendakkai sambar is a traditional dish that is healthy, tasty and wholesome on the plate.

When I make sambar, I always prefer using homemade sambar powder just like how my mom use to make. I remember my mother handpicking the ingredients from the market and sun drying them on the terrace. And here I am, taking the tradition forward by making homemade sambar powder. As a sambar lover, I love experimenting with new styles and different vegetables.Β 

vendakkai sambar served with potato fry

Vendakkai Sambar Ingredients

  • Toor dal - Use quality toor dal for better taste. Soak the dal for at least 30 minutes before use for quick cooking.
  • Tomato - Used juicy and fresh tomatoes for additional flavors. SautΓ© till the raw smell goes away.
  • Ladies finger (Vendakkai) - Use long and fresh ones. Wash them and wipe them with a kitchen napkin before cutting them into medium-sized pieces.
  • Sambar powder - I have used homemade sambar powder. You can use store-bought.
  • Turmeric powder - I have used homemade turmeric powder for extra aroma and color. You can use the store bought as well.
  • Thin tamarind pulp - Thin, runny pulp works the best for this sambar.
  • To temper:
  • Mustard seeds - Add the seeds only after the oil is ready. They need to pop up.
  • Split Urad dal - Another important tadka ingredient for earthy flavors.
  • Small onion - Peel the onions and add them along with the other ingredients. SautΓ© them till they are transparent.
  • Hing - A pinch of hing is used. It adds aroma and helps in digestion.
  • Curry leaves - A South Indian dish is incomplete without curry leaves. Add a handful of the leaves for its fragrance.
  • Fenugreek seeds - These seeds are added when the oil is hot. They help for easy digestion.

Why This Recipe Works

  • A healthy and comforting dish
  • One pot dish
  • Vegetarian and protein-rich dish
  • Works best with steamed rice and tiffin items
  • Can be customized with any vegetable
  • Easy recipe for beginners

Similar Recipes

How to make Vendakkai Sambar Step by Step

1.Rinse ladies finger well, Β wipe off the moisture with a kitchen towel or tissue. Trim both the ends of the veggie.

how to make vendakkai sambar step1

2.Chop int 1 inch pieces. Now heat a non stick pan and sautΓ© ladies finger till the color changes slightly browned. By this time sliminess and stickiness would have reduced. Set aside.

how to make vendakkai sambar step2

3.Pressure cook toor dal with enough water for at least 5 whistles or until mushy. Once pressure releases mash it up well with a ladle, Set aside. Heat oil in a pressure cooker - add the items listed under 'to temper' let it splutter. Then add small onion, tomato and sautΓ© till raw smell of tomato leaves.

how to make vendakkai sambar step3

4.Add ladies finger along with turmeric powder and sambar powder. SautΓ© for 2 minutes. Add required salt.

how to make vendakkai sambar step4

5.Then add cooked dal along with little water and let it boil in low medium flame until ladies finger is cooked.

how to make vendakkai sambar step5

6.Now add tamarind water and let it boil for 5mins in low flame. Add chopped coriander leaves generously and switch off.

how to make vendakkai sambar step6

Serve with hot rice and any veggie of your choice.

vendakkai sambar served with potato fry

Expert Tips

  • Dry the Okra Well - Wash and dry the okra well. This will help in reducing the sliminess while cooking.
  • Cut them evenly - Don't chop them too small or they might open up. Chop them evenly so they are cooked well.
  • SautΓ© well - This is an important step. Slightly saute okra in a little oil before adding to the sambar. This helps lifting the taste of the sambar also reduce stickiness okra.
  • Tamarind extract - Use fresh tamarind extract for the tang. I have used homemade extract.
  • Cook Toor dal - Cook the dal till it's soft and mushy. This gives sambar a rich and creamy consistency.
  • Tempering - Tempering brings the entire dish together, blending the aroma and the flavor. You can even temper in ghee for additional taste and flavor.
  • Cookware - Use a heavy-bottomed pot or a kadai so the sambar doesn't get burnt while simmering. I have used a pressure cooker to simmer the sambar.
  • Garnishing - Garnish with fresh finely chopped coriander leaves just before serving.
  • A dollop of ghee - Add a dollop of ghee right before serving. It adds richness, and aroma and tastes best when mixed with hot rice.

Serving & Storage

Serve Vendakkai Sambar hot with steamed rice and a dollop of ghee for a flavorful meal. It is paired well with potato poriyal, raw banana fry, and carrot beans poriyal. You can serve this vendakkai sambar with tiffin items as well. Garnish it with coriander leaves before serving to add freshness.

Store the leftover sambar in an airtight container in the fridge for up to 3 days. Reheat gently. Splash water if the sambar has thickened in the fridge. It is not advisable to freeze vendakkai sambar as the texture may change.

FAQS

1.Can I use store-bought sambar powder?

Yes, you can. However, homemade sambar gives an authentic flavor and taste.

2.How do I prevent okra from becoming slimy?

Wash and pat the okra dry after washing them. Cut them into medium pieces and sautΓ© them in a little oil which reduces sliminess. Add them to the sambar and simmer in low flame.

3.What should be the consistency of my Sambar?

The consistency of the sambar should be balanced. Not too thick, not too runny. If it is thick, add hot water and simmer. If it's too watery, let it simmer uncovered until it slightly thickens.

4.What can I replace okra with?

You can replace okra with drumstick, brinjal, carrot, ashgourd, pumpkin etc.

vendakkai sambar served with potato fry

If you have any more questions about this Vendakkai Sambar Recipe do mail me at sharmispassions@gmail.com. In addition, follow me on Instagram,Β Facebook,Β PinterestΒ ,YoutubeΒ andΒ TwitterΒ .

Tried this Β Vendakkai Sambar Recipe? Do let me know how you liked it. Also tag us on Instagram @sharmispassions and hash tag it on #sharmispassions.

πŸ“– Recipe Card

15922237815 f435c7da0f o
Print

Vendakkai Sambar Recipe | Ladies Finger Sambar Recipe

Vendakkai Sambar is one of those timeless South Indian dishes that makes its appearance almost every day, with a different vegetable. It is the simplest, comforting and flavor some side dish. If you are running late to office or your alarm missed waking you up, this vendakkai sambar is a perfect lunch dish when served with steamed rice and crispy potato fry.
Course Lunch, Side Dish
Cuisine Indian
Keyword 30 mins recipes, Gravy, gravy recipes, hotel sambar recipe, idli sambar, idli sambar recipe, lunch box menu, lunch box recipes, lunch recipes, lunchbox recipes, sambar, sambar recipes, veg recipes, vegetable
Prep Time 10 minutes
Cook Time 20 minutes
Total Time 30 minutes
Servings 2
Calories 223kcal
Author Sharmilee J

Ingredients

  • Β½ cup toor dal
  • 1 small tomato
  • 12-15 ladies finger
  • 1 heaped teaspoon sambar powder
  • 2 pinches turmeric powder
  • β…› cup thin tamraind pulp
  • water as required
  • salt to taste

To temper:

  • 2 teaspoon oil
  • Β½ teaspoon mustard seeds
  • Β½ teaspoon split urad dal
  • 8 small onion
  • ΒΌ teaspoon hing
  • 1 small sprig curry leaves
  • ΒΌ teaspoon fenugreek seeds

Instructions

  • Rinse ladies finger well, Β wipe off the moisture with a kitchen towel or tissue. Trim both the ends of the veggie.
  • Chop int 1 inch pieces. Now heat a non stick pan and saute ladies finger till the color changes slightly browned. By this time sliminess and stickiness would have reduced. Set aside.
  • Pressure cook toor dal with enough water for at least 5 whistles or until mushy. Once pressure releases mash it up well with a ladle, Set aside.
  • Heat oil in a pressure cooker - add the items listed under 'to temper' let it splutter. Then add small onion, tomato and saute till raw smell of tomato leaves.
  • Add ladies finger along with turmeric powder and sambar powder. SautΓ© for 2 minutes. Add required salt.
  • Then add cooked dal along with little water and let it boil in low medium flame until ladies finger is cooked.
  • Now add tamarind water and let it boil for 5 minutes in low flame. Add chopped coriander leaves generously and switch off.
  • Serve Vendakkai Sambar with hot rice and any veggie of your choice.

Notes

  • Dry the Okra Well - Wash and dry the okra well. This will help in reducing the sliminess while cooking.
  • Cut them evenly - Don't chop them too small or they might open up. Chop them evenly so they are cooked well.
  • SautΓ© well - This is an important step. Slightly sautΓ© okra in a little oil before adding to the sambar. This helps lifting the taste of the sambar also reduce stickiness okra.
  • Tamarind extract - Use fresh tamarind extract for the tang. I have used homemade extract.
  • Cook Toor dal - Cook the dal till it's soft and mushy. This gives sambar a rich and creamy consistency.
  • Tempering - Tempering brings the entire dish together, blending the aroma and the flavor. You can even temper in ghee for additional taste and flavor.
  • Cookware - Use a heavy-bottomed pot or a kadai so the sambar doesn't get burnt while simmering. I have used a pressure cooker to simmer the sambar.
  • Garnishing - Garnish with fresh finely chopped coriander leaves just before serving.
  • A dollop of ghee - Add a dollop of ghee right before serving. It adds richness, and aroma and tastes best when mixed with hot rice.

Nutrition

Serving: 75g | Calories: 223kcal | Carbohydrates: 36g | Protein: 11g | Fat: 5g | Saturated Fat: 1g | Polyunsaturated Fat: 1g | Monounsaturated Fat: 3g | Trans Fat: 0.01g | Sodium: 41mg | Potassium: 412mg | Fiber: 10g | Sugar: 6g | Vitamin A: 898IU | Vitamin C: 24mg | Calcium: 97mg | Iron: 3mg

The post Vendakkai Sambar | Ladies Finger Sambar appeared first on Sharmis Passions.

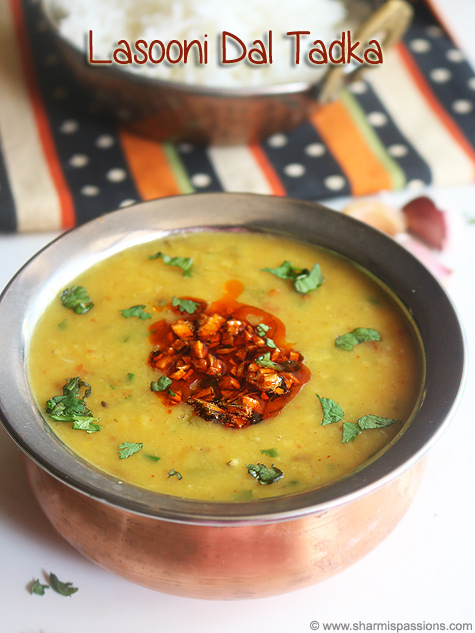
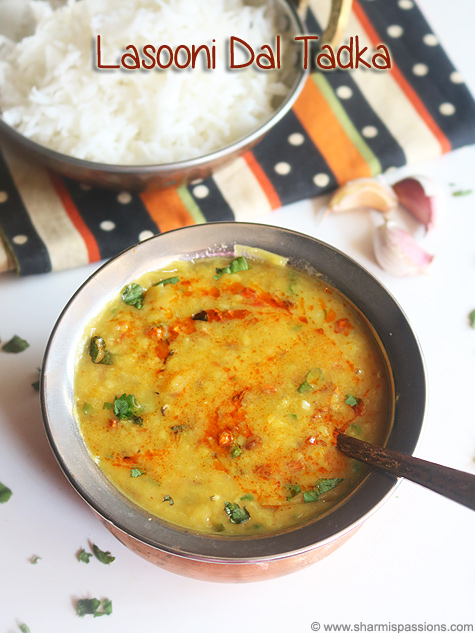
Lasooni Dal Tadka | Garlic Dal

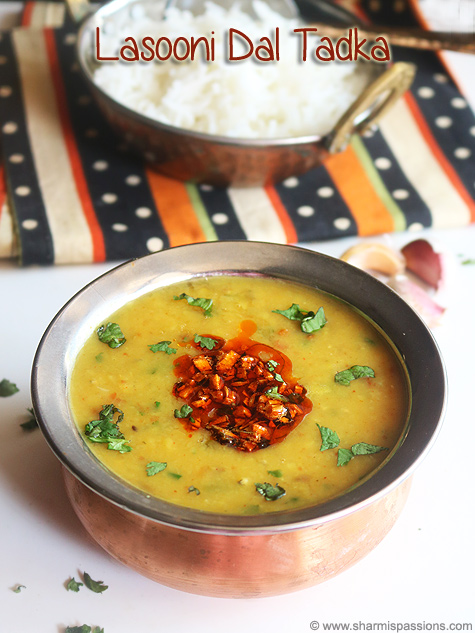
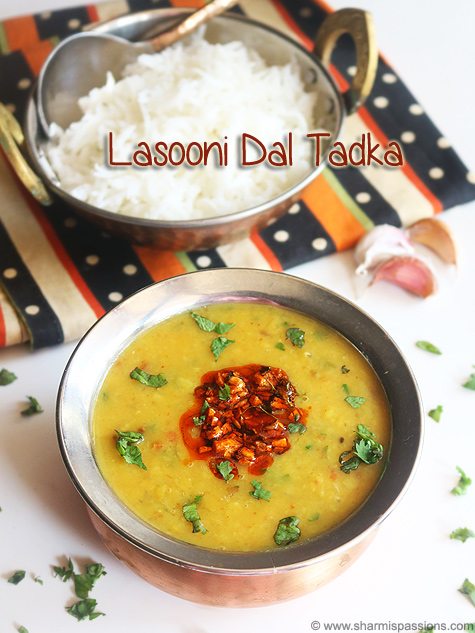
Lasooni Dal Tadka is a simple dal curry made with toor dal and masoor dal cooked together till soft and creamy. It comes out in a beautiful golden colour with a garlic flavour from tadka on top, and this strong garlic flavour is what makes this dal really different from regular dal.Β 

lasooni dal served with rice

This dal is quick to make because it comes together in about 30 to 40 minutes, and it uses two dal varieties together which gives it better taste and texture. It is not too spicy so kids enjoy it, and it gives a nice homemade comfort feeling to any meal you make.

[feast_advanced_jump_to]

About Lasooni Dal Tadka

Lasooni Dal Tadka is a traditional Indian dal made with basic ingredients. It is mild, creamy, and the hot garlic tadka makes it so much more flavourful and special. The tadka has garlic, cumin, methi and chillies which bringa strong flavour and nice aroma to the dal.

The dal recipe tastes warm and comforting and it goes so well with rice or roti and feels light but filling at the same time. You can just make it thick or thin based on what you prefer, you can add more water if you like it lighter or cook it longer for thicker consistency.

The tadka just tastes good when you make it fresh and hot but you can also prepare it ahead and keep it separate till you are ready to serve.Β You can make it any day when you want something tasty but quick to prepare for the family.

I usually make this when I want something quick but tasty for family instead of making regular dal again.Β 

Similar Recipes

lasooni dal served with rice

Lasooni Dal Tadka Ingredients

  • Toor Dal - I use toor dal as main dal in this recipe and it gives creamy texture and mild flavour when cooked properly, making the base of dal soft and smooth.
  • Masoor Dal - Masoor dal is added along with toor dal for better taste and it also cooks faster than toor dal, it adds slight natural sweetness to whole mixture.
  • Garlic - I use fresh garlic while cooking dal and also in tadka, garlic gives dal its strong flavour and nice aroma.
  • Onion - Chopped onion is added while cooking dal and it gives slight sweetness and adds more flavour to base, making dal taste richer and complete.
  • Tomato - I add tomato for colour, and it helps balance all flavours in dal so everything tastes well together.
  • Green Chilli - I added this for mild heat and freshness, you can adjust the quantity based on how much heat you prefer.
  • Turmeric Powder - Turmeric adds colour and warm earthy flavour to whole dal.
  • Ghee - I use ghee for tadka as it brings out flavour of garlic and cumin nicely when heated.
  • Cumin Seeds - Cumin seeds crackle in hot ghee and gives nice nutty flavour to tadka.
  • Hing - Just a pinch of hing adds depth and traditional flavour to tadka.
  • Kasoori Methi - Gives light herbal flavour and aroma to the dish, even small amount makes big difference to the taste.
  • Red Chilli Powder - I added for heat and colour to tadka, you can adjust it based on how spicy you like your dal to be.

How to make Lasooni Dal Tadka Step by Step

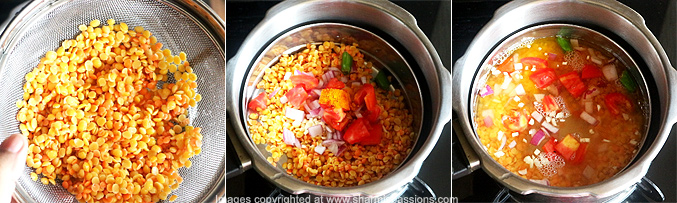
1.Rinse and drain dal, add to pressure cooker. Add chopped garlic, onion, tomato, green chilli, turmeric powder and water.

how to make lasooni dal step1

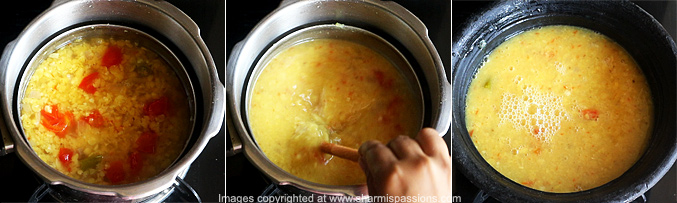
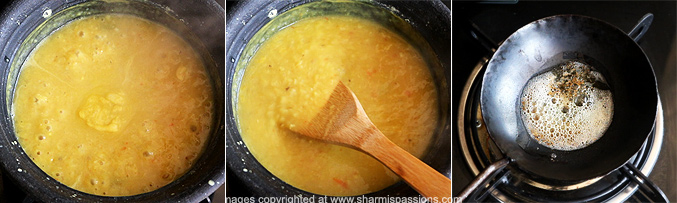
2.Pressure cook in low medium flame for 5 whistles. Mash the dal well. Transfer to another vessel.I used my black mud pot. Add little water.

how to make lasooni dal step2

3.Simmer and let it boil until thick and creamy. Add required salt.Meanwhile prepare the tadka.Heat ghee in a tadka pan - add jeera let it crackle.

how to make lasooni dal step3

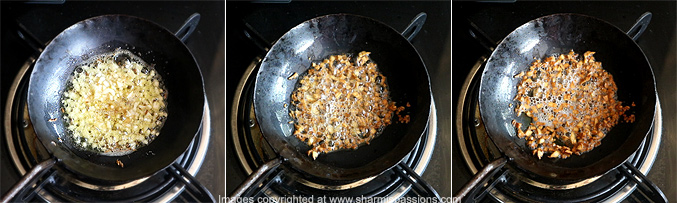
4.Add chopped garlic and fry till golden brown. Do not burn it, Switch off the flame.

how to make lasooni dal step4

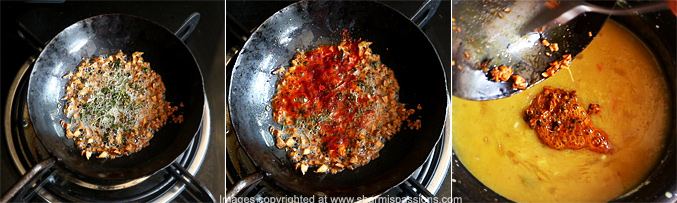
5.Add kasoori methi and red chilli powder. Mix well and transfer tadka to dal.

how to make lasooni dal step5

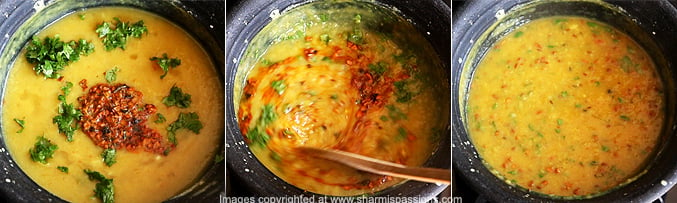
6.Add chopped coriander leaves, mix well and switch off.

how to make lasooni dal step6

Serve hot with basmati rice and ghee!

lasooni dal served with rice

Expert Tips

  • Pressure Cooking Dal - I pressure cook dal till it is soft and mashable, then mash it well so dal becomes creamy and smooth without any lumps in it.
  • Tadka Timing - I always make tadka just before serving dal because fresh and hot tadka tastes much better than tadka made ahead of time and aroma is nicer too.
  • Garlic Browning - I heat ghee well before adding garlic so it browns nicely and smells good, you should not burn it because burnt garlic tastes bitter and spoils the dal.
  • Getting Right Consistency - I simmer dal after mashing till it become creamy and smooth, if it becomes too thick then I add little hot water to loosen it up properly.
  • Using Both Dals - Using both toor dal and masoor dal together gives better taste and texture than using only one dal by itself, each dal bring something different to recipe.

Serving and Storage

Serve this dal hot with plain rice and ghee or with roti and other mild dishes. It also go well with idli, dosa, pongal or upma and taste so good with any of these sides. Store leftovers in the fridge andΒ  just reheat gently before serving.

FAQS

1. Can I use only one dal?

Yes you can use only toor dal or masoor dal if thats what you have at home. But using both together gives better flavour and texture.

2. Can I skip kasoori methi?

Yes you can skip it if you do not have it at home. Dal tastes good without it also but kasoori methi gives nice herbal flavour to tadka that makes it taste more authentic.

3. Can I use moong dal?

Yes moong dal works fine and gives slightly different taste because it has its own unique flavour.Β 

4. Can I make tadka ahead?

Yes you can make it few hours ahead if you busy. But it tastes best when made fresh and added hot to dal just before serving.

5. How do I make dal creamy?

Cook dal till soft and mash it well with the back of spoon. Then simmer on low flame for few more minutes after mashing so it become thick and creamy.

lasooni dal served with rice

If you have any more questions about this Lasooni Dal Tadka Recipe do mail me at sharmispassions@gmail.com. In addition, follow me on Instagram,Β Facebook,Β PinterestΒ ,YoutubeΒ andΒ TwitterΒ .

Tried this Lasooni Dal Tadka Recipe ? Do let me know how you liked it. Also tag us on Instagram @sharmispassions and hash tag it on #sharmispassions.

πŸ“– Recipe Card

LasooniDalTadka3
Print

Lasooni Dal Tadka | Garlic Dal

Lasooni Dal Tadka is a simple dal curry made with toor dal and masoor dal cooked together till soft and creamy. It comes out in a beautiful golden colour with a garlic flavour from tadka on top, and this strong garlic flavour is what makes this dal really different from regular dal.Β 
Course Lunch
Cuisine Indian
Keyword curry, curry recipes, dal recipes, fry, garlic recipes, Gravy, gravy recipes, lunch box menu, lunch box recipes, lunch recipes, lunchbox recipes, recipes, restaurant style recipes, veg recipes
Prep Time 5 minutes
Cook Time 25 minutes
Total Time 30 minutes
Servings 2 people
Calories 260kcal
Author Sharmilee J

Ingredients

  • β…“* cup toor dal
  • 2* tablespoon masoor dal
  • 1 teaspoon garlic
  • 2 tablespoon onion
  • Β½ small sized tomato
  • 1 no green chilli
  • ΒΌ teaspoon turmeric powder
  • 1 and Β½ cups + ΒΌ cup water

For the tadka:

  • 1 and Β½ tablespoon ghee
  • 2 tablespoon garlic minced
  • 1 teaspoon cumin seeds
  • a pinch hing
  • Β½ teaspoon kasoori methi
  • Β½ teaspoon red chilli powder

* Both the dals together should measure Β½ cup

Instructions

  • Rinse and drain dal, add to pressure cooker. Add chopped garlic, onion, tomato, green chilli, turmeric powder and 1 and Β½ cups of water.
  • Pressure cook in low medium flame for 5 whistles. Mash the dal well. Transfer to another vessel. I used my black mud pot. Add ΒΌ cup water.
  • Simmer and let it boil until thick and creamy. Add required salt.
  • Meanwhile prepare the tadka. Heat ghee in a tadka pan - add jeera let it crackle.
  • Add chopped garlic and fry till golden brown. Do not burn it. Switch off the flame.
  • Add kasoori methi and red chilli powder. Mix well and transfer tadka to dal.
  • Add chopped coriander leaves, mix well and switch off.
  • Serve Lasooni Dal Tadka hot with basmati rice and ghee!

Video

Notes

  • Pressure Cooking Dal - I pressure cook dal till it is soft and mashable, then mash it well so dal becomes creamy and smooth without any lumps in it.
  • Tadka Timing - I always make tadka just before serving dal because fresh and hot tadka tastes much better than tadka made ahead of time and aroma is nicer too.
  • Garlic Browning - I heat ghee well before adding garlic so it browns nicely and smells good, you should not burn it because burnt garlic tastes bitter and spoils the dal.
  • Getting Right Consistency - I simmer dal after mashing till it become creamy and smooth, if it becomes too thick then I add little hot water to loosen it up properly.
  • Using Both Dals - Using both toor dal and masoor dal together gives better taste and texture than using only one dal by itself, each dal bring something different to recipe.

Nutrition

Serving: 75g | Calories: 260kcal | Carbohydrates: 29g | Protein: 11g | Fat: 12g | Saturated Fat: 7g | Polyunsaturated Fat: 1g | Monounsaturated Fat: 3g | Cholesterol: 29mg | Sodium: 50mg | Potassium: 257mg | Fiber: 5g | Sugar: 2g | Vitamin A: 428IU | Vitamin C: 8mg | Calcium: 71mg | Iron: 3mg

The post Lasooni Dal Tadka | Garlic Dal appeared first on Sharmis Passions.

Banana Chocolate Chip Cake Squares Recipe

Banana chocolate chip cake squares are soft, moist and delicious banana flavoured cake with gooey chocolate chips in every bite. If you love my classic banana cake, you will definitely enjoy these easy banana squares too. They are simple to make and are perfect for breakfast, snack time or as a quick dessert.Β  Banana Chocolate...

Read More

The post Banana Chocolate Chip Cake Squares Recipe appeared first on Yummy Tummy.

❌