Today, in this post i will be sharing my write-up on Admin panel bypass that I have found while doing my regular bug bounty
This write-up is very unique, because it does not need authentication at first place and it does not require any sort of response manipulation, no brute force, and no old school stuff.
While testing a target, I came across a subdomain that was an admin panel, upon inspection I thought it was hard to get into and better to leave, as it requires a valid username and then a valid phone number linked to that, after that it sends an OTP to that mobile number, then it will grant access to the Admin Panel.
Let's Break the Application's Logic
When you visit the subdomain (Admin panel), it asks you to enter the Username. If the Username is Valid then it will ask you to enter the valid Phone number connected to the username. If the phone number is found, then it will send an OTP, after OTP verification is successful it grant access to the Admin panel.
The most difficult part is guessing the username and a valid phone number. If you send multiple requests, then WAF will block you, and it is challenging to brute force.
The application is running on PHP., I thought I could give it a try for SQL injection, but it failed.
Its Time to exploit
Upon observing the HTTP requests and Responses from Burp's Proxy History, after entering a valid Username admin, it redirected to the phone.php page there we have to enter a valid phone number and OTP
Now, in the phone.php page we have to enter a valid phone no and a valid OTP, to my surprise, the phone number was hardcoded in the response itself. In the source code of the page in JavaScript, I used the phone number and sent an OTP to that number
After analysing the source code (view-source), I have noticed that it was only validating the OTP on the client side. If the OTP is valid, then it redirects the User to set a password, for me I cannot access the OTP, since it was sent to the admin.
Out of curiosity, I have opened the page setpass.php
Now it asked for a new password and a confirmation password. I set a random password and submitted. The application successfully processed the request
Now I came back to the login page, and entered the username and the newly set password. Boom, it redirected me to the dashboard. For some reasons I cannot show you the internal admin panel screenshots
ICMP (Internet Control Message Protocol) is crucial for network communication and primarily for error reporting and diagnostics. It facilitates the exchange of control messages, helping to identify connectivity issues, unreachable destinations, and routing problems. ICMP tools like ping and traceroute are essential for troubleshooting, ensuring efficient data transmission, and maintaining network health.
Understanding the Basics of ICMP
ICMP, or Internet Control Message Protocol, is a vital network communication component. It is used for diagnostic purposes and assists in error reporting and network device querying. ICMP plays a crucial role in maintaining the health and efficiency of networks, making it indispensable for IT professionals and network administrators. Without ICMP, diagnosing and resolving network issues would be much more complicated and time-consuming.
The protocol operates within the Internet Protocol (IP) suite and is primarily used to send error messages indicating unreachable network locations, congestion, and connectivity failures. It also provides a means for diagnostic and query messages, helping network devices communicate operational data. This communication ensures that all network parts can sync correctly and any issues can be flagged and addressed promptly.
Common ICMP Messages and Their Purposes
ICMP messages are varied, and each serves a particular purpose in network diagnostics and maintenance:
• Echo Request and Echo Reply: The command called "ping," which determines whether a host on an IP network can be reached, has made these signals generally recognized. When you "ping" a device, an echo request is sent, and if the device is reachable, it sends back an echo reply. This simple interaction can confirm connectivity and measure round-trip time.
• Destination Unreachable: This message indicates that a destination is unreachable, alerting about routing issues, blocked ports, or the absence of a route to the destination. Each subtype of this message provides specific details about why the destination cannot be reached, helping network administrators troubleshoot the problem.
• Time Exceeded: Often seen in traceroute operations, this message alerts when a data packet's time-to-live (TTL) has expired. The TTL value is a counter that decrements every time the packet passes through a router. A time-exceeded message is returned, and the packet is deleted if it approaches zero. This helps identify routing loops or excessively long routes.
The Role of Ping in Network Diagnostics
The ping command, utilized by ICMP echo request and reply messages, is one of the most ubiquitous tools in network diagnostics. Ping waits for an echo response after sending an ICMP echo request to the intended host. The time for the round trip is recorded, providing a measure of reachability and latency. This tool can quickly determine whether a server is down or network latency affects performance. Consider reading this article for an in-depth look at how ping works and its applications.
Ping's simplicity makes it accessible even to those with limited networking knowledge, providing a straightforward method to check connectivity. However, experienced IT professionals use it more sophisticatedly, such as scripting ping tests to monitor network stability over time or using ping options to test different packet sizes and intervals.
Utilizing Traceroute for Network Path Analysis
Traceroute leverages ICMP time-exceeded messages to map the path packets take to reach a destination. By incrementing the TTL value of successive packets, the traceroute receives a time-exceeded message from each hop along the route. This maps out a packet's entire path through the network, indicating where delays or failures occur. This is crucial for identifying network bottlenecks and diagnosing complex routing issues.
For example, if there's a delay in a particular network segment, traceroute can pinpoint precisely where it happens, allowing network administrators to address the issue at its source. This diagnostic tool is essential in large network environments where multiple paths to various destinations exist, and identifying the exact route a packet takes can mean the difference between a quick fix and prolonged downtime.
ICMP and Network Security
While ICMP is essential for network maintenance, it presents potential security risks. Malicious actors might exploit ICMP for reconnaissance attacks, such as mapping out network topologies or discovering active IP addresses. To counter these threats, network administrators configure firewalls to allow only necessary ICMP traffic while blocking potentially harmful messages. This article provides an overview of how ICMP can be used in attacks and how to mitigate them.
Effective ICMP management involves setting specific firewall rules that permit diagnostic messages needed for network operations but deny those that could be used for surveillance. This selective filtering helps balance operational efficiency and security, ensuring the network remains accessible for legitimate purposes while being safeguarded against unauthorized probing.
Configuring Firewalls to Handle ICMP
Firewalls play a crucial role in managing ICMP traffic, balancing the need for diagnostic tools with the risk of potential attacks. Proper configuration involves allowing beneficial ICMP messages while blocking those that pose security threats. For instance, echo requests and replies might be permitted within a private network but restricted from external sources to prevent external ping sweeps or DDoS attacks.
A well-configured firewall will distinguish between necessary and redundant ICMP types, enhancing security without compromising diagnostic capabilities. Regular reviews and updates to firewall rules ensure they adapt to evolving network needs and emerging threats, maintaining an optimal security posture over time.
Future Trends in ICMP Use and Network Diagnostics
As network technologies evolve, so does the role of ICMP. Emerging trends focus on enhancing diagnostic capabilities and integrating ICMP with advanced security protocols. Artificial intelligence and machine learning developments could see ICMP messages used in predictive analytics, foreseeing network issues before they affect operations.
The continuous growth of IoT and cloud computing also presents new challenges and opportunities for ICMP. Ensuring secure and efficient communication in increasingly complex network environments will likely depend on advanced ICMP protocols and innovative diagnostic tools, driving the ongoing evolution of network management strategies.
You can get the IP address of a person whom you are calling through telegram.
Though this was not a new bug, this bug has been there since 2018, and
Telegram declared this is a feature, not a bug
Recently Whatsapp introduced a new feature, Protect My IP during Whatsapp calls. Maybe Meta worried about the same as Telegram used to Leak IP address during an audio call
I have been aware of this bug since then but never tried it. I was a web
developer, and after being involved in WebRTC projects, I am aware of how
these real-time communication applications work. Of course, I have developed
some real-time chatting applications using ReactJs and Nodejs
Most of the Chatting, real-time communication applications use WebRTC,
WebSockets where WebRTC focuses on Audio, Video Transmission and Websockets on
general data transfer
While these connections work on peer-to-peer, a server is still needed. Once the connection is established between two clients, then there is
no need for a server. The clients can transfer the data without a server
After reading the recent article by
Techcrunch
on Telegram still leaking the IP addresses of its users, I found it
interesting and thought it could be possible; I have also tried the
script by n0a. I have tested the script on Linux as well as Windows, but it doesn't
seem to be working for me (But it does the same for Whatsapp too), so I used Wireshark to demonstrate this again
Wireshark is a Network monitoring troubleshooting software. It is free and
open source, used by IT professionals and Hackers to analyze the network
packets.
How to get the IP address of a Telegram User by Making an audio call
Make sure Wireshark and Telegram for Desktop are installed on your system. It doesn't matter Windows or Linux. I have used the Windows system
Firstly, Open Wireshark and choose the network. In my case, I was connected to
my wifi, and I will be choosing the wifi. If you are connected to your ethernet, then you should choose that
After that, open Telegram Desktop, call any of your friends and wait till they accept the call. After accepting the call, you can end
the call and Open Wireshark to see the logs.
In the search bar, filter the protocol by stun. You can search
stun and search for the message XOR-MAPPED-ADDRESS
Image2
You will get the IP address of the other person. This is how you can use that
IP address to geo-locate the Person.
Note: Telegram allows Peer-to-peer calls. If this option is enabled, then
only this will work. Otherwise, the call will be relayed through Telegram servers.
How to prevent This?
Go to Telegram Settings, Privacy calls Disable Peer to Peer.
In today's technologically driven society, safeguarding
sensitive data and ensuring secure access are paramount concerns. The
exponential growth of digital transactions and interactions has brought the
need for robust authentication methods beyond traditional passwords.
This article sheds light on the ever-evolving landscape of
biometric security. This cutting-edge approach harnesses individuals' unique
biological and behavioral traits to bolster data protection and authentication
mechanisms.
The Fundamentals of
Biometric Security
Biometric security is a cybersecurity technique that capitalizes
on the distinctive physical and behavioral attributes that distinguish one
individual from another. Fingerprint patterns, facial features, retinal scans,
voice timbre – each biometric identifier is like a digital signature, uniquely
tied to a person. This inherent individuality makes biometrics an ideal
candidate for accurate identification and authentication, as they're inherently
difficult to replicate or fake. The convergence of technology and biology has
enabled us to translate these biometric traits into digital codes that can be
used to grant secure access.
Current State of
Biometric Security
Biometric security is not confined to sci-fi movies; it's a
tangible reality that has infiltrated various aspects of our lives. From
unlocking smartphones with a fingerprint to entering secure facilities with an
iris scan, biometric authentication has become second nature. Banking and
financial institutions have implemented biometric measures to thwart fraud,
ensuring only authorized individuals can access accounts and make transactions.
In healthcare, biometrics enhance patient safety by ensuring that medical
records can only be accessible to authorized personnel. Governments are also
leveraging biometrics for secure border control and law enforcement activities.
Emerging Trends in
Biometric Security
lMulti-Factor Biometric Authentication
Combining multiple biometric identifiers into a single
authentication process offers enhanced security. This multi-layered approach
fortifies the authentication process and minimizes the chances of false
positives or negatives.
lBehavioral Biometrics
The uniqueness of human behavior patterns is being harnessed as
an additional layer of security. Analyzing how individuals type, move their
mouse, or interact with devices adds a dimension of authenticity that goes
beyond physical traits.
lContinuous Authentication
As cyber threats become increasingly sophisticated, traditional
static authentication methods fall short. Continuous authentication monitors
user behavior throughout an active session, dynamically assessing the user's
legitimacy and swiftly identifying any anomalies.
lPost-Quantum Biometrics
In an era of quantum computing, cryptographic methods need to
evolve. Biometric data's complexity makes it a promising candidate for
post-quantum cryptography, ensuring data remains secure even against quantum
attacks.
lContactless Biometrics
The global pandemic has reshaped our approach to hygiene and physical
interactions. Contactless biometrics, such as facial recognition and
voiceprints, offer secure authentication without physical touch.
Challenges and
Considerations
lPrivacy Concerns
Collecting and storing biometric data necessitates a meticulous
approach to privacy. Transparent data usage policies and secure storage
practices are vital to earn user trust.
lSecurity Risks
While biometric data is inherently unique, its digital
representation can still be vulnerable, so it is essential to update with the
latest practices and adapt to continuous learning through cybersecurity courses or other means.
Employing encryption and robust security protocols ensures that stored
biometric data remains inaccessible to unauthorized entities.
lLegal and Regulatory Framework
Navigating the legal landscape surrounding biometric data is a
complex endeavor. Adhering to regional regulations and ensuring compliance is
essential to prevent legal repercussions.
Advantages of Biometric
Security
lConvenience
Bid farewell to forgotten passwords or lengthy authentication
processes. Biometric authentication offers a seamless and user-friendly
experience.
lEnhanced Security
Unlike passwords that can be shared or guessed, biometric traits
are inherent to individuals, minimizing the risk of unauthorized access.
lScalability
From personal devices to enterprise-level systems, biometric
solutions can be scaled to cater to various needs, making them versatile tools
for diverse scenarios.
Real-World Applications
lMulti-Factor Biometric Authentication
Combining various biometric identifiers into a single
authentication process creates a multi-factor approach that enhances security.
By utilizing multiple distinct traits, such as fingerprints, facial
recognition, or iris scans, the system creates a layered defense against
unauthorized access. This approach strengthens the authentication process and
minimizes the chances of false positives or negatives, providing a robust
shield against cyber threats.
lBehavioral Biometrics
Behavioral biometrics leverages the uniqueness of human behavior
patterns to enhance security. This approach examines actions like typing
patterns, mouse movement, and touchscreen interactions. By analyzing these
behavioral cues, systems can create a behavioral profile that adds a layer of
authentication. This dynamic approach is difficult for attackers to mimic and
offers extra assurance beyond traditional biometric traits.
lContinuous Authentication
Continuous authentication monitors user behavior throughout an
active session in response to the transforming sophistication of cyber threats.
The system assesses their legitimacy in real-time by observing a user's actions
and interactions. This dynamic process allows for quickly identifying anomalies
or unauthorized access attempts. Continuous authentication is a proactive
defense that adapts to user behavior, mitigating the risk of unauthorized
access or data breaches.
lPost-Quantum Biometrics
With the advent of quantum computing, older cryptographic
techniques face a new level of vulnerability. Post-quantum biometrics leverages
the complexity of biometric data to provide robust security in the face of
quantum threats. Unlike traditional encryption methods that quantum computers
can crack, the inherent uniqueness of biometric identifiers offers a resilient
defense mechanism. This innovative approach ensures that data remains secure
even as quantum computing capabilities evolve.
lContactless Biometrics
The global shift towards contactless interactions has
accelerated the adoption of contactless biometrics. Facial recognition,
voiceprints, and other touchless authentication methods offer secure access
without physical contact. This trend has gained prominence due to hygiene
concerns and convenience. Contactless biometrics cater to the new normal of
minimizing physical touch while maintaining high security.
These emerging trends in biometric security address unique
aspects of authentication, data protection, and cyber threats. By combining
these approaches, organizations can create a multi-faceted security strategy
that adapts to evolving challenges in the digital landscape.
Future Outlook and
Implications
The trajectory of biometric security is poised for an intriguing
evolution. With the rapid evolvement of technology, integrating biometrics with
cutting-edge fields like artificial intelligence and machine learning holds the
promise of unprecedented accuracy and resilience. Artificial intelligence can
harness the vast datasets generated by biometric identifiers to refine
recognition algorithms, ensuring a more precise and adaptable authentication
process. Machine learning, on the other hand, empowers systems to adapt and
learn from new data, enhancing their ability to distinguish between legitimate
users and potential threats.
The convergence of biometric security with quantum-resistant
algorithms addresses the looming challenge of quantum computing. As quantum
computers gain the ability to break traditional cryptographic methods swiftly,
biometric data's inherent complexity and uniqueness offer a potential shield
against quantum threats. This integration ensures that the security foundations
built on biometric identifiers remain robust despite quantum-powered attacks.
In this dynamic landscape, the synergy between biometrics, artificial
intelligence, machine learning, and quantum-resistant technologies underscores
the potential to fortify data protection and authentication to unparalleled
levels, paving the way for a safer digital future.
Conclusion
In the digital transformation era, biometric security stands at
the forefront of safeguarding sensitive data and ensuring authenticated access.
As biometric technologies evolve, they empower us to embrace a future where the
unique attributes that define us as individuals are harnessed to create a safer
and more secure digital realm. By embracing the cybersecurity course, one can understand
these emerging trends, and we're collectively elevating the standards of data
protection and authentication in increasingly interconnected domains this way.
Biometric technology has been rapidly growing in popularity across various sectors, revolutionising the way access is controlled and managed. From unlocking smartphones with a fingerprint to securing data centres with facial recognition, the applications of biometrics are expanding. This article delves into biometric access control systems, exploring their benefits, limitations, and future prospects.
What Are Biometric Access Control Systems?
Biometric access control systems refer to the security measures that utilise unique physical characteristics, such as fingerprints, iris patterns, or voice recognition, to authenticate an individual's identity. Unlike traditional access control methods, which rely on passwords or physical keys, biometrics offers a more secure and convenient solution.
Benefits of Biometric Access Control Systems
Enhanced Security
One of the key benefits of biometric access control systems is the level of security they provide. Since biometrics relies on unique physical traits, it is nearly impossible to duplicate or forge these attributes, making unauthorised access extremely difficult.
Convenience
Biometric systems offer unparalleled convenience as there is no need to remember passwords or carry physical keys. A simple fingerprint or facial scan is all that's needed to gain access, simplifying the authentication process.
Efficiency and Speed
Time is often a critical factor in access control, especially in industries like healthcare or emergency services. Biometric access control systems provide rapid authentication, granting access within seconds and improving overall efficiency.
Reduction in Costs
In the long term, the elimination of physical keys or card systems can result in significant cost savings. There's no need to replace lost keys or reissue access cards, reducing ongoing maintenance expenses.
Accountability and Audit Trails
With biometrics, each access attempt is logged with the individual's unique identity, creating a clear and unambiguous audit trail. This can be invaluable for compliance with regulations and for investigating any security incidents.
Limitations and Challenges of Biometric Access Control Systems
While the benefits are clear, there are also some challenges and limitations to be aware of:
Privacy Concerns
The collection and storage of biometric data raise legitimate privacy concerns. Ensuring that this sensitive information is handled with the utmost care and in compliance with data protection laws is essential.
Initial Costs
The initial setup cost for biometric access control systems can be higher than traditional methods. However, considering the long-term benefits and savings, this investment often justifies itself.
Potential Errors
Though rare, biometric systems can sometimes make errors, such as false rejections or false acceptances. Ensuring the system is correctly calibrated and using additional authentication methods when necessary can mitigate these risks.
Vulnerability to Changes
Physical traits can sometimes change due to aging or injury. Ensuring the system can handle such variations is vital to maintaining accurate authentication.
Future Prospects: Where Is Biometric Technology Heading?
Biometric technology is not a static field; it's continually evolving. The integration of artificial intelligence (AI) and machine learning is leading to even more advanced and reliable systems. The global biometric system market is expected to reach $65.3 billion by 2024, according to MarketsandMarkets, reflecting the growing trust and reliance on this technology.
Embracing the Future of Access Control
Biometric access control systems are reshaping the landscape of security, offering a more robust, efficient, and convenient way to control access. While there are challenges to address, the potential benefits far outweigh the limitations. As technology advances, biometric systems are poised to become an integral part of our daily lives, transforming the way we access our homes, workplaces, and digital platforms.
Embracing biometric technology is more than a trend; it's a step towards a more secure and efficient future. The transformation of access through the power of biometrics is here, and it's redefining what's possible in security.
Shadowhacker, the well-known hacker/hacker group, claims to be breached the Indian Railways Booking portal.
This time, Shadowhacker are selling 30 Million User Info and Invoices related to Indian Railways in a popular Underground Hackers forum.
However, the hacker did not disclose any Vulnerability or Source of the data but posted some sample data that contained Passenger's name, emails, phone numbers, train numbers, pnr etc.
The hacker claims there were two endpoints for data harvesting, another for invoices, train number, arrival time, email, phone, passenger gender, nationality, and all passenger information. The data also contains emails related to the Indian government ending with gov.in email extension.
After analysis of the Sample data, we are not sure this data is of that 2019 breach, but according to some reports, this breach seems fresh.
Still, There was no official confirmation of this breach by Indian Railways
The Hacker Claimed that the data was from RailYatri
Android network traffic interception is a process of capturing and analyzing network traffic that is transmitted or received by an Android device. This can be useful for various purposes, including debugging network issues, monitoring network activity, and identifying security vulnerabilities.
There are several ways to intercept Android network traffic, each with benefits and limitations. Here are some standard methods I used to capture android network traffic
1. Using a proxy tool: A proxy tool is software that sits between the Android device and the internet, allowing you to intercept and modify the traffic passing through it. Some popular proxy tools for Android include Burp Suite, Fiddler, and Charles. These tools are usually used by developers and security professionals to test an application's security or debug network issues.
2. Using a packet capture tool: Packet capture tools allow you to capture and view the raw network traffic transmitted or received by the Android device. Some popular packet capture tools for Android include WireShark and tcpdump. These tools are often used by network administrators and security professionals to troubleshoot network issues and monitor network activity
3. Using a VPN: A virtual private network (VPN) is a service that encrypts and tunnels your internet traffic through a secure server. Using a VPN, you can intercept and analyze the traffic transmitted or received by the Android device.
In this article, you will learn how to capture android app traffic using Wireshark without any physical connection.
As a Malware Researcher, I have experienced that some android malware is heavily obfuscated, and we cannot use them on emulators. In that case, we must use that malware on the physical device. The Network Interception thing is that we have to pay a closer look, so I used Wireshark to study the behaviour of the Command and Control servers.
I Will show you the exact process I used to remotely capture mobile traffic using Wireshark.
Requirements
Physical Android Device
Remote PCAP Android App
Wireshark
Physical Device Setup
No setup is required to start, but you must install the Remote PCAP Android App.
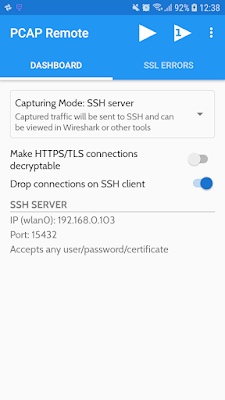
PCAP Remote is a non-root network sniffer app that allows you to debug and analyze
Android traffic on your desktop PC using the app's built-in SSH server. It uses the VPN service to do the Job.
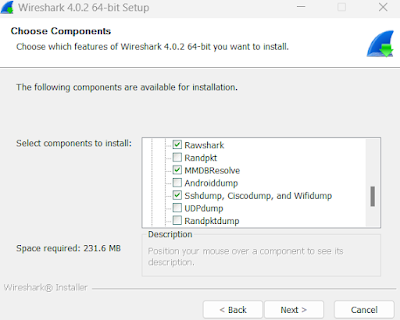
While Installing, you have to install the SSH Dump from the Components.
After that, You have to Open Wireshark and click on the SSH Capture settings icon, configure the IP address you will get from the PCAP Remote's Network interfaces, configure the port, and use any username and password for authentication.
Now you are all set. Click on save and double-click on the SSH Capture. You will notice Wireshark started capturing the traffic.
Conclusion
Hope you guys learnt how to capture android network traffic with Wireshark remotely, you can use USB dump, and there are many other methods available to do the job.
CoWin Indian's digital platform seems to be in Hacker's hands. Hackers Selling Access To CoWin Portal in a popular Underground forum.
CoWin is a digital platform used by the Indian Government to support its mass vaccination program. The platform provides services such as online registration, appointment scheduling & vaccine coverage tracking. CoWin also facilitates healthcare service providers in managing vaccine stock and administering the vaccines to eligible citizens at approved sites.
On December 8, an unknown Hacker claimed to have hacked the CoWin Portal, gained access to the admin portal, and owned the database.
The Hacker Claims he has access to 5K employee records and can edit and delete the records. They also posted some sample data and screenshots, which seem legitimate data.
The Breached data contains the Full Name, phone number, address and PIN code.
Here are some of the photos posted on the Dark web forum
Phone Numbers, Addresses are blurred for privacy reasons.
Conclusion
Since the data is of Internal Employees of CoWin, we cannot verify that the breach is confirmed; and that the Hacker did not disclose any vulnerability yet, the breach seems real. We will update this article if we find additional information.
In this blog post will discuss everything you need to know as an Android app
penetration tester. Whether you are a Bug bounty hunter, a working cyber
security professional, or a random security researcher, this blog will surely
benefit you.
I will simplify everything in this tutorial so that you do not struggle while setting up your Android Pentesting lab. I wish no one should face the same issues which I faced earlier. That's why I put my
hard work here to give you a clear picture so you can start quickly.
Having a developer background, I Know how to build Android Mobile applications
using Java, Kotlin, Flutter, and React Native. I am also good at Building web
applications, having good knowledge of frontend and backend, along with OWASP
knowledge for Both Web and Android apps. I will share my knowledge through
this blog.
Without wasting your valuable time, let me tell you the resources and tools
you should have before jumping into Android app pentesting. Also, there are
some frequently asked questions you have to know.
Table of Contents
Frequently Asked Questions
Is Programming Knowledge required for Android Pentesting?
Sometimes Yes, having knowledge of Java helps you understand the
application better
How much Java/Kotlin Knowledge is needed?
You don't have to be a super coder, but having basic knowledge of
android app development is a plus
How much time will it take to learn Android Pentesting
It depends on you, and your past experience of Pentesting, Bug Bounty Knowledge
Setting up Android App Pentesting Environment
I will use Windows to set up the android Pentesting lab. You can follow the same steps to install those tools on Linux since the tools
are cross-platform.
Required Tools
Burp Suite
VirtualBox
Android Emulator
ADB
Jadx GUI
Python
apktool
apkleaks
Frida
Objection
There are no limitations when it comes to pentesting tools, I personally use these tools, and there are some advanced tools, which we will discuss in another blog post.
Note:
If you try to Run Android Emulators inside Virtual machines, then it won't
work. When I was new to Android pen testing, I used to do the same but later
realised and Switched all my tools to my Primary machine.
Android app pentesting tools
Burp Suite
Burp Suite is a must-have tool for hackers. In case you don't know what Burp
Suite is, Burp suite is a proxy between client and server.
VirtualBox is a virtualization software used to install and use multiple
operating systems inside your primary machine; in our case, we will use
Genymotion to install Android Emulators.
Genymotion offers Android Emulators. You can test as many as for free. The
limit is that it is free for personal use; again, they provide cross-platform
software.
Jadx is a tool to convert Dex files to java source code. We will use this
tool to decompile the apk file and read its source code up to a certain
level.
How to intercept Android app traffic in Burp Suite
In this section, we will set up the Burp suite to intercept the android
app's traffic. Note that if you choose an android emulator for android
version 6, it is easy to install the burp suite's CA certificate. You can
still install burp CA on android 7 and above.
Configure Burp Suite Proxy
Open Burp Suite
Go to the Proxy tab, then Options, then Click on Add.
Make these settings and bind to port 8080 (You can choose any)
And tick on All Interfaces and save
Configure Proxy settings on Android
Now its time to configure the proxy on your Android; before that, we will
find our local machine's IP and configure that IP on your Android Emulator's
Wifi Proxy
To Find the IP address on your Local Machine
Open any terminal and type:
ipconfig
(or ifconfig for Linux)
Now Open Android Emulator's Wifi settings, and you will notice that the
device is connected to a network, now long click or right-click on the
network, and then you will see the options, click on Modify Network.
Now click Advanced, and configure the IP address and port.
Note:
For some emulators, there is another way to achieve this. In the emulator's
settings, you will find the settings to change the proxy settings of the
device
Configure CA certificate on up to Android 6
Now we have to configure a CA certificate
Open any Browser, visit htttp://burp
and download the file, rename the file cacert.der to cacert.cer
Now open Settings, then Security, then
Install from SD Card.
Now Choose the file, and you are asked to enter a name for the certificate.
You can give any name and then click Ok.
Now you are ready to intercept the traffic of your android emulator. Now
open Burp suite, and you will see the traffic in the proxy section.
Installing CA cert on Android devices above Android 6
on android version 7, you need root access to install the CA
certificate on your device,
if you are on Windows, then you need gitbash or WSL to
continue
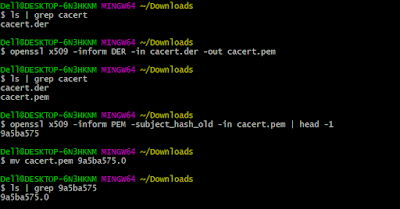
Export the CA cert from Burp, and save the file as cacert.der
then type the commands
openssl x509 -inform DER -in cacert.der -out cacert.pem
We will use openssl to convert the der file to pem, generate a
self-signed certificate, then move the file to Emulator's and install it.
openssl x509 -inform PEM -subject_hash_old -in cacert.pem | head -1
You will get a hash. Now you have to rename the perm file with this hash.0
mv cacert.pem 9a5ba575.0
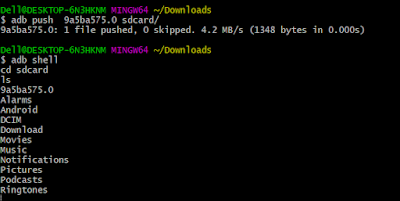
Now move the file to the android emulator's sdcard
It requires root to move the certificate to
/system/etc/security/cacerts
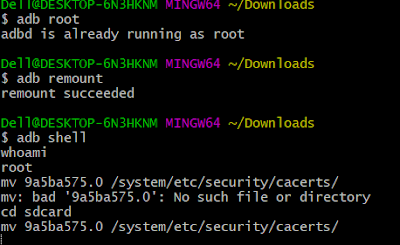
For that, we will log in to adb as the root
adb root
then
adb remount
now open adb shell, goto sdcard
cd sdcard
Now move the file to /system/etc/security/cacerts
mv 9a5ba575.0 /system/etc/security/cacerts/
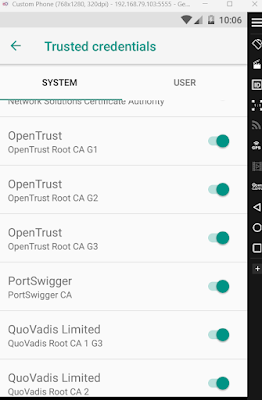
Now, In the device Settings, Security, Encryption, and Trusted
Credentials, you will see PortSwigger's CA certificate.
Conclusion
Android application penetration testing is a broader topic and cannot be
covered in a single blog post, and we have to discuss many android
pentesting frameworks. We will be publishing several blog posts to cover all
of them.
Hello there, In this tutorial, we will be discussing how to install and use
Sqlmap in termux
What is Sqlmap?
Sqlmap is an automatic SQL Injection scanner and exploitation tool written in
Python. We use this tool to detect SQL injection vulnerabilities in websites
and exploit
how to use sqlmap in termux
Follow the below steps to use sqlmap in Termux.
After Installing Termux, You have to install the following packages, so
type the commands in termux
in simple words, Termux Commands are the terminal commands, which is executed to perform a particular task. These commands are similar to Linux Commands.
Termux Commands List :
Important Termux Commands
Command
Purpose, Usage
termux-setup-storage
Will setup the storage system
apt update
will update the available packages
apt upgrade
will upgrade the available packages
pkg install
will install new packages, eg: pkg install php
pkg uninstall
will uninstall packages, eg: pkg uninstall php
pkg list
will show installed packages
pkg search
will search packages, eg: pkg search php
pkg-list-installed
will show the list of installed packages
Important System Level Commands
Command
Purpose, Usage
uname -a
Will Display the system information
whoami
Will Display the current user information
history
Will Display the list of perviously typed commands
clear
Will clear the teminal
pwd
Will print the present working directory
ls
will list the directories, files in that directory
cd
you can open a folder/directory using cd command, usage cd test
mv
mv command is used to rename a file, folder, also used to move a file from one directory to another
cp
cp is used to copy files from directory to another
rm
will remove the file, folder, usage rm test.txt
touch
will create a new file, touch test.txt
mkdir
will create a new directories, usage mkdir test
Before we dive deep, let's start with some cool commands. Let's Learn How To Use Cmatrix effects on Termux
For That Type Below Command
pkg install cmatrix
After that type
cmatrix
Ctmatrix effects will be displayed on termux
Another Cool Command is Sl Type
pkg install sl
After that type sl That's all a small Train will Start Running On Termux
Now let's see what the background running tasks through termux are just type the below command
Top
Now let's find the factor of any number for that install below package by typing
pkg install coreutils
After that to find the factor of any number, then type the factor number eg: factor 100
Let's play with text on termux we can write text in different styles, firstly try with the figlet Type
pkg install figlet
After that type figlet and type the text you want to write in the figlet style
For Colourful text, you have to install toilet package for that, type below command
pkg install toilet
After that type toilet "your text" You can also try color combination eg toilet -f mono12 -F gay "Your Text"
Calendar in termux, if you can't to see the calendar in termux then type
cal
To see the calendar To see the time and date just type date in termux
Now let's talk about some helpful commands
apt update
This command used to update the termux built-in busybox and other packages
apt upgrade
This command is used to upgrade the packages to the latest
Accessing and managing files in termux
To manage and access files in termux then you must type below command
termux-setup-storage
To access a directory cd commandis used The termux default directory is located at /data/data/com.termux/ You can access it anytime by typing cd $home
ls Command is used to see the list of sub directories To access your internal sdcard you have to type cd /sdcard && ls To Access your External Sdcard the same command is used cd /sdcard0/ && ls To Remove/delete an empty Directory or a file, use this command: rm -rf filename Where filename belongs to the name of the file or directory Similarly, you can use rm-r filename To Make a Directory mkdir Command is used Eg: mkdir Hello Where Hello Belongs to a Directory Name For Copying files from one directory to another, cp Command is used eg: cp /path/file /path Similarly for moving files mv Command is used Termux also Supports zipping and Unzipping of Zip files For that zip , unzip Commands are used
Let's talk about Networking ifconfig Command is used to get all the information regarding your Network IP Address To check a particular website is accessible or not in your ISP then you can check that through termux by typing
ping website
Eg: ping google.com The Interesting thing is you can access the internet through termux, directly in the command line
Firstly you have to install the w3m package by typing
pkg install w3m
After that, type the below command to access any website
w3m website
eg: w3m google.com Lynx is similar to w3m To install lynx, type pkg install lynx After that, type lynx google.com
As a Cyber Security Expert, I was concerned about the Data Protection Bill of India, and, Finally, The Ministry of Electronics and Information Technology moved a step ahead.
In this post, we will discuss how the bill is effectively helpful for individuals and how much pressure it may create for the IT industry in India.
Of course, I am not an expert on digital laws, but as an Ethical Hacker, I have spent my time in European Bug Bounty Platforms and the Underground Hacker's Market Places. I also have good knowledge of the countries that deal with data protection.
Previously many IT laws appeared with a bang and were withdrawn silently; however, this bill is heavily inspired by the EU GDPR. Still, not enough. It has to implement a lot.
Digital Personal Data Protection Act, 2022.
We are not Going to explain each and every line of the Act, but a quick overview. If you want to explore, you can refer to meity.gov.in
Overview
There will be a separate board for Data Protection by the Government of India. Called "Data Protection Board of India" for taking accountability for those who did not follow the Act
The Personal Data can be processed for lawful purposes only. That means a data firm may collect data and process it as long as it doesn't go against the law
Before asking for Personal data, the companies must tell the users why they collect data.
The Data Processors (Companies) must take strict security safeguards to prevent data breaches.
Companies should ensure they have the Data Protection Officer responsible for answering the Question of Data Protection.
In Case of a Data Breach, the Companies (Data Processors, Every Data Fiduciary) have to report to the Board.
Companies should remove the personal data of their users if that is no longer necessary for their business purposes.
When Processing a child's data, companies should ensure they have gone through parental consent and ensure there will be no harm or targeted advertising.
The Transfer of Personal data outside India has limitations. Still, it has exceptions for Claiming legal rights, processing by the court, or In the interest of detection, prevention, investigation etc., by the Government.
There will be heavy penalties if any Company, Business doesn't follow this Data Protection Act.
Since this is a quick overview, There are many other terms and conditions that we did not mention, as our aim is to give an overview of the act,
My Views
As we know, there are over 76 crores (760 million) active internet users in India, and over the coming years, this is expected to reach 120 crores (1.2 billion). Govt is taking a good step to protect citizens' personal data.
Some people don't even know how their data is sold, marketed, or used for fraud.
If we look broader side of the Internet, there are many underground marketplaces for Hackers, where they buy and sell people's personal data by hacking into companies, and of course, Indian Company data is being published for free as no one cares for Indian Companies, and they don't have enough budget for a Ransomware Attacks nor to Protect their Infrastructure, India's Data Protection act is relatively weak before
European Nations have strict data protection rules. We had seen how the internet was banged when the GDPR rules were introduced. There are strict rules regarding privacy, and companies have to pay heavy penalties if they get breached, whereas, in India, the Companies Bravely deny the data breaches.
In European countries, companies take cyber security seriously to protect their infrastructure and even encourage white hat hackers to hack into their Applications and reward them for their findings, whereas in India, the reported bugs take years to patch or never be fixed.
There are many things that the Indian Government should look into. For suppose, when registering a new Domain name, European Companies hide the Whois info and protect the owner's privacy. In India, we have to pay extra fees to protect our privacy.
However, there are many factors to discuss, compare and make it much better. Some of my views sound like satire. For some, it might be interesting.
Let me know your thoughts in the comments section.
Tata Power, India's Largest power supply company, has faced a cyber attack this year. This story is about how the hackers gained access to the company and how far the story started
On 24th October, In the HiveLeaks darknet blog, the Hive Ransomware group claimed that they had encrypted the files of Tata Power. Hive operators claimed that they had encrypted Tata Power on 3rd October,
They did not get any ransom from the Tata Group, the negotiation failed, and the Data related to Tata Power was released for free.
The Data Contains, Personal details of its customers, Internal billing, Bank records, Contract Information and other sensitive information. Now the Data is being shared across various Underground hacking forums.
According to research by Microsoft, Attackers used the decades-old vulnerability in The Boa web server, which has been discontinued since 2005. Boa web server is used for IoT devices, Security Cameras, Management consoles etc
Microsoft researchers also claimed that half of the IPs are not detected as malicious; therefore, The IPs belong to compromised IoT devices and routers used to spread malware.
This tool is a combination of many other subdomain enumeration tools. You can either install other tools manually or install the necessary tools using the setup script
The main advantage of this tool is it can go through parallel and grabs all the subdomains in a txt file,
Available Tools and online services:
Tools:
Findomain
SubFinder
Amass
AssetFinder
Httprobe: To Probe For Working HTTP and HTTPS Subdomains.
anew: To delete duplicates when using -s/--silent option.
online services:
WayBackMachine
crt.sh
BufferOver
Httpx for checking live domains
After enumerating the sub-domains, I always used to check the status of the subdomains, filter out the live domains, and remove the unnecessary or bogus domains.
For that, I use httpx, a tool by Project Discovery.
This tool can filter out the live domains in a faster way. It can get the page title and detect the technology used by the domain.
Browser Extensions
Here are the browser extensions that I use while doing recon
Wappalyzer
Wappalyzer is a free browser extension that Fingerprints the Technologies the target website uses.
WhatRuns
WhatRuns is similar to Wappalyzer. This extension is recommended by Jason Haddix on his Bug Bounty methodology. Since then, it was a must-use tool for me.
Shodan
Shodan is a search engine for Hackers. They also offer a Browser extension that can detect the target's Open ports on the browser, giving us a clear insight into what services the target runs.
Cookie Editor
The cookie editor plugin will be helpful when testing the target with multiple logins and cookie-based attacks.
Radom user agent
I often use this extension to test how the website responds on different devices and bypass some restrictions.
Web Proxies
Burp suite
Burp suite is becoming a must-use tool for hackers. I always use this tool to intercept the request response of the target.
Port Scanning
Nmap
Nmap is a powerful port scanner. Who else will keep it aside,
Naabu
Naabu is a port scanning tool developed by project discovery. It can detect open ports from a list of URLs
Smap
Smap is another fast port scanner developed by Somedev. It does not make any contact with the target and is based on shodan.
Shodan
I use shodan. It will be helpful when scanning is not allowed by the Program.
Automated Tools
Nuclei
Nuclei is an automatic vulnerability detection tool developed by Project Discovery. It can go through the templates and check if the target is vulnerable to any vulnerabilities.
Sqlmap
Who will forget Sqlmap? We all started with it. Sqlmap is an automatic SQL injection detection and exploitation tool written in Python.
Wpscan
Wpscan is an automatic WordPress vulnerability scanner. It can detect the latest vulnerabilities in WordPress websites.
Fuzzers
As a web application pentester, it's essential to fuzz the hidden directories of the target. Here are my favourite fuzzers
Dirsearch
Dirsearch is a web directory brute-forcer written in Python. You can find the go version also.
In this tool, you can use the default wordlist, or give the path of the wordlists.
ffuf
ffuf is my second best directory fuzzer. It is a little bit faster. You can customize the requests according to your need.
Dirbuster
it is a GUI-based Directory brute forcing tool. The main advantage of this tool is you can customize the settings as per your needs and prevent your IP from being banned by the Web application firewall.
WAF Detection
Most of the targets are protected by some kind of Web application firewalls. We have to detect the WAF and bypass it for maximum impact,
Here are the tools I use for WAF detection
wafw00f
This tool can detect almost all web application firewalls.
WhatWaf
This is an advanced Waf Detection Tool.
Others
This section contains some uncategorized tools, wordlist etc.
Wordlists I often use
PayloadAllTheThings
SecLists
Conclusion:
This Article will be updated again, I use even more tools that I did not mentioned here, I hope these tools will give you the best results, making your bug bounty journey much easier
Hello guys. In this tutorial, we will be discussing how to use the L3MON Rat. If you are entirely new to this RAT, then follow this tutorial carefully so that you should not face any issues while using the L3MON Rat.
Before getting into the tutorial, here are a few things you have to know
What is L3MON?
L3MON vs Xploitspy?
Why not XploitSpy?
L3MON mod by Techncyber
What is L3MON?
L3MON is a cloud based remote android management suite, powered by NodeJS, and its features
GPS Logging
Microphone Recording
View Contacts
SMS Logs
Send SMS
Call Logs
View Installed Apps
View Stub Permissions
Live Clipboard Logging
Live Notification Logging
View WiFi Networks (logs previously seen)
File Explorer & Downloader
Command Queuing
Built In APK Builder
L3MON vs Xploitspy
L3mon can only be used on the local machine every time you have to start the server on your local machine. Also, you have to use ngrok or similar port forwarding solutions to attack devices outside of your network,
Where Xploitspy is the Copy of L3mon, it can be used on your local machine and any cloud hosting solution. Thus, you don't have to start your local machine each time.
What's Wrong with L3mon and Xploitspy?
Due to the breaking changes and dependency vulnerabilities, you may face many issues regarding the Javascript ejs error. Also, the Xploitspy has been backdoored and steals the username and passwords, even after changing the password.
L3mon Mod by Techncyber
While we tried to contribute to the l3mon project, it's archived. That's why we modded it for personal use,
In this mod, we removed the Built-in APK Builder. Instead, we have given the client project so that you can plug into the android studio or edit the apk using any apk editor tool.
Also, all the EJS errors are fixed in this mod. The exciting thing is you can use this tool in any distro without any issues.
You can use it with your local machine or deploy it to any cloud hosting service.
Install L3mon-mod in Kali Linux, Windows, Termux
The procedure is the same for all operating systems. You can use this l3mon-mod tool in any operating system. All you need is nodejs installed in your system.
, then go to the L3MON-MOD directory, then node index.js
cd L3MON-MOD
then
node index.js
Now open http://127.0.0.1 in any browser, and you will see the login panel.
Setting up the Client part.
Now your server is ready, we need the client for our android, I have given you two ways to use it, either you can plug into the android studio, or you can use any apk editor tool to modify the apk
All you have to do is search and replace the URL http://192.168.x.x
Note that you have to replace the URL with your machine's IP. You can quickly get it by typing the below command on the Terminal.
ifconfig
Look for the inet, starting with 192.x.x.x
On Windows, you can type
ipconfig
The URL does not require the port.
Now Compile the APK, and Install it on your victim's Phone. You will see the device in your panel.
Conclusion
This tutorial is only for educational purposes, and we are not responsible for your actions. If you face any issues, then feel free to ask your questions.
The rise of cloud services has made it easier than ever for businesses to operate and collaborate remotely. This has also led to a surge in the use of business email services such as Gmail and Microsoft Exchange. However, this convenience comes with an increased number of different types of email attacks. If attackers are able to gain access to your business email account or other cloud services, they could potentially wreak havoc on your company’s operations and expose sensitive data - with consequences that can last long after the attack. In this blog post, we’ll take you through some of the ways you can secure your business email and protect your company from cyber threats.
Know Your Email Service Provider (ESP) Basics
Email servers are the backbone of your business communications, but that doesn’t mean you can skimp on security. In fact, many email services offer tools that can help you secure your email communications and protect your business from cyber threats. You should know the basics of the email service providers (ESPs) your organization uses. This will help you understand what security features are available, how they work, and whether they’re strong enough to protect your business. You’ll also be in a better position to select an alternative email service in the event of a service outage or other disruption.
Use Strong Passwords and MFA
Strong passwords and multi-factor authentication (MFA) are two of the most important tools you can use to protect your email account. They’re also two of the most basic - yet many businesses still neglect them. Strong passwords are the first line of defense against account takeovers. They help protect your email account by making it harder for attackers to break in. You should use a different (complex) password for each of your online accounts. Of course, this can be difficult to manage. In this case, password management tools such as KeePass can be helpful. There are also tools such as LastPass that offer a “password manager as a service” (PMaaS) model. These tools allow you to create one “master” password, which gives you access to all your other account passwords. When it comes to MFA, it’s important to remember that the strength of your password doesn’t matter if an attacker has access to your email account. In this scenario, MFA can be a line of defense against account takeovers. It can also help make sure that only authorized individuals are accessing your account.
Implement Email Encryption
If your business uses email, you need to consider how to protect sensitive information that is exchanged via email. One way to do this is to implement encrypted email. This ensures that the content of your emails is securely transmitted over the internet. Most ESPs offer some kind of email encryption, but the level of protection may vary: Some ESPs encrypt the content at the moment of sending, while others encrypt the content at the moment of receiving. You should make sure that you know where and when the content of your emails is being encrypted. If your ESP doesn’t offer an encrypted email option, you may want to consider a third-party email encryption product/service.
Monitor your Network Activity
Attackers are likely to use one of the following methods to gain access to your business email account:
Password brute force attacks: Attackers try to guess your password. They may also use a password harvesting tool to access your account.
Social engineering: Attackers try to trick you or your employees into giving up your login credentials.
Malware: Attackers install malicious software on computers and devices within your network. This malware can give attackers remote access to your systems.
Phishing: Attackers send spoofed emails that try to trick you into clicking malicious links or downloading harmful attachments.
DNS poisoning: Attackers redirect the DNS server to point to a server under their control. This can allow attackers to intercept traffic, such as emails, and redirect it to a server they control. You can use network monitoring software to track the activity and alerts on your network. This can help you detect malicious activity before it results in a breach.
Lock Down Privileged Account Use
If you use third-party tools and services, such as CRM, marketing automation software, and cloud storage, you should consider ways to lock down the use of privileged accounts. The best way to lock down privileged account use is to create a centralized account management system. This will allow you to:
Require multifactor authentication to access sensitive accounts.
Restrict the amount of time an individual has access to an account.
Log account activity and terminate accounts if they’re no longer being used.
Stop Unnecessary Services
You may be running a third-party service that isn’t necessary for your business to operate. This means you’re putting unnecessary strain on your IT and security infrastructure. When selecting cloud services, take time to consider whether the service is necessary. If it isn’t, you’ll need to weigh the potential benefits against the potential security risks. For example, you may want to use a cloud-based service for data storage. But is this service necessary? If you have in-house data storage that’s secure, you may want to stick with that option. After all, when you’re storing data remotely, you’re giving it to a third party. If that third party is hacked or otherwise compromised, your data may be put at risk.
Conclusion
When it comes to securing your business email, the basics are important. They include using strong passwords, implementing encryption, monitoring network activity, and shutting down unnecessary services. However, the best way to secure your business email and protect your company is to take a strategic approach. This means assessing your security posture, monitoring vulnerabilities and threats, and taking steps to mitigate risks. Finally, don’t forget to test your security systems. Test your login processes to make sure they’re secure and that you’re following best practices.
Today In this post, I will be sharing a unique writeup on SQL injection with Authorization Headers token.
A little bit intro to Authorization Tokens,
=> An Authorization token is generated and signed by the servers and is used to verify the users by unique tokens.
=> After the successful login, the server sends an authorization token, and web developers often store it in the browser's local storage or session storage.
=> Modern Websites use JWT(JSON Web Tokens) for User Authorization. It doesn't mean that each Authorization token is JWT. It depends on the backend and the Framework that the website uses,
Without wasting time, let's jump into the story
I am not a regular Bug Bounty hunter. You can say I am a seasonal Bug bounty hunter. I was bored and tried to search for some private bug bounty programs through google dorks, And Randomly selected a program for hunting. I did not do basic recon like Subdomain enumeration or any Dorking as I started with the main target.
For me, it was a typical day. I just fired up the Burp suite and opened the target site. as per the company policy, I am unwilling to reveal the target.
With the help of the Wappalyzer Plugin, I have noticed that the target runs on PHP. For me, PHP is vulnerable by nature. As a Web developer, I have plenty of experience building websites in PHP and fixing vulnerabilities.
While attacking targets, I have a practice of directory brute-forcing and checking the robots.txt file at the initial stage of my recon process.
I used Dirsearch to find the hidden directories, but no luck. I did not get anything fishy other than the admin page.
I tried Opening the admin page by visiting target/admin/
But No Luck it throws an error 403 Forbidden
I did not give up too quickly, again tried to Fuzz inside the admin page using Dirsearch. This time events page got 200 responses.
Without any delay, I have opened the page target/admin/events/
I have noticed that the page is a regular login page, where it has two ways to log in, one for the author and another for the super admin
Exploitation Starts here
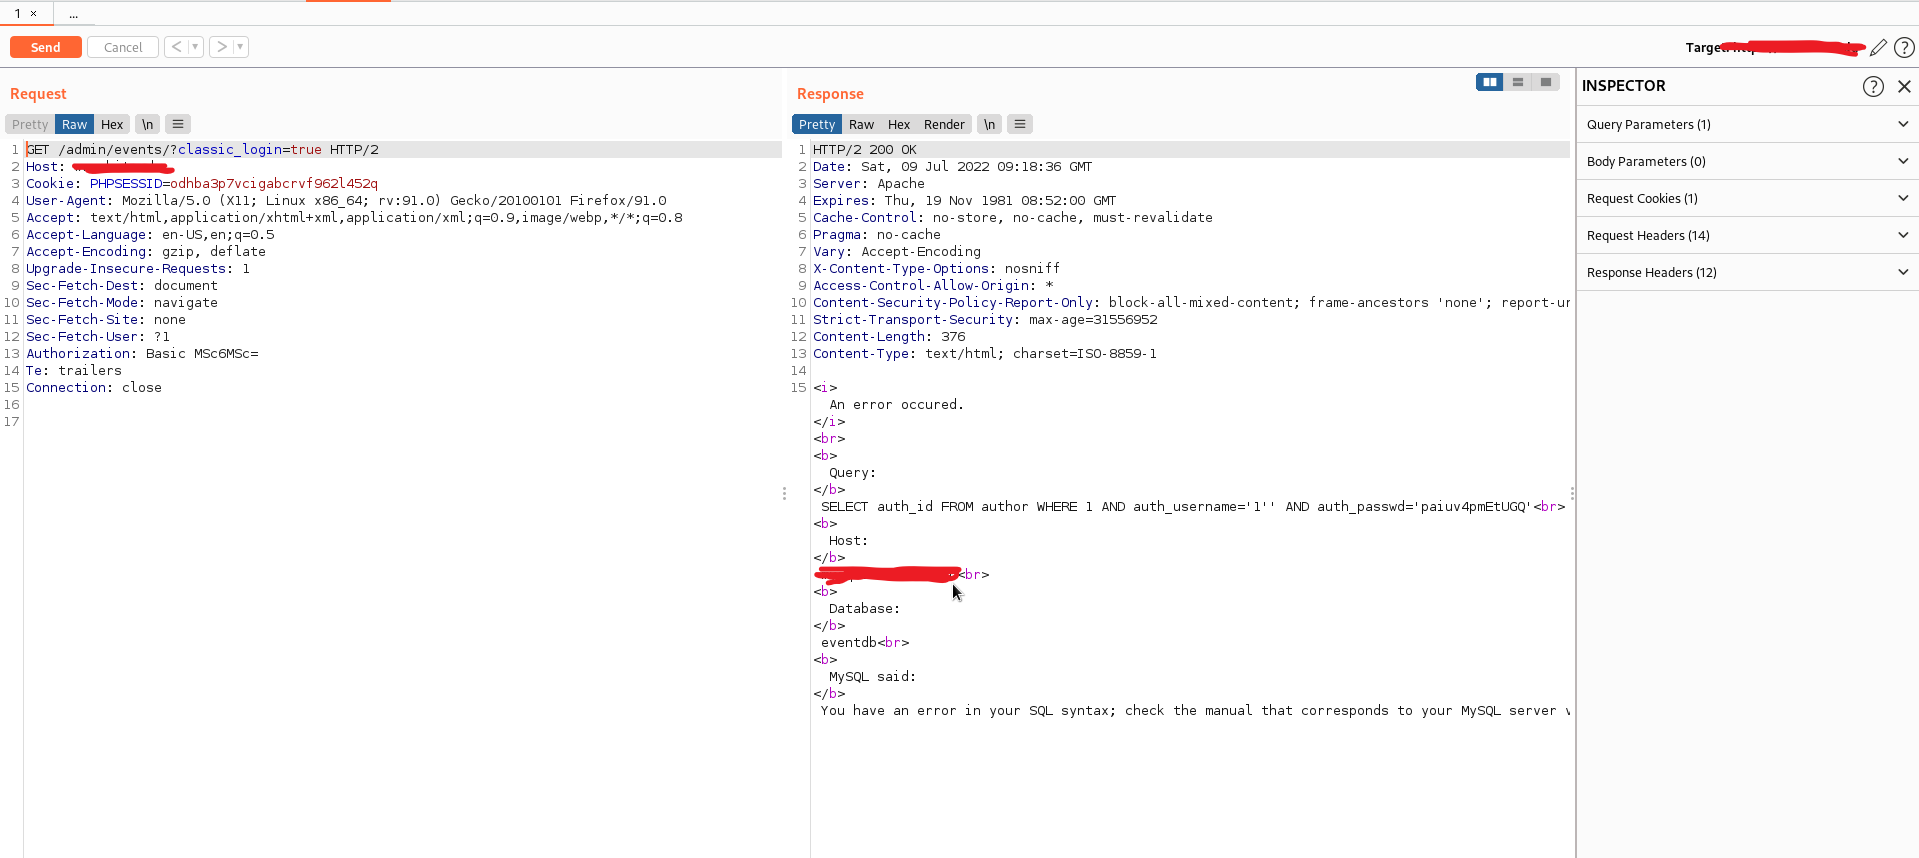
As I said, there are two links for login pages, One for author and another for admin, I have choose the first one, and It redirected me to target/admin/events/?classic_login=true
and it pops up for username and password, I have started giving wrong credentials and observed the response from the server, and after playing for a while, I have supplied the username and password as 1'
Luckily it displayed the SQL error.
I tried to reproduce it, but it doesn't work, and the login popup is wholly gone. Even after refreshing the page, the error message is displayed there, as I thought it might be some backend error.
I have gone to the burp proxy history and noticed no regular POST form data sent or JSON data.
I was gone blank for a while and later opened the link in Incognito mode, and the popup appeared for login. Again observed the request and response.
Found Nothing :P
Later, I noticed a Header Value Authorization with a token.
As a web developer, I know How the Authorization tokens work, and I Have good Knowledge of PHP, MERN stack and a bit of Django Framework. I can easily guess the tokenization developers use
The Header Looks as follows.
Authorization: Basic Base64Values
You might often see this Header in Modern Web applications.
Authorization: Bearer <TOKEN>
Pro Tip: On the backend side, in most cases, the Bearer is ignored, and developers match the token with the issued token. If that was a JWT, then developers often decode it instead of verifying that's where Improper Access Control, Account takeover occurs.
Let's continue the story
I have sent the request to the repeater, selected the Token and decoded it using the Burp decoder, as I guessed the encryption type by its length and nature. It was not a JWT, but the base64 value of 1':1'
I quickly remembered the Sqlmap tool, captured the entire request, and saved it to a text file.
.
And tried to run sqlmap, but the problem occurs at base64 encoding. Though sqlmap supports base64 encode, the scenario is there was a colon : between the values.
as the application behaves as follows
It takes the username and passwords and encodes the values with base64 with the separation of :
eg: username:password
base64 <username>:<password>
Though I was good at manual SQL injection exploitation, there was a live mode of base64 encoding and applying the payload in the repeater. For that, I tried to find the Number of columns for the target.
and supplied the payload for username and password as: 1' Order By 1-- -:1' Order By 1-- -

 Login
Login