Reading view

There are new articles available, click to refresh the page.

Vegetable Brinji | Brinji - Tamil Nadu Special

All this while, I was always under the impression that Biryani was colloquially called as Brinji in Tamil Nadu . Not sure, how I got that into my head ;well am thinking still ! 

Coming to my encounter with Brinji; recently on our way back from Chennai ,we had a lunch stop over at famous restaurant near Kanjivaram and that's where I first tasted this Brinji . I had ordered a mini thali which had 3 flavored rice along with some Poori and curry . One of the flavored rice looked like pulao,but it was garnished with bread crumbs . 

Intrigued by that presentation, I asked the waiter what's that and he replied "Akka adhu Brinji". That was my first taste of Brinji a.k.a Birinji .

Brinji, Tamil Nadu style veg Brinji , Birinji , jeera samba Brinji , Brinji saadham , how to make vegtable Brinji , one pot veg Brinji , Brinji is not Biryani , veg Biryani

Without wasting a moment ,I took a spoonful and I must tell you; I totally fell in love with the flavors . That's when my myth was broken and I realized that Brinji is not Biryani and also it is a vegetarian recipe and has no meat .

It was a riot of flavor explosion.  The essence from fennel;sombu as it is called in Tamil and slightly over powering flavor of ginger, garlic ,bay leaf mint along with the vegetables was a treat to the taste buds. 

What is Brinji ?

Brinji is  made using Jeera Samba rice which is a native rice used for Biryanis in TN . A melange of flavors from whole spices , fresh mint , ginger garlic paste along with fresh vegetables is what makes Brinji a delight .

The other main flavor enhancer is the use of coconut milk to cook the rice. The subtle sweetness from the coconut milk lends a wonderful balance of flavors to the palate with every mouthful .Served with a slightly watery onion raita and a veg kurma, the Brinji is a whole meal by itself and keeps us full .

I wanted to try this Brinji ever since I tasted it,but somehow it kept getting delayed, but today we wanted to eat something different for lunch and I immediately told hubby I am making Brinji that too with my own recipe trying to replicate what I ate remembering the taste . 

I am told that Brinji is a very common in the vegetarian menu during Christmas and New Year parties in Tamil Nadu . So for the upcoming year end parties, you could also make it for your office potluck or friends' get together .


Brinji, Tamil Nadu style veg Brinji , Birinji , jeera samba Brinji , Brinji saadham , how to make vegtable Brinji , one pot veg Brinji , Brinji is not Biryani , veg Biryani


Preparation Time - 30 mins
Cooking Time- 30 mins
Complexity - medium 
Serves - 3 to 4 

Ingredients 

1.5 cups Basmati rice 
1 cup coconut milk (canned or home made)
2 cups water 
1 carrot cut into long strips 
2 small potatoes cut into long strips
8 to 10 French beans cut into 1 " strips
1 medium onion cut length wise 
3 to 4 green chillies slit 
2 tbsp ginger garlic paste
2 bay leaves /tej patta/ birinji elai
3 to 4 cloves/lavang
1 inch stick cinnamon/dalchini/pattai
2 to 3 cardamom/elaichi /elakkai
1.5 tsp fennel /saunf /sombu
Handful of chopped mint leaves 
Handful of chopped corriander leaves 
Salt as needed
2 tbsp cooking oil
3 tbsp ghee 

Method 

  • Wash the basmati rice and soak it in water for 20 mins and then drain it .
  • Heat the pressure cooker vessel with oil and ghee .
  • Crackle the fennel seeds and the whole spices until they turn aromatic. 
  • Saute the onions until transparent followed by the mint leaves , ginger garlic paste and vegetables.
  • Let the fat coat the vegetables and saute ginger garlic  until the raw flavor is lost . This will prevent the ginger garlic paste from burning and sticking to the pan's base .
  • Add required salt ,coconut milk and water . Bring  it to a boil .
  • Add the drained Basmati rice. Check for salt and adjust if needed.  Add the fresh corriander and close the cooker lid .
  • Pressure cook for 2 whistles on high flame and turn off. Let the pressure release naturally. 
  • Open it and wait for 5 mins before you can fluff it . Trying to fluff immediately will make it mushy .
  • Roast cashews in ghee and add it to the brinji . You may also add some fried or toasted bread crumbs for extra taste.  
  • Serve hot with onion raita and a gravy of your choice.  

📍 Pin me up 


Brinji, Tamil Nadu style veg Brinji , Birinji , jeera samba Brinji , Brinji saadham , how to make vegtable Brinji , one pot veg Brinji , Brinji is not Biryani , veg Biryani


Nei Payasam | Aravana Payasam

 Nei Payasam also known as Aravana Payasam is very popular as prasadam in Kerala Temples especially Bhagavathy (Devi) Temple and Ayyappa Temple . Sharkara Payasam ,Kadu Madhuram or just Aravanai are some other names for Nei Payasam.

Nei means ghee and payasam means kheer. This payasam gets it flavor and taste from just 3 ingredients; rice,ghee and jaggery. The payasam is either garnished with fried coconut bits or ghee fried cashews . A pinch of ginger powder at the end elevates the flavor profile manifold. 

Though we call this as Nei Payasam, the consistency of nei payasam isn't like the usual paysam (kheer). Consistency of nei payasam is gooey and thick similar to sakkarai pongal . 

Originally, Kerala Matta raw rice or red rice is used in the preparation of Nei Payasam,but if that us not available we can use any short grained rice, but a strict No to Basmati rice as it will alter the taste of Nei Payasam, because of the natural flavor that Basmati rice possesses


 In temples, nei payasam is made in huge bronze urulis and slow cooking method is followed. Ghee is poured at intervals until the ghee is completely absorbed into the rice and jaggery mixture.  Normally, dark colored jaggery is used for preparing nei payasam, hence the color will be dark and deep brown. 

Aravana / Nei Paysam shouldn't be confused with sakkarai pongal though they may sound similar. The quantity of ghee used in Nei payasam in more also there is no use of milk or lentils. Because the quantity of ghee is more ,we cannot eat this nei paysam like any other paysam for dessert . Just a small quantity can be savored and that itself will be very satiating and satisfying. 

Even to this day, Bhagavati Seva Pooja always has the offering of nei paysam and the same is distributed to all those partaking in the Pooja . 

I have very fond memories of enjoying piping hot Nei Payasam and crispy fried Medhu Vadai served as prasadam in leaf cups after Bhagavathy Seva Pooja.  The taste still lingers on my tongue and nothing can beat the taste and flavor of prasadam that is blessed with divine vibrations.

Holy month of Aashada or Aadi or Karikatam(July 15 to Aug 15 as per English calender) is known for Bhagavathy Seva ,many Brahmin families hailing from Kerala / Palakkad have the tradition of performing thus pooja at home on either Tuesdays or Fridays in this holy month .

So,whether or not you perform Bhagavthy Seva at home,you can always prepare Nei Payasam and offer as prasadam during auspicious pooja days or even on Tuesdays and Fridays during Aadi Maasam .


Preparation Time - 15 to 20 mins
Cooking Time - 45 mins
Complexity- medium 
Serves - 2 to 3

Ingredients 

3/4 cup raw rice (I have used Sona Masuri )
3/4 cup powdered organic jaggery 
1/2 cup ghee 
Few cashews 
Pinch of dry ginger powder 
Pinch of cardamom powder 

Method 

  • Wash the rice well and pressure cook it with 3 cups of water and let the pressure release naturally. 
  • The rice must be cooked well and soft but not mushy . With the back of ladle ,lightly mash the rice but don't make it mushy . 
  • In a thick bottomed vessel , melt the jaggery with 1/2 cup water . We don't need any string consistency  just the jaggery needs to melt . Incase ,you see any impurities in the jaggery syrup,then filter it out and bring the syrup to a quick rolling boil.
  • Slowly add the mashed and cooked rice and mix it well without any lumps .Gradually add the ghee in parts and keep stirring until all the ghee is well absorbed into the nei payasam and the paysam looks glossy and well done .
  • If you are using coconut bits ,fry them in ghee until it turns golden brown and crisp ,likewise the same with cashewnuts as well.
  • Add this to the nei payasam along with cardamom powder and ginger powder and mix it well .
  • Offer it to the lord and distribute it among family and friends. 

Pin me up


Tomato Rice | Thakaali Saadham - Quick one pot vegan recipe

 Thakali Saadham / Tomato Rice is a simple and delicious recipe from South India . It makes for a Quick fix lunch or dinner option and also apt to pack for lunch boxes . 

It is not a traditional recipe, hence each household may have different recipes to dish out this yummy Thakali saadham .

The main ingredient for this recipe are juicy and slightly tangy tomatoes for the extra punch. I use just basic spices and not much whole masalas/ garam masala . I like the rice to soak in the taste and flavor of tomatoes and chillies . 

If you like you may add some fried cashews or boiled peas while preparing the tomato rice . I add them depending on my family's request . 

My hubby loves to have his tomato rice with either Pattani (Peas) Masala or Potato Curry and some chilled raita/pachadi . Papads or fryums are an excellent addition as well . 

If packing for lunch , make sure you cool the rice completely and then pack it . If you pack it very hot ,there is a chance the rice may go bad especially in summer.  

I often make thakali saadham for dinner as it is a quick fix and I wont see fussy faces at home . As always, I realised that this delicious tomato rice wasn't on my blog and as a matter of coincidence our gourmet food group theme for this month was "cook what you like " .. Viola !! I got an opportunity to publish this recipe.  My partner Rafeeda has dished out a baked Pasta recipe and if you are a pasta lover, you must try it for sure .

Preparation Time- 10 mins
Cooking Time - 20 mins
Complexity - simple
Serves  - 2 to 3

Ingredients 

2 cups rice (Basmati / Sona Masuri / any short grained rice ) 
3 to 4 medium sized tomatoes 
1 onion chopped (optional) [skip for jain and no onions no garlic recipe ] 
3 green chillies slit 
Few curry leaves 
Fresh corriander 
1 tsp mustard seeds 
1 tsp channa dal 
1 tsp udad dhal 
2 tsp corriander powder 
1/2 tsp jeera powder 
1/2 tsp chilli powder 
Pinch of turmeric powder 
Salt as  needed
2 tbsp cooking oil 
Pinch of sugar 

Method 

  • Wash the rice well and soak it for 10mins and then drain the water through a colander. 
  • Chop the tomatoes into medium sized chunks and finely chop the green chillies .
  • Heat the oil in a pressure cooker or pressure pan and crackle the mustard seeds followed by channa dal and udad dal until they turn crisp and golden brown . Saute onions if using until pick and translucent. 
  • Fry the green chillies,  curry leaves . Keep the flame on low and add the chopped tomatoes and  spice powders (haldi, red chilli powder, jeera powder and corriander powder ).
  • Saute the tomatoes well and sprinkle some water ..cook covered until the tomatoes turn mushy and soft . Continue cooking until the oil begins to separate.Add salt at this  stage along with some chopped corriander. 
  • Add water and bring to a boil . If using basmati rice use 1.5 cups water for 1 cup rice and if using sona masuri rice use 2 cups water for 1 cup rice.
  • Once the water begins to boil,add the drained rice,  Pinch of sugar and adjust salt if needed .
  • Close the pressure cooker and cook on medium flame for 2 whistles.  Let the pressure release naturally. 
  • Fluff it with a fork and add some ghee if not vegan and serve hot with raita ,papads and some gravy or curry . 


NeerAagaram | Pazhaya Saadham | Probiotic rice porridge

 Neer is water and Aagaram is food ,so basically NeerAagaram boils down to Watery Food or put it simply,  a liquid diet . Neeragaram is very popular in the Southern part of India and also in Orissa, Bengal, Bihar ,chattisgarh as well . Partaking Neeragaram on a daily  basis prevents malnutrition and also improves our immune system .

Now,if you are wondering what is this  Neeragaram ? The answer is very very simple and will leave you amazed .

Neeragaram is just left over cooked rice soaked in water overnight and the next morning it is mashed well and mixed with buttermilk ,rock salt and consumed with shallots and some green chillies .

Neeragaram is also known as Pazhaya Saadham , Saadhertham , pazhaya sor Kanji in South and in the North it is called as Pakhala, Paani Bhaat,Panta Bhaat etc

Neeragaram is also known as Pazhaya Saadham , Saadhertham , pazhaya sor Kanji in South and in the North it is called as Pakhala, Paani Bhaat,Panta Bhaat etc . Orissa celebrates this health rich food as Pakhala Dibasa in the month of March every year .

Neeragaram is a powerhouse of nutrients for the benefit of good gut health . It's a natural probiotic just like home set curd .

The overnight soaking of cooked rice helps in the activation of good bacteria which is very beneficial on consumption for good gut /intestinal health.  You may need not take probiotic supplements if you have this pazhaya saadham regularly.

Neeragaram is also known as Pazhaya Saadham , Saadhertham , pazhaya sor Kanji in South and in the North it is called as Pakhala, Paani Bhaat,Panta Bhaat etc

Consuming Neeragaram early in the morning is an age old practice followed by ancestors especially during the hot summer months when the sun is blazing. The soaked rice acts as a natural coolant and also keeps us full for long hours due to the absorption of starch content in the rice and most importantly prevent us from dehydration. 

Neeragaram can be had with some pickle , fried curd chillies (mor milagai) or with chopped shallots /onions . If you are pairing pazhaya saadham with onions you must definitely try it out with Srilankan Seeni Sambol - get the recipe from my fellow blogger Priya's blog.

You may adjust the quantity of buttermilk as per your preference. I like my neeragaram watery,so I add more buttermilk, if you like it thick like a porridge, you can adjust accordingly. 

Preparation Time - 8 to 10 hours /overnight 
Cooking Time - Nil
Complexity - easy 
Serves - 2 to 3 

Ingredients 

1.5 cups cooked rice (I use the sona masoori variant)
2 cups water 
3 cups buttermilk
Rocksalt as needed 

Method 

  • Soak the rice in 2 cups water overnight . Use an earthen vessel if you can else regular steel bowls will work.
  • The next morning, mash the rice well with your hands or use a masher . The rice when mashed should resemble porridge /gruel like consistency.  Mashing the rice with your hands is always a good choice .
  • To this now add the buttermilk ,rock salt and mix well . Pour it into glasses and serve with the accompaniments of your choice .
  • You may also add 1/4 tsp fenugreek seeds while soaking the rice previous night. 

Pin it up 

Neeragaram is also known as Pazhaya Saadham , Saadhertham , pazhaya sor Kanji in South and in the North it is called as Pakhala, Paani Bhaat,Panta Bhaat etc


Set Dosa | Set Dose (variation 2)

 Set dosa is one of the most loved breakfast in Karnataka.  Though the basic ingredients remain the same,there are some mild variations used by various restaurants that make them a speciality .

My mom had learnt a recipe from one restaurant cook and I have been following that primarily all these years to make Set Dosas at home . To check out my Mom's variant click here

Recently, my cousin Kalyani who blogs at Sizzling Tastebuds posted a Millet Set Dosa which prompted me to look up her recipe of The Regular Set Dosa and I found that it was slightly different from my recipe and  I went ahead and made Set Dosas with her proportion and needless to say everyone at home liked it. They were just spongy and so soft that it was a melt in mouth experience. I have followed her recipe to the 'T' and no changes at all . 

I served these cotton soft set dosas with Aloo Sagoo and Coconut Chutney the way it is served in most restaurants here in Bangalore . Chutney Pudi is of course our family favorite and we cannot imagine having our Dosas without Molagapudi.  Click on the recipe names above for detailed method of preparation. 

Ingredients 

2 cups idli rice 
1 cup whole udad dhall (udad dal gota)
1/4 cup beaten rice /Poha 
1/4 sabudana /jawwarsi 
 2 tsp channa dal
1 tsp methi seeds 
salt to taste 

Method 

  • Wash the idli rice and udad dal 3 or 4 times until the water is clear .
  • Sift the beaten rice once and wash it thoroughly under the colander .
  • Soak the idli rice , udad dhall, beaten rice, Sabudana ,methi seeds in sufficient water for 3 to 4 hours .
  • After the soaking Time,  grind the ingredients in a wet grinder or blender until you get a smooth batter . Batter must have the consistency of Dosa batter, neither too thick nor too runny . I prefer the wet grinder as the yield is more compared to  the blender method .
  • Add salt, beat it well once with your hands . The warmth from our hands induces good aeration and helps the batter to ferment well.
  • Allow the batter to ferment in a warm place for 8 to 10 hrs .

  • To prepare the dosas ,heat the tawa , drop a ladle of the batter and donot spread too much. The set  Dosa has to be slightly thick .
  • The moment you pour the batter on the hot tawa ,you can see lot of pores /holes developing on it.This means your batter is perfect. Just drizzle a few drops of oil and cook covered for 1min.
  • Slowly flip over and cook on the other side for just 10 sec . 
  • If the batter is well fermented, then absolutely no oil is required to cook the dosa.
  • Serve hot with accompaniment of your choice.

Pin me up


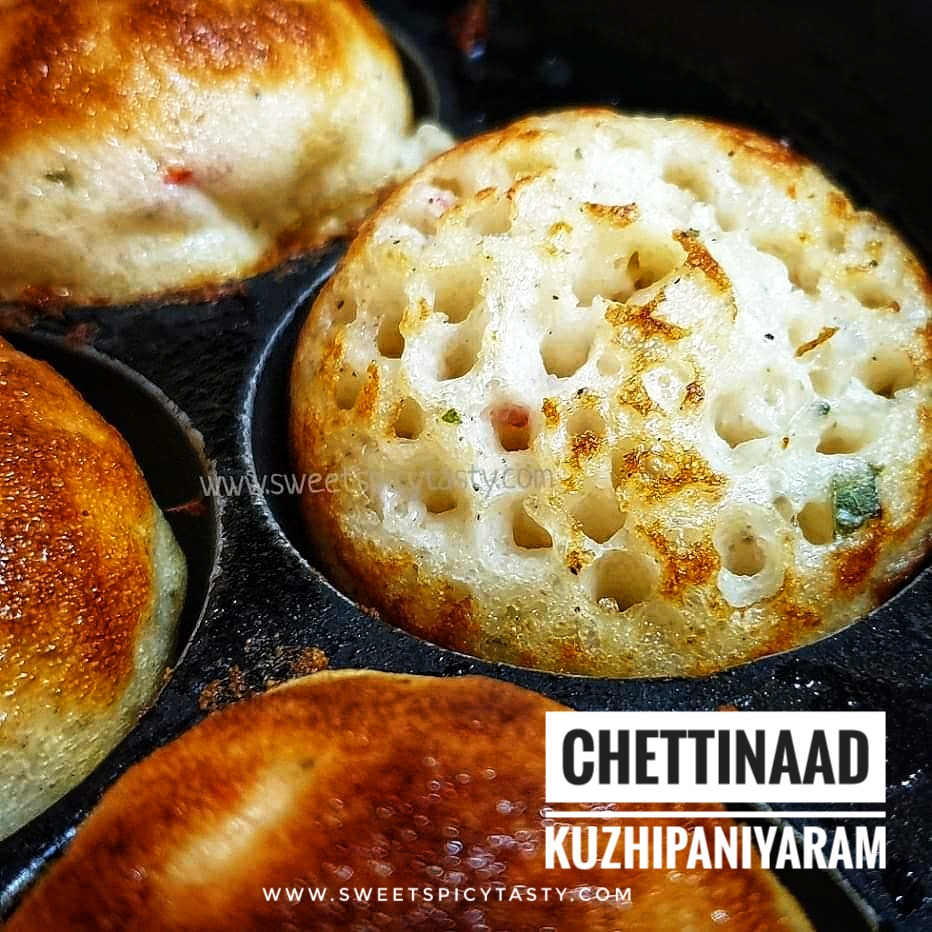
Chettinaad Kuzhipaniyaram - savory snack

 Kuzhipaniyaram is a very tasty and delightful savory snack which takes a very important place either for breakfast or evening snacks  in Tamil Nadu.

Kuzhi in Tamil means cavity/depression and paniyaram means snack in general . So Kuzhi paniyaram means a snack with a depression..sounds funny right ? Basically kuzhi refers to the cavity in the mould of the pan which is used to prepare this snack. 

Kuzhipaniyaram is made in a special vessel called as paniyarakal . It is the same pan which is used to make Sweet Appams ,paddu or gunthaponganalu .

I have already shared the other variant of Paniyaram made from regular Idli batter ,but this chettinaad Kuzhipaniyaram is a special recipe where the batter is ground solely for the purpose of making paniyarams.

Some classic recipes using the Paniyaram Kal / Aebelskeiwer Pan 

Jackfruit Nei Appam

Watermelon Nei Appam

Paddu/Gunthaponganalu

Kunukku Paniyaram

Chettinaad is a region in the Sivagangai district in Tamil Nadu (Southern India) . Chettinaad is known for amazing cotton sarees,Athangudi tiles and lipsmacking food with bold flavor profile especially non veg .

Chettinaad cuisine is known for its pungent and spicy flavor and variety of food ranging from main course , snacks to sweets and savories . As much as they are famous for non veg ,there are a lot of vegetarian options as well .

 Kuzhi paniyaram is served with coconut chutney and /or thakali(Tomato) chutney and some piping hot filter coffee. 

Kuzhipaniyaram also known as uppu appam should not be confused with the other chettinaad special known as Vellayappam .

Vellayappam is a totally different recipe and it has been very well explained by my co blogger Radha on her blog who is my partner this month for the Shh secretly cooking challenge ..we are celebrating Chettinaad cuisine suggested by Kalyani of Sizzling Tastebuds. Kalyani has shared a classic recipe Kaigari Mandi which is very delicious and a perfect accompaniment for main course or idli/dosas .


Soaking Time - 6 to 7 hrs
Fermentation Time - 8 hrs
Preparation Time - 30 mins
Cooking Time - 20 mins
Serves - 5 to 6

Ingredients 

1 cup raw rice (strictly no basmati rice)
1 cup idli rice 
1/4 cup whole udad dal (udad gota)
1 tsp fenugreek seeds 
Salt as needed 

For tempering 
1 tsp mustard seeds
2 to 3 green chillies finely  chopped 
Handful of curry leaves
2 tbsp grated coconut
1/4 cup oil
Fresh chopped corriander 
1/2 onion finely chopped (optional - I haven't used )

Method

  • Wash multiple times until the water is clear. Soak the rice and lentils with fenugreek in water for 5 to 6 hrs.
  • Grind the soaked rice and lentils in a blender or grinder to a fine smooth paste .Batter should be of idli batter consistency not a very runny batter . Let the batter ferment overnight or for 8 hrs . 
  • Before making the kuzhi paniyarams , we need to prepare a tempering that will be added to the batter. 
  • To prepare the tempering, heat about 2 tbsp oil in a pan and splutter the mustard seeds, followed by the green chillies,  curry leaves and fry the onions if using until they turn pink and soft . Lastly add in the coconut and give a quick stir .Add this tempering along with finely chopped corriander to the batter and mix well . 
  • Heat the paniyaram pan and add a few drops of oil in each cavity . 


  • Once the pan is well heated ,add the batter to each cavity and remember to fill only 3/4th of the cavity . The batter on cooking will raise and it needs space to swell . So if you fill it to the brim,the batter will overflow making it a mess .
  • The paniyarams will develop lot of pores as they are cooking, these pores are perfect indicator of a well fermented batter . Once the batter appears cooked on top ,carefully flip it over and cook the underside until it turns brown and crisp .Cooking has to be on medium flame throughout. 
  • Remove the appams /paniyarams from the pan and serve hot with chutney of your choice. 

Pin me up


Neer Dosa | Neer Dose - vegan breakfast

 Neer dose or neer dosa is a very popular breakfast from Tulu Nadu in Karnataka and delicacy from Manglorean cuisine . 

Neer dosa literally means water dosa in Tulu/Kannada but that doesn't mean that it is made from water ,just that the batter to prepare the dosa is very watery hence its called Neer Dosa. The consistency of the batter is very similar to that of Rava Dosa meaning pouring consistency.

Best part of Neer Dosa is the simplicity in preparation as there is no fermentation needed like the usual dosas,meaning you can make dosas as soon as the batter is ready . 

Neer Dosa uses just 2 ingredients ;rice and water .Adding grated coconut is optional but tastes really good when added to the batter .

Neer dosas are very soft and spongy to eat and it remains the same even after a few hours of preparing, making it ideal to pack for lunch box or travel . 

Neer dosas are served with coconut chutney , sagoo , balehannu Rasayana and for non veg lovers it is paired with some spicy curry made from egg,chicken etc .


Soaking Time - 4 to 5 hrs 
Preparation Time - 15 mins
Complexity - simple 
Makes - 15 to 16 neer dosas 

Ingredients 

2 cups normal rice (except basmati)
1/2 cup grated coconut 
Salt as needed
Water to grind 

Video recipe 


Method 

  • Wash the rice well and soak it overnight or for minimum of 5 hrs .
  • After 5 to 6 hrs , transfer the soaked rice to a blender along with the coconut and grind it to a fine paste..donot add water to grind. The water in which you have soaked the rice is sufficient to grind the batter .
  • Transfer this batter to a wide vessel and add some more water and bring it to a pouring consistency. Check the video recipe below for exact consistency.  Add salt as needed.
  • Heat a non stick tawa or a seasoned cast iron .
  • Sprinkle some water on the tava and if it sizzles immediately the tawa is ready to make dosas .
  • Pour the batter from outside to inside like how we do for rava dosa . Donot spread the batter like regular dosas.
  • Close the dosa with a lid for 30 to 40 sec and then open it up .Slowly using a spatula remove the dosa and fold it up like a wedge and serve with chutney or any other side dish of your choice. 
  • Neer dosa gets cooked only on one side. You don't have to flip over and cook . 
  • Keep adjusting the heat of the tawa as you keep making the dosas.  If the tawa is too hot then the dosas won't get cooked evenly.  

Pin me up !!


❌