❌

Reading view

There are new articles available, click to refresh the page.

Amazing Sooji Halwa | Suji Halwa Recipe

My mum’s sooji halwa is special because it’s got this gorgeous caramel-y nuttiness that comes from roasting the semolina (sooji) in ghee. You’ll never make it any other way!
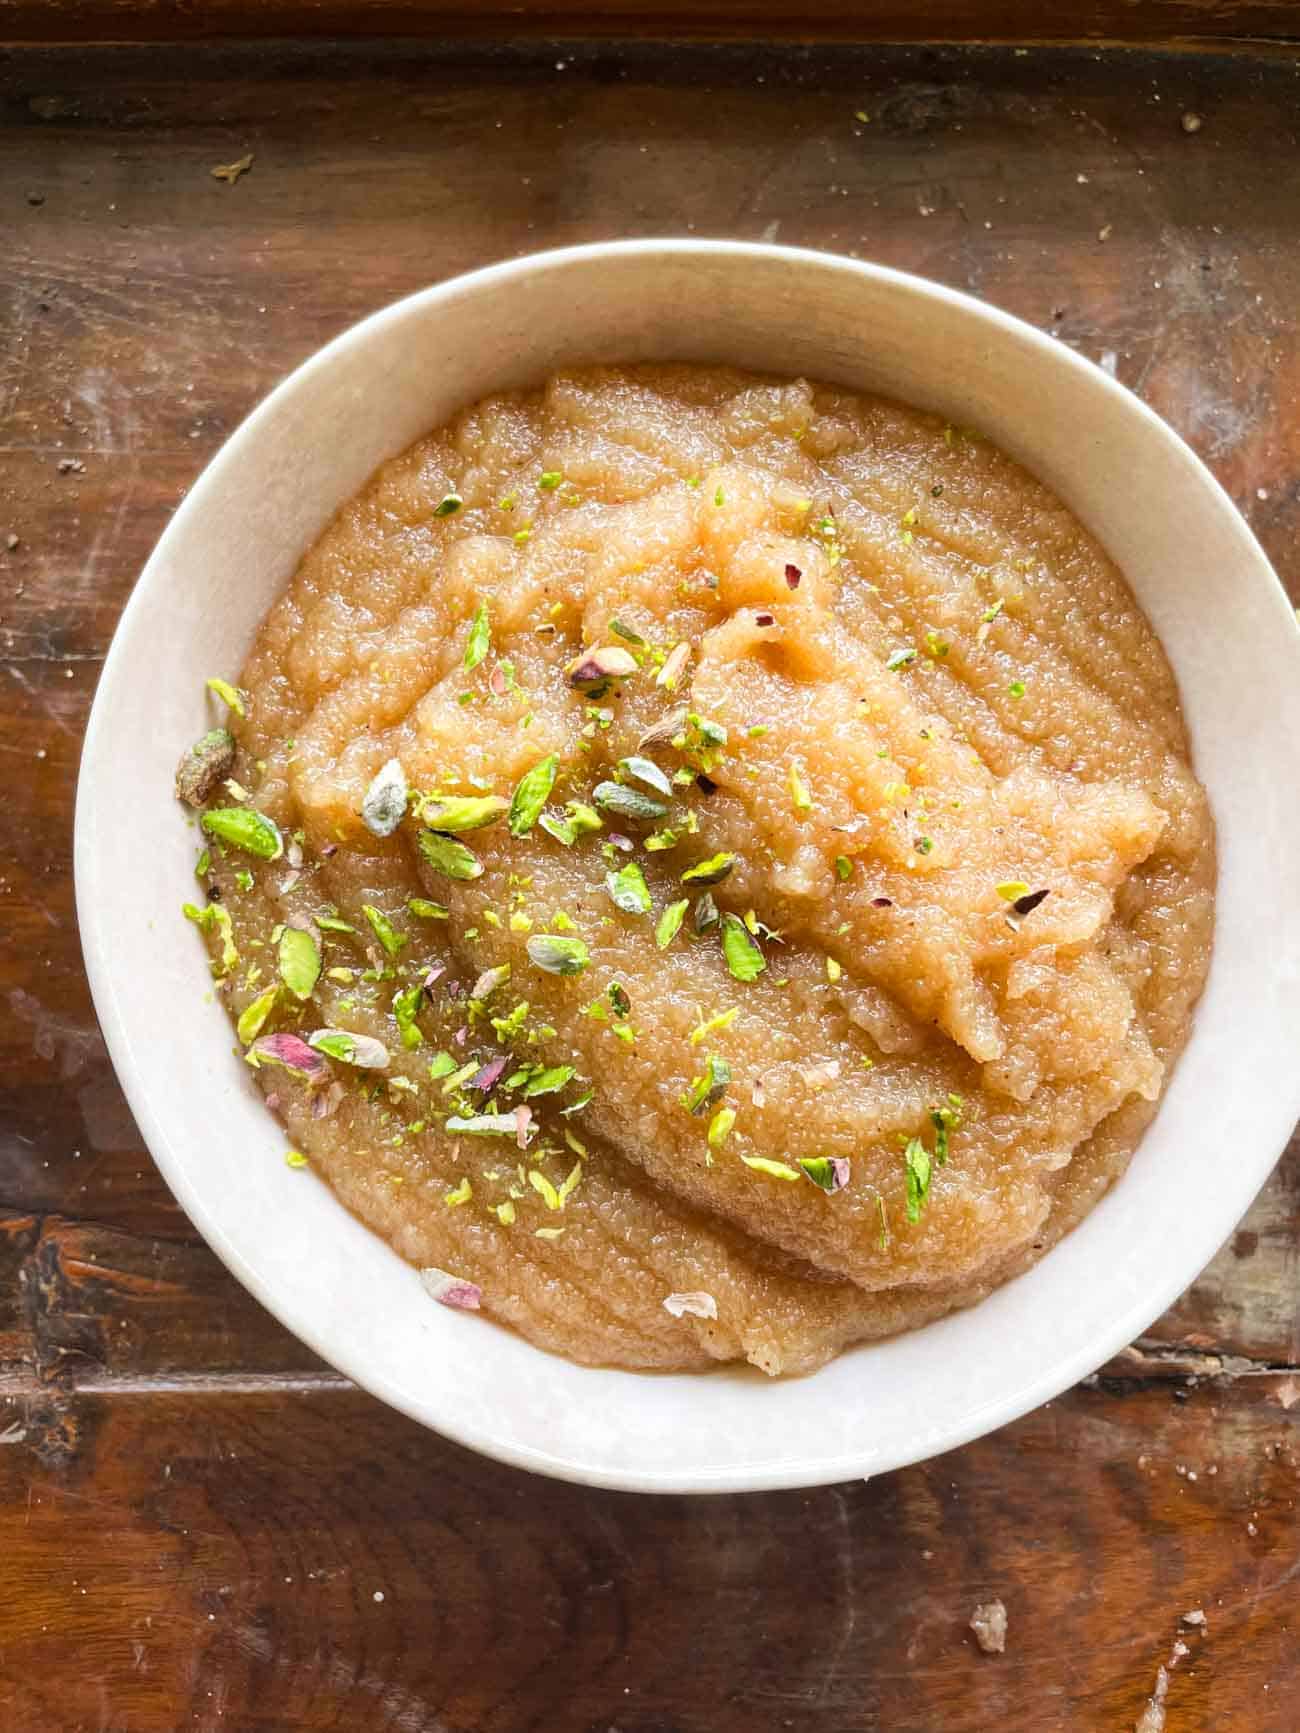
Sooji Halwa topped with sliced pista and served in a bowl

There is nothing that screams Indian festivities quite like sooji halwa does (okay, and maybe also Malpua, Rabdi and Kheer!). However, I think this recipe is particularly special. What makes it stand out is the gorgeous, caramel-like glaze that coats every little bit of sooji. It’s my mum’s trick, and honestly, it’s the only way I like to make it now!

The magic, though, lies in patiently roasting the sooji in ghee for 20–25 minutes, until its colour changes from white to a deep brown. As a result, you get that deep, toasty flavour paired with a smooth, melt-in-your-mouth texture that makes this halwa an instant family favourite. And the best part? Whether you’re making it for a festival, a puja, or simply to satisfy a sweet craving on a weeknight, this halwa is just the thing to whip up because it always hits the spot!

Sooji Halwa Ingredients

Sooji (Semolina/Rava): The star ingredient; use fine sooji for a smooth texture and rich flavour. Bombay sooji works best here because the grains are neither too big nor too small. Bansi rawa will also work.

Besan (Gram Flour): Adds depth and enhances the nutty aroma.

Ghee: The key to flavour and richness. Please use the best quality ghee you can find for best results.

Sugar – Balances the nutty flavour with sweetness.

Water – Helps cook the semolina into a soft, smooth halwa.

Nuts (Almonds/Pistachios) – For crunch and garnish.

How to make sooji halwa
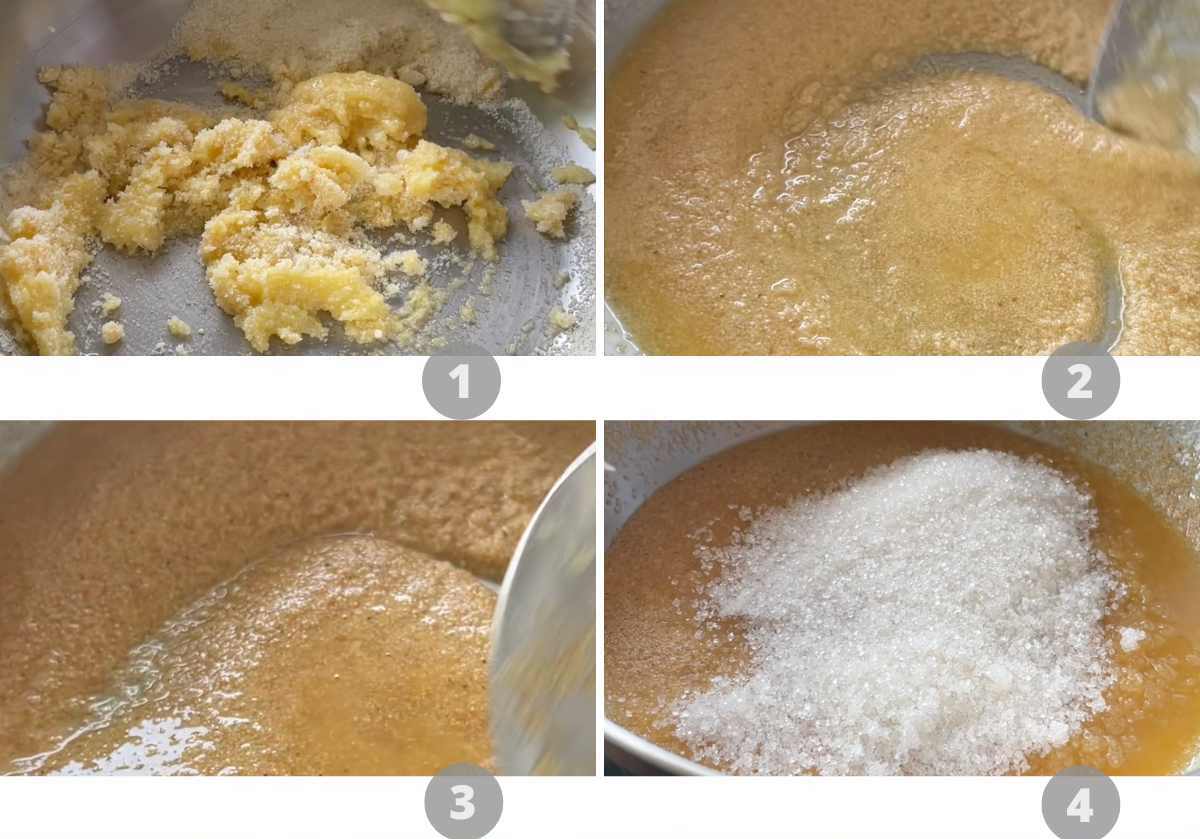
Step by step picture collage showing how to make Sooji halwa

1. In a pan, roast the sooji and besan together over low flame, stirring continuously for 5-6 minutes. Add the ghee and continue cooking on low flame.

2. Stir constantly until the mixture changes to a light chocolate brown colour and becomes fragrant.

3. Continue roasting until the brown becomes a little deeper and darker.

4. Add the sugar and mix it in.
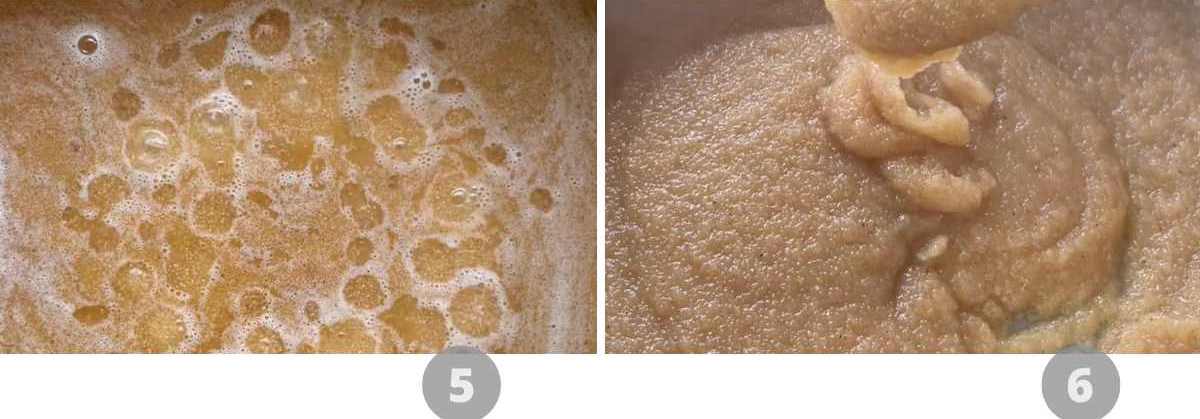
Step by step picture collage showing how to make Sooji halwa

5. Slowly pour in the water while stirring continuously. Increase the flame. Be cautious as the mixture may bubble and splutter.

6. Keep stirring until the halwa thickens, and you see ghee starting to ooze out from the sides. Garnish with slivered pistachios or almonds.

Frequently Asked Questions

Which is the best type of sooji to make halwa?

For a smooth, melt-in-the-mouth halwa, use Bombay sooji (fine semolina). For a nuttier, coarser texture with more bite, use Bansi rava. Both work, it just depends on the texture you prefer!

Can I replace sugar with jaggery for this recipe?

Yes! Jaggery gives the halwa a deep, earthy sweetness and a slightly different colour. Just make sure to melt and strain the jaggery first (to remove impurities) before adding it in.

Why is my sooji halwa lumpy?

This happens if water is added too quickly. Always add water slowly while stirring continuously to prevent lumps.

Can I make this halwa without ghee?

You can use butter or oil, but I’d really suggest you don’t! The ghee is what makes this Sooji Halwa!

Is Sooji Halwa the same as Sheera or Rava Kesari?

They’re variations of the same dish. Rava Kesari includes saffron or food color, while sheera may include milk instead of water.

Can I make sooji halwa ahead of time?

Yes! Store in the fridge for up to 2–3 days. Reheat with a splash of water or milk to soften.

Can I reduce the sugar?

Absolutely, feel free to adjust to taste. Just remember that less sugar means less stickiness in texture.

Richa’s Top Tips

  • Don’t skimp on the ghee. That’s where the flavor and that glistening texture come from.
  • Always roast sooji on medium heat. Too high and it will burn, too low and it won’t develop flavour.
  • Bombay sooji works best here. The grains are neither too big nor too small. But you can also use bansi rawa if that’s what you have available.
  • Be patient and pay attention. Be prepared to spend half an hour in the kitchen. Sooji can burn pretty quickly or brown unevenly if not stirred often. So keep stirring every minute or so for the best, even results.
  • The halwa will thicken as it cools. So take it off the heat slightly before your desired consistency.
  • Add the sugar before the water. Or the sugar will caramelize and harden when it hits the water.
  • The consistency should be thick but runny. If its too thick, it’ll start to become gloopy.

Serving Ideas

Storage Tips

  • Fridge: Store in an airtight container and refrigerate for up to 2-3 days. Reheat with a splash of water or milk to soften.
  • Freeze: Sooji halwa also freezes quite well. Portion into single servings and store in a freezer safe container or bag for up top 3 months.
  • Thaw: Allow it to thaw in the refrigerator overnight. Transfer it to a pan along with a splash of milk or water and then reheat gently until it reaches your desired consistency.
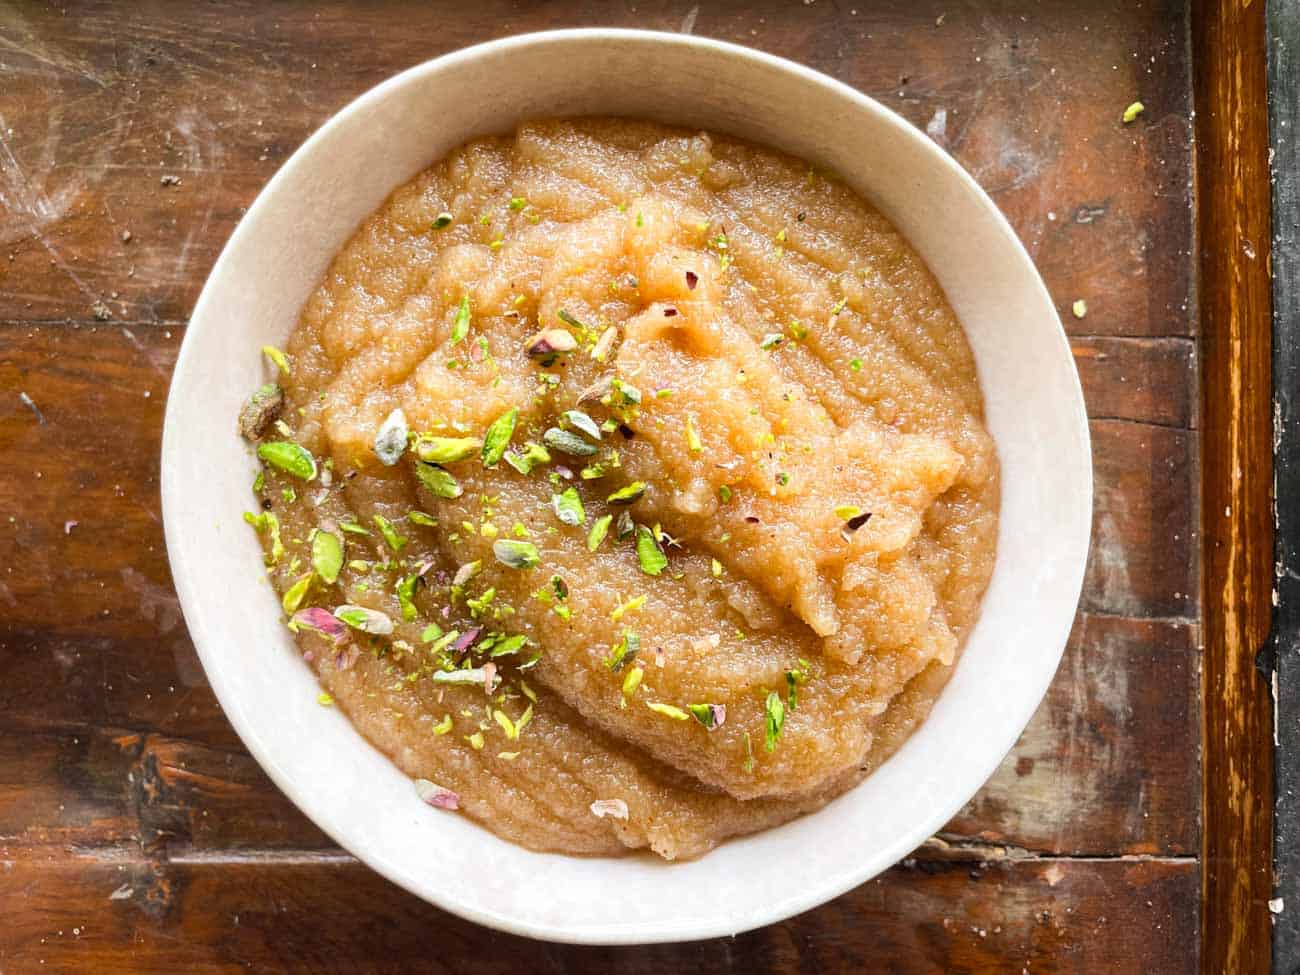
a white bowl with sooji halwa with sprinkled pistachio on top

One bite of this Sooji Halwa and you’ll understand exactly why I can’t stop raving about it! It’s warm, rich, comforting – everything I’d want in a dessert (and honestly just the thing for this festive season!) I hope you give this one a try. Β 

Make sure to send me your recreations over on my IG @my_foodstory, I loveee to see them!!Β 

Also check out my Navratri recipes round up for all the inspo you need this festive season ❀️

Watch How To Make Sooji Halwa Video

LOVE THIS RECIPE? Subscribe to my newsletter and be the first to receive all new recipes!
a white bowl with sooji halwa with sprinkled pistachio on top
Print

Sooji Halwa

This dessert made of semolina is my mum's recipe which has a very caramel and nutty note that just makes it absolutely delectable.
Course Desserts
Cuisine Indian
Diet Gluten Free, Vegetarian
Cook Time 20 minutes
Total Time 20 minutes
Servings 4 people
Calories 2011kcal
Author Richa

Ingredients

  • 1 Cup Sooji or Semolina
  • 1 1/2 tablespoons Besan or Gram Flour
  • 1/2 Cup plus 1 tablespoon Ghee or Clarified Butter
  • 3/4 Cup Sugar
  • 3 Cups Water

Instructions

  • In a pan, roast the sooji and besan together over low flame, stirring continuously for 5-6 minutes.
    1 Cup Sooji or Semolina, 1 1/2 tablespoons Besan or Gram Flour
  • Add the ghee and continue cooking on low flame, stirring constantly until the mixture changes to a light chocolate brown color and becomes fragrant.
    1/2 Cup plus 1 tablespoon Ghee or Clarified Butter
  • Add the sugar and mix it in. Slowly pour in the water while stirring continuously. Increase the flame. Be cautious as the mixture may bubble and splutter.
    3/4 Cup Sugar, 3 Cups Water
  • Keep stirring until the halwa thickens, and you see ghee starting to ooze out from the sides.
  • Garnish with slivered pistachios or almonds.

Video

Nutrition

Serving: 2g | Calories: 2011kcal | Carbohydrates: 278g | Protein: 24g | Fat: 93g | Saturated Fat: 56g | Polyunsaturated Fat: 4g | Monounsaturated Fat: 26g | Cholesterol: 230mg | Sodium: 48mg | Potassium: 409mg | Fiber: 8g | Sugar: 151g | Vitamin A: 5IU | Calcium: 56mg | Iron: 8mg

This article was researched and written by Navya Khetarpal.

The post Amazing Sooji Halwa | Suji Halwa Recipe appeared first on My Food Story.
Makhana Chocolate Bark

This makhana chocolate bark is for the times whenΒ  the chocolate craving hits, but you don’t want to reach for a packet of biscuits.It takes about 20 minutes and uses just five ingredients.

a person holding a piece of makhana chocolate bark

My family loves makhana as a snack, but this makhana chocolate bark has taken it to a completely different level at home. The combination of crunchy roasted makhana with milk and dark chocolate is so good that we now keep a batch in the freezer at all times. It’s become our favourite thing to reach for when someone wants something sweet after dinner.

This makhana chocolate bark recipe uses just five ingredients, and the air fryer does most of the work, so it’s really not much effort at all. If you’ve tried our mocha lava cake or eggless chocolate brownies for dessert, this chocolate makhana bark is the no-bake, everyday alternative that satisfies the same craving with a fraction of the effort.

Ingredients for Makhana Chocolate Bark

Makhana: AKA fox nut or popped lotus seed. If you’re outside India, you can easily find these in your local Indian grocery store.Β 

Chocolate: A mix of milk and dark chocolate. The milk chocolate adds sweetness and the dark chocolate adds depth.Β 

Butter: Just a teaspoon, tossed with the makhana before roasting.

Sugar: Half a tablespoon mixed in with the melted chocolate. You can skip it if your chocolate is sweet enough.

Cocoa Powder (Optional): Dusted on top before serving for a more intense chocolate flavour.

Oil: A little sunflower or neutral oil for greasing the parchment paper so the bark peels off cleanly.

Richa’s Top Tips

  • Don’t over-roast the makhana. Six minutes at 170Β°C is enough to get them light and crunchy. If they go too long, they’ll turn hard and bitter instead of crispy. But all air fryers are different. So you may need to experiment on yours to figure out the perfect timing.Β 
  • Use a mix of milk and dark chocolate. All milk chocolate makes it too sweet, and all dark can be too bitter. The combination gives you the best flavour and the right amount of sweetness.
  • Mix the chocolate and makhana quickly once the chocolate melts. The chocolate starts setting fast, so you want every piece coated evenly before transferring to the parchment paper. Work quickly at this step.
  • Grease the parchment paper before spreading the mixture. If you skip this, the bark will stick to the paper and break unevenly when you try to peel it off.
  • Freeze for at least 2 hours before serving. The chocolate needs to set completely so the bark snaps cleanly into pieces. If you try to break it too early, it’ll be soft and messy.

Frequently Asked Questions

Can I make this chocolate makhana bark without an air fryer?

Yes. Roast the makhana in a pan on low heat with the butter for about 5-6 minutes until they’re crunchy. For the chocolate, melt it using a double boiler or in the microwave in 30-second intervals, stirring in between. Toss the roasted makhana in the melted chocolate, spread on parchment paper, and freeze as usual.

Can I use only dark or milk chocolate?

You can, but the balance won’t be the same. All dark chocolate will make the bark more bitter, and all milk chocolate will make it quite sweet. If using only one, dark chocolate with half tablespoon of sugar works better than milk chocolate on its own.

Can I make this recipe without sugar?

Yes. If your milk chocolate is already sweet enough, you can skip the sugar entirely. Taste the chocolate once it melts and decide. The sugar is really just there to round things out if needed.

Is chocolate makhana bark a healthy snack?

It’s definitely a better option than most packaged chocolate snacks. Makhana is naturally low in calories, high in fibre, and a good source of protein. The chocolate does add sugar and fat, but because the makhana is so light, you’re getting a lot of crunch and satisfaction without eating a heavy dessert.

Storage Tips

  • In the freezer: Store in an airtight container for up to two weeks. Place parchment paper between layers so the pieces don’t stick together.
  • In the fridge: It keeps well in the fridge for about a week, though the texture is slightly less snappy than when frozen. Still tastes great.
  • At room temperature: Not recommended. The chocolate will soften and melt, and the makhana will lose its crunch. Always keep this refrigerated or frozen.

Serving Ideas

This chocolate makhana bark works as a dessert, a snack, or even a homemade gift:

  • With Masala Chai: A few pieces of cold chocolate bark with a hot cup of chai is a really lovely afternoon combination.
  • As part of a dessert platter: Serve alongside chocolate covered almonds and eggless churros for a fun, shareable spread when you have people over.
  • With Tender Coconut Ice Cream: Crumble the bark over a scoop of ice cream for an easy, fancy-looking dessert.
  • As a gift: Break the bark into pieces, pack it into a nice box or jar, and you’ve got a really thoughtful homemade gift that takes almost no effort.

Customisation Ideas

  • Peppermint bark: Add a few drops of peppermint extract to the melted chocolate before mixing in the makhana. Crush some candy canes and sprinkle on top before freezing for a festive version.
  • Orange chocolate: Add a teaspoon of orange zest to the melted chocolate. It brings a really fresh, citrusy lift that pairs beautifully with the dark chocolate.
  • Nutty bark: Toss in a handful of roughly chopped almonds, pistachios, or cashews along with the makhana before spreading on the parchment paper. Adds extra crunch and makes it more filling.
  • White chocolate version: Swap the milk and dark chocolate for white chocolate and top with dried cranberries and crushed pistachios. Completely different flavour but just as easy.
  • Sea salt and caramel: Drizzle some caramel sauce over the bark before freezing and finish with a light sprinkle of flaky sea salt. The sweet-salty combination with the crunchy makhana is incredible.

Did You Know?

Makhana, also called fox nuts or lotus seeds, are harvested from the prickly water lily plant that grows in stagnant water bodies across Bihar. India produces over 90% of the world’s makhana, and almost all of it comes from the wetlands of Bihar’s Mithila region. The harvesting process is entirely manual. Workers wade chest-deep into muddy ponds to collect the seeds from the bottom, which is why makhana is more expensive than most dry snacks despite looking so simple. Once harvested, the seeds are sun-dried, roasted, and popped, which is what gives them that light, crunchy texture.Β 

a person holding a piece of makhana chocolate bark

Fair warning, once you make this chocolate makhana bark, plain roasted makhana is going to feel a little boring. But that’s a good problem to have. We make a fresh batch almost every week now, and it’s become the thing everyone in the house reaches for after dinner. When you try it, share your pictures with me on InstagramΒ  @my_foodstory.

Watch Makhana Chocolate Bark Recipe Video

a person holding a piece of makhana chocolate bark
Print

Chocolate Makhana Bark

Cruchy, cripsy, and super easy to make, this makhana chocolate bark is so delicious and addictive that you'll always keep a jar in your fridge.
Course Desserts
Cuisine international
Diet Vegetarian
Prep Time 5 minutes
Cook Time 15 minutes
Total Time 20 minutes
Servings 4 servings
Calories 150kcal
Author Richa

Equipment

Ingredients

  • 2 cups makhana approx. 40 grams
  • 1 teaspoon butter
  • 60 grams milk chocolate
  • 40 grams dark chocolate
  • Β½ tablespoon sugar
  • 1 teaspoon sunflower or any neutral cooking oil
  • 2 teaspoons cocoa powder optional

Instructions

  • Take makhana in an airfryer safe container, add butter and mix well. Air fry at 170C for 6 minutes till it’s mildly roasted.
  • Cut out a parchment paper with diameter 10 inches and grease with oil on one of the sides.
  • Place chocolate on top of the roasted makhana and air fry at 170C for 2 minutes till the chocolate melts. Add sugar, mix well so the makhana is coated with chocolate & sugar.
  • Transfer the mix to the greased parchment paper and freeze for at least 2 hours.
  • Just before serving, peel off the parchment paper from the chocolate bark, transfer to a plate, dust with cocoa powder and serve.

Video

Notes

  1. This has to be stored refrigerated.

Nutrition

Calories: 150kcal | Carbohydrates: 18g | Protein: 4g | Fat: 7g | Saturated Fat: 4g | Polyunsaturated Fat: 0.4g | Monounsaturated Fat: 3g | Trans Fat: 0.04g | Cholesterol: 5mg | Sodium: 20mg | Potassium: 323mg | Fiber: 1g | Sugar: 5g | Vitamin A: 58IU | Vitamin C: 0.1mg | Calcium: 51mg | Iron: 2mg

This article was researched and written by Harita Odedra.

The post Makhana Chocolate Bark appeared first on My Food Story.
Chocolate Covered Almonds in the air fryer

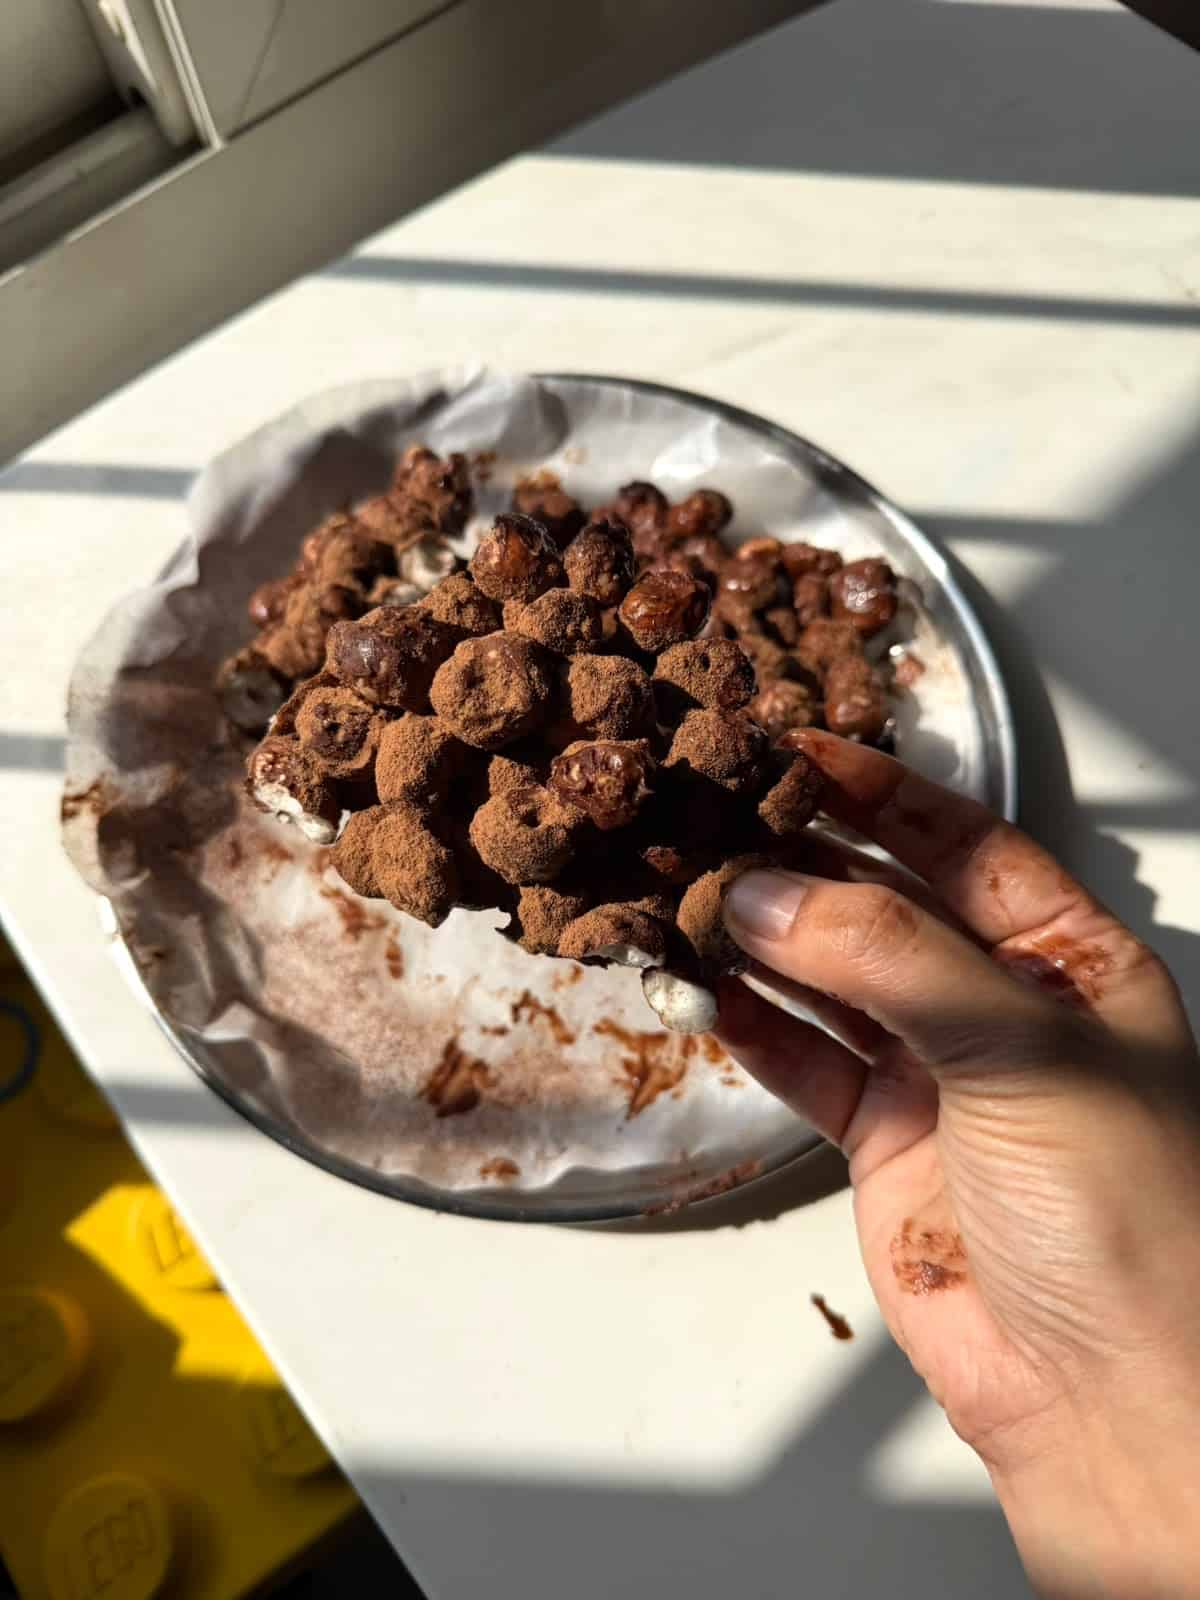
You won’t believe how easy and hassle-free it is to make Chocolate Covered Almonds in the air fryer. All it takes is 4 ingredients and 10 minutes to make the most addictive snack ever!Β 

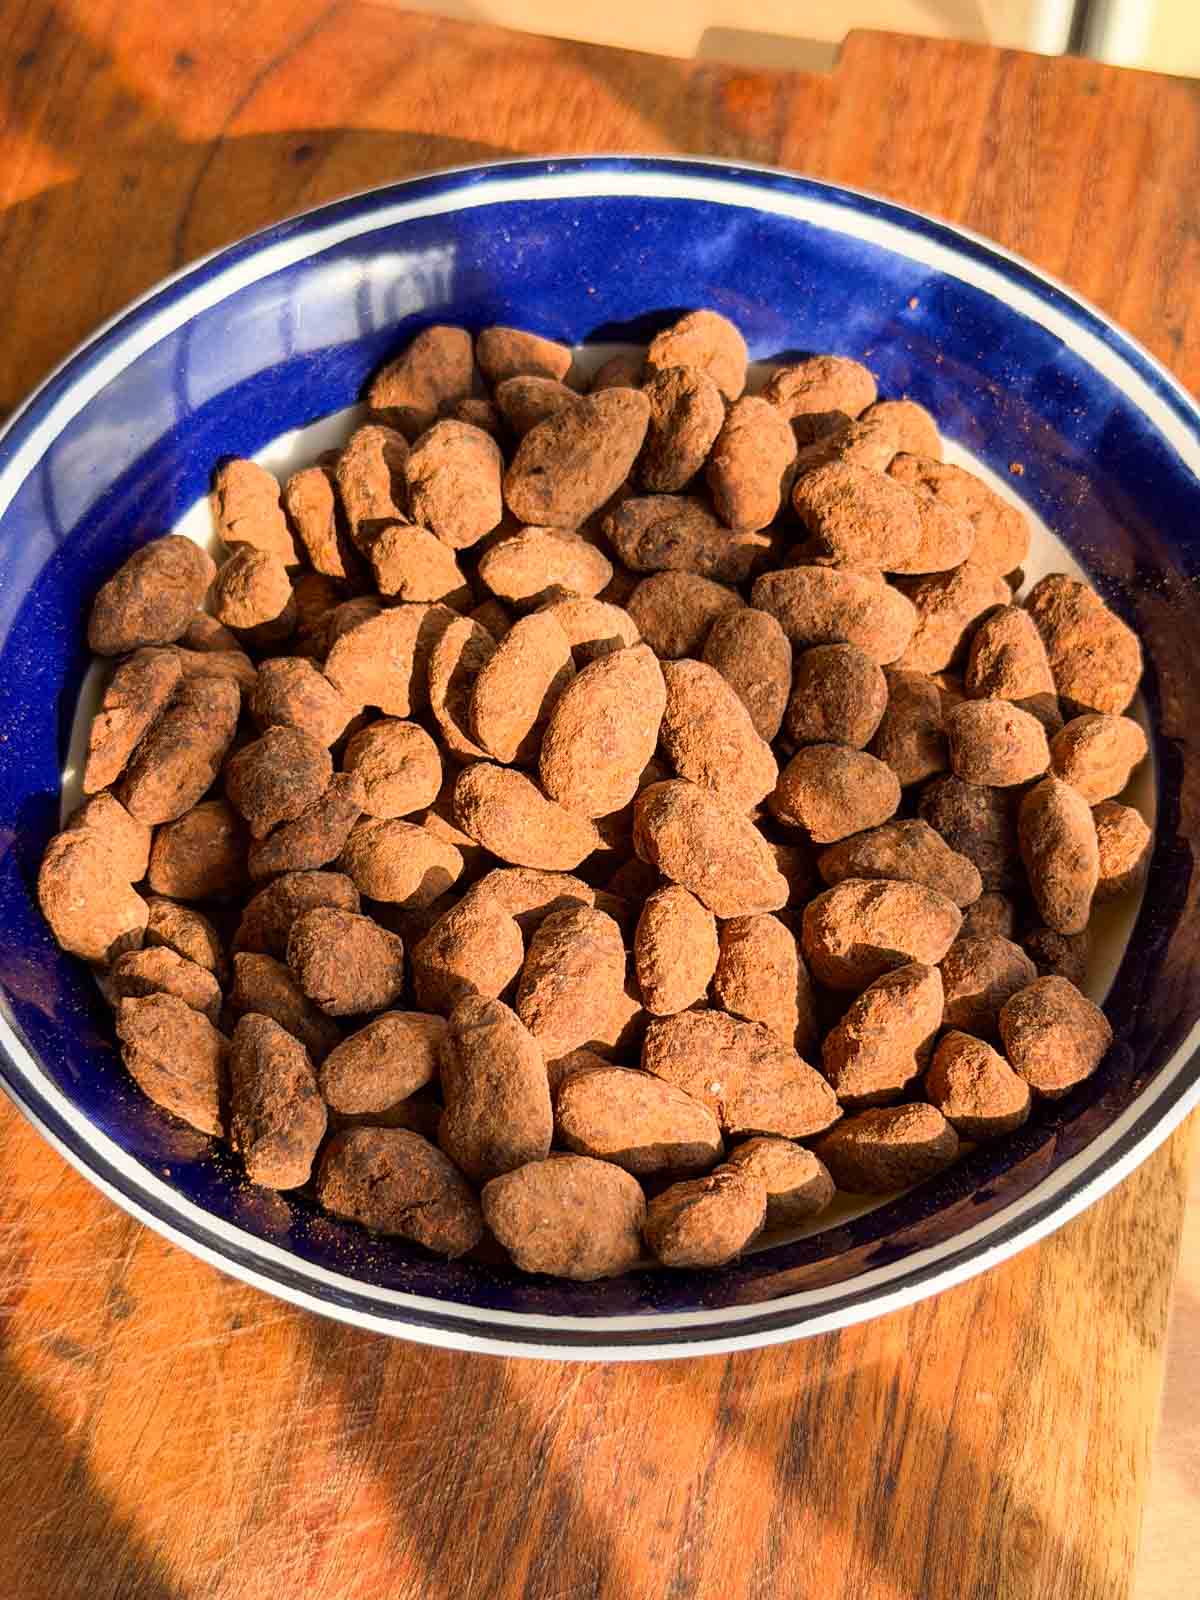
chocolate covered almonds in a bowl

These chocolate covered almonds might look fancy and complicated, but trust me, they are a breeze to make. Especially if you have an air fryer. It calls for zero prep, only a couple of ingredients, just one container, and then the air fryer does most of the work for you. We roast the almonds in the air fryer, melt the chocolate in there, and then use the same container to coat them too. Sounds easy-peasy, right?

This recipe is super customisable too! You can use whatever chocolate and nuts you like and have or throw in some add-ins for a different flavor. Plus, you can make one big batch of these chocolate coated almonds and eat them for a long time, because they basically stay well forever! So let’s find out how to make them!

Ingredients for Chocolate Covered Almonds

Chocolate bar: I have used half a bar of dark chocolate and half a bar of milk chocolate, but you can use full dark or milk based on how your preferenceΒ 

Nuts: I have used almonds for this recipe, but you can use any nut of your choice Β 

Cocoa powder: I have used sugar-free cocoa powder for an intense chocolate flavor, but you can use whatever you have available.Β 

Sugar: This is optional, but I would recommend using a little for balance, especially if you’re using only dark chocolate

Frequently Asked Questions

Can I use only milk chocolate for this recipe?

Yes, why not! Milk chocolate, white chocolate, dark chocolate, spiked chocolate, flavored chocolate, half and half like I have, or a mix of different chocolates, whatever you have and like works in this recipe.

Can I make these chocolate coated almonds without an air fryer?

Yes, you can make this recipe on the stove top as well, but it takes a little more effort. Start by dry roasting the almonds until slightly brown. Then melt the chocolate on a double boiler until it’s smooth and creamy. Follow the rest of the recipe as is for an easy chocolate covered almonds recipe on the stovetop.

Can I make this recipe using another type of nut?

Of course! You can use cashews, pecan nuts, peanuts, macadamia, walnuts, or a mix of all of them. This recipe is very customisable and forgiving. Use whatever you have and like, it all tastes amazing!!Β 

Richa’s Top Tips

  • Melting chocolate: If your chocolate is not becoming very smooth when melting, stir in a drop or two of coconut oil to the melted chocolate.
  • Adjust the sugar: We prefer the slight bitterness of dark chocolate, but you can increase or reduce the quantity of sugar in your cocoa powder depending on how sweet you like your chocolate coated almonds.Β 
  • Add cocoa powder in batches: Adding the entire quantity of cocoa powder at once leads to clamping and uneven coating. So add in a little at a time, shake, and repeat for the most evenly coated choco almonds.Β 

Storage Tips

  • Countertop/Room temperature: These chocolate almonds keep well in an airtight container on the countertop (away from humidity, heat, and direct sunlight) for 2-3 days.Β 
  • Fridge: If you are making a larger batch and won’t be able to finish quickly, store these chocolate covered almonds in the fridge for up to 2 weeks.Β 
  • Freeze: These choco almonds are super freezer friendly and stay good for months.Β 

Customisation Ideas

  • Add some spice: Mix some cayenne pepper or red chilli powder into the chocolate for hint of spicy, smoky flavor
  • Make it citrusy: Fold in a tablespoon of lemon or orange zest for a bright, citrusy flavor. A little goes a long way hereΒ 
  • Sprinkle sea salt: For a sweet and salty flavor, sprinkle a pinch of sea salt before the chocolate covered almonds hardenΒ 
  • Coffee flavored: Add a teaspoon or two of instant coffee powder mixed with hot water to deepen the flavor of chocolate.
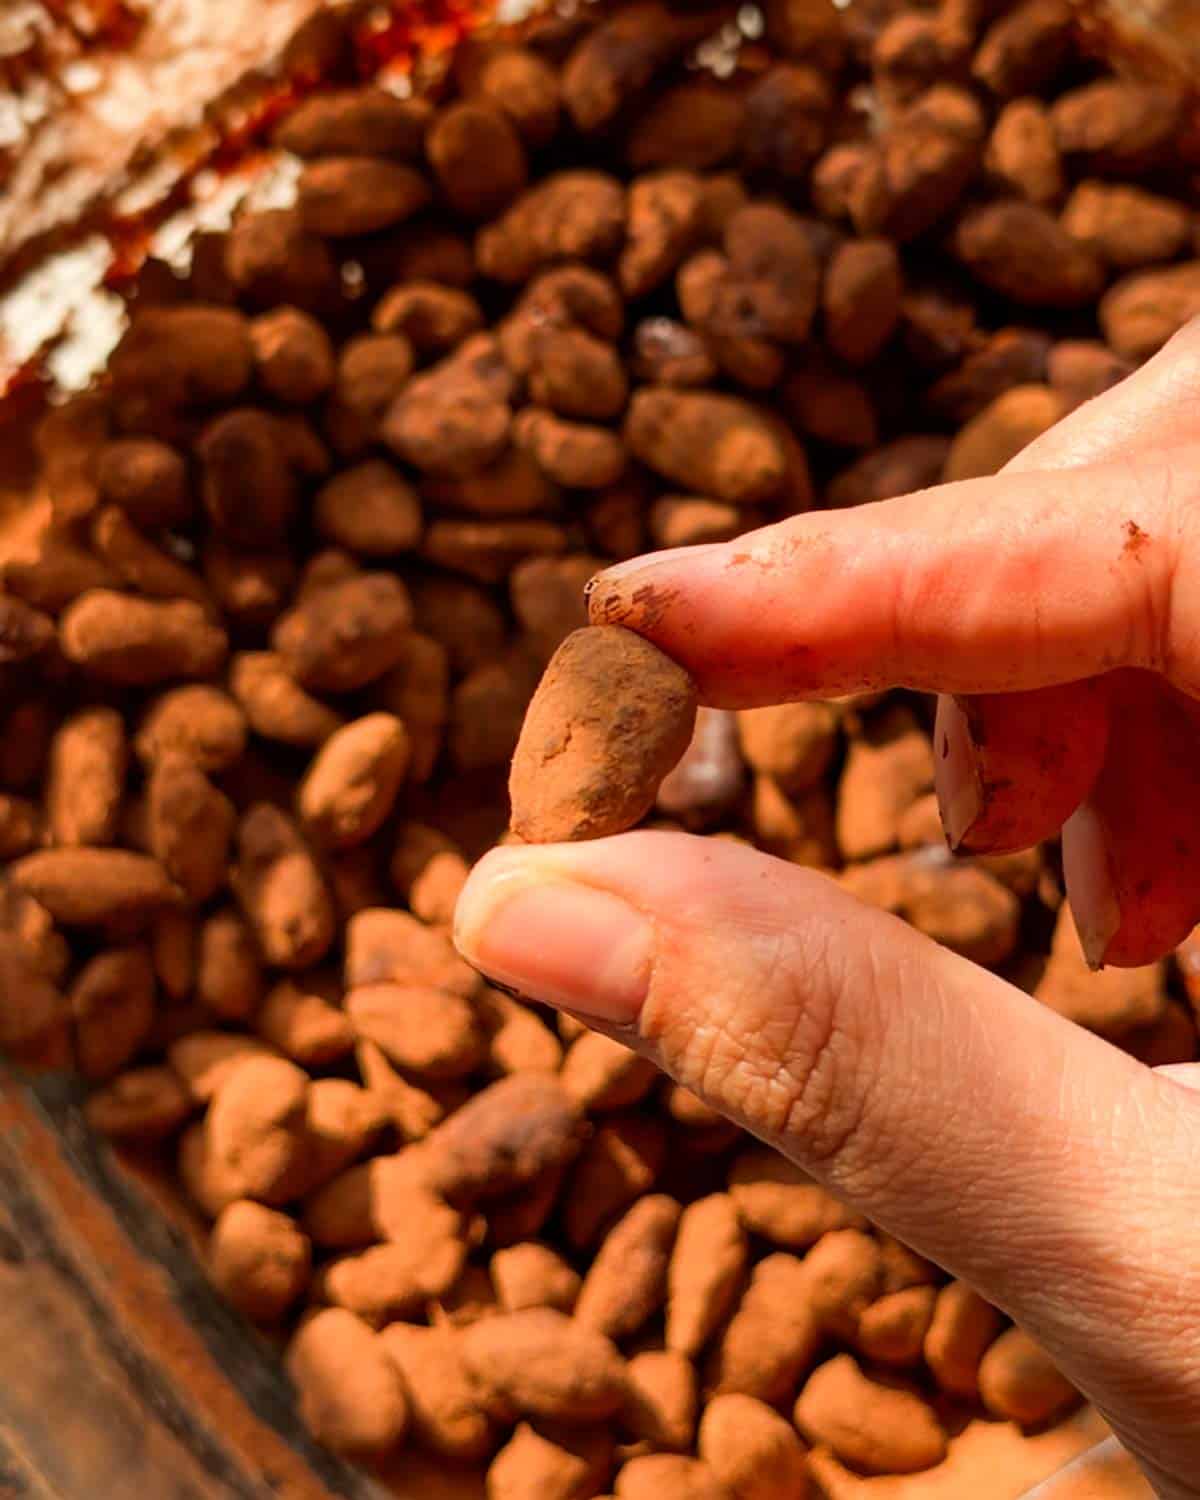
a person holding one chocolate covered almond to showcase its color and texture

This chocolate almond recipe in the air fryer is a fun, mess-free way to make an addictive snack in no time. It’s a clean, healthy snack (when eaten in moderation), and my kids absolutely love it!Β 

If you make this chocolate covered almonds recipe, don’t forget to DM the pictures @my_foodstory. Happy cooking!

Watch Chocolate Almonds Recipe Video

chocolate covered almonds in a bowl
Print

Chocolate Covered Almonds | Chocolate Almonds

Making chocolate covered almonds in your air fryer is sooo easy and hassle-free! All it takes is 4 ingredients and 10 minutes to make the most addictive snack ever!
Course Desserts, Snacks & Appetisers
Cuisine international
Diet Vegetarian
Cook Time 10 minutes
Total Time 10 minutes
Servings 6 servings
Calories 228kcal
Author Richa

Equipment

Ingredients

  • 175 grams almonds approx. 1ΒΌ cups
  • 35 grams milk chocolate
  • 35 grams dark chocolate
  • 1 tablespoon sugar
  • 30 grams cocoa powder

Instructions

  • Take almonds in an air fryer safe container and air fry at 180C for 6 minutes till it’s mildly roasted. Use the container which has a lid.
  • Place chocolate on top of the roasted almonds and air fry at 150C for 3 minutes. Add sugar, mix the chocolate, sugar and almonds with a spatula till all the almonds are coated well with chocolate. Set aside to cool.
  • Once it’s completely cool, add β…“ quantity (10 grams) of cocoa powder, cover the container with the lid and shake well to coat the almonds. Open the lid, add another β…“ quantity (10 grams) of the cocoa powder and repeat the same process. Add the remaining β…“ quantity (10 grams) of cocoa powder and shake well to coat all the almonds. cocoa powder is added in 3 parts to ensure even coating of the almonds, if you add the cocoa powder all at once, it tends to clump at some places and does not taste good.

Video

Nutrition

Calories: 228kcal | Carbohydrates: 14g | Protein: 8g | Fat: 18g | Saturated Fat: 3g | Polyunsaturated Fat: 4g | Monounsaturated Fat: 10g | Trans Fat: 0.01g | Cholesterol: 1mg | Sodium: 6mg | Potassium: 341mg | Fiber: 6g | Sugar: 5g | Vitamin A: 8IU | Vitamin C: 0.1mg | Calcium: 96mg | Iron: 2mg

This article was researched and written by Urvi Dalal.

The post Chocolate Covered Almonds in the air fryer appeared first on My Food Story.
One-Bowl Chocolate Cake (Simple Chocolate Cake Recipe)

This is the lushest one-bowl chocolate cake recipe I’ve tested – it’s moist, rich and SO SO chocolatey. And it keeps for days (if you can stop yourself from finishing it right away)!

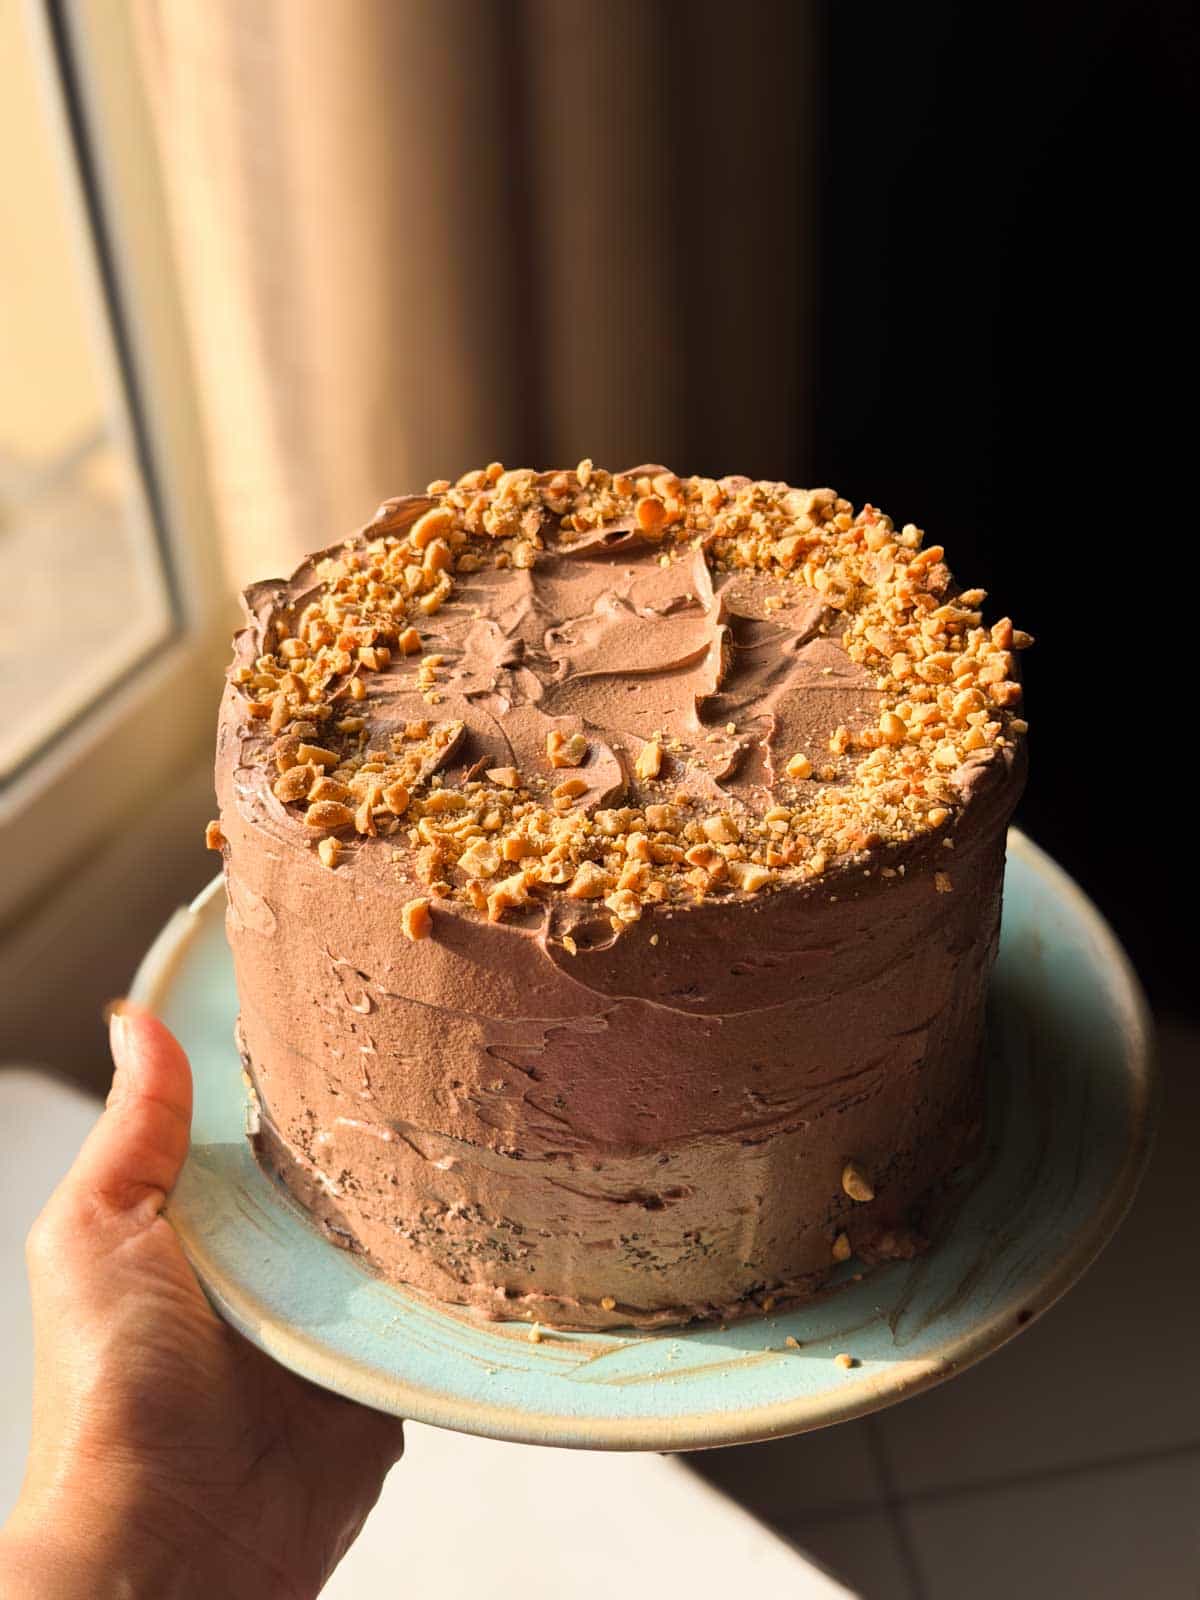
an image of the whole chocolate cake decorated with frosting and crushed nuts

This chocolate cake recipe is hands down THE BEST!It’s one of those fab recipes that’s ridiculously simple because everything gets mixed together in one bowl. Yet it gives you a cake that stays super moist for up to FIVE DAYS! In fact, this simple chocolate cake tastes like it’s freshly baked even days later. Better still, you can make it in both the oven and the air fryer.

Whether you’re baking for a birthday party, packing a treat for the kids’ tiffins, satisfying a random chocolate craving, or just looking for something to enjoy with your evening chai, this cake always delivers. I’ve made it more times than I can count and it’s been a huge hit every single time, especially with that delicious buttercream frosting. So if you’re after an easy, reliable chocolate cake recipe, this is one you’ll definitely want to bookmark!

Chocolate Cake Ingredients

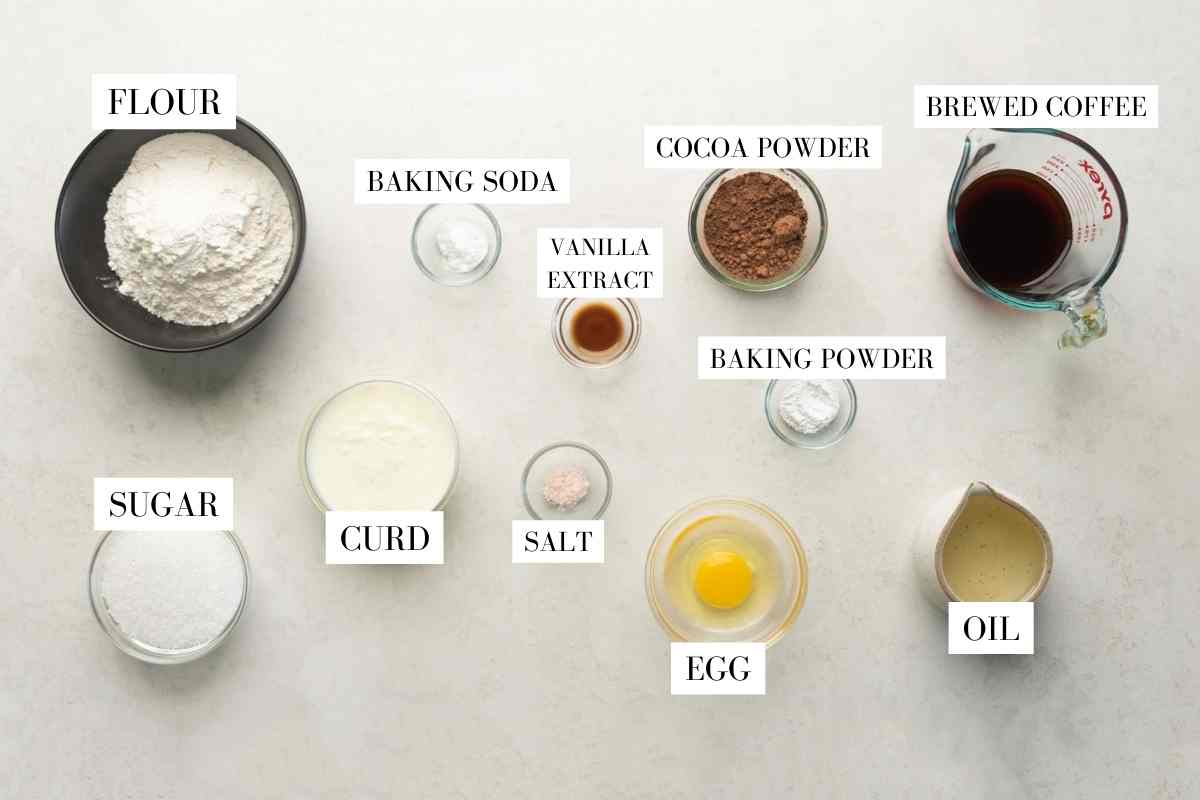
ingredient shot for one bowl chocolate cake

This is one of those recipes where I wouldn’t recommend any substitutes. It’s this proportion and combination of ingredients that create the moist texture that we want in a world-class chocolate cake.

  • All Purpose Flour (Maida) – the base of our cake. I don’t recommend subbing this for atta or gluten free flour since that will affect the texture. Maida keeps our cake light, bouncy, and moist.
  • Cocoa Powder – this is a chocolate cake, after all!
  • Sugar – I use granulated white sugar but you can also use caster sugar or brown sugar here
  • Oil – this ensures our cake stays moist for longer, any neutral flavored oil like canola, sunflower, rice bran works
  • Curd – my secret ingredient! I find that the combination of oil, curd, and egg in a cake batter results in an extra moist texture which is what we want.
  • Egg – for texture and binding. I don’t recommend subbing for a flax egg or making it eggless
  • Hot Black Coffee – an espresso shot or just brewed instant coffee works super well here. Coffee enhances the flavour of the cocoa powder and makes this cake super chocolatey and yum. Don’t add plain coffee powder as the liquid from the brewed coffee helps bring the batter together
  • Salt – just a pinch
  • Baking Powder + Soda – so our cake rises!

Note: the batter will be runny – that’s what we want! Don’t worry about this. Once baked, it’ll be just perfect.

How to make One-bowl chocolate cake:

Here’s a step-by-step guide on how to make the one-bowl chocolate cake:

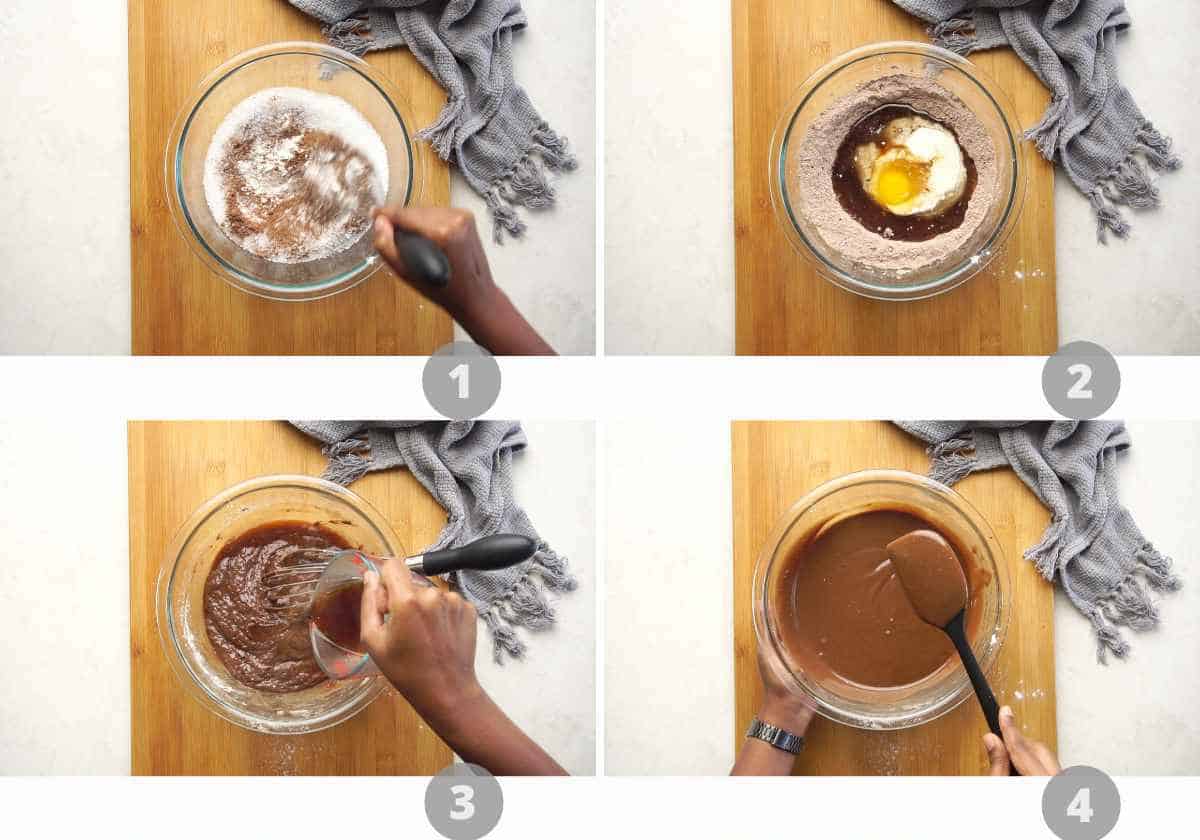
Step by step picture collage showing how to make chocolate cake

1. Add all purpose flour, sugar, cocoa powder, baking soda, baking powder and salt to a bowl. Whisk together until combined.

2. Add vanilla extract, egg, oil and curd. Whisk well until combined, about 1-2 minutes. Scrape the sides of the bowl.

3. Pour in hot coffee.

4. Give it another mix till it’s a smooth, runny batter.

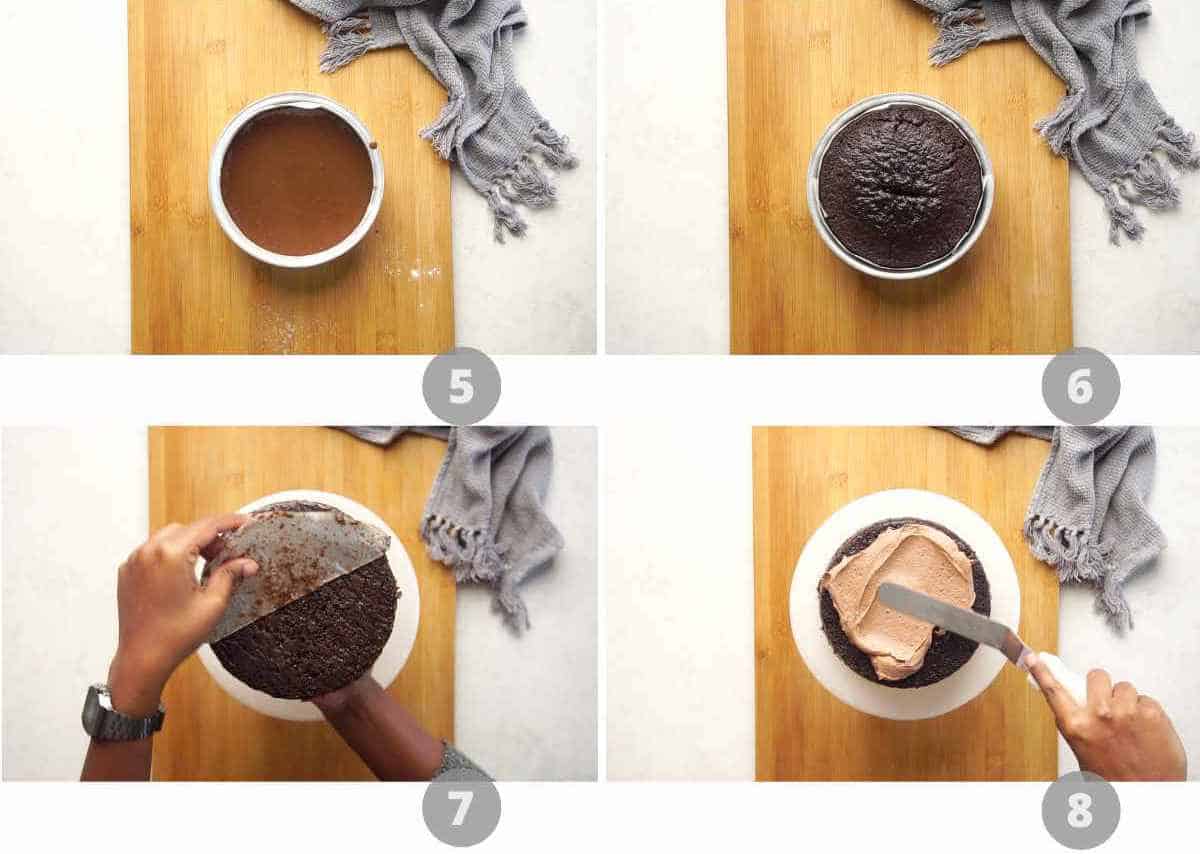
Step by step picture collage showing how to make chocolate cake

5. Pour the batter into lined and greased 6 inch cake mould.

6. Bake at 180C in a preheated oven for 30-40 minutes or till a skewer inserted into the centre comes out clean.

7. Allow it to cool for 15 minutes. Demould, remove the parchment paper and transfer to a wire rack.

8. Allow it to cool completely before serving or frosting.

I like serving mine with a quick chocolate buttercream frosting but this also works great on its own or with a layer of Nutella and chopped berries on top.Β 

Frequently Asked Questions

1. Is there any difference in baking this cake in the air fryer vs the oven?

The oven will have a longer preheat time, although I recommend that you preheat your air fryer for a couple minutes as well. We want to bake our cake until a knife comes out clean. The overall baking time range is 30-40 mins.Β 

2. Can I sub curd for Greek yogurt?

Yes, these can be substituted 1:1 easily. Just use non sweetened, non flavored greek yogurt.Β 

Can I skip the coffee?

Yes. The coffee doesn’t make the cake taste like coffee. It simply enhances the chocolate flavour.

Can I make this cake without eggs?

This recipe has only been tested with an egg, so I can’t guarantee the same texture with an egg substitute.

Can I double this recipe?

Yes. You can double the recipe and bake it in a larger cake tin. Keep in mind that the baking time will increase, so start checking for doneness after about 40 minutes.

Richa’s Top Tips

  • Don’t overmix the batter. Once the wet and dry ingredients are combined, mix just until smooth. Overmixing can make the cake dense.
  • Scrape the bowl before adding the coffee. This ensures there aren’t any pockets of dry flour hiding at the bottom or sides.
  • Measure the flour correctly. Spoon the flour into your measuring cup and level it off instead of scooping directly from the container. Too much flour can make the cake dry.
  • Don’t worry about the thin batter. The batter will be quite runny after adding the coffee, and that’s exactly how it should be.
  • Cool the cake completely before frosting. Even if it feels only slightly warm, frosting can melt and slide off.

Storage Tips

  • At room temperature: Store the cake in an airtight container for up to 2 days.
  • In the refrigerator: Keep it in an airtight container for up to 5 days. And before serving, let it sit at room temperature for 20-30 minutes for the best texture.
  • To freeze: Wrap the completely cooled cake (whole or in slices) tightly in cling film followed by foil, or place it in a freezer-safe container. Freeze for up to 2 months. Thaw overnight in the refrigerator or at room temperature before serving.
  • If frosting the cake later: Wrap the cooled cake tightly and store it at room temperature or in the fridge until you’re ready to frost. This helps keep it moist and prevents it from drying out.
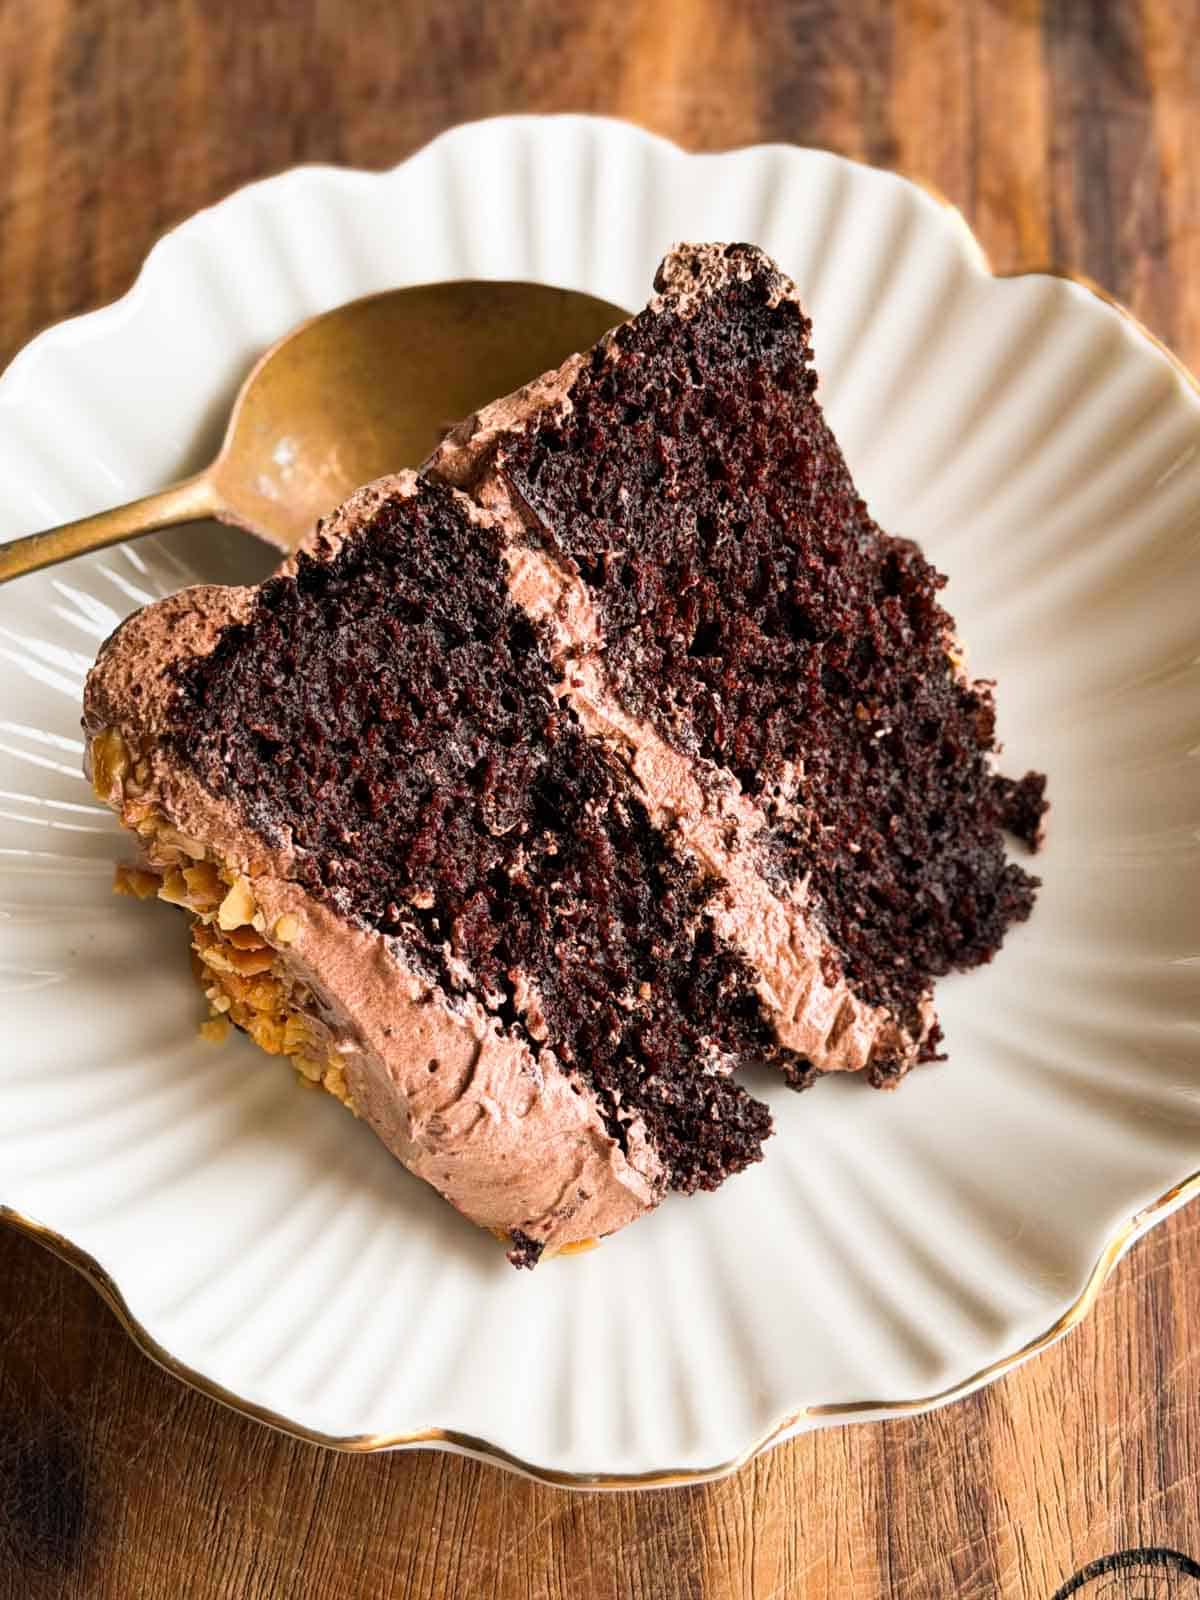
a slice of the one bowl chocolate cake served on a white dish with a spoon

I think we all need our hands on a fool-proof simple chocolate cake recipe when those sweet tooth cravings come up. Trust me, this is THAT recipe! And if you want to an activity to do with the kiddos, baking this cake is also perfect for that.

Watch This Simple Chocolate Cake Recipe Video

a slice of the one bowl chocolate cake served on a white dish with a spoon
Print

One-Bowl Chocolate Cake

This one-bowl chocolate cake uses everyday ingredients and stays moist for days!
Course Desserts
Cuisine American, Continental
Prep Time 10 minutes
Cook Time 40 minutes
Resting Time 30 minutes
Total Time 1 hour 20 minutes
Servings 6 people
Calories 370kcal
Author Richa

Ingredients

  • 1 cup All Purpose Flour 125 grams
  • 3/4 cup Sugar 150 grams
  • 1/4 cup Cocoa Powder 32 grams
  • 1 tsp Baking Soda
  • 1/2 tsp Baking Powder
  • 1/4 tsp Salt
  • 1 tsp Vanilla Extract
  • 1 Egg
  • 1/2 cup Oil 125 millilitres
  • 1/2 cup Curd or Yogurt 130 millilitres
  • 1/2 cup Hot Black Coffee 1 Teaspoon Coffee dissolved in 1/2 cup of hot water

Instructions

  • Line and grease a 6 inch tin with parchment paper. Preheat the oven to 180C
  • Add all purpose flour, sugar, cocoa powder, baking soda, baking powder and salt to a bowl. Whisk together until combined.
  • Add vanilla extract, egg, oil and curd. Whisk well until combined, about 1-2 minutes. Scrape the sides of the bowl.
  • Pour in hot coffee and give it another mix till it's a smooth, runny batter. Bake at 180C for 30-40 minutes or till a skewer inserted into the center comes out clean.
  • Allow it to cool for 15 minutes. Demould and transfer to a wire rack and allow it to cool completely before serving or frosting.

Video

Nutrition

Calories: 370kcal | Carbohydrates: 44g | Protein: 5g | Fat: 21g | Saturated Fat: 2g | Polyunsaturated Fat: 6g | Monounsaturated Fat: 12g | Trans Fat: 0.1g | Cholesterol: 30mg | Sodium: 336mg | Potassium: 130mg | Fiber: 2g | Sugar: 26g | Vitamin A: 60IU | Vitamin C: 0.1mg | Calcium: 57mg | Iron: 2mg

This article was researched and written by Urvi Dalal.

The post One-Bowl Chocolate Cake (Simple Chocolate Cake Recipe) appeared first on My Food Story.
❌