❌

Reading view

There are new articles available, click to refresh the page.

Mixed Veggi Paneer Masala Curry, Quick & Delicious Dinner Idea,Every day, Simple
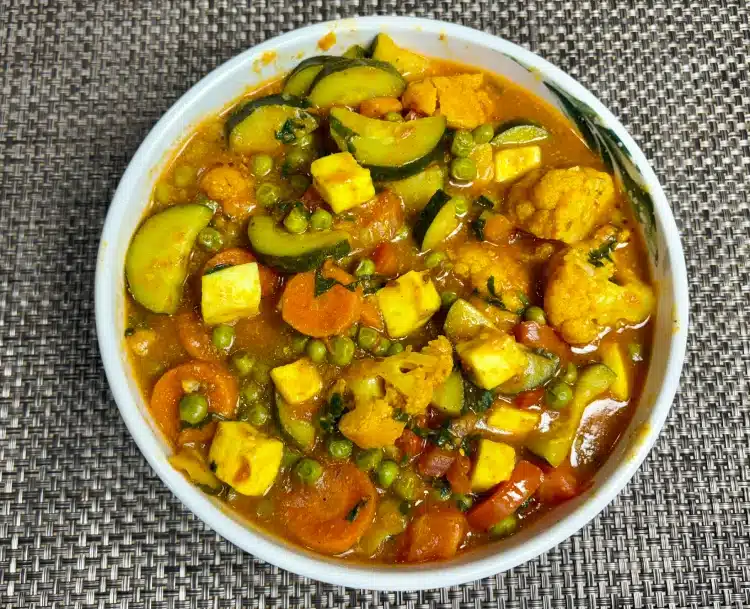
Mixed Veggi Paneer Masala Curry
Print

Mixed Veggi Paneer Masala Curry, Quick & Delicious Dinner Idea, Every day, Simple

This is a simple and tasty dishmade with mixed vegetables and soft paneer, all cooked in rich tomatogravy. It’s one of those recipes that works perfectly for both busyweeknights and special occasions whether you are cooking a familydinner or treating your friends.
Every bite has a lovely mix oftextures from the vegetables and soft paneer, making it not onlydelicious but also very satisfying and comforting.
You can easily serve it withroti, paratha, or steamed rice for a complete and wholesome meal.
Try it once, and it may becomeone of your family favorites!
Servings 4

Ingredients

  • 2 cups of cauliflower florets (phoolgobhi)
  • 1 cup green peas (hari matar)
  • Β½ cup carrots, diced (about Β½-inchpieces)
  • 1 medium zucchini, cut into bite-size pieces (withskin)
  • 1 cup paneer, cut into small cubes
  • 6 medium tomatoes
  • Β½ inch ginger
  • 1 green chili
  • 2 tbsp oil
  • Β½ tsp cumin seeds (jeera)
  • 1/8 tsp asafetida (hing)
  • ΒΌ tsp turmeric (haldi)
  • ΒΌ tsp red chili powder
  • 1 tbsp coriander powder (dhania)
  • 1 tsp salt (adjust to taste)
  • 1 tsp sugar
  • 1 tbsp cornstarch
  • Β½ tsp garam masala
  • 2 tbsp cilantro, finely chopped (haradhania)

Instructions

Preparation

  • Mix the cornstarch with ΒΌ cup water and set aside.
  • Blend 5 sliced tomatoes with ginger and green chili to make a smooth puree.(Tip: Remove chili seeds for a milder taste.)
  • Slice 1 tomato lengthwise into 8 to10 pieces and set aside.

Method

  • Heat oil in a pan. To check if it’s ready, add one cumin seed, if it cracks right away, the oil is hot.
  • Add cumin seeds and asafetida. As the seeds crackle, add the tomato puree.
  • Add coriander powder, turmeric, red chili powder, salt, and sugar. Mix well.
  • Cover and cook for about 5 minutes, until the gravy thickens slightly.
  • Add all the vegetables and ΒΌ cup water. Cover and cook on medium heat for about 10 minutes. Stir occasionally.
    (Vegetables should be tender, not mushy.)
  • Add paneer and gently mix.
  • Stir in the cornstarch mixture and cook for 2 more minutes to thicken the gravy.
    (Add a little hot water if the gravy becomes too thick.)
  • Turn off the heat. Add tomato slices, garam masala, and cilantro.
  • Cover the pan for a few minutes before serving to let the flavors blend.


Serving Suggestions

Serve hot with roti, paratha, or steamed rice. This dish makes a comforting and nutritious meal for any day of the week.

Tag Words may be you can use: Easy Weeknight Dinner, no onion garlic, mandir food, sattvic, Mixed Veg Paneer Masala, Mixed Veg Paneer Curry, Paneer Masala Recipe, Mixed Vegetable Curry, Veg Paneer Recipe, Paneer Gravy, Indian Curry Recipe, Easy Paneer Recipe, Vegetarian Dinner Recipe, North Indian Curry, Tomato Gravy Paneer, Paneer Sabzi, Mixed Veg Recipe, Quick Dinner Ideas, Homemade Indian Food, Restaurant Style Paneer, Family Dinner Recipe, Indian Vegetarian Recipes, Healthy Veg Curry, Rainbow Veg Paneer, Simple Indian Cooking,


Maybe you can use these hash tags: #PaneerRecipe #VegCurry #IndianFood #VegetarianRecipes #PaneerCurry #DinnerRecipe #EasyRecipes #HomemadeFood #NorthIndianFood #TomatoGravy #HealthyRecipes #QuickDinner #IndianCooking #FamilyMeals #ComfortFood #MixedVegetableCurry #SimpleRecipes

Frequently Asked Questions (FAQs)

1. Can I make this paneer curry without onion and garlic?

Yes, this recipe is completely made without onion and garlic, making it perfect for sattvic meals, fasting days, or temple-style cooking. Despite that, it still has a rich and flavorful taste from the tomato-based gravy and spices.

2. How do I keep paneer soft in curry?

To keep paneer soft and tender, avoid cooking it for too long. Add it towards the end and cook for only a couple of minutes. You can also soak paneer cubes in warm water for 5–10 minutes before adding them to the curry.

3. Can I use frozen vegetables for this recipe?

Yes, frozen vegetables are a convenient option and work well in this recipe. You can add them directly to the gravy without thawing, but you may need to adjust the cooking time slightly.

4. What can I use instead of cornstarch?

If you prefer not to use cornstarch, you can skip it or replace it with alternatives like cashew paste, fresh cream, or a small amount of gram flour (besan) to thicken the gravy.

5. Is this recipe spicy?

This dish has a mild to medium spice level. You can easily adjust the heat by reducing or increasing the amount of green chili and red chili powder according to your taste.

6. Can I prepare this curry in advance?

Yes, this curry can be made ahead of time. In fact, it often tastes better after a few hours as the flavors blend nicely. Reheat gently before serving and add a splash of water if needed.

7. What vegetables can I substitute or add?

You can customize the recipe based on what you have. Vegetables like beans, capsicum, potatoes, or mushrooms can be added or substituted easily.

8. What is the best way to serve this dish?

This mixed veg paneer masala pairs wonderfully with roti, paratha, naan, or steamed rice, making it a complete and satisfying meal.

9. Can I make this curry vegan?

Yes, you can make it vegan by replacing paneer with tofu. The rest of the ingredients are already plant-based, so it’s an easy swap.

10. How do I make the gravy richer?

To make the gravy richer and more indulgent, you can add a little cream, butter, or cashew paste. This gives the curry a smooth, restaurant-style texture and flavor.


The post Mixed Veggi Paneer Masala Curry, Quick & Delicious Dinner Idea,Every day, Simple appeared first on Manjula's Kitchen.


πŸ’Ύ

A quick and delicious mixed vegetable paneer masala cooked in rich tomato gravy. This easy no onion garlic recipe is perfect for weeknight dinners or special meals. Serve with roti, paratha, or rice.

Moong Dal Salad with Home Made Dressing, Healthy, Fresh, & Delicious

Print

Moong Dal Salad with Home Made Dressing, Healthy, Fresh, & Delicious!

This Moong Dal Salad is a healthy and wholesome choice, perfect for lunch. It is made withprotein-rich moong dal and fresh vegetables that add vibrant color and a crunchy bite. Toppedwith cheese and seeds, it is delicious, fresh, slightly tangy, and wonderfully satisfying. It’srefreshing and full of flavor!This is my favorite dressing, and all my friends love it. It’s my go-to dressing. Fresh ginger juicebrings a completely different dimension to it. It adds a gentle spice and freshness that transformsa basic dressing into something much more flavorful and complex.Ginger juice is very easy to make. Simply grate the ginger using a fine shredder and squeeze itwith your fingers to extract the juice.Fresh, colorful, and full of flavor, this Moong Dal Salad makes a perfect light meal. I hopeyou enjoy it as much as we do.
Servings 4

Ingredients

The ingredients are just a guideline and can be adjusted to your taste.

  • Β½ cup split yellow moong dal
  • 6 spinach leaves
  • 1/2 cup cucumber cut into bite sizes
  • 1/2 cup tomato cut into bite sizes
  • ΒΌ cup red bell pepper cut into bite size pieces
  • 2 tbsp grated carrots
  • 1 sliced radish in round
  • ΒΌ cup feta cheese
  • 1 tbsp tablespoon pumpkin seeds
  • 1 tbsp sunflower seeds

For Dressing

  • 3 tablespoons of olive oil
  • 2 teaspoons of ginger juice
  • ΒΌ teaspoon black pepper
  • 1 tablespoon lemon juice
  • Β½ teaspoon yellow mustard seeds powder
  • 2 teaspoons of sugar

Instructions

Method

  • Wash the moong dal thoroughly and soak for about 30–40 minutes.
  • Drain the water well. Cook dal in one cup of water, after dal comes to boil lower the heat to low medium for about 6-8 minutes. Dal should be soft and tender but not mushy.

Notes

Serving

Serve the salad fresh for the best taste. The crisp vegetables and tender moong dal make every bite refreshing and satisfying. In a salad bowl, arrange the colorful vegetables around the moong dal. Sprinkle feta cheese on top and finish with a generous drizzle of the dressing. Toss lightly just before serving and enjoy this fresh, vibrant salad. This Moong Dal Salad is simple, healthy, and full of fresh flavors. It’s a great way to enjoy a protein-rich dish that feels light yet satisfying.

Frequently Asked Questions (FAQs)

1. Can I make this Moong Dal Salad ahead of time?

Yes, you can prepare the moong dal and chop the vegetables a few hours in advance. Store them separately in the refrigerator and add the dressing just before serving to keep the vegetables fresh and crunchy.

2. Can I use sprouted moong instead of cooked moong dal?

Yes, sprouted moong works very well in this salad. It adds extra nutrition and a slightly crunchy texture. You can use it raw or lightly steamed if you prefer a softer bite.

3. What can I substitute for feta cheese?

If you don’t have feta cheese, you can use paneer, goat cheese, or even skip the cheese for a lighter version. The salad will still taste fresh and delicious.

4. How long can the dressing be stored?

The dressing can be stored in an airtight container in the refrigerator for up to 3–4 days. Shake or stir well before using.

5. Is this salad suitable for a vegan diet?

Yes, this salad can easily be made vegan by omitting the feta cheese or replacing it with a plant-based cheese alternative. The rest of the ingredients are naturally vegan.

The post Moong Dal Salad with Home Made Dressing, Healthy, Fresh, & Delicious appeared first on Manjula's Kitchen.

Ultimate Wholesome Dal Soup with Veggie Crunch

Print

Ultimate Wholesome Dal Soup with Veggie Crunch

Some days call for food that is simple, nourishing, and comforting. This Ultimate Wholesome Dal Soup with Veggie Crunch is one of those recipes. Made with a blend of moong and masoor dal, it’s light yet satisfying, gently spiced, and easy to put together. What makes it special is the final touch, a quick stir-fry of colorful vegetables added at the end, bringing a little crunch and freshness to every spoonful. It reminds you how comforting homemade food can be. Serve warm and enjoy this ultimate wholesome dal soup, where soft lentils meet a fresh, veggie crunchβ€”simple, nourishing, and deeply comforting.
Prep Time 10 minutes
Cook Time 25 minutes
Soaking Time 30 minutes
Servings 2

Ingredients

For the Dal

  • Β½ cup red dal masoor dal
  • Β½ cup moong dal washed
  • 2 tbsp oil
  • Β½ tsp cumin seeds
  • 1 cup chopped tomatoes
  • ΒΌ tsp turmeric
  • β…› tsp asafetida hing
  • ΒΌ tsp black pepper
  • 1 tsp salt or to taste
  • 3 cups of water
  • 1 cup of additional water for adjusting consistency

For the Stir-Fried Vegetable Topping

  • 1 tbsp oil
  • Β½ tsp cumin seeds
  • ΒΌ cup zucchini finely chopped
  • ΒΌ cup yellow or red bell pepper finely chopped
  • ΒΌ cup of shredded carrots
  • 1 tbsp ginger thinly sliced
  • 2 dried red chilies

For Garnishing

  • 2 tsp lemon juice
  • Β½ tsp garam masala
  • 2 tbsp finely chopped cilantro

Instructions

  • Wash the moong dal and red dal until the water runs clear. Soak for 30 minutes. Drain and wash again.
  • Heat oil in a pot. Add cumin seeds and let them sizzle.
  • Add chopped tomatoes and cook until soft and mushy.
  • Stir in turmeric, asafetida, black pepper, and salt.
  • Add the soaked dals and 3 cups of water. Cover and cook on low to medium heat for 15 to 20 minutes, until the dal is soft and mushy.
  • Blend the dal using a hand blender until smooth and soup-like in consistency.
  • Add 1 cup of water to adjust the consistency and bring it to a gentle boil.
  • In a separate pan, heat 2 tablespoons oil. Add cumin seeds.
  • Add ginger and dried red chilies. SautΓ© until fragrant.
  • Add zucchini and bell peppers. Stir-fry briefly until just tender, keeping a slight crunch.
  • Pour the stir-fried vegetables over the dal soup. Add lemon juice, garnish with cilantro, and sprinkle garam masala.
  • Serve warm.

Notes

  • Serve this dal soup as a light lunch with toasted bread, or plain rice.
  • This soup also works well as a make-ahead dishβ€”reheat gently and add the veggie
    topping fresh before serving.
  • Frequently Asked Questions (FAQs)

    1. Can I use only one type of dal instead of both moong and masoor?

    Yes, you can use either moong dal or masoor dal alone. However, using both gives a better texture and balanced flavor.

    2. Do I have to soak the dal?

    Soaking helps the dal cook faster and become softer. If you’re short on time, you can skip soaking, but increase the cooking time slightly.

    3. Can I make this in a pressure cooker or Instant Pot?

    Yes. Cook the soaked dals with water and spices for:

    • Pressure cooker: 2–3 whistles
    • Instant Pot: 6–8 minutes on high pressure
      Let the pressure release naturally before blending.

    4. Can I skip blending the dal?

    Yes. Blending gives it a smooth soup-like texture. If you prefer a more rustic texture, you can lightly mash it instead.

    5. Can I add other vegetables to the topping?

    Absolutely. You can add beans, corn, spinach, peas, or mushrooms. Just make sure not to overcook them so they keep their crunch.

    The post Ultimate Wholesome Dal Soup with Veggie Crunch appeared first on Manjula's Kitchen.

    πŸ’Ύ

    https://www.youtube.com/embed/zGeyyxyQAQA Ultimate Wholesome Dal Soup with Veggie Crunch Some days call for food that is simple, nourishing, and

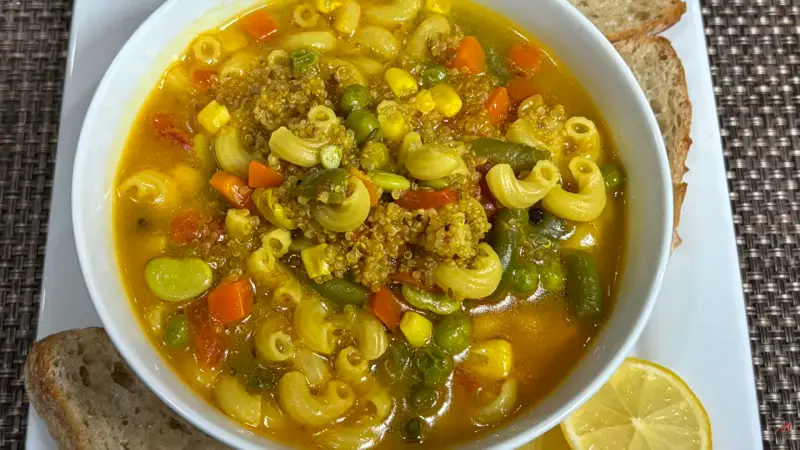
    Quinoa Vegetable Soup, Healthy Comforting One Pot Meal

    Print

    Quinoa Vegetable Soup, Healthy Comforting One Pot Meal

    A warm bowl of this quinoa vegetable soup is comfortable, nutrition, and simplicity all in one. It’s perfect for busy days when you want something homemade, light, and wholesome without spending too much time in the kitchen.
    I love this recipe because quinoa and pasta together make the soup hearty, while the vegetables add color and freshness. It’s simple, satisfying, and comes together with ingredients most of us already have.
    Prep Time 10 minutes
    Cook Time 30 minutes
    Total Time 40 minutes
    Servings 4

    Ingredients

    • 1/2 cup of quinoa
    • 1/4 cup elbow pasta (or any small pasta of your choice)
    • 2 cups of mixed vegetables (I’m using frozen mixed veggies β€” carrots, corn, green

      peas, green beans, and lima beans)

    • 1 cup chopped tomato
    • 2 tbsp oil
    • 1/2 tsp cumin seeds (jeera)
    • 1/8 tsp asafetida (hing)
    • 1/4 tsp turmeric (haldi)
    • 1 tsp grated ginger
    • 6 cloves (laung)
    • 6 black peppercorns
    • 3 cups of water
    • 1 tsp fresh lemon juice
    • 1 tsp of salt

    Instructions

    • Wash the quinoa in a fine strainer under running water. Set aside.
    • Heat oil in a saucepan over medium-high heat. When moderately hot, add cumin seeds and asafetida.
    • Once the cumin seeds crackle, add the mixed vegetables. Stir for a minute.
    • Add quinoa, pasta, tomatoes, ginger, cloves, black peppercorns, and water.
    • Add salt to taste.
    • Bring the mixture to a boil, then reduce the heat to low-medium.
    • Cover and cook for 25–30 minutes, or until the quinoa, pasta, and vegetables are tender.
    • Finish the soup
    • Add lemon juice. Taste and adjust salt and pepper as needed.

    Notes

    • Always rinse quinoa well to remove bitterness.
    • Keep the soup consistency adjustable-add more water if you prefer a thinner soup.
    • Lemon juice should be added at the end to keep the flavors fresh.
    • This soup thickens slightly as it rests, so adjust water while reheating.
    • Works great as a light meal, detox-friendly option, or comfort food during cold days.

    Serving Suggestion

    Serve hot. This soup is paired well with toast, or even a simple paratha.
    It’s light, flavorful, and perfect for lunch, dinner, or a late-evening warm
    snack.

    Frequently Asked Questions (FAQs)

    1. Can I skip pasta in this soup?

    Yes, you can skip the pasta if you want a gluten-free or lighter version. You may slightly reduce the water quantity in that case.

    2. Can I use fresh vegetables instead of frozen?

    Absolutely. Fresh vegetables like carrots, beans, peas, and corn work very well. Just chop them evenly for uniform cooking.

    3. Can I make this soup vegan?

    Yes, this soup is naturally vegan as it contains no dairy or animal-based ingredients.

    4. Can I prepare this soup in advance?

    Yes. You can store it in the refrigerator for up to 2 days. Reheat gently on the stovetop, adding a little water if needed.

    5. Is quinoa necessary for this recipe?

    Quinoa adds protein and makes the soup hearty. However, you can substitute it with rice, millet, or just increase the vegetables if preferred.

    6. Can I make it spicy?

    Yes. You can add green chili, chili flakes, or black pepper powder to adjust the spice level.

    The post Quinoa Vegetable Soup, Healthy Comforting One Pot Meal appeared first on Manjula's Kitchen.
    Stuffed Parathas Made Easy Aloo Potato Gobhi Cauliflower

    Print

    Stuffed Parathas Made Easy Aloo Potato Gobhi Cauliflower

    I am truly excited! Stuffed parathas sound difficult to make and time consuming and
    honestly, they are. They’re one of the most loved Indian breads, but making the dough
    and rolling the parathas is the part that creates the most work, the most mess, and the
    most cleanup.
    That’s why I’ve been experimenting with easier ways to make them while keeping the
    taste true to the original. You can even call it semi-homemade because I’m using store-
    bought uncooked rotis. I was so happy and surprised when I came up with this quick,
    simple method. In the end, your own finishing touch makes all the difference!
    Today, I am sharing recipes for two different parathas:
    Aloo (Potato) Paratha β€” my favorite classic
    Gobhi (Cauliflower) Paratha β€” my husband’s favorite
    This recipe will make 2 parathas β€” one of each.
    Prep Time 15 minutes
    Cook Time 15 minutes
    Servings 2 parathas

    Ingredients

    Aloo Paratha

    Ingredients

    2 Uncooked Rotis (available at Indian stores)

    For filling

    • Β½ cup boiled and mashed potatoes
    • ΒΌ teaspoon cumin seeds
    • 1/2 teaspoon coriander powder
    • ΒΌ teaspoon dry mango powder

    A pinch of asafetida

    • ΒΌ teaspoon salt
    • ΒΌ teaspoon finely grated ginger
    • Β½ teaspoon finely chopped green chili (adjust to taste), or ΒΌ teaspoon red chili powder
    • 1 tablespoon finely chopped cilantro
    • 2 teaspoons oil to cook the paratha

    Gobhi (cauliflower) Paratha

    Ingredients

    • 2 Uncooked Rotis (available at Indian stores)
    • Β½ cup grated cauliflower (Gobhi)
    • 2 tablespoons of boiled mashed potatoes (to help hold the filling)
    • Β½ teaspoon cumin seeds
    • 1 teaspoon coriander powder
    • ΒΌ teaspoon dry mango powder

    A pinch of asafetida

    • ΒΌ teaspoon salt
    • ΒΌ teaspoon finely chopped ginger
    • Β½ teaspoon finely chopped green chili (adjust to taste), or ΒΌ teaspoon red chili powder
    • 1 tablespoon finely chopped cilantro
    • 2 teaspoons oil

    Instructions

    • Prepare the filling:
    • Mix all the ingredients together. Taste and adjust the salt. If filling seems too dry add 1spoon of water.
    • Lightly cook the rotis:
    • Heat a flat skillet over medium heat. Cook each roti on one side only for about 30 seconds.
      Place them on a plate.
    • Assemble the paratha:
    • On one roti (cooked side up), spread the potato filling evenly. The filling should not be too thick. Place the second roti on top with the cooked side facing down.
    • Cook the paratha:
    • Heat the skillet to medium-high. Transfer the prepared paratha to the skillet. Cook on both sides using about 1 teaspoon oil per side.
      Press gently with a spatula and cook until golden brown and crispy. These come out looking just like traditional aloo parathas β€” crispy, hot, and delicious.
      They taste best when served hot!

    Gobhi (cauliflower) Paratha

    • Prepare the filling:
    • Grate the cauliflower finely. Add the mashed potatoes and mix well, this helps bind the loose cauliflower.
    • Mix in all remaining ingredients. Taste and adjust the salt.
    • If filling seems too dry add 1 spoon of water
    • Lightly cook the rotis:
    • Heat a flat skillet over medium heat. Cook each roti on one side only for about 30 seconds.
      Remove and set aside.
    • Assemble the paratha:
    • Place one roti on a plate with the cooked side facing up.
      Spread the cauliflower-potato filling evenly in a thin layer.
      Place the second roti on top with the cooked side facing down.
    • Cook the paratha:
    • Heat the skillet on medium high. Gently place the stuffed paratha on the skillet.
    • Cook both sides using about 1 teaspoon oil per side.
    • Press lightly with a spatula and cook until both sides are golden brown and crisp.
    • These semi-homemade Gobhi Parathas turn out wonderfully β€” flavorful, easy to handle, and so much simpler to prepare than the traditional method. Serve hot for the best taste!

    Notes

    • Keep the filling layer thin to prevent tearing.
    • Prick the paratha lightly while cooking to avoid puffing and separation.
    • Always cook on medium to medium-high heat for even browning.
    • These parathas stay crisp and reheat well on a skillet.

    I like to serve paratha spiced yogurt or pickle or just enjoy, with hot cup of tea.
    Thank you! Enjoy!

    Frequently Asked Questions (FAQs)

    1. Can I use frozen rotis?

    Yes. Thaw them completely before cooking to ensure even heating and proper texture.

    2. Why add potatoes to gobhi filling?

    Cauliflower releases moisture while cooking. Adding potatoes helps bind the filling and prevents the paratha from separating.

    3. Can I make these ahead of time?

    Yes. Cook them slightly less if you plan to reheat later on a skillet.

    4. Can I make them oil-free?

    A small amount of oil helps create a crisp texture, but you can reduce the quantity if needed.

    5. What can I serve with parathas?

    Parathas pair well with spiced yogurt, pickle, butter, or simply enjoy them with a hot cup of tea.

    The post Stuffed Parathas Made Easy Aloo Potato Gobhi Cauliflower appeared first on Manjula's Kitchen.

    ❌