❌

Reading view

There are new articles available, click to refresh the page.

If It’s Electronic Paper, Why Not Print To It?
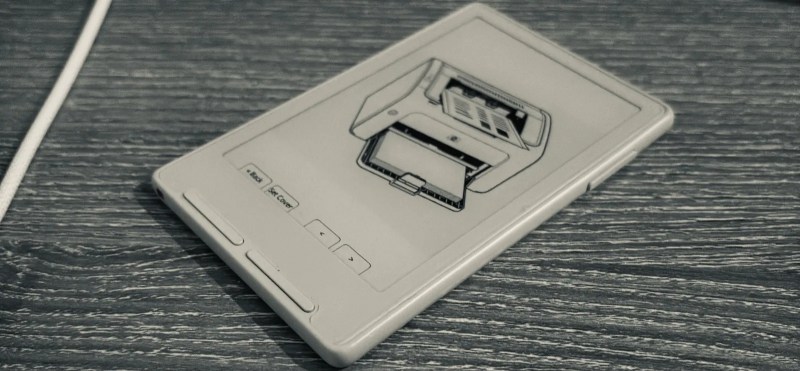
E-ink is supposed to be the electronic version of dead-tree paper, but there’s one enormous difference: how you get your images and text onto it. For paper, you print on it. E-ink? Well, it depends on what it’s hooked up to. If it’s an ESP32C3-based Xteink X4 and X3, then you can just print to that, too, thanks to [Nishant Joshi]’s fork of the popular CrossPoint firmware.

The fork implements the Internet Printer Protocol, IPP, on the ESP32-C3. It makes loading documents a breeze: select the printer in your operating system, and press print. To the computer, the reader advertises itself as a printer that provides monochrome, single-sided output at 300 DPI on A5 paper, and accepts Apple raster and PWG raster formats. Of course these raster images are enormous compared to the paltry RAM available on the microcontroller, so pixels are received and written row-by-row β€” both to the screen directly, and to the SD card for later perusal. That makes a folder on the SD card the equivalent of a printer’s output tray.

This interface is amazing in its simplicity, and we’d love to see it in other E-ink devices. It reminds us somehow of AlphaSmart word processors β€” which are still relevant today in large part because their β€˜file transfer’ mechanism is to pretend to be a USB keyboard and type the document onto your computer. As long as IPP is available, so too will you be able to get documents onto this e-reader.

GOG Brings Back 'Big Box' PC Games, One Printable Template At a Time

An anonymous reader quotes a report from Ars Technica: Those who remember PC gaming in the days before Steam may have fond memories of the "big box" packaging that made those games stand out as shelf eye candy and sought-after in-home collectibles. Today, PC gaming platform GOG is hoping to reignite some of the nostalgia for those days by adding downloadable 3D models and printable, foldable high-res packaging scans for a handful of PC games on the platform. Thus far, the "Printable Big Box" collection on GOG is limited to just five games: Armikrog, Descent, Hitman: Codename 47, Myst, and Star Trek: 25th Anniversary. Players browsing those games on the GOG store will now see "3D Boxes" listed among the included "Goodies" before purchase. Owners of those games on GOG can download a ZIP file containing a version of the box art as an animated 3D object file (in an easy-to-open GLB format) and a "flat printable template" in PDF, SVG, and Adobe Illustrator formats. Those downloads allow for what GOG calls "a proper papercraft project for anyone who misses shelves full of PC game boxes." The physically focused expansion of the existing GOG Preservation Program comes through a partnership with Benjamin Wimmer's Big Box Collection website, which has grown since 2015 to include over 1,000 3D scans from his private collection of physical PC games. In an interview with GOG, Wimmer said that while he appreciates the artistry of a good old-fashioned big box, he also appreciates their evolution into the "interactive cards" on modern digital storefronts that "provid[e] us art, screenshots, gameplay videos and whatnot and that not shown as a box, [it] is just good UX." "Physical media doesn't survive the way software can -- boxes get lost, crushed, thrown out," GOG writes in today's announcement. "Scanning them, and letting you print your own, is preservation in a different shape: the same mission that keeps these games running on modern PCs, applied to the objects they used to come in."

Read more of this story at Slashdot.

Printing Micron-Scale Benchies With Resin and Turmeric

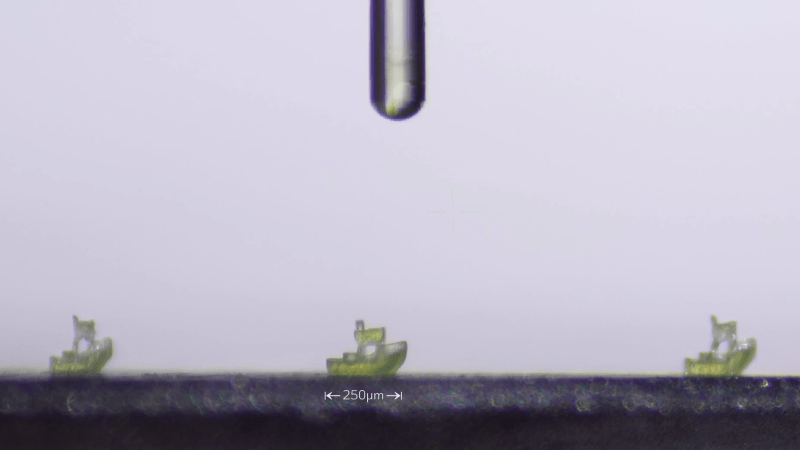
A white background is shown, with a grey metal plate at the base of the image. On the plate are three tiny green Benchy models. Above the Benchies is a glass cylinder. Below one of the Benchy models, text says "250 Β΅m".

Resin 3D printing has opened up a whole new scale of resolution for hackers, but the technology can go still finer; commercial micro-SLA and two-photon polymerization printers can print items with sub-micron feature sizes, but the machines are well out of reach for hackers. There’s more than one way to get such high resolution, though, as [Diffraction Limited] demonstrated with his micron-scale resin printer.

The printer builds on [Diffraction Limited]’s previous micro-manipulator and fiber-coupled laser. The micro-manipulator holds the end of the optical fiber just in front of the build plate, which is coated with resin. A 405-nm laser shines through the fiber, curing the resin in a narrow cone in front of the fiber’s core, which the micro-manipulator can trace in a pattern to build up objects, much like an FDM printer. Since the fiber’s inner core is only three microns across, the cured resin shears cleanly away from it when the fiber moves. Since the principle is so similar to an FDM printer, a standard slicer could be used to generate the tool paths.

Early testing proved that the principle worked, but the resin wasn’t absorbent enough for very high resolutions; UV light passed through previously cured resin too easily, limiting the minimum layer height. A UV-absorbent dye dissolved in the resin solves this by limiting the light’s penetration depth. [Diffraction Limited] found that curcumin, the natural dye responsible for turmeric’s bright yellow colour, worked well for this; as an added bonus, alcohol easily extracts it from turmeric powder. This solved the resolution issues well enough for [Diffraction Limited] to print a series of Benchies 150 Β΅m long, a Stanford bunny dwarfed by a human hair, and a few other microscopic pieces. Conveniently, the curcumin dye leaves the printed objects slightly fluorescent under UV light, making them easier to pick up under a microscope.

For a slightly different approach to FDM-inspired microscopic 3D printing, check out necroprinting. For the absolute limits of 3D printing, check out the world’s smallest Benchy.

Doubling Thermal Printer Resolution by Wiggling

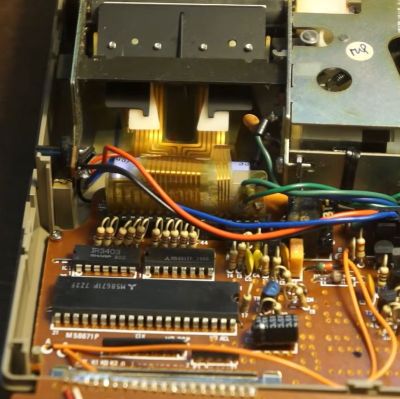
Insides of the Sears 12 calculator. (Credit: Danalog, YouTube)

Thermal printers are still extremely common today, using small heating elements in combination with temperature-sensitive paper to create a dot matrix-like effect without messing with ink ribbons and complex mechanisms. Of course, even with just a line of elements you still needed one of these per pixel, which at least in the 1970s when the Sears 12 calculator was released added significantly to the cost. The solution here was to wiggle the elements, doubling the resolution of the print head, as detailed in this video by [Danalog].

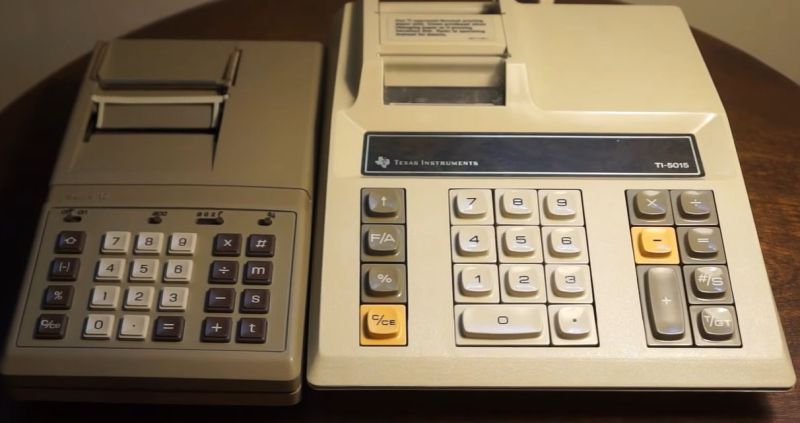
Using a contemporary Texas Instruments TI-5015 calculator as comparison with its non-wiggling print head, it’s easy to see the advantages here. In an era where electronic calculators didn’t have displays but a thermal printer, this print quality was the selling point, yet adding more thermal elements added to the price tag of the final device and more complexity to the design in terms of driving circuitry.

In this regard adding a way to make the print head move side-to-side at a set rate and tying this fact into the printing would save about half of that circuitry. Inside the Sears 12 is a fairly standard Mitsubishi M58671 calculator IC, but also the whole printer mechanism. When operating, as demonstrated in the video with the cover removed, you can see the whole print head moving rapidly.

With this mechanism this much cheaper Sears 12 definitely gives the TI-5015 a run for its money, even if as noted by [Danalog] the timing would go off a bit after a longer session, resulting slightly wavy printing. Presumably with the massive cost savings of buying a Sears calculator over a TI one, this was deemed an acceptable trade-off.

Laser Your Way to Smoother FDM 3D Prints

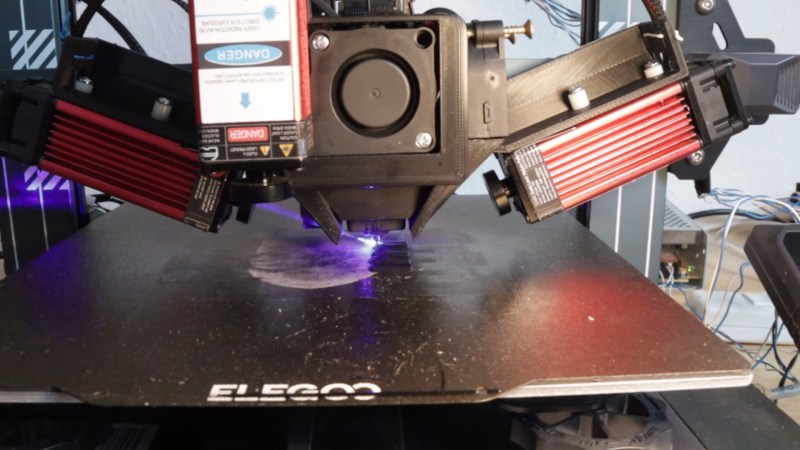
Now, not everyone minds the characteristic layer lines you get with Filament Deposition Modeling (FDM) 3D prints, but sometimes you need a smooth surface. If so we might go for filling primer, Bondo, or maybe break out the ABS and vapor smooth. Well, [I changed a thing] has an alternate suggestion: lasers. Laser melting can smooth the walls on a print, or the top surfaces as he shows in two different videos, both embedded below. The results look roughly similar to vapor smoothing, without the chemical exposure small risk of explosion.

Of course, you need a laser to do this, and [I changed a thing] has two diode lasers mounted to the X-axis of his printer. Of the two, the top surfaces were a lot easier to get right than the wall smoothing, which makes sense. Top surfaces are right there for the laser to get at, after all, while with his laser setup [I changed a thing] needs to get at the walls obliquely. [I changed a thing] tries melting layer-by-layer as well as a few methods to get at the walls of a finished print; which works best seems to depend on the size of and geometry of the object, so it looks like this technique is as much art as science right now.

This effort is closely related to the previous work [I changed a thing] did onΒ improving layer adhesion with laser melting.Β  It’s also not the first time we’ve seen laser-driven print smoothing, but that project used non-planar movements to do a post-print laser pass.

This Library Needs to Be At Least… Three Times Bigger

Many of us have noted a tremendous price increase in many computer components for some mysterious reason. Whatever this cause is will be debated among the various modern philosophers and Diogeneses, but regardless of cause we all still have to live in this world and make do. That turns us towards getting maximum value from the things we already have rather than trying to go out and buy more computer components right now, like [svofski] using his vast swath of existing microSD cards to build an SD card library.

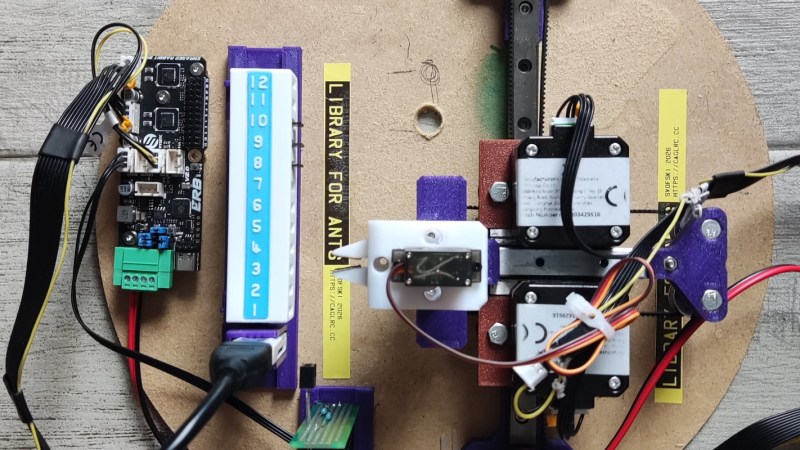
The library is based around a tiny robotic arm that can physically grip the cards and move them in and out of a reader. The first iteration of the arm involved rotating the two pincers, but this turned out to be overly complicated and [svofski] eventually settled on a design resembling a rack and pinion that slides the two pincers together instead. With the gripper sorted out, it’s placed in system called T-bot arrangement, similar to coreXY kinematics, that lets it pick and place among 12 microSD card slots.

Many of the parts in this build were directly from or inspired by 3D printers, making it relatively simple with so many parts available. [svofski] didn’t build it for a specific use case, though; mostly it was constructed out of fascination for robotic tape changers which perform a similar function. But for anyone who actually needs to duplicate a large number of SD cards, or other types of removable media, this could prove to be a fairly handy robot.

A Hot End And Material Database For 3D Printing

When it comes to 3D printing in the FDM world, you can go a long way just relying on standard settings that ship with your 3D printer and/or slicer. If you want to push the limits, though, it pays to better understand the hardware and materials you’re working with to know what you can get away with. To that end, [Robert Samples] put together the MeltCalc database to help.Β 

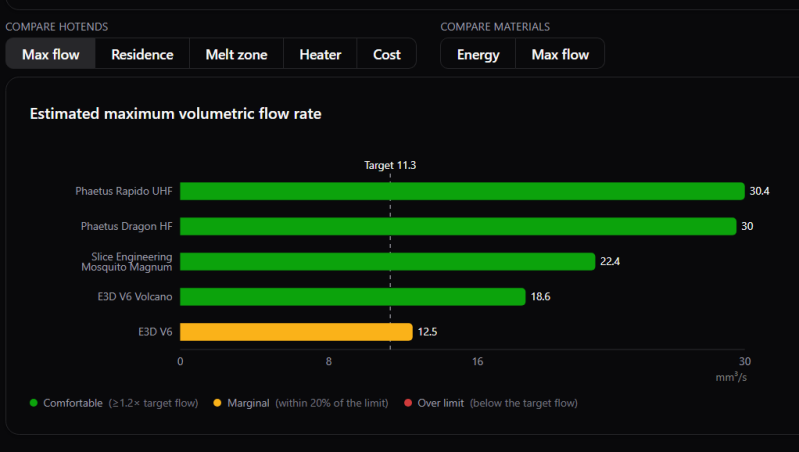
The purpose of MeltCalc is simpleβ€”it collates data on hot ends and materials regarding factors like maximum flow rate, print speeds, and heater requirements. If you’re wondering whether a given hot end can flow a given filament at a given rate, for example, this tool is a great place to start. It features 64 different hot ends and 36 polymers typically used in the 3D printing world, and can spit out maximum flow rates and print speed estimations even accounting for fancy tech like Core Heating Technology (CHT) nozzles. It’s all based on thermodynamic modelling which [Robert] put together based on his experience as a chemist who works with polymers. His aim was to provide a tool withΒ realistic flow rates for hot ends, so that end users don’t have to just rely on often-optimistic marketing numbers.

For those eager to dive deeper into the code and modelling, the project source is available on Github. We’ve featured all kinds of other useful hacks in this space lately, too, like our recent look at how to achieve wave overhangs. If you’ve got your own nifty 3D printing tools in the works, don’t hesitate to notify the tipsline.

❌