I stumbled on PTM7950 listing on AliExpress and thought to try it out. My Laptops and PC were working fine in my opinion until I checked out that I had the following Temps :
Relevant PC Specs : CPU – AMD Ryzen 9 3900X 12-Core Processor [CPU Max : 83 ] GPU – AMD Radeon RX 5700 XT [GPU Max : 89 / Hot Spot 100] Laptop Specs [Asus M16]: CPU – 11th Gen Intel Core i9-11900H [CPU Max : 100] GPU – NVIDIA GeForce RTX 3060 Laptop GPU [GPU Max : 75 / Hotspot 80]
Decision to Use PTM7950
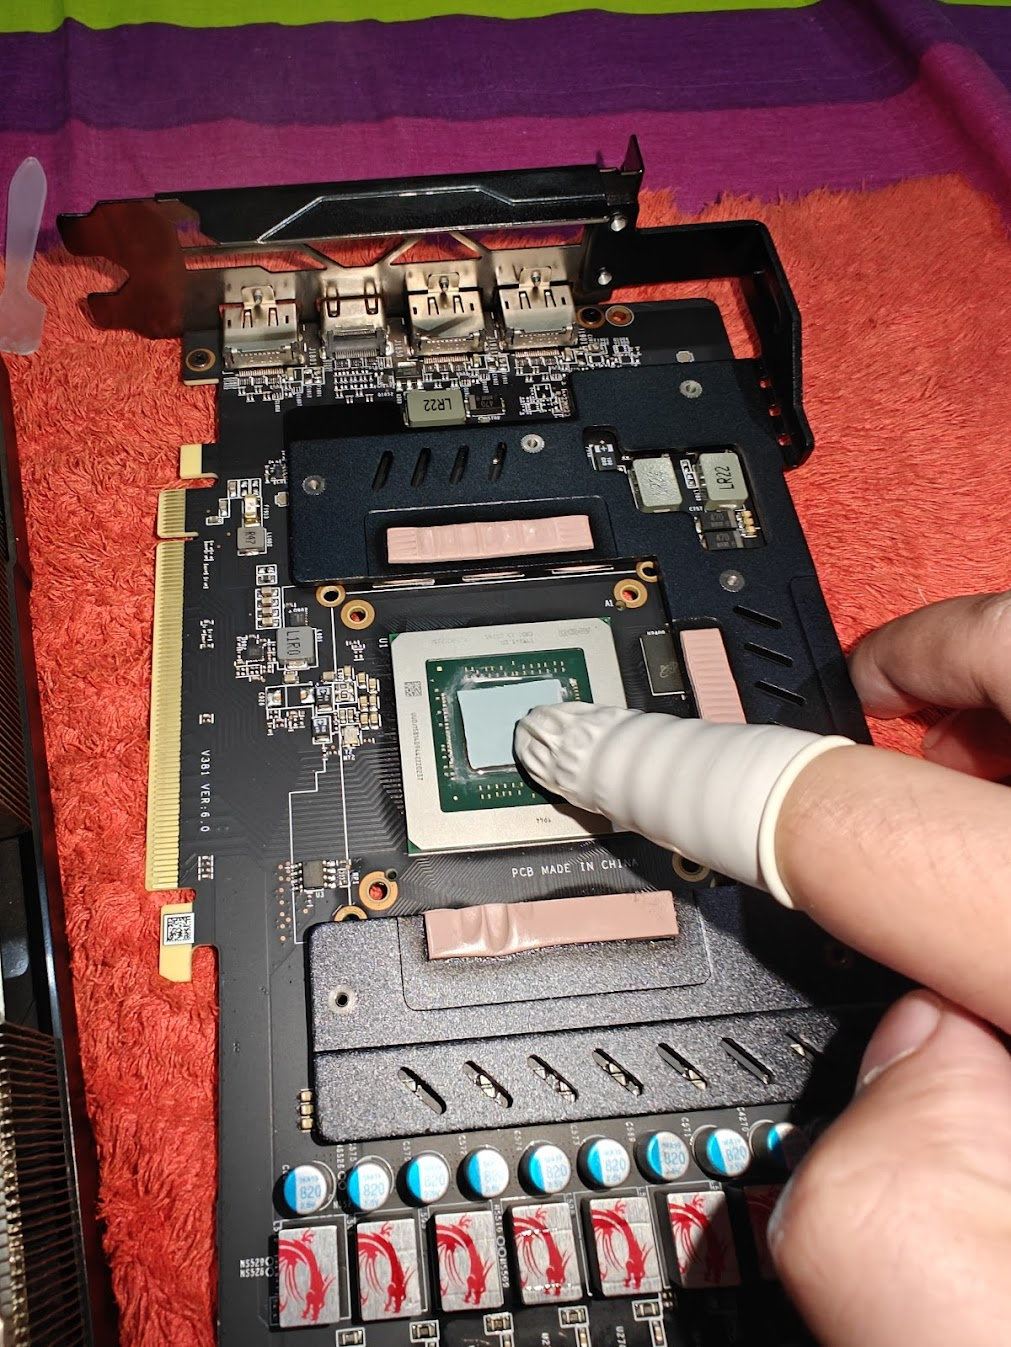
The above mentioned temps on PC GPU and Laptop CPU made it clear to me that I need to apply PTM7950 and I while the process of repasting of PTM on GPU for PC was very uneventful.
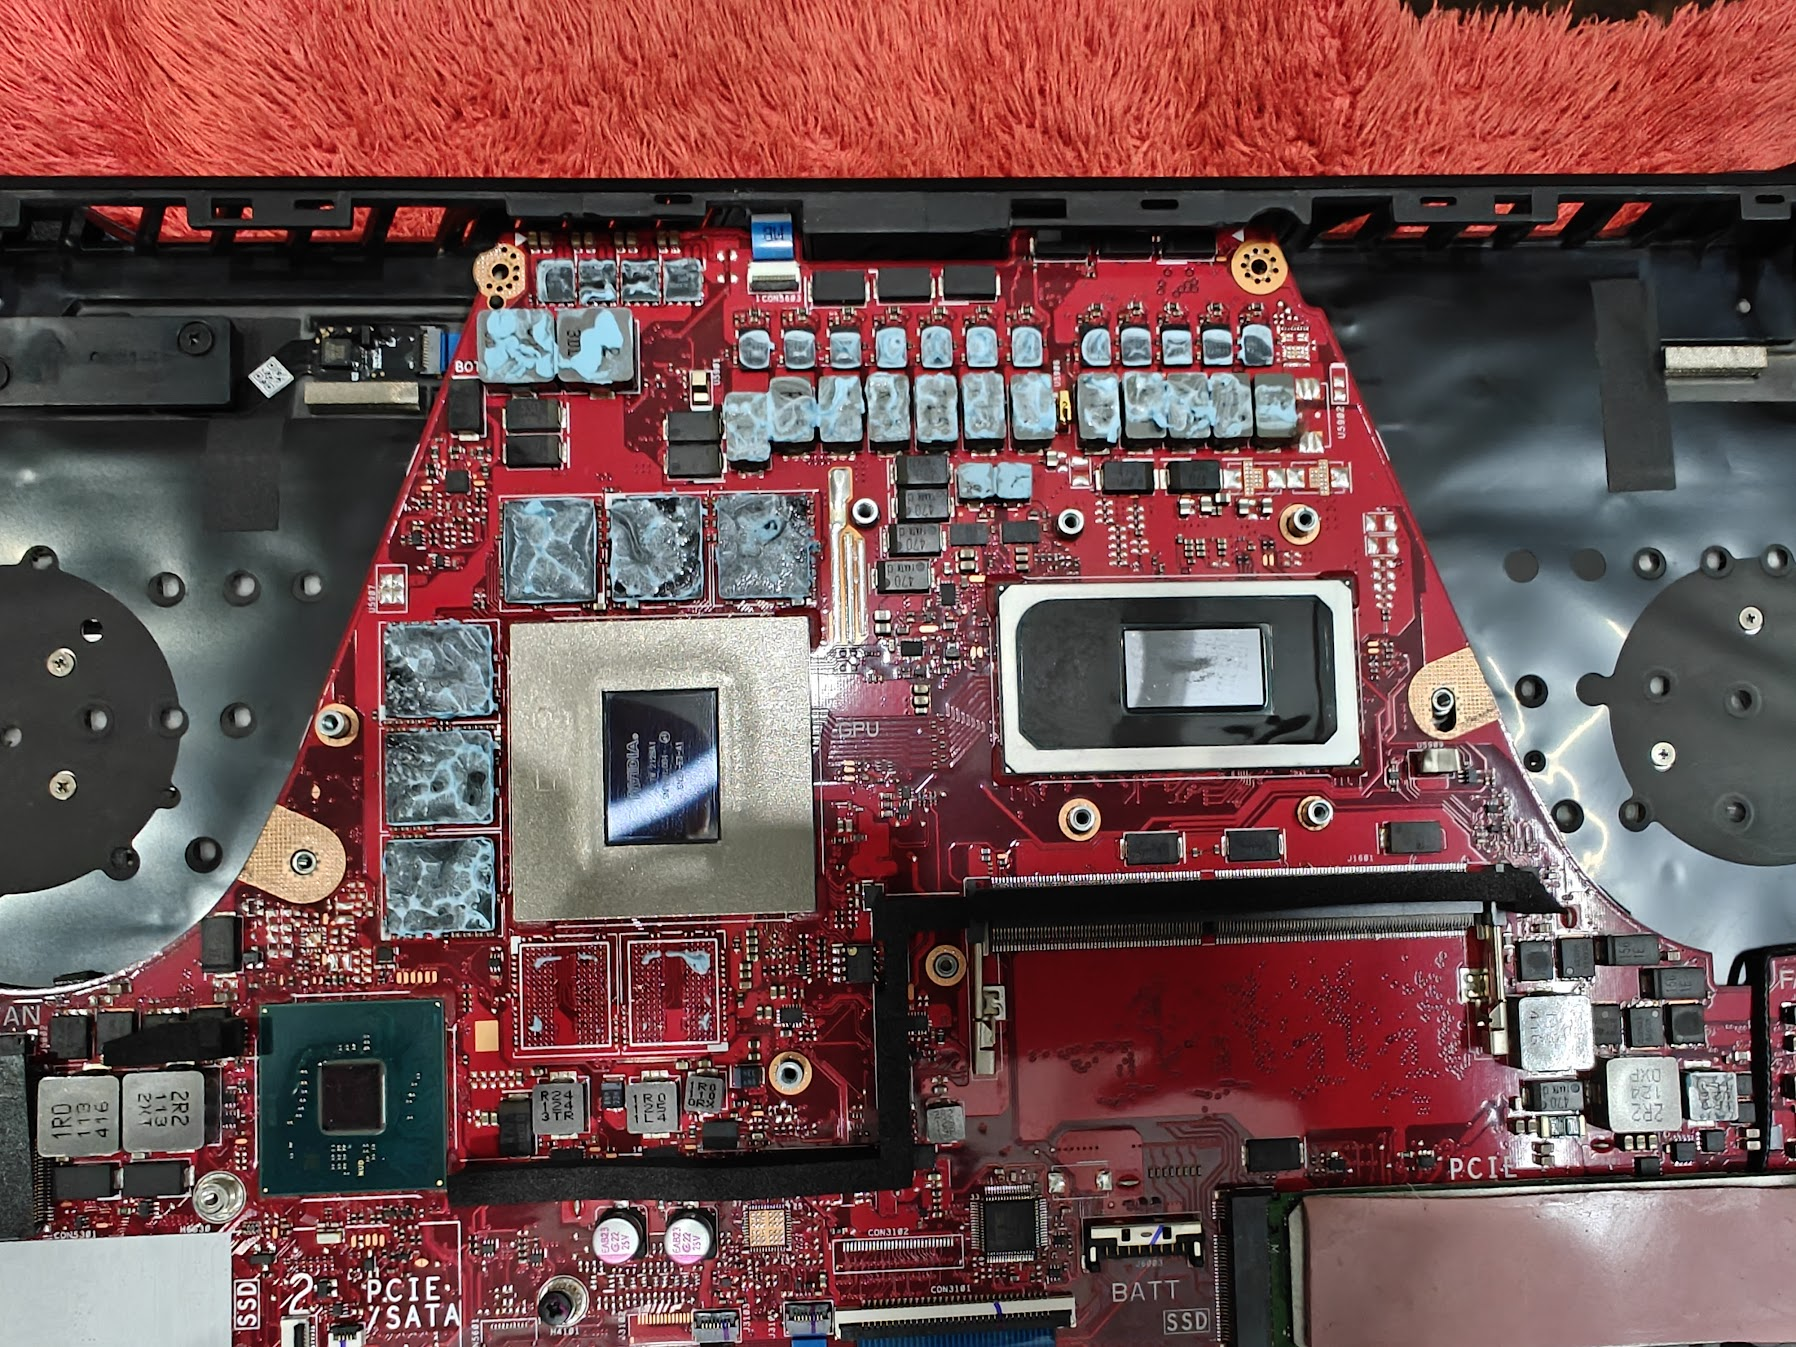
Things were bit different for the Asus Zephyrus M16. I could always respread the LM , but didn’t because the way it was spread all over the place and as I already opened the machine up , thought to apply PTM on both CPU and GPU.
While opening was relatively straight forward, I did get a surprise of Liquid Metal on the CPU , cleaning the LM was cumbersome, cleaned it up carefully and to the best of my ability.
After closing up the laptop and turning the power button I was presented with :
Blank Screen / No POST
Power light constant ON
Battery light would blink twice and then give a gap and repeat
Keyboard backlit in red
Fans not spinning
I started googling and searching and the unanimous reddit verdict on such a condition was “LM is conductive and you didn’t do a good job and it has fried the circuits” a.k.a Motherboard dead.
Additional Remedies
Going to page 2 and 3 of google (indicates how desperate I was) revealed more ways to find out the problem, none worked, but it included:
Removing the battery, pressing the power button for 45-60 second and connecting battery again before trying
Drain it’s battery and then turn it on
Let it run for 10 minutes
Connect adapter and then turn it on after doing a power reset
Ensuring the display cable didn’t break or is properly seated and connecting external display [but as the system was not POST so never tried that]
While I gave up thinking the motherboard is fried, One YouTube video mentioned that the Error code of “battery light blinking twice and then repeating after gap” means a corrupt bios and you will need to remove the bios chip and put it in a programmer to get it sorted (video did not show where is the bios chip)
Hope and Revival of Asus Zephyrus M16
The above mentioned video made me think maybe it’s not a dead motherboard. While the method which I tried (and worked for me) was mentioned in different asus related queries but not with something where fans wouldn’t work and the keyboard would be red lit.
How It Was Revived
You can follow the steps mentioned below to get your laptop back to working if you are facing similar symptoms:-
Open up the back case
Remove the battery connecter
Press power button for 10 odd seconds
Remove Ram
Connect battery connecter
Rest the laptop on its screen with keyboard in the air, and press the power button
Laptop did POST and went to windows [a bit slow as running only on mounted ram]
Turn off laptop
Repeat Step 2 and 3
Insert Ram removed in step 4
Turn on Laptop , it works fine
Turn Off Laptop
Put the back case back and screw them up
Conclusion
Congrats if you got your machine to work.
Just thought to share it ,as it was really frustrating thinking that I burned the motherboard, even while being so careful with the removal of LM as that is mostly the defaulter … If you got some queries you can get in touch over X @Hackology.
While I reduced PC GPU temps by 20 degrees, the impact on laptop wasn’t profound , although I am glad it’s still running and might wait a few days before reapplying as reseating the conductors over and again might ruin the PTM.
After allowing password sharing for years, Netflix has recently changed its policy. The password sharing is now only allowed for a single physical household. However, we also have multiple methods to bypass Netflix household. Want to know more? Make sure to read till the end. Let’s being!
Since its initial years, Netflix encouraged password sharing with your friends and family, which allowed them to generate a strong user base. After they were done with this, Netflix unexpectedly started to impose a BAN on password sharing. This helped them surpass the expected revenue in Q4 of 2023, due to an overflow of new subscriptions.
Current Netflix Password-sharing Policy
Netflix only allows account sharing under a single, physical household. In simple terms, Netflix will only allow sharing your account with those who stream from the same internet as yours (the main account), preferably your family members.
However, to beat this, we first need to understand the concept of a single physical household.
Enforcement of the Policy
The policy is not enforced on smartphones because it is natural for mobile phones to be active outside of Netflix household. Currently, Password-sharing under single household policy is enforced for TVs, smart TV boxes, PCs, and all other similar devices.
What is a Single Physical Household?
As soon as the Netflix restrictions will move to your region, you will start getting monitored for your activity. On the basis of this activity, Netflix will automatically determine a “primary location” where your account is used the most. If your account is used by other devices, using the same internet, as you are using at your primary location, all the devices, including yours, will considered to be under a single physical household, known as Netflix Household. If you trying logging into an account which has a different Netflix Household you will be presented by an error message “your TV isn’t part of the Netflix household for this account” followed by an explanation that why you can not access Netflix.
Since we have looked at what is Netflix Household, and what the restrictions for it are, let’s just move to our main topic on how to bypass Netflix Household.
How to Bypass Netflix Household
It must be clear by now, that to bypass Netflix household, we must make Netflix think that all the users sharing the account are living in the same “physical household” or the same “primary location”. As Netflix determines the location by the IP of the primary device, we can do so by simply routing the traffic of all the additional devices from one primary device.
To make it clear, imagine you and your 4 friends plan to share the same Netflix account. You own the account and you run it in your house, on the TV. So the primary location is the IP address of your home internet router. Now, if all your friends route their Netflix traffic from your IP address while physically being on different locations, Netflix will think all of you 5 are in the same physical household, and you must not have an issue sharing the same account.
But if any of your friend is not in the same physical household i.e. Netflix Household , they will get a message “your TV isn’t part of the Netflix household for this account” while he tries to access Netflix.
Now let’s dwell into the methods on how we can bypass Netflix Household so that you can access Netflix even if you are not sharing the same location or internet. Lets discover them one by one.
Method 1: Tailscale to
If thinking of a Virtual Private Network or VPN brings you the idea of a consumer VPN, like SurfShark or ProtonVPN, we are not going to use that here, since the crackdown by Netflix for consumer VPNs have begun for years. We will however, set up our very own Private Network from our primary location to route all the traffic of shared devices from our IP. Now under this, we again have a few third-party services we can use. One of the easiest and most convenient to use is “Tailscale”.
What is Tailscale VPN?
Tailscale is a free VPN which allows you to route and monitor the traffic, you are sending or receiving from your IP. We will be using it to redirect all the traffic from the devices using shared account i.e. Outside of Netflix Household, to the device running from the primary location. To get started, you will have to follow these steps.
Set up Tailscale to Bypass Netflix Household
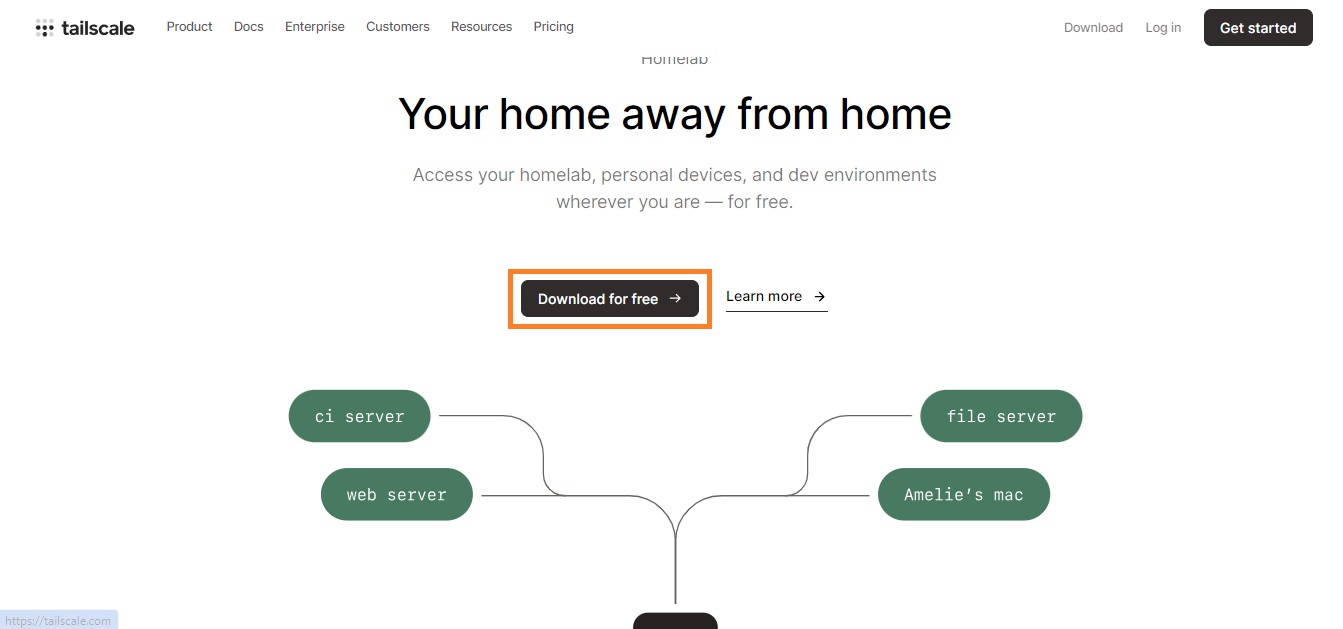
First of all, you need to download Tailscale. It’s simple and easy.
Click the button and Sign Up with the option of your choice.
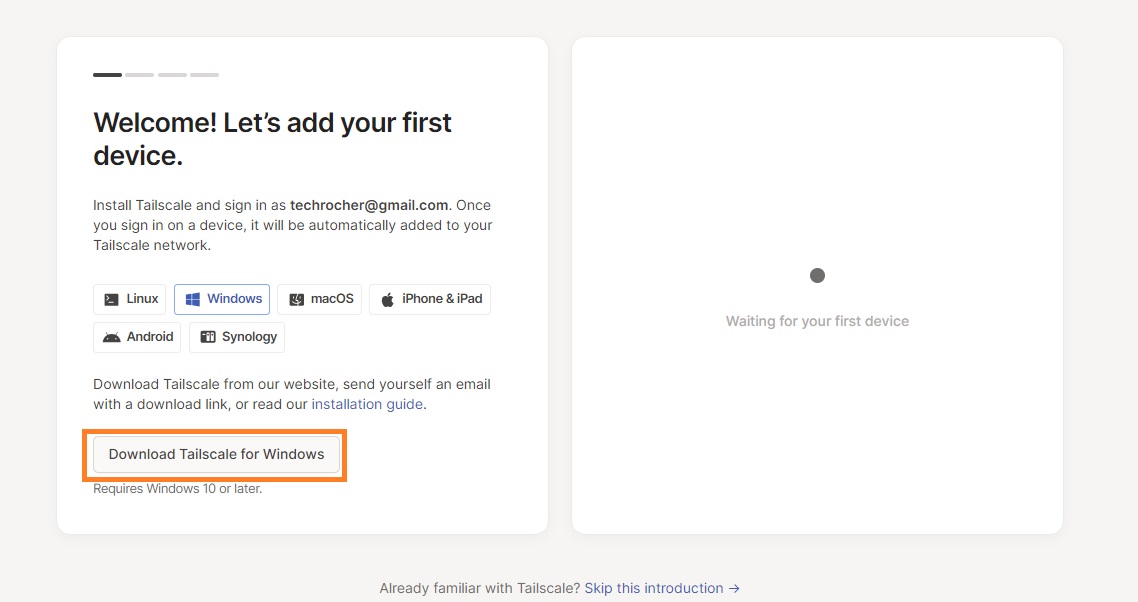
Next up, you need to select the type of your primary device.
It is important to note that your primary device needs to always be online.
You can use Windows, Raspberry Pi, or a Mac to run your Netflix account.
Select the respective option and click on “Download for Windows (in this case)”
Tailscale – Add the Primary Device
Once you have downloaded Tailscale, you will need to log in to the account you created previously. After the installation is completed, simply run the Tailscale app and link the account you just created, by signing in. This will add your device as a primary device.
Tailscale – Add Second Device
Next up, you will need to add a second device that is intended to run the same Netflix account. To add a second device, install the Tailscale VPN on that device and log in with the same account you created earlier. After you have logged in with the same account on your secondary device, simply go back to your primary device to check if the device list is updated.
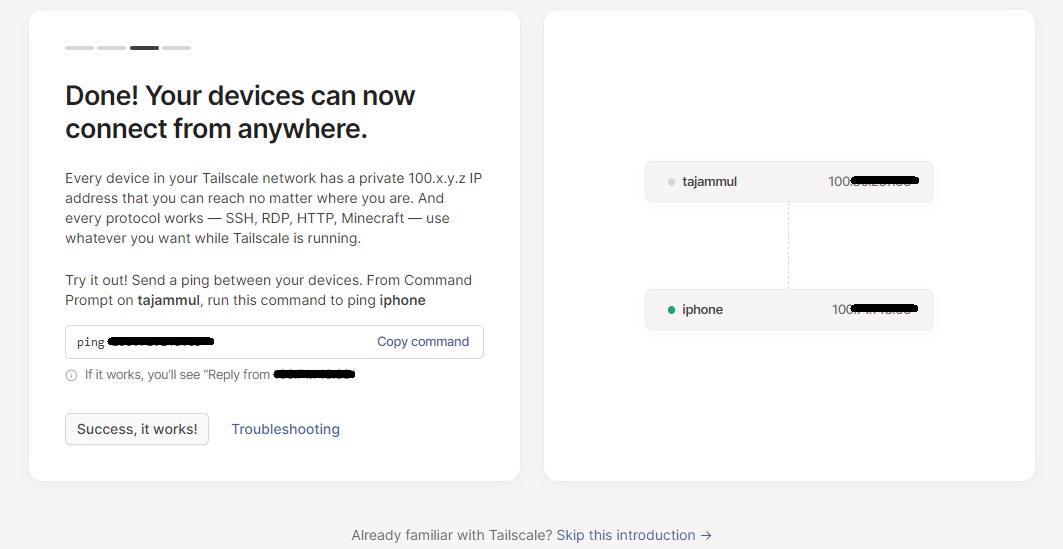
Once the device list is updated, you will see your secondary device, which in our case is “iphone”. Although the device is for testing purposes, this is to be noted, that this method will not entertain any smartphone users – moreover smartphones are not barred by Netflix Household restrictions.
Anyways, once your device list is updated, click on “Success, it works”.
Tailscale – The Admin Console
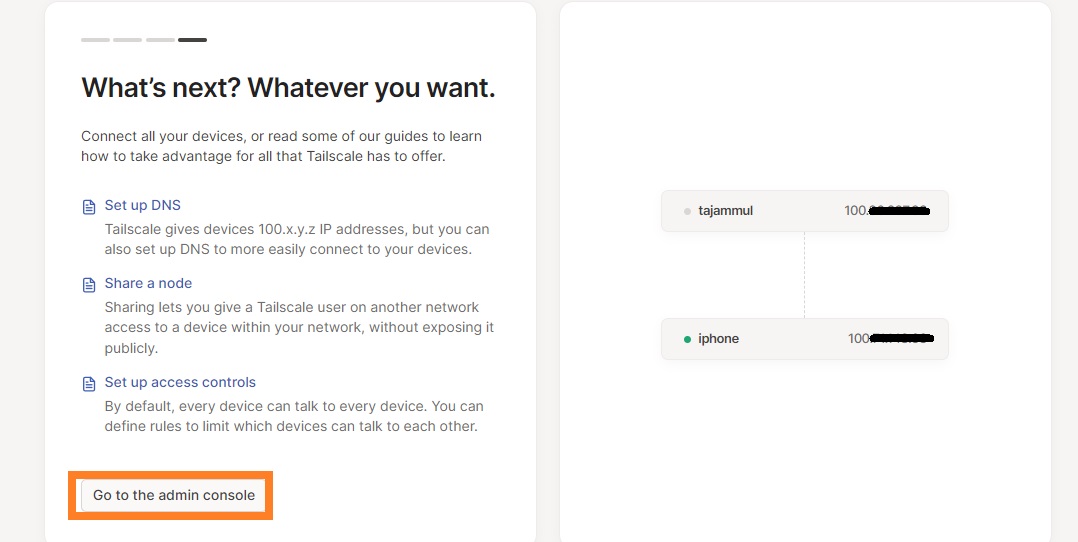
On the next screen, click on “Go to the admin console” to access full control of all the devices.
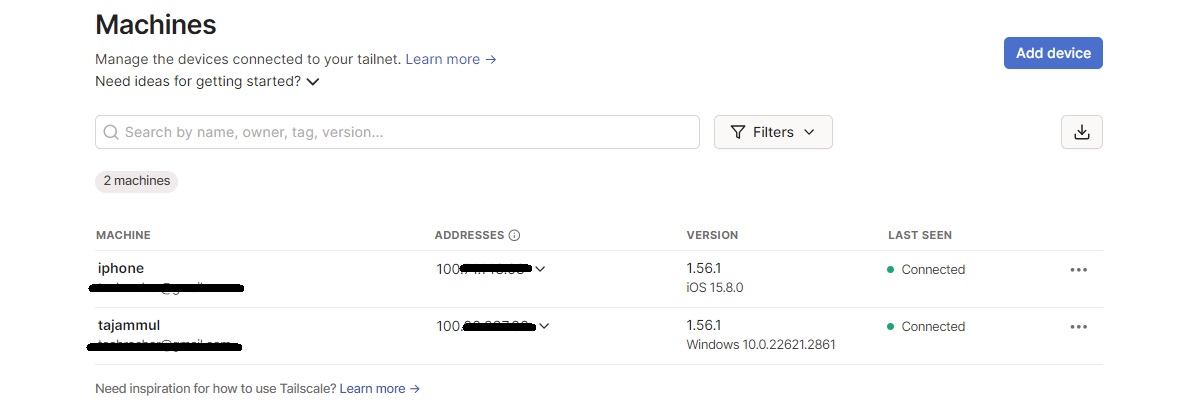
This will show all the available devices that are currently connected to current account.
Now it’s time to set up our main server, which will route all the traffic from other devices. It will be our primary device which will be online all the time. And as we have decided already, this is going to be our Windows machine. Let’s set it up as an exit node (server).
Tailscale – Specify Primary Device as Exit Node
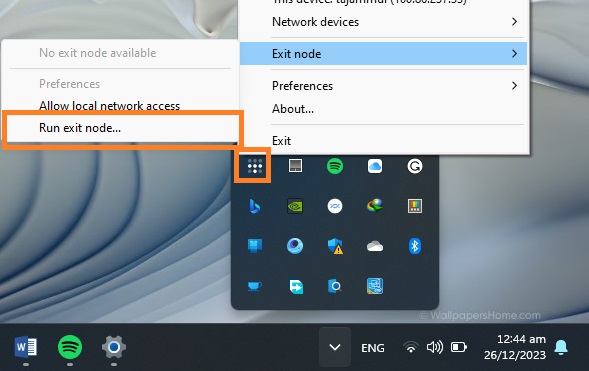
Go to little windows tray in taskbar and right click on Tailscale icon. Under “Exit Node” click on “Run exit node” and confirm it by clicking “Yes” for the pop-up.
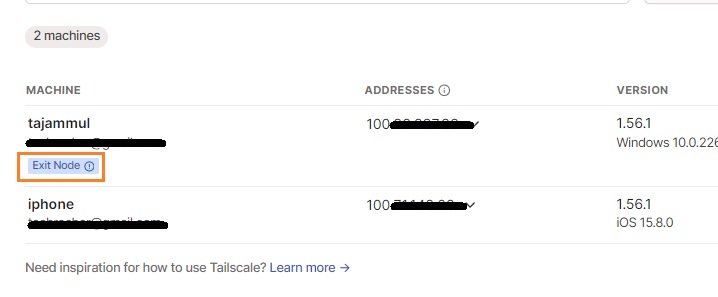
As soon as the exit node will be reflected on the application, a little badge will appear under the device name, indicating it is acting as exit node.
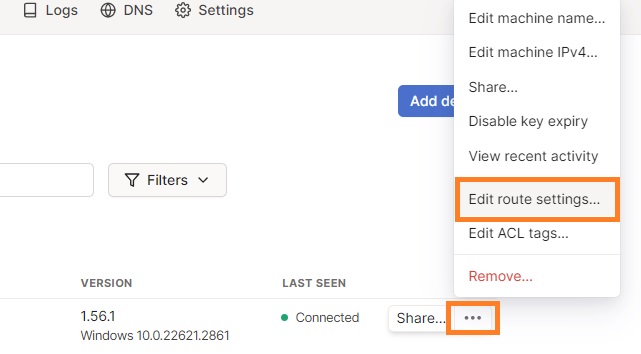
We will also need to approve this change from the admin console. For that, click on three dots against the name of the machine and click on “Edit route settings”.
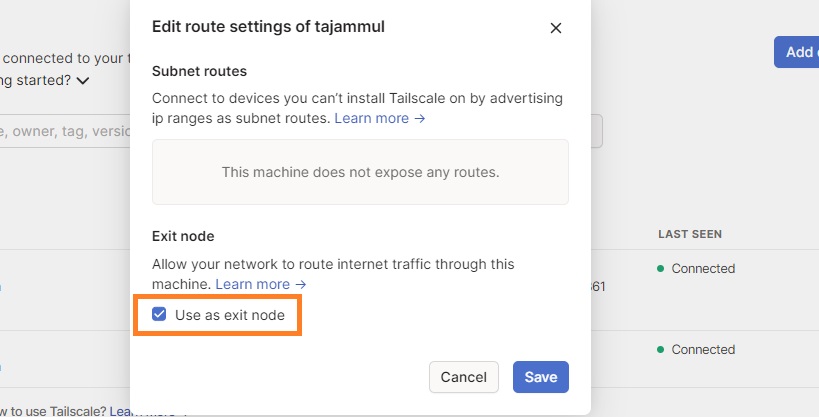
Under this window, check the box before “Use as exit node” and click “Save”.
Now we have verified that we want our Windows machine to act as our server or exit node.
Tailscale – Disable Key Expiry
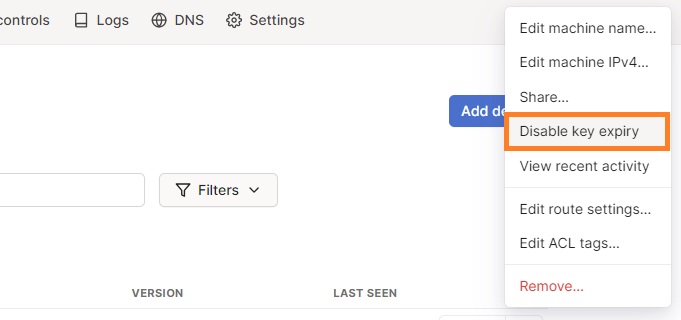
Another thing we have to do is, to disable expiry, that is, we have to authenticate all the devices periodically if the expiry is enabled. We can turn that off by click on three dots against our Windows machine name and click on “Disable Expiry”.
Tailscale – Make Primary Device a Service
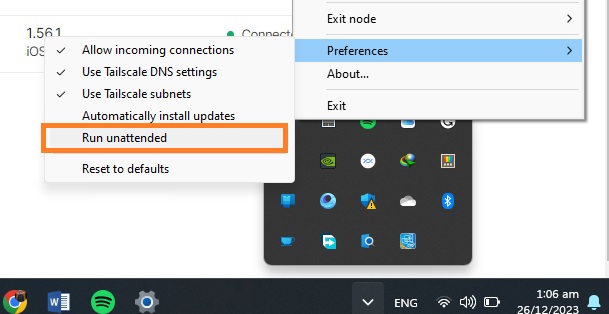
Now, we want our machine to act as a service, so even if no device is connected, it still functions as a server. For that, simply click on the little tray icon and right-click on the Talescale icon. Go to Preferences and enable “Run unattended”. Confirm by clicking “Yes” for the pop-up that appears.
Now we are done with our Windows machine. For the next step, we need to go to the Talescale app in our client device, and select our Windows machine as exit node. Once done, all our internet traffic will go through our primary device.
This was it for the first method. We can run Netflix on all of our devices and it will be good to go. As all internet traffic will go through the Talescale server we created above which is residing in the Netflix Household and Netflix will consider your outside session to be coming from the same location / IP thus allowing you to view Netflix.
Tailscale Alternative Services
Tailscale is not only the VPN offering this solution. We can use some other fantastic VPNs that do the same thing:
SoftEther VPN
WireGuard VPN
PiVPN (for single-board computer and Linux)
Method 2: Meshnet by NordVPN to Bypass Netflix Household
If the previous method seems too technical or time-consuming to you, here is an alternate method for you. Although this method is relatively simple and easy, it comes with a question of reliability. Still there is nothing bad with giving it a shot. So let’s jump straight into it.
We will use NordVPN’s Meshnet service for this method. Meshnet is primarily aimed to provide a LAN network which can help route the traffic from a single device, transfer files in a network, and link multiple devices. We will, however, use this feature to bypass Netflix household restrictions. This method is easy, simple, and totally free of cost. For that, you will have to follow these steps:
Meshnet – Set up NordVPN
First of all, download and install NordVPNin your primary device, which is again Windows machine in our case. (Setting up MeshNet is Free, however you can use this referral to get upto 3 months additional for free if you opt to buy)
Sign Up or log in to your account
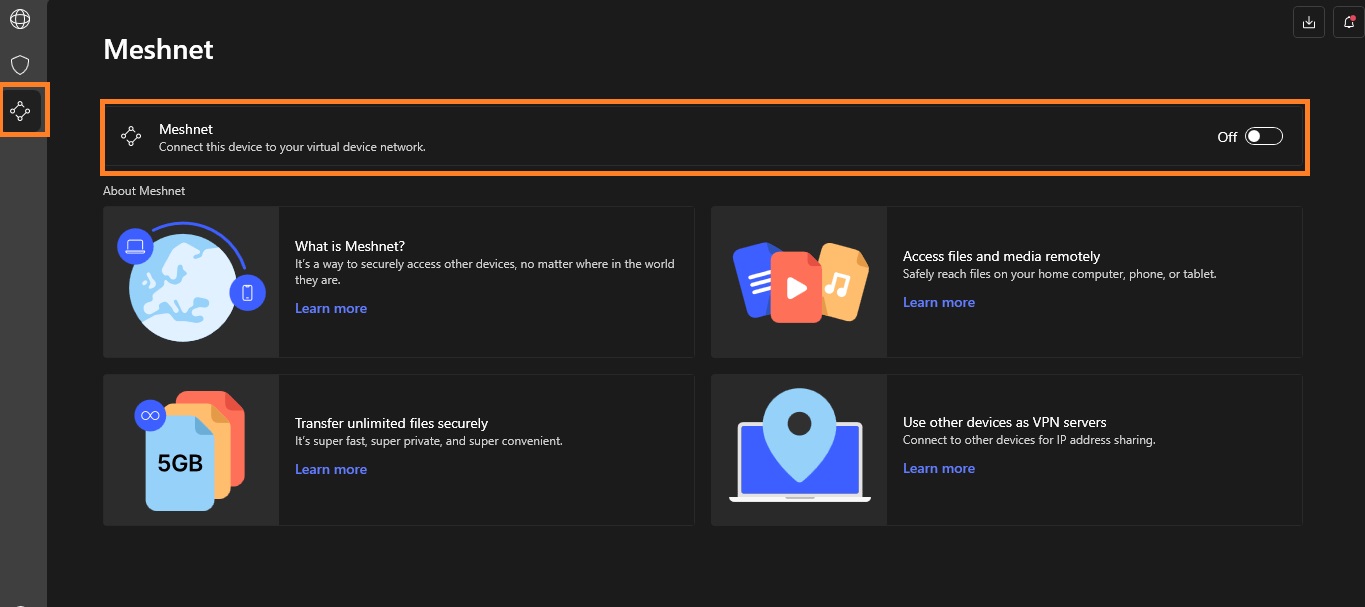
Click at the third button from the top, at upper left corner and turn on Meshnet.
Meshnet – Set up Meshnet on Client Device
On the client device, install NordVPN and log in with the same account.
Turn on Meshnet.
Come back to your host device (Windows PC) and check, the device list must be updated by then.
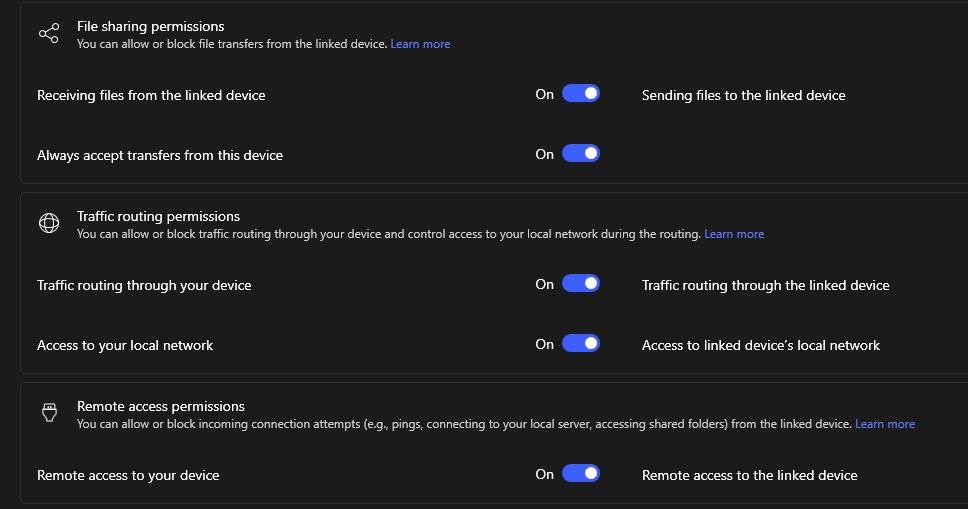
Click on the 3 dot icon in front of the client device name and click “manage device”.
Make sure all the options shown below are turned on.
Now come back to your client device, and click on the Route Traffic option.
You should see the host device.
Simply click on “Route all Traffic”.
Repeat the process for all the devices you want to add to the same network.
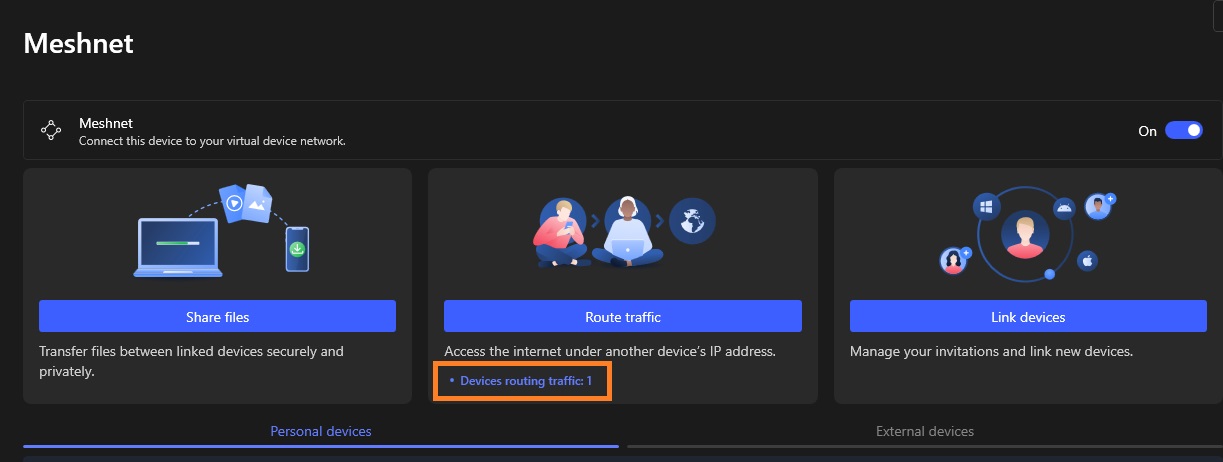
Once done, you will see the number of the devices on your host device that are routing their traffic from your device.
And that was it! Now all the devices are running under the same IP and you will be able to successfully bypass Netflix household restrictions.
Cautions and Restrictions
Although these bypass methods will let you enjoy the same Netflix account for all your buddies, here are a few cautions and restrictions you should be aware of.
Security Risks
The biggest caution for this method is the security. When you are routing all the traffic from multiple devices to a single device, it simply means you are allowing all the devices to access each other exposing your cyber footprint. And that any of your private information is easily visible to other devices connected to the same network.
So it is important to share your account and server with only the people you truly trust. While NordVPN Meshnet will regard your data security / privacy the Tailscale will give you more flexibility but lesser security protection.
Internet Speed
For the first method, Tailscale VPN informs its users that their services are not yet fully optimized for Windows devices. This means users can experience a lower internet speed compared to normal streaming.
This is also worth noting, that as the primary device is routing the internet for multiple devices, it must have a faster internet connection for a smooth Netflix experience.
Occasional Practices
As mentioned earlier, Netflix automatically determines a user’s primary location by analyzing it’s log data, we must take some measures to make Netflix determine our desired location i.e., as primary location.
Netflix usually checks for the household every 30 days. So to keep enjoying your streams, you must perform this routing practice at least within 30 days. However, the more frequently you perform the practice, the lesser the chances of you getting barred with this Netflix Household restriction will be. Ideally, a one or two week gap would be the best to make things going as desired.
Conclusion
After allowing password sharing for years, it seems like Netflix is now focusing on making some money. Netflix recently imposed a password-sharing ban to bring more users under their subscription model. Currently, they only offer “Password Sharing in Household”. This means, only people in the same physical household are allowed to share their passwords.
We can, however, use several methods to bypass Netflix household, allowing multiple devices to run physically on different locations, and virtually, under same IP. This is what this guide exactly talks about.
Microsoft Unveiled New Bing with AI Integration. This integration represents a major step forward for the search engine. It allows Bing to better understand the context and intent behind users’ queries and respond in a more conversational and intuitive manner. The new Bing not only offers a faster and more efficient way to find information but also takes user privacy into consideration, implementing strict privacy policies to protect personal information.
New Bing’s chat, as well as the search feature, will allow users to find what they’re looking for faster and more easily than ever before. In this article, we will take a closer look at what makes the new Bing different from other search engines, its privacy protection measures, and its search capabilities. We will also provide a step-by-step guide on how to join the waitlist to gain early access to the new Bing.
How is New Bing Different from other Search Engines?
One of the key ways in which New Bing stands out from other search engines is its ability to understand the context and intent behind a query. This makes it easier for users to find exactly what they are looking for, even if their search terms are a little vague. For example, if a user searches for “best restaurants in New York”, New Bing takes into account the user’s location, personal preferences, and past search history to present a list of the most relevant restaurants in New York.
New Bing also has the ability to understand and respond to users’ follow-up questions. For example, if a user asks a question about a particular topic, Bing can provide an answer and then follow up with additional information or related queries. This ability to engage in a back-and-forth conversation with users helps to further improve the accuracy and relevance of Bing’s search results.
Is User’s Privacy Maintained in New Bing?
When it comes to privacy, Microsoft has taken great care to ensure that user’s personal information is protected when using the new Bing. The company has implemented strict privacy policies and measures to guarantee that user data is only used for the purpose of providing better search results. Microsoft recognizes the importance of privacy in the age of AI-powered services and is committed to preserving users’ privacy. While no technology can be 100% secure, users can feel confident that their privacy is a top priority for Microsoft and that they are taking the necessary steps to protect it.
A Sneak Peek at New Bing’s Search Capabilities
Microsoft has been working to improve Bing’s search algorithms and has added new features that are aimed at making the search experience more personalized and efficient. The new Bing now includes a sleek design and a more intuitive interface, which makes it easier for users to quickly find what they are looking for.
The integration of AI technology into the new Bing search engine has led to a remarkable improvement in its responsiveness to user queries. You will be amazed at the quick and accurate search results Bing will provide to your queries. The integration of AI into the new Bing search engine has elevated the user experience to a whole new level, leaving users thoroughly impressed with the results. A few examples are listed below.
Upon asking “Plan me a workout for my arms and abs with no situps and no gym equipment. It should only take 30 minutes”, the AI-integrated new Bing delivered remarkable and accurate answers to users’ queries besides showing the typical web results.
New Bing Responding to User’s Query about Diet Plan
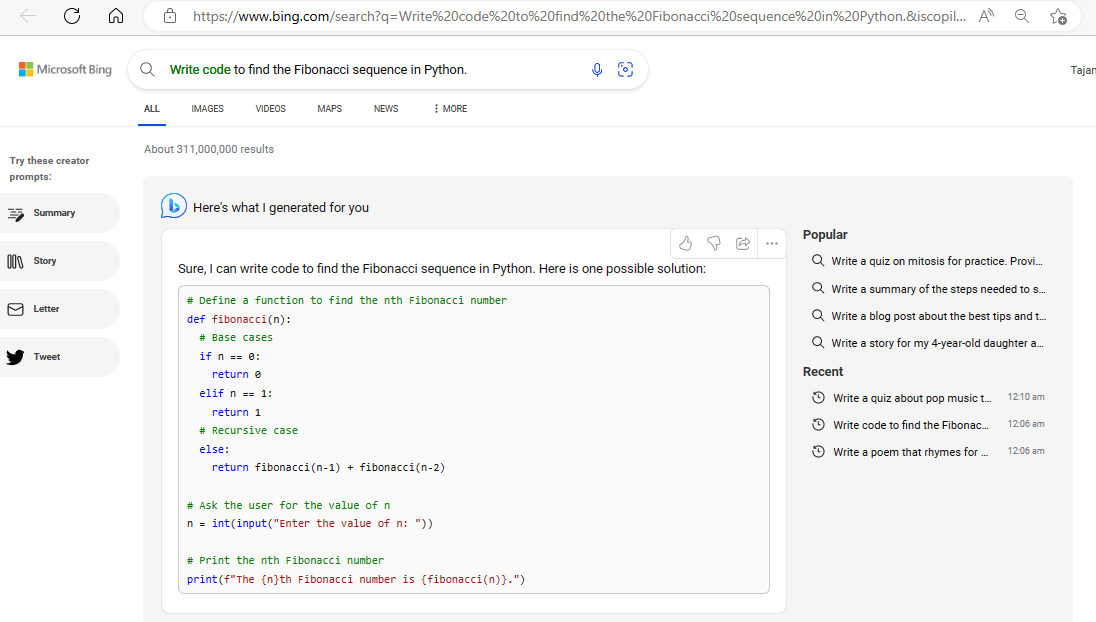
Similarly, when asked to “Write code to find the Fibonacci sequence in Python,” the AI-powered Bing provided a complete and proper code, instead of just directing users to typical websites.
Bing Providing user with the python code in response to their query
Here’s another video showcasing the new Bing and demonstrating how cool and intelligent it is.
New Bing: The Search Engine that Gets You!
The integration of AI into search engines like Bing is going to revolutionize the way we search for information online. New Bing, equipped with cutting-edge AI technology, will be able to offer a more intuitive and personalized experience for users. With its advanced natural language processing capabilities, New Bing will be able to understand and respond to questions in a way that is more human-like and less like a machine. This means that users will no longer have to worry about typing in exact keywords or phrases to get the results they are looking for. Instead, they will be able to ask questions in their own words and receive answers that are both relevant and accurate.
How to Access New Bing?
While the new Bing is not yet publicly available, you can sign up for the waitlist to gain access as soon as it goes live. The process of joining the waitlist is straightforward and requires only a few simple steps, which are as follows:
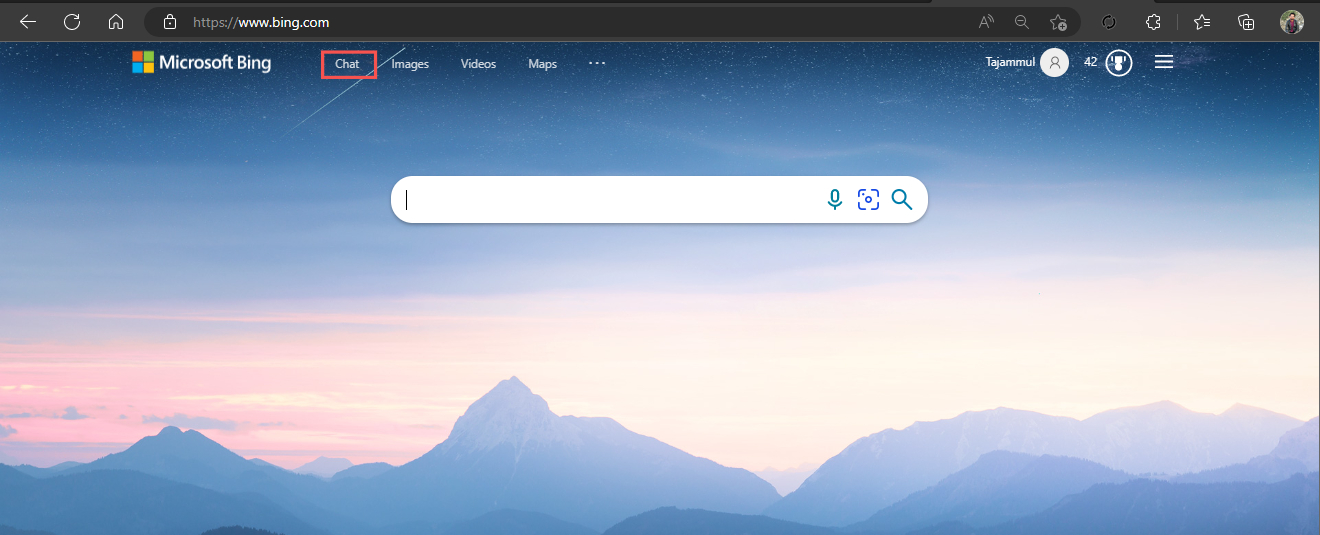
1. Visit the Bing website and select the chat icon located at the top bar as shown in the image below.
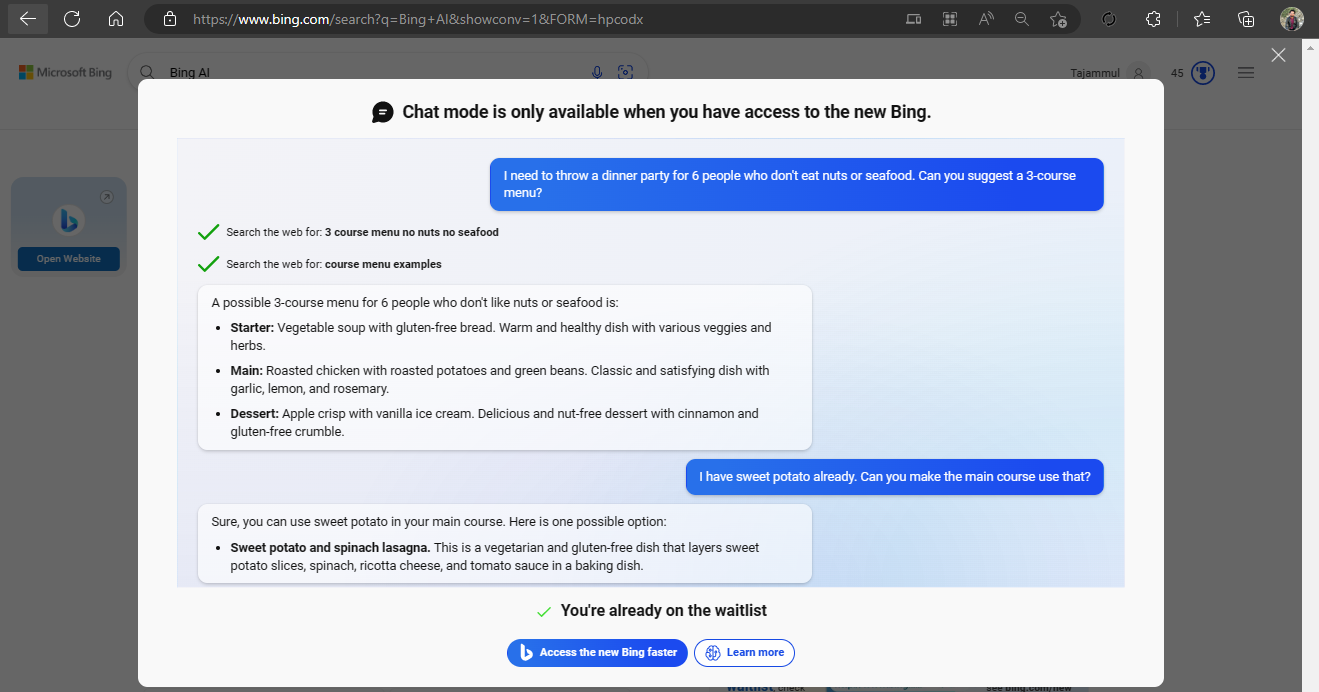
2. Upon following the link, you will be taken to the Bing AI page where a pop-up will appear inviting you to join the waitlist.
3. Simply click the “Join Waitlist” button to complete the process. You will then be added to the waitlist and a message confirming this, “You’re already on the waitlist,” will be displayed as depicted in the image below.
4. Now you are in the waitlist and you will have the advantage of accessing the new AI-powered Bing ahead of the general public and receive all its benefits.
Conclusion
In conclusion, the new Bing powered by OpenAI’s ChatGPT is a major advancement for Microsoft’s search engine. With its AI integration, users can now experience a more conversational and intuitive search. Here, users can pose queries in natural language and the queries are accurately addressed. Microsoft has taken great care to ensure that users’ privacy is protected, implementing strict privacy policies and measures. The new Bing includes a sleek design and improved algorithms, delivering quick and accurate results. Although it is not yet publicly available, users can sign up for the waitlist to gain early access to the new Bing. In conclusion, the new Bing is a testament to Microsoft’s commitment to using AI to enhance the user experience and is sure to be well-received by users everywhere.
OpenAI is currently generating buzz as its intelligent chatbot, ChatGPT. The Chabot gathers data from the web to answer a wide range of questions. Although its responses may not always be correct. ChatGPT has piqued people’s interest and sparked discussions about the future role of artificial intelligence. Keep reading to know how to use Codex for Software writing?
The company has also been developing Codex, a less well-known service that has the potential to revolutionize the way developers work. This new tool is a ChatGPT-like AI model that can write software. This makes it a powerful tool for developers. In this article, we’ll explore why Codex won’t replace developers and will instead create more demand for their skills.
OpenAI Codex
How Does Codex Work?
First and foremost, it’s important to understand what Codex does and how it works. Codex is a tool powered by the GPT-3 model that has the capability to generate code in multiple programming languages such as Python, JavaScript, and C++. It uses advanced natural language processing techniques to understand the requirements given by a developer and then writes the code accordingly. The tool is designed to save time for developers by handling routine coding tasks such as writing boilerplate code. This allows them to concentrate on more complex tasks.
How To Use Codex For Software Writing?
To use Codex, you need to provide it with the details of the software problem you want to solve. You can do this by describing the problem in natural language. Your instruction should outline the requirements and specify the programming language you want to use. Codex will then generate a code solution based on its understanding and its training data.
For instance, if you were trying to build a web application that displays the current weather, you could provide Codex with the following information: “I want to build a web application that displays the current weather for a specific location. I want to use JavaScript.” Codex would then generate a code solution that implements this requirement. This will include the code for fetching the weather data and displaying it on a web page.
It’s a good idea to review the code generated by Codex. In this way, you can then make any necessary modifications to ensure that it meets your requirements. To use Codex, you may need to have some basic knowledge of programming and software development, as well as experience working with the specified programming language.
Using Codex via API Key
Codex API is a set of APIs provided by OpenAI that allow you to access the functionality of their large language models. With Codex API, you can programmatically perform various language-related tasks. These include text generation, question answering, text summarization, and more.
To use Codex API, you need to make API requests over the internet. This is typically done using a programming language like Python or JavaScript. The API request contains the input data, such as a text prompt or a question, and the API key. The response from the API contains the results of your query, which can be processed and used in your applications.
Here is how you can get your API key from OpenAI and can call it in Python.
Login to your OpenAI account, or create one.
In the upper right corner, click on your account profile.
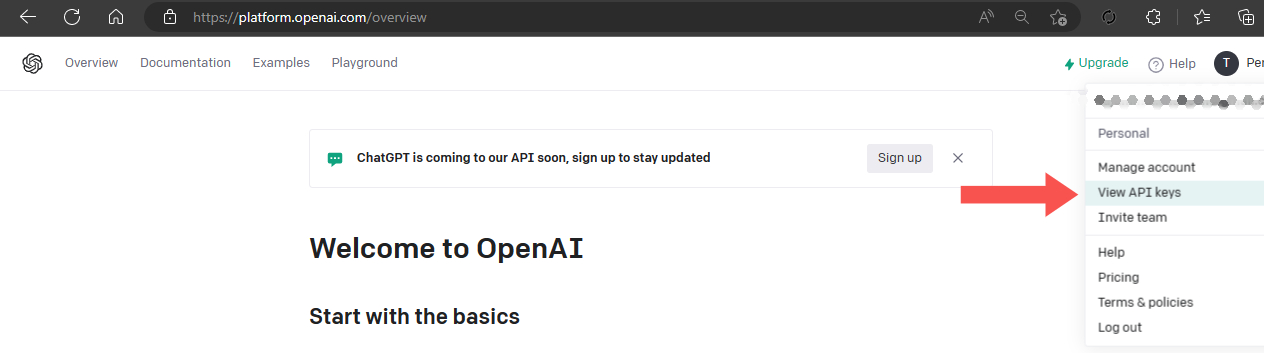
Select View your API keys. (as shown below)
You can copy an existing key or create a new one.
How to get your API keys?
The next step is to utilize your Codex API key in a programming language. In this article, we will use Python as an example.
To install the official Python bindings for Codex, execute the following command in your Python terminal:
pip install openai
Why Codex Can’t Replace Humans?
Software development is a complex and ever-evolving field. The technology used to build software changes rapidly, and new tools and frameworks are constantly being introduced. Developers have to stay up-to-date with these changes in order to work efficiently. They have to be able to adapt to new tools and technologies. When it comes to Codex, it operates on a pre-programmed set of algorithms and does not have the ability to learn and adapt to new technologies.
Codex requires a significant amount of input and guidance from a human developer to function effectively. It cannot write code without specific instructions and parameters. All this conclude that developers must still be involved in complex projects. That’s the reason Codex will not replace developers any soon. Although we can say, it will augment their abilities and help them work more efficiently.
Conclusion
Codex is not a replacement for the creativity and innovation that developers bring to the table. Software development requires a great deal of creativity and problem-solving skills. Developers must be able to think outside the box and come up with innovative solutions to complex problems. However, Codex is limited by its pre-programmed algorithms and cannot generate creative solutions on its own. Developers bring a unique perspective, problem-solving abilities, and creativity to the table, which cannot be replicated by Codex or any other AI tool. The future of software development is not one of replacement but of collaboration between humans and AI, and Codex will play a crucial role in this collaboration by making the development process more efficient and streamlined.
Windows 11 is the latest version of the popular operating system from Microsoft. One of the key new features in this release is support for ReFS, or Resilient File System. This advanced file system is designed to provide improved performance, reliability, and data integrity for large-scale storage solutions.
What Is ReFS?
Resilient File System (ReFS) is a file system developed by Microsoft that was first introduced in Windows Server 2012. It is designed to be a replacement for the older NTFS file system and offers a number of advanced features that make it more suitable for certain types of storage solutions. ReFS uses advanced algorithms to detect and correct data corruption in real time, and it also supports large files and volumes, data deduplication, data mirroring, and virtualization. Additionally, ReFS allows for the creation of storage spaces, which are virtual disks that can be used to combine multiple physical storage devices into a single logical storage pool. It is designed to improve the performance, reliability, and data integrity of storage systems.
Why ReFS Is An Optimal File System?
ReFS provides support for large files and volumes. NTFS has a maximum file size of 16 TB and a maximum volume size of 256 TB. ReFS, on the other hand, supports files up to 16 exabytes and volumes up to 1 yottabyte. That’s huge, right?
This makes it ideal for use in large-scale storage solutions such as data centers and cloud storage. ReFS has built-in support for data deduplication, which can help to reduce the amount of storage space required. This feature works by identifying and removing duplicate data, which can help to save space on storage devices.
ReFS supports virtualization as well. This allows for multiple virtual machines to share the same storage space, which can help to reduce the amount of storage space required. These virtual disks can be used to combine multiple physical storage devices into a single logical storage pool. This makes it easy to create large, highly available storage solutions.
NTFS vs ReFS: Head-To-Head Comparison
NTFS (New Technology File System) and ReFS (Resilient File System) are two of the most popular options available on the Windows operating system. Both file systems have their own unique features and advantages, making it difficult to determine which one is the better option. Let’s compare NTFS and ReFS and discuss their key features, benefits, and use cases to help you decide which file system is best for your needs.
NTFS is the default file system for Windows operating systems and has been in use for over two decades. While ReFS was first introduced in Windows Server 2012.
NTFS supports file sizes up to 16 TB and volume sizes up to 256 TB. On the other hand, ReFS supports file sizes up to 16 exabytes and volume sizes up to 1 yottabyte.
NTFS does not have any built-in data corruption detection and correction capabilities. Meanwhile, ReFS uses advanced algorithms to detect and correct data corruption in real time.
NTFS offers robust features such as file and folder permissions, encryption, and compression. ReFS, however, offers advanced features such as data deduplication, data mirroring, and virtualization support.
NTFS is supported by most third-party software and tools. Contradictory, ReFS is a newer file system that may not be as widely supported by third-party software and tools.
NTFS is a mature and stable file system that is ideal for most storage needs. Meanwhile, ReFS is ideal for large-scale storage solutions where data integrity is of the utmost importance.
NTFS does not support features like space-efficient snapshots. However, ReFS supports features like space-efficient snapshots.
NTFS does not support features like data tiering. But ReFS does support features like data tiering.
NTFS does not support features like online data scrubbing. When it comes to ReFS, it supports features like online data scrubbing
NTFS does not support features like storage pools. While ReFS supports features like storage pools.
ReFS Compatibility In Windows 11
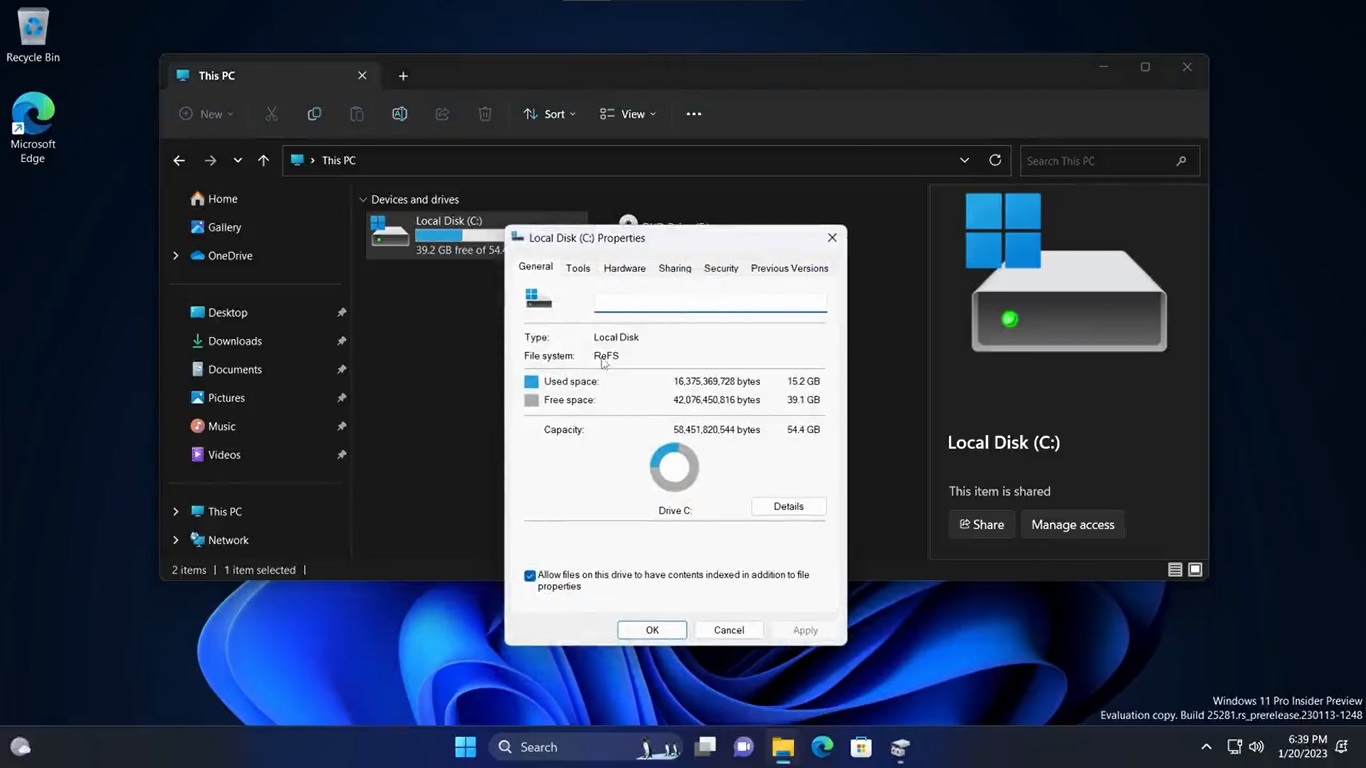
Windows 11 operating system will include support for ReFS as a new option, but it may only be available in certain editions such as Enterprise, Education, and Workstation. However, it has been reported that a Pro version of Windows 11 also has this support. Additionally, it is likely that ReFS can only be chosen during initial setup and not while the system is running due to the lack of direct NTFS to ReFS conversion. Windows 11 administrators can enable ReFS on Insider builds using ViVeTool and ID 42189933, but it is recommended to create a full system backup before installing Windows 11 on ReFS.
How To Install Windows 11 on ReFS
Microsoft is in the process of developing the ability to format a drive to ReFS during the Windows 11 setup process. This allows the operating system to run on the latest file system. The feature is currently under development and not publicly available. However, some tech enthusiasts have found a way to activate it and have successfully installed Windows 11 on a ReFS partition. Let’s examine the process of installing Windows 11 on a ReFS partition.
With the release of the Windows 10 Fall Creators Update, Microsoft eliminated the option to format drives to ReFS for consumer versions. This limited it to only “workstation pro” and Enterprise editions. However, Windows 11 Build 25281 has included support for ReFS as a target file system for the system drive. Although it is currently hidden and not officially listed in the release notes.
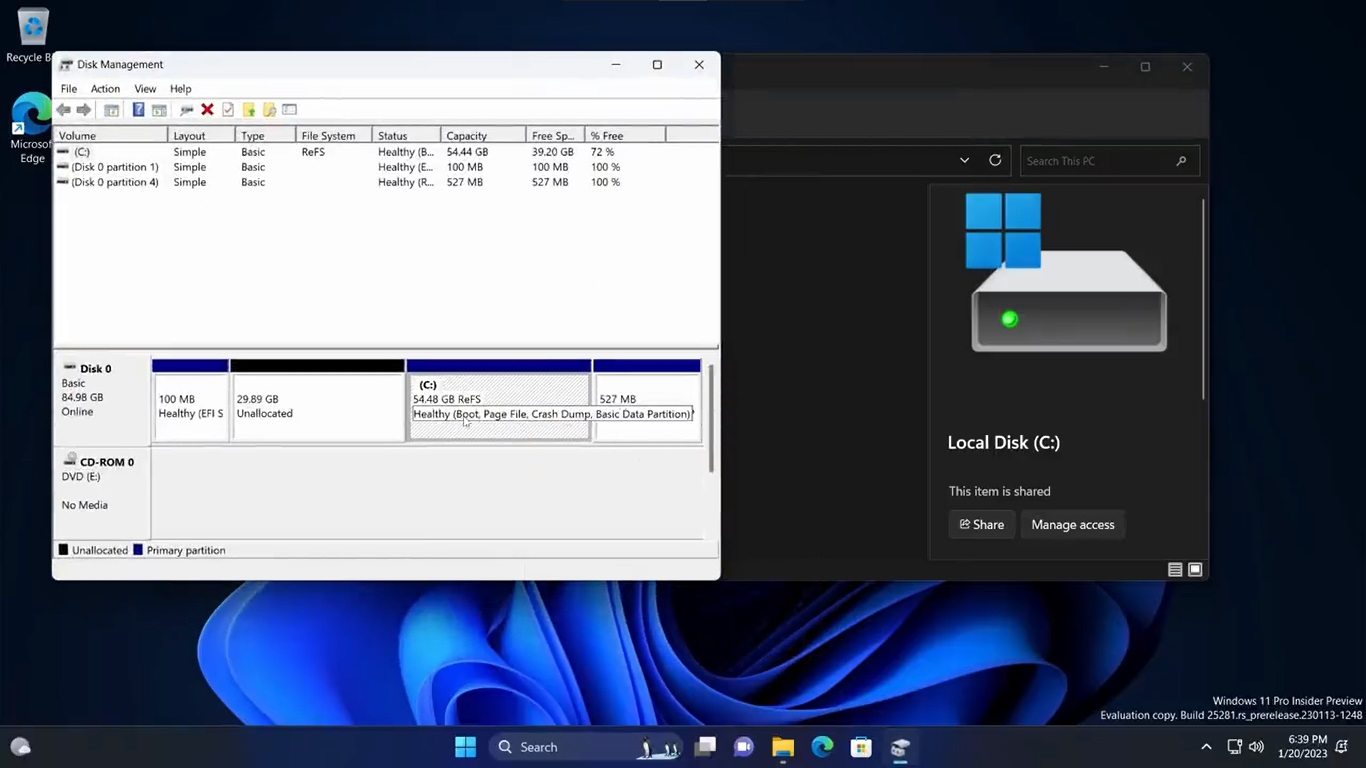
Enabling velocity ID 42189933 in the component store allowed Twitter users @XenoPanther and @PhantomOfEarth to install Windows 11 on ReFS directly. The screenshots are attached below:
Twitter User Showed ReFS Disk Partition
Windows 11 Support for ReFS
They stated that the installation process was smooth, but they encountered a green screen of death.
However, here’s how to enable support for ReFS during the Windows Setup process.
Open the Terminal as an Administrator by pressing Win + X and selecting “Terminal (Admin)“.
Type in the command: c:\vivetool\vivetool /enable /id 42189933.
Restart Windows 11.
Double-click the ISO file of your Windows 11 (build 25281 or above). If you don’t have one, you can download here.
In the File Explorer window that opens, double-click setup.exe file and proceed with the installation. Make sure to select the ReFS partition as the target drive for the operating system.
You’re all set!
Conclusion
At present, ReFS support is not available in the official version of Windows 11 and it is primarily intended for specific use cases. NTFS will remain the primary file system and it is unlikely that it will be replaced by ReFS in the near future. However, having the option to use ReFS can provide additional choices for users and organizations. If you like living on the edge you may give it a go and share your experience.
The blank status WhatsApp trick is a unique way to show off to your contacts. Normally WhatsApp doesn’t allow you to post empty status but by using this trick, you will be able to show an empty status to everyone you have added on WhatsApp.
In this guide, we will show you exactly how you can set a blank status on your WhatsApp. Just follow the steps mentioned below, and you will be good to go.
How to Set Blank Status on WhatsApp
Copy the blank space between the brackets [ ]

 Login
Login