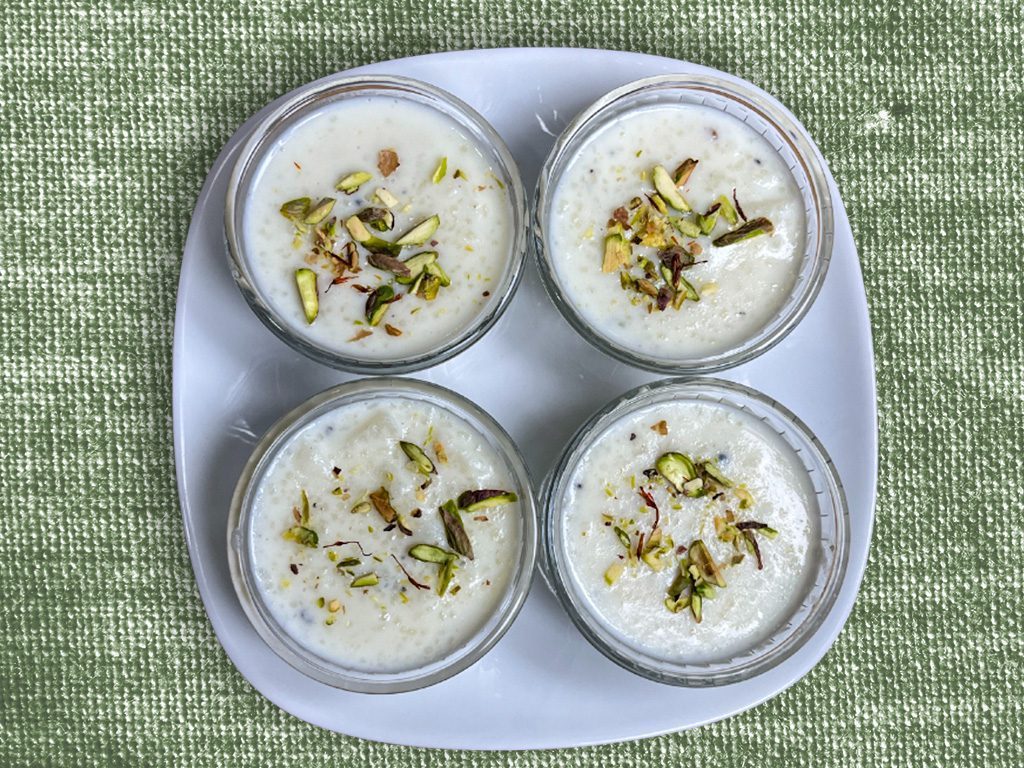
Royal Khoya Pistachio Treat, Easy Five Minutes Recipe, Tasty Dessert, Home Made
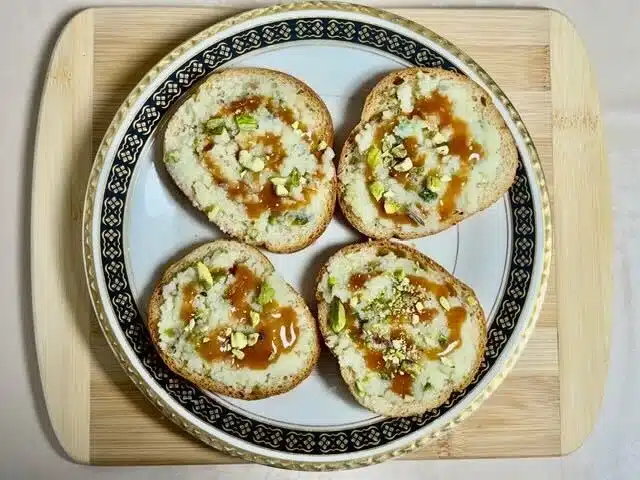
Khoya Pistachio Treat is quick and delicious dessert, you can make in just five minutes usingsimple ingredients already in your kitchen. These sweets are rich, creamy, and full of wonderful pistachio flavor. The soft texture and nuttytaste make them perfect when you want something sweet without spending a lot of time cooking. I love recipes like this because they are easy, satisfying, and feel a little special. Whether youmake them for a quick dessert, to share with family, or to serve guests, they always turn out delightful. Try this wonderful quick dessert and enjoy every bite!This recipe will make 6 pieces.I am using French Baguette; right now, I will just make 4 pieces, I have 4 slices ofbread, lightly butter them and toast them.
Servings 6
Ingredients
For Khyoa Topping
1/3cupheavy cream
1/2cupmilk powder
2tbspof cup coconut powder
2tablespoonscrushed pistachios
1/8teaspooncardamom powder
1/4cupof sugar
For the Caramel Sauce
1/2cupof sugar
1/4cupof cream
Garnishing
2tablespoonssliced pistachios
Other
Bread slices4β6 slices
Instructions
Prepare the toast
I am using French Baguette; 4 pieces lightly butter them and toast them.
Preparing the Khyoa Topping
While bread is toasting make this filling
In a microwave-safe bowl, combine the heavy cream, milk powder, coconut powder,crushed pistachios, cardamom powder, and sugar. Mix everything well.
Microwave the mixture for 40 seconds. Remove the bowl from the microwave and mix itagain thoroughly. The mixture should have a very soft dough-like texture. As it cools, itwill become slightly drier. If it is too soft microwave again for 10 seconds more seconds.
Make sure the mixture does not become too dry, it should remain soft and moist, so it iseasy to spread over toast. If it is needed add little heavy cream.
Making Caramel Sauce
In a small pan add the sugar and cook on medium-low heat until it melts and turns light golden.
Carefully add the cream and stir continuously. The mixture will bubble at first but will quickly become smooth. Cook for about 30β40 seconds until the caramel sauce becomes silky.
Assemble the Toast
Spread a generous layer of creamy nut mixture over the toasted bread.
Drizzle the warm caramel sauce on top and finish by sprinkling chopped pistachios.
Notes
Toast the bread until light golden and crisp, not too dark. This gives the perfect crunch with the soft nut mixture.The nut mixture should be soft and creamy, so it spread easily but does not run off the toast.When making caramel, cook the sugar on low heat and stir gently. Overcooking can make the caramel bitter.If the caramel becomes too thick, add a small spoon of warm cream or milk and stir to loosen it.Perfect for tea-time treats with family and friends.They are also nice for festive occasions or small gatherings, because they look rich and special but take only a few minutes to prepare.You can even serve them as a sweet snack for guests, since they are quick to assemble and always feel a little royal and indulgent.
Frequently Asked Questions (FAQs)
1. Can I use regular bread instead of French baguette?
Yes, you can use any bread like white, whole wheat, or brioche. Just toast it until lightly crisp.
2. What can I use instead of pistachios?
You can substitute with almonds, cashews, or a mix of dry fruits for a different flavor.
3. Can I make the khoya mixture without a microwave?
Yes, you can cook it in a pan on low heat, stirring continuously until it becomes soft and dough-like.
4. How do I store leftovers?
Store the topping and caramel separately in the refrigerator for up to 2 days. Assemble fresh before serving.
5. Is it necessary to make caramel sauce?
No, itβs optional. You can skip it or replace it with honey, condensed milk, or chocolate syrup for a different taste.
Moong Dal Salad with Home Made Dressing, Healthy, Fresh, & Delicious!
This Moong Dal Salad is a healthy and wholesome choice, perfect for lunch. It is made withprotein-rich moong dal and fresh vegetables that add vibrant color and a crunchy bite. Toppedwith cheese and seeds, it is delicious, fresh, slightly tangy, and wonderfully satisfying. Itβsrefreshing and full of flavor!This is my favorite dressing, and all my friends love it. Itβs my go-to dressing. Fresh ginger juicebrings a completely different dimension to it. It adds a gentle spice and freshness that transformsa basic dressing into something much more flavorful and complex.Ginger juice is very easy to make. Simply grate the ginger using a fine shredder and squeeze itwith your fingers to extract the juice.Fresh, colorful, and full of flavor, this Moong Dal Salad makes a perfect light meal. I hopeyou enjoy it as much as we do.
Servings 4
Ingredients
The ingredients are just a guideline and can be adjusted to your taste.
Β½cupsplit yellow moong dal
6spinach leaves
1/2cupcucumbercut into bite sizes
1/2 cuptomatocut into bite sizes
ΒΌcupred bell peppercut into bite size pieces
2tbspgrated carrots
1sliced radish in round
ΒΌ cupfeta cheese
1tbsptablespoon pumpkin seeds
1tbspsunflower seeds
For Dressing
3tablespoonsof olive oil
2teaspoonsof ginger juice
ΒΌteaspoonblack pepper
1tablespoonlemon juice
Β½teaspoonyellow mustard seeds powder
2teaspoonsof sugar
Instructions
Method
Wash the moong dal thoroughly and soak for about 30β40 minutes.
Drain the water well. Cook dal in one cup of water, after dal comes to boil lower the heat to low medium for about 6-8 minutes. Dal should be soft and tender but not mushy.
Notes
Serving
Serve the salad fresh for the best taste. The crisp vegetables and tender moong dal make every bite refreshing and satisfying. In a salad bowl, arrange the colorful vegetables around the moong dal. Sprinkle feta cheese on top and finish with a generous drizzle of the dressing. Toss lightly just before serving and enjoy this fresh, vibrant salad. This Moong Dal Salad is simple, healthy, and full of fresh flavors. Itβs a great way to enjoy a protein-rich dish that feels light yet satisfying.
Frequently Asked Questions (FAQs)
1. Can I make this Moong Dal Salad ahead of time?
Yes, you can prepare the moong dal and chop the vegetables a few hours in advance. Store them separately in the refrigerator and add the dressing just before serving to keep the vegetables fresh and crunchy.
2. Can I use sprouted moong instead of cooked moong dal?
Yes, sprouted moong works very well in this salad. It adds extra nutrition and a slightly crunchy texture. You can use it raw or lightly steamed if you prefer a softer bite.
3. What can I substitute for feta cheese?
If you donβt have feta cheese, you can use paneer, goat cheese, or even skip the cheese for a lighter version. The salad will still taste fresh and delicious.
4. How long can the dressing be stored?
The dressing can be stored in an airtight container in the refrigerator for up to 3β4 days. Shake or stir well before using.
5. Is this salad suitable for a vegan diet?
Yes, this salad can easily be made vegan by omitting the feta cheese or replacing it with a plant-based cheese alternative. The rest of the ingredients are naturally vegan.
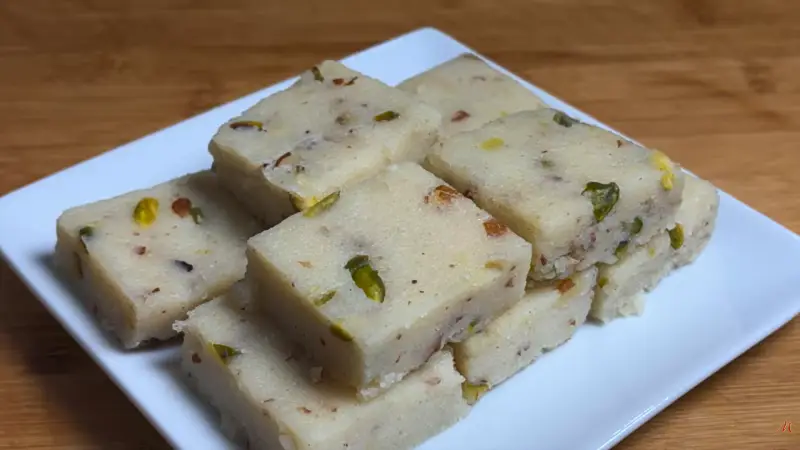
Homemade sweets always bring comfort and happiness, and this Instant Milk Burfi is one ofthose recipes youβll want to make again and again. Itβs quick, easy, and comes together in just 15 minutes. Your guests will be surprised when they find out this burfi is homemade, and evenmore surprised when they hear how little time you spend in the kitchen. This Instant Milk Burfi is my go-to recipe, no fuss, no fancy steps, yet the taste is rich, creamy, and truly desi. It proves that you donβt need hours of cooking to make a delicious Indian sweet just 15 minutes.
Prep Time 5 minutesminutes
Cook Time 15 minutesminutes
Ingredients
1cupfine soojisemolina
ΒΌcupbutter or ghee
2cupsof milk
1cupheavy cream
1cupsugar
β tspgreen cardamom powderelaichi
About 10 almondscrushed
About 10 pistachiossliced
Instructions
Lightly grease a small plate or tray and set it aside.
Heat the ghee in a heavy-bottom pan on low to medium heat.
Add sooji and roast slowly, stirring continuously, until aromatic and lightly golden. This step is important and takes about 5 minutes.
Lower the heat and slowly add milk and cream, stirring continuously to avoid lumps.
The mixture will loosen at first, then start to thicken.
Cook on medium heat, stirring constantly, until the mixture thickens and starts leaving the sides of the pan, about 6 to 8 minutes.
Add sugar and cardamom, mix well.
The mixture will loosen again. Continue cooking and stirring until it thickens once more and comes together like a soft dough. Turn off the heat.
Stir in almonds and pistachios and mix evenly.
Immediately transfer the mixture to the greased plate.
Spread evenly with a spatula.
Let it cool for about 30 minutes.
Once set, cut into the desired shape.
Notes
Quick Tips for Perfect Instant Milk Burfi
Roast sooji well on low to medium heat until aromatic and lightly golden, this removes the raw sooji taste.
Add milk and cream slowly, stirring continuously to avoid lumps and get a smooth texture.
Cook until the mixture leaves the pan sides, even after adding sugar, this helps the burfi set perfectly.
Frequently Asked Questions (FAQ)
1. Can I use coarse sooji instead of fine sooji?
Itβs best to use fine sooji for a smooth texture. If you only have coarse sooji, you can grind it slightly before using, but the texture may still be slightly grainy.
2. Can I replace ghee with butter?
Yes, you can use butter instead of ghee. However, ghee gives a more authentic desi flavor and richer aroma.
3. Can I skip heavy cream?
Heavy cream adds richness and softness to the burfi. If you donβt have it, you can replace it with full-fat milk, but the texture may be slightly less creamy.
4. Why did my burfi turn soft and not set properly?
This usually happens if the mixture was not cooked long enough. Make sure the mixture:
Leaves the sides of the pan
Thickens again after adding sugar It should come together like a soft dough before turning off the heat.
5. Why did my burfi turn hard?
Overcooking the mixture can make the burfi hard and chewy. Once the mixture thickens and starts leaving the pan, remove it from heat promptly.
What is Agar Agar: Agar agar is a natural setting agent made from seaweed. It works like gelatin, but itβs completely plant based. When you boil it in water and then let it cool, it helps desserts like pudding or jelly set beautifully.β
Strawberry Almond Pudding, Delicious and Elegant Dessert, Easy to make, Home Style
This strawberry almond pudding is creamy and smooth, light and refreshing. It comes togetherquickly using simple ingredients. A beautiful dessert that looks elegant and tastes delicious,perfect for entertaining or for a simple treat at home.
Servings 4
Ingredients
2cupsof chopped strawberriesshould be very chilled
1 cup heavy creamchilled
For a dairy-free optionuse 1 cup of coconut milk
ΒΌ cup almond powder
1 tsp of agar powder
Β½ cup water
4 tbsp sugaradjust to taste
1 few strawberries to garnish
Instructions
In a saucepan, add Β½ cup water and 1 teaspoon agar agar.Add 4 tablespoons sugar, mix well, and bring it to a gentle simmer.Keep stirring continuouslyβthis is important to ensure the mixture is smooth and lump-free.Once the agar agar is fully dissolved, turn off the heat. The syrup is ready.
In a blender, add 2 cups strawberries, cut into a few pieces.The strawberries should be chilled before usingβplace them in the freezer for about 30minutes.Add ΒΌ cup almond powder, 1 cup chilled heavy cream, and the prepared sugarβagarsyrup.Blend on high speed until smooth and creamy
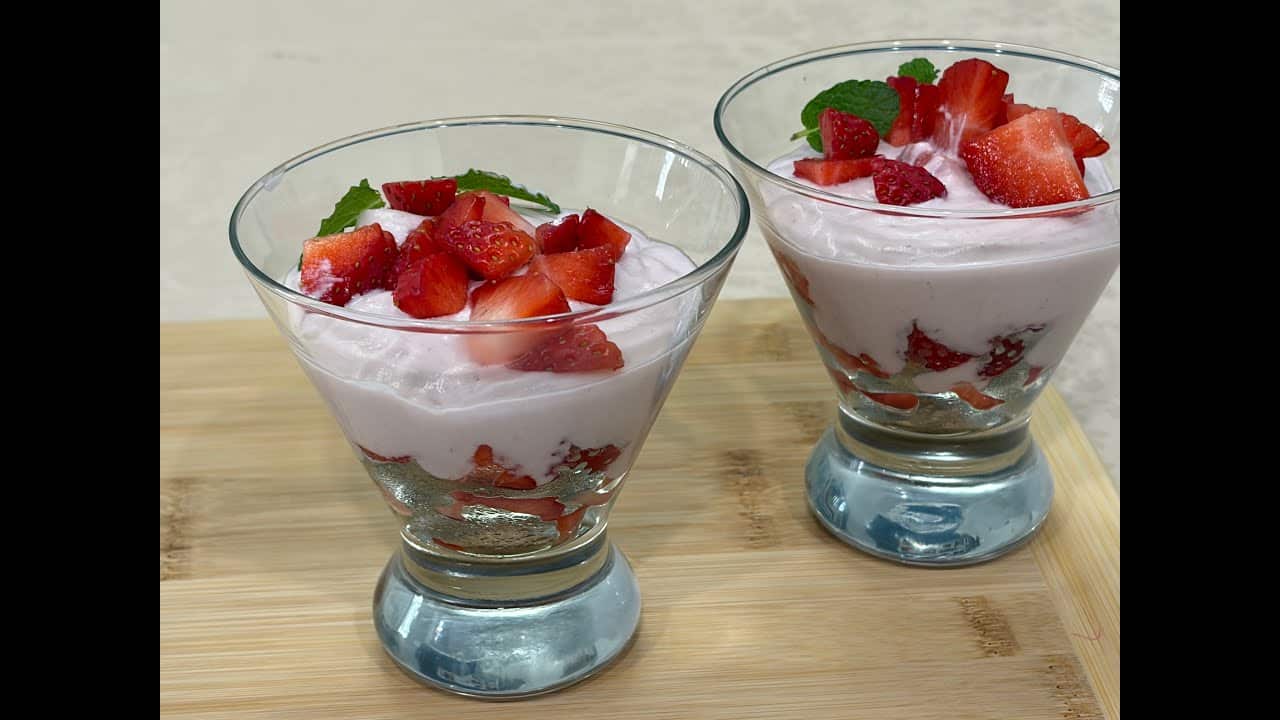
Add a few fresh strawberries, sliced into small pieces, to the serving bowls.Pour the strawberryβalmond mixture over them.
Refrigerate for about 1 hour before serving.
Finish by adding a few more strawberry pieces on top.
For a final touch, garnish with a couple of fresh mint leaves.
Notes
A lovely dessert for get-togethers or simply treating yourself.
You may use frozen strawberries, there is no need to thaw, just blend directly.
Adjust sugar based on the sweetness of the strawberries.
Agar sets quickly, so work efficiently once itβs boiled.
What is Agar Agar:Agar agar is a natural setting agent made from seaweed. It works like gelatin, but itβs completely plant based. When you boil it in water and then let it cool, it helps desserts like pudding or jelly set beautifully.β
1. What is Strawberry Almond Pudding?
Strawberry Almond Pudding is a creamy, smooth dessert made with fresh strawberries, almond powder, cream, and agar agar. Itβs light, refreshing, and naturally elegant in taste and appearance.
2. Is this pudding easy to make?
Yes, itβs very easy to prepare. The recipe uses simple ingredients and comes together quickly with minimal cooking and blending.
3. Can I make this pudding dairy-free?
Absolutely. You can replace the heavy cream with coconut milk to make a dairy-free version without affecting the texture too much.
4. What is agar agar, and why is it used?
Agar agar is a natural, plant-based setting agent made from seaweed. It works like gelatin and helps the pudding set firmly once chilled, making it suitable for vegetarian and vegan diets.
5. Can I use frozen strawberries instead of fresh ones?
Yes. Frozen strawberries work well for this recipe. Thereβs no need to thaw themβjust blend them directly.
6. How long does the pudding need to set?
The pudding needs about 1 hour in the refrigerator to set properly. Agar agar sets faster than gelatin.
Quinoa Vegetable Soup, Healthy Comforting One Pot Meal
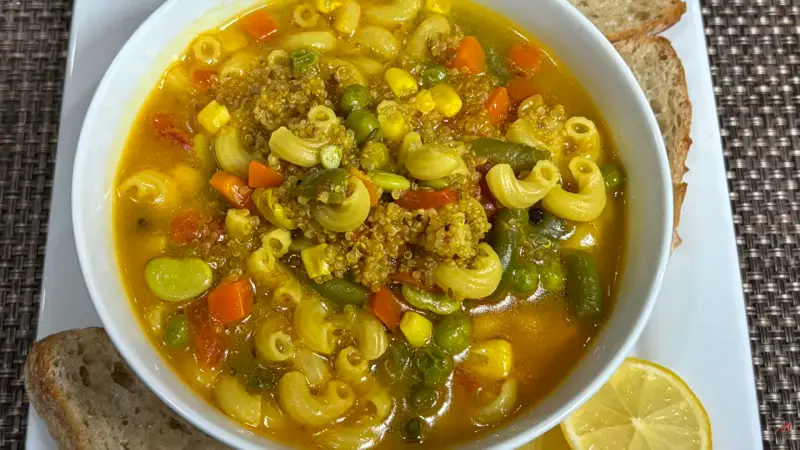
A warm bowl of this quinoa vegetable soup is comfortable, nutrition, and simplicity all in one. Itβs perfect for busy days when you want something homemade, light, and wholesome without spending too much time in the kitchen. I love this recipe because quinoa and pasta together make the soup hearty, while the vegetables add color and freshness. Itβs simple, satisfying, and comes together with ingredients most of us already have.
Prep Time 10 minutesminutes
Cook Time 30 minutesminutes
Total Time 40 minutesminutes
Servings 4
Ingredients
1/2cupof quinoa
1/4cupelbow pasta (or any small pasta of your choice)
2cupsof mixed vegetables (Iβm using frozen mixed veggies β carrots, corn, green
peas, green beans, and lima beans)
1cupchopped tomato
2tbspoil
1/2tspcumin seeds (jeera)
1/8tspasafetida (hing)
1/4tspturmeric (haldi)
1tspgrated ginger
6cloves (laung)
6black peppercorns
3cupsof water
1tspfresh lemon juice
1tspof salt
Instructions
Wash the quinoa in a fine strainer under running water. Set aside.
Heat oil in a saucepan over medium-high heat. When moderately hot, add cumin seeds and asafetida.
Once the cumin seeds crackle, add the mixed vegetables. Stir for a minute.
Add quinoa, pasta, tomatoes, ginger, cloves, black peppercorns, and water.
Add salt to taste.
Bring the mixture to a boil, then reduce the heat to low-medium.
Cover and cook for 25β30 minutes, or until the quinoa, pasta, and vegetables are tender.
Finish the soup
Add lemon juice. Taste and adjust salt and pepper as needed.
Notes
Always rinse quinoa well to remove bitterness.
Keep the soup consistency adjustable-add more water if you prefer a thinner soup.
Lemon juice should be added at the end to keep the flavors fresh.
This soup thickens slightly as it rests, so adjust water while reheating.
Works great as a light meal, detox-friendly option, or comfort food during cold days.
Serving Suggestion
Serve hot. This soup is paired well with toast, or even a simple paratha. Itβs light, flavorful, and perfect for lunch, dinner, or a late-evening warm snack.
Frequently Asked Questions (FAQs)
1. Can I skip pasta in this soup?
Yes, you can skip the pasta if you want a gluten-free or lighter version. You may slightly reduce the water quantity in that case.
2. Can I use fresh vegetables instead of frozen?
Absolutely. Fresh vegetables like carrots, beans, peas, and corn work very well. Just chop them evenly for uniform cooking.
3. Can I make this soup vegan?
Yes, this soup is naturally vegan as it contains no dairy or animal-based ingredients.
4. Can I prepare this soup in advance?
Yes. You can store it in the refrigerator for up to 2 days. Reheat gently on the stovetop, adding a little water if needed.
5. Is quinoa necessary for this recipe?
Quinoa adds protein and makes the soup hearty. However, you can substitute it with rice, millet, or just increase the vegetables if preferred.
6. Can I make it spicy?
Yes. You can add green chili, chili flakes, or black pepper powder to adjust the spice level.
Kheer is one of the most traditional and loved sweets found all over India. Over the years, Iβve made videos on many variations of kheer, each with its own unique charm, although Rice Kheer remains the most traditional. Once, my friends served me Carrot Kheer. While it was delicious, I felt something was missingβa certain balance of flavors that I couldnβt quite pinpoint. After experimenting a few times, I finally developed a simple yet delicious version of Carrot Kheer that Iβm happy with.Some of my younger friends, who usually avoid kheer, were pleasantly surprised when I served it to them as pudding. They loved it!What I love most about Carrot kheer is that it can be made with just a few simple ingredients, yet the result is always rich and flavorful. This version, in particular, is delightful with its creamy texture and subtle sweetness.
Course Dessert
Cuisine Indian
Keyword Dessert
Prep Time 10 minutesminutes
Cook Time 30 minutesminutes
Servings 4people
Ingredients
3cupsshredded carrots, divided
4 cupsmilk, divided
β cupsugar
ΒΌtspcrushed green cardamom
2tbspsliced almonds
Instructions
Before shredding the carrot, it should be washed and peel, peeling is an important of preparation. Blend 1 cup of shredded carrots with 1 cup of milk into a fine paste.
Bring the remaining milk to a boil over low to medium heat in a saucepan. To prevent the milk from sticking, wet the pan with a little water before adding the milk.
Once the milk boils, add the shredded carrots and carrot paste. Continue boiling for about 15 minutes over low to medium heat, stirring occasionally. Scrape the sides of the pan to prevent sticking and browning.
Cook until the carrots are tender, and the milk has reduced by about half, becoming creamy. Stir often to avoid burning.
Add sugar, cardamom, almonds, and cashews, and let the mixture simmer for a few more minutes.
Turn off the heat.
As the kheer cools, it will thicken in texture.
Notes
Enjoy!Β To serve as a pudding, you should cook the kheer for 2 to 3 more minutes to thicken it, bringing it to a pudding-like texture.
Carrot Kheer (Carrot Paayasam): A Delicious Twist on a Timeless Indian Sweet | Manjulaβs Kitchen
Introduction to Carrot Kheer
Kheer is one of the most cherished and traditional sweets in Indian cuisine, with its creamy, sweet, and flavorful profile making it a favorite during festivals and special occasions. Carrot Kheer, also known as Carrot Payasam, offers a delightful twist to the traditional rice-based kheer, adding a unique layer of flavor and texture with shredded carrots. Over the years, kheer has seen many variations, and this version brings the earthy sweetness of carrots into the creamy goodness of milk and sugar. With just a few simple ingredients, this Carrot Kheer delivers a rich and flavorful dessert thatβs perfect for any occasion.
Cultural and Traditional Importance
Kheer holds a special place in Indian households, especially during festivals such as Diwali, Holi, and Raksha Bandhan. It is often served as an offering to deities and enjoyed as a dessert after meals. While Rice Kheer is the most traditional form, Carrot Kheer adds a refreshing twist by incorporating a vegetable into the dessert, making it both nutritious and flavorful. The vibrant color of the carrots combined with the rich texture of milk creates an aesthetically pleasing and indulgent treat that is sure to impress your family and friends.
Although Carrot Kheer may not be as well-known as its rice counterpart, it is quickly gaining popularity for its unique taste and simplicity. This version strikes the perfect balance of sweetness and creaminess, making it a must-try for those looking to experiment with traditional Indian sweets.
Recipe Variations from Manjulaβs Kitchen
While Carrot Kheer is a delightful dessert on its own, you can explore other variations of kheer or similar milk-based sweets from Manjulaβs Kitchen:
Rice Kheer: The classic, most traditional form of kheer made with rice, milk, and sugar.
Sabudana Kheer: A delicious variation using tapioca pearls, commonly served during fasting periods.
Vermicelli Kheer (Seviyan Kheer): Made with thin vermicelli noodles, this version offers a unique texture to the traditional kheer.
Badam Burfi (Almond Candy): Rich and creamy, this version uses almonds to create a decadent dessert thatβs both healthy and delicious.
Health Benefits and Dietary Considerations
Carrot Kheer offers a nutritious alternative to traditional kheer, with the inclusion of carrots providing a good source of vitamins, fiber, and antioxidants. Carrots are rich in vitamin A, which promotes eye health and boosts immunity, making this kheer not only delicious but also beneficial for overall wellness. Additionally, milk provides calcium and protein, while the nuts add healthy fats, making this dessert a well-rounded treat.
This kheer can be easily adjusted for various dietary preferences. For a vegan option, you can substitute dairy milk with almond or coconut milk. The natural sweetness of the carrots also allows for a reduction in added sugar if you prefer a lighter dessert.
Serving Suggestions
Carrot Kheer can be served warm or chilled, depending on your preference. Its vibrant color and rich flavor make it an attractive addition to any festive meal. For an even more indulgent experience, you can serve Carrot Kheer with a sprinkle of extra chopped nuts, such as almonds or pistachios, for added crunch and richness.
If you want to serve Carrot Kheer as a pudding, cook it for a few more minutes to achieve a thicker, more pudding-like consistency. This version pairs wonderfully with Gulab Jamun or Rasgulla for a complete Indian dessert platter.
Conclusion
Carrot Kheer is a simple yet luxurious dessert that offers a modern twist on the traditional Indian sweet. With its creamy texture, vibrant color, and subtle sweetness, this dessert is sure to become a favorite at your dinner table. Whether youβre celebrating a festival or simply want to treat yourself to something special, this Carrot Kheer recipe is a must-try. Explore the other kheer variations on Manjulaβs Kitchen to discover even more delicious ways to enjoy this timeless dessert.
Frequently Asked Questions (FAQs)
What is the difference between Carrot Kheer and Rice Kheer?
Carrot Kheer uses shredded carrots as the main ingredient, while Rice Kheer is made with rice. Both versions are cooked in milk and flavored with sugar and cardamom, but Carrot Kheer offers a more vibrant color and slightly different texture.
Can I make Carrot Kheer vegan?
Yes, you can easily make Carrot Kheer vegan by using plant-based milk like almond or coconut milk instead of dairy milk.
What are some other variations of kheer I can try?
You can try Rice Kheer, Sabudana Kheer, Vermicelli Kheer, or Badam Kheer, each offering unique flavors and textures while still being deliciously creamy and satisfying.
How do I serve Carrot Kheer as a pudding?
To serve Carrot Kheer as a pudding, cook it for 2-3 extra minutes to achieve a thicker consistency, similar to a pudding. You can serve it warm or chilled
How long can I store Carrot Kheer?
Carrot Kheer can be stored in an airtight container in the refrigerator for up to 2-3 days. Reheat it gently before serving if you prefer it warm.
Kalakand is a simple yet delightful, sweet that's perfect for any holiday celebration or festive occasion. Known for its moist and grainy texture, this milk-based dessert is delicately flavored with cardamom, making it irresistible.Traditionally, Kalakand is made with just three ingredientsβmilk, sugar, and cardamom. While most Indian sweets, such as burfi, have a fudge-like consistency, Kalakand stands out with its moistness. Although it doesn't typically require garnishing, I decided to add pistachios for a touch of color and presentation. I also used ricotta cheese to make it simple and the results were just as delicious.Kalakand is a must-try treat, whether you're celebrating a festival or simply want to enjoy something sweet!
Prep Time 5 minutesminutes
Cook Time 30 minutesminutes
Servings 8people
Ingredients
3cups full fat milk
1Β½ cups ricotta cheese
ΒΌcupsugar
ΒΌtsp cardamom powder
1Β½ tbs crystal sugar, for garnishing
ΒΌtspcrushed cardamom for garnishing
1tbs sliced pistachio for garnishing
Instructions
Boil the milk over low to medium heat. Before adding the milk, wet the pan with water to prevent it from sticking to the surface.
Boil the milk for about fifteen minutes, allowing it to reduce to almost half its original quantity. Stir the milk occasionally and scrape the sides to prevent the milk from sticking and browning.
Add the ricotta cheese and sugar mix well. Keep stirring and scraping the sides of the pan until the mixture is very soft but it has come together, I do not want to cut them into pieces. Then, add the cardamom powder and mix it in before turning off the heat.
As the Kalakand cools to room temperature, it will thicken slightly. I prefer to keep it soft so that it can be served with a spoon, similar to thick yogurt. Kalakand should be moist and have a grainy texture.
Before serving, garnish with crystal sugar, crushed cardamom, and, if desired, sliced pistachios. I used slightly less sugar in the Kalakand, and sprinkling crystal sugar adds a pleasant mild crunch, while the crushed cardamom enhances the flavor.
Notes
Kalakand is ready, canβt wait to tryEnjoy!
Introduction to Kalakand
Kalakand is a beloved Indian sweet that is often enjoyed during festivals, special occasions, or anytime you want to indulge in something rich and satisfying. Known for its moist and grainy texture, this milk-based dessert is delicately flavored with cardamom and garnished with pistachios for a touch of elegance. Unlike other Indian sweets such as burfi, which have a fudge-like consistency, Kalakand stands out because of its soft, creamy texture. This delightful sweet is easy to make and irresistibly delicious, making it a perfect addition to your festive celebrations.
Cultural and Traditional Importance
Kalakand holds a special place in Indian households during festivals like Diwali, Holi, and Raksha Bandhan. It is one of those sweets that brings a sense of joy and celebration. Traditionally, Kalakand is made with just a few simple ingredientsβmilk, sugar, and cardamomβbut its slow-cooking process brings out rich flavors that make it unique. In many Indian homes, making Kalakand is not only about the sweet itself, but also about the shared moments of celebration with family and friends.
Though Kalakand doesnβt require garnishing, I like to add sliced pistachios for a burst of color and texture, enhancing both its presentation and taste. Itβs a treat that brings back nostalgic memories of festive occasions, and now, with this simplified version using ricotta cheese, you can enjoy it with minimal effort.
Recipe Variations from Manjulaβs Kitchen
While Kalakand is a delightful dessert on its own, you can explore other similar milk-based sweets from Manjulaβs Kitchen that offer unique flavors and textures:
Burfi: A classic fudge-like sweet made with condensed milk and nuts like cashews or almonds.
Rasgulla: A spongy, syrup-soaked dessert made from paneer, offering a light and juicy contrast to Kalakand.
Rasmalai: Soft paneer dumplings soaked in sweetened, flavored milk, with cardamom and saffron.
Peda: A simple and elegant sweet made from condensed milk and flavored with cardamom.
Health Benefits and Dietary Considerations
Kalakand is a rich, indulgent dessert, but it also offers some nutritional benefits due to its milk base. Full-fat milk is a good source of calcium, protein, and essential vitamins. Using ricotta cheese in this recipe simplifies the cooking process while keeping the dessert creamy and delicious. If youβre looking for a lighter version, you can reduce the sugar or substitute it with a natural sweetener like honey.
This version of Kalakand is naturally gluten-free, making it suitable for those with gluten sensitivities. For a vegan alternative, you can experiment with plant-based milks and vegan ricotta, though it may slightly alter the texture.
Serving Suggestions
Kalakand is best served at room temperature, allowing its soft, grainy texture to shine. Garnish it with crushed cardamom, crystal sugar, and sliced pistachios for added flavor and visual appeal. This sweet treat can be enjoyed on its own or as part of a larger dessert spread during festivals or family gatherings.
For a more complete festive meal, consider serving Kalakand alongside other Indian sweets like Gulab Jamun or Jalebi to create a dessert platter that showcases a variety of textures and flavors.
ConclusionKalakand is a simple yet irresistible sweet thatβs perfect for celebrating any special occasion. Its creamy, moist texture combined with the subtle flavor of cardamom makes it a dessert that everyone will love. With this easy-to-follow recipe using ricotta cheese, you can recreate the traditional taste of Kalakand in less time, making it an ideal treat for festivals, parties, or even as a special indulgence after dinner. Try this recipe today and enjoy the rich flavors of Kalakand with your loved ones.
Frequently Asked Questions (FAQs)
What is Kalakand made of?
Traditionally, Kalakand is made with milk, sugar, and cardamom. In this simplified version, ricotta cheese is used to reduce the cooking time while maintaining the rich texture.
How is Kalakand different from Burfi?
Kalakand has a moist and grainy texture, while Burfi is firmer and more fudge-like. Both are milk-based sweets, but Kalakand is known for its soft, melt-in-your-mouth consistency.
Can I make Kalakand vegan?
While this recipe uses full-fat milk and ricotta cheese, you can experiment with plant-based milks and vegan ricotta to make a vegan version. However, the texture may differ slightly.
What are some similar desserts to Kalakand?
Similar milk-based sweets include Burfi, Rasgulla, Rasmalai, and Peda.
How should I serve Kalakand?
Serve Kalakand at room temperature, garnished with crystal sugar, crushed cardamom, and pistachios for added flavor and texture.
Kheer is a traditional, delicious dessert, often referred to as rice pudding. To make kheer, you donβt need any special occasionβjust treat yourself. Kheer has many variations. Traditionally, it is made with rice and milk, but rice can be replaced with different vegetables, fruits, or lentils. I have done many videos and posts on Manjula's Kitchen website and YouTube channel related different kheer recipes. This time, I decided to make rice kheer with a new twist. Petha is a candy-like treat made with ash gourd or winter melon, and it is readily available in Indian grocery stores. Adding Petha gives a very refreshing twist to kheer. My friends couldn't believe it, and all of them enjoyed it. For many years i've been experimenting various indian rice recipes, and today made one more change to the rice, and they kept asking about it, amazed that it was indeed rice. This recipe is very easy and takes less time than traditional kheer. Petha Rice Kheer is a fruity twist on the favorite Indian dessert, Rice Kheer. It is an easy recipe but feels like you have spent a lot of time.
Course Dessert
Cuisine Indian
Keyword Kheer, petha
Popular YouTube
Prep Time 5 minutesminutes
Cook Time 25 minutesminutes
Servings 4people
Ingredients
3cupswhole milk
Β½cuprice cooked
Β½cupthinly sliced Petha, available in Indian grosser
Blend the rice with half a cup of milk until the rice looks like pearls; do not make it into a paste, as this is a very important part of this recipe.
Heat a pan on medium-low and add 2 tablespoons of water, ensuring the surface of the pan is wet. Add the blended rice, milk, thinly sliced patha, and almond powder. Increase the heat to medium-high, bring the milk to a boil, then lower the heat to medium-low. Cook for about 15 minutes, stirring occasionally and cleaning the sides to prevent the milk from burning.
Add sugar and cardamom and cook for a few more minutes. Remember, as the kheer (pudding) comes to room temperature, it will thicken slightly. If needed, add a bit more milk and bring it to a boil once more. At this point, you can also adjust the sugar.
The kheer is ready. Serve it chilled and garnish with sliced pistachios.
Notes
About Rice Kheer, or puddingDifferent part of India Kheer is made different, in north kheer is made using any long grain rice.In South part of India, it is known Rice Payasm and they use short grain rice, ghee and Jaggery.Β In Bangel is known as Payesh with rice and date palm jaggery.Β One thing common they all use different nuts of their choice.
Discover the Exotic Rice Pudding with a Secret Ingredient
Kheer, often referred to as rice pudding, is a beloved traditional Indian dessert. While it is typically made with rice and milk, variations using different vegetables, fruits, or lentils/indian daal are also popular. This patha rice kheer recipe introduces a unique twist by incorporating Petha, a candy-like treat made from ash gourd or winter melon, readily available in Indian grocery stores. This addition brings a refreshing flavor to the classic kheer, making it a delightful treat for any occasion.
The Essence of Patha Rice Kheer
The essence of petha rice kheer lies in its creamy texture and the subtle sweetness of petha. The combination of cooked rice, milk, almond powder, and thinly sliced petha creates a rich and flavorful pudding. This Indian rice pudding is further enhanced with the aromatic hint of cardamom and the crunch of pistachios.
Origin and Popularity
Kheer is a traditional dessert enjoyed across India, known for its versatility and rich flavors. Each region has its own variation of kheer. In North India, it is made with long grain rice, while in South India, it is known as Rice Payasam, made with short grain rice, ghee, and jaggery. In Bengal, it is called Payesh, made with rice and date palm jaggery. Despite these regional differences, the use of nuts and a creamy base remains common.
Why Youβll Love This Recipe
Unique and Refreshing: The addition of patha gives a refreshing twist to traditional kheer.
Easy to Make: Simple ingredients and quick preparation.
Delicious and Nutritious: Combines the goodness of milk, rice, and nuts.
Perfect for Any Occasion: Ideal for festive celebrations or as a special treat.
Variations of Indian Desserts
Exploring Manjulaβs Kitchen reveals a treasure trove of other delicious Indian dessert recipes that you might enjoy alongside your patha rice kheer. Here are some related dishes that you might find interesting:
Mango Cheesecake: A creamy and fruity cheesecake made with fresh mangoes
Gulab Jamun: Deep-fried milk-solid-based balls soaked in a fragrant sugar syrup.
Kheer: A traditional rice pudding made with milk, sugar, and flavored with cardamom and saffron.
Rasgulla: Soft and spongy cheese balls soaked in sugar syrup.
Seviyan Kheer: A sweet and creamy dessert made with vermicelli noodles, milk, and sugar called seviyan kheer.
Serving Suggestions
Petha rice kheer can be enjoyed in various ways:
As a Dessert: Serve chilled for a refreshing end to your meal.
For Festive Occasions: Perfect for festivals like Diwali, Holi, or religious ceremonies.
With Tea or Coffee: Enjoy as a sweet treat with your afternoon tea or coffee.
Garnished with Nuts: Add a garnish of sliced pistachios or other nuts for extra flavor and crunch.
Tips and Tricks
To perfect your petha rice kheer recipe, consider these helpful tips:
Blend Rice Correctly: Blend the rice with milk until it looks like pearls; avoid making it into a paste.
Use Fresh Patha: Fresh patha provides the best flavor and texture, but it is available in Indian grocery stores.
Balance Sweetness: Adjust the amount of sugar to suit your taste preference.
Serve Chilled: This kheer is best enjoyed chilled for the most refreshing experience.
FAQs
Can I Use Other Vegetables Instead of Petha?
Yes, you can experiment with other vegetables or fruits to create different variations of kheer.
How Long Does Petha Rice Kheer Last?
Store petha rice kheer in an airtight container in the refrigerator for up to 3 days. Reheat gently before serving.
Is Petha Rice Kheer Gluten-Free?
Yes, this recipe is naturally gluten-free as it is made with rice and milk.
Can I Make This Recipe Vegan?
Yes, you can use plant-based milk and a vegan sweetener to make a vegan version of this recipe.
What Can I Serve with Petha Rice Kheer?
Petha rice kheer pairs well with Indian breads like puri or paratha, or you can enjoy it on its own as a sweet treat.